
6. Shooting Basketball
Timing is everything. For this game, I was shooting on strobe, meaning I could take only one picture every three seconds. This moment happened in a fraction of a second. I was able to make this image because I was ready and able to anticipate the action.
Covering the Action from all Angles
Basketball is full of action, and that makes for a lot of great opportunities for fantastic shots. It’s a very fast, physical sport. But the downside of shooting basketball is that you have limited space courtside to take advantage of those chances.
This chapter reveals different ways to cover the game and what to consider when you’re trying to make an image.
Poring Over the Picture
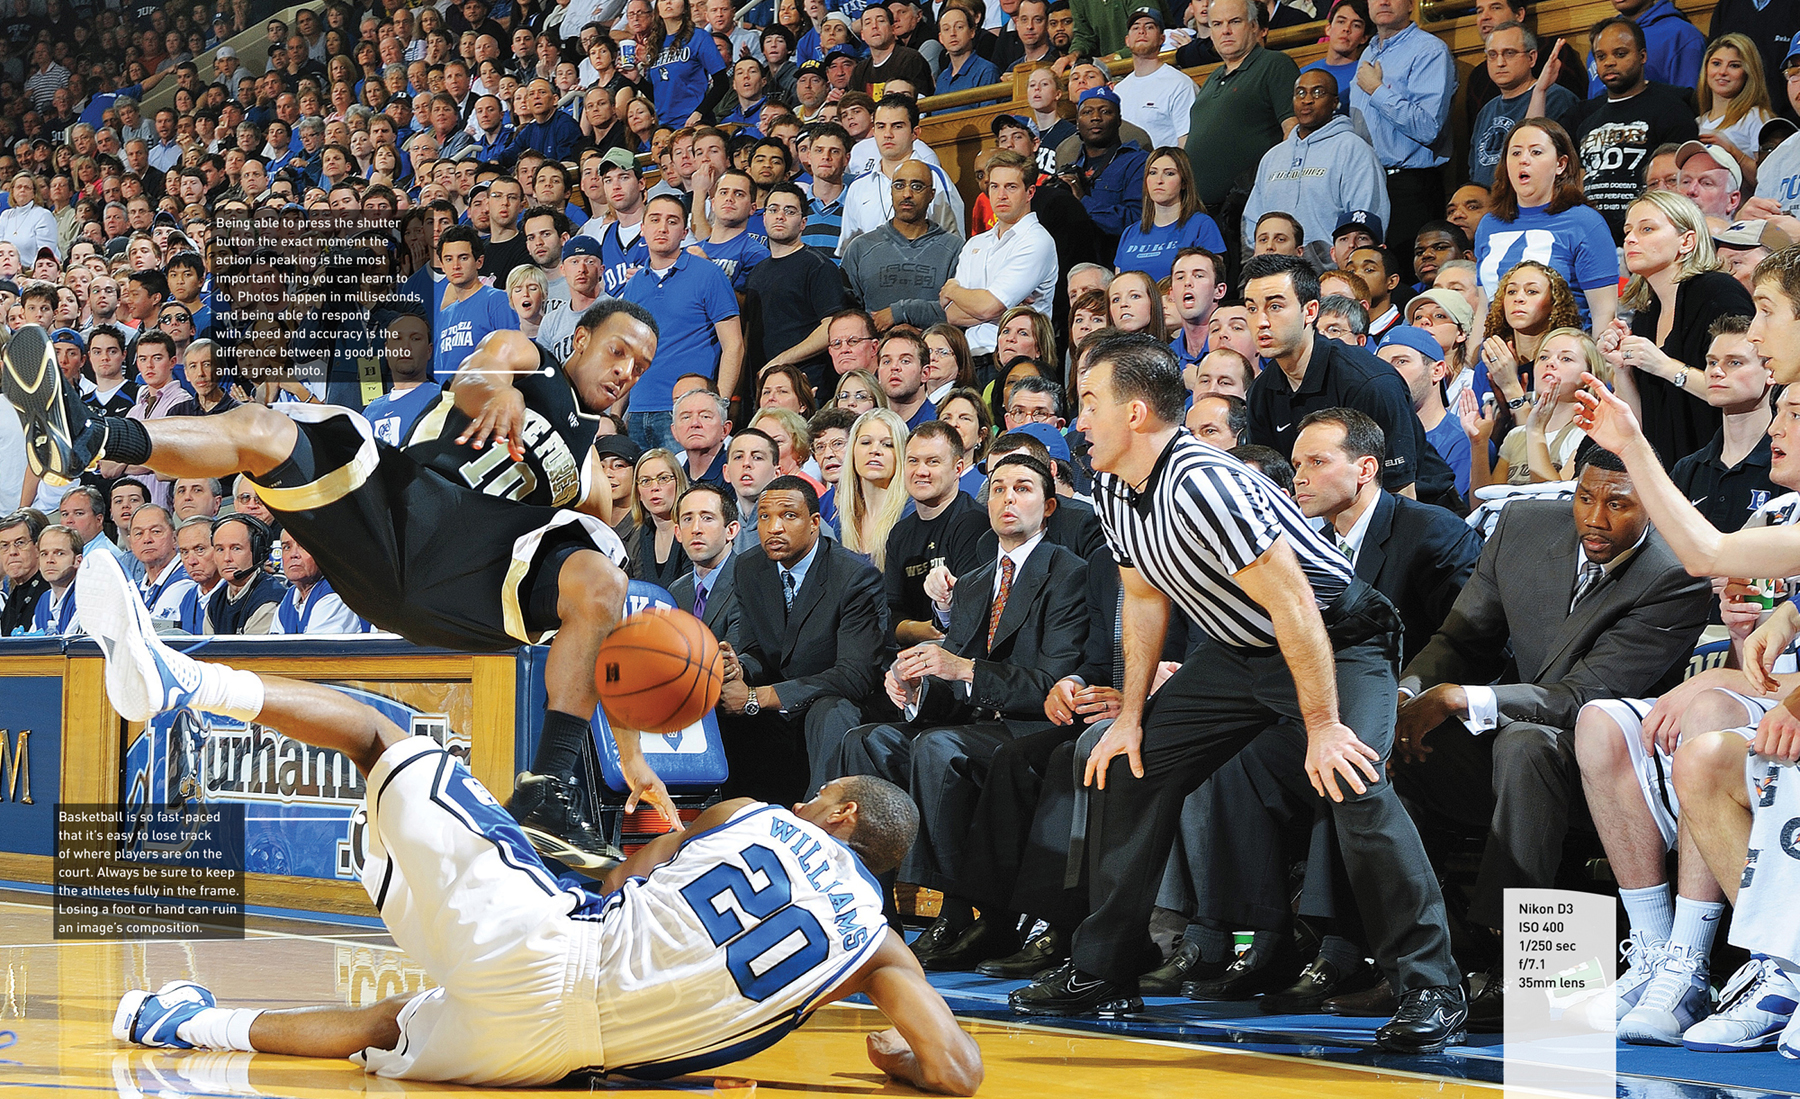
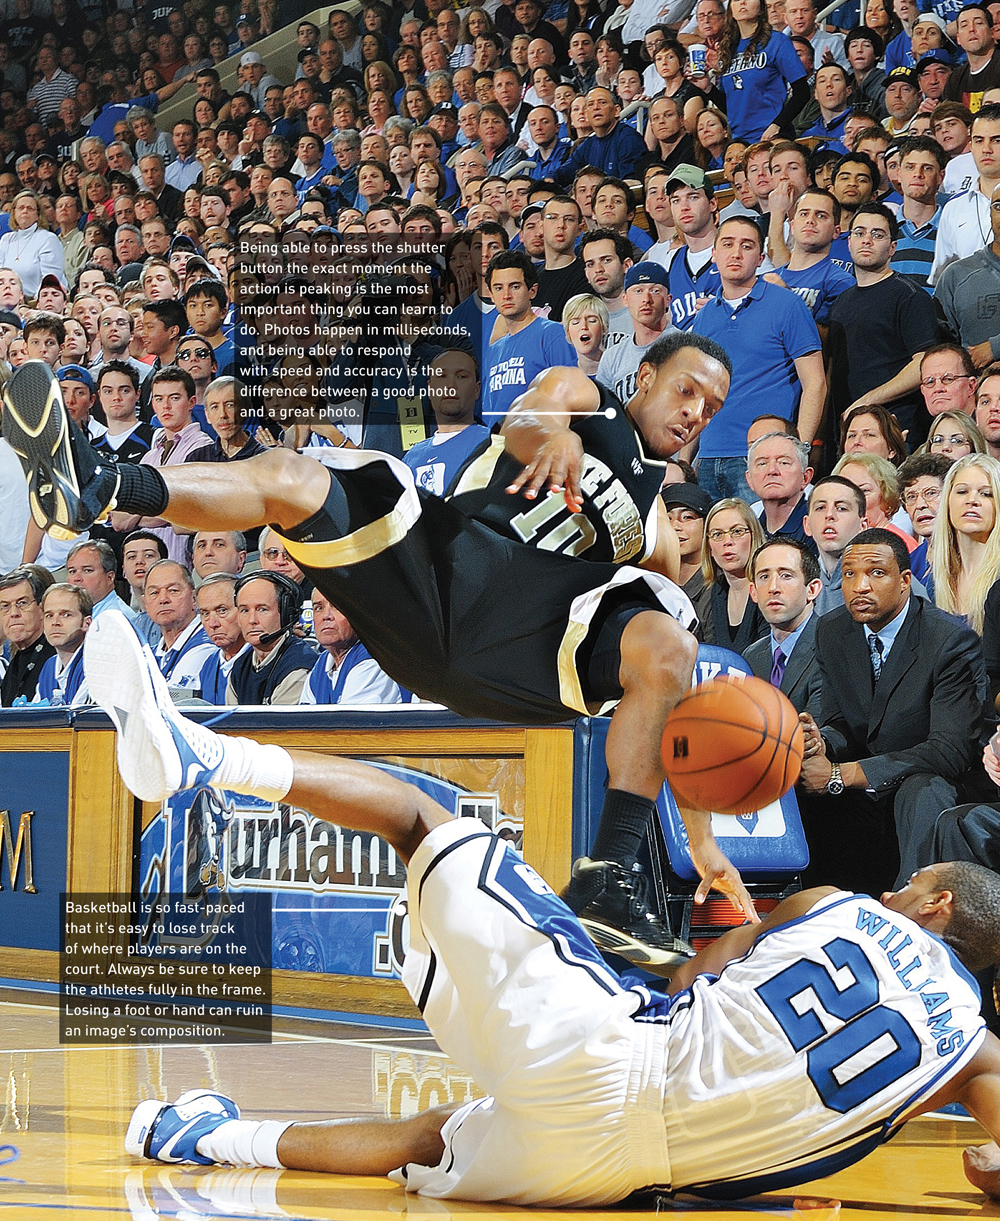
This moment during a Duke vs. Wake Forest game in 2010 happened quickly. I was shooting on strobe, which allowed me to increase my aperture while still keeping my ISO low. The extra depth of field allowed me to capture not only the athletes who were competing, also the entire arena of fans behind them.
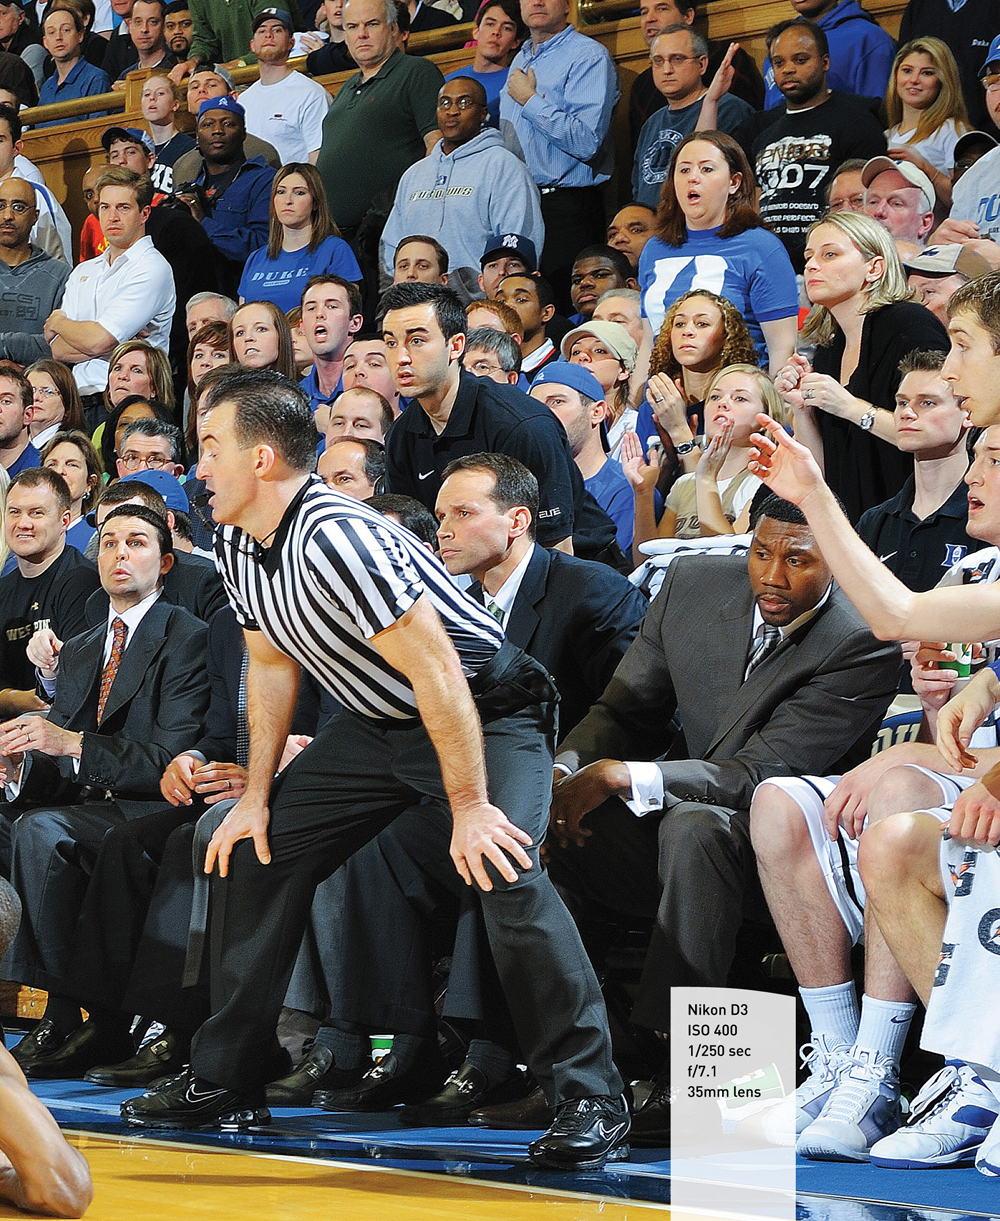
This image was shot at f/7.1 with a 24–70mm zoomed to 35mm. A combination of the elements—a wide-angle lens, the light from the strobe, and the aperture at 7.1—allowed me to keep about 50 feet of the image in sharp focus. The key element of this photo is not the athletes on the floor, but the reaction from coaches and fans.
Basketball: How to Get the Best Shots
Of all the sports, basketball has the least amount of room to work. Most of the time it is necessary to be seated, and that makes it difficult to move quickly. In small gyms you may be able to stand against a wall, but that is the exception, not the rule.
Lighting is also a challenge when you’re shooting basketball games.
Lighting
You need to consider two kinds of basketball: indoor and outdoor. Indoor games can be difficult to cover because of limited space and poor lighting conditions.
Those of you shooting indoor basketball at high schools or little league games will also be challenged by bad light. Even with the improved sensors available in contemporary cameras, the light is frequently uneven, poorly focused, and has an ugly color temperature.
You can solve some of the lighting issues by using small strobes. However, before you do, you need to check with the officials in charge. Many places don’t allow you to use a flash on your camera because it is distracting to the players, and because it can become a safety issue for the athletes. Always keep in mind that the game is about the athletes, not about you.
If using a small strobe on your camera is not an option, you’ll have to use the highest ISO setting you are comfortable with. This is a quality issue and one only you can determine.
You’ll need to use the fastest, wide aperture optics you can afford to allow the most light possible to reach the camera’s sensor. After you set the camera for the highest ISO and the lens to the widest aperture possible, you can set the shutter speed. Hopefully, the shutter speed can be 1/500 or faster so you have a chance to stop the action.
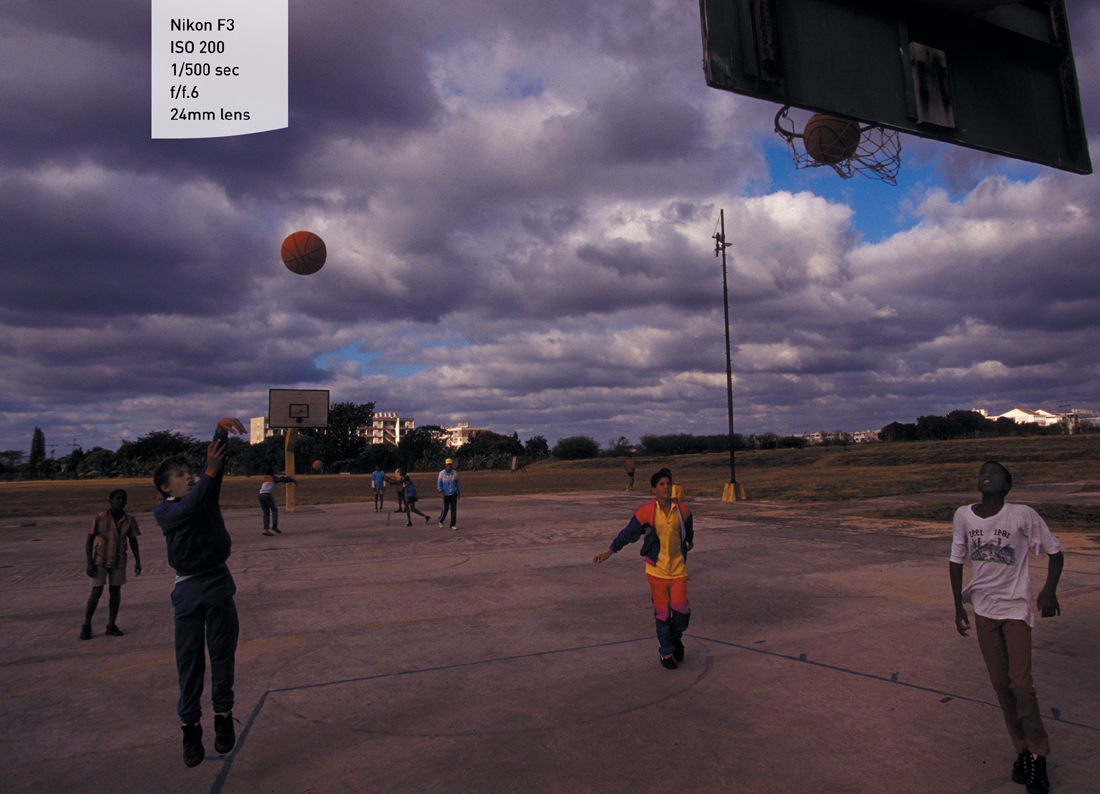
Outdoor basketball allows you even better opportunities to create great images. Some of the best basketball being played in the world happens during unregulated playground play. Just because a game isn’t professional doesn’t mean it’s not a good game. When it happens during the day, the light can be wonderful; you just need to take advantage of it using the techniques discussed in Chapter 4 (Figure 6.1).
In most arenas, the light on the athletes’ faces will be much better when they are looking up because all of the light is coming from above.
Covering the Action
Making good action shots during basketball games—as in every sport—is all about anticipation.
The field of play in basketball is the smallest of all the major team sports, and the game moves at an extremely fast pace. Therefore, knowing the tendencies of certain players is important. For example, LeBron James is big and powerful, and he dominates with his size and strength. So when he gets the ball, I’m ready for a dunk, power layup, or just a big hit on another player (Figure 6.2).
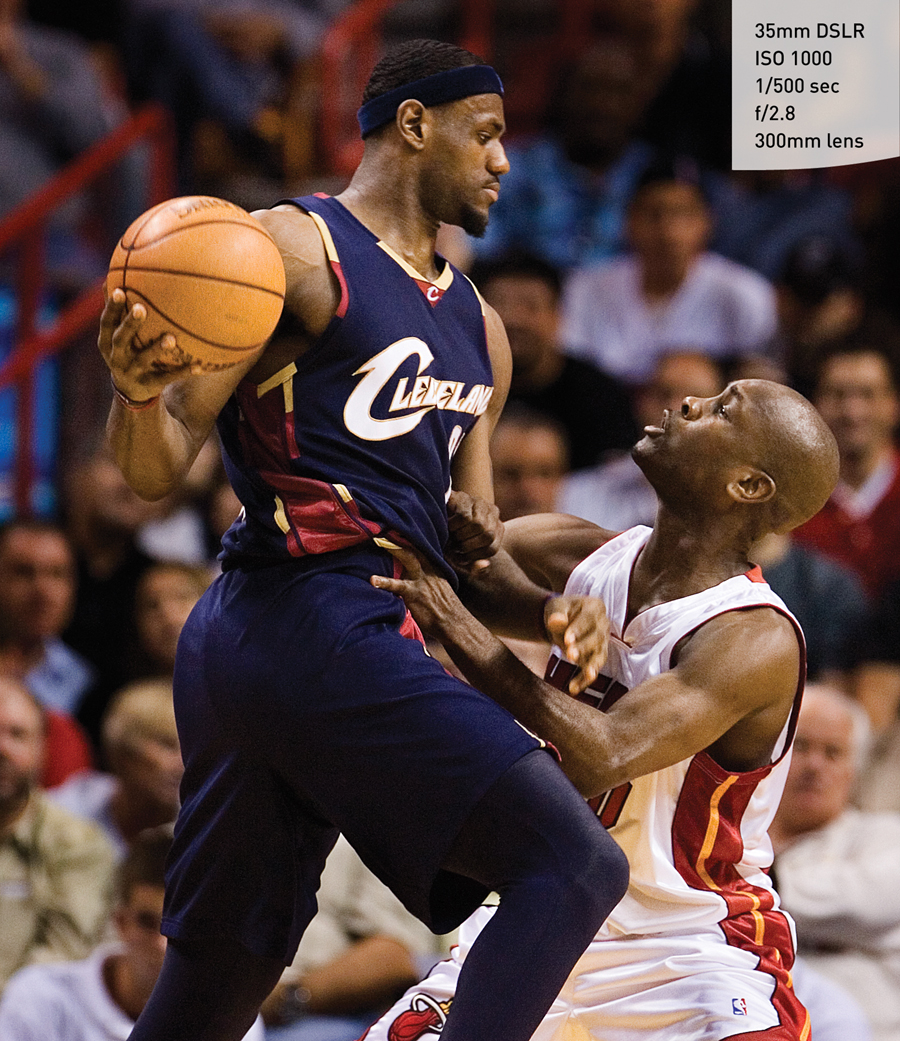
Figure 6.2 Understanding how certain athletes play the game always helps me figure out how to approach a game. LeBron James is one of the most dominant players in the sport, and this photo shows that.
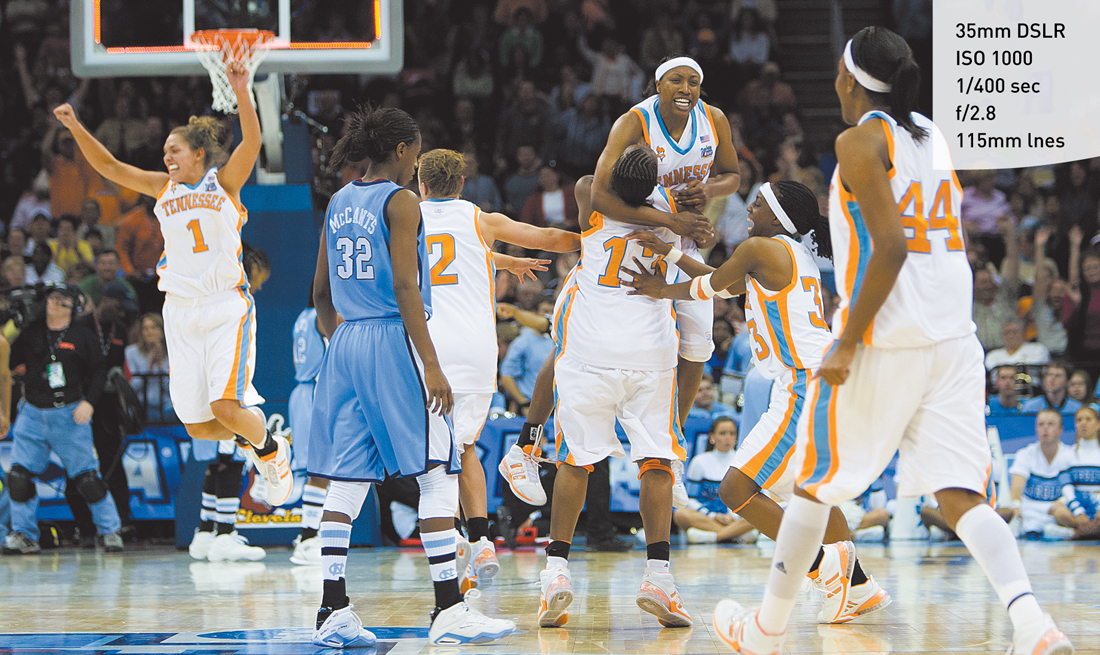
Women’s basketball is a very different game from the men’s game. It’s the same sport with slightly different mechanics. It too is fast and physical, but for the most part it is much closer to the ground. To cover women’s basketball well, you have to be aware of how the game is played and what key players on each team excel at (Figure 6.3).

Figure 6.3 Stanford vs. UConn in the 2010 Women’s NCAA Championship Game in San Antonio, Texas. For tough, physical games like this one, I always focus on the game near the hoop. The women are physical, but most of the action stays low.
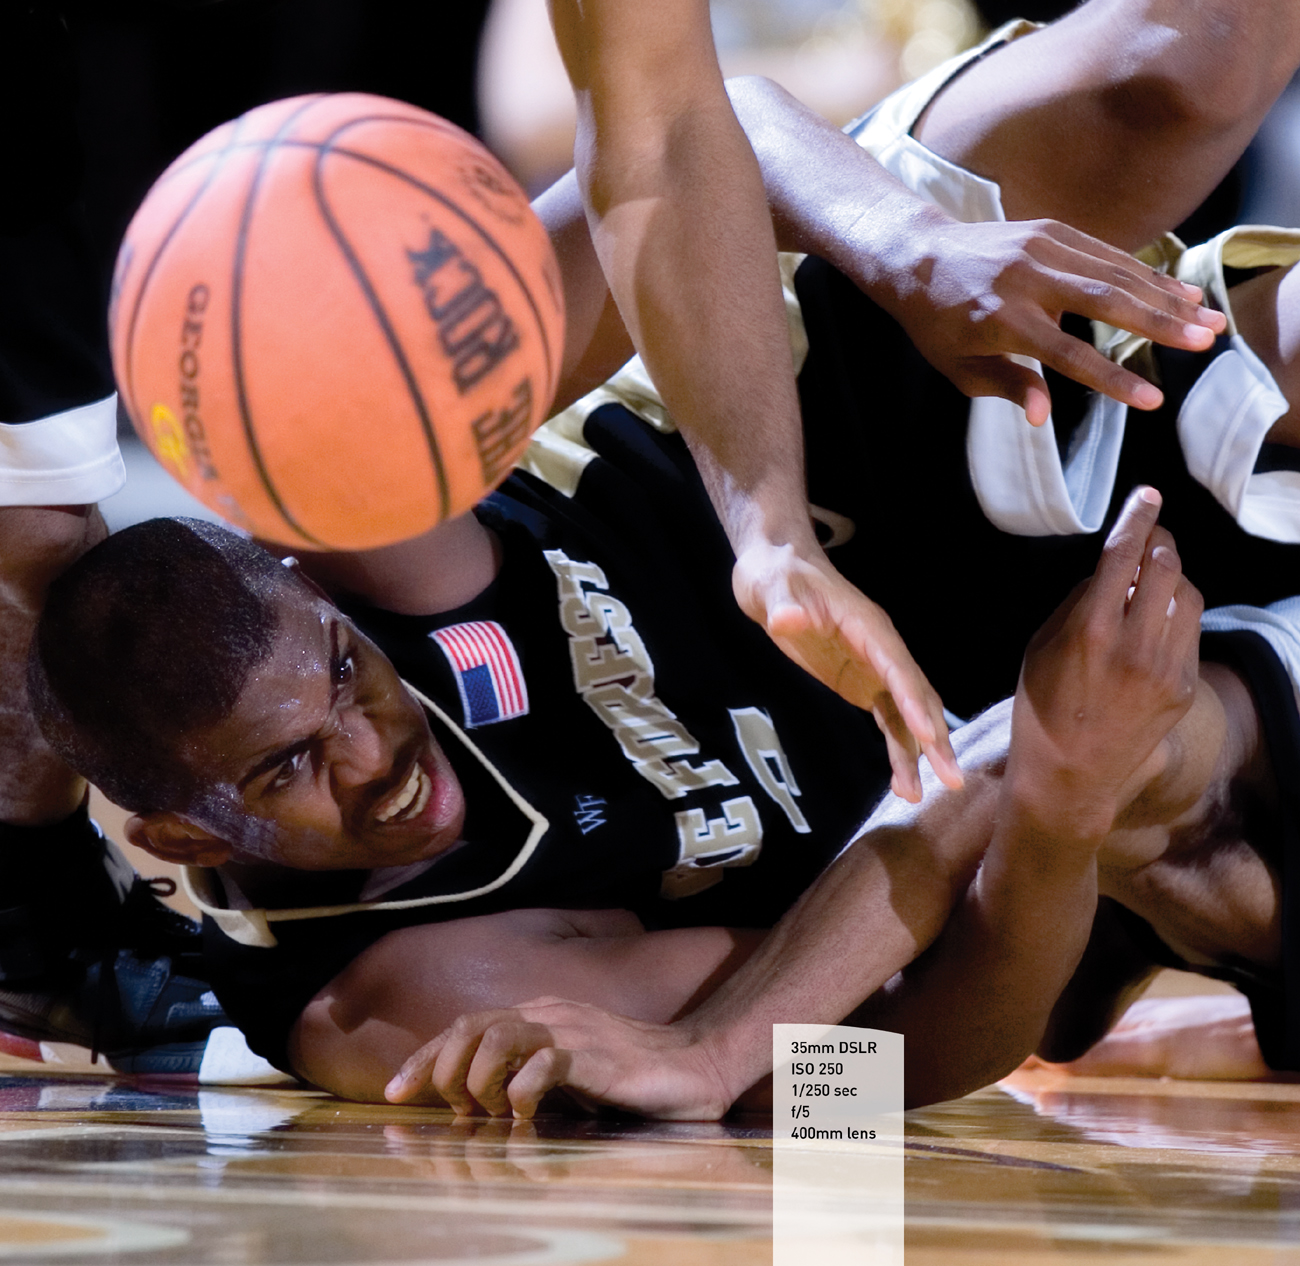
Some of my favorite shots in both men’s and women’s basketball come when the game gets scrappy. By that I mean the ball gets loose, the players dive for it (which never happens in baseball), and their faces strain as they fight for the ball. No matter how close the game is or how much the outcome matters, the best players will always fight for possession, which makes for great photos (Figure 6.4 and Figure 6.5).
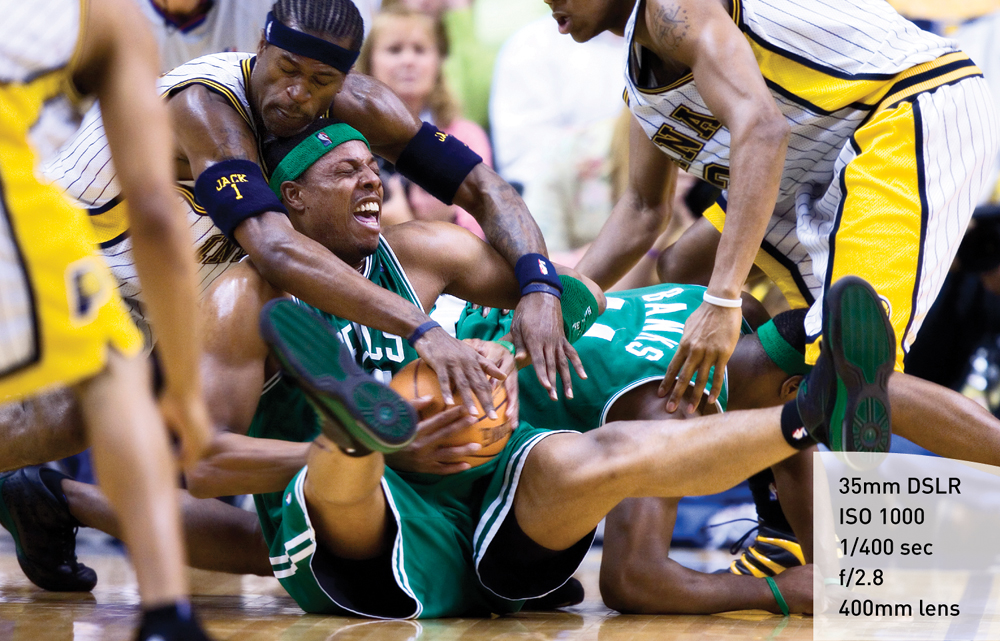
Figure 6.4 In this picture, all the action is centered around the player on the ground, and the action is relatively stationary, giving photographers a chance to focus and make a nice picture.
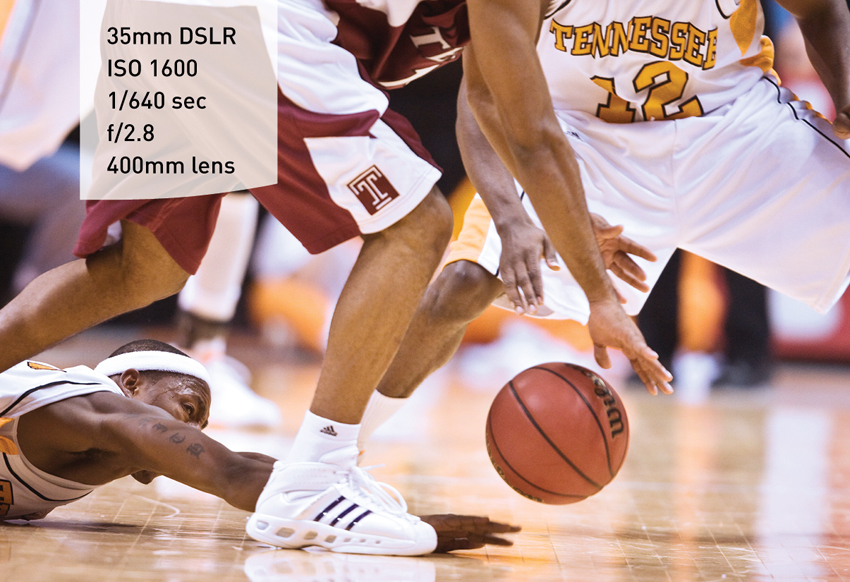
Figure 6.5 Sometimes a dive to the floor happens quickly, so you always have to be alert and ready to focus and fire quickly.
More than with any other sport, you have to think and move quickly to get great shots of basketball. The confined space and speed of the game keeps even the best photographers on their toes.
Tip
Place the camera on the floor/ground pointed at the basket. Be sure to have the floor and the ceiling in the frame. With the camera at that angle, the players will appear to be jumping even higher.
Eventually the action will involve the basket. By concentrating your focus on the hoop, you’ll make good pictures at every game. The images may not be of every player or every play, but it is the highest percentage shot in all of sports photography.
Covering the Moments After the Game
The end of a game yields a winner and a loser. If the game is close or if it is during a tournament, the reactions of fans and players to the outcome can be very important from a journalistic standpoint. I always make it a point to position myself or a remote camera in a place that can best capture the post-game celebrations. This location will change from game to game because of the physical limitations imposed by the conditions of the competition and the facility. But there will be some place that will not be blocked, where you can place the camera’s focus on the winners or the losers (Figure 6.6).
You can easily refer to the game clock to help you get ready for the post-game reaction. The players will be on the bench until the final seconds, and then the winners will jump up and race onto the court. The losing team will stay on the bench. The emotions are amplified during big games.
How I Cover Basketball
As a Sports Illustrated staff photographer, I am given access and opportunities that most photographers are not. Still, I believe it’s instructional to give you a look behind the curtain at how my basketball images are made.
When I cover a major game, I am given one spot on the floor by the basket, and that is where I have to stay for the game. Being in one spot gives me one look at the game. Because I never know when and where the best moments will occur, I employ the use of remote cameras to fully cover games.
Remote Cameras
For an NBA or NCAA game, I generally arrive at the arena five or six hours before tip-off. Because I can’t physically move during the action, I position cameras in places where I know the action will happen to get great shots.
In basketball, one fact is guaranteed: All action, at some point, will move to the hoop. With that in mind, I place my remote cameras in locations where they can capture the best action in and around the basket. There are several remote positions that I try to employ in every game.
One of my favorite remote placements is a wide-angle lens on the floor looking up from the baseline at the basket. This camera has a low ratio of success, but when it works, it offers a very different look at the game (Figure 6.7).
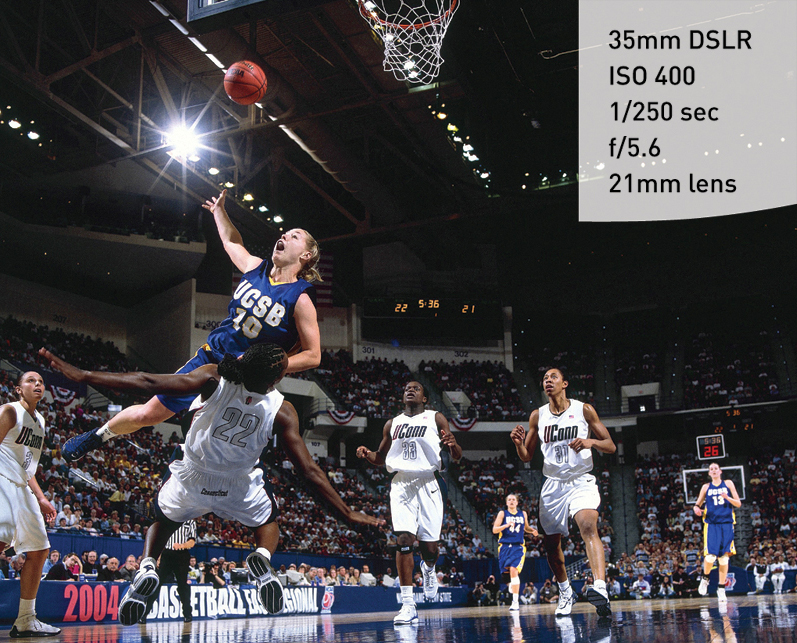
Figure 6.7 The floor remote provides a different point of view. This angle shows the crowd, other players, the score, and the time left in the game. Including internal identifiers like these in a shot can be extremely important.
Because action at the hoop is a given at some point, I always try to find a spot in the stands where I can place a camera with a telephoto lens looking back across the basket from the side. This camera works only if the players are facing the right direction. But when they do, it makes a nice big rebound or dunk shot (Figure 6.8).
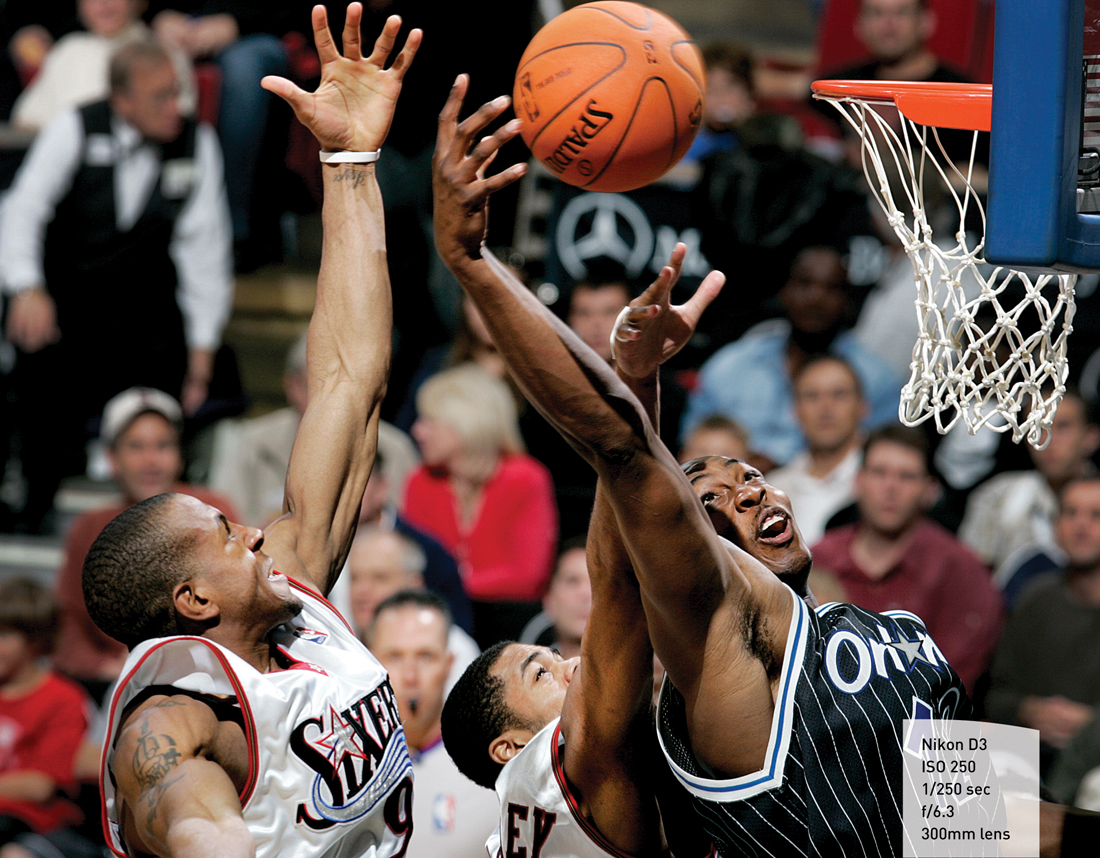
Figure 6.8 I made this image for a story about Dwight Howard—a big, physical player who makes his presence known at the hoop. I placed a 300mm lens over the entrance leading out to the court.
The stanchion of the basket is also a great spot for cameras. However, not all leagues, arenas, or tournaments allow cameras here. The view is an elevated version of the floor camera and is good for capturing layups and rebounds (Figure 6.9). This camera position allows me to get an elevated look at what I’m shooting on the floor.
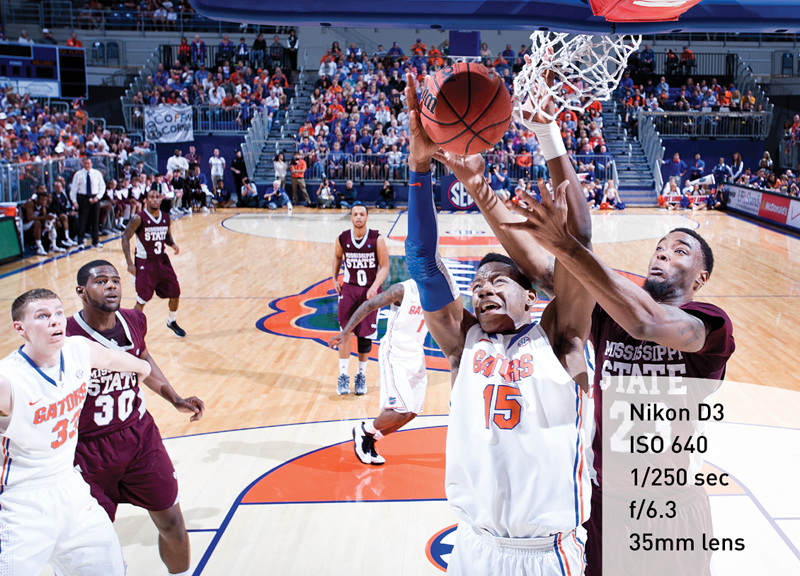
Figure 6.9 Because I don’t know which way the players will turn their faces and bodies, I need cameras that can see them from all angles. Taking this image from my position on the floor would have blocked faces.
Wide-angle lenses on cameras behind the glass create some of the most dynamic pictures from the game (Figure 6.10). A wide lens from that angle gives viewers a more complete look of the action at a particular moment than a tight shot from the side or a tight overhead shot, which is discussed next.
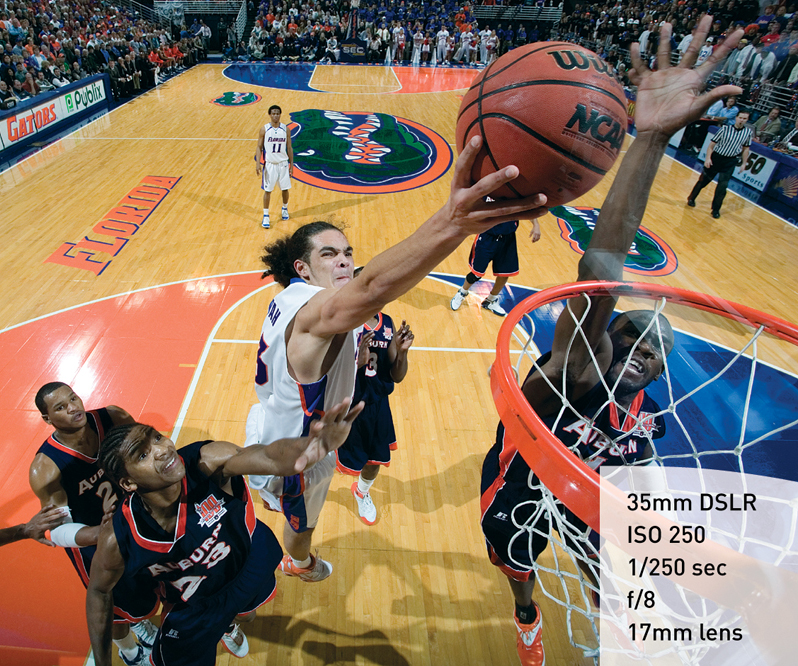
Figure 6.10 Joakim Noah is over seven feet tall and has a massive wingspan. Placing a wide-angle lens behind the backboard allowed me to show that.
Remotes placed directly over the hoop create a very clean image with big impact. This angle is almost guaranteed to create great images. Generally, this position is hard to get to, and securing the camera properly is incredibly important (Figure 6.11).
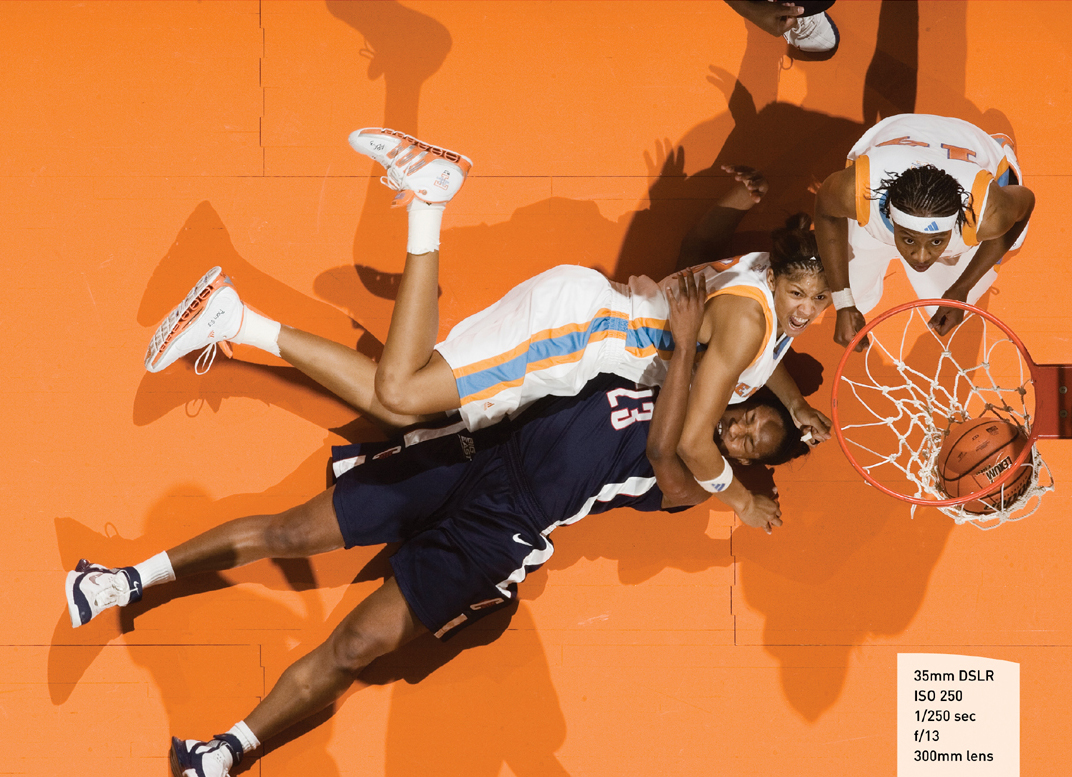
Figure 6.11 Candace Parker falls to the court after making a layup against UConn. The overhead camera places the players over a clean background and is in prime position to capture peak action, like in this shot.
Media tables are always set up on the side of the court opposite the team benches. I typically set up under-the-table cams, which are wide-angle lens remotes on the floor to take shots from the side. This angle is especially good for women’s basketball because the players generally play close to the floor, and cameras at this angle can focus on jump shots (Figure 6.12).

Figure 6.12 UConn vs. Stanford in the 2010 Women’s NCAA National Championship Game. During the NCAA tournament, we are limited in where we can place remote cameras based on tournament rules and restrictions in the specific arena. This angle allowed me to show a lot of information, including the UConn bench, fans, and other players.
Handheld Cameras
I always have two cameras by my side for a basketball game—a telephoto (usually a 300mm f/2.8) and a wide to medium zoom (a 24–120mm f/4 or a 24–70mm f/2.8). I use the telephoto for down court action and the wide zoom for near court action. Both cameras are tethered into my remote system, so I can fire my remotes and the strobes from my handheld cameras (Figure 6.13). I explain this in detail in the next section, “Settings and Lighting.”
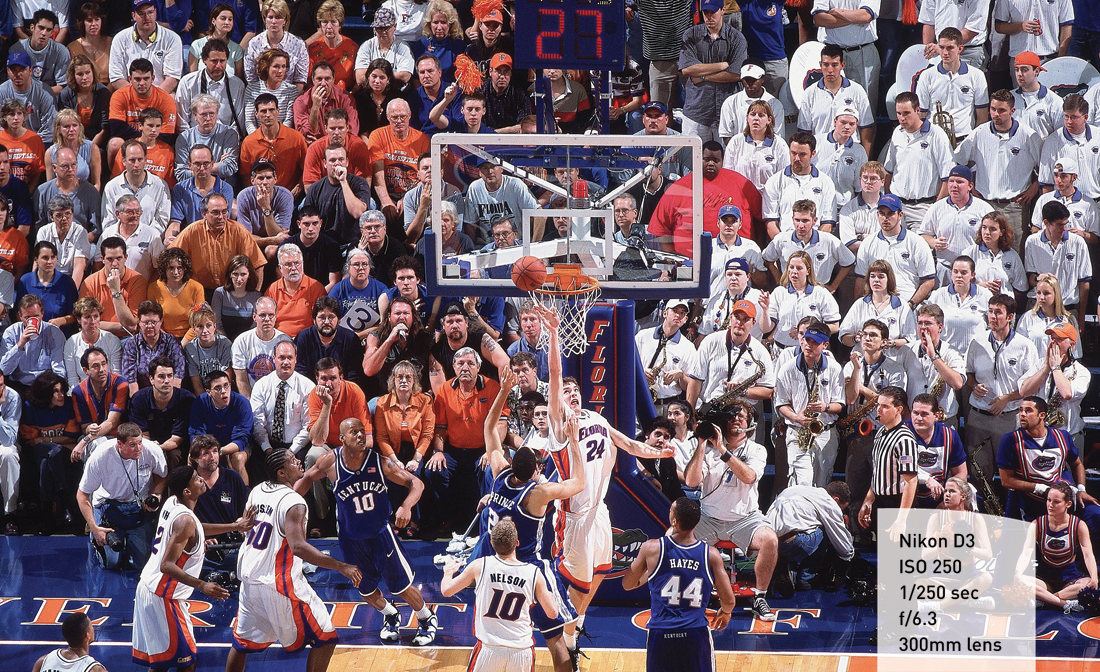
Figure 6.13 Can you spot me? I’m in black in the bottom-left corner. A wide angle is in front of me—a 400mm f/2.8 on a monopod on my lap—and I am firing my remotes, including the one that took this picture.
Settings and Lighting
Basketball is different from other action sports in that I almost always use a strobe to light the action. Even with the new DSLR cameras and their improved high ISO capabilities, images taken with a strobe look better. Many arenas that I work in at NBA or NCAA games have strobes already in place that Sports Illustrated either owns or rents.
The strobes I usually use are 2400 w/s units, and generally there are four of them, one in each corner of the arena. To connect them all, I run hundreds of feet of household 18 amp wire to each strobe and drop the line down to my spot on the floor.
The setup gets a bit technical because the strobes and cameras all have to fire at the same time. To make that happen, I have to use radio transmitters. PocketWizards are the most commonly used form of transmitter in the photo community. I use them frequently in other sports, but for basketball I use the PocketWizard’s big brother, the LPA FlashWizard.
The FlashWizard is similar to the PocketWizard, but it is better at deflecting unwanted radio signals. This is important in basketball because I am in an enclosed space with literally thousands of conflicting signals. Scoreboards, Jumbotrons, radio, television, and every fan in the stands with a cell phone use radio signals, and sometimes those signals get crossed.
Each remote camera is connected to a FlashWizard, as are the strobes. When I plug my camera into the master FlashWizard, all of my cameras and strobes fire in sync with each other.
Shooting on strobe increases the quality of the photo, allowing for lower ISO settings, because the maximum shutter speed on strobe is 1/250 of a second. But strobes also reduce the frequency I can shoot. For the strobes to recycle their power, I can shoot only once every three seconds, which sometimes seems like an eternity, because cameras like the Nikon D4 can fire up to 11 frames per second. For this reason, I leave my down court camera off strobe. That allows me to shoot more action. To make sure I can still fire my remotes down court, I tape triggers to the side of my camera right next to the shutter release.
The settings on the cameras are fairly uniform, depending on the arena. On strobe, the exposure is always somewhere in the vicinity of ISO 400 and f/5.6, and the shutter speed is always 1/250 of a second.
Chapter 6 Assignments
Basketball requires you to shoot from fixed positions. These exercises will help you learn how to anticipate the action and respond quickly and accurately.
Learning How to Time Your Shots
Go to a basketball court where a game is in progress. Sit on the baseline, position yourself where you will not be stepped on by the players, and prefocus the camera on the hoop using the widest focal length lens you have at the widest aperture possible. Try to time your shots using single frame shutter advance. Practice until you can anticipate precisely when the ball will leave the player’s hand. Be sure to keep the players’ full bodies in the frame.
Learning How to Compose Your Camera
Go to a basketball court where a game is in progress. Sit on the baseline, position yourself where you will not be stepped on by the players, and place the camera on the floor/ground. Do this with the widest focal length lens you have. Tilt the camera up so you have the floor/ground in the foreground and the action completely within the frame. Shoot repeatedly and then look at the image review. Do this until you can confidently place the camera and make consistently well-composed images.
Positioning Yourself for Success
Go to a basketball court where a game is in progress, and find a high angle. Practice making images that show as much of the playing surface as possible. When courts are very dark and shooting positions are limited, making overall images may be the only option. Notice how being farther from the action allows you to use slightly slower shutter speeds than you use courtside and still stop the action.
Share your results with the book’s Flickr group!
Join the group here: flickr.com/groups/sportsphotographyfromsnapshotstogreatshots.