
5. Shooting Football
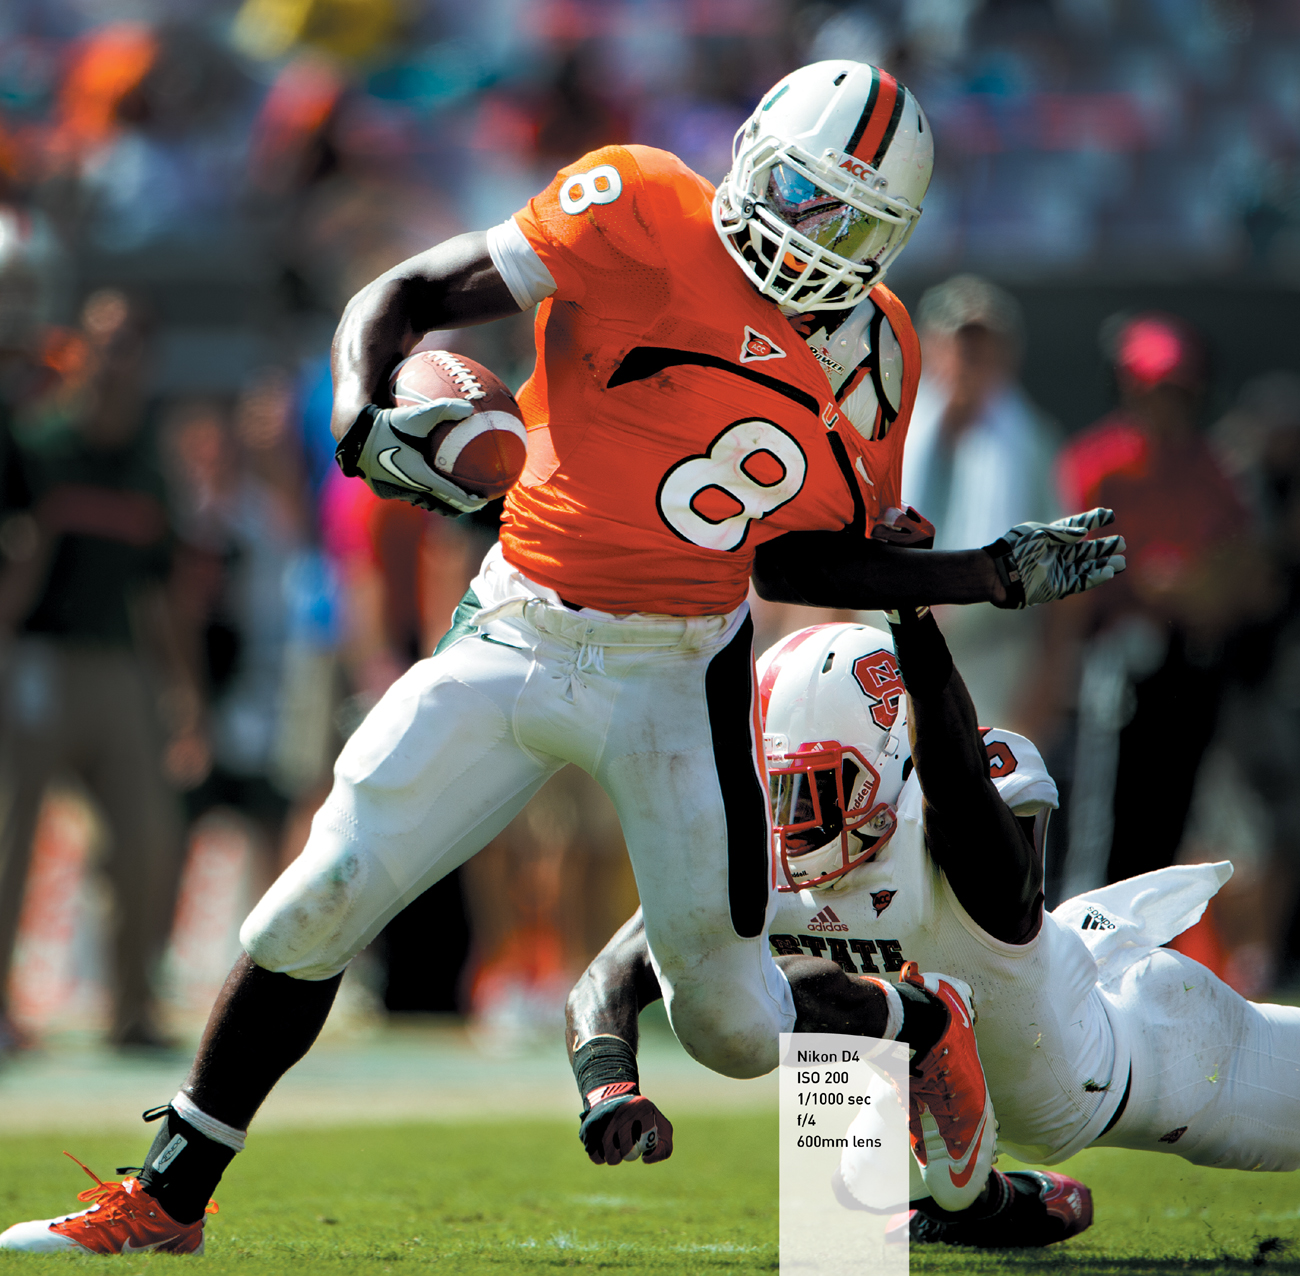
University of Miami running back Duke Johnson is dragged down by a North Carolina State defender.
Big Hits, Big Reactions
Football is the most popular American sport and the one I get asked about shooting most often. Of the sports I’ll explain in this book, football is the easiest to cover because it is predictable and there’s lots of action. It may also be the most difficult to cover because the game happens on a fairly large surface, the athletes’ faces are often obscured, you’re usually subject to the elements, and the ball takes funny bounces.
Poring Over the Picture
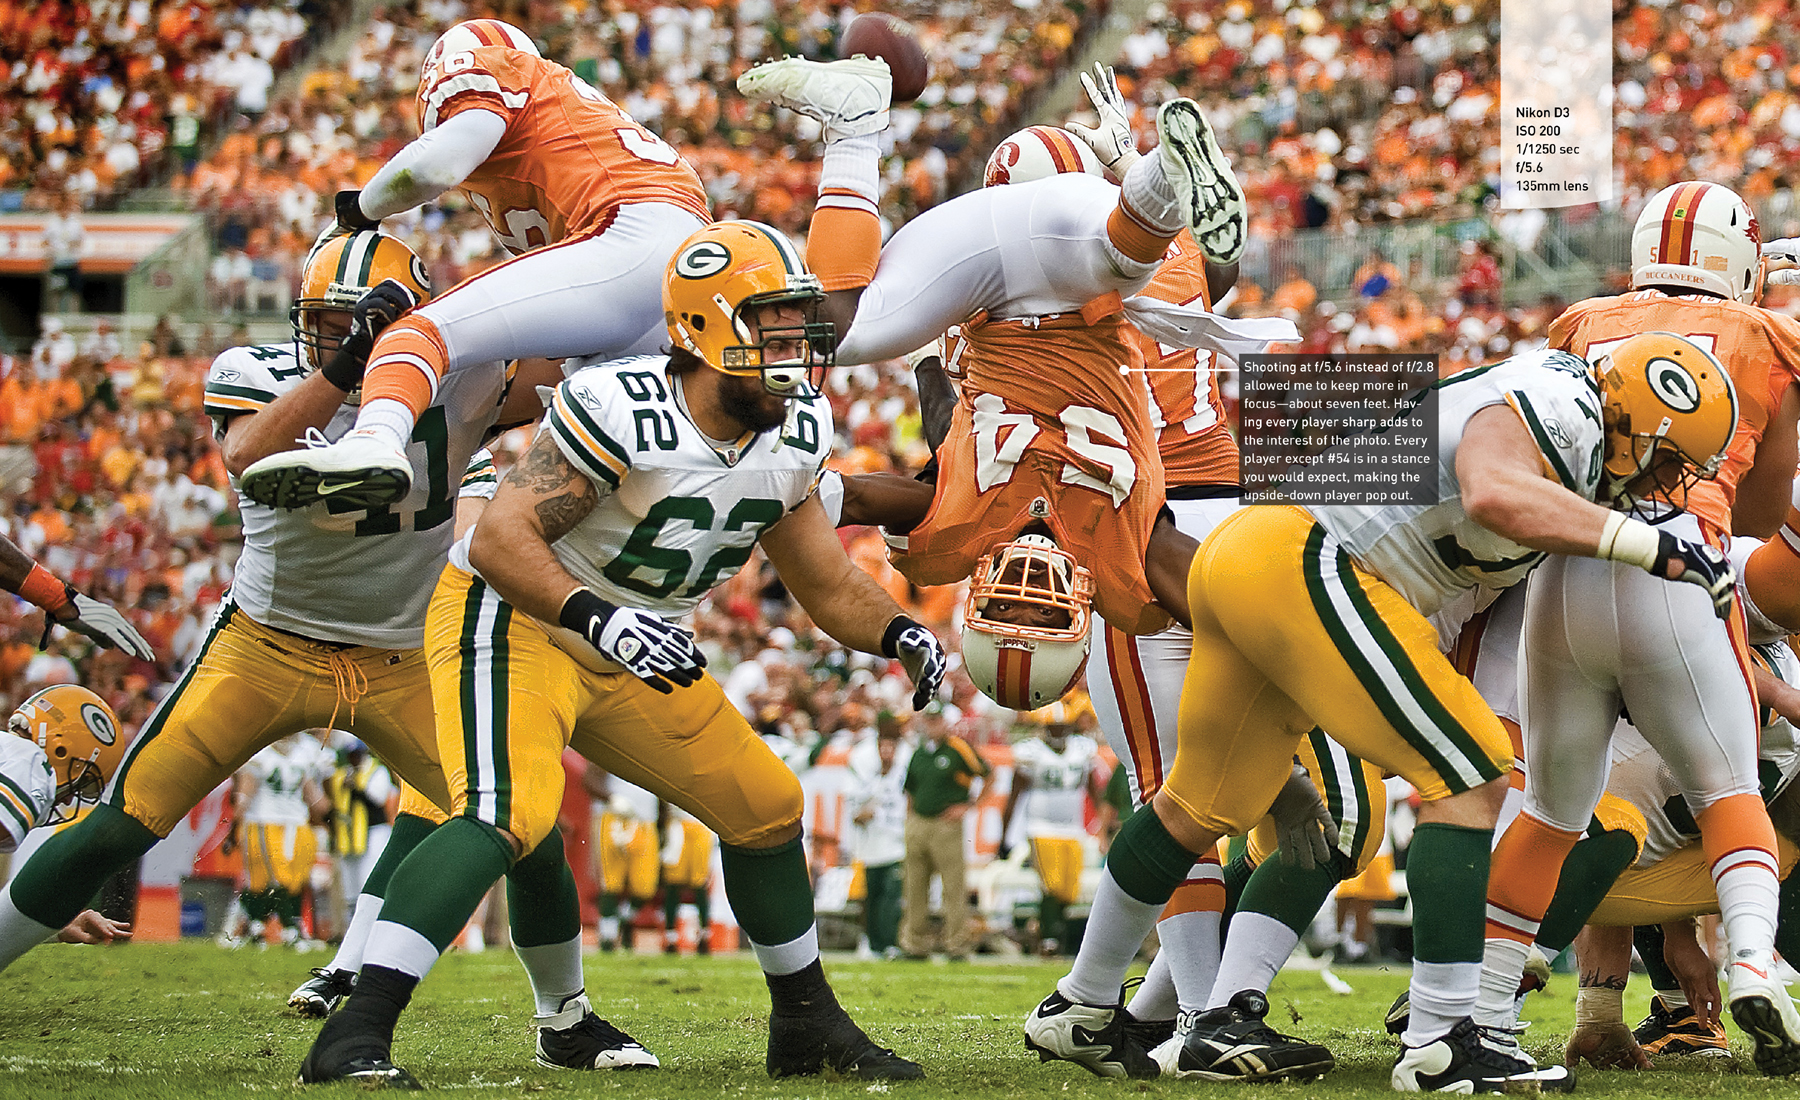
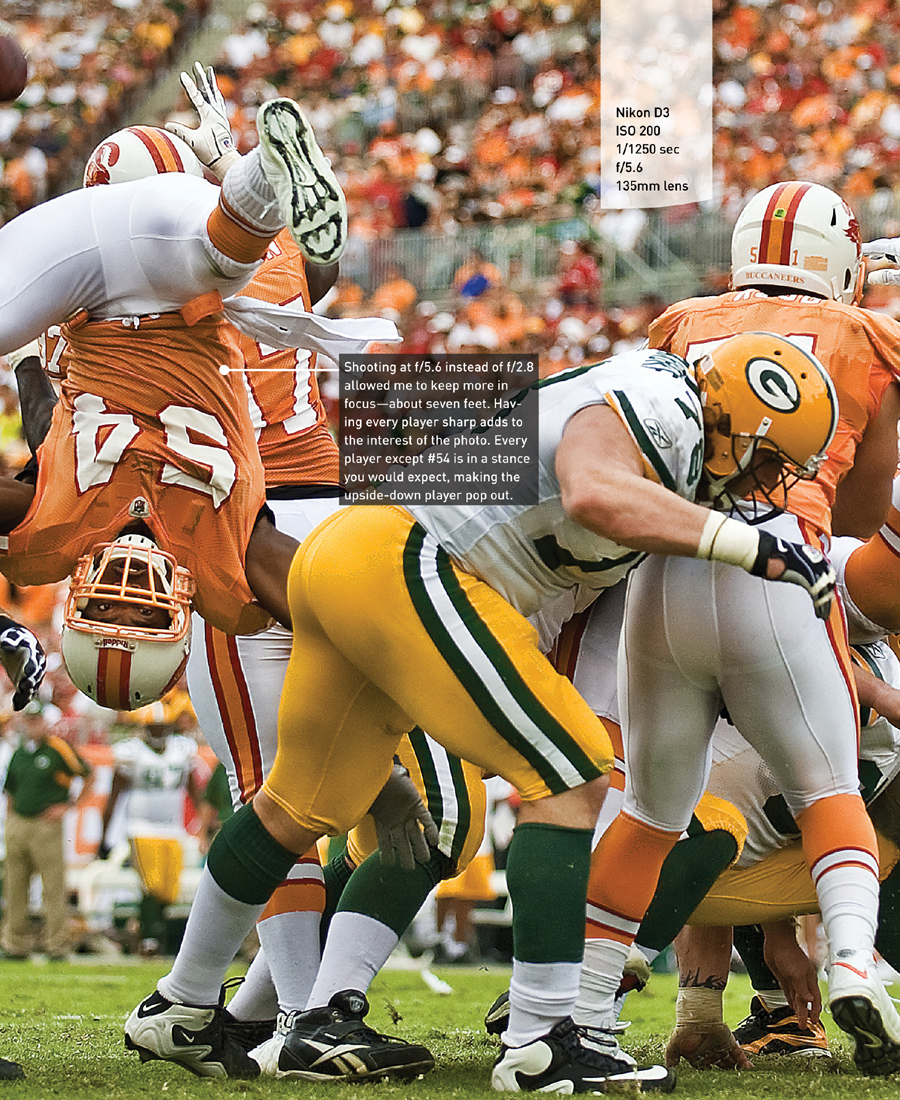
I could never have anticipated getting this picture when the Green Bay Packers were attempting an extra point. I don’t always shoot extra points, but it was a pretty day in Tampa and I loved the combination of colors. After grabbing my 70–200mm f/2.8, I shot the field goal showing the center of the line of scrimmage in case the Buccaneers blocked the kick. The extra point wasn’t blocked, but linebacker Geno Hayes, #54, was flipped upside down by Packers’ guard Evan Dietrich-Smith, #62. It was one of my favorite pictures from that year.
Anticipation is a key element in shooting football. But shooting every moment, even the seemingly mundane, is even more important. The extra point meant nothing in the final outcome of the game but ended up being my best photograph.
Football: How to Get the Best Shots
There are many breaks in the action during football games. This gives you a chance to anticipate what will happen and prepare for it.
Where to Position Yourself
Pro and college football is played in large stadiums, and the field of play area is relatively large. Each stadium has its own credentialing rules, but there are four general areas to shoot from: end zones, sidelines, stands, and catwalks. Catwalks are only found in indoor stadiums and are normally very difficult to access.
High school games are usually played in smaller stadiums and are normally easy to gain access to.
Credentialing and space issues aside, the process of covering the games is basically the same. With each step up the food chain, the athletes get faster and stronger, access gets tougher, and the harder it gets to make emotional images.
I’ve covered more than 25 Super Bowls, at least that many big bowl games, and thousands of regular season NFL and NCAA games. But my favorite memories are from small-town high school games (Figure 5.1).
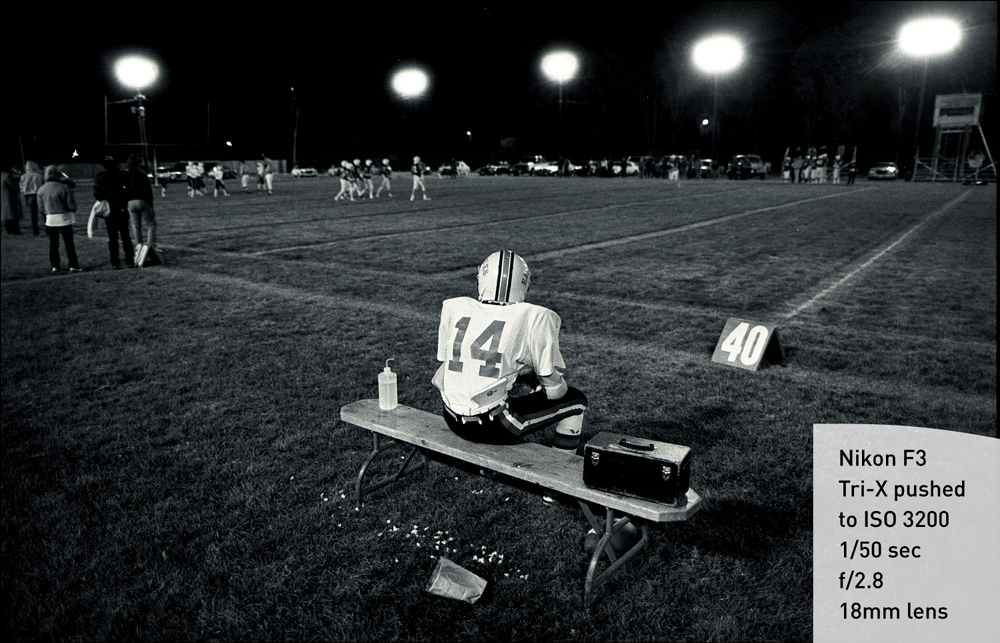
Figure 5.1 This photo was taken at a high school football game in Lyman, Nebraska. This was taken before the digital age took over photography, and was shot on Kodak Tri-X film, pushed three stops. Quiet moments like these are some of my favorite sports photos.
Shooting from the End Zones
If I’m covering a game from field level, I generally shoot from the end zones. This gives me a head-on view of the action. If a running back or receiver breaks free, I’m in the best position to capture the moment. At the other end zone, if I get behind an offense, I am in prime position to capture a sack or fumble.
If a team is attempting a game-winning kick, I like to go to the opposite end zone to show the whole scene and capture the reaction of the players (Figure 5.2 and Figure 5.3). Whether the field goal is made, blocked, or missed, there is always a big reaction from the fans and players that a tight shot of just the kicker won’t show. I’ll use the longest lens I have when play is at the end of the field opposite me and use progressively shorter lenses as the action gets closer to me. I always have a camera with a normal (35mm to 50mm) lens hanging around my neck. It is typically referred to as a “chest camera.”
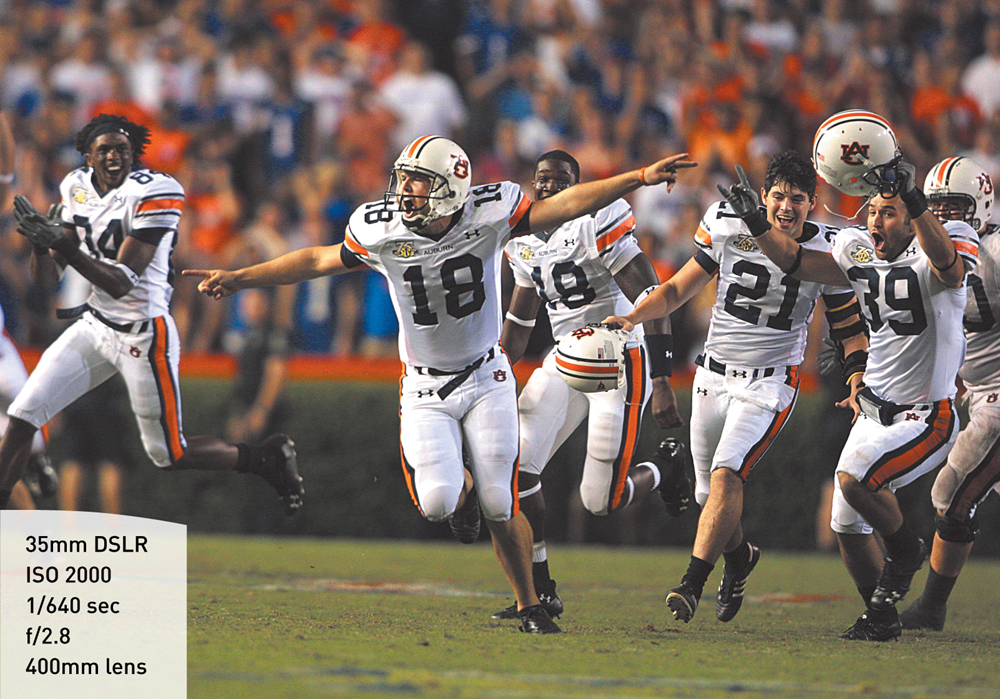
Figure 5.2 In this picture, Auburn kicked a field goal to beat the Florida Gators at Florida Field in the last second of the game.
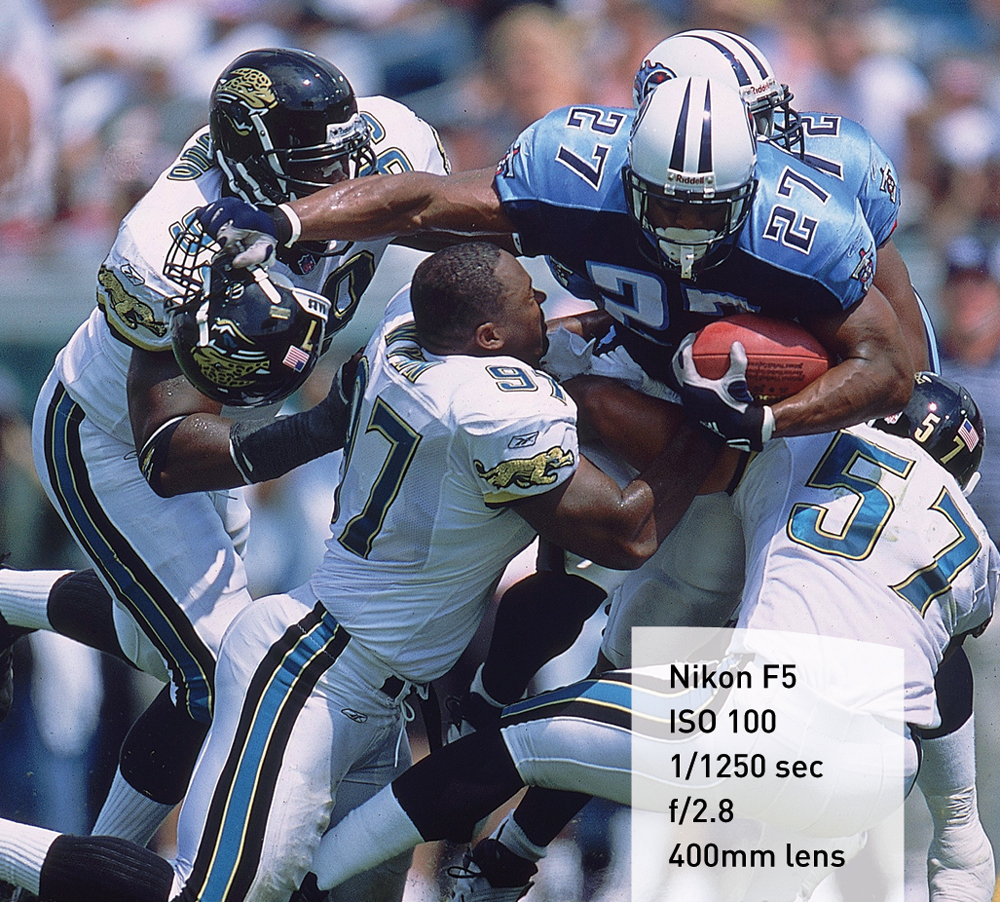
Figure 5.3 The end zone is a great location to capture images like these. I love how it appears that the running back is coming directly toward me. The fact that he removed a Jaguar helmet in the process just adds to the interest of the photo.
Prefocus the chest camera on a spot directly in front of you and use gaffer tape to secure the focus position. Be sure to set the camera on manual focus when you do this.
Tip
The first frame you take with the chest camera will usually be the best one, so be sure you have the f-stop set so that you have at least five feet of depth of field. A scale on your lens should provide you with that information.
Shooting from the Sidelines
Shooting on the sidelines offers a slightly different perspective from shooting in an end zone. Instead of capturing action that is moving away from you (north and south or end zone to end zone, as football players like to say), the sidelines give you side-to-side action. If there is a screen pass to a sideline, a sack just behind the line of scrimmage, or a sweep, the sideline is a prime place to be (Figure 5.4).
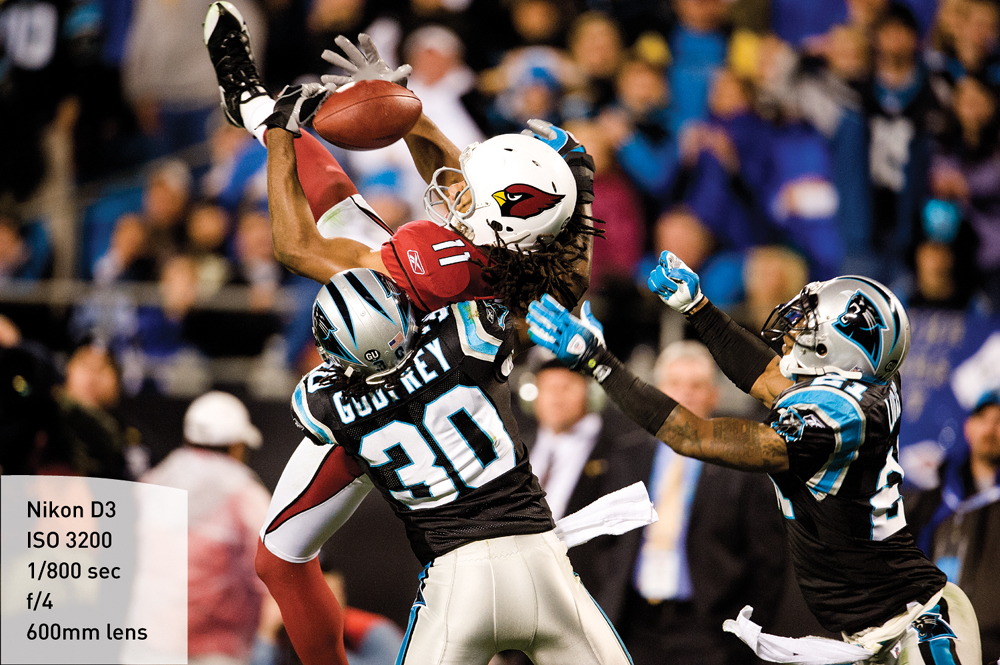
Figure 5.4 Sidelines are a great place to capture receivers in midair, like this Larry Fitzgerald catch.
By positioning myself on the sidelines directly next to the spot of the kick, I was able to capture an aspect of the game that is frequently overlooked (Figure 5.5).
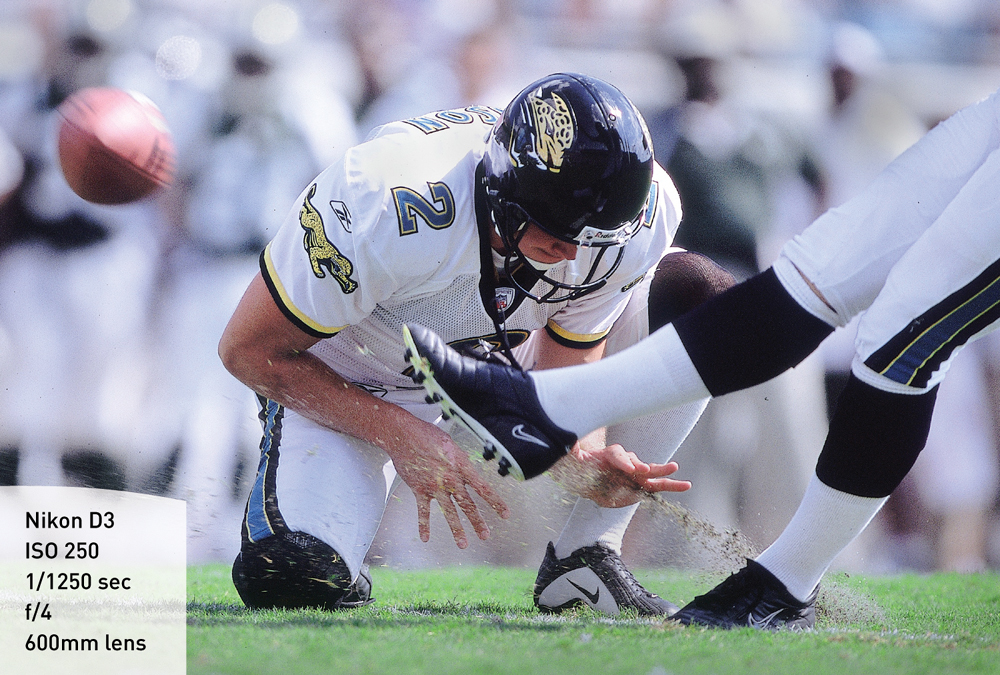
Figure 5.5 This shot is not a high-action photo in the traditional sense. However, it does show a lot of motion.
Sidelines offer great views of quarterbacks throwing and getting hit (Figure 5.6).
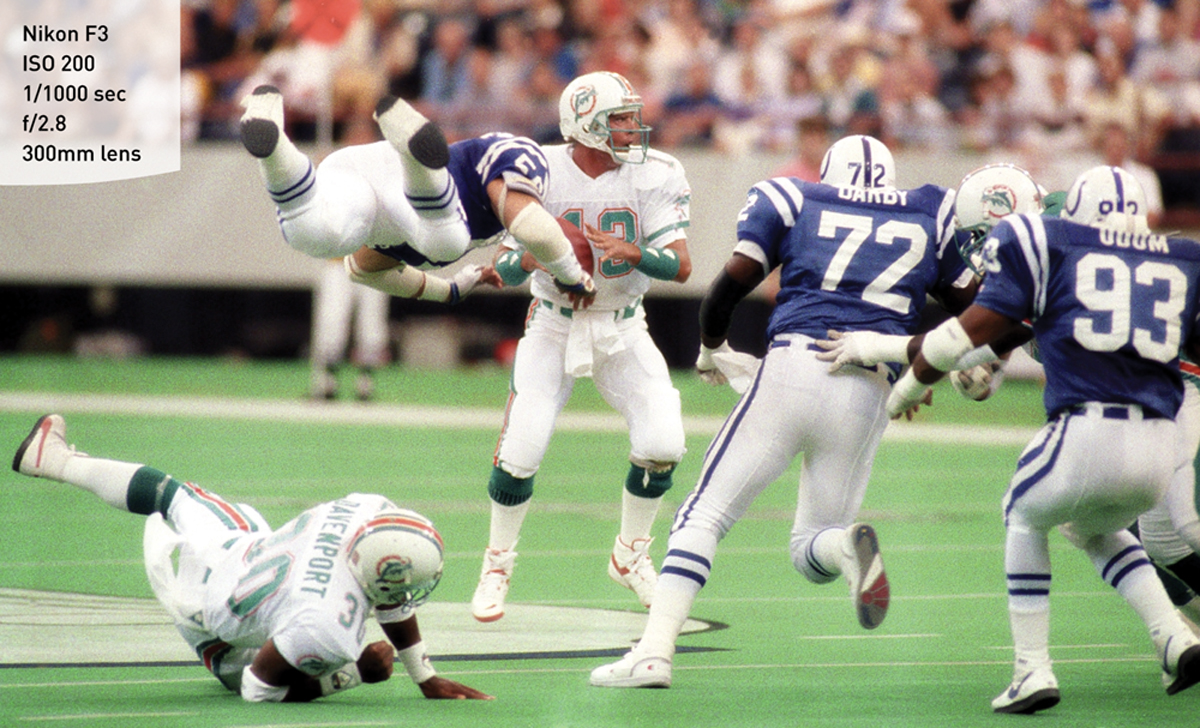
Figure 5.6 In this photo, Dan Marino is about to get crunched by Barry Krause of the Indianapolis Colts. If I was shooting from the end zone, I would be blocked from taking this shot by the linemen.
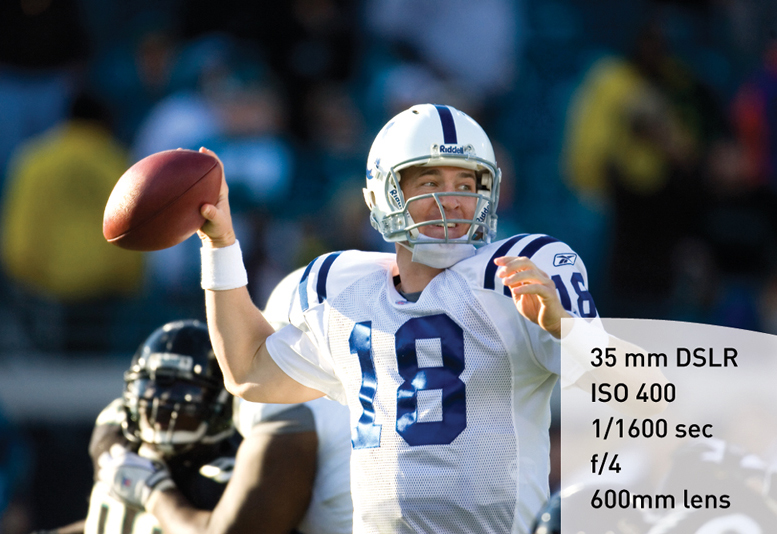
I’ve been photographing Peyton Manning since he was a high school athlete (Figure 5.7). Peyton is credited with having the fastest and most analytical mind among NFL players. My favorite images of Peyton all involve his intensity (Figure 5.8). The only thing you can be sure of is when he is on the field, it’s going to be exciting.
I generally pick my field level spot based on the specific assignment I am covering. If I’m at a game to shoot a running back, for example, I’ll position myself in the end zone. If I’m covering an outside linebacker or offensive tackle, I’ll be on the sidelines. If you can’t see the player because he is obscured by other players, you can’t do your job, so you have to have a clean line of sight.
Tip
When the play starts, don’t be concerned if an official is obscuring your view. He will move as the action does.
Shooting from the Grandstands or Bleachers
Shooting from the stands gives you an elevated look at the field and allows you to make beautiful graphic photos. From the stands, the most important details are shape and light. I love to go into the stands to make overalls of the stadiums with wide-angles lenses—as discussed in Chapter 3.
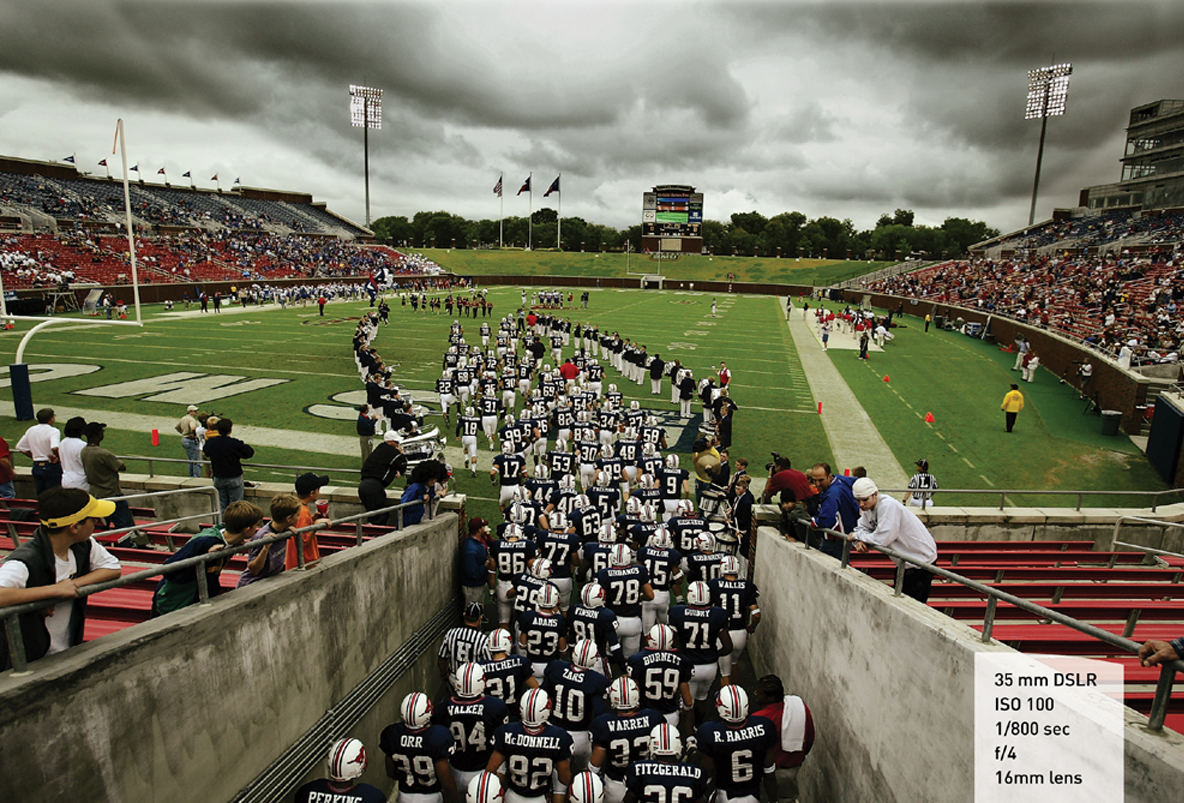
The photo in Figure 5.9 was made as the Southern Methodist University (SMU) Mustangs took the field for their homecoming game in 2001. SMU was a football powerhouse until the school was given the “death penalty” in 1987 for paying players. The program has never fully recovered, and the dark, foreboding skies and empty grandstands in the figure help tell that story.
Shooting from Catwalks
Obviously, not all football stadiums have catwalks. Catwalks are only found in domes. For Super Bowl XLVI, which was played at Lucas Oil Stadium in Indianapolis, I put remote cameras in the catwalks over the 50-yard line and the Super Bowl logo so that I could fire them when the teams passed over those sections of the field (Figure 5.10).
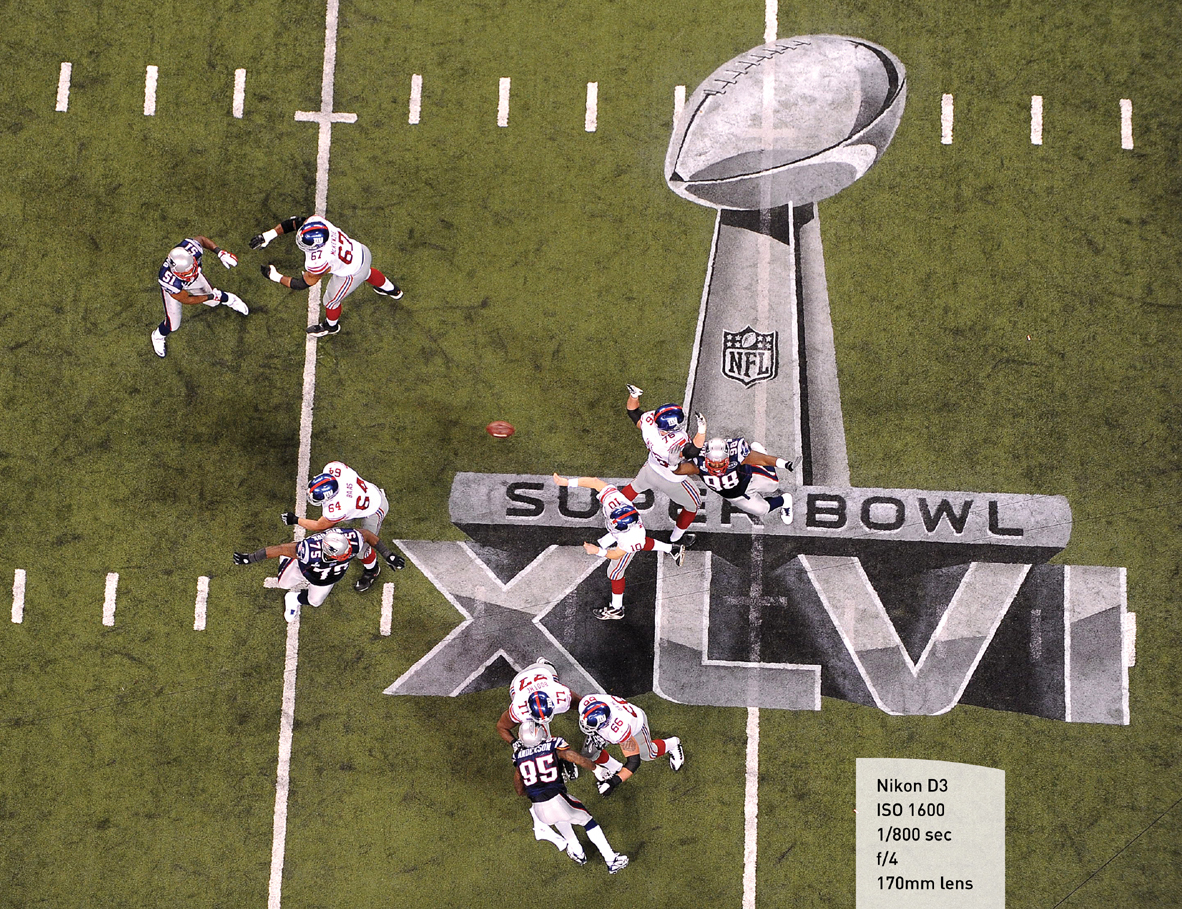
Figure 5.10 Because of the dome, I was able to place remote cameras in the catwalks and make a nice, graphic picture of Eli Manning throwing a pass.
In Figure 5.11, Alabama tight end Colin Peek catches a touchdown pass against the Florida Gators in the 2010 SEC Championship Game in the Georgia Dome. The Georgia Dome has three levels of catwalks. For this picture, I positioned myself on the first level because Alabama was driving and I knew that Alabama quarterback Greg McElroy would soon try a down field pass.
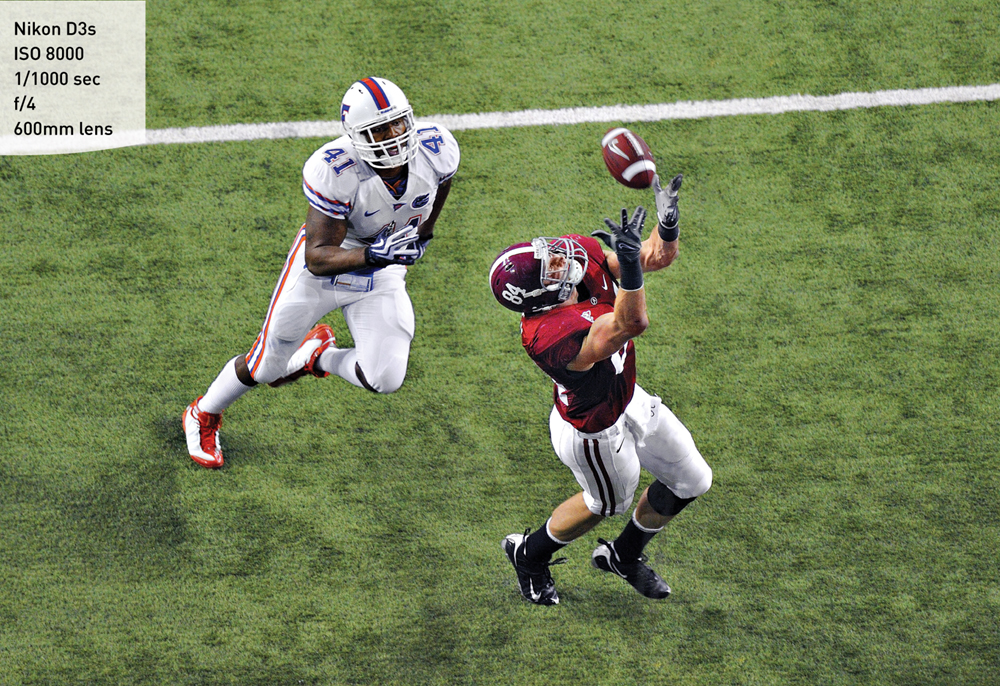
Figure 5.11 Being almost directly overhead, I was able to capture the players’ faces as the play happened. Sports Illustrated used this photo as the cover the week after the game.
Settings and Lighting
Camera settings for football vary greatly depending on when and where the game is played. Carefully consider how much you want to be in focus in each frame. After you calculate the depth of field, make sure you have a fast enough shutter speed, and then use the ISO settings on your camera to make it work.
A one o’clock game in Miami will have drastically different settings from an eight o’clock game in Green Bay. As discussed in Chapter 4, keep in mind that light is extremely important and managing it has to be one of your principal concerns.
I never shoot football with a shutter speed less than 1/1000 of a second if I can possibly help it. Freezing action is extremely important in football, and it is a rare occasion that I would employ a pan or blur. Pans and blurs work best in sports where you can predict the action, such as track and field or horse racing. You can predict those sports because they run, for the most part, in straight lines and do not vary their paths.
Football isn’t all about peak action, either. There are opportunities to make truly stunning photos of candid portraits of the participants when the light is right. Don’t forget the fans either (Figure 5.12)!
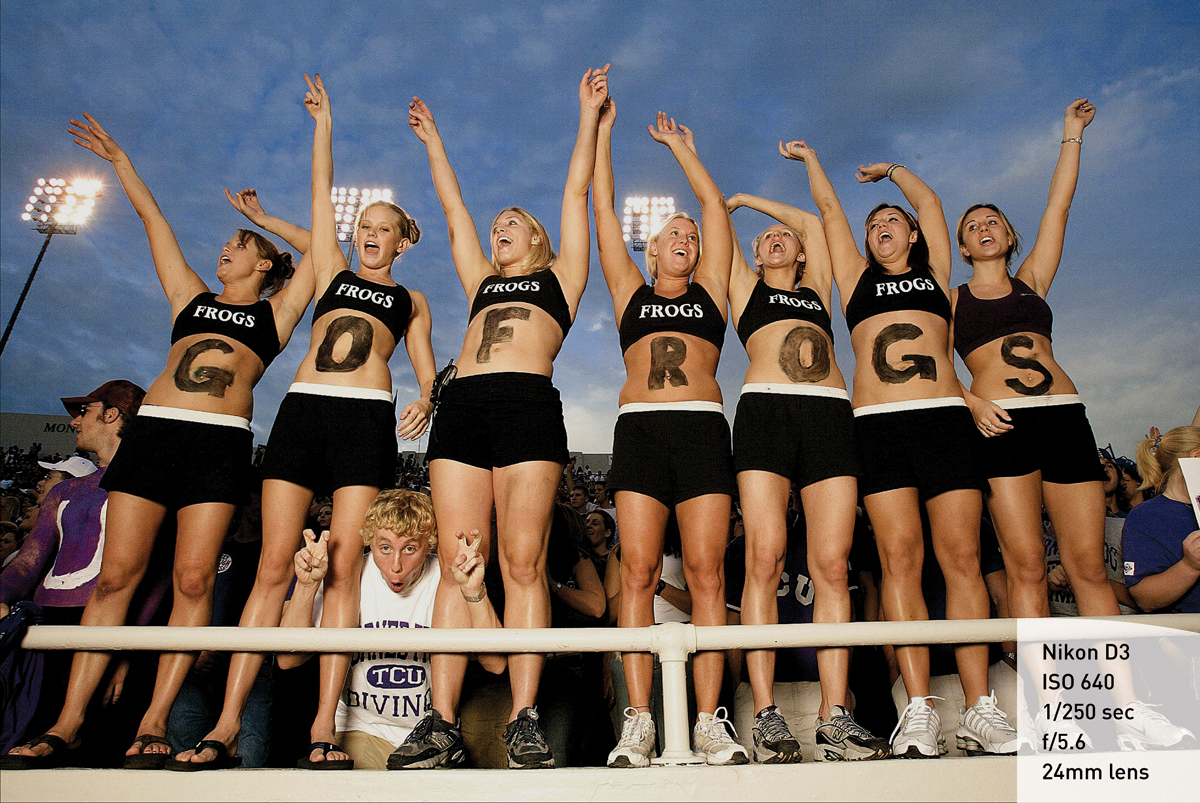
Figure 5.12 Big hits and touchdowns aren’t the only great pictures you can make at a football game. Always be on the lookout for wacky fans, like this image taken at TCU.
Tip
When the action on the field stops, turn your attention to the bench and look for emotion from the participants there.
Figure 5.13 shows the Cardinals kicking a field goal to beat the 49ers in overtime. The moment was important, but the way the light shaped the field and captured the action within it gave it a powerful dynamic tension. I exposed for the bright sunlight, which let the shadows go very dark. This is an example of where the camera would have picked a different, flatter exposure to try to bring the shadows into the light.
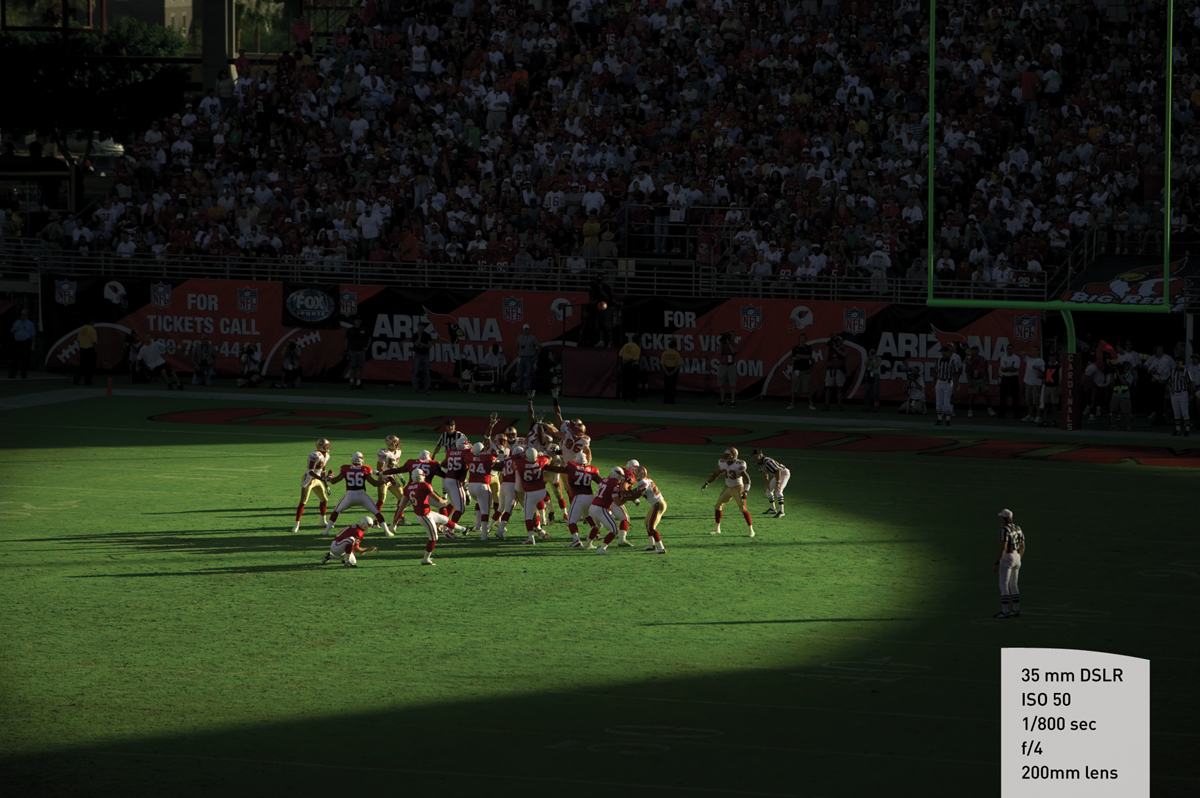
Figure 5.13 Because I had my camera set to manual, I was able to stop down, underexpose, and make a different and beautiful image.
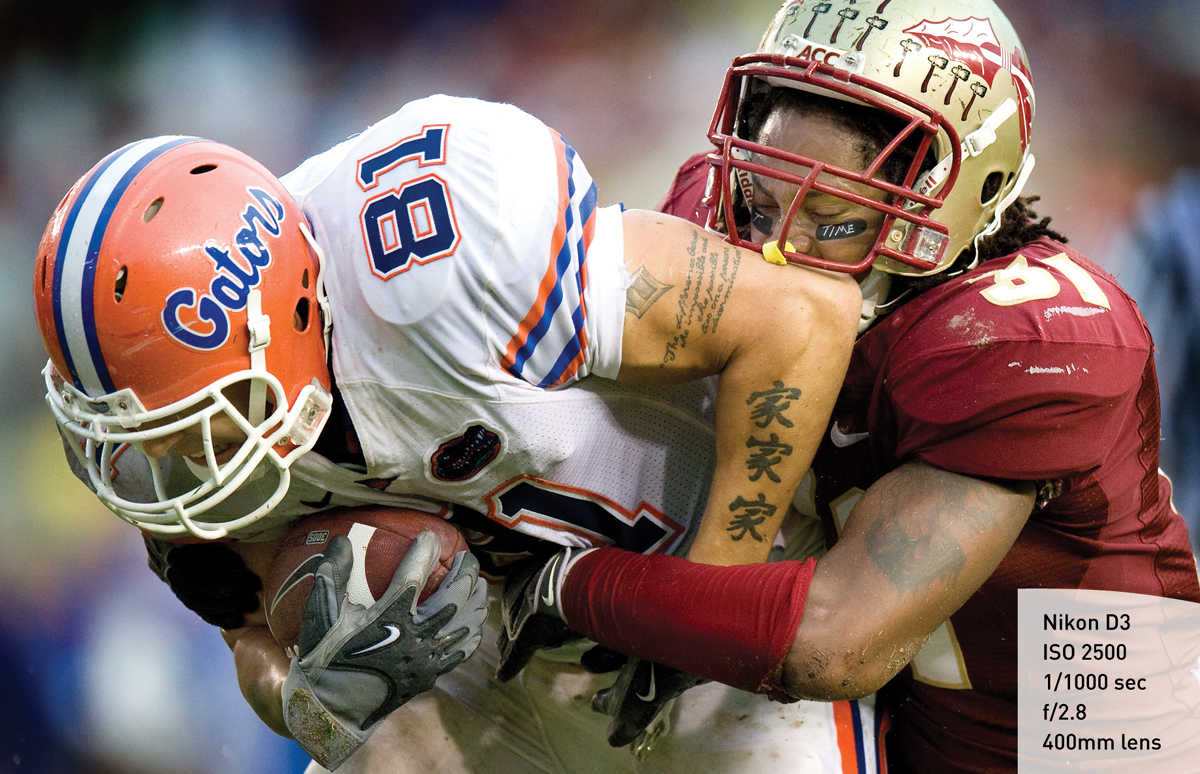
Figure 5.14 shows an action shot, but it isn’t really about the action. What makes this image work are the tattoos on #81 Aaron Hernandez’s arm compared to the tomahawks on the defender’s helmet, the angle at which Hernandez’s elbow is positioned, and the look on the defender’s face.
Covering the Action
Capturing key moments in football is all about anticipation. The more you know about the sport and each team playing, the better your pictures will be.
Tip
If a team runs a play successfully, the team will nearly always try the same play again in similar situations. Being aware of the team’s tendencies will help you anticipate the action.
Having control over your camera is also hugely important when you’re covering football. You need to be one with your equipment. The camera has to be an extension of your mind, or you won’t be able to react quickly enough.
The game, for the most part, is played outside, which makes for changing conditions. Bright sunshine that changes to cloud cover can make for up to six or seven stops’ difference in exposure. Correcting for that quickly can be the difference between a great image and an unusable one.
Tip
Check the light immediately before the play begins. Think about not only the basic ambient exposure, but also about the exposure inside the helmets, which will often be darker than that on the jersey, especially white jerseys.
Covering the Moments After the Game
What happens after the game can be as important as what happened during the game. The players, fans, and coaches will react. They always do. That can be the defining picture of the game just as easily as an action image (Figure 5.15).
Figure 5.16 on the next page shows the University of Florida quarterback Tim Tebow high-fiving fans after his last game in The Swamp. The outcome of the game didn’t matter, but this moment did.
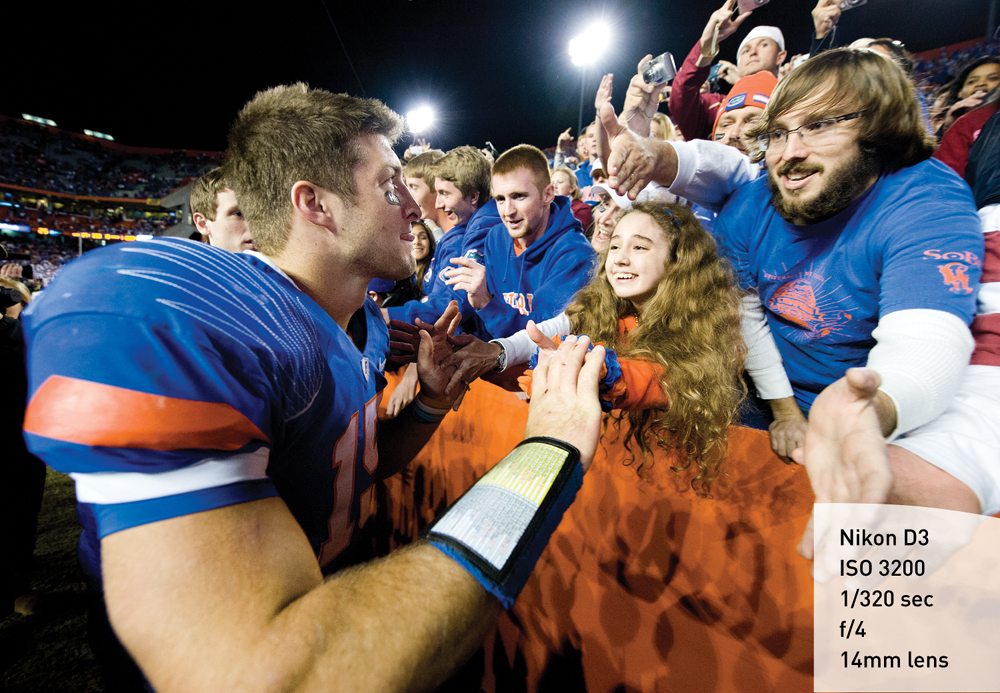
Figure 5.16 This photograph speaks to Tebow’s personality and how widely popular he was at the University of Florida.
Suggestions for Shooting Football
Be patient when you’re shooting. Pay careful attention to the action away from the ball. Many great photographs happen after the play is whistled dead (Figure 5.17).
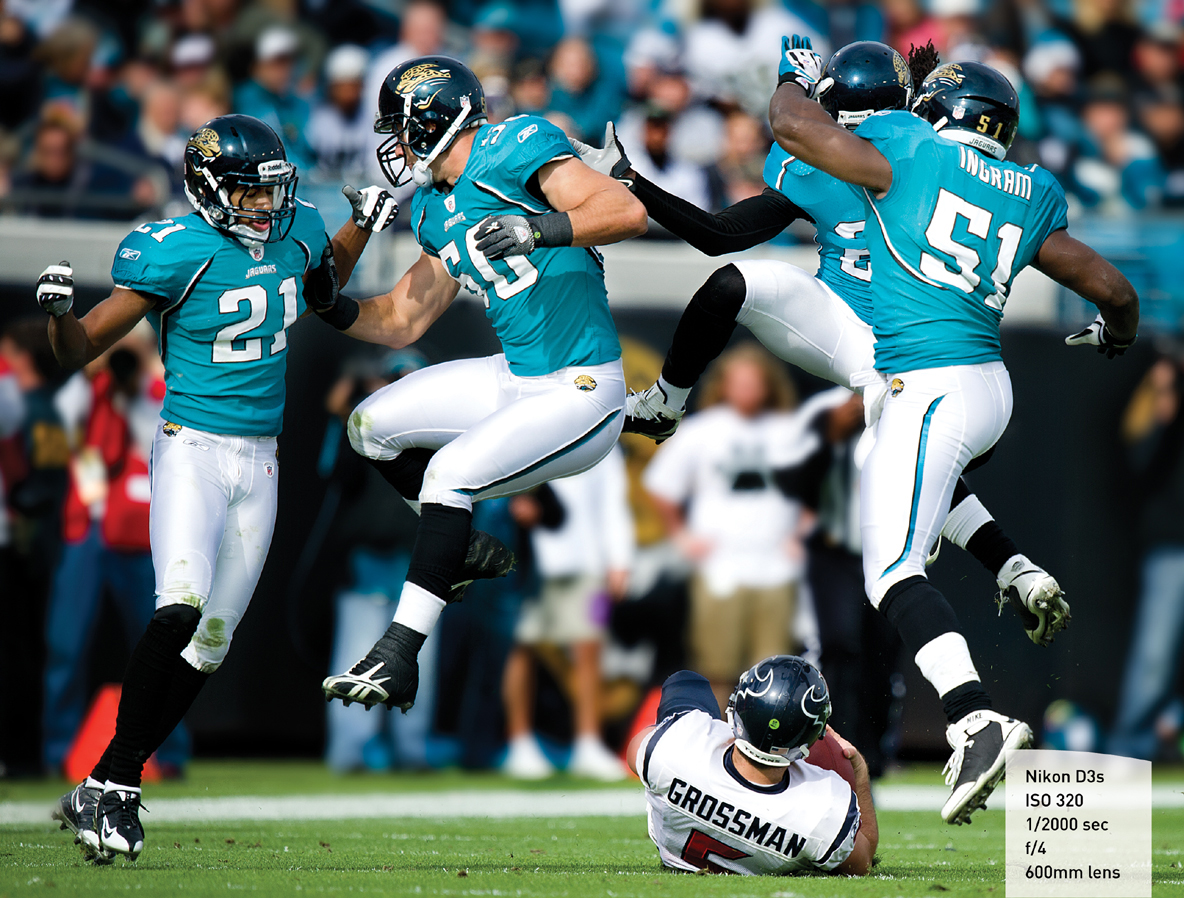
Figure 5.17 The Jacksonville Jaguars celebrate after sacking Texans quarterback Rex Grossman. If I had stopped shooting when Grossman went down, I would have missed this moment.
Never give up on the action. Running backs can bust through a pack of defenders, players can celebrate a big play, or things that seem ordinary can end up resulting in surprising photos.
Figure out what the offensive and defensive tendencies are for each team. Anticipate what they will do instead of just trying to react quickly after the play starts. Football is a game of carefully calculated and choreographed movements. Luck favors the prepared.
Remember that the teams won’t stop a football game for inclement weather, so come prepared for the elements. Dress accordingly, and protect your cameras from the cold and wet. Many companies make gear to protect your cameras and lenses; be sure to check them out.
Until the teams head to the huddle, keep your eyes on the field. You not only want to be sure you don’t miss any images, you also have to protect yourself. If you are watching only the ball, you may miss a player coming at you full speed, and trust me, they are bigger, stronger, and faster than you. Add to that the fact that they are wearing pads and like to hit, and you can be sure that almost no collision will come out in your favor.
One funny exception to this, however, occurred while I was covering a University of Miami vs. Notre Dame game in South Bend. The teams didn’t like each other, and there was a lot of pushing, shoving, and yelling going on as they took the field. I was where I was supposed to be, covering the conflict. One of the Notre Dame defensive backs was looking back shouting at the Miami players, and ran right into me. I saw him coming and tried to move, but there was nowhere for me to go. My back was literally against the wall. He hit me, but I got my hands up in time to steer him away. He went to the ground. To his great chagrin, the other players saw what happened and he got a serious ribbing as they laughed and yelled, “You just got knocked down by a photographer.” It was funny. And in all fairness, at 6′5″ and 220 pounds, I was bigger than he was.
But it almost never turns out that way. Every year several photographers and TV camera operators get badly injured because they aren’t paying attention. Don’t let that be you.
Chapter 5 Assignments
The following exercises will help you learn how to gauge where to position yourself in relation to the action on the field. They will also help you learn how quickly you can focus and anticipate action.
Shooting from Different Field Positions
Call your local Pop Warner or high school football team and ask permission to shoot a few games. Take a variety of lenses with you, from wide-angle to telephoto lenses. Try to shoot from every position—end zone, sidelines, and grandstands—using a variety of focal lengths. Make sure your camera is in manual mode so you can control what you capture.
Shooting with Two Cameras
Find two athletes who will run toward you at full speed as you follow focus on them with the longest lens you have. When they get close, switch to your “chest” camera and make images as they continue toward you. As the athletes get closer, you’ll have to change to a shorter lens to keep the athletes in the frame. Practice until you can judge accurately how to set your chest camera and until you learn how to change cameras while the athletes are running at full speed right toward you.
Practice Manual Focus
Have an athlete run toward you carrying a football and then have the athlete drop the football on the ground. Try to keep the athlete and the football in the frame. To do this, you will most likely have to manually focus the lens. If you try to follow the ball with autofocus, you’ll have trouble keeping your composition intact. Do this exercise using manual focus, and then repeat it using autofocus. Compare your ability to compose tight images with each method.
Share your results with the book’s Flickr group!
Join the group here: flickr.com/groups/sportsphotographyfromsnapshotstogreatshots.