
4. Finding the Light

Future winner of the Belmont Stakes, Union Rags breezes in the early morning sun in Florida in May 2012.
Using the Right Light
Light is the single most important component in a photograph. The amount and texture of light can drastically change the content of the picture in good ways and bad. A large quantity of light does not mean you have good quality light.
This chapter walks you through the many types of light available—ambient light, both daylight and artificial—and how to use them to your advantage.
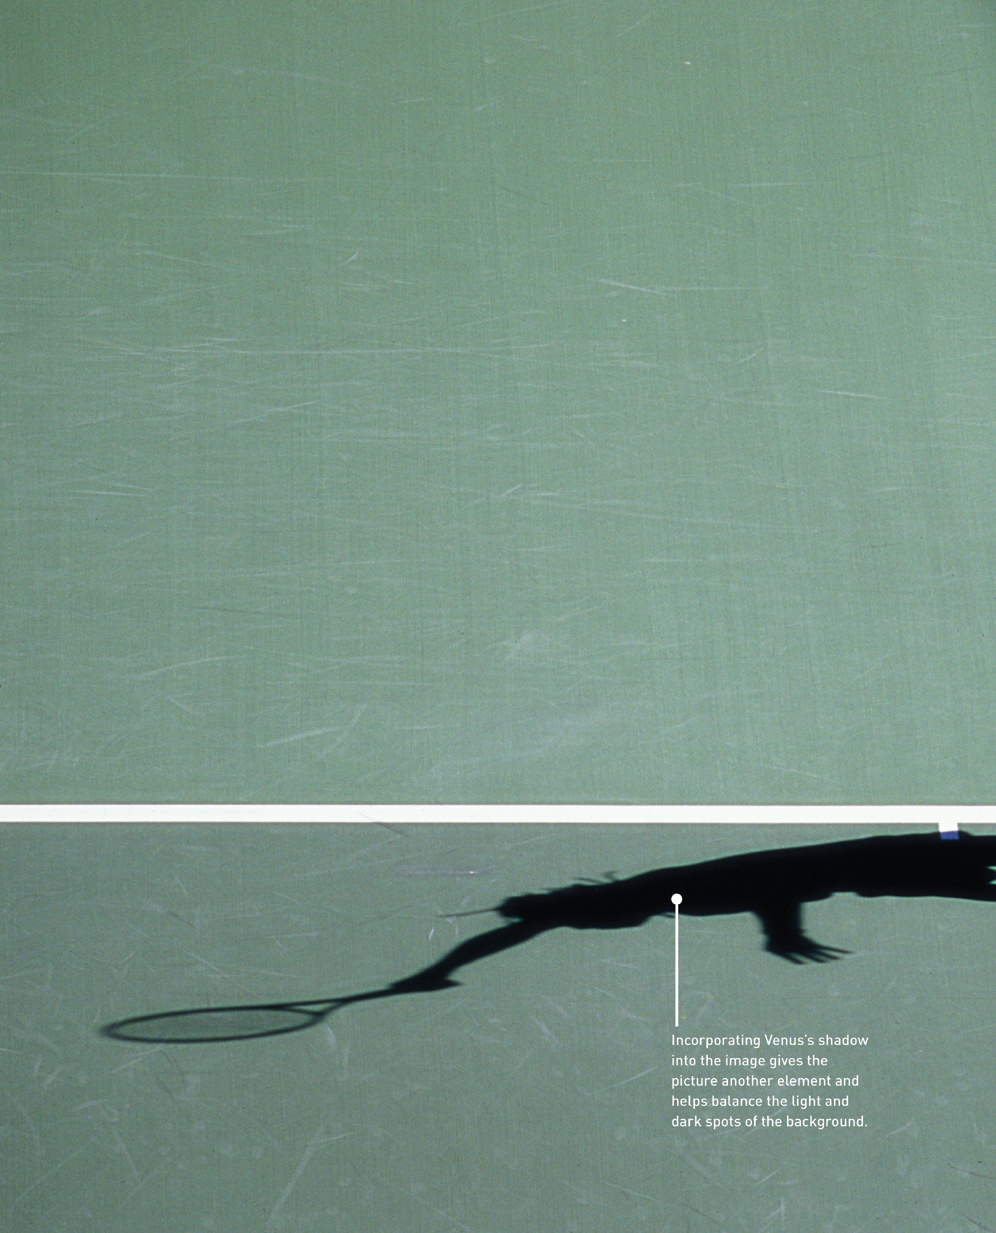
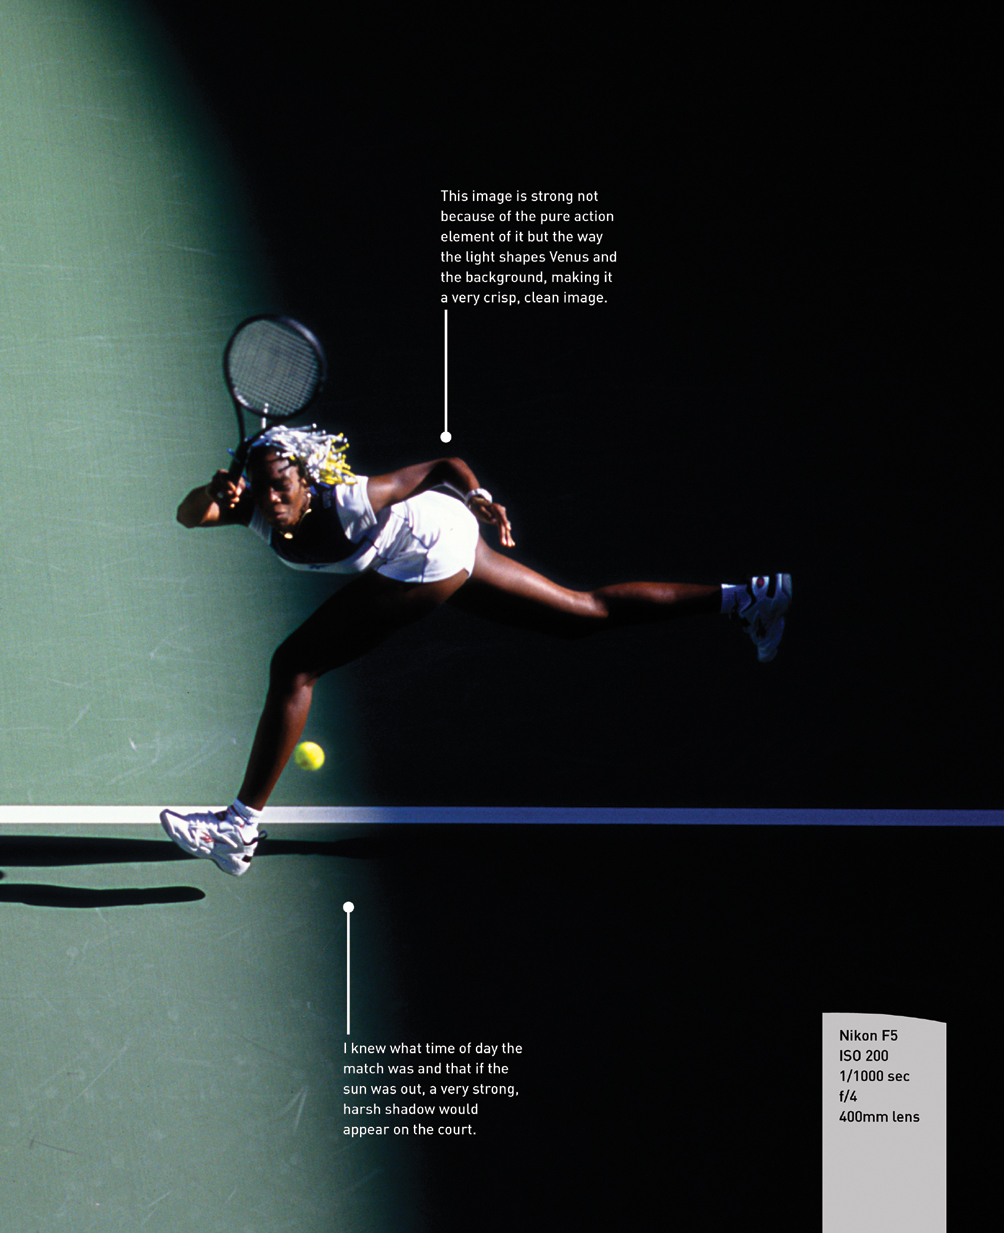
Poring Over the Picture
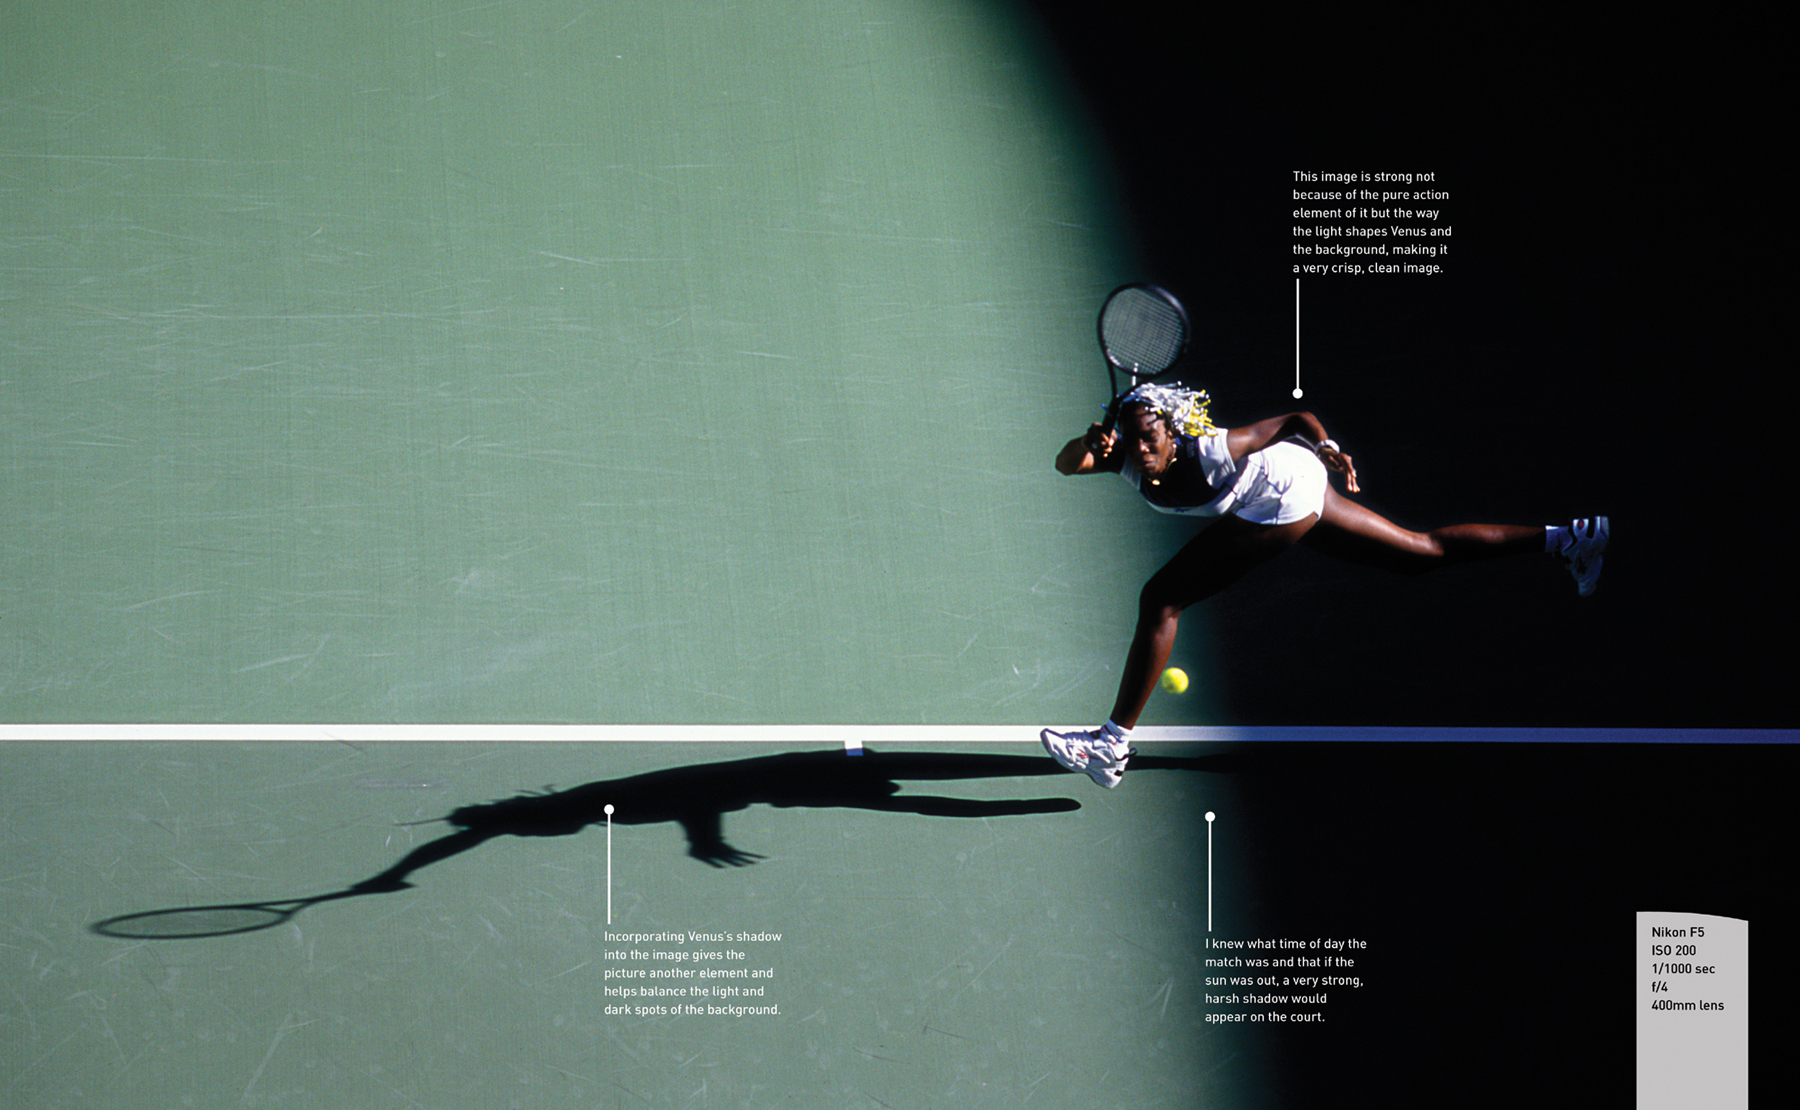
At the Australian Open, I decided to climb to the roof to shoot Venus Williams from an elevated position to capture a different kind of image. The angle combined with the strong directional light allowed me to make a very graphic action photograph that was powerful, yet simple. From the ground, the light would be entirely different, cutting her body in half, and the shadow would be barely visible.
The shadow is a key element in the composition, suggesting motion and depth. She is running out of the dark into the light with the light coming from above and behind her. I exposed for her and let everything else fall into place.
Ambient Light
Ambient light can be sunlight, or it can be artificial light that is provided at a stadium or arena. It is simply light you can’t control that but you have to learn to use.
Tip
Quality, not quantity, is the most important consideration when working with light. When evaluating light, be sure to prioritize direction, color, and texture over the amount if you want your images to be beautiful.
Daylight
You must learn to use the light that is present at game time. It is what it is. The key consideration to remember is that there is no one correct exposure. You have to look at the situation, decide what part of the subject matter is most important to you, and then expose to amplify that part of the image. You can also help yourself massively by paying attention to where the light is coming from and positioning yourself to take advantage of it.
Often, the light is constantly changing. Therefore, you should monitor the exposure settings each time before you shoot and make sure that you have the camera set to do what you want it to do. You should drive the equipment instead of letting the equipment drive you.
The Golden Hour
Ideally, the best time to make dramatically lit images is the hour before sunset. This lighting is often referred to as “liquid light.” Its qualities are rich, full, golden, and very directional. It’s perfect for making front and backlit images, and it normally changes quickly (Figure 4.1).
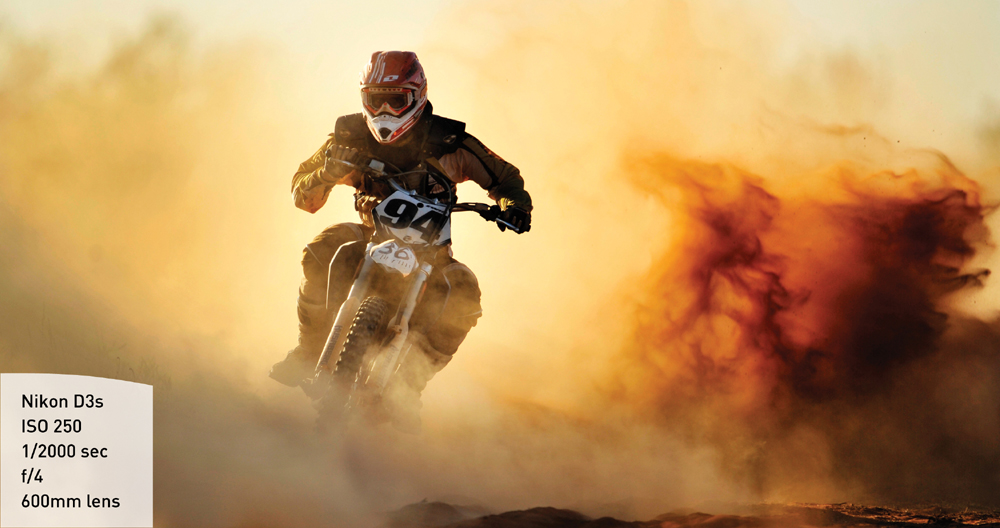
Figure 4.1 This motorcycle race was shot in the Australian Outback at sunset. I sat facing west so the backlight would amplify the dust being kicked up by the motorcycles.
Tip
When you’re shooting backlit, be sure to calculate the exposure of the subject’s face first. Otherwise, you’ll end up with a significantly underexposed image.
Midday Harshness
Working from an elevated position or getting very low is often the best way to deal with ugly light. Sports equipment the athletes wear—uniforms, hats, or helmets—is particularly difficult to expose for during the middle of the day (Figure 4.2).
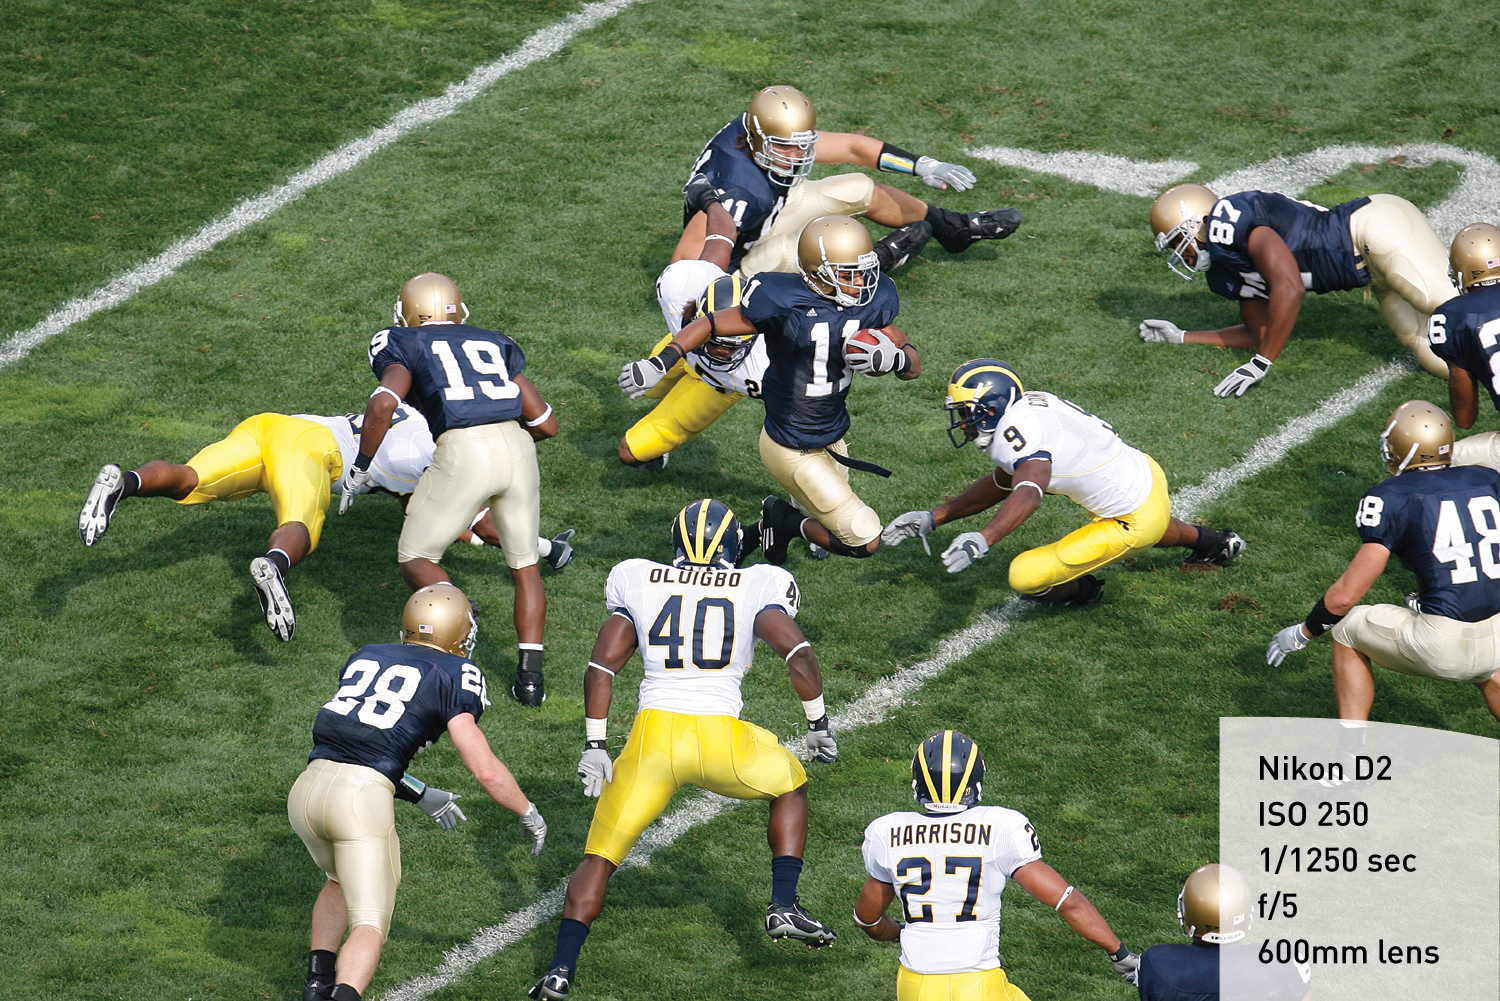
Figure 4.2 Notre Dame vs. Michigan was a noon game in Ann Arbor, Michigan. Football is very difficult to shoot in midday light, so I decided to shoot from an elevated position and take advantage of shadows and patterns.
Overcast Deception
There is a common misconception that you need bright sunlight to make photographs. The truth is actually quite the opposite. Flat, soft light has the potential to be simply lovely and is by far the easiest light to work with. Overcast light is wonderful when you’re shooting action sports. The tonal range is condensed, and you can expose in a way to capture highlights and shadows well. This is especially important for sports where faces are obscured by helmets, and where hats can cause dark shadows on foreheads and eyes.
I love shooting horse racing in overcast weather (Figure 4.3). When the sun is shining, it is very difficult to expose for the skin tone of the riders, which can mix with the generally dark coats of the horses and the light tan mud.
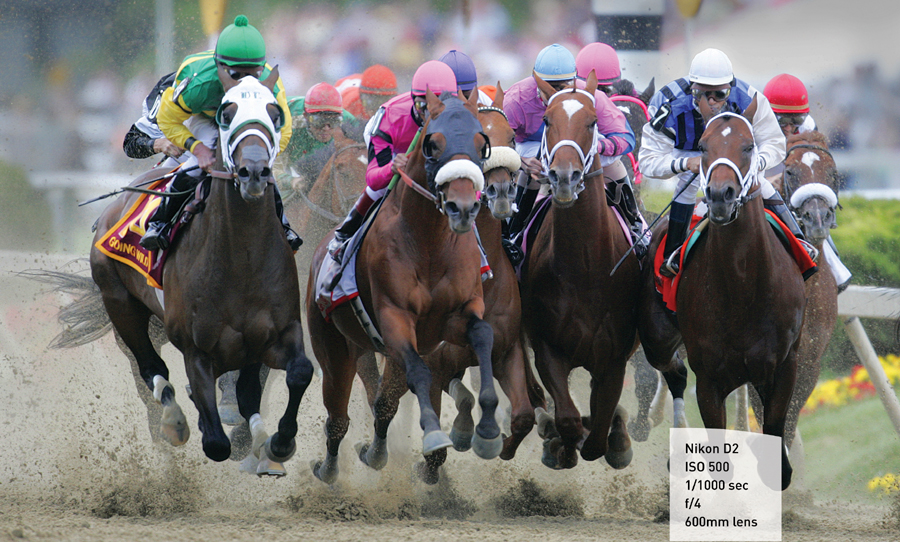
Figure 4.3 Overcast weather casts a nice, even light across the whole field, making the image easier to read.
Tip
In overcast situations, you have to be sure that the camera’s color balance is correct and isn’t recording too much blue. The clouds filter the light, and the result is often a blue cast if the camera’s color temperature is not set to cloudy.
Artificial Light
Artificial light is usually the ugliest light possible and is frequently the light you will have to deal with. When you’re working under these lights, you will have limited options. To stop action, you’ll need to use the fastest lens you have and work with the highest ISO settings your camera will produce acceptable images with.
Color temperature will be important. Auto normally works fine, but if you can identify the color temperature of the light, set your camera accordingly.
Pay attention to the direction of the lights, and make sure that you note any places on the playing surface where it is brighter or darker. The light might appear to be roughly consistent, but patches of dark and light can make a big exposure difference, as can the angle the light is coming from. For example, the exposure from an elevated position and the exposure at the field of play will be very different. In basketball, the higher you go the brighter it will be, because basketball courts reflect light.
Basketball is one of the many sports that takes place indoors (Figure 4.4). The good thing about shooting inside is that the light never changes. The bad news is that you have no control over what that light is.
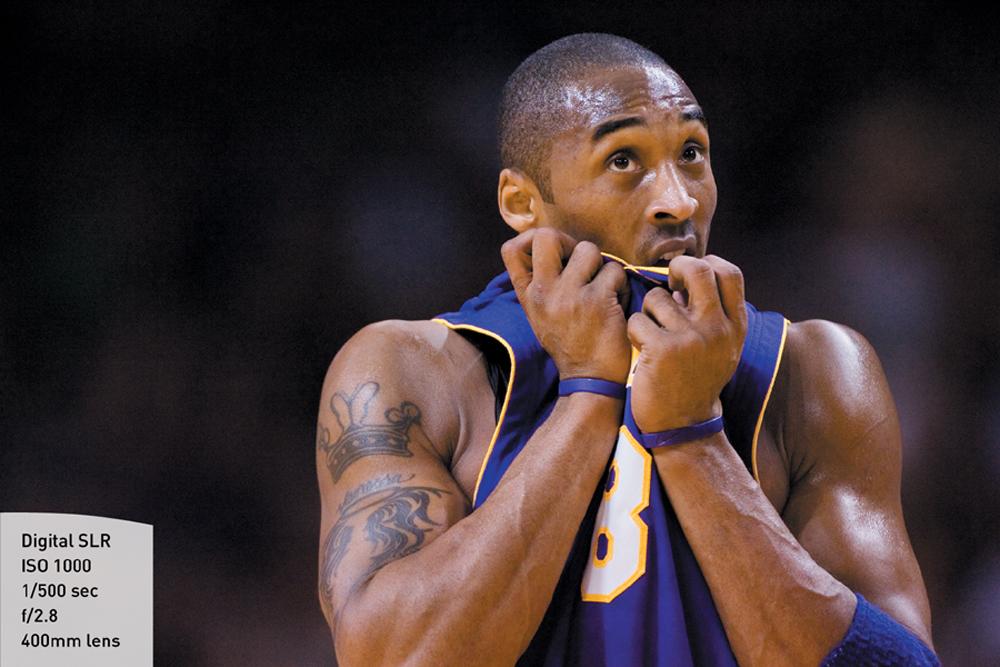
Figure 4.4 Kobe Bryant wipes his face during a game in 2005. To make this image, I got as low to the floor as I could and shot up to reduce the effect of the ambient light by putting him against the black ceiling.
Strobes
Strobes provide that necessary flash of light when you need it most. One of my favorite ways to use strobes is in combination with natural—or ambient—light. Without a strobe, the subject in Figure 4.5 would have been in silhouette. But by introducing light, I was able to draw him out of the background while still including it.
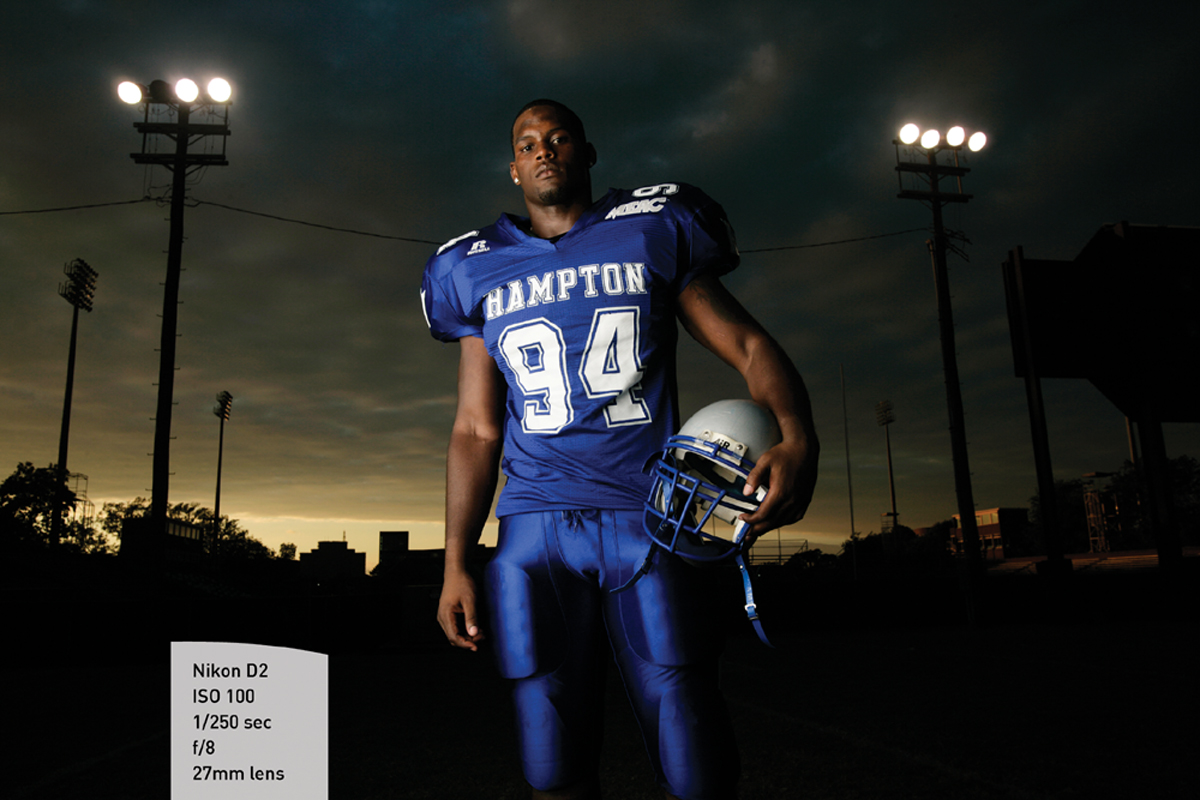
Figure 4.5 Placing the sunset in the background gives viewers more information and adds an interesting element to the photo.
Tip
When you’re shooting backlit, you can fashion a longer lens hood from cardboard, attaching it to your normal lens hood with gaffer tape or strong rubber bands. This will help eliminate lens flare.
On-Camera Flash
On-camera flashes are small, less powerful lights that normally fit in the hot shoe of your camera. They are lightweight and usually work automatically with the camera, allowing the sensors in the camera and the flash to communicate with each other and provide an acceptable amount of light for normal situations.
These flashes put out a small amount of light, which means they cannot sufficiently illuminate a very large area. They have a short flash duration, which means the burst of light is short and therefore has greater stopping power (Figure 4.6).
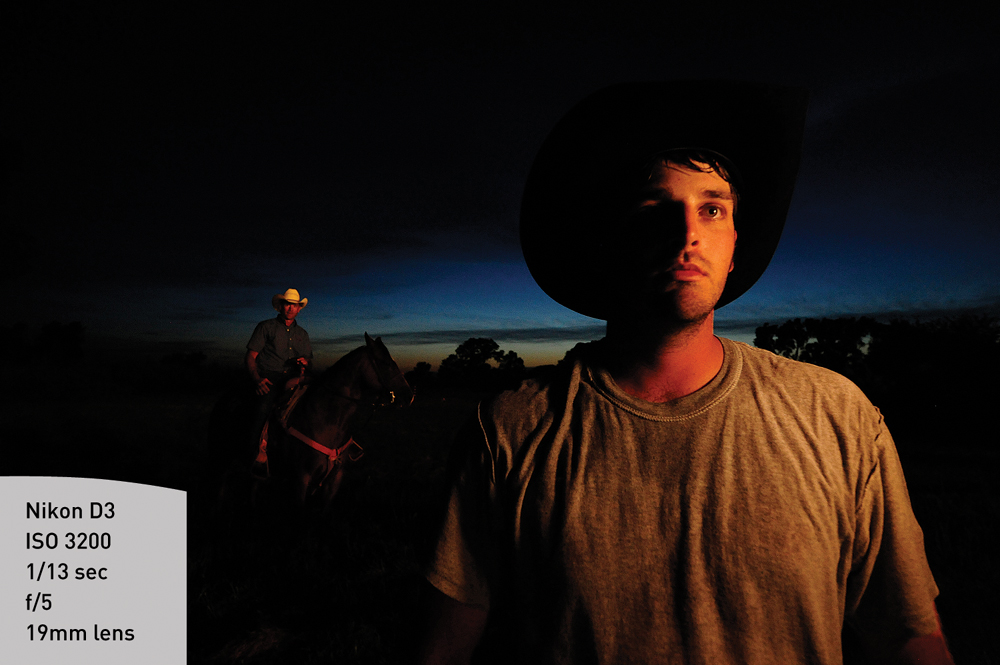
Figure 4.6 Using the Nikon SB-900 and a slow shutter speed, I was able to illuminate both cowboys and maintain the dusk light in the background.
Big Strobes
Big strobes provide significantly more light. They are large, require more power, and normally have slow flash durations. They are not automatic, so they do not communicate with cameras directly.
The advantage of using a big strobe is the size of the area that it can light. Use big powerful strobes that you can place a good distance from the playing surface at angles that will not disturb the competition, or use the artificial light that is in place. Small strobes are not powerful enough to get the job done and will likely not be allowed for security reasons.
If you can’t get access to big strobes, you’ll have to use the ambient light that already exists. It’s your only other option.
Strobes for Portraits
The size of a strobe unit doesn’t matter nearly as much for portraits. The key to good portraiture is controlling the light by shaping it, modifying it, and making it provide the tone and style you want.
I made the portrait of Danny Woodhead in Figure 4.7 after he broke the NCAA all-time rushing record at Chadron State University in Chadron, Nebraska. For the portrait, I wanted to show the small environment he was in, even though he was one of the best college football players ever.
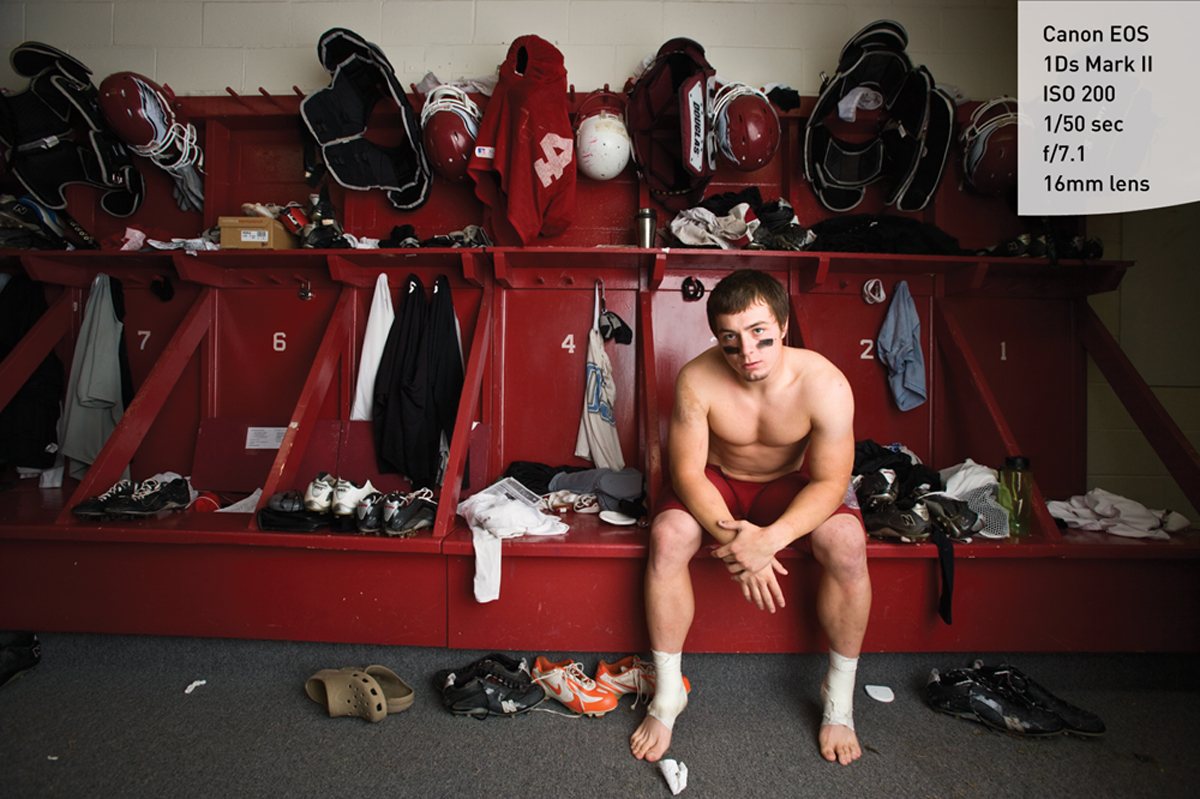
Figure 4.7 I used a large strobe—an Elinchrome 1200 watt/second strobe with a Chimera octabox—to illuminate the whole locker room around Danny.
Chapter 4 Assignments
Noticing a change in light is a learned skill. Over the course of my career, I have come to think in terms of exposure—quality first and then quantity. When I walk outside and see gorgeous light, I want to find something to photograph; it’s always my initial reaction and it’s a labor of love. Usually, the light becomes such an important part of the content that I can photograph almost anything and be happy.
When I have to make a photo because the assignment or situation calls for that, I take a different approach. I analyze the situation and decide how to use the light to enhance the content I have to use.
The following exercises will help you think in terms of exposure, making the transition from observer to photographer more seamless. Remember that there is no right or wrong exposure, just the exposure you want to make.
Shooting at Different Times of Day
Find an object—a silver garbage can or mailbox, for example. Put it in a location where it won’t be disturbed or be in anyone’s way. Photograph it using the same lens from the same angle at noon, at 3:00 p.m., and 30 minutes before sunset. Compare the shadows, the tones, and the textures created by the light. Notice how the light changes the mood of the photograph.
Shooting at Different Angles
Go to a high school football or baseball field. Shoot a person standing 15 yards from the sideline. Then climb to the top of the stands and shoot the same person from as high an angle as you can. Compare the shadows, the tones, and the textures created by the light. Decide how you can use the angle to your benefit to take advantage of different lighting conditions.
Changing Your Perspective
Find a football game. Shoot half of the game from the end zones and half of the game from the sidelines. Notice how changing your position on the field gives you not only an altered perspective, but also significantly different opportunities to make photographs. Take note of what you capture where and when.
Share your results with the book’s Flickr group!
Join the group here: flickr.com/groups/sportsphotographyfromsnapshotstogreatshots.