
Chapter 2. Introducing Visual Basic
It was a dark and stormy night. Hector gazed wearily through his bloodshot eyes, through the black-rimmed corrective lenses, and through the haze of the fluorescent overhead lights at the phosphor-enriched display. Had it really been four months since he started the six-month project? Did his boss really threaten to fire him after seeing his progress? It seemed like all of those MS-DOS programs he had written for the company over the years meant nothing. Why did he promise to port the company’s main internal system to Windows? In a moment of despair, tears streamed down his cheeks, diluting his last remaining can of Jolt Cola.
8:00 a.m. A loud thump on Hector’s desk brings him suddenly out of his slumber, the drool still trickling out of the corner of his mouth. What’s that? What’s that box on his desk? “V-i-s-u-a-l B-a-s-i-c?” A note on the box says to rewrite his code in “this.” Desperate to try anything, Hector installs the three floppy disks on his 386 powerhouse.
Six weeks later, Hector has completed the project, ahead of schedule, feature-complete, and with the accolades of his boss and department. And it’s all due to Visual Basic. But VB didn’t just improve his programming life. Overall, he’s happier, has kicked the caffeine habit, is able to bench press 300 pounds, no longer walks with a limp, has increased libido, and has whiter teeth. “Thank you, Visual Basic 1.0!”
The History of the Visual Basic Revolution
It’s possible that I got a few of the details wrong in Hector’s life. But for many business developers, Visual Basic 1.0 was a breath of fresh air. It’s not that they could do more with Visual Basic; programs written in C were more powerful and had greater flexibility. But business programmers didn’t always need that flexibility back in the transition from MS-DOS. They just wanted to manage data, and they didn’t want to worry about how to present every little pixel on the screen. Visual Basic provided the tools to write applications quickly and with much less effort than that required by other Windows development tools and languages.
Visual Basic’s simplicity was embraced by developers everywhere, but the honeymoon quickly wore off. Given the speed at which programs of reasonable quality could be cranked out with Visual Basic, programmers and businesses began demanding more. And Microsoft provided. Visual Basic 2.0 and 3.0 were released in quick succession in 1992 and 1993, each providing enhanced database integration and additional visual development features. Version 4.0, released in 1996, introduced 32-bit programming to the language, and support for the already-popular Windows 95 platform. Two more quick releases—Visual Basic 5.0 in 1997 and Visual Basic 6.0 in 1998—added even more features and complexity to the otherwise “basic” language, features supporting some but not all object-oriented programming (OOP) techniques, ActiveX control development, and web-based logic coding. Microsoft had even integrated the core Visual Basic engine—christened Visual Basic for Applications, or VBA—into its suite of Office products, proclaiming it as the new official macro language, and making the engine available to any third party that wanted to do the same.
Seven years after its initial introduction, Visual Basic had taken the programming world by storm. Millions of developers were using the language, including in-house developers at Fortune 500 companies, writing applications that supported core business functions. VB still retained some of the flavor of the original BASIC language—a “beginner’s” programming language developed by John Kemeny and Thomas Kurtz at Dartmouth College back in 1963. This caused no end of snickering from C and C++ developers and other cola addicts. But VB programmers could see a powerful future for their language of choice.
Then the unthinkable happened. Microsoft announced that it would no longer enhance the core Visual Basic engine. Instead, it would rewrite and re-implement Visual Basic using its soon-to-be-released .NET development platform. Yes, Visual Basic would be endowed with all the power promised for Microsoft’s new C- and Java-like language, C#. But for many hard-core VB developers, it was wrong, just wrong. Words were exchanged. Petitions were crafted. Letters to the editor sounded the call to the Visual Basic faithful, urging them to never write a single line of Visual Basic .NET code, ever. In frustration, a Visual Basic user’s group set fire to the entire Microsoft campus in Redmond.
Well, that didn’t happen. In fact, nothing bad happened at all. Visual Basic .NET turned out to be a software wunderkind, providing power and features that far surpassed anything available in Visual Basic 6.0. Its initial release in 2002 was proof of that. Visual Basic .NET 2002 was powerful, but it was also a little hard to use, at least compared with version 6.0, and especially when compared with the original 1.0 product. Visual Basic .NET 2003, released just a year later (obviously), was a relatively minor update with not much in the way of new or easier functionality.
Visual Basic 2005, the latest VB offering from Microsoft, marks a return to the simpler days of Visual Basic development, days of harmony and peace between “newbies” and their general-purpose programming language. Not only has Microsoft removed the term “.NET” from the product name, it has removed some of the barriers that kept entry-level programmers from approaching the language. Pre-.NET features, such as Edit and Continue and the display of forms through the simple use of the form’s name, have once again found their way into the language and into the hearts of software engineers. Visual Basic still retains all of the power it gained with .NET, but with true improvements in usability. It’s like when they add a label to your toothpaste that says, “New package, same great regular flavor!” except that Visual Basic’s flavor is improved, too. Visual Basic is once again accessible to first-time developers.
Since the 2005 release, Microsoft hasn’t just been sitting on their laurels, as painful as that would be. They are hard at work on the next release of Visual Basic, code-named “Orcas,” with its support for the .NET Framework 3.0 (formerly named WinFX) and Windows Vista. That release will also introduce new language syntax to support LINQ (Language Integrated Query), the ability to use SQL-like syntax to manipulate in-memory collections of objects.
Visual Basic from the Inside Out
As a general-purpose development language, Visual Basic includes gobs of features that allow you to develop just about any type of application supported by Microsoft Windows platform. As such, all of its features could never be covered in a concise, 20- or 30-page chapter, and I won’t try. What I will do in this chapter is introduce you to the basics of the language, and its core features.1 Features not covered in this chapter are discussed throughout the rest of the book. It has to be that way, because I don’t want you to finish this chapter, and then say to yourself, “That Tim Patrick is so amazing. I learned all I needed to know about Visual Basic in one chapter; I didn’t even have to read the rest of the book.” My publisher would not be amused.
In the remainder of this chapter, I will take the “from the inside out” approach, starting the discussion with the core concepts of logic and data, and adding layer after layer of Visual Basic functionality as you turn the pages.
The Basics of Logic and Data
Lest you forget it, let me remind you again: Computers are not really very smart. They only know how to do the simplest of tasks. If you want them to do anything remotely complex, you have to give precise, step-by-step instructions down to moving individual bits of data—only 1s and 0s, remember—around in memory. Fortunately, most of the code you would ever need at that low level has already been written for you, and incorporated into the Windows operating system and the .NET Framework. Microsoft- and third-party-supplied code libraries give you a lot of pre-written functionality that’s available for use in your own programs. And that’s good, because you would rather be hurtled into space on a giant bungee cord than have to write business applications at the machine code level all day long.
Even though you have all of this great pre-written code in your arsenal, you still have to tell the computer precisely what you want it to do, in fine detail, or it won’t do it. And that’s where high-level languages like Visual Basic come in. They provide the grammar you need to communicate with the computer. For any given tasks that the computer needs to perform, your job as a programmer is to determine the individual steps to accomplish that task—the logic—and translate those steps into computer-ese using the programming language.
As an example, let’s say you receive a request from the sales department for a program that will reverse all of the letters in any chunk of text provided to the program. “Our customers are clamoring for this; we need it by Tuesday,” they say. Okay, so first you figure out the logic, and then you implement it in Visual Basic. Using pseudo-code, an artificial programming language that you make up yourself to help you write programs, you can sketch out the basics of this task (with leading line numbers).
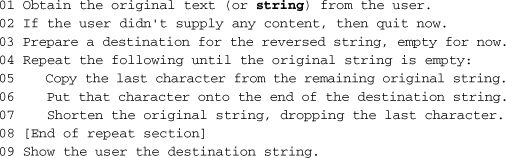
There are many ways that this logic could be written; this is just one example. This pseudo-code can now be converted into your language of choice; in this case, Visual Basic (don’t worry about the syntax details for now).

This source code is now ready to be used in a Visual Basic program. And it also demonstrates several essential aspects of coding.
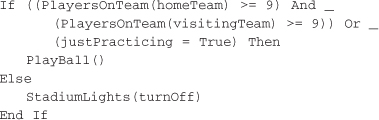
- The individual steps of the step-by-step instructions are called statements. In Visual Basic, each statement appears on a line by itself. Long statements can be broken into multiple lines by connecting the lines with a space-underscore pair, as shown in line 07 of the code. When a single statement is spread across multiple lines in this manner, the entire statement is sometimes called a logical line. Because a single logical line often includes only a single primary Visual Basic action (such as the If or Do actions, or the various assignment actions using the = sign), these actions are also referred to as statements.
- The statements of the code are processed one at a time, from top to bottom. However, certain statements alter the normal top-to-bottom flow of the program, as is done with the Do While . . . Loop block on lines 04 and 08 of the sample code. Such statements are called flow control statements, and include loops (repeating a block of code), conditions (optionally processing a block of code based on a comparison or calculated result), and jumps (moving immediately to some other section of the code).
- Data can be stored in variables, which are named containers for data values. The sample code block includes three variables: originalText, oneCharacter, and finalText, all of which store text (string) data. The .NET Common Type System allows you to create variables for four primary types of basic data values: text (both single characters and longer strings), numbers (both integer and decimal values), dates (and times), and Booleans (true or false values). You can also build more complex types of data by grouping the basic types.
- Data is stored in a variable through an assignment. Generally, this involves placing a variable name on the left side of an “=” assignment operator, and putting the data or calculation to store in that variable on the right side of that same equals sign. The statement finalText = ”” on line 03 stores an empty string (””) in the variable finalText.
- Statements can include function calls, blocks of pre-written functionality, all squished down into a single name. Function calls do a bunch of work, and then return a final result, a data value. Function names are always followed by a set of parentheses, which may include zero or more arguments, additional data values supplied by the calling code that the function uses to generate its result.
The sample code includes many examples of function calls, including the Right function on line 05. This function returns a copy of the right-most characters from another string. It accepts two parameters: the original string from which to extract the right-most characters, and an integer value indicating the number of characters to return. The code Right(originalText, 1) returns a copy of the right-most single (1) character from originalText.
When using a function in your source code, it acts a little like a variable; all the text of the function call, from the start of its name to the end of its closing parenthesis, could be replaced by a variable that contained the same resulting data. Function calls cannot appear on the left-hand side of an assignment statement, but they can appear almost anywhere else that a variable can appear. For example, the following two lines could be used to replace line 02 in the sample.

- In addition to functions, Visual Basic also includes procedures. Procedures bundle up pre-written code in a named package, just like functions, but they don’t return a value. They must be used as stand-alone statements; you cannot use them where you would use a variable or a function call. The call to MsgBox on line 09 is a typical example of a procedure call in use.
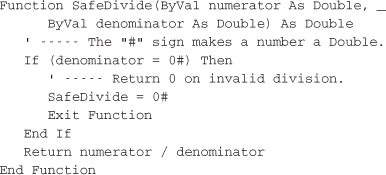
This sample code listed previously could be made a little more efficient. In fact, it’s entirely possible that Microsoft obtained an early draft of this book, because they included a string-reversal feature right in Visual Basic, and called it StrReverse.

That’s right, Visual Basic already includes a string reverse feature, some of that pre-written library code I keep taking about. Visual Basic includes many such intrinsic functions that are considered part of the language, and that bundle up useful pre-written functionality. Many of these functions appear in the Microsoft.VisualBasic namespace, which is automatically made available to your Visual Basic source code when you create a new VB project.
Data Types and Variables
Take my data . . . please! Ha, ha, that one always cracks me up. But it’s actually what I ask my Visual Basic application to do: take data from some source (keyboard, hard disk, Internet, etc.) and present it in some useful way. All programs I write will actively manage at least some data in memory. Each data value is stored in a specific area of the computer’s memory, as determined by the Common Language Runtime (CLR). The statements in Visual Basic exist primarily to manage and manipulate this data in useful and complex ways.
All data managed by the CLR is stored in the computer’s memory, with each data value separated and protected from all others. It’s as if each data value had its own individual teacup, as in Figure 2-1.
Figure 2-1. All types of teacups and data

All data values managed by the CLR have content and type. Content is the actual data: the text string “abc,” the number 5, a sales invoice, orange pekoe. Whatever you put in the teacup, that’s the content. In some cases, .NET allows you to store absolutely nothing in the teacup (only for “reference” types).
Type indicates the kind of content stored in the teacup. In Figure 2-1, this is shown by the shape of each teacup. Each teacup has limits on the type of data that can be poured into the teacup: a text string, an integer number, a customer invoice.
Literals
Some basic data values, such as numbers and text strings, can be entered into your source code and used just as they are. For instance, the MsgBox procedure displays a window with a supplied text message. The statement:
MsgBox("The answer is " & 42)
includes a literal string, “The answer is,” and a literal integer value, 42. (The “&” symbol is an operator that connects two values into a new string.) Literals are used once, and then they’re gone. If I wanted to show the same “The answer is 42” message again, I would have to once again type the same literal values into a different part of the source code.
There are several types of basic literals supported by Visual Basic. String literals are always surrounded by quote marks. If you want to include a quote mark itself in the middle of a string, include two instead of one:
"This is ""literally"" an example."
String literals can be really, really long, up to about two billion characters in length; if you were to type just one character per second, it would take over 63 years to reach the maximum string length. Visual Basic also includes a character literal that is exactly one character in length; if you were to type just one character per second, well, never mind. These character literals are recognized by the “c” trailing after the string. The character literal “A” is entered as:
"A"c
Date and time literals are surrounded by number signs instead of quote marks. The date or time (or both) that you include can be in any format recognized by Microsoft Windows in your specific region. If you are using Visual Studio, it will reformat your date when you type in the literal.
#7/4/1776#
There are 11 different kinds of numeric data values—both integers and floating point values—that make up the “core” set of numeric teacups. And who needs more than 11? With these 11 teacups, you can manage numbers from zero all the way to 1x10300 and beyond. To use a numeric literal, type the number right in your code, like 27, or 3.1415926535. Visual Basic also lets you specify which of the 11 numeric teacups to use for a number, by appending a special character to the end of the number. Normally, 27 is an integer. To make it a currency-focused “decimal,” append an @ sign:
27@
When I talk about data types in full detail in Chapter 6, “Data and Data Types,” I will list the different special characters, like @, that set the data type for literal numbers.
The fourth and final type of Visual Basic literal is the Boolean literal. Boolean values represent the simplest type of computer data: the bit. Boolean values are either true or false, on or off, yes or no, delicious or disgusting, cats or dogs, zero or non-zero. Booleans always represent any two opposite values or states. George Boole invented Boolean Algebra, a language he used to represent logic statements as mathematical equations. It just so happens that computers love Boolean Algebra. All of the basic operations of a computer, such as addition, are implemented using Boolean functionality.
Visual Basic includes the Boolean literals True and False. No quotes. No number signs. Just the words True or False. Question: Is Tim Patrick telling the truth about this? Answer:
True
In certain cases, you can treat numbers as Boolean values. I’ll talk about it more later, but for now just know that False equates to zero (0), and True equates to everything else (although generally, –1 is used for “everything else”).
Variables
Literal data values are all well and good, but they are useful only once, and then they’re gone. Each time you want to use a literal value, you must retype it. It’s as if the data values are stored in disposable cups instead of fine china teacups. And besides, only programmers enter literal values, not users, so they are of limited use in managing user data.
Variables are not simply disposable cups; they are reusable. You can keep putting the same type of tea over and over into the teacup. A string variable teacup can hold a string for reuse over and over. For instance, in this block of code, response holds the various strings assigned to it.
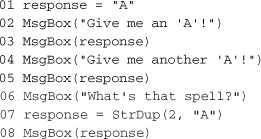
The variable response is loaded twice with two different strings: an “A” and then “AA.” It keeps whatever value was last assigned to it; both lines 03 and 05 display “A” in a message box window. And you don’t just have to assign literal strings to it; anything that generates a string can assign its result to response. Line 07 uses a built-in Visual Basic function, StrDup, to return the two-character string “AA” and assign it to response.
Using variables is a two-step process. First you must declare the variable, and then you assign a value to it. The Dim statement takes care of the declaration part; it lets you indicate both the name and the type of a variable. Its basic syntax is pretty straightforward:
Dim response As String
where response is the name of the variable, and String is its type. Assignment occurs using the “=” assignment operator:
response = "The answer"
A single variable can have new values assigned to it over and over again. For those times when you want your variable to have some specific value immediately upon declaration, you can combine declaration and assignment into a single statement:
Dim response As String = "The answer"
Of course, you’re not just limited to a single declaration; you can create as many variables as you need in your code. Each one normally uses its own Dim statement:
Dim question As String
Dim answer As String
These can also be combined into a single statement, although I think it’s just plain ugly:
Dim question As String, answer As String
See, I told you it was ugly. This is just the start of what’s possible with the Dim statement. I’ll get into more details as the chapter progresses.
Value Types and Reference Types
I talked about value types and reference types in Chapter 1, “Introducing .NET.” Value type variables store an actual value; the tea in a value type teacup is the content itself. All of the literal data values I mentioned previously, except for Strings, are value types.
Reference type variables store a “reference” to the actual data, data found somewhere else in memory. When you look into a reference type teacup, you have to read the tea leaves at the bottom to determine where the real data resides.
Reference types either have data or they don’t. In the absence of data, a reference type has a value of Nothing, a Visual Basic keyword that indicates no data. Value types are never Nothing; they always contain some value, possibly the default value for that type (such as zero for numeric types).
Data Types
The String data type is useful, but it’s only one of the teacup shapes at your disposal. The .NET Framework defines several core data types. Each data type is implemented as a specific class within the System namespace. The most basic data type, a large teacup that can hold any type of data, is called Object. More than just an object, this is object with a capital O. In the .NET Class Library namespace hierarchy, it’s located at System.Object. It’s the mother of all classes in .NET; all other classes, structures, enumerations, delegates, and other types, no matter where they reside in the namespace, whether they are written by Microsoft or by you, all derive from System.Object. There’s no getting around it; you cannot create a class that ultimately derives from anything else.
So, back to these “core” data types I’ve been hinting at. They match the four types of literal data values I listed before: strings, dates, numbers, and Boolean values. Table 2-1 lists these core data types. Each of these types also has a Visual Basic-specific name that you can (and should) use instead.
Table 2-1. Core .NET and Visual Basic Data Types
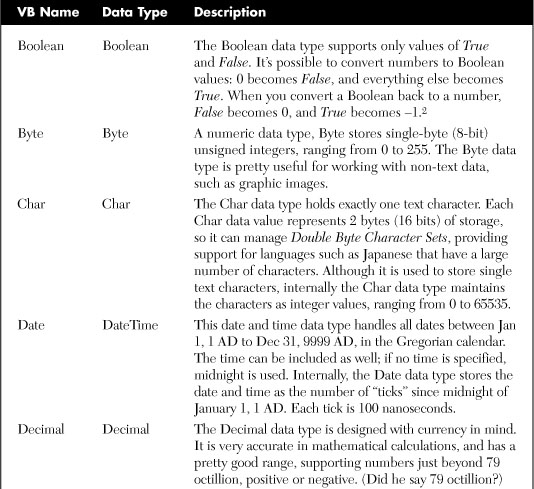
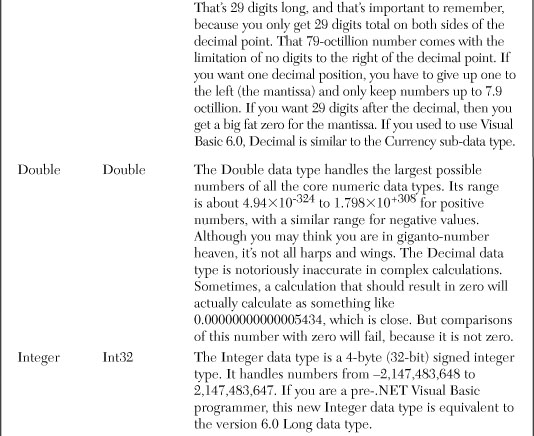
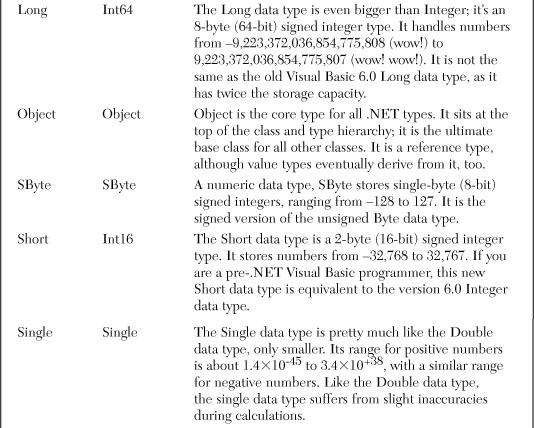
The Microsoft developers in charge of Visual Basic data types lucked out on that job because all core Visual Basic data types are simply wrappers for specific data types implemented by .NET. The Visual Basic names given for each of these core data types are fully interchangeable with the .NET names. For example, Integer is fully equivalent to System.Int32. In fact, when writing Visual Basic code, it is better to use the Visual Basic synonyms, because most Visual Basic developers expect these data type names in the code they read and write.
Except for Object and String, all of these data types are value types. All value types are derived from System.ValueType (which in turn derives from System.Object).
The SByte, UInteger, ULong, and UShort data types were added to Visual Basic with its 2005 release, although their System namespace equivalents have been in .NET since its inception. Unlike the other core data types, these four types are not “CLS-compliant”; that is, they cannot be used to interact with .NET components and languages that limit themselves to just the very core required features of .NET. Generally this is not much of a limitation, but be on your guard when working with third-party components or languages.
Advanced Declaration
When I mentioned the need for declaration and assignment of variables, I was really focusing on value types. Reference types require one additional step: instantiation. Consider the following declaration statements:
![]()
These lines declare three separate variables: two value types (the Integers) and one reference type (the Object). Although only one variable has an explicit data assignment, all three have actually been assigned something, either explicitly or implicitly. Let’s look at those statements again and see what is truly being assigned to each variable.
![]()
Both declaration and assignment already occurred for all of the variables, just by using the Dim statement. The defaultValue variable, with its default assignment of zero, can be used immediately in equations. However, the reference type variable defaultReference is just an empty teacup, with no default data to manipulate. There are features in Visual Basic that let you compare a reference type with Nothing, and you could do this immediately, but it’s not really data. And remember, variables live to manage data.
Reference data values need instantiation, and instantiation needs the New keyword.
Dim defaultReference As Object = New Object
Now defaultReference points to a real object; now the defaultReference teacup has something consumable inside of it, but because it is just System.Object, it doesn’t have much in the way of flavor. Strings are a little more interesting, and they also have more interesting constructors.
As you may recall from way back in Chapter 1, a constructor is a block of initialization code that runs when you create a new data value or object. Some objects allow you to supply extra information to a constructor, additional information that is used in the initialization process. A default constructor doesn’t allow you to supply any extra information; it just works on its own, initializing data like it was nobody’s business. There is no limit on the number of constructors in a class, but each one must vary in the type of extra information passed to it.
So back to Strings. You would expect the default String constructor to create a blank, zero-length string:
Dim worldsMostBoringString As String = New String
But the String class doesn’t have a default constructor. Instead, you initialize the string with a literal:
Dim worldsMostBoringString As String = ""
That’s because Strings are treated specially by Visual Basic. String literals are actually instantiations of String data values; it’s as if you created a new String instance using the System.String class. But String also has more interesting constructors. (I’ll delve into the details of constructors in Chapters 6 and 8, “Classes and Inheritance.”) One of the constructors creates a new String instance initialized with a specific character repeated a number of times. For instance, to create a String instance with a 25-character string of the letter M, use the following syntax:
Dim mmGood As String = New String("M"c, 25)
If you’re going to use the same data type just after the As keyword that you use right after the New keyword, you can use a collapsed syntax.
Dim mmGood As New String("M"c, 25)
As with value types, you can also break the statement into distinct declaration and assignment statements.
Dim mmGood As String
mmGood = New String("M"c, 25)
Constants
Literals don’t change, but they can only be used once in your code. Constants are a cross between a literal and a variable; they have a single, never-changing value just like data literals, but they also have a name that can be reused over and over again, just like variables.
You declare constants using the Const keyword instead of the Dim keyword:
Const SpeedOfLight As Integer = 186000
Actual assignment of the value to the constant occurs in the statement itself, with the value following the = sign. Once your constant is declared and assigned, it’s available for use in actual statements of your actual code:
MsgBox("Lightspeed in miles/second: " & SpeedOfLight)
Local Declaration and Fields
In the real world, there is some data that you need to keep private, for your use only. Your neighbors have other juicy bits of data and information that they share among themselves. And then there is public data that isn’t hidden from anyone. But it’s not just this way in the real world; the fake world of Visual Basic has different levels of access and privacy for your data.
A little later in the chapter, we’ll see that your application’s logic code will always appear in procedures, named blocks of source code. You declare local variables (and constants) in these same procedures when you need a short-lived and personal variable that is only for use within a single procedure. Other variables (and constants) can appear outside of procedures, but still within the context of a class or similar type. These fields, whether variable or constant, are immediately available to all of the different procedures that also call the current class home.
You define all local variables using the Dim keyword. The Dim statement works for field definitions, but it’s more common to use special access modifier keywords instead. These modifiers determine what code can access the fields, from Private (only used by code inside of the class) to Public (also available outside of the class).
Private ForInClassUseOnly As Integer
There are five access modifiers in all. I’ll talk more about them, and about fields in general, in Chapters 6 and 8.
Intermission
That was a lot to take in. Getting your mind around data and variables is probably the most complex part of programming in Visual Basic. Once you have the data in variables, it’s pretty easy to manipulate.
Although the thought of a cup of tea may cause you to run out the room like a raving lunatic, you might want to take a few minutes, grab a cup, glass, saucer, or mug of your beverage of choice, and relax. I’ll see you in about 20 or 30 minutes.
Comments
If you’re an opera fan, you know how exciting a good opera can be, especially a classic work presented with the original foreign language libretto. If you’re not an opera fan, you know how irritating it can be to listen to several hours of a foreign language libretto. With the advent of “supra titles” conveying the English-language interpretation of the content, those who until now have gotten little joy out of the opera experience will still find it repulsive, only this time in their native tongue. But at least now they will know why they don’t enjoy the story.
That’s really what comments do: tell you in your own language what is actually going on in a foreign language. In this book, the foreign language is Visual Basic, and English is the vernacular. You may find a particular block of Visual Basic code to be poorly written or even detestable, but if the accompanying comments are accurate, you can be disgusted in your own language, with a human language understanding of the process.
Comments normally appear on lines by themselves, but you may also attach a comment to the end of an existing code line. If a logical line is broken into multiple physical lines using the “_” line continuation character, a trailing comment is only valid at the end of the final physical line.

Comments begin with the comment character, the standard single quote character ('). Any text following the comment character is a comment, and is ignored when your code is compiled into a usable application. Any single quote that appears within a literal string is not used as a comment marker.
MsgBox("No 'comments' in this text.")
Comments can also begin with the “REM” keyword (as in “REMark”), but most programmers use the single-quote variation instead.
Option Statements
A few code examples ago, you saw that Visual Basic would supply a default assignment to a variable—at least for value types—if you neglected to include one. In certain cases, Visual Basic will also supply the declaration if you leave it out. In the statement:
brandNewValue = 5
if there is no related Dim statement that defines brandNewValue, Visual Basic will declare the variable on your behalf, assigning it to the Object data type. Don’t let this happen to you! You don’t know what kind of trouble you will have if you allow such practices in your code. You will quickly find your code filled with mysterious logic bugs, esoteric data issues, recurrent head lice, and so on.
The problem is that Visual Basic will not complain if you mistype the name of your auto-declared variable. Left unchecked, this practice could lead to code like this:
brandNewValue = 5
MsgBox(brandNewVlaue)
My, my, my, look at that spelling mistake on the second line. What? Visual Basic compiled without any error? And now your message box displays nothing instead of 5? Such trauma could be avoided by judicious use of the Option statements included in the Visual Basic language. There are three such statements.
- Option Explicit On. This statement forces you to declare all variables using Dim (or a similar statement) before use. It’s possible to replace “On” with “Off” in the statement, but don’t do it.
- Option Strict On. Visual Basic will do some simple data conversions for you when needed. For instance, if you assign a 64-bit Long data value to a 32-bit Integer variable, Visual Basic will normally convert this data to the smaller size for you, complaining only if the data doesn’t fit. This type of conversion—a narrowing conversion—is not always safe because the source data will sometimes fail to fit in the destination. (A widening conversion, as with storing Integer data in a Long, always works, because the destination can always hold the source value.) The Option Strict On statement turns off the automatic processing of narrowing conversions. You will be forced to use explicit conversion functions to perform narrowing conversions. This is good, because it forces you to think about the type of data your variables will hold. You can replace “On” with “Off” in this statement, but if I’ve warned you once, I’ve warned you twice: Don’t even try it.
- Option Compare Binary and Option Compare Text. These two variations of the Option Compare statement instruct your code to use specific sorting rules for certain string comparison features. In general, “Binary” comparison is case-sensitive, while “Text” comparison is not. It’s up to you which method you want to use; the default is “Binary.”
These statements appear at the top of each source code file in your project, before any other code.
Option Explicit On
Option Strict On
Or, to save on precious disk space, set default values that apply to your entire project through the project’s properties. In Visual Studio, select the Project ![]() Properties menu command. On the project’s properties window that appears, select the Compile tab, and set your default choices for the Option explicit, Option strict, and Option compare fields (see Figure 2-2).
Properties menu command. On the project’s properties window that appears, select the Compile tab, and set your default choices for the Option explicit, Option strict, and Option compare fields (see Figure 2-2).
Figure 2-2. Options, options everywhere

Basic Operators
Visual Basic includes several basic operators that let you do what your code really wants to do: manipulate data. To use them, just dial zero from your phone. No, wait, those operators let you place operator-assisted calls for only $2.73 for the first minute. The Visual Basic operators let you perform mathematical, logical, bitwise, and string management functions, all at no additional cost.
The most basic operator is the assignment operator, represented by the equals sign (=). You’ve already seen this operator in use in this chapter. Use it to assign some value to a variable; whatever appears to the right of the operator gets assigned to the reference type or value type variable on the left. The statement:
fiveSquared = 25
assigns a value of 25 to the variable fiveSquared.
Most operators are binary operators—they operate on two distinct values, one to the operator’s left and one to the right; the result is a single calculated value. It’s as if the calculation is fully replaced by the calculated result. For instance, the addition operation:
seven = 3 + 4
becomes:
seven = 7
before the final application of the assignment (=) operator. A unary operator appears just to the left of its operand. For instance, the unary negation operator turns a positive number into a negative number.
negativeSeven = -7
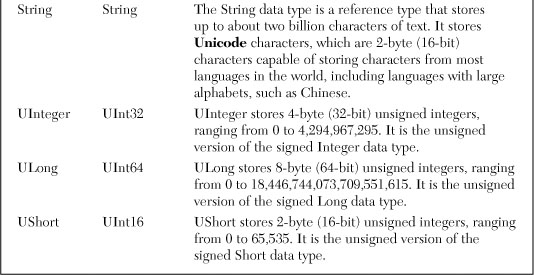
I’ll comment on each operator in detail in Chapter 6. But we’ll need a quick summary for now so we can manipulate data before we get to that chapter. Table 2-2 lists the main Visual Basic operators and briefly describes the purpose of each one.
Table 2-2. Visual Basic Operators


As powerful as operators are, even more power comes when you combine them. This works because any of the operands can be a complex expression that includes its own operands. Parentheses grouped around clauses in operands ensure that values are processed in the order you expect.
circleArea = pi * (radius ^ 2)
In this statement, the second operand of the * multiplication operator is another expression, which includes its own operator.
Using Functions and Subroutines
Years ago I worked for a software company that sometimes published software developed outside of the organization, all for a non-Windows platform. While most of these programs were written in the C language, we also published software written in Pascal, assembly language, and good ol’ BASIC. I inherited one such external application written entirely in BASIC, a program that assisted the user in 3-D modeling and graphic rendering. It was a complex program, containing about 30,000 lines of source code. The problem was that it was one large block of 30,000 source code lines. No comments, no variable names longer than a few characters, no extra-strength buffered aspirin product. Just thousands of lines of code with flow control statements jumping this way and that. And, of course, it had a bug.
I was able to move past that event in my life without too much therapy, but at the time it was a shock to see code in that condition. And it was so unnecessary, because that flavor of BASIC was a procedural language, just like C and Pascal. Procedural languages allow you to break your code into named blocks of logic, called procedures. These procedures allow the programmer to take a “divide and conquer” approach to programming; you write procedures that accomplish a specific logical portion of the code within your entire application, and then access these procedures from other procedures.
Visual Basic includes three types of procedures.
- Subroutines. These procedures, also called “sub procedures,” do a bunch of work and then return to the calling procedure. Data can be sent into the subroutine through its argument list, and some values may come back through that same list, but there is no official final result sent back from the procedure. A subroutine does its work, and once it is complete, the calling code continues on its merry way.
- Functions. Functions are just like subroutines, with one additional feature. You can return a single value or object instance from the function as its official result. Usually, the calling code takes this return value into consideration when it completes its own logic.
- Properties. When used, properties actually look like variables. You assign and retrieve values to and from properties just like you would for a variable. However, properties include hidden code, often used to validate the data being assigned to the property.
Subroutines, functions, and properties are the code members of each class or similar type. I’ll delay discussion of properties until a little later in the chapter. For now, let’s enjoy functions and subroutines, which together are also known as methods. Let’s start with subroutines. To call a subroutine, type its name as a statement, followed by a set of parentheses. Any data you need to send to the subroutine goes in the parentheses. For instance, the following subroutine call does some work, passing the ID number of a customer and a starting date:
DoSomeWork(customerID, startDate)
Each subroutine defines the data type and order of the arguments you pass. This argument list may include one or more optional arguments, which are assigned default values if you don’t include them. A subroutine might also be overloaded, defining different possible argument lists based on the number and data type of the arguments. We’ll encounter a lot of these later.
Functions are a little more interesting because they return a usable value. Often, this value is assigned to a variable.
Dim balanceDue As Boolean
balanceDue = HasOutstandingBalance(customerID)
Then you can do something with this result. If you want, you can ignore the return value of a function, and we already have. The MsgBox function used earlier returns the identity of the on-screen button clicked by the user. If you only include an OK button (the default), you probably don’t care which button the user presses.
MsgBox("Go ahead, click the OK button.")
But you can also capture the result of the button.
whichButton = MsgBox("Click Yes or No.", MsgBoxStyle.YesNo)
In this case, whichButton will either be MsgBoxResult.Yes or MsgBoxResult.No, two of the possible results defined by the MsgBox function.
Conditions
Sometimes, you just have to make some choices, and conditional expressions will help you do just that. Visual Basic includes support for conditions, which use data tests to determine which code should be processed next.
If Statements
The most common conditional statement is the If statement. It is equivalent to English questions in the form, “If such-and-such is true, then do so-and-so.” For instance, it can handle, “If you have $20, then you can buy me dinner,” but not, “If a train departs Chicago at 45 miles per hour, when will it run out of coal?”
If statements have a syntax that spans multiple source code lines.
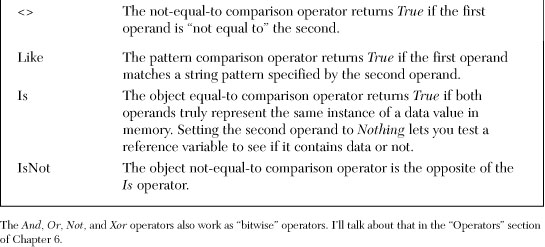
The If statement lets you define branches in your code based on conditions. It is built from three main components.
- Conditions. The expression found between the If (or ElseIf) keyword and the Then keyword is the condition. The sample includes two conditions, on lines 01 and 04. Conditions may be simple or complex, but they must already result in a Boolean True or False value. They can include calls to other functions and multiple logical and comparison operators.
The original condition always follows the If keyword. If that conditions fails, you can specify additional conditions following an ElseIf keyword, as on line 04. You may include as many ElseIf clauses as you need.
- Branches. Each condition’s Then keyword is followed by one or more Visual Basic statements that are processed if the associated condition evaluates to True. All statements up to the next ElseIf or the final End If are included in that branch’s statement block. You may include any number of statements in a branch block, including additional subordinate If statements. In the sample code, branch lines 02 and 03 are processed if the original “hadAHammer” condition is true. Line 05 is processed instead if the original condition fails, but the second “hadAShovel” condition passes. If none of the conditions are True, the Else’s branch, on line 07, executes.
- Statement keywords. The If statement is one of several multi-line statements in Visual Basic, all of which end with the keyword End followed by the original statement keyword (If in this case). The If statement’s keywords, which give the statement its structure, include If, Then, ElseIf, Else, and End If. All ElseIf and Else clauses and related branches are optional. The simplest If statement includes only an If branch.

For conditions with simple single-statement branches and no ElseIf clauses, a single-line alternative can keep your code looking clean.

If statements are cool because they make your code more than just a boring set of linear step-by-step instructions that never deviate for any reason. Software is written to support some real-world process, and real-world processes are seldom linear. The If statement makes it possible for your code to react to different data conditions, taking the appropriate branch when necessary.
Once the entire If . . . End If block completes, processing continues with the next statement that follows the End If statement.
Select Case Statements
Sometimes you might write an If statement that simply tests a variable against one possible value, then another, then another, then another, and so on.

And on it goes, through many more ElseIf clauses. It’s effective, but a little tedious, as your code must specifically test every case. The Select Case statement provides a cleaner alternative to simple value comparisons against a list.
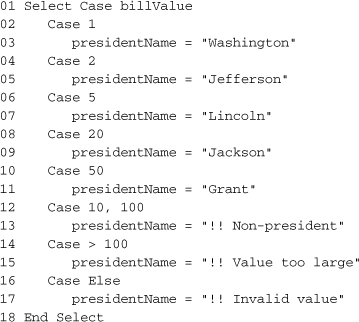
Unlike the If statement, which checks for a Boolean result, Select Case compares a single value against a set of test case values. In the example, the billValue variable is compared against the different values identified by each Case clause. All code that follows a Case clause (until the next Case clause) is the branch that is processed when a match is found. An optional Case Else condition (line 16) catches anything that is not matched by any other Case. Normally, Case clauses list single values for comparison. They can also include a list of comma-separated comparison values (line 12), or simple range comparison expressions (line 14).
IIf Function
Visual Basic includes a variation of the If statement for “in line” use. Consider the following statement.
If (gender = "F") Then fullGender = "Female" _
Else fullGender = "Male"
Using the IIf function, this statement compresses into a single assignment statement with an embedded condition.
fullGender = IIf(gender = "F", "Female", "Male")
The IIf function has three comma-delimited arguments. The first is the condition, which must result in a Boolean True or False value. The second argument is returned by the function if the condition is True; a condition result of False returns the third argument. For simple conditions that are destined to return single values to a common variable, it’s really a useful function. But with anything really useful, there are caveats. The caveat with IIf is that anything appearing inside the IIf statement will be processed, even if it is not returned as a result. Here’s a dangerous example:
purgeResult = IIf(level = 1, PurgeSet1(), PurgeSet2())
The statement will correctly return the result of either PurgeSet1() or PurgeSet2() based on the value of level. The problem, or potential problem, is that both functions, PurgeSet1() and PurgeSet2(), will be called; if level is 1, both PurgeSet1() and PurgeSet2() will be called, even though only the function result from PurgeSet1() will be returned.
Loops
Visual Basic includes three major types of loops: For . . . Next, For Each . . . Next, and Do . . . Loop. Just as conditions allow you to break up the sequential monotony of your code through branches, loops add to the usefulness of your code by letting you repeat a specific block of logic a fixed or variable number of times.
For . . . Next Loops
The most common loop structure is the For . . . Next loop. This loop uses a numeric counter that increments from a starting value to an ending value, processing the code within the loop once for each incremented value.
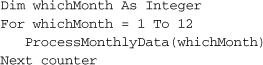
This sample loops 12 times (1 to 12), once for each month. You can specify any starting and ending values you wish; this range can also be specified using variables or functions that return numeric values. Once the starting and ending values are obtained, they are not recalculated each time through the loop, even if a function call is used to obtain one or both limits.

Normally, the loop increments by one (1) each time through. You can alter this default by attaching a Step clause to the end of the For statement line.
![]()
One additional syntax variation allows you to declare the loop counter variable within the statement itself. Such variables are available only within the loop, and cease to exist once the loop exits.
![]()
For Each . . . Next Loops
A variation of the For loop, the For Each . . . Next loop, scans through a set of ordered and related items, from the first item until the last. Arrays and collection objects also work, as does any object that supports the IEnumerable interface (all these topics are covered in Chapter 6). The syntax is quite similar to the standard For statement.
![]()
Do . . . Loop Loops
Sometimes you want to repeat a block of code as long as a certain condition is true, or only until a condition is true. The Do . . . Loop structure performs both of these tasks. The statement includes a While or Until clause that specifies the conditions for continued loop processing. For instance, the following statement does some processing for a set of dates, from a starting date to an ending date.
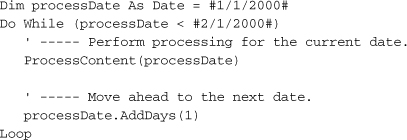
Processing in this sample will continue until the processDate variable exceeds 2/1/2000, which indicates the end of processing. The Until clause version is somewhat similar, although with a reversed condition result.
![]()
Make the included condition as simple or as complex as you need. Putting the Until or While clause at the bottom of the loop guarantees that the statements inside of the loop will always be processed at least once.
![]()
There is another loop that is similar to Do . . . Loop called the While . . . End While loop. However, it exists for backward compatibility only. Use the Do . . . Loop statement instead.
Exit Statements
Normally, when you enter a loop, you have every intention of looping for the full number of times specified by the initial conditions of the loop. For For loops, you expect to continue through the entire numeric range or collection of elements. In Do loops, you plan to keep the loop going as long as the exiting condition has not yet been met. But there may be loops that you want to exit early. You accomplish this using an Exit statement.
There are two loop-specific exit statements.
- Exit For. Exits a For . . . Next or For Each . . . Next loop immediately.
- Exit Do. Exits a Do . . . Loop statement immediately.
Each Exit statement exits the loop that contains the statement; processing continues with the line immediately following the loop.

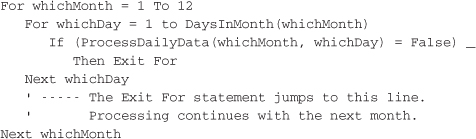
The following sample is designed to loop through all 12 months. However, a processing failure for any of the 12 months will immediately exit the loop, abandoning all remaining month processing actions. The Exit Do statement similarly exits Do . . . Loop loops immediately.
When using an Exit loop statement within nested loops (where one loop appears within another), only the matching loop that immediately contains the statement is exited.
Continue Statements
Because exiting a loop abandons all remaining passes through the loop, you may miss out on importing processing that would have happened in subsequent passes. Visual Basic includes a Continue statement that lets you abandon only the current pass through the loop.
There are different Continue statement variations for each of the loop types.
- Continue For. Immediately jumps to the end of the For . . . Next or For Each . . . Next loop and prepares for the next pass. The loop variable is incremented and compared with the range limits.
- Continue Do. Immediately jumps to the end of the Do . . . Loop statement and prepares for the next pass. The Until or While condition is reevaluated.
Because the loop conditions are reevaluated when using the Continue statements, there are times when Continue may cause the loop to exit, such as when it had been the final pass through the loop already.
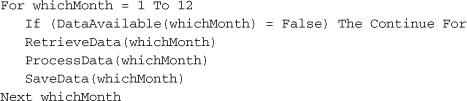
In this example, the Continue For statement skips processing for months that have no data to process.
Creating Your Own Procedures
All logic statements in your code must appear within a procedure, whether in a subroutine, a function, or a property. Although there are thousands of prewritten procedures for you to choose from in the Framework libraries, you can also add your own.
Subroutines
Subroutines begin with a Sub declaration statement and end with an End Sub statement. All of your subroutine’s logic appears in between these two mighty jaws.

Line 01 shows the subroutine’s declaration line in its simplest form; throughout the book, you will find that there are additional keywords that decorate procedure declarations to change their behavior. The statement begins with the Sub keyword (for subroutine), followed by the name of the procedure, ShowIngredients.
The parentheses following this name contain the subroutine’s parameters. Parameters allow another block of code that will use this procedure to pass data into the procedure, and optionally receive data back. You can include any number of parameters in the subroutine definition; simply separate them by commas. Each parameter specifies the name as it will be used in the procedure (gender in the sample) and its data type (Char). The arguments are treated as declared variables within the procedure, as is done with gender on lines 03 and 05.
The values supplied by the calling code are known as arguments. All arguments are passed by value or by reference. In the sample code, the argument passed into gender will be passed by value, as specified through the ByVal keyword. The related ByRef keyword indicates an argument to be passed by reference. If you don’t include either keyword, ByVal is assumed. This passing method impacts whether changes made to the argument within the local procedure are propagated back to the calling code. However, the ability to update the original data is also influenced by whether the data is a value type or a reference type. Table 2-3 indicates the behavior for each combination of passing method and data type.
Table 2-3. Updating Data, the .NET Way
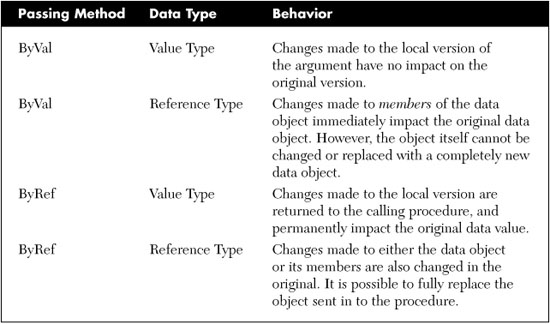
In most cases, if you are interested in modifying the value of a parameter and having the changes return to the caller, use ByRef; otherwise, use ByVal.
Lines 02 through 08 in the sample code comprise the body of the procedure, where all of your logic appears. Any variables to be used solely in the routine are also defined here, as with the theMessage variable on line 02. The subroutine always concludes with an End Sub statement.
Functions
The syntax of a function differs only slightly from subroutines, to support a return value.
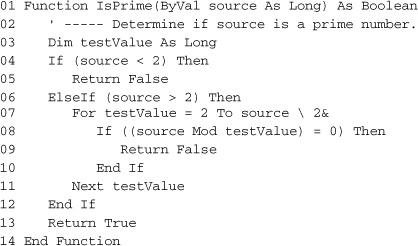
As with subroutines, the function’s declaration line appears first (line 01), followed by the body (lines 02 through 13) and the closing End Function statement (line 14). The declaration line includes an extra data type definition after the parameter list. This is the data type of the final value to be returned to the calling code. Use this return value in the calling code just like any other value or variable. For example, the following line calls the IsPrime function and stores its Boolean result in a variable.
primeResult = IsPrime(23)
To indicate the value to return, use the Return statement (described later in the chapter). The sample code does this on lines 05, 09, and 13. (An older VB 6.0 syntax that lets you assign the return value to the name of the function still works.)
Properties
A little earlier I mentioned fields, variables or constants that appear within a class, but outside of any procedure definition.
![]()
Properties are similar to fields; they are used like class-level variables or constants. But they are programmed like functions, accepting parameters, having return values, and including as much logic as you require.
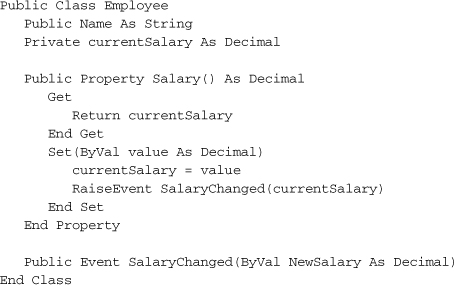
Properties are often used to protect private class data with logic that weeds out inappropriate values. The following class defines a single property that provides access to the hidden related field.
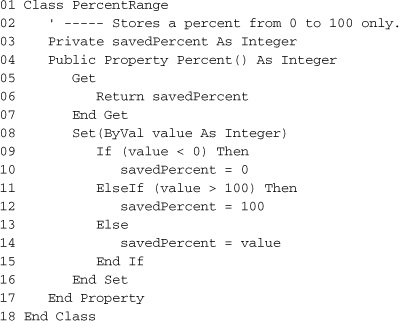
The Percent property (lines 04 to 17) protects access to the savedPercent field (line 03), correcting any caller-supplied values that exceed the 0 to 100 range. Properties include separate assignment and retrieval components, also called accessors. The Get accessor (lines 05 to 07) returns the property’s monitored value to the caller. The Set accessor (lines 08 to 16) lets the caller modify the value of the property.
The property declaration statement (line 04) includes a data type that matches the data type passed into the Set accessor (line 08). This is the data type of the value set or retrieved by the caller. To use this sample Percent property, create an instance of the PercentRange class, and then use the property.
![]()
You can create read-only or write-only properties by including the ReadOnly or WriteOnly keyword just before the Property keyword in the declaration statement (line 04), and leaving out the unneeded accessor.
Properties do not need to be tied to fields. You can use properties to get and set any type of value, and store it or act upon it in any manner you wish.
Where to Put Your Procedures
Back in the good ol’ days of Visual Basic 6.0, procedures could appear just about anywhere in your source code files. You would open a source file, type a function, and go; it was that easy. With the move to .NET, all Visual Basic procedures must now appear within a defined class (or a structure or module).
When you create instances of your class later in code, the methods can be called directly through the object instance.
![]()
Chapter 8 shows you how to use and build classes.
Other Flow Control Features
The loops and conditional statements available in Visual Basic let you reroute your code based on data. The language includes a few other statements that let you control the action in a more direct manner.
The GoTo Statement
The GoTo statement lets you jump immediately to some other location within the current procedure. The destination of a jump is always a line label, a named line position in the current procedure. All line labels appear at the start of a logical line, and end with a colon.

In this sample, the GoTo statement jumps back to the PromptUser label when the code detects invalid data. Processing continues with the line immediately following the PromptUser label. You can’t use the same label name twice in the same procedure, although you can reuse label names in different procedures. If you want, include another logic statement on the same line as your label, right after the colon, although your code will be somewhat easier to read if you keep labels on their own lines.
![]()
It’s all right to include as many labels in your code as you need, but the GoTo statement is one of those elements of Visual Basic that is monitored closely by pesky international software agencies, such as the International Committee to Keep GoTo Always Gone (ICK-GAG). That group also scans computer books looking for derogatory references to their organization name; not that they would find anything like that in this book. But their core issue is that overuse of GoTo statements can lead to spaghetti code, such as the following.
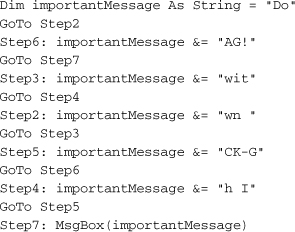
Some people say that such code is hard to read. Others call it job security. No matter what you call it, it does make code very hard to maintain and review. You should probably keep an eye on your use of GoTo statements; if you don’t, someone else might.
There are some limits placed on the use of GoTo by Visual Basic itself. You cannot jump into or out of certain multi-line statements that would result in improperly initialized code or data values. For instance, you cannot jump into the middle of a For . . . Next statement from outside of the statement, because the loop counter variable and the starting and ending ranges would not be properly initialized.
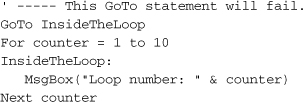
However, once you are inside of the loop, you can jump to line labels that also appear in the loop, and it’s acceptable to jump out of the loop using GoTo. Some other multi-line structures impose similar restrictions.
The Return Statement
Not only can you jump around within a procedure using GoTo, you can jump right out of a procedure anytime you want using the Return statement. Normally, a procedure exits when processing reaches the last line of code in the procedure; processing then continues with the code that called the procedure. The Return statement provides a way to exit the procedure before reaching the end.
In subroutines, the Return statement appears by itself as a standalone statement.
Return
In functions, the statement must include the value to be returned to the calling code: a variable, a literal, or an expression that must match the specified return value data type of the function.
Return 25
Pre-.NET releases of Visual Basic used an Exit statement to immediately leave a procedure. These are still supported in .NET. There are three variations.
- Exit Sub. Exits a subroutine.
- Exit Function. Exits a function.
- Exit Property. Exits a property.
When exiting from a function, the Exit Function statement does not include a way to specify a return value. You must set the return value separately by assigning the return value to the name of the function.
The End and Stop Statements
The End and Stop bring an immediate halt to your Visual Basic application. The End statement exits your program immediately, aborting all further code and data processing (although certain acquired resources are cleaned up).
The Stop statement suspends processing only when you are running your application within a debugger, such as the Visual Studio development environment. Stop returns control to the environment, allowing the developer to examine and possibly alter data and code before continuing on with the program. If a Stop is encountered in a standalone application running outside of the debugger, it prompts the user to debug the application using any debugger installed on the workstation. Needless to say, the user will not be amused.
Events and Event Handlers
Visual Basic is an event-driven language. This is especially true of programs written to run on the Windows desktop. After some important initialization, the user is generally in control of all actions in the program. Who knows what the crazy user will do? He might click here. She might type there. It could be all mayhem and bedlam. But whatever the user does, your program will learn about it through events.
Since the first days of Windows, desktop programs have used a message pump to communicate user and system actions to your code. Mouse and keyboard input, system-generated actions, and other notifications from external sources flow into a program’s common message queue. The message pump draws these messages out one by one, examines them, and feeds them to the appropriate areas of your code.
In traditional Windows programming, you craft the message pump yourself, including code that makes direct calls to event-handling procedures based on the message type. In a Visual Basic program (both in .NET and earlier), the language provides the message pump for you. It analyzes the messages as they are pumped out of the message queue, and directs them to the appropriate code. In .NET, this code appears within classes. Once a class has a chance to analyze the message, it can generate an event, which is ultimately processed by an event handler, a subroutine you write to respond to the action. This calling of the event handler is know as firing an event. So there are two parts of an event: (1) some code that decides to fire the event, and (2) an event handler that responds to the event.
Events are really just indirect calls to a procedure. Instead of having the main code call another subroutine directly, it asks .NET to call the other subroutine for it, passing specific arguments that the original code may wish to include. So why would I want to do this instead of just making the subroutine call directly? For one thing, this indirect method lets you add event handlers long after the initial event-firing code was written. This is good, because the event-firing code may be in a third-party assembly that was written years ago. A second benefit is that one event can target multiple event handlers. When the event fires, each of the event handlers will be called, and each can perform any custom logic found in the handler subroutine.
The code that fires the event passes event-specific data to the target event handler(s) through the handlers’ parameter list. In order for the indirect subroutine call to work, the event handler needs to contain the correct number of arguments, in the right order, each of a specific and expected data type. The Event statement defines this contract between the event and the handler.
Public Event SalaryChanged(ByVal NewSalary As Decimal)
This Event statement defines an event named SalaryChanged with a single argument, a Decimal value. Any event handler wishing to monitor the event must match this argument signature.
Sub EmployeePayChanged(ByVal updatedSalary As Decimal) . . .
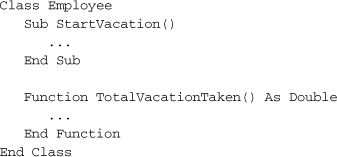
Events can occur for any reason you deem necessary; they need not be tied to user or system actions. In this sample class, an event fires each time a change is made to the employee’s salary. The RaiseEvent statement performs the actual firing of the event, specifying the name of the event to fire, and a set of arguments in parentheses.
The event handlers are not added directly to the class. Instead, they are attached to an instance of the class. The instance, declared as a class field, must be defined using the special WithEvents keyword, which tells Visual Basic that this instance will process events.
Public WithEvents MonitoredEmployee As Employee
Event handlers are ordinary subroutines, but they include the Handles keyword to indicate which event is being handled.
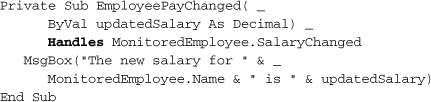
All that is needed is something to kick off the action.

When the salary is set, the Employee class’ Salary property raises the SalaryChanged event using the Visual Basic RaiseEvent command. This fires the EmployeePayChanged event handler, which finally displays the message.
The events built into the Windows Forms classes in .NET work just like this, but instead of watching with me for a salary increase, they are watching for mouse clicks and keyboard clacks. All of these system events use a common argument signature.
Event EventName(ByVal sender As System.Object, _
ByVal e As System.EventArgs)
The sender argument identifies the instance of the object that is firing the event, in case the caller needs to examine its members. The e argument is an object that lets the caller send event-specific data to the handler through a single class instance. The System.EventArgs class doesn’t have much in the way of members, but many events use a substitute class that is derived from System.EventArgs.
As we pass through the chapters of this book, there will be no end to the number of event examples you will see and experience. I will save the more involved and interesting samples until then.
Namespaces
Classes, structures, modules, enumerations, interfaces, and delegates—the major .NET types—don’t just float around in the code of your application. They must all be grouped and managed into namespaces. As described in Chapter 1, namespaces provide a hierarchy for your types, sort of a tree-shaped condominium where each type has a home. Some of those homes (or nodes), like System, get pretty crowded with all of those type families living there. Others, such as System.Timers, may have only a few types dwelling in its ample abode. But every type must live in the hierarchy; none of the types is adventurous enough to strike out on its own and build a ranch house.
At the very root of the hierarchy is Global, not a node itself, but a Visual Basic keyword that indicates the root of all roots. You can include Global when referencing your namespaces, but its use is only required when leaving it out would cause confusion between two namespace branches.
Directly under Global are the few top-level namespaces, including System and Microsoft. Each top-level namespace contains subordinate namespaces, and each of those can contain additional third-level namespaces, and so on. Namespaces nodes are referenced relative to each other using a “dot” notation.
System.Windows.Forms
This specifies the third-level Forms namespace. You could also have typed:
Global.System.Windows.Forms
which means the same thing. Relative namespaces are also supported.
Forms
However, to use relative namespaces, you must tell your Visual Basic code to expect them. There are so many namespaces out there, and there may be several Forms namespaces somewhere in the hierarchy.
Referencing Namespaces
Before namespaces can be used in your code, they must be referenced and optionally imported. Referencing a namespace identifies the DLL file that contains that namespace’s types. Perform both of these actions through the References tab of each project’s Properties form (see Figure 2-3).
Figure 2-3. References and imports for a project
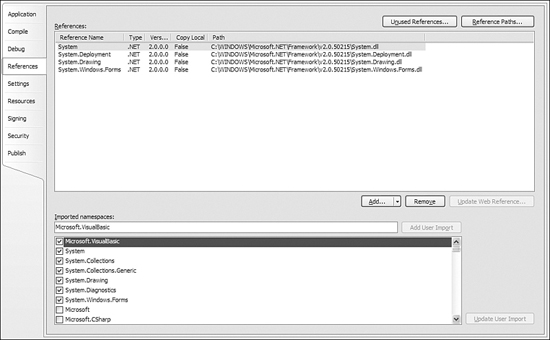
Actually, you are not referencing the namespaces in the DLL, but the types, all of which happen to live in specific namespaces. However, for the core type DLLs supplied with the .NET Framework, it feels like the same thing. In fact, Microsoft even named the DLLs to match the namespaces they contain. System.dll contains types within the System namespace. System.Windows.Forms.dll includes types specific to Windows Forms applications, and all of these types appear in the System.Windows.Forms namespace or one of its subordinates.
If you don’t reference a DLL in your project, none of its types will be available to you in your code. Visual Studio loads several references into your project automatically based on the type of project you create. Figure 2-3 shows the four default references included within a Windows Forms application: System, System.Deployment, System.Drawing, and System.Windows.Forms.
Once you have referenced a library of classes in your code, access any of its classes by specifying the full namespace to that class. For instance, the class for an on-screen form is referenced by System.Windows.Forms.Form. That’s three levels down into the hierarchy, and some classes are even deeper. I hope that your health insurance plan covers carpel tunnel syndrome.
To avoiding typing all of those long namespaces over and over again, Visual Basic includes an imports feature. Imports are namespace-specific; once a namespace has been imported, you can access any of the types in that namespace without specifying the namespace name. If you import the System.Windows.Forms namespace, you only have to type “Form” to access the Form class. The bottom half of Figure 2-3 shows how to set these imports through the project’s properties. The Imported namespaces list shows all available referenced namespaces. Simply check the ones you wish to import; System.Windows.Forms is already checked for you by default in Windows Forms applications.
You can also import a namespace directly in your source code. Use the Imports statement at the very start of a source code file.
Imports System.Windows.Forms
The Imports statement supports namespace abbreviations, short names that represent the full namespace in your code. Using the statement:
Imports Fred = System.Windows.Forms
lets you reference the Form class as “Fred.Form.” Unlike the imports list in the project’s properties, which impacts the entire project, the Imports statement affects only a single source code file.
Namespaces in Your Project
By default, all of the classes and types in your project appear in a top-level namespace that takes on the name of your project. For a Windows Forms application, this default namespace is called WindowsApplication1. To specify a different top-level namespace, modify it through the Application tab of the project’s properties, in the Root namespace field. All of the types in your project appear in this namespace; if you specify an existing Microsoft-supplied namespace as your project’s Root namespace, all of your types will appear in that specified namespace, mixed in with the preexisting types. For standalone applications, this mixture will only be visible from your code.
From the root namespace, you can place types within subordinate namespaces by using the Namespace statement. Namespace is a block statement that ends with the End Namespace clause. Any types you create between the Namespace and End Namespace clauses will be contained in that subordinate namespace. For example, if your root namespace is WindowsApplication1, the following statements create a class whose full name is WindowsApplication1.WorkArea.BasicStuff.BusyData:
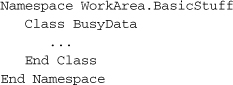
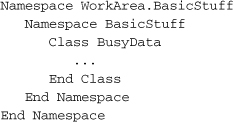
You can include as many Namespace statements in your code as needed. Nesting of namespaces is also supported.
The My Namespace
Visual Basic 2005 includes a new “My” top-level namespace, which Microsoft is touting as one of the big new convenience features that will draw holdout Visual Basic 6.0 stalwarts into the .NET fold. But most of it is really not that dramatic. My collects commonly used features that are currently sprinkled around the FCL, and puts them in a mini-hierarchy for convenient access. It’s really not much more complicated than that. The hierarchy is nicely organized, with sections for user, application, and computer-specific information. It’s used just like any other part of the framework, although you cannot use the Imports keyword to access its components by a relative path.
Overall, My is very easy to use. To display the version number of your application, for instance, use the following statement.
MsgBox(My.Application.Info.Version.ToString)
Some areas of the My namespace are dynamic; classes are added or removed as you modify your source code. In Windows Forms applications, the My.Forms branch includes entries for each one of the project’s forms. As you add new forms, new entries are added automatically. The My.Forms object then makes a reference to each form available for use in your code.
My.Forms.Form1.Text = "Welcome"
Summary
Sadly, this chapter has reached its conclusion. You may feel that it went by all so fast; you may feel that you didn’t really learn how to write Visual Basic programs; you may feel that a mild sedative would be right just about now. But don’t fret. This chapter served as an introduction to the syntax and major features of Visual Basic. Now begins the deeper training. As we start this book’s main focus—the Library Project—you will encounter specific examples of all features covered only briefly in this chapter.
Project
In this chapter, we will use the Code Snippets feature of Visual Studio to insert source code into a basic sample code framework. Code snippets is a new Visual Studio feature that is basically a hierarchy of saved source code text. If you have installed the code for this book, you will find code snippets for most chapters included right in Visual Studio. In this chapter’s project, I will show you how to use them to add chapter-specific code into your project.
Because we haven’t officially started the Library Project, this chapter’s project will simply extend the “Hello, World!” project we developed in Chapter 1, but with fun parts added. I will include some of the language features we discovered throughout this chapter.
Project Access
Load the “Chapter 2 (Before) Code” project, either through the New Project templates, or by accessing the project directly from the installation directory. To see the code in its final form, load “Chapter 2 (After) Code” instead.
Each chapter’s sample code includes a “Before” and “After” version. The “After” version represents the code as it will look when all the changes in that chapter’s “Project” section have been applied. The before version doesn’t have any of the chapter’s project changes included, just placeholders where you will insert the code, one block at a time.
Like the project in Chapter 1, this chapter’s project includes a basic Windows form with a single button on it. Clicking on the button displays the same “Hello, World!” message. However, this time, the message starts in an encoded form, and a separate class decodes the message and triggers an event that displays the form.
Once the project is open, view the source code attached to Form1. It should look somewhat like the following.

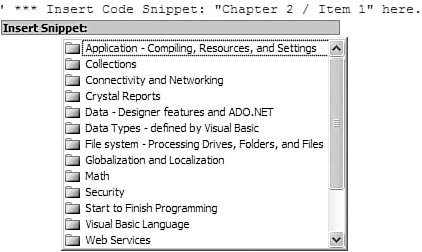
This sample uses a separate class to process the displayed message. The code for this class appears as snippet number 1. To insert the snippet, move the cursor just after the #1 snippet marker line, which reads:
' *** Insert Code Snippet #1 here.
To insert a snippet through the Visual Studio menus, select Edit ![]() IntelliSense
IntelliSense ![]() Insert Snippet. The equivalent keyboard sequence is Ctrl+K, Ctrl+X. Or type a question mark (?) anywhere in the source code, followed by the Tab key. Any of these methods displays the first level of snippets (see Figure 2-4).
Insert Snippet. The equivalent keyboard sequence is Ctrl+K, Ctrl+X. Or type a question mark (?) anywhere in the source code, followed by the Tab key. Any of these methods displays the first level of snippets (see Figure 2-4).
Figure 2-4. Snip, snip, snip
From the snippet list, select Start-to-Finish Visual Basic 2005, and then select Chapter 2. A list of the available snippet items for this chapter appears (see Figure 2-5).
Figure 2-5. Item, item, item
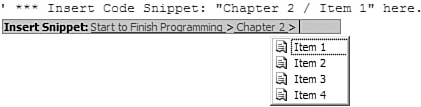
Finally, select Item 1. The content magically appears within the source code. All insertions of code snippets throughout this book occur exactly this way.
Snippet 1 inserts the SayHello class, part of the HelloStuff namespace, a portion of which appears here.
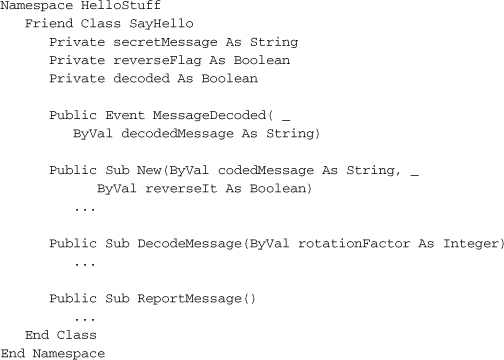
The SayHello class includes three private fields (secretMessage, reverseFlag, and decoded), which monitor the current status of the display message. A constructor (New) allows the user to create a new instance of SayHello with an initial message text, and a flag that indicates whether the text should be reversed before display. The DecodeMessage subroutine converts each letter of the encoded message to its final form by shifting each letter a rotationFactor number of places. If the letter “E” appears, and rotationFactor is 3, the letter E is shifted three spaces forward, to “H.” A negative rotation factor shifts the letters lower in the alphabet. The alphabet wraps at the A-Z boundary. Only letters are rotated, and upper and lowercase are handled independently.
The ReportMessage method fires the MessageDecoded event, sending the previously decoded message to the event as an argument. So where is this event handler? It’s attached to an instance of SayHello that will be added to the Form1 class.
Insert Snippet
Insert Chapter 2, Snippet Item 2.
Private WithEvents HelloDecoder As HelloStuff.SayHello
The HelloDecoder class is an instance of the HelloStuff.SayHello class that we just wrote, and the snippet makes it a member of the Form1 class. The WithEvents keyword says, “This instance will respond to events;” specifically, the MessageDecoded event from the SayHello class.
Let’s add the code that triggers the message to display when the user clicks on the on-form button. This occurs in the button’s click event.
Insert Snippet
Insert Chapter 2, Snippet Item 3.
![]()
These three lines create an instance of the SayHello class, storing it in the HelloDecoder class field. Can’t read the first argument in the constructor? It’s encoded! It’s a secret! And the True flag says that it’s been reversed to make it an even bigger secret (you don’t know what it is!). The DecodeMessage removes the secrets by shifting each letter as needed, although the reversal doesn’t happen until the call to the ReportMessage.
The ReportMessage method doesn’t actually display the message. Instead, it fires an event that makes the unscrambled message available to an event handler.
Insert Snippet
Insert Chapter 2, Snippet Item 4.
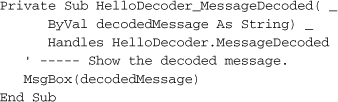
The Handles keyword connects the subroutine with the fired event. The decoded message comes into the handler through the decodedMessage argument, and is splashed all over the screen with a simple yet powerful call to the MsgBox function.
That’s it for the sample code. Now it’s time to roll up your sleeves and embark on a full Visual Basic 2005 project.