
Chapter 1: Getting Started with Tableau Prep
Tableau Prep Builder is an exciting new platform to develop data pipelines to transform your data for reporting and analytics purposes.
In this chapter, you will come to understand how we think about data preparation from the perspective of Tableau Prep Builder. You will learn about the different use cases you may employ Tableau Prep for, be it ad hoc data analysis, creating a dataset for a BI tool, or specifically for Tableau Desktop.
In this chapter, we will cover the following recipes:
- Installing Tableau Prep Builder
- Checking out the user interface
- Using Tableau Prep for ad hoc data analysis
- Preparing data for generic BI tools
- Preparing data for Tableau Desktop ad hoc analysis
Technical requirements
To follow along with the recipes in this chapter, you need to have Tableau Prep Builder installed, and Tableau Desktop. In the first recipe, we'll walk through the details of installing Tableau Prep Builder.
Installing Tableau Prep Builder
In this recipe, you'll install Tableau Prep Builder. We'll download the software, perform the installation, and open Tableau Prep Builder for the first time.
Getting ready
To enjoy the many benefits of Tableau Prep Builder, you need a license key. Typically, this would be issued by your administrator. Alternatively, you may have purchased a license yourself at https://buy.tableau.com/.
If you do not have a license key, Tableau offers a free trial so you can start right away.
As with all recipes in this book, the installation is performed on an Apple MacBook running macOS Big Sur. The steps are nearly identical on Windows machines and you can follow along on either operating system.
How to do it…
Ensure you're connected to the internet and have your favorite browser open:
- Navigate to https://www.tableau.com/products/prep/download, enter your business email, and click START FREE TRIAL:

Figure 1.1 – Tableau Prep Builder download site
- The installer file should start downloading in a few seconds. Wait until the download has been completed, then proceed to open it. On the first step, click Continue.
- Review the license agreement and when ready, select Continue.
- Next, the installer will confirm the installation destination. In most cases, the default location should work. However, you may customize it at this time. When done, click Install to continue.
- The installer may prompt you for your password. This is normal. Enter your password and click Install Software to continue.
- When the installation has completed, click Close.
- You won't be needing the installer file after this, so you may safely delete it. Select Move to Bin to do so now.
- With the installation completed, you may now open Tableau Prep Builder for the first time. Your trial will automatically be activated without the need for a product key. If you do have a product key, you can always add it via the Help menu under Manage Product Keys.
You're now ready to start using Tableau Prep Builder with the recipes in this book.
How it works…
Tableau Prep Builder is updated frequently, and you may expect new features, enhancements, and bug fixes at a regular cadence. Once you have installed a version, as in this recipe, Tableau Prep Builder will always notify you upon startup if a more recent version is available, along with a link to the download page.
Checking out the user interface
Tableau has taken great care in creating an interface that is intuitive and easy to understand. Perhaps best of all, it has quite a few similarities to the manner in which things are laid out in Tableau Desktop. So, if you are familiar with Tableau Desktop, you should feel right at home.
In this recipe, we will take a brief tour of the Tableau Prep user interface.
Getting ready
Tableau Prep provides what we need right out of the box. That includes data connectors, sample flows, training resources, and community updates. We'll walk through these step by step. This knowledge is foundational to all recipes.
How to do it…
Open Tableau Prep:
- When you open Tableau Prep Builder, you're presented with the home screen. From here, you can take a number of actions, which we'll cover briefly:

Figure 1.2 – Tableau Prep Builder home page
In Tableau Prep, a flow is what we call a data pipeline. If you've used other software in the past, you may have referred to a pipeline as an Extract, Transform, and Load (ETL) process, workflow, or data pipeline.
It's easy to start a new flow, simply by creating a data connection. To get started, click the blue Connect to Data button to expand the data connection options:
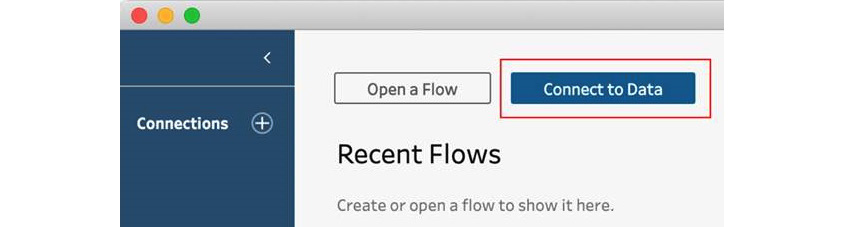
Figure 1.3 – Starting a new flow
From here, select your connection type, and that will complete the creation of a new flow:
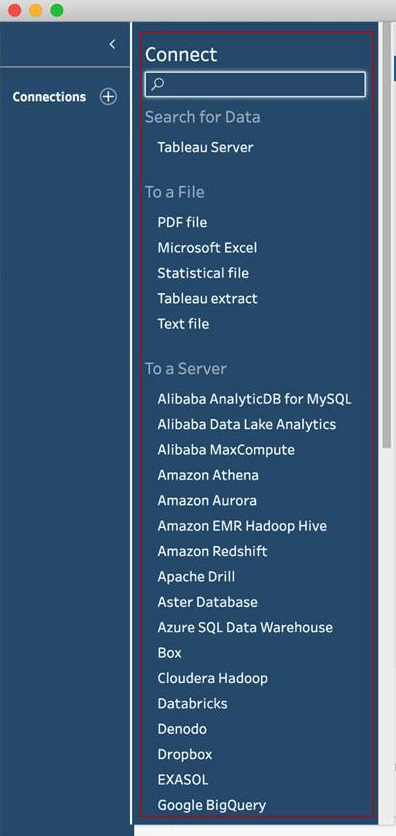
Figure 1.4 – Selecting a data connection type
In Chapter 2, Extract and Load Processes, we'll cover the configuration of various data connections in detail.
- At the bottom of the home page, you'll notice two example flows provided by Tableau:
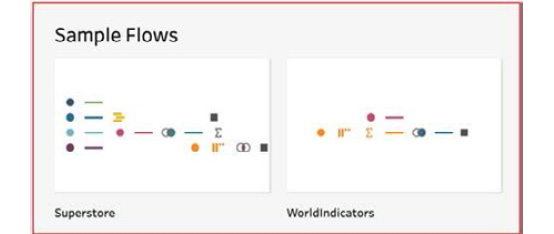
Figure 1.5 – Preinstalled sample flows
Both these flows use the sample Superstore and WorldIndicators data that is delivered with the Tableau Desktop application as well, so you may be familiar with this data already.
These example flows can be opened with one click and run locally. They're excellent for testing out quick actions and recipes learned in this book, without the need for you to create a new flow from scratch. Personally, I've become so accustomed to this, I typically try something out in an example workflow quickly, and then move on to my own flow and implement the action there when I'm confident it'll work.
- To the right side of the home screen, you'll find the Discover pane:
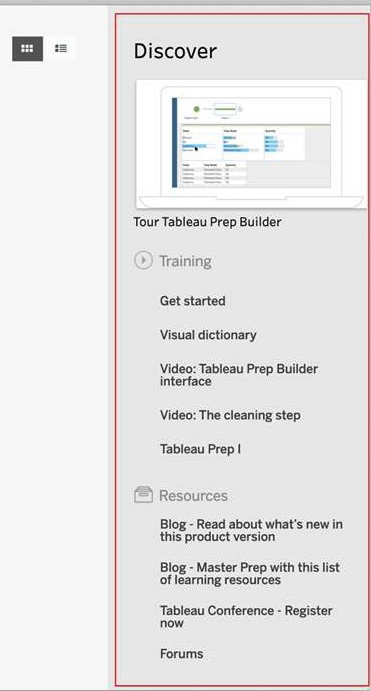
Figure 1.6 – Discover pane
The Discover pane has two sections that are always visible, Training and Resources. Training includes links to training materials authored by the Tableau team, while Resources includes links to Tableau blogs and user community forums.
These links update over time, so it's great to glance at this pane every time you open Tableau Prep, to make sure you're up to date on the latest developments.
- There are two ways to open flows. Firstly, you can use the Open a Flow button at the top of the home screen.
The second, one-click approach is to select a flow from the Recent Flows section. This section will automatically update based on your activity, with the latest flow accessed being the first one listed:
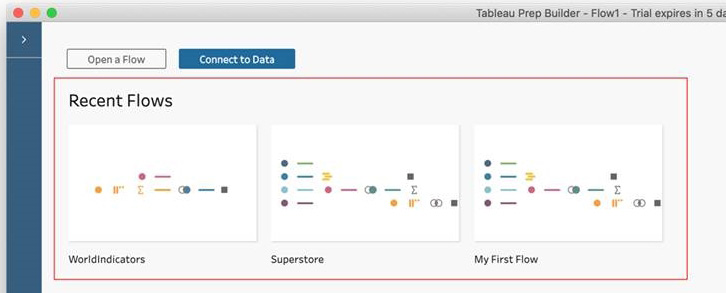
Figure 1.7 – Quick access to Recent Flows
- Click the Superstore flow in the Recent Flows section to view a flow in the flow builder interface, which shows you the data input, transformations, and output steps in a single overview:
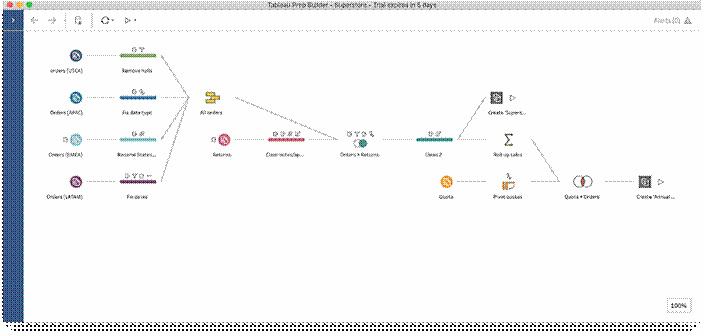
Figure 1.8 – Flow builder interface
- A key feature of the flow interface is pausing data updates, which you can enable and disable with a single click in the top action bar:

Figure 1.9 – Pausing data updates
- When data updates are paused, Tableau Prep Builder does not validate all the changes you are making instantly. As a result, you get increased performance. However, some features that require a data preview will be disabled until you resume data updates:
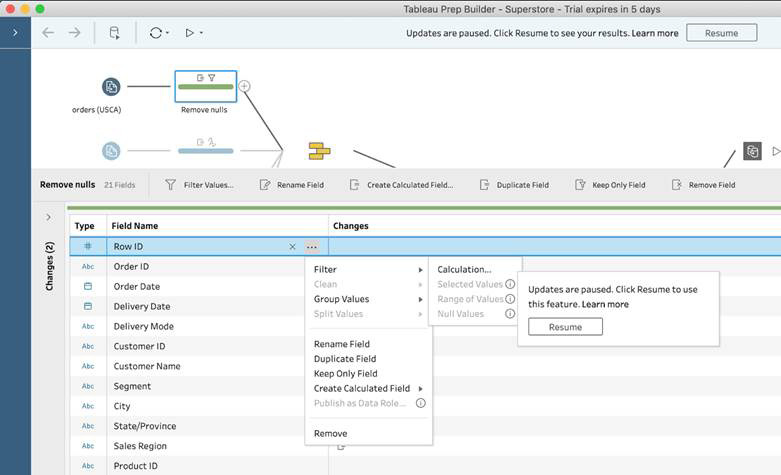
Figure 1.10 – Some features are disabled when data updates are paused
- Next to the Pause Data Updates icon, you'll find the Data Refresh button. This comes in handy when you are actively working on a flow and you are expecting changes to your data inputs at the same time. For example, a column may have been added to a data input since you opened the flow. In that case, you'll need to refresh the input to ensure the column becomes visible to Tableau Prep:

Figure 1.11 – Refreshing all data inputs
- You can click the button itself to simultaneously update all inputs. Alternatively, open the dropdown to select a single input to update:

Figure 1.12 – Refreshing specific data inputs
- The play button in the action bar will run your workflow and produce all outputs with a single click:

Figure 1.13 – Running an entire data flow
- However, you may also select the dropdown and select a specific output to be generated only. This could significantly improve the flow runtime, a great benefit during development and testing:

Figure 1.14 – Running a specific data output only
You're now familiar with the foundational elements that make up the Tableau Prep Builder user interface and can start building flows using your data.
How it works…
Simply put, Tableau Prep Builder works by ingesting data from a source to your local machine and processes it there whenever you make updates to a flow, in real time. To stay performant, Tableau Prep Builder automatically takes a sample of your data inputs only during this process. When you execute an entire flow, only then will the full data input be processed, and so this may take longer than previewing data in real time. In Chapter 2, Extract and Load Processes, there is a recipe to manage the sampling size and method used by Tableau Prep.
Using Tableau Prep for ad hoc data analysis
In this recipe, you'll learn how to leverage Tableau Prep Builder to perform ad hoc data analysis. In most scenarios, getting insights from your data would involve the creation of a data pipeline and then connecting a data visualization tool to the output of that pipeline to perform your analysis. However, with Tableau Prep Builder, you can perform basic ad hoc analysis on your data from within the tool itself.
Getting ready
Open the Tableau Prep Superstore flow to follow along with the steps outlined.
How to do it…
Ad hoc analysis typically starts with a business question to be answered with the use of your data. Let's assume the question posed for the Superstore data is: Which is the top category of products that consumers order with same-day delivery?
Following these steps, you'll be able to use Tableau Prep to answer this question without the need for additional reporting tools:
- In Tableau Prep Builder, select the All orders step:

Figure 1.15 – Selecting the All orders step
- Whenever we select a step in Tableau Prep, the bottom pane will become visible. The pane will leverage data as it is at the time of the step being selected. In our case, this will be the state of the data after having passed through the All orders step:

Figure 1.16 – The bottom pane offers many additional options
- First, let's reduce the dataset to consumers only. To do this, scroll horizontally through the columns in the results pane until you find the Segment column. From the three available values, Consumer, Corporate, and Home Office, right-click Consumer. From the context menu, select Keep Only:
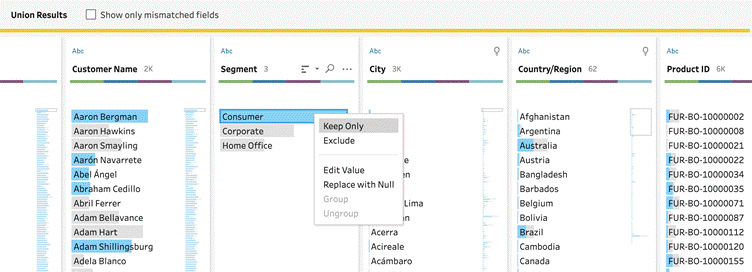
Figure 1.17 – Selecting the All orders step will bring up the bottom pane
Tableau Prep will instantly apply the filter and show you the data preview excluding any segments that are not Consumer.
- Next, locate the Delivery Mode field. We could perform the method of filtering as in the previous step. However, an alternate method ideally suited to quick exploratory analysis is using highlights. Highlights instantly mark data related to the selected value in the results pane, in a shade of blue. Go ahead and left-click Same Day delivery mode.
- Next, locate the Category column and sort its values by descending order:
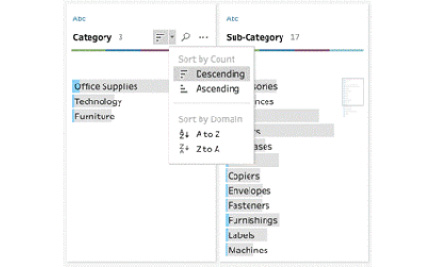
Figure 1.18 – Instantly sort data in Tableau Prep Builder
- Now, we can clearly see the top category for consumers' orders with same-day shipping is Office Supplies, which is the answer to the business question posed. We can get additional information by hovering over the item and see that 707 rows, or 5% of consumer orders, fall into this category:
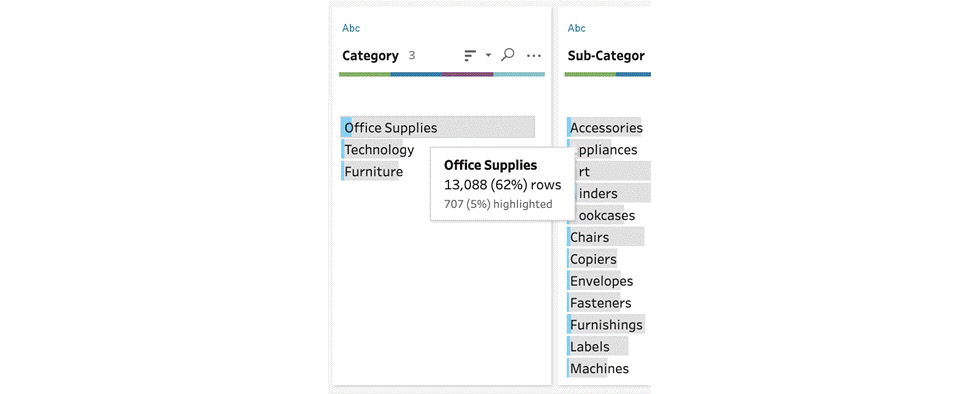
Figure 1.19 – Instant category details
With these steps, you've quickly performed ad hoc analysis on the Superstore data and identified the top product category for consumers who placed orders with the same-day shipping delivery mode.
How it works…
Using Tableau Prep Builder, we've quickly performed exploratory data analysis without the need to run our flow or create new outputs. Doing so provides great value not only in terms of a fast turnaround but also in keeping your data landscape clean by avoiding the creation of new data sources (outputs) for simple analysis.
When you perform analysis in this fashion, Tableau Prep instantly runs the required actions in the background to give you the results. In the Superstore example flow, this is fairly quick. However, on large datasets, this may take more time. Tableau Prep will show a progress indicator in the top-right corner when performing such background actions:

Figure 1.20 – Background actions
In this recipe, you've learned how to quickly perform ad hoc data analysis in Tableau Prep without the need to export your data for analysis in a downstream application.
Preparing data for generic BI tools
In this recipe, you'll learn how to use Tableau Prep to generate outputs for consumption by a variety of Business Intelligence (BI) tools. Specifically, we'll write a single output, from a flow with multiple outputs, to a CSV file. At the time of writing, output to CSV is the only non-Tableau proprietary format supported by Tableau Prep. Future releases of Tableau Prep will see the introduction of output to databases.
Getting ready
Open the Tableau Prep Superstore flow to follow along with the steps outlined.
How to do it…
In the steps that follow, we'll create an output that is suitable for consumption by data visualization and BI tools other than Tableau Desktop:
- Examine the output steps in the Superstore flow by clicking either output. In the bottom pane, notice how Output type is set to Tableau Data Extract (.hyper). This is the default output format for any output step added to a flow:
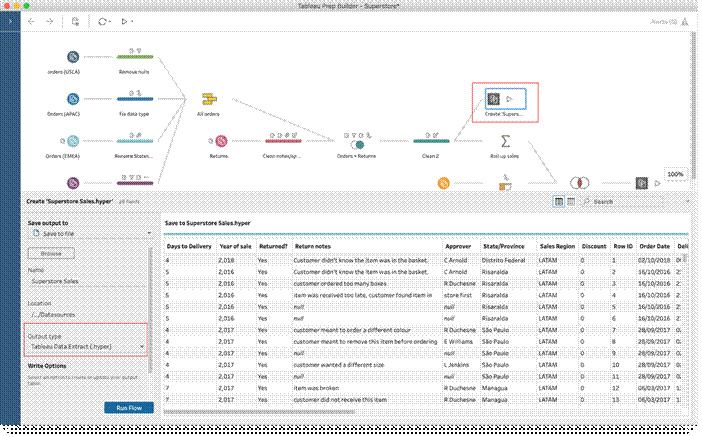
Figure 1.21 – Tableau Prep defaults outputs to .hyper extracts
- Since the .hyper extract is a proprietary format, it cannot be opened by other applications for further analysis. However, we can change the output type to CSV. CSV outputs are compatible with most leading BI tools and spreadsheet applications:
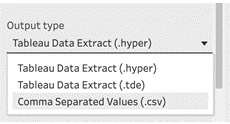
Figure 1.22 – Changing the output type
- Once you have an output configured, run just the output that you need to open in the BI tool. If you're using the Superstore sample flow, select the Create 'Superstore Sales.csv' output step and click on the play button within the step. This will ensure the flow only generates this one output, rather than all outputs in the flow:
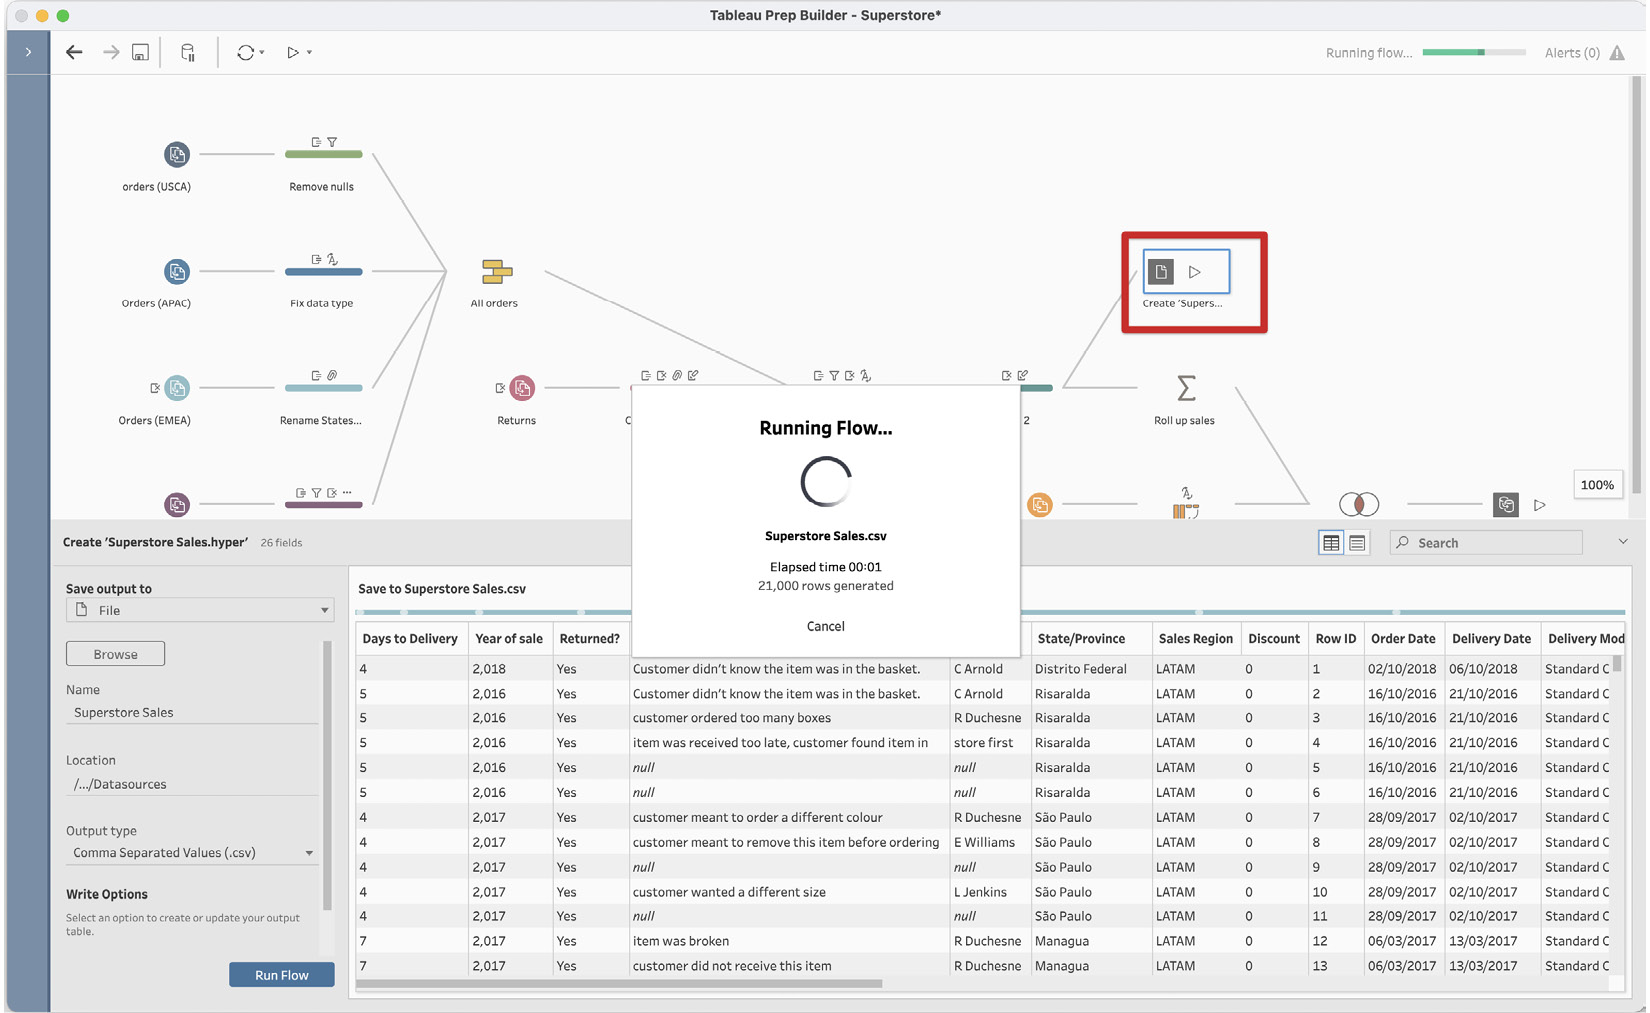
Figure 1.23 – Running a single output
- Finally, open the CSV file in the tool of your choice for further analysis. You can keep both Tableau Prep and the analysis application open and, if needed, tweak your flow and run the output again to update the saved CSV file:
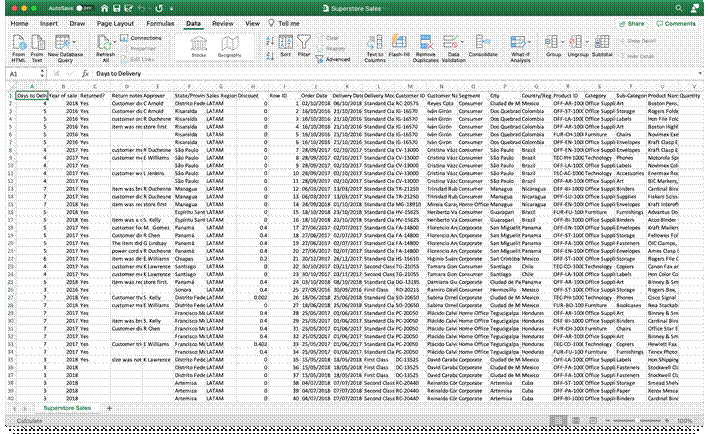
Figure 1.24 – CSV output in Microsoft Excel
You've now successfully completed this recipe and are able to export data to CSV so that you may utilize the transformed dataset in a BI application.
How it works…
Using the preceding steps, Tableau Prep Builder generates a generic CSV file that can be opened by most popular BI and spreadsheet applications. The benefit of this is that you are free to leverage any tool of your choice and are not locked into any particular ecosystem.
Using Tableau Prep to run distinct outputs separately is a great feature for ad hoc analysis, as you do not need to refresh your entire output every time.
Preparing data for Tableau Desktop ad hoc analysis
In this recipe, you'll learn how to use Tableau Prep to generate a Tableau Desktop workbook at any point in your flow, to perform further analysis on that data.
Similar to the third recipe, Using Tableau Prep for ad hoc data analysis, we'll find the answer to the question posed for the Superstore data: Which is the top category of products that consumers order with same-day delivery? However, this time, we'll get the answer in Tableau Desktop instead.
Getting ready
Open the Tableau Prep Superstore flow to follow along with the steps outlined. Ensure that Tableau Desktop is installed.
How to do it…
In the steps that follow, we'll produce a temporary hyper extract that will allow us to perform quick ad hoc analysis in Tableau Desktop:
- To perform quick ad hoc analysis with a dataset in Tableau Desktop, you can click any step (excluding input and output steps) and select Preview in Tableau Desktop. Go ahead and select the UNION step, then select Preview in Tableau Desktop:
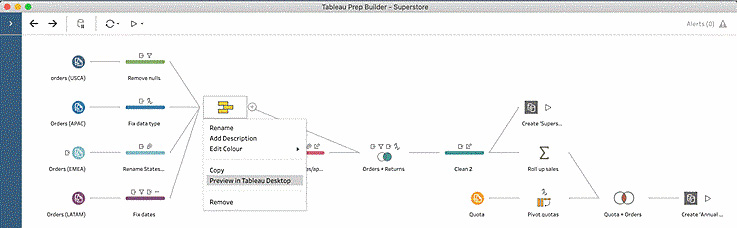
Figure 1.25 – Preview data at any time in Tableau Desktop
- Within moments, Tableau Desktop will start automatically and open a new workbook connected to the data from the step we selected in the flow:
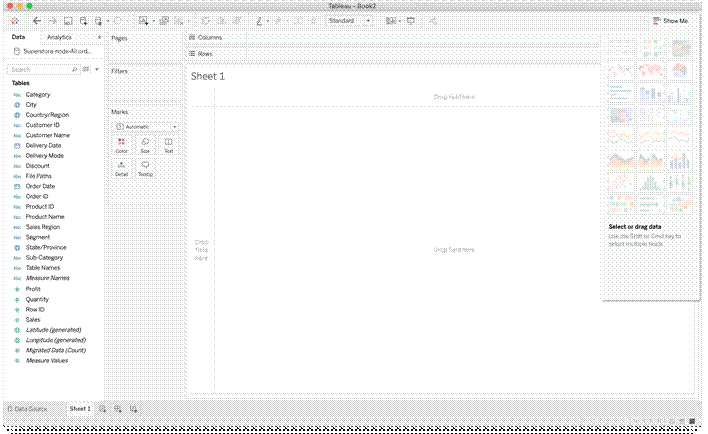
Figure 1.26 – Tableau Desktop workbook automatically created by Tableau Prep
- From here, you can perform the typical analysis you'd perform in Tableau Desktop. Add a Segment filter for Consumer, a Delivery Mode filter for Same Day, and create a bar chart using the Category dimension and the Migrated Data (Count) measure, as shown in the following screenshot:
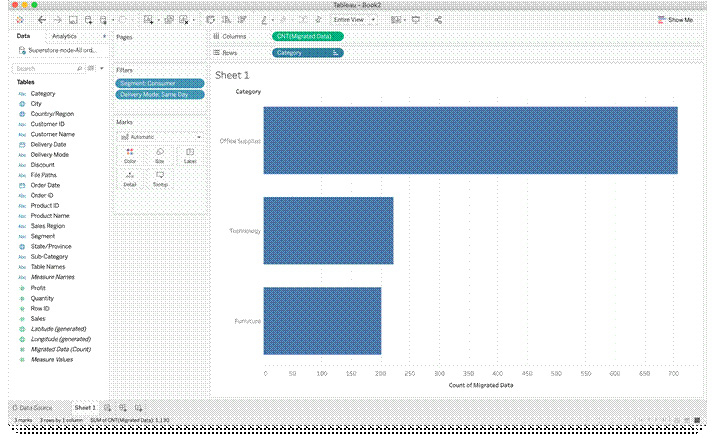
Figure 1.27 – Ad hoc analysis in Tableau Desktop
And with this, we've found the answer to our question. Office Supplies is the product category for which consumers most often leverage same-day shipping.
How it works…
When leveraging the Preview in Tableau Desktop functionality, Tableau Prep automatically creates a temporary .hyper extract and connects that to a new Tableau workbook. This is ideal for quickly visualizing your data at any point in the data flow, whether that is for exploratory analysis or simply verifying that your flow works as expected up to the selected step.