Navigate a PDF Document
Some PDFs you encounter consist of just one page, such as an advertising flyer. Navigating those kinds of PDFs is simple, because there’s really nowhere to navigate to.
But a PDF of, say, a software manual or a yearly financial report is another matter. PDFpen provides several ways to navigate a large document. This chapter shows you how to get around quickly so you can get on with your work.
Display Pages
For decades, the World Wide Web has made us comfortable with the idea of single pages that contain endlessly flowing text. On the web we expect everything to exist on a single page, and we become annoyed when, for example, we read a news story that is “continued on page 2,” forcing us to click and wait for a page to load. How primitive! How 20th century!
But, unlike HTML, PDF was designed to replicate the physical, paginated world of books, magazines, pamphlets, and reports. Fundamental to the PDF specification (see Learn about PDF Files) is the concept that PDFs are composed of pages: rectangular areas on which text, images, and graphic objects are placed.
PDFpen provides several ways to arrange and view the pages in a PDF to suit your needs and personal proclivities.
Facing Pages
Although we tend to read one page at a time, it can be very helpful to see pages spread out, side by side (or “two-up”), the way they appear in books, such as in Figure 11. This is especially true with today’s wide-screen, high-resolution monitors where there’s room to see two pages at a time clearly. It’s also useful when you want to get a better idea of how a page design works in the context of other pages.
There are two ways you can switch from single page view to facing pages view:
Choose View > Facing Pages.
In the toolbar, click Sidebar
 , and then choose Facing Pages.
Magnifying Pages
Sometimes, such as when you want to select text set in very small type, it’s useful to see a page in a magnified view. Other times, such as when you want a general overview of a page layout, you may want to zoom out so you can view an entire page, or even several pages, at once.
You can use the following commands on the View menu to set the magnification of the page view:
Actual Size (⌘-0 [Zero]): PDFpen obtains the pixel density of the Mac’s display from macOS and uses that information to scale the document to its full size on screen.
Zoom In (⌘-+): This magnifies the view of the page by a small percentage, which varies depending on the current magnification. For example, at 100% magnification (actual size), this command increases the magnification to 110%. At 110% magnification, however, the same command increases it to 121%. In other words, the higher the current magnification, the larger the percentage of increased magnification the command delivers.
Zoom Out (⌘--): This reduces the magnification by a percentage relative to the current magnification, much like the way that Zoom In works.
Zoom to Fit (⌘-Option-0 [Zero]): This adjusts the magnification so an entire page fits within the viewing area of the window. If you have facing pages displayed, the command adjusts the magnification so two pages fit in the viewing area.
Zoom to Width (⌘-Option-9): To view the complete width of the current page regardless of the viewing area’s height, choose this command.
Split the View
Have you ever read a book with endnotes? Did flipping back and forth between the main text and the notes irritate you? If the book were in PDF form, and you were reading it in PDFpen, that irritation would evaporate with the morning dew, courtesy of the Split command. This command offers the capability of displaying two parts of the same document at once (Figure 13).

To split a PDFpen window, choose Window > Split > Horizontally (as in Figure 13 just above) or Window > Split > Vertically (for a side-by-side layout).
To remove the split view, choose Window > Split > Remove Split.
When you split a PDFpen window, you can scroll each view separately: click within the view you want to scroll to focus PDFpen’s attention on it, and then scroll as you ordinarily would. Or you can use the Page Up ![]() or Page Down
or Page Down ![]() buttons on the Toolbar to move from page to page within the selected view (see Navigate Pages for more about moving between pages). The Toolbar’s Page indicator shows the number of the selected view’s page.
buttons on the Toolbar to move from page to page within the selected view (see Navigate Pages for more about moving between pages). The Toolbar’s Page indicator shows the number of the selected view’s page.
Similarly, you can zoom into or out of each view independently using the Toolbar’s Zoom ![]() buttons or with the menu commands described in Magnifying Pages just previously: click the view you want to zoom and then use any of the zooming methods. The Toolbar’s Scale indicator reflects the magnification of the currently selected view.
buttons or with the menu commands described in Magnifying Pages just previously: click the view you want to zoom and then use any of the zooming methods. The Toolbar’s Scale indicator reflects the magnification of the currently selected view.
Adjust the View by Hand
For those times when you are zoomed in to the PDF very closely, or, for that matter, zoomed really far out, you could make use of the scroll bars to move your view (depending on your Show Scroll Bars setting in System Preferences > General and the type of pointing device you have), but an alternate, and often easier, way to pan around your PDF is with the Editing Bar’s Hand ![]() tool.
tool.
To pan around the page, simply drag with the tool.
You can also use the Hand ![]() tool to zoom the view in and out:
tool to zoom the view in and out:
Zoom in: Option-click the page to zoom the view in the same manner as View > Zoom In (⌘-+).
Zoom out: ⌘-Option-click the page to adjust the view in the same way as View > Zoom Out (⌘--).
Zoom in an arbitrary amount: Option-drag the Hand
 tool in any direction. The shorter the drag, the greater the magnification, up to PDFpen’s maximum of 800%.
Continuous vs. Non-Continuous Page Display
PDFpen can display pages in a continuous stream, or restrict the viewing area to display just the current page (or set of facing pages) by itself. What’s the difference? Mostly a matter of personal choice and how you want to focus your attention.
If you are reading a book in PDF form, you may not want to see a continuous page display so you can focus on just the current page. If you are browsing through the same book, though, the continuous view makes it easier to see where you are among the pages that make up the document. Figure 14 shows a continuous page display.
You can enable or disable continuous page display by choosing View > Continuous; you can also choose Continuous from the Sidebar ![]() pop-up menu at the left of the document window’s toolbar.
pop-up menu at the left of the document window’s toolbar.
Navigate Pages
PDFpen gives you several different ways to move through a PDF document. How they work sometimes depends on whether you have enabled continuous page display (see the previous section).
Here are the ways to move from page to page:
Page Up/Page Down
 buttons: Click these to scroll up and down either by the height of the document display area or by a complete page, depending on whether you are viewing the document with continuous page display enabled or not.
Page field: To go to a specific page, select the page number displayed in the toolbar’s Page field and enter a new page number. PDFpen doesn’t let you enter page numbers that don’t exist in a document.
Go menu: You have a number of navigation commands here:
Next Page and Previous Page: These work the same as the toolbar’s Page Up/Page Down
buttons, described just above.First Page and Last Page: These go, respectively, to the first page and last page in the document.
Go to Page (⌘-Option-G): Similar to the toolbar’s Page field, this command presents a dialog where you enter the page number to which you want to go.
Back and Forward: You can choose Go > Back (⌘-[) to retrace your most recent navigation moves, and Go > Forward (⌘-]) to un-retrace them, much like the Back and Forward commands in a web browser. (The keyboard shortcuts work exactly the same way in Apple’s Preview app.) This feature is especially handy when you navigate using page links within a document (page links are described in Create Links).
Gestures or scrollbar: If continuous page display is turned on, you can use trackpad or mouse gestures to scroll quickly through a document; if you have scrollbars displayed on your Mac (set this in System Preferences > General), you can also use the scrollbar on the right to move through the document.
Keyboard: Press the Page Up or Page Down key to move up or down by screen or page, depending on the continuous page display setting and whether the complete page fits within the document display area. On keyboards that lack these keys, such as laptop keyboards and the Apple wireless keyboard, Page Up is Fn-Up arrow and Page Down is Fn-Down arrow. You can also use ShiftSpace and Space as alternates on any keyboard (as long as you are not editing text, of course). Use the Home or End key to go to the first or last page.
Navigate with the Sidebar
One of PDFpen’s most valuable navigation tools is the sidebar, which you can display at the side of the document window, as shown in Figure 15.
You can make the sidebar visible by choosing View > Show Sidebar (⌘-Shift-D), or you can use the Sidebar ![]() pop-up menu on the document window’s toolbar and choose a sidebar display option. The width of the sidebar is adjustable: position your pointer on the border between the sidebar and the document so that it becomes a resize
pop-up menu on the document window’s toolbar and choose a sidebar display option. The width of the sidebar is adjustable: position your pointer on the border between the sidebar and the document so that it becomes a resize ![]() pointer, and then drag left or right.
pointer, and then drag left or right.
The sidebar display options available from the toolbar’s Sidebar ![]() pop-up menu include hidden (no sidebar showing), page thumbnails, annotations, attachments, and the document’s table of contents (if it has one); in PDFpenPro it can also show form fields (see Set the Tab Order). Note that these commands also appear on the menu bar’s View menu.
pop-up menu include hidden (no sidebar showing), page thumbnails, annotations, attachments, and the document’s table of contents (if it has one); in PDFpenPro it can also show form fields (see Set the Tab Order). Note that these commands also appear on the menu bar’s View menu.
Navigate with Annotations
You saw the tools you use to add notes, comments, text imprints, and other sorts of annotations to a document in The Markup Tools. Once you have annotated a PDF, PDFpen makes it easy for you to find your annotations in the Annotations sidebar. It can list every note, comment, text imprint, link, audio note, attachment, scribble, and highlight you’ve added to the document (Figure 16).

Click any entry in the Annotations sidebar to navigate to the page that contains the corresponding item. When you do, PDFpen also selects the item so you can immediately work on it. For example, if you click a note entry, PDFpen displays the page that contains the note icon, and also opens the associated note window.
You can limit the kinds of annotations displayed in the sidebar by clicking the Show pop-up menu at the bottom of the Annotations sidebar and choosing a type of annotation to show or hide.
Navigate with a Table of Contents
Not all PDF documents contain a table of contents, but, for those that do (like all Take Control ebooks!), PDFpen’s sidebar can display them. You can see part of the Table of Contents sidebar in Figure 17. The table of contents shown in the figure has several main entries that contain sub-entries; these appear indented below their main entry.

sub-entries.
Click any entry or sub-entry to navigate to the associated page.
If, as in Figure 17, a table of contents entry has sub-entries, you can hide or reveal them in the list by clicking the disclosure triangle ![]() beside the main entry.
beside the main entry.
Navigate with Search Results
In PDFpen, you perform text searches with the Find window. Click the Find ![]() button in the toolbar or choose Edit > Find > Find (⌘-F) to display the Find window (Figure 19).
button in the toolbar or choose Edit > Find > Find (⌘-F) to display the Find window (Figure 19).

As soon as you begin typing in the window’s search field, PDFpen begins searching and displays the first match beyond your current position in the document. Click the Show Results button to list each match with some surrounding context, arranged by page. Click any line in the list of results to display the page that contains the search term with the term selected (Figure 20).
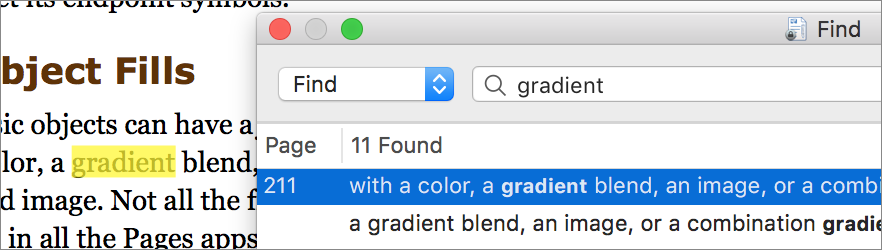
Once PDFpen has produced some search results (whether you choose to display them or not), you can navigate through the document using the next and previous ![]() buttons in the Find window. You can also use commands on the Edit > Find submenu as follows:
buttons in the Find window. You can also use commands on the Edit > Find submenu as follows:
Find Next (⌘-G): Choose this to jump forward to the next search result.
Find Previous (⌘-Shift-G): Jump back to the preceding search result.
Jump to Selection (⌘-J): This command displays the currently selected text within the PDF document, whether or not it is a search result, and it can be useful if you have been browsing through the document and want to get back to the page containing your most recent selection.
Navigate Portfolios
Portfolios are special types of PDF documents that contain more than one document—and they don’t all have to be PDFs, either. Portfolios come in handy when you have a group of PDFs and related files that all belong to one project and you want to keep them all together. You must have PDFpenPro to create portfolios (see Create Portfolios (Pro Feature), but you don’t need it to open and use them: PDFpen works fine for that.
You open a PDF portfolio like any other PDF: choose File > Open (⌘-O) in PDFpen, or double-click the portfolio in the Finder, or drop the portfolio icon on PDFpen in the Dock. No matter how you open it, PDFpen displays the portfolio window (Figure 21).
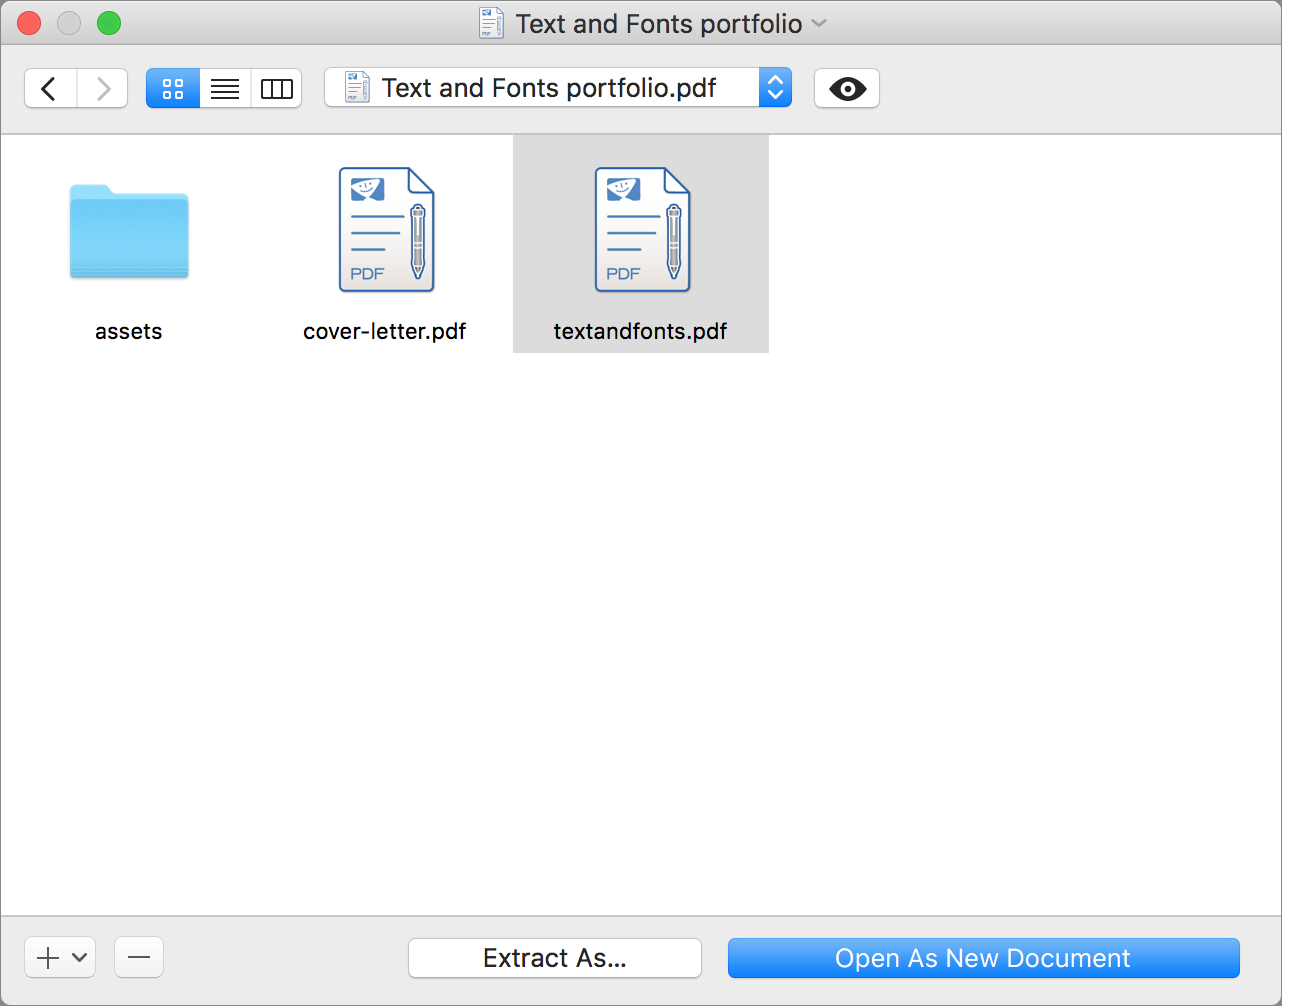
To preview one of the documents in a portfolio, click to select it and then click the portfolio window’s preview ![]() button. This opens a preview window similar to those displayed by the Finder.
button. This opens a preview window similar to those displayed by the Finder.
Also just as in a Finder window, you can use the multi-segment file view ![]() button to display the portfolio’s contents as icons, in a list, or in a column hierarchy.
button to display the portfolio’s contents as icons, in a list, or in a column hierarchy.
Portfolios can contain folders: double-click a folder to display its contents in the portfolio window. You can use the forward and back ![]() buttons to retrace your steps like you can in a Finder window, or use the hierarchy pop-up menu at the top of the window to move up the portfolio’s folder hierarchy.
buttons to retrace your steps like you can in a Finder window, or use the hierarchy pop-up menu at the top of the window to move up the portfolio’s folder hierarchy.
Of course, portfolios would be almost useless if you couldn’t do anything with their contents. You can do three things with the items in a portfolio:
Extract: Select a document and click Extract As, and then use the file saving dialog that appears to save a copy of the extracted document on your Mac, optionally renaming the copy.
Open as a new document: For PDF documents in the portfolio, you can select the document and click Open as a New Document to edit an untitled copy of the document in PDFpen, which you can then save as you would any other PDF.
Delete: Select one or more items in the portfolio and click the delete
 button at the window’s bottom.
Finally, even though you need PDFpenPro to make a portfolio, you can add items to an existing portfolio with PDFpen. See Create Portfolios (Pro Feature) to see how to add items to an existing portfolio.