
Ever since iTunes 2.0 came out, Apple’s music player has offered at least one syncing capability, albeit a narrowly specialized one: the capability to sync music playlists to an iPod. As both the iPod and iTunes matured, iTunes’ syncing capabilities became more powerful and varied, while still maintaining the original narrow iPod focus. By the time the video iPod was released, iTunes could sync music, podcasts, photo albums, videos, iCal calendars, and Address Book contact lists.
Recently, Apple has added two other types of devices to the iTunes syncing stable—the Apple TV and the iPhone—and has provided syncing capabilities tailored for these devices. For example, when an iPhone is connected, iTunes adds the capability to sync Safari bookmarks and Mail account settings along with all the other things it can sync.
Behaviorally, iTunes divides how it syncs stuff with an Apple device into two different categories:
Media: This includes video, audio, and photos. iTunes sends these items on a one-way trip from your iTunes or iPhoto libraries to the device.
Structured information and media metadata: This category comprises not only the commonly synced structured information items, like contacts and calendars, but things like a song’s rating, a song’s current playback position, and the last time you played it. Such items can flow both from iTunes to the device and from the device to iTunes. (Naturally, if you can’t change the information on the device, the syncing is still effectively one-way: from iTunes to the device—for example, the contact information on an iPod.)
Connect Your Gear describes the ways in which you can connect your Apple devices to your Mac. To recap, these Apple devices use the following connection methods:
iPod with video, iPod nano, iPod shuffle, iPhone: These devices use USB, so see Connect with USB.
Apple TV: This uses either a wired or wireless network connection, as described in Connect over a Network.
First- and second-generation iPods: These use FireWire, so see Connect with FireWire if you have one of them.
Other iPods: The third- and fourth-generation iPods and iPod minis can connect either with FireWire (see Connect with FireWire) or USB (see Connect with USB).
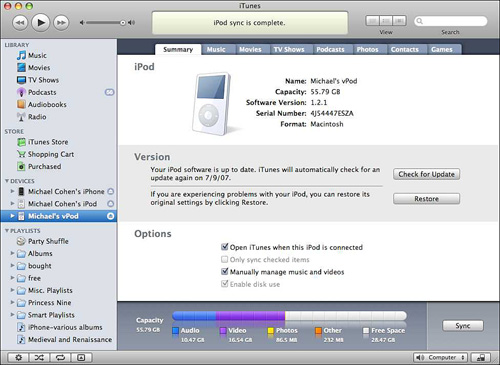
After you connect an Apple device to your Mac, you gain access to all of iTunes’ sync settings by selecting the device in the left pane of the iTunes window, under the Devices heading (Figure 4). iTunes keeps track of individual Apple devices that you’ve connected to your Mac, and it maintains separate sync settings for each of them.
Each tab in the device’s settings pane controls a specific type of syncing to be used with the selected Apple device.
The number of tabs available in the settings pane varies depending on the selected device’s capabilities; this figure shows the eight tabs (Summary, Music, Movies, TV Shows, Podcasts, Photos, Contacts, and Games) that an iPod with video has available. Note that three devices are currently connected to this copy of iTunes.
Figure 4.
You can change a device’s sync settings only while it is connected to your Mac. If you have more than one Apple device connected to your Mac at the same time, you can change the settings for any one of them by selecting the one you want to change from under the Devices heading in the iTunes window.
Note
While you can have several Apple devices connected to iTunes at a time, such as the multiple iPods shown in Figure 4 (previous page), iTunes can only connect and sync with one iPhone at a time.
Tip
iTunes syncs your iPod or iPhone the moment iTunes detects it, but it won’t sync any changes you make to your iTunes library while your device is connected (it will sync the Apple TV, though). You don’t need to disconnect and reconnect to sync such changes, though: select the device in the Devices list, then choose File > Sync DeviceName to sync the latest changes to the connected device.
Tip
See Steve Sande’s Take Control of Your iPod: Beyond the Music (http://www.takecontrolbooks.com/ipod-btm.html) for a much deeper look into all the non-musical things your iPod can do.
When you select an Apple device from the left pane of the iTunes window, the device’s settings pane appears in the right side of the iTunes window. The settings pane opens to show the Summary tab, which contains the selected device’s general syncing options.
Tip
Changes to the device settings you make don’t take effect until you either click Apply at the bottom right or you select something else in the left pane of the iTunes window. Therefore, you can freely explore the selected device’s syncing options—just don’t click Apply or select something else in the iTunes window’s left pane unless you mean it!
Also, note that you can click Cancel at any time to restore the settings in the pane to the way they were before you opened the pane or last clicked Apply.
The options listed on a device’s Summary tab vary depending on the device and its capabilities. The Apple TV Summary tab, for example, lists no general syncing options, while a video iPod has several. Furthermore, depending on the device, similar options may use different labels. For instance, the iPod option labeled Open iTunes When this iPod is Connected bears the label Automatically Sync When this iPhone is Connected on an iPhone, even though both options produce almost identical behaviors, which is to open iTunes when the device is connected and to start an automatic sync.
Because of the fluid nature of the general device option names, I describe the general syncing options in the following sections by function rather than name.
iTunes can sync automatically with a device as soon as it is connected. For the iPod and iPhone, you control this option with a checkbox on the device’s Summary tab. Check the checkbox and the next time you connect the device, iTunes opens (if it is not running) and syncs the device.
Note
Any time you make a change in any of the device’s settings tabs, clicking the Apply button that appears at the lower right of the tab initiates an automatic sync.
The Apple TV’s Summary tab does not have the option to open iTunes and start a sync, partly because the Apple TV is always connected to the Mac via your local network. By default, Apple TV syncs automatically whenever both it and iTunes are running.
You turn Apple TV automatic syncing on or off using the Apple TV menus displayed on your TV screen:
Using the Apple Remote, navigate to the main menu.
Select Sources.
Select Syncing.
Select Turn On Syncing (if off) or Turn Off Syncing (if on).
Note
When Apple TV syncs, it copies items from the iTunes library in this order: movies, TV shows, music, podcasts, and photos. It stops either when it has copied everything you have specified or when it is filled. On subsequent syncs, when space needs to be made for a new item on the Apple TV’s internal storage, Apple TV first deletes items from itself, starting with photos, and works its way back up the list.
If you look at the contents of the collections in your iTunes library you’ll notice that each song, video, podcast episode and audiobook has a checkbox to the left of its name. By default, iTunes selects the checkbox for each of these types of items when you add one to your library.
You can use these item checkboxes in conjunction with the Only Sync Checked Items checkbox to include or exclude items that you want to sync with your iPod or iPhone (sorry, the Apple TV has no checked items syncing option). When you select the Only Sync Checked Items checkbox on the Summary tab, iTunes syncs only those items from your iTunes library that have a selected checkbox by their names.
You can use this option to refine your control of what gets automatically synced. For example, an iPhone only has limited storage when compared to a video iPod, but it can still store and play video. To conserve free space on your iPhone, you can set your iPhone video sync preferences to sync all unwatched episodes of all your TV shows, but then put checkmarks by only those shows you intend to watch on your commute today (I hope you’re not driving!) and uncheck the rest (see Sync Movies and TV Shows). This insures that your iPhone will contain no shows you’ve already seen and only the unwatched shows you want.
The only devices that let you manually manage their contents are iPods. The iPod shuffle always lets you manage its contents manually; see Shuffling Your Shuffle for more about how to manage a shuffle’s contents. For other iPods, the Summary tab has a Manually Manage Music checkbox (labeled Manually Manage Music and Videos on video iPods).
In a sense, this is really an unsyncing option. When you select it, iTunes doesn’t sync anything in your iTunes library’s Music, Movies, TV Shows collections, or any of your iTunes playlists, with your iPod.
Note
The Manually Manage checkbox controls only music, audiobook, and video syncing. No matter how the checkbox is set, iTunes will still sync podcasts, photos, contacts, addresses, and games.
When the checkbox is selected, here’s how you get music, videos, and playlists onto your iPod:
Select the items you want on the iPod from your iTunes music collections, your video collections, or any of your playlists. You can select individual items, several items at time, or whole playlists.
Drag the items over the iPod icon under the Devices heading on the left side of the iTunes window.
Drop the items on the iPod icon.
Here’s how to remove items from your iPod:
On the left side of the iTunes window, under the Devices heading, click the triangle to the left of iPod’s name so you can see the iPod’s collections and playlists.
On the left side of the iTunes window, select one of your iPod’s collections or playlists.
At the right, select the items you want to remove.
Press Delete.
The Manually Manage option gives you the most control over what is on your iPod: for example, you can put custom playlists on your iPod and you can rearrange the play order of items in any of your iPod’s playlists. The downside, of course, is that you have to do all of the media management yourself.
Note
If you drag a playlist from your iTunes library to your iPod, it will have the same name in both places, which can lead to confusion when you manually manage: any changes you later make to the playlist in iTunes won’t be reflected in the identically named playlist on your iPod, and vice versa.
Selecting or deselecting the checkbox automatically selects or deselects the Sync Music, Sync Movies, and Sync Episodes checkboxes under their respective tabs in the iPod settings pane.
Tip
iTunes disables the Only Sync Checked Items checkbox on the iPod Summary tab when you manually manage the iPod. However, because other items, such as podcast episodes and audiobooks, can have checkmarks next to their titles, you may want to have the Only Sync Checked Items checkbox selected even if you want to manually manage your music and videos.
Here’s how you can have a check in the Only Sync Checked Items checkbox when you have selected Manually Manage Music:
Every Apple device, with the exception of the iPod shuffle (see Shuffling Your Shuffle), has a Music tab in its settings pane that you use to view or change an device’s music sync settings. These sync settings determine which songs and playlists are synced with your device. Other settings that can appear on this tab control whether music videos are synced—if the device can display video—and whether album artwork is synced—for iPods with color screens.
Note
iPhones and Apple TVs always sync album artwork, and older iPods with black-and-white displays never sync album artwork.
Here’s how to set iTunes to sync music with your Apple device:
Click the Music tab in the settings pane.
Select the Sync Music checkbox.
Note
On iPods, when you select the Sync Music checkbox, the Manually Manage Music checkbox under the Summary tab is automatically unchecked. See Manually managing your music and videos.
Choose what you want to sync. When you turn music syncing on, iTunes offers two radio buttons:
All Songs and Playlists: Select this radio button to instruct iTunes to sync as many of the songs and audiobooks in your iTunes music library with the connected Apple device as will fit. Changes to the iTunes library—such as added songs, modified playlists, song ratings—appear on the device the next time you sync it.
Selected Playlists: Select this radio button and then, in the list of playlists shown below the button, select the playlists you want to sync. With this option set, the device’s music collection contains only the playlists you’ve checked, and iTunes syncs only the changes you make to those playlists in the iTunes library.
Note
Choosing selected playlists makes it easy for you to control which songs end up on your Apple device without requiring you to laboriously roam through your music collection, checking and unchecking individual songs, as described in Syncing checked items.
Of course, this is not an either/or choice: selecting the Selected Playlists checkbox under the Music tab along with the Sync Checked Items checkbox under the Summary tab on an iPhone or an iPod gives you the ability to choose both the playlists and the items in those playlists that get synced—a control freak’s paradise!
If you have an iPhone, Apple TV, or video-capable iPod, choose whether or not to sync music videos. iTunes provides an Include Music Videos checkbox under the Music tab when you connect one of these devices.
If you’re syncing an iPod that can display color images, choose whether or not to sync the artwork along with your music. iTunes provides a Display Album Artwork on Your iPod checkbox when you connect an iPod that can display album artwork.
Note
The Display Album Artwork checkbox is enabled even if you don’t choose to sync music. When Sync Music is deselected and Display Album Artwork is selected, dragging music to your iPod, as described in Manually managing your music and videos, brings the artwork along with it.
Once you choose to sync music, the sync happens automatically every time you connect your Apple device, without any further action required on your part. It’s so easy to use (witness the popularity of iPod) that almost nothing else need be said.
However, here are a few miscellaneous facts related to iTunes music syncing to round out this section:
iTunes’ implementation of automatic syncing means you can’t change your Apple device’s syncing preferences until after a sync takes place: you can’t access the device’s settings pane until you connect it, and the moment you do, the automatic sync occurs. In practice, the quirk seldom causes problems; otherwise, the behavior would have been changed a long time ago.
If you connect an iPod to a different Mac than the one with which you configured it, iTunes warns you with an alert and gives you the option of replacing the device’s contents with the contents of that Mac’s iTunes library. You can (and usually want to) decline that option.
If you connect an iPhone to a different Mac than the one with which you configured it, you won’t get the warning that you’d get with an iPod. However, a copy of iTunes that hasn’t seen an iPhone before by default won’t sync music, video, contacts, calendars, mail accounts, or bookmarks, though it will sync photos. At worst, then, you’ll have to sync with the original Mac to get your photos back on the iPhone. Note that Apple recommends that you sync your iPhone only with a single Mac.
On-the-go playlists that you create on an iPod sync back to your iTunes music library when music syncing is enabled. The iPhone’s on-the-go playlist, on the other hand, does not sync back to iTunes.
You mustn’t disconnect an iPod while it is syncing; doing so can damage the information being synced, and possibly, the iPod’s internal storage. The iPhone is much more forgiving: you can cancel an iPhone sync in progress and then disconnect. To cancel an iPhone sync, simply use the Slide to Cancel slider that appears on the iPhone screen while it is syncing with iTunes.
After years of pooh-poohing the idea that anyone would want to watch video on a tiny iPod screen, in late 2005 Steve Jobs introduced two iPod models that provided video playback. Soon thereafter, the iTunes Music Store began selling episodes of TV shows and music videos, and the following year it began selling feature-length movies. With the advent of the Apple TV and the iPhone in 2007, Apple now sells three devices that play video from your iTunes library (four if you count the Mac).
To accommodate the range of video offerings that Apple now sells, iTunes presents both a Movies tab and a TV Shows tab in its iPod and Apple TV settings panes. When an iPhone is connected, iTunes presents the sync settings for TV Shows and Movies together on the Video tab. As described in Sync Music, music video syncing is handled by a setting under the Music tab for all Apple devices that can play video.
Note
iTunes will sync movies, episodes of TV shows, and music videos to your device only if the device can play them. Apple’s description of compatible video formats for the Apple TV and the iPod can be found in Apple’s “Podcaster Tech Specs” document, under the “Formatting Video for the iPod or Apple TV” heading: http://www.apple.com/itunes/store/podcaststechspecs.html. Video specifications for the iPhone can be found at: http://www.apple.com/iphone/specs.html.
You use the controls on the Movies tab to choose whether or not to sync movies with your Apple device, and to choose which of your movies get synced.
Here are the basic steps you perform to sync movies:
In the Apple TV or iPod settings pane, click the Movies tab; in the iPhone settings pane, click the Videos tab.
For an iPod or an iPhone, select Sync Movies (the Apple TV has a slightly different way of turning movie syncing on; see Movie syncing for Apple TV).
Choose the movies you want to sync:
For an iPhone, performing this last step is simple: iTunes presents a list of movies, and you put a checkmark by the ones you want to move to the iPhone. Mischief managed.
Setting how iTunes syncs movies with an Apple TV or a video iPod, however, can be somewhat more complex. When you select the Sync Movies checkbox on an iPod, additional controls become active. Some of these controls contain embedded pop-up menus in their labels, which allow you to refine how the controls behave (Figure 5, next page). The Apple TV, which has no Sync Movies checkbox, has similar controls that are always active.
Because Apple TVs and video iPods provide similar but subtly differing strategies for specifying how movie syncing works, I deal with each device separately below.

The iPod movie syncing controls use radio buttons to give you a set of either/or choices for syncing your movies. You can sync all your movies, your unwatched movies (or a subset of them), or a specified set of movies, whether watched or not.
To sync all your movies: Select the All Movies radio button. iTunes will sync as many movies with the iPod as will fit on it.
To sync movies you haven’t watched yet: Select the menu Unwatched Movies button, and use the menu embedded in the button’s label to narrow down how iTunes syncs unwatched movies. The pop-up menu offers these choices:
All: Choose this to sync all unwatched movies from your iTunes library to your iPod. An unwatched movie is any movie you haven’t watched to the end.
1 Most Recent, 3 Most Recent, 5 Most Recent, 10 Most Recent: Choose one of these items on the pop-up menu to specify how many unwatched movies iTunes syncs to your iPod, from those that you’ve recently added to your iTunes library.
To sync specific movies: select the Selected menu button. Use the pop-up menu in this button’s label to choose either from a list of individual movies or from your iTunes playlists. Here’s how the choices in the pop-up menu work:
Movies: Choose this to display the title of every movie in your iTunes Library in a list below the button. Select the checkbox beside each movie you want to sync with your iPod.
Playlists: Choose this to display the names of all your iTunes playlists that contain movies in a list below the button. Select the checkbox beside each playlist you want to sync. Any movies in the selected playlists are synced with your iPod. Keep in mind that movies that aren’t in any playlists won’t be synced.
By default, Apple TV comes set up to sync all the movies in your iTunes library. You can narrow down what gets synced to various quantities of unwatched movies—but after you narrow down the syncing list, you can add movies back into it, either individually or collected in playlists. iTunes provides this narrow-down-then-augment capability with a couple of double-decker checkbox-with-embedded-menu controls.
The first checkbox is labeled menu Movies, And (where menu indicates an embedded pop-up menu). The second checkbox is labeled Selected menu. As you might suspect by the “and” in the first checkbox’s label, these checkboxes are designed to work together to form a complete sentence that describes what gets synced; for example, Sync 5 most recent movies, and selected playlists.
Here’s how to use these checkboxes:
To sync all your movies: Select the menu Movies, And checkbox, and choose All from its embedded pop-up menu. iTunes will sync as many movies with the Apple TV as will fit on it.
To sync movies you haven’t watched yet: Select the menu Movies, And checkbox, and choose how many unwatched movies to sync from the embedded menu in the checkbox’s label. You can choose from 1 Unwatched, 3 Unwatched, 5 Unwatched, or 10 Unwatched. An unwatched movie is any movie that you haven’t watched to the end.
To sync selected movies: Select the Selected menu checkbox and choose whether you want to select individual movies or movie playlists from the checkbox label’s embedded menu. The list below the checkbox shows either individual movies or playlists containing movies depending on your choice; use the checkboxes in the list to select the items you want to sync. If the menu Movies, And checkbox is also selected, the number of unwatched movies you have specified is added to what gets synced.
Because the Apple TV, unlike other devices, stays in constant contact with your Mac over the network, the Apple TV syncs whenever it needs to—as long as iTunes is running on the Mac. If iTunes isn’t running, the Apple TV syncs the next time you launch iTunes.
In iTunes, a TV show is similar to an album of music: just as an album has of one or more songs, a TV show has of one or more episodes. Apple TVs, video iPods, and iPhones all provide the same controls to set whether or not to sync TV show episodes with your Apple device, and to choose which episodes of which shows get synced.
To sync TV show episodes, here are the steps:
In the Apple TV or the iPod settings pane, click the TV Shows tab; in the iPhone settings pane, click the Video tab.
Select the Sync menu Episodes Of checkbox.
Limit the number of episodes that will sync by picking an item from the embedded menu in the label of the Sync menu Episodes Of checkbox. You can limit the number of episodes iTunes syncs depending on when you obtained them and whether you have watched them:
All: This choice syncs every video in the TV Shows category—or however many will fit on your device. If your device has a lot of free space—and you have only a few TV episodes in your library—this is a reasonable choice.
1 Most Recent, 3 Most Recent, 5 Most Recent, 10 Most Recent: Choose one of these items to sync episodes you’ve recently added to your iTunes library. You may want to sync only the most recently obtained episodes if space on your device is limited and you’re content with not having older episodes available there. iTunes removes older episodes from the device when your iTunes library has newer ones with which to replace them.
All Unwatched: This choice syncs every unwatched video in the TV Shows category. Choose it if you want only fresh episodes on your device, and, of course, if you have room to store them. Each time you sync (which, for an Apple TV, is any time it needs to), iTunes removes episodes from the device that you’ve watched since the last sync.
1 Most Recent Unwatched, 3 Most Recent Unwatched, 5 Most Recent Unwatched, 10 Most Recent Unwatched: These items sync one or more recently acquired and unwatched episodes of TV shows. They keep the fewest number of episodes on your device when you sync, since the episodes on your device have to be both unwatched and recently obtained to remain there after a sync. Choose one of these items to keep your device’s TV content slim and fresh.
Tell iTunes where to look for episodes to sync: Select the All TV Shows radio button if you want iTunes to choose from among all episodes of all the TV shows in your library, no matter where they are stored. To narrow where iTunes looks for episodes, select the Selected menu radio button, and then choose from that button’s embedded menu:
TV Shows: Choose this if you want to pick and choose specific TV shows in your iTunes library that have episodes you want to sync with your device. When you choose this item from the embedded pop-up menu, a list below the radio button displays the name of every TV show in your Library. Select the checkbox beside the TV shows you want included in a sync.
Playlists: If you prefer to organize episodes in playlists—for example, you choose to keep episodes of comedy shows in their own playlist—choose Playlists. A list below the radio button then displays the names of all playlists that contain episodes of TV shows. Select the checkbox beside each playlist you want to sync. Any TV episodes in your selected playlists sync with your device, using the criteria you established in the Sync menu Episodes Of checkbox’s pop-up menu. Keep in mind that TV shows that aren’t in any playlists won’t sync to the device.
Tip: Transfer Your Purchases from Your iPod
iTunes provides a limited capability to let you sync the purchased items in your iTunes libraries between two Macs authorized to play those purchases. Choose File > Transfer Purchases from iPodName when an iPod is connected to your Mac and all purchased items on the iPod end up in your iTunes library.
Granted, using the iPod to synchronize content between Macs currently only works for iTunes Store purchases, but it’s a start.
If, like me, you’ve become devoted to some of the offerings in the burgeoning world of podcasts, you’ll definitely want to take control of podcast syncing. All the current Apple devices sync podcasts and they all sync them in (almost) the same way. The Podcast tab of the device’s settings pane offers the syncing options you can set to make sure your Apple device always holds the stuff you want to play, and doesn’t waste precious storage space on stuff you’ve already enjoyed.
Follow these steps to sync podcasts with your Apple device:
In the device’s settings pane, click the Podcasts tab.
Select the Sync menu Episodes Of checkbox.
Limit the number of podcast episodes you want to sync by picking an item from the embedded menu in the label of the Sync menu Episodes Of checkbox. You can limit the number of episodes that iTunes synchronizes depending on when you obtained them and whether you have watched or listened to them:
All: This choice syncs episodes from all the podcasts in your iTunes library, no matter when you got them or whether you’ve played them. It’s the safest choice if you have enough storage on your device to hold the podcasts to which you subscribe.
1 Most Recent, 3 Most Recent, 5 Most Recent, 10 Most Recent: Choose one of these items to sync one or more podcast episodes that you’ve recently downloaded to your iTunes library. iTunes removes older episodes from your device when your iTunes library has newer ones with which to replace them. These are good choices if the podcasts to which you subscribe tend not to be of enduring interest, such as news podcasts.
All Unplayed: This choice syncs only unplayed podcasts to your device. Each time you sync, iTunes removes episodes from the device that you’ve played since the last time you synced—in the case of an Apple TV, which syncs continuously, played podcasts are removed immediately. Choose this option if the podcasts to which you subscribe are not the kind you would want to replay again and again.
1 Most Recent Unplayed, 3 Most Recent Unplayed, 5 Most Recent Unplayed, 10 Most Recent Unplayed: Use this item to narrow down the number of unplayed podcast episodes that iTunes syncs with your iPod: only those podcasts that are new and never played remain on your iPod after a sync. With one of these choices, your iPod contains only the freshest podcast episodes.
Warning!
When you choose any of the Unplayed menu items from the Sync menu Episodes Of pop-up menu, iTunes will delete any partially played podcasts on your iPod when it syncs. Why? Because, unlike songs and movies, iTunes considers a podcast on an iPod as having been played if you’ve played any part of it. Oddly, the same does not hold true for the Apple TV or the iPhone: iTunes doesn’t treat a podcast on these devices as having been played until you play to the end of the podcast.
All New: This choice syncs only new podcasts to your device. Each time you sync, iTunes removes episodes from the device that were new the last time you synced, even if they haven’t yet been played. Choose this option to put only the newest stuff on your device, and to discard unplayed but “stale” podcasts.
1 Most Recent New, 3 Most Recent New, 5 Most Recent New, 10 Most Recent New: Use this item to narrow the new podcast episodes that iTunes syncs with your device to only the newest new episodes. You’ll never have more podcasts on your device than the number you choose from this set of items.
Note
The All New and Recent New options aren’t available on the Apple TV, which syncs whenever iTunes is running. If you think about it, this makes sense: if the option were available, every time iTunes downloaded a new podcast, all other podcasts on the Apple TV would be removed because they would no longer be new.
Select a radio button to set which podcasts iTunes will check for episodes to sync:
All Podcasts: Select this button if you want iTunes to choose from all of the podcasts to which you subscribe for the episodes that it will sync.
Selected Podcasts: Select this button if you subscribe to some podcasts that you don’t want on your device. When you select it, a list below the radio button lists all the podcasts to which you subscribe. Select the checkbox beside each podcast you want to sync. Any episodes that belong to the selected podcasts sync with your device, and are filtered using the criteria you chose in the Sync menu Episodes Of checkbox’s pop-up menu.
Note
Although you can’t copy podcast episodes from a device to your iTunes library, podcast syncing does transfer some information from a podcast on your device to your library: iTunes marks an unplayed episode in your library as played once you’ve played it on your device and then synced it (which in the case of Apple TV is immediately), and it also syncs the current playing position, so if you started playing a podcast on your device, you can pick up where you left off in iTunes.
iTunes provides photo syncing for iPhones, Apple TVs, and those iPods that can display photos, a group that includes all the iPods and iPod nanos that Apple currently ships. When iTunes syncs photos, it reduces the images’ resolutions to match the resolution of the device’s screen and to conserve both storage space and, for iPods and iPhones, battery power—resizing pictures to fit the those devices’ screens makes their processors consume more energy.
Note
By photo iTunes means a file in one of several image formats, having the following filename extensions: JPG, JPEG, TIFF, PICT, GIF, PNG, JPG2000 or JP2, PSD, SGI, or BMP.
To specify how iTunes syncs photos, follow these steps:
Click the Photos tab in the device’s settings pane.
Select the Sync Photos From checkbox to turn on photo syncing.
Choose which photos to sync—first, choose an item from the pop-up menu, located to the right of the Sync Photos From checkbox; second, refine your choice:
iPhoto or Aperture: When you choose either of these items from the pop-up menu, you can then select the All Photos and Albums radio button to sync all your photos, or at least as many as will fit. Alternately, you can select the Selected Albums button and then pick albums by selecting their checkboxes in the list that appears.
A folder: If you choose this, either directly from the pop-up menu or via the Choose Folder command, iTunes syncs photos from the selected folder and its sub-folders—but not from sub-folders of those sub-folders. When you choose a folder, you can then select All Photos to sync all the photos, or as many as will fit, or you can sync only photos in specific sub-folders by selecting Selected Folders and then, in a list of folders that appears, clicking the checkboxes by the desired folder names.
Tip
You can drag items in the lists that appear below the radio buttons up and down to change the order in which iTunes syncs. If iTunes can’t fit all your photos on the device, it will include as many will fit, beginning from the top of the list.
The next time you sync, iTunes will sync everything else (songs, videos, podcasts, and so on) before it starts syncing photos (but see “Apple TV syncing order and photos,” below). It will sync as many as photos as it can with the device if storage space is limited.
If you have enabled disk access on your iPod (a checkbox near the bottom of the Summary tab—see Figure 4) and want to put regular copies of your photos on the iPod, select Include Full-resolution Photos: when you do so, iTunes not only syncs photos for viewing on your iPod but also copies full-resolution versions of the photos to a Photos folder on the iPod, providing a convenient way for you to move photos between Macs.
The Apple TV by default syncs media in this order: Movies, TV Shows, Music, Podcasts, and then, finally, Photos. If you have a lot of video or music, there may be no room left for the Apple TV to store any of your photos. For avid photographers, this is obviously unacceptable.
iTunes therefore provides a Sync Photos Before Other Media checkbox on its Photos tab. When you select this checkbox, the Apple TV syncs media with iTunes in this order: Photos, Movies, TV Shows, Music, and then, finally, Podcasts. This option, of course, still may not satisfy a podcast addict who also possesses a plethora of photos.
The iTunes Store sells games that the nimble-fingered among us can play on video iPods. You can manually drag games from iTunes to your iPod, or you can use settings available under the Games tab in the iPod settings pane to have them transfer automatically.
Note
Currently, Apple does not sell games for any of its other devices. Many industry observers have speculated, however, that games eventually will become available for iPhones. Should that come to pass, one might expect that game syncing with an iPhone will resemble iPod game syncing... on the other hand, where Apple is concerned, expectations are often confounded.
Select the Sync Games checkbox to have iTunes copy games you’ve purchased from the iTunes Store to the iPod. When you turn on game syncing, you can then choose which games to sync by selecting one of two radio buttons:
All Games: With this selected, all the games you’ve downloaded to iTunes end up on your iPod.
Selected Games: Select this to enable a list of games displayed below the button. You choose games to sync by selecting checkboxes by the games’ titles.
One of the first non-musical enhancements that appeared on the iPod was the capability to store and view calendar and contact information. As Syncing with Apple devices explains, once upon a time you synced these items with your iPod using iSync, but ever since the release of iTunes 4.8 you use iTunes to sync such information with an iPod.
Now that the iPhone has entered the Apple device fold, you use iTunes to sync calendar and contact information with it, too—and not just your iCal calendars and Address Book contacts, but your Safari bookmarks and Mail account settings, as well. The Apple TV, however, does not sync personal information—not that it couldn’t (the device is running a full version of Mac OS X, after all), but apparently because Apple thought few people would ever want to peruse their contacts or calendars on a high-definition, wide-screen, plasma television.
Note
Information maintained by applications that sync with Address Book or iCal (such as Microsoft’s Entourage; see Sync Entourage) is also synced with the iPhone or the iPod when you sync.
Which device settings tab you use to control personal information syncing depends on the device:
iPod: Use the Contacts tab, which is divided into two almost identical settings areas, one for Address Book contacts and one for iCal calendars.
iPhone: Use the Info tab, which is divided into areas for syncing Address Book contacts, iCal calendars, Safari bookmarks, and Mail account settings. It also includes an area for resetting the iPhone’s synced information.
Turning on personal information syncing is simply a matter of selecting a checkbox for the kind of information you want synced with your iPod or iPhone.
Contacts: Select the Sync Address Book Contacts checkbox in the Contacts area of the Contacts tab (iPod) or Info tab (iPhone).
Calendars: Select the Sync iCal Calendars checkbox in the Calendars area of the Contacts tab (iPod) or Info tab (iPhone).
Mail account settings: Select the Sync Selected Mail Accounts checkbox in the Mail Accounts area of the Info tab (iPhone only).
Safari bookmarks: Select the Sync Safari Bookmarks checkbox in the Web Browser area of the Info tab (iPhone only).
The personal information syncing options provided on the iPod’s Contacts tab are straightforward:
Contacts: Select either the All Contacts radio button or the Selected Groups button. When you select the latter, iTunes enables a list of checkboxes that you can use to select which of your contact groups to sync to your iPod.
Calendars: Select either the All Calendars radio button or the Selected Calendars button. When you select the latter, iTunes makes a list of checkboxes available that you can use to select which of your iCal calendars to sync to your iPod.
Because you can’t change the contact or calendar information on an iPod, the syncing goes only one-way: from your Mac to the iPod. This means that there’s no risk of messing up your Mac’s Address Book contacts or iCal calendars when you sync it with an iPod.
The iPhone, unlike the iPod, allows you to add, delete, or modify almost all the personal information that you sync between it and your Mac. Apple has therefore designed the iPhone information syncing management options in iTunes and the way they operate to be simple to understand and, even more importantly, to be reasonably safe to use. For example, you can’t delete more than one contact or calendar entry at a time on the iPhone, which means you can’t lose all of your Mac’s contacts or events with a careless finger-tap or two and a subsequent sync.
The following sections describe the syncing options available on the iPhone settings pane’s Info tab.
Once you turn on Address Book contact syncing (see Turn on personal information syncing for iPods and iPhones), you can specify some additional options:
Choose contact groups: You can choose between syncing all your contacts (select the All Contacts button) and syncing one or more individual contact groups from Address Book (select the Selected Groups button, and then select the groups you want in the Selected Groups list). In either case, both your contacts and the groups to which they belong are synced with the iPhone.
Changes you make to contacts (including assigning a photo to a contact) travel back to Address Book when you sync. And, although you can’t create new contact groups on the iPhone, any changes you make to a group on the iPhone (such as adding or removing contacts) sync back to that group in Address Book.
Sync Yahoo! Address Book: iTunes can sync contacts with a Yahoo! Address Book (accessible at http://address.yahoo.com/). Select Sync Yahoo! Address Book at the bottom of the Info tab’s Contacts area, click the Configure button, and then enter your Yahoo! ID and password in the dialog that appears.
On the first sync after you enable Yahoo! syncing, the sync engine presents a dialog where you can choose to merge the Yahoo! address book and the Mac’s Address Book (and, by extension, the iPhone contact list) or to replace the Yahoo! address book’s contents with the Mac’s Address Book contacts. On subsequent iPhone syncs, changes you have made to contacts on the iPhone, in Address Book, or to your Yahoo! contacts sync with your other contacts.
Turning on iCal calendar syncing (see Turn on personal information syncing for iPods and iPhones) enables these additional calendar syncing options:
Choose the calendars to sync: Select All Calendars to sync every calendar in iCal with your iPhone. Select the Selected Calendars button to sync specific iCal calendars, and then select the calendars your want to sync from the list below the button.
When you sync, events from the calendars you have chosen show up in the iPhone calendar application. Note, though, that the iPhone places all the events from iCal into the single calendar it maintains. Changes made on the iPhone to events that come from iCal, however, sync back to the appropriate iCal calendar.
Limit syncing to recent events: To purge older events from your iPhone, and to keep old events from appearing on your iPhone from iCal, select the Do Not Sync Events Older Than number Days checkbox. You can specify how old an event must be to be ignored when you sync your iPhone; the default is 30 days.
Specify where new events go in iCal: Because the iPhone has only a single calendar, iTunes provides the Put New Events Created on this iPhone into the Calendar calendar name menu. Choose a calendar from the menu to send iPhone-created events to that calendar; the default is the Home calendar in iCal.
Mail account syncing copies the account setups—such as account names, login names, passwords, protocols, and port information—from your Apple Mail settings. This feature is a convenience that allows you quickly to set up your mail accounts on the iPhone.
To use it, select the Sync Selected Mail Accounts checkbox, and then select the mail accounts that appear in the list below the checkbox.
Note that iTunes doesn’t sync your Mac’s local mail folders, your mail rules, nor your signatures to your iPhone. Also, any changes you make to the mail account settings on the iPhone do not sync back to Mail: mail account syncing is a one-way trip.
The bookmarks syncing feature simply keeps the bookmarks you have in Safari on your Mac in sync with the bookmarks you have in Safari on your iPhone. This is the easiest sync feature in the entire iTunes/iPhone menagerie of syncing to manage: to enable it, just select the Sync Safari Bookmarks checkbox.
When bookmark syncing is enabled, any changes you make to your bookmarks on your iPhone sync back to your Mac and vice versa.
If you somehow manage to mangle the synced information on your iPhone, you can use options in the Advanced area of the iPhone settings pane’s Info tab to replace the information on your iPhone with the information on your Mac. You can replace calendar, contact, bookmark, and mail account information. Select the checkbox for the information you want to replace. The next time iTunes syncs with the iPhone, the selected information on the iPhone is replaced with the corresponding information from your Mac.
“Wait a minute!” I can hear you saying (I have very good ears). “What good does that do me if syncing takes place as soon as the iPhone is connected? Won’t my iPhone’s mangled information mess up my Mac before I have a chance to replace it?” Good question. In fact, you can instruct iTunes to skip its automatic sync when an iPhone is connected by using a keyboard trick:
Before you connect your iPhone, open iTunes.
Hold down the Command and Option keys.
While holding down the keys, connect your iPhone.
Wait until the iPhone appears under Devices in the left pane of the iTunes window, then release the keys. No automatic sync takes place.
Once the iPhone appears in iTunes’ Devices list, you can set the iPhone’s reset options in the Advanced area of its Info tab and click Apply to commence a new sync. This sync will replace your iPhone’s information with the information on your Mac.
To be doubly safe, back up your Mac’s contact, calendar, and bookmark information before you connect your iPhone (see Back up and reset in the Appendix). Don’t worry about the mail settings: iTunes never syncs the mail settings from the iPhone to the Mac, but only from the Mac to the iPhone. In the event the worst happens, you can restore your Mac’s information from your backups.