Connect with a Personal Hotspot
In addition to a Wi-Fi radio, every smartphone and some tablets contain a built-in modem that lets them access high-speed mobile data networks. Early in the smartphone era, manufacturers took advantage of pairing the two together so you could use Wi-Fi to route traffic via the cellular data modem.
This took a lot of twists and turns in terms of cell carrier service plans, options, overages, and throttling, but most smartphones and some tablets (those with cellular modems) can act as personal hotspots for a few or many other devices, whether laptops or other phones and tablets.
While “personal hotspot” implies a Wi-Fi hotspot connection, many phones and tablets can also use Bluetooth or USB to extend access to other devices. On some hardware, all three methods may be used simultaneously.
In this chapter, I first discuss how to turn your device into a personal hotspot and then I talk about how to connect with a personal hotspot.
Turn on Hotspot Sharing
Here’s how to turn on the hotspot feature in iOS, iPadOS, and Android.
Enable in iOS or iPadOS
On any device capable of acting as a Personal Hotspot, Apple automatically enables access for all of your Apple hardware logged into the same iCloud account. Simply select the Personal Hotspot from your Wi-Fi menu in iOS, iPadOS, or macOS, and it turns on. Personal Hotspot is always on standby for you.
You can also allow members of a Family Sharing group to have access in the same way. In the Settings app, tap Personal Hotspot, tap Family Sharing, and enable access. You can then set for each individual whether you are prompted to allow access or they can just use it.
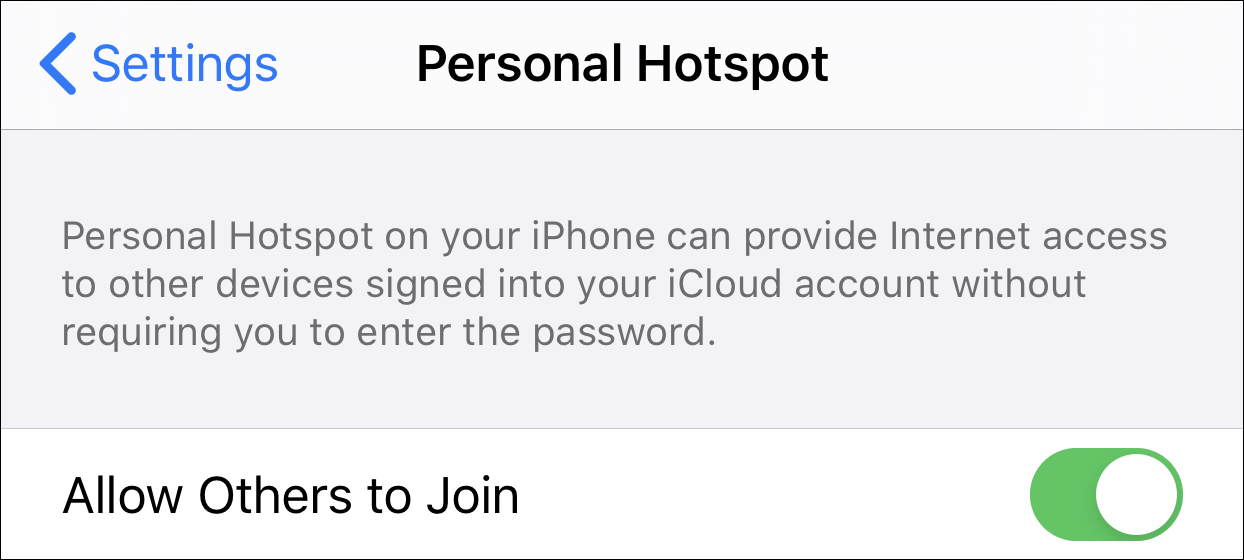
Apple lets you enable a broader access method, too. In iOS or iPadOS, open Settings, tap Personal Hotspot, and tap Allow Others To Join. The operating system sets a default password the first time you tap this switch; you may want to change this to something more memorable or easy to enter. iOS and iPadOS always set the name of your hotspot to the device’s name (Figure 40).
Allow Others To Join also enables tethering via USB and Bluetooth.
Enable in Android
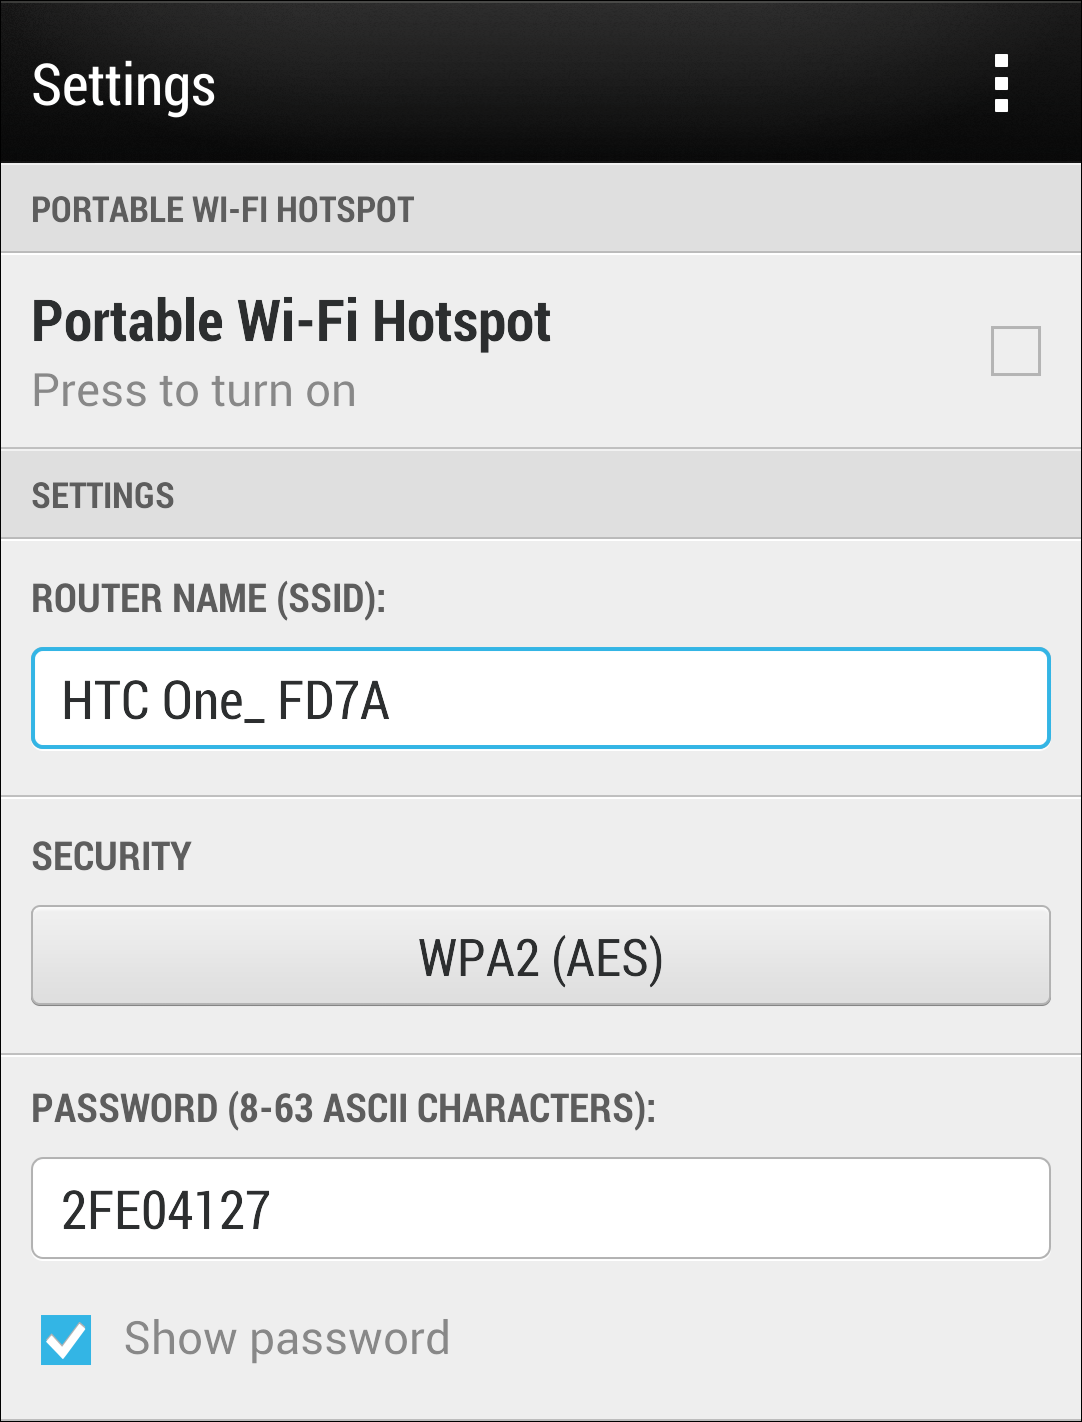
Android requires a few more steps. In Settings, under Wireless & Networks, tap More and then tap “Mobile network sharing. Tap “Portable Wi-Fi hotspot” to enable the hotspot, or tap “Portable Wi-Fi hotspot settings” to change the network name, security method and password, as well as to manage users (Figure 41). You can also tap the More Options ![]() menu and tap Advanced. From here, you can modify additional items, like the Wi-Fi channel and DHCP service over the WLAN.
menu and tap Advanced. From here, you can modify additional items, like the Wi-Fi channel and DHCP service over the WLAN.
To tether via Bluetooth or USB, you may have to enable these features via the same “Mobile network sharing” view:
Tap “USB network setting,” and you can switch from None to one of three options. “Smart network sharing” effectively picks the right option from the next two as the phone senses it. “USB tethering” locks the phone into sharing its cellular connection to the connected device, while “Internet pass-through” shares a network connection to the phone from a computer.
“Bluetooth tethering” is a simple checkbox you can turn on or off.
Disable Sharing
To turn off the hotspot on the device that’s sharing its connection, tap to reverse the option above.
You can also change the Wi-Fi password or disable USB tethering (Android), disable Bluetooth sharing (Android), or turn off the Wi-Fi or Bluetooth radios (iOS and Android). Changing the Wi-Fi password prevents devices with a stored password from reconnecting automatically or manually until you provide the changed password.
Connect to a Personal Hotspot
Generally, connecting to a personal hotspot is just like connecting to any internet connection, but there are a few minor differences, telltale symbols, and one-time setup factors you should keep in mind.
Access via Wi-Fi
Using Wi-Fi to connect to a Personal Hotspot network is the easiest case because no special setup is required. You use whatever method you normally employ to connect to a Wi-Fi network from the device.
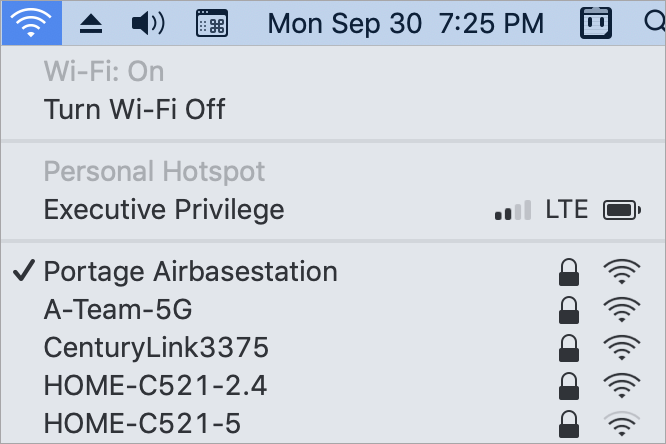
In iOS, iPadOS, and macOS, an iPhone or iPad hotspot appears in the Wi-Fi list in a special place (under a Personal Hotspot label) and with a special icon interlocked chain icon (Figure 42).
Tether with USB
With a personal hotspot enabled, connect your hotspot device to your computer with a USB cable. To halt the active USB tethering connection, disconnect the USB cable.
Configure with macOS
The first time you enable Personal Hotspot’s Allow Others To Join option and plug the device in to a Mac via USB, macOS alerts you that the interface is added and the Mac’s System Preferences > Network pane adds an adapter entry to the list on the left (Figure 43).

macOS automatically activates a tethered link and turns that red dot green.
You can disable the iPhone or iPad adapter profile to prevent a re-connection. In System Preferences > Network, select the iPhone USB or iPad USB adapter, and then from the gear ![]() pop-up menu, choose Make Service Inactive. Click Apply in the lower-right corner.
pop-up menu, choose Make Service Inactive. Click Apply in the lower-right corner.
Configure with Windows
The tethered USB device will appear in Network Connections as an “Ethernet” device, likely labeled Mobile Device Ethernet. It should connect automatically, but you can double-click that adapter to modify settings. You can remove the profile to disable a connection.
Tether with Bluetooth
Bluetooth devices have to be paired in order to communicate, thus the first time you use a computer, tablet, or phone with your personal hotspot, you have to use Bluetooth settings on both devices to create a connection.
How To Pair
Here’s how to make sure you’re set up to pair, and then confirm pairing:
On the mobile device, make sure Bluetooth is enabled in Settings > Bluetooth (iOS, iPadOS, and Android). Also, make sure it’s discoverable in Android in Settings > Bluetooth, by tapping “Not visible to other Bluetooth devices” to enable them to see it. iOS and iPadOS keeps discoverability turned on whenever Bluetooth is enabled.
On the other device, check that Bluetooth is on. (Check the Bluetooth system menu item in macOS or the Bluetooth system tray item in Windows.)
Select the smartphone on your computer:
In macOS, open System Preferences > Bluetooth and click the Connect button next to the device.
In Windows, click the Action Center and then click Bluetooth. Click Connect and pick the phone’s name.
In iOS or iPadOS, tap Settings > Bluetooth, and tap the device’s name under Other Devices.
In Android, tap Settings > Bluetooth, and then tap the device under Available Devices.
When prompted on each device, check that the pairing PIN shown on each is identical. Then tap Pair or Connect, as the case may be, on each device (Figure 44).

Once you’re paired, you can tether to the personal hotspot by using the Bluetooth settings view (iOS, iPadOS, and Android), system menu (macOS), or Action Center (Windows) to connect and disconnect.
How To Unpair
You might want to discard a stored Bluetooth pairing if, for instance, you’re using a friend’s device or you don’t want someone else using your iPhone or iPad with the paired connection:
In macOS, right-click the device name in the Bluetooth preference pane, and select Remove and confirm.
In Windows, open Settings > Devices > Bluetooth & Other Devices, and click the device you want to remove. Now click Remove Device and confirm.
In iOS or iPadOS, tap Settings > Bluetooth, and tap the device’s name under Other Devices. Tap the info
 button, tap Forget This Device, and then confirm.
In Android, tap Settings > Bluetooth, and then tap the device under Available Devices. Tap Unpair; there’s no confirmation!