
Pick a Wi-Fi Channel
This chapter helps you tune your network for optimum performance. It starts by discussing the portion of the radio frequency spectrum that your access point uses and then shows how to determine the right channel to use in each frequency band.
Many modern gateways and range extenders automatically pick channels for you, but you may need to tap into this knowledge when your network isn’t performing as expected.
Spectrum Trade-Offs
To make the best choice when selecting channels for an access point, you may need some background on spectrum and channel choices. (If you don’t know the basics of spectrum bands and channels, brush up with Wi-Fi Spectrum before proceeding here.)
Choosing Between the Bands
Let’s begin by comparing the two bands. The 2.4 GHz band is crowded with Wi-Fi networks, Bluetooth devices, and other uses. The 5 GHz band, on the other hand, is relatively empty: almost no common personal or business electronics makes use of most of it. In the United States, the 5 GHz band has almost seven times the amount of frequency available than the 2.4 GHz band. Each band is divided into a series of 20 MHz channels, which are spaced 5 MHz apart.
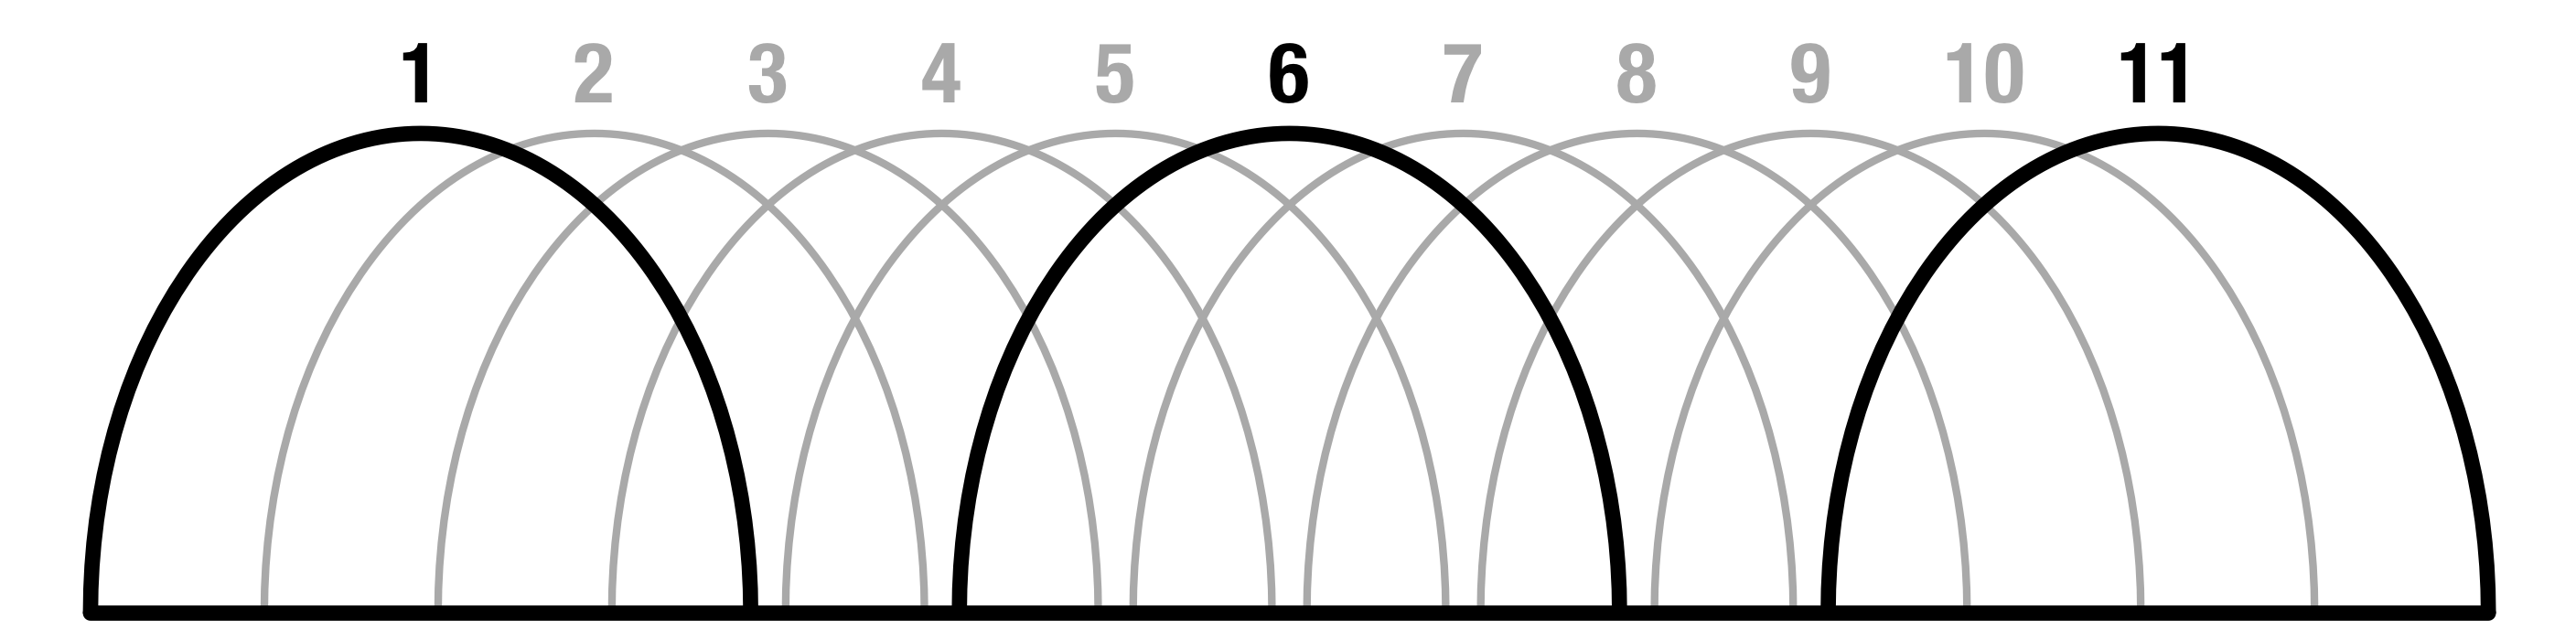
In the 2.4 GHz band, Wi-Fi uses channels that overlap because of the lack of available spectrum when the group that created early Wi-Fi standards developed it. That means you have to plan carefully or let a base station figure the channel out automatically for you (Figure 16).
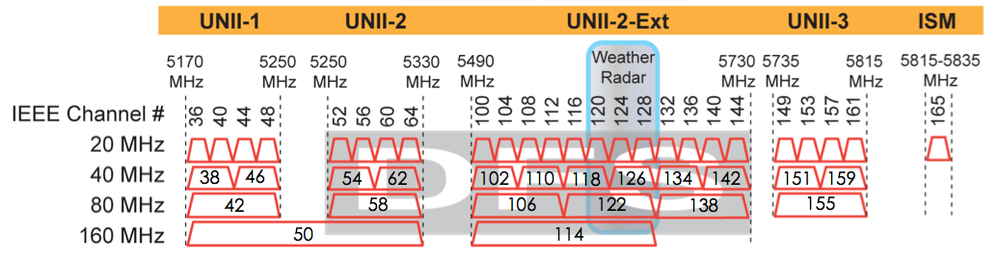
In the 5 GHz band, Wi-Fi standards only use non-overlapping channels, which makes the band easier to work with (Figure 17). However, the complexity of channel allocation, division into segments, and the use of wide channels (see sidebar, below) can be a little overwhelming, as you can see in that figure. The good news? You don’t have to manage nearly any of this: the devices (and the protocol) limit the choices you have to make.
One more way to visualize this may be via a practical example. With WiFi Explorer, a macOS app for detecting and visualizing the network usage around your Mac, you can view how base stations span channels in both bands (Figure 18). Height shows relative signal strength; width, the channels occupied.

Maximizing Throughput
The 5 GHz band offers consistent throughput—the amount of actual data passing over the network exclusive of overhead used to transmit it. With 2.4 GHz, however, throughput is all over the place. When other technologies interfere in the 2.4 GHz band, Wi-Fi devices and access points are forced to slow down.
The highest possible Wi-Fi 4 rate happens when a wireless adapter and access point use the 5 GHz band with 40 MHz, and the highest WiFi 5 and 6 rates can take place in 5 GHz at 160 MHz.
Dealing with Distance
Wi-Fi performs at its highest rates the closer you are to an access point. For newer flavors, this can be even more extreme, because they offer their fastest performance only when there’s relatively little background noise relative to signal strength. The busier and more chaotic the spectrum between an access point and a wireless adapter—because of other networks in the vicinity or just plain noise in the spectrum from other kinds of hardware—the worse performance will be. But distance is also a good predictor.
As noted in the previous chapter, Wi-Fi signals can pass through seemingly solid objects, but the fewer walls and cabinets and such, the better. If you can see your access point from the device you’re using, your throughput is generally better than if you can’t. Use that guideline when you’re planning the right spot for a Wi-Fi gateway or mesh node.
In practice, you need the best throughput between a digital TV or laptop, table, or phone and the source of the streaming media. Most other devices are more “tolerant” of varying levels of throughput or less throughput.
Choosing a Channel
By default, gateways assign channels automatically based on which one is experiencing the least congestion. With modern hardware, you shouldn’t have to intervene.
However, there may be occasions or locations when you need to lock your Wi-Fi network on a specific gateway or other device to a specific channel. Read on for those details.
2.4 GHz
The 2.4 GHz channels are numbered 1 to 14, although just 1 to 11 are available in the United States. Channels 1, 6, and 11 are typically chosen in the United States because they lack any substantial overlap with each other. (In countries in which 14 channels are available, 1, 6, 10, and 14 may be used with a little overlap, but not enough to cause noticeable problems.)
What that means in practice is that if you want to control multiple gateways’ 2.4 GHz channel assignments, you should lay out your network so that gateways within range of each other use either 1, 6, or 11. If you have three gateways, that’s easy! Pick one channel for each. If you have four or more, plan to have gateways that use the same 2.4 GHz channel be farthest apart.
You may also discover terrible performance—bad throughput or lots of network connections dropping—in a given channel. That could be because of some competing 2.4 GHz use, or even an old baby monitor, some of which used to spew out a lot of noise in transmitting audio or video over 2.4 GHz (not using Wi-Fi, but proprietary or analog specs). That might make you choose a channel specifically to lock out that problem.
5 GHz
In the U.S., the 5 GHz band offers 25 non-overlapping 20 MHz channels. (See earlier discussion and Figure 17.) These are grouped together as adjacent channels:
36, 40, 44, 48 (grouped as Unlicensed National Information Infrastructure 1, or UNII-1)
52, 56, 60, 64 (UNII-2)
100, 104, 108, 112, 116, 120, 124, 128, 132, 136, 140, 144 (UNII-2 Extended)
149, 153, 157, 161 (UNII-3)
165 (ISM, a generic term for industrial/scientific/medical)
Because Wi-Fi 4, 5, and 6 can all dynamically stretch from 20 MHz to as wide as to 160 MHz in the later standards, it’s unlikely you have a reason to pick a channel! Only certain channels can gang up with adjacent channels to make these wider swaths, and automatic assignment will be the best unless you have very particular requirements or specific kinds of interference.
Because of certain restrictions in the 5 GHz band to avoid interference with government and military uses in some countries, modern access points automatically move their broadcast channel around—and tell associated wireless adapters to do so, too. This allows for much greater flexibility and interference avoidance.
If you live elsewhere in the world, you’ll find that the 5 GHz band is much less available. Some countries allow a small slice of 4.9 GHz spectrum to be used instead.
Create Separate 2.4 and 5 GHz Networks
Simultaneous dual-band gateways allow devices that connect to switch between the two bands as seamlessly as roaming among multiple gateways with the same network name and security settings.
However, you may find cases in which you want to separate your 2.4 GHz and 5 GHz networks. This used to be more common, because bandwidth was limited enough, even in 5 GHz, that people would want to shunt slower, older, and less-time-critical devices to 2.4 GHz.
Gateways still largely retain this capability of creating two networks, separated by band. In fact, in some cases, you have to change the default setup so that the network name is identical between the two bands!
With a different network name for 2.4 GHz and 5 GHz, you can choose which devices connect to which network by name. A device will not roam among bands with different names unless you connect it at some point to each network and let the device store the password for future connections.
Look for a tab or link in your gateway admin software labeled Wireless Networking or Wireless Setup. If you don’t see checkboxes and labels for each network, as in this NetGear example in Figure 19, click an Advanced Options or Wireless Options button (or consult the manual).

You typically set up two separate networks in either of these ways:
In a single view, as in the figure, you name the 2.4 GHz and 5 GHz networks differently.
In a single view or a separate dialog, you select a popup menu or check a box that says something like “separate 5 GHz network name.”
Once you’ve named the networks differently (and restarted the gateway if prompted), you can figure out which of your devices should be locked to a given band.
Troubleshoot Your Connections
In Make a Plan, I discussed how to figure out the best placement of your Wi-Fi networking hardware. Now that you understand more about spectrum and channels, here’s some advice that can help you when your network isn’t working as expected. Ask yourself these questions:
How fast am I connecting? Wi-Fi automatically drops down through many intermediate data rates. It starts with the maximum that a wireless client and access point can communicate with using the best standard they both agree on, such as Wi-Fi 5. The devices then drop down through slower and slower speeds until they find a mutually reliable one. You probably are experiencing a problem, for instance, if you have an 867 Mbps 5 GHz network, but you’re only connecting at 54 Mbps.
What standard is in use? You might also experience slower connection speeds if the client and access point aren’t using the same Wi-Fi standard. The pair might have dropped down to an older (slower) standard, or something might be misconfigured on the gateway or mesh router.
How noisy is it? All radio systems teeter between signal and noise. Signal is useful information, whether it’s a human voice or data bits. Noise is chaotic and reduces the quality of the information content. Wi-Fi’s signal-to-noise ratio (SNR) and separate signal and noise components may appear in software monitoring tools I describe below. You want as high a signal and as little noise as possible. The ratio between the two, the signal-to-noise ratio (SNR), defines the space in which information can pass.
Testing from Device to Access Point
If you’re trying to understand network performance, you need to be able to gauge how fast and well devices connected to the network are performing.
When you want to check for problems using your computer’s built-in tools, first connect to the network. Then, follow directions for each platform:
In macOS: hold down the Option key and select Wi-Fi
 menu in the system menu bar. Under the current network, you’ll see some salient details like Tx Rate, or transmission rate (the maximum throughput at your current location for your device), and the PHY Mode (the type of 802.11 protocol used). You’ll also see RSSI, a form of signal measurement, and noise (Figure 21).
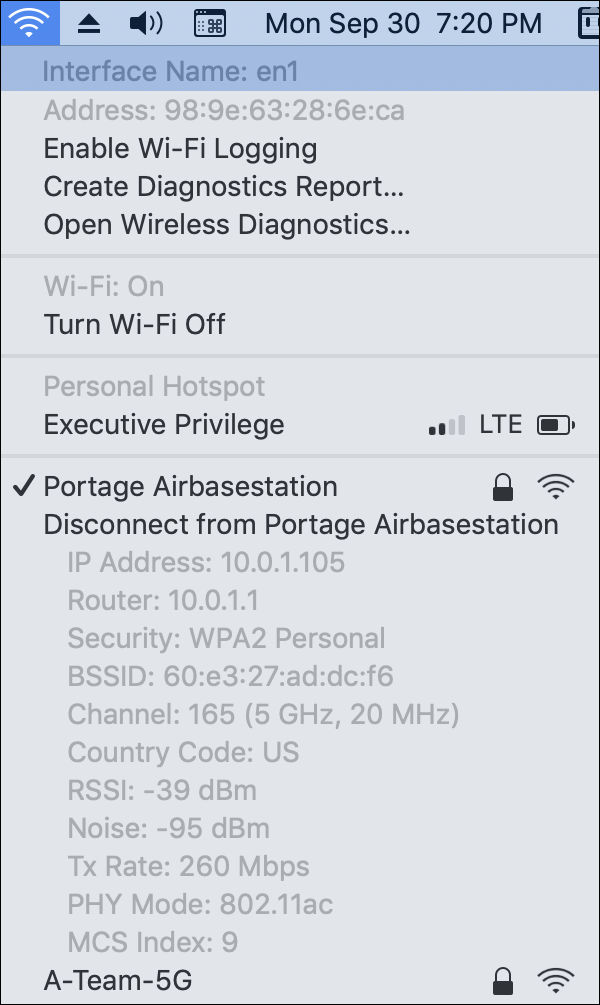
Figure 21: If you hold down Option before selecting Wi-Fi in your Mac’s menubar, you’ll see a lot of useful information. For even more detail, hold down the Option key, select the Wi-Fi
menu in the system menubar, and choose Open Wireless Diagnostics. Use items in this diagnostic tool’s Window menu to see details. For instance, if you choose Window > Info, you see the same information as in the Option-click Wi-Fi menu. Choose Window > Performance to monitor Wi-Fi performance over time by data rate, quality (a somewhat arbitrary number, the higher the better), and signal to noise.In Windows 10: The Wi-Fi status dialog tells you the current connected data rate (Figure 22). To find it, click Start, and then select Settings > Network & Internet > Status > Network and Sharing Center. Next to Connections, select your Wi-Fi network’s name.
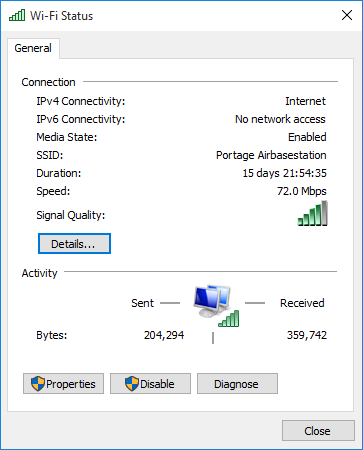
Figure 22: Open Wi-Fi Status via the Network and Sharing Center to see more detail about your Wi-Fi network. A free and well-reviewed app, WiFi Analyzer, available in the Microsoft Store, provides more detailed monitoring and data.
In iOS or iPadOS: When you’re using an iPhone or iPad, third-party apps are the way to go. The folks at NetSpot have compiled a handy list of recommended Wi-Fi scanning apps.
In Android: Again, the OS offers little insight—just the connection speed if you dig down deeply—so turn to the well-reviewed Wifi Analyzer (ad supported) (Figure 23).

Testing from Network to Client
Depending on the model of gateway or other device you have, you might be able to use your network hardware’s administration software to see how well clients are connecting.
Some have no information whatsoever—the TP-Link router on my network lists clients in a few ways, but offers no connection insights. When I spot-checked Linksys and Netgear routers, I got the same result.
Apple’s discontinued AirPort line, on the other hand, offered extensive details. If you own AirPort gear, here’s how to find that information in AirPort Utility in macOS and iOS/iPadOS:
In macOS: Select a base station to see a list of any connected hardware beside the Wireless Clients label. Hover over, but do not click, any client name, and a floating panel appears (Figure 24), showing connection details: the data rate, RSSI, and PHY mode, as described earlier in this section. You can also see this information in AirPort Utility’s Summary pane by Option-clicking the Edit button.
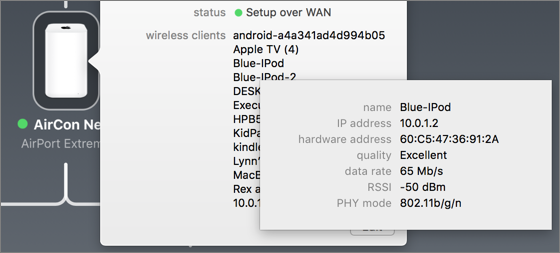
Figure 24: In AirPort Utility for Mac, the Wireless Clients entry shows connection information. Wow, that’s a lot of clients for a family of four in a small house! In iOS or iPadOS: Select a base station, then tap Wireless Clients (you may have to slide down), and then tap a client name. Then tap Connection to get the details on Data Rate, RSSI, and (PHY) Mode (Figure 25).
