Share Your Screen
Zoom makes it easy to share your screen to from a few to as many as hundreds, or even thousands, of people. Knowing a few key settings will help you from the get-go.
Pick What You Share
What you can share varies by platform, but it includes photos, apps, a full monitor or device screen, and files that an operating system can show natively without requiring another app, like video and PDFs.
Share from a Desktop App
Desktop apps offer a very long list of what you can share to other participants. Start by selecting an item and then proceed to share.
Choose a Desktop Option to Share
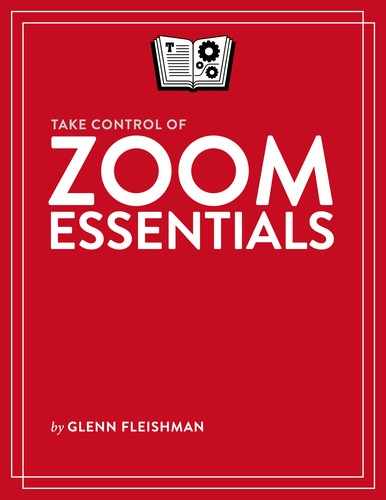
Click the Share Screen button and Zoom reveals a three-tabbed window with an array of choices. Shared items either have a green outline or appear in a green-outlined window in Zoom, depending on the item.
The Basic tab includes screen-based options (Figure 7):
Any display: Zoom notes these as Desktop 1, Desktop 2, and so forth, and overlays large numbers on the corresponding displays.
Whiteboard: A blank screen appears that you (and others) can draw on with annotation tools available in a toolbar.
iPhone/iPad via AirPlay or via Cable: Zoom can stream the screen from a device connected via Wi-Fi or via USB (macOS only). The device’s display appears as a resizable window in Zoom.
Any app window: All app windows appear as available choices. You can limit which windows are shown across an app via Share Screen settings: click Share Screen and click Advanced, then select “Share selected app window only.” Zoom switches to the app’s window, and your interactions in the app are shared to the meeting.
The Advanced tab isn’t that different from some items in Basics, but presents four choices:
Slides as Virtual Background (beta): Zoom can export PowerPoint (macOS, Windows) or Keynote (macOS only) slides from a deck you specify, and overlay your live video as a silhouette on top, letting you be effectively in your presentation.
Portion of Screen: An outline appears that you can drag around your display (or across displays) and then drag on a corner to resize. This is an extremely useful way to take a portion of a window in an app without interface elements.
Music or Computer Sound Only: If you want to pump in just audio, you can pick this option.
Content from 2nd Camera: This allows you to share an additional video input, such as a document camera, instead of selecting it as a different source for your participant video stream.
The Files tab reveals integrations with online cloud file services, including Box, Google Drive, and Microsoft OneDrive. Sharing a file this way—as opposed to within an app you’re running on the same computer—opens it using a Zoom viewer that relies on formats supported natively on the operating system.
Control Sharing from the Desktop
When you’re ready to share, click Share and the selected content or item is shared. Instructions appear if you need guidance on how to proceed, like connecting an iPhone or selecting part of a screen.
Zoom brings up a control bar that shows meeting options alongside screen-sharing controls, including showing your status and a Stop Share button to end the session (Figure 8).

Click the More  icon, and you have several granular controls:
Disable Attendee Annotation: Even when you’re not the host, you can prevent others from marking up your screen.
Hide Names of Annotators: Enabled by default, Zoom labels attached to all on-screen markup. Select hide to remove those.
Hide Floating Meetings Controls: If you want to avoid having this bar float around, choose this option or press ⌘-Control-Shift-H in macOS or Control-Alt-Shift-H in Windows. Press Esc to restore it.
Share Computer Sound: You can toggle this option, which is also found when originally selecting a shared item.
Optimize Screen Share for Video Clip: Zoom can be optimized for shared videos, but only if you check the box shown in Figure 7.
Meeting Info: Select this if you need the particulars of the current meeting, such as its ID, while sharing.
Share from a Mobile App
Choose what to share in a mobile app by tapping the Share Content  icon. You can then select from a set of options:
Screen: Stream the device’s screen (Figure 9). You can navigate among apps. Exit by tapping Stop Broadcast (iOS) or Cancel (Android) as it starts or Stop Share in Zoom when it’s running.
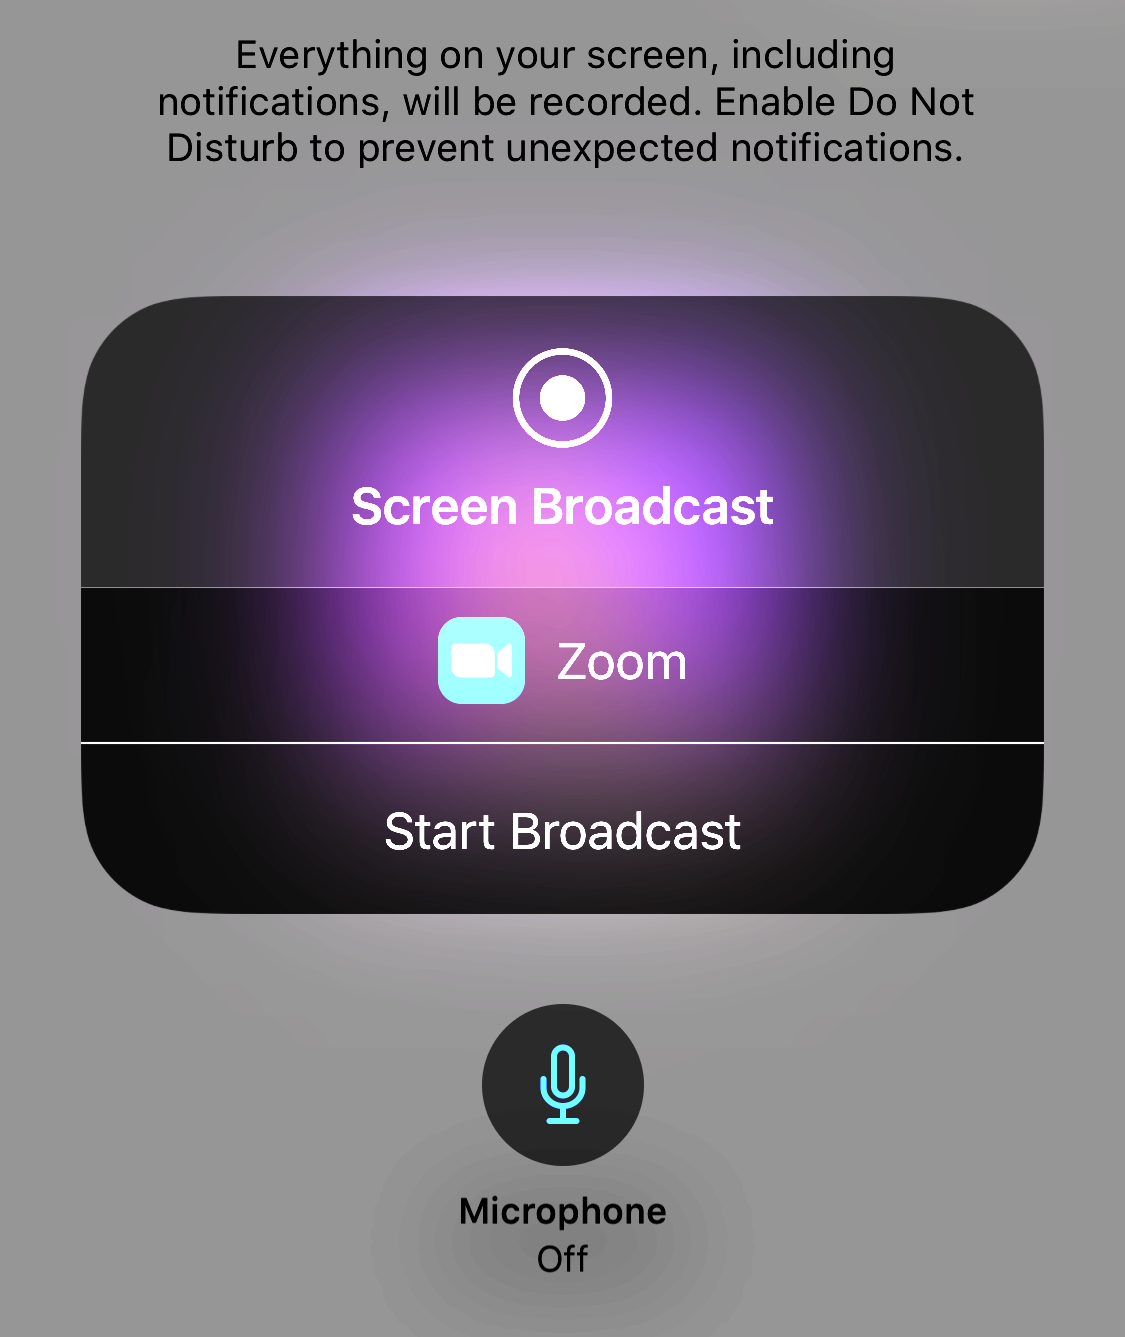
Figure 9: iOS provides a strong warning before you start “broadcasting” your screen via Zoom (or any app). Photos (iOS); Google Photos, another photos app, or a file manager (Android): Select an image to share.
Documents (Android): Android’s Documents option only allows sharing PDFs, which can be paged through in Zoom.
iCloud Drive (iOS); Google Drive and several others (Android): The broader file-selection options allow both images and PDFs of one or more pages.
Website URL and Bookmark: Type in a URL or select a bookmark and the mobile app opens a browser window within the app. The browser can be used as if it were freestanding.
Share Whiteboard (Android): Share a whiteboard you can annotate on, just like in desktop apps.
Mobile apps offer no control for managing the session after selecting a sharing option. Tap Stop Sharing and share again to change selections.