
Chapter 16
Customizing Your iPhone
The iPhone has many settings allowing you to customize how the device works and looks. These settings are all customizable in the Settings app on the Home screen of your iPhone. The iPhone’s Settings application offers many ways to enhance your iPhone experience, in addition to those options tied to a particular application. These general settings control everything from screen brightness to sound effects to keyboard tricks. I’ve explored various options in the Settings app throughout this book. This chapter covers the remainder of these extra settings and discusses how you can use them in your day-to-day routine. I’ll start this chapter by showing you the top five settings people use the most.
Tap the Settings app icon shown in Figure 16–1, and you’ll be presented with the Settings screen, which is a list of preferences for the iPhone and other applications that are installed on it (see Figure 16–2). To select an app’s settings, tap the name of the app.

Figure 16–1. The Settings app icon
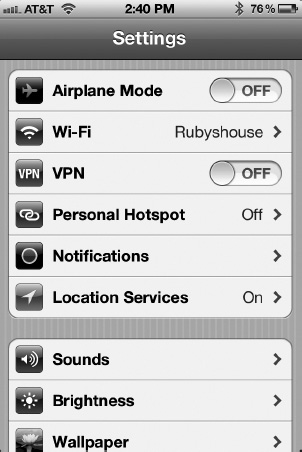
Figure 16–2. The Settings screen
Not all of the settings that are controlled within the Settings app are covered in this chapter, because they vary by iPhone model and installed applications.
Six Important Settings
The Settings app lets you really customize your iPhone to its fullest. However, most people won’t be messing around with all the advanced settings. Before I launch into explaining all of the general settings, let’s go through the top six settings people use the most.
Airplane Mode
This one is for all your frequent fliers and business travelers. Airplane Mode puts your iPhone into a configuration that allows you to use it on a plane without the flight attendant telling you to turn your device off. To enable Airplane Mode, tap the switch to On (Figure 16–3). You’ll notice that an orange airplane icon appears in the upper-left status bar where the signal strength bars and carrier abbreviation usually are.

Figure 16–3. Airplane Mode. Note the airplane icon in the top-left menu bar.
When Airplane Mode is on, no Bluetooth or Wi-Fi signals emanate from the iPhone. In other words, Airplane Mode disables antennas that can interfere with flight instrumentation. When Airplane Mode is enabled, you are not able to use wireless Bluetooth headsets or use in-flight Internet on your iPhone. You can reenable Wi-Fi when the plane is in flight, even while using Airplane Mode. This allows you to purchase and use in-flight Wi-Fi and even have a video chat with your friends and family back home if you own an iPhone that can run the FaceTime app.
Note that during takeoff and landing, you are instructed to turn off all portable electronics, regardless of whether they are in Airplane Mode or not. After you’re back on the ground, turn Airplane Mode off by tap the switch to Off. Since all of your iPhone’s wireless transmitters are turned off, turning on Airplane Mode also improves your battery life significantly.
In case you haven’t heard, Twitter is the Internet social network and micro-blogging service that allows users to instantly send messages to friends and followers in 140 characters or less. It seems like the whole world is tweeting these days, from your next-door neighbor to celebrities and politicians. As you’ve seen throughout this book, Twitter is highly integrated into iOS 5. You can tweet directly from Photos, Safari, YouTube, Camera, and Maps, plus many other third-party apps.
Before iOS 5, you had to log into your Twitter account in every app that supported tweeting. With iOS 5, there’s just a single login location for Twitter, and that means your Twitter account ID is integrated systemwide for easy tweeting.
To set up your Twitter account, go to Twitter in the Settings app. In the Twitter settings (Figure 16–4), enter your Twitter ID and password, and then tap Sign In. If you don’t have a Twitter ID, tap the Create New Account button and set up a new Twitter account right in the Settings screen.
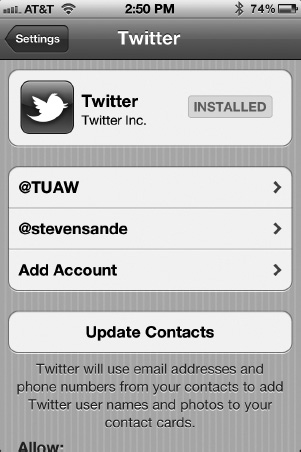
Figure 16–4. Settings for Twitter. In this figure, the Twitter app is installed, and two accounts have been enabled.
Once you are signed into Twitter, you’ll be able to tweet directly from iOS 5’s built-in apps like Safari, Maps, YouTube, and more. Also, on the Twitter Settings screen you can tap the Install button to immediately download and install the official Twitter app, which lets you fully interact with Twitter.com and all your friends and followers.
In Twitter Settings, tap your account name for additional settings. These include the ability to let your friends find you on Twitter using your e-mail address and automatically tweeting your location when you post a tweet. Finally, you can tap Update Contacts to add Twitter usernames to the people in your Contacts lists.
Sounds
The Sounds settings enable you to select which ringer and alerts sound effects you hear while interacting with your iPhone (Figure 16–5). These settings are useful when you are using your iPhone in a public place like a library or a coffee shop or attending a meeting.
Vibrate: If Vibrate is turned on, your phone will vibrate when receiving a call or other notification. If you’ve enabled the Mute switch on the side of the phone, the vibration is the only way you’ll know that a call is coming in. If the Mute switch is off, your iPhone will both ring and “buzz.”
Volume slider: This slider allows you to turn your ringer volume up or down. The ringer volume refers to the level of sound that you hear when someone calls you or initiates a FaceTime call with you.
Change with Buttons: When this is switched to On, you can use the physical volume buttons on the side of your iPhone to adjust the volume level of the ringer and alerts. When set to Off, the volume of the ringer and alerts is separate from the volume of the other sounds (like music playback) on your iPhone.
Ringtone: This allows you to choose your ringtone from one of Apple’s built-in ringtones. If you’ve synced your own ringtones from iTunes (see Chapter 2), you can also select that ringtone here.
Alerts: By default the iPhone plays a sound effect whenever you send or receive mail, have a calendar alert, lock your iPhone (by pressing the Sleep/Wake button on the top of the iPhone), press a key on the on-screen keyboard, and more. On the Sounds settings screen, you can choose to change any of these sound effects or even disable them entirely. Tap the sound effect you want to change and then select a replacement sound effect from the list of effects or choose None.
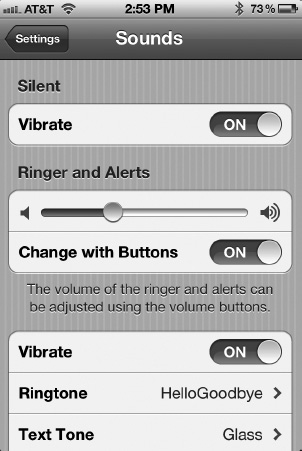
Figure 16–5. Use Settings ![]() Sounds to choose how your iPhone plays back system alert sounds.
Sounds to choose how your iPhone plays back system alert sounds.
Brightness
Choose Settings ![]() Brightness (see Figure 16–6) to control your iPhone’s screen brightness intensity. The slider at the top of the Settings screen lets you manually set exactly how bright your screen is, from very dim (on the left) to very bright (on the right).
Brightness (see Figure 16–6) to control your iPhone’s screen brightness intensity. The slider at the top of the Settings screen lets you manually set exactly how bright your screen is, from very dim (on the left) to very bright (on the right).
A lot of people who jog or walk at night benefit from turning down the brightness on their iPhone. Why? Your eyes adjust to the darkness, and when you look at your iPhone to read a message or change songs, the screen can temporarily blind you if it’s set too bright. I’ve had friends trip and fall while jogging at night because of the sudden blinding light from their iPhone screen.
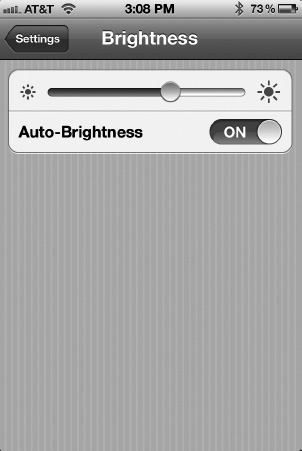
Figure 16–6. The Settings ![]() Brightness control allows you to set the overall screen intensity for your iPhone.
Brightness control allows you to set the overall screen intensity for your iPhone.
The Auto-Brightness option, beneath the brightness slider, controls another light-level feature. It determines whether your iPhone samples the ambient light when it wakes up as you slide to unlock. When enabled, it adjusts the screen according to the light it senses in the room. If you’re in a dim room, it lowers the brightness of the screen. In a brightly lit room, the brightness is enhanced for readability.
Wallpaper
Although this was covered in Chapter 3, setting your iPhone’s wallpaper is an important and easy way to personalize your iPhone, so I’ll cover it briefly one more time.
The Settings ![]() Wallpaper screen allows you to set your system wallpaper from a library of commercial-grade photos that shipped on your iPhone. You can also select wallpaper from any image, such as your personal photos, on your iPhone. Select Wallpaper to see your current lock and Home screen wallpaper settings (Figure 16–7). To change either wallpaper, tap the lock and Home screen image, and you’ll be presented with a list of all the photos on your iPhone. The Wallpaper collection is full of images that came with your iPhone. Below it is a list of all of your photos, both on your iPhone’s Camera Roll and in your Photo Stream.
Wallpaper screen allows you to set your system wallpaper from a library of commercial-grade photos that shipped on your iPhone. You can also select wallpaper from any image, such as your personal photos, on your iPhone. Select Wallpaper to see your current lock and Home screen wallpaper settings (Figure 16–7). To change either wallpaper, tap the lock and Home screen image, and you’ll be presented with a list of all the photos on your iPhone. The Wallpaper collection is full of images that came with your iPhone. Below it is a list of all of your photos, both on your iPhone’s Camera Roll and in your Photo Stream.
NOTE: Unlike the images in your Photos library, you cannot move and scale the iPhone’s built-in library of Wallpaper pictures. They are sized at 640-by-960 pixels, perfectly matched to your screen.
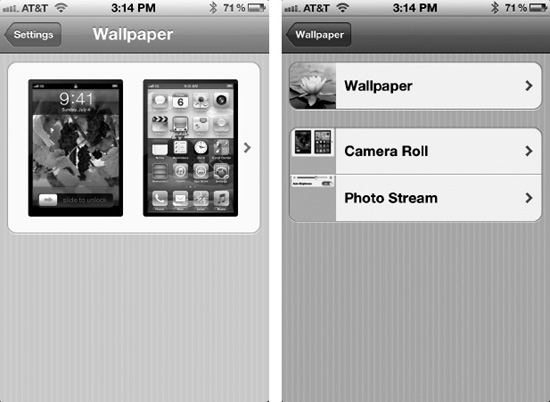
Figure 16–7. Settings ![]() Wallpaper offers the ability to set wallpaper for the lock screen and the Home screen on your iPhone (left). Select from Apple-supplied wallpapers or use photos from your own collections (right).
Wallpaper offers the ability to set wallpaper for the lock screen and the Home screen on your iPhone (left). Select from Apple-supplied wallpapers or use photos from your own collections (right).
When you find the image you want to use, move and scale it with your fingers and then tap the Set button (Figure 16–8). From the pop-up menu, choose to use that image as the lock screen wallpaper, as the Home screen wallpaper, or as both wallpapers.
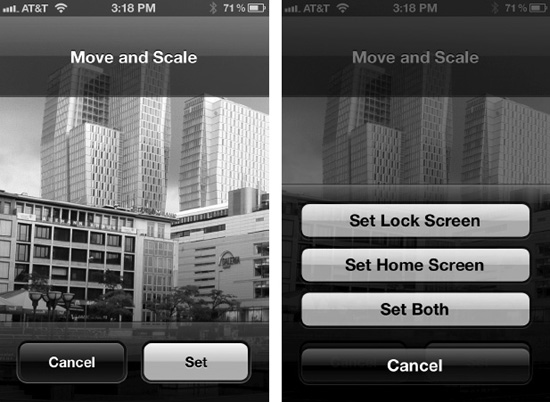
Figure 16–8. Move and scale your image (left), and then choose to use it as wallpaper for the lock screen, Home screen, or both.
Location Services
On the iPhone there are dozens of apps that rely on knowing your current location. These include Maps, time zone settings, Weather, photo geolocation, and more. However, in today’s privacy-sensitive world, people want to be able to control what apps or processes have access to their current location. That’s where Location Services comes in (Figure 16–9).
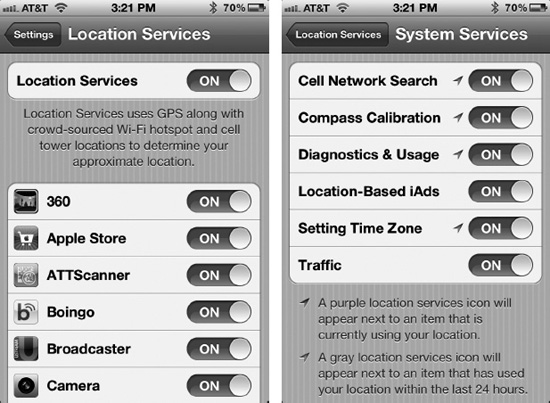
Figure 16–9. Left, the Location Services settings can be used to disable all location services or just disable some apps from reading your current location. Right, the System Services screen gives you control over iOS 5 location services.
To control location information on your iPhone, navigate to Settings ![]() Location Services. If Location Services is set to On, any apps that can automatically find your location (like the Maps app) are able to do so. Any app that has permission to read your current location shows up in the list. But before any app can access your current location, you must give it approval to do so. A pop-up notification automatically appears when an app requests your current location (see Figure 16–23).
Location Services. If Location Services is set to On, any apps that can automatically find your location (like the Maps app) are able to do so. Any app that has permission to read your current location shows up in the list. But before any app can access your current location, you must give it approval to do so. A pop-up notification automatically appears when an app requests your current location (see Figure 16–23).
Apps can use your location in any number of ways. The Facebook app, for example, uses your location to tell your friends where you are posting from and the Maps app uses your location in order to help identify where you are on a map.
Location services are very handy. However, today it’s easy to get paranoid about people finding you based on your device’s location. To turn all location services off, tap the Location Services switch to Off (Figure 16–9). Alternatively, leave location services on, but disable location services on a per-app basis.
NOTE: When an app has used your current location in the past 24 hours, you’ll see a tiny gray arrowhead icon next to its name in the Location Services settings. When an app is using your current location now, the tiny arrow next to it on this screen is purple. Whenever an app is currently using your location, that tiny arrowhead also appears in the menu bar.
You can also control the amount of access other iOS services have to your location. On the Location Services screen, tap the System Services button, and then toggle on or off services such as location-based iAds, traffic, and diagnostics.
Other Good-to-Know Settings
Under Settings ![]() General, you’ll find that the General settings (Figure 16–10) are the “meat” of settings that have to do with the iPhone itself, like Siri, networking, and security.
General, you’ll find that the General settings (Figure 16–10) are the “meat” of settings that have to do with the iPhone itself, like Siri, networking, and security.
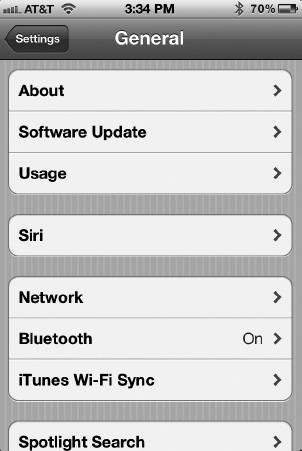
Figure 16–10. The General settings screen
“About” Your iPhone
Your iPhone summarizes its capabilities and storage levels, listing the number of songs, videos, photos, and other important information on the Settings ![]() General
General ![]() About screen (see Figure 16–11). Here, you’ll find basic details about the space available and remaining on your iPhone, as well as other details such as the model of your iPhone, the serial number, and more.
About screen (see Figure 16–11). Here, you’ll find basic details about the space available and remaining on your iPhone, as well as other details such as the model of your iPhone, the serial number, and more.
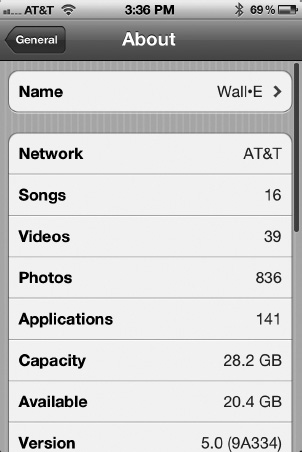
Figure 16–11. The Settings ![]() General
General ![]() About screen lists basic information about your iPhone.
About screen lists basic information about your iPhone.
At the top of the screen, tap Name to change your iPhone’s name. If you scroll all the way down to the bottom of the About screen, you’ll see a link labeled Legal. Tap this to jump to an insanely long list of Apple legal notices. It’s a boring document to read, but it’s an amazingly good place to get some practice flicking your screen. You almost never run out of text to scroll through.
Software Update
New to iOS 5 is the ability to update the iOS software without having to plug your iPhone into iTunes and download the software from there. These automatic updates are referred to as over-the-air (OTA) updates. Now any time a software update is available for iOS, a red badge appears on the corner of the Setting icon. You can also manually check for iOS software updates by navigating to Settings ![]() General
General ![]() Software Update. Any available IOS software updates are listed there.
Software Update. Any available IOS software updates are listed there.
Usage
Usage is another new Settings screen that allows you to see how much storage is being used by each app on your iPhone. View your usage at Settings ![]() General
General ![]() Usage (Figure 16–12).
Usage (Figure 16–12).
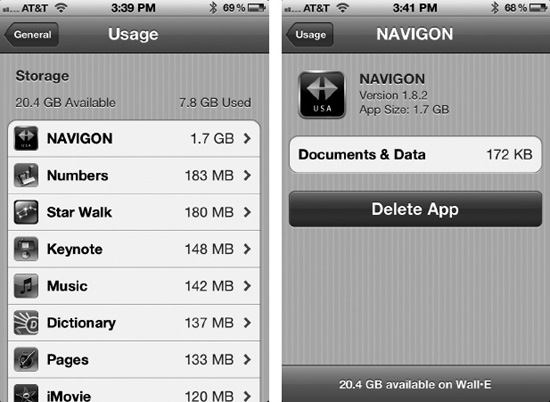
Figure 16–12. Viewing how much storage space each app is consuming
In Figure 16–12 you can see that the Navigon app is taking up the most storage space on my iPhone. If I tap Navigon, I can see documents and data (primarily personal settings) are taking up only 172KB of storage, while most of the 1.7GB must be the app and its built-in maps. You can delete entire apps (but not the ones that shipped on your iPhone) to free all the space they take up.
Usage is handy if your iPhone is almost full but you want to download a movie at the airport to watch on the plane. You can free up some songs or other content in apps to get enough space to download that movie.
iTunes Wi-Fi Sync
As I mentioned in Chapter 2, you can now sync your iPhone wirelessly when it’s in range of your computer and on the same Wi-Fi network. When you plug your iPhone into a power source, it automatically syncs over the network. You can also manually initiate syncing from your iPhone at any time by going to Settings ![]() General
General ![]() iTunes Wi-Fi Sync (Figure 16–13) and tapping the Sync Now button.
iTunes Wi-Fi Sync (Figure 16–13) and tapping the Sync Now button.
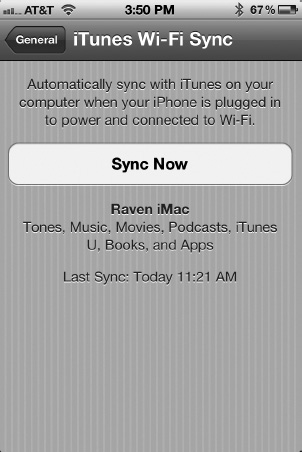
Figure 16–13. Initiating a Wi-Fi sync from your iPhone
Network
The settings found on the Settings ![]() General
General ![]() Network screen duplicate the Wi-Fi settings covered in Chapter 4. They also include a switch to enable, disable, and customize virtual private network (VPN) connections as well as turn your iPhone into a Personal Hotspot.
Network screen duplicate the Wi-Fi settings covered in Chapter 4. They also include a switch to enable, disable, and customize virtual private network (VPN) connections as well as turn your iPhone into a Personal Hotspot.
A VPN is usually used for secure communications over public Internet connections. When this option is enabled, you can configure your VPN account settings with the Network settings screen. Consult your IT department or network provider for details on how to set up your iPhone for a VPN connection.
Personal Hotspot turns your iPhone into a Wi-Fi hotspot anywhere you have a 3G data signal. This feature, which has an extra carrier cost associated with it, means that your cellular data connection can be shared with up to five other users.
Bluetooth
The Bluetooth settings allow you to turn the iPhone’s Bluetooth signal on or off. This is also where you’ll find a list of Bluetooth-compatible devices that your iPhone is aware of. To pair a Bluetooth device, select it in the list, and then enter the pairing code. For keyboards, a random code is usually generated. For devices such as Bluetooth headsets, look for the code on a label on the headset. Note that some newer Bluetooth devices no longer use pairing codes, show up in your pairing list automatically, and ask whether you want to give the device access. To unpair a Bluetooth device, select it from the list, and choose Forget this Device.
If you aren’t using any Bluetooth devices with your iPhone, keep Bluetooth turned off to preserve battery life. Don’t forget to switch it back on when you want to use Bluetooth headsets, use external keyboards, or play games between iPhone devices.
Auto-Lock
Use the Settings ![]() General
General ![]() Auto-Lock screen (see Figure 16–14) to determine the period of time after which your iPhone automatically locks. Autolocking is an energy-saving feature. When locked, your screen turns off—although music playback continues—and you must swipe to unlock and return to any previous activities. Choose from 1, 2, 3, 4, or 5 minutes, or choose Never to leave your screen always on. This last option wears down your battery very quickly indeed.
Auto-Lock screen (see Figure 16–14) to determine the period of time after which your iPhone automatically locks. Autolocking is an energy-saving feature. When locked, your screen turns off—although music playback continues—and you must swipe to unlock and return to any previous activities. Choose from 1, 2, 3, 4, or 5 minutes, or choose Never to leave your screen always on. This last option wears down your battery very quickly indeed.
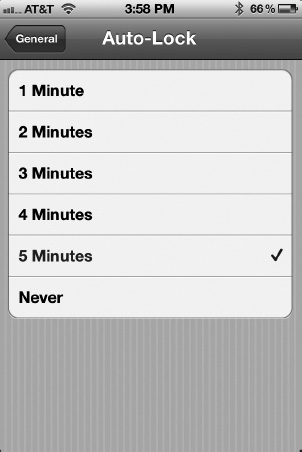
Figure 16–14. Save your battery and save your screen by setting an autolock time in Settings ![]() General
General ![]() Auto-Lock.
Auto-Lock.
Restrictions
If you share your iPhone with your family or have purchased one for your children, you may want to limit what they can do on it. The Restrictions settings (Figure 16–15) lets you restrict access to Safari, YouTube, the iTunes Store app, the ability to install apps, the Camera and FaceTime apps, and the ability for apps to use location services. In addition, you can also choose what content you want allowed on the iPhone. Settings include restricting In-App purchases and limiting access to movies, music, TV shows, and apps that surpass your chosen ratings. Finally, you can also limit multiplayer gaming in Game Center.
TIP: Enabling restrictions for YouTube or Facetime is a great way to “remove” factory-installed apps from your iPhone! They’re still there; you just won’t be able to see their icons on the Home screen!
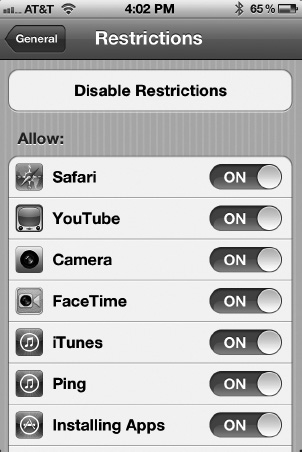
Figure 16–15. The Restrictions settings
As you can see, Restrictions is all about protecting your children not only from age-inappropriate music and movies but also from potential outside threats such as strangers calling them on FaceTime or apps that post their current location online. When you enable restrictions, you’ll be asked to enter a four-digit passcode. You (or your children) need this passcode to change or disable any restriction you’ve set up. The only way your kids can get around these restrictions is if they completely restore the iPhone to factory conditions. However, if they do this, they lose all their music and movies on the iPhone.
Date and Time
The settings found on the Settings ![]() General
General ![]() Date & Time screen (see Figure 16–16) allow you to specify how you want your system to handle time. Here, you can choose between a 12-hour (9:30 p.m.) and a 24-hour (21:30) clock, set your time zone, oroverride the system clock to set a new date and time.
Date & Time screen (see Figure 16–16) allow you to specify how you want your system to handle time. Here, you can choose between a 12-hour (9:30 p.m.) and a 24-hour (21:30) clock, set your time zone, oroverride the system clock to set a new date and time.

Figure 16–16. Most of the time, you’ll want to let your iPhone set the internal clock and time zone automatically.
Keyboard
You’ll find five very clever and helpful typing settings on the Settings ![]() General
General ![]() Keyboard settings screen (see Figure 16–17).
Keyboard settings screen (see Figure 16–17).
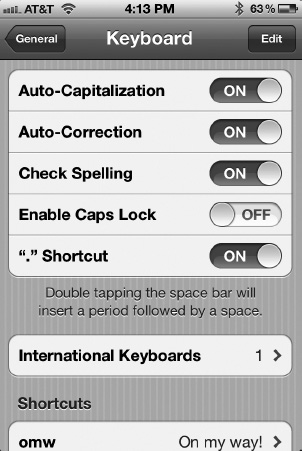
Figure 16–17. Use Settings ![]() General
General ![]() Keyboard to set several handy typing shortcuts.
Keyboard to set several handy typing shortcuts.
Auto-Capitalization: When this feature is set to On, the iPhone is smart about guessing when you’re at the start of new sentences. After detecting a period, question mark, or other sentence-ending punctuation, it automatically presses the Shift key for you.
Auto-Correction: When this feature is set to On, the iPhone suggests words to you as you type. Switch it to Off to get rid of those word pop-ups.
Check Spelling: When this is set to On, the iPhone spell-check feature underlines misspelled words in red. Tap the underlined word to see spelling suggestions.
Enable Caps Lock: When selected, Enable Caps Lock treats all taps on the Shift key as the Caps Lock function—setting it either on or off. When it’s disabled, you must press the Shift key before each capitalized letter. The Shift key switches itself back off after each use.
“.” Shortcut: Enabling the period shortcut feature lets you add a period and then a space to the end of sentences by double-tapping the spacebar.
Also, as discussed in Chapter 3, this is the place where you can set text shortcuts that enable you to type using acronyms that expand to full phrases (in other words, typing ttyl will expand to “talk to you later”).
The International Keyboards option on the Keyboard settings screen allows you to set the language for your keyboard. This setting is identical to the one found on the International settings screen we’ll discuss now.
International
On the Settings ![]() General
General ![]() International screen (see Figure 16–18), you’ll find all the settings you need if you want your iPhone to operate in a different language.
International screen (see Figure 16–18), you’ll find all the settings you need if you want your iPhone to operate in a different language.
Language: The primary system language determines how all your menus and buttons display. Whenever an iPhone application supports multiple languages, your setting here tells that application which words and phrases to use, internationalizing that application appropriately.
Voice Control: Choose the language you’ll be speaking your voice commands in.
Keyboards: The keyboard language sets the default keyboard layout for when you type. If you use a lot of foreign phrases, you may want to switch to an international keyboard for certain tasks. Be aware that the keyboard automatically changes when you set a system language. The rather mysterious number shown on the settings screen (1 in Figure 16–17) indicates the chosen keyboard.
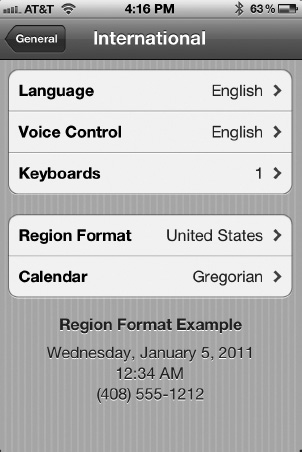
Figure 16–18. International settings let you set your system language, regional keyboard, and date/time formats.
NOTE: You can also choose keyboards in Settings ![]() General
General ![]() Keyboard
Keyboard ![]() International Keyboards. The two options lead to identical settings screens.
International Keyboards. The two options lead to identical settings screens.
Region Format: The region format switches the standards for how dates, times, and phone numbers display. November 5, 2011, for the U.S. region would display as 5 November2011 for the U.K. region. Use this setting to augment your language settings with a country norm.
Calendar: This setting changes the calendar format according to which calendar you follow. Select from Gregorian, Japanese, or Buddhist.
Accessibility
Apple wanted to make sure everyone could use the iPhone as easily as possible. To that end, Apple built in accessibility features to help people with disabilities use the iPhone. To see all the accessibility options, on the iPhone go to Settings ![]() General
General ![]() Accessibility (see Figure 16–19). Let’s go through these settings one by one.
Accessibility (see Figure 16–19). Let’s go through these settings one by one.
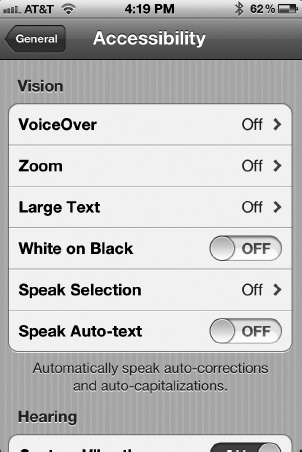
Figure 16–19. The Accessibility settings
As you can see when looking at the Accessibility settings, Apple has divided the options into three main categories: Vision, Hearing, and Physical & Motor.
VoiceOver
With VoiceOver turned on, a user simply touches the screen to hear a description of what is beneath his finger and then double-taps to select the item. With VoiceOver enabled, the iPhone speaks when the user has a new e-mail message and can even read the e-mail to the user. This is in addition to the ability for Siri to read e-mail messages, as discussed in Chapter 7.
It’s important to remember that when VoiceOver is turned on, the iPhone’s Multi-Touch gestures change. As a matter of fact, when VoiceOver is enabled, pretty much all of the gestures we’ve taught you in this book are irrelevant. The Voice Over settings are also where you can pair your iPhone with a Braille device.
VoiceOver Gestures
I list common VoiceOver gestures here, but be sure to carefully read Apple’s VoiceOver article at http://support.apple.com/kb/HT3598 for complete VoiceOver gesture controls.
Tap: Speaks the selected item.
Double-tap: Activates the selected item.
Triple-tap: Acts as a double-tap normally would. Triple-tapping an item when VoiceOver is enabled effectively double-taps that item.
Flick right or left: Selects the next or previous item.
Two-finger tap: Stops speaking the current item.
Two-finger flick up: Reads all text or items from the top of the screen.
Two-finger flick down: Reads all text or items from the current position.
Three-finger flick up or down: Scrolls one page at a time.
Three-finger flick right or left: Goes to the next or previous page (such as the Home screen pages, Weather pages, or Safari web pages).
Zoom
Zoom allows those impaired vision to magnify their entire screen. This is different from the standard pinch-and-zoom features of the iPhone’s regular software. Accessibility Zoom magnifies everything on the screen, allowing the user to zoom into even the smallest of buttons. When this option is selected, the user double-taps any part of the iPhone’s screen with three fingers to automatically zoom in 200 percent. When zoomed in, you must drag or flick the screen with three fingers. Also, when you go to a new screen, zooming always returns you to the top middle of the screen.
Large Text
Large Text allows those with vision impairments to enlarge the text in alerts, Contacts, Mail, and Notes. They can choose from 20-, 24-, 32-, 40-, 48-, or 56-point text (12-point text is the normal text you see on a web page).
White on Black
For some people with vision difficulties, inverting the color of a computer screen so it resembles a photographic negative allows them to read text better. Turning on White on Black does just this.
Speak Selection
With this option selected, any selected text (such as the text you select when copying and pasting)is spoken aloud.
Speak Auto-text
With this option selected, any autocorrection text (such as the spell-check pop-ups that appear when you are typing) is spoken aloud.
Mono Audio
With this selected, the stereo sounds of the left and right speakers or headphones are combined into a mono (single) signal. You can then choose which speaker, the left or the right, you want to hear the mono audio come from. This option lets users who have a hearing impairment in one ear hear the entire sound signal with the other ear.
Assistive Touch
Apple recognizes that for people who have limited motor skills, using a small multitouch screen like the one found on the iPhone can be difficult. With this in mind, Apple created Assistive Touch. When Assistive Touch is enabled, a black-and-white dot is always displayed on the iPhone’s screen.
Tapping the dot displays an on-screen menu overlay (Figure 16–20) that allows users to tap icons that represent gestures. Instead of tapping or swiping with two fingers, Assistive Touch allows the user to simply tap a button that performs the gesture automatically.
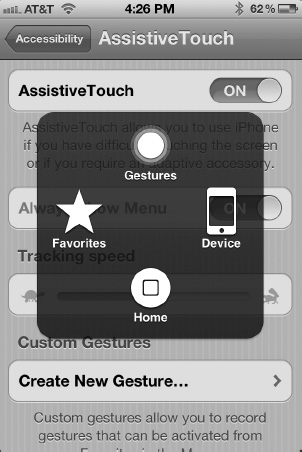
Figure 16–20. The Assistive Touch on-screen menu
Triple-Click Home
If you are sharing an iPhone with someone with disabilities, selecting this option allows users, by triple-clicking the iPhone’s physical Home button, to quickly toggle VoiceOver, Zoom, White on Black, or Assistive Touch on or off. You can also set it so triple-clicking the Home button causes a pop-up to appear on-screen asking the user what accessibility feature they want to use (Figure 16–21).
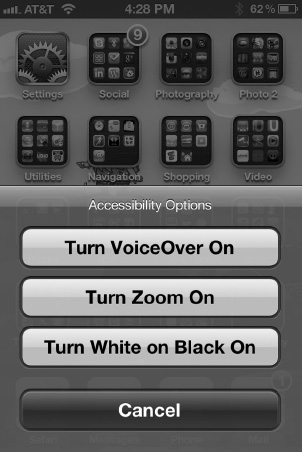
Figure 16–21. The Accessibility Options pop-up menu
NOTE: With the exception of the triple-click home feature, all of these accessibility settings can also be configured from within the iPhone iTunes Preferences window on the Summary tab (see Chapter 2). Click Configure Universal Access to choose your settings.
Reset
At times, you may need to reset certain iPhone features via Settings ![]() General
General ![]() Reset (see Figure 16–22). Each of the following options offers a slightly different twist on restoring your iPhone to factory conditions and provides a different degree of security.
Reset (see Figure 16–22). Each of the following options offers a slightly different twist on restoring your iPhone to factory conditions and provides a different degree of security.

Figure 16–22. The Settings ![]() General
General ![]() Reset screen allows you to return your iPhone to factory-fresh settings.
Reset screen allows you to return your iPhone to factory-fresh settings.
Reset All Settings: This option returns all settings to those that are factory installed.
Erase All Content and Settings: This option deletes all content from your iPhone—music, calendar events, videos, contacts, and so forth—and resets your settings at the same time.
Reset Network Settings: This option restores your Wi-Fi network settings to the defaults. This ensures that your iPhone will not automatically connect to any “known” but dangerous network you might have once encountered.
Reset Keyboard Dictionary: This option “forgets” all words you have typed into your iPhone. The onboard keyboard dictionary is smart about learning the words and names that you type, but it also learns a lot of personal information (including passwords) at the same time. Tap this option to delete this dictionary from your system.
Reset Home Screen Layout: This resets your Home screen icon arrangement to the default one that shipped on your iPhone. Any third-party apps appear in alphabetical order starting on the second Home screen page. Any Web Clips also appear in alphabetical order mixed in with the third-party apps. Finally, any folders you created are deleted, and their apps all appear on the Home screens.
Reset Location Warnings: Any time an app (such as Facebook, Starbucks, Maps, and so on) wants to use your current location, it must first ask you for permission, as shown in Figure 16–23. Resetting the location warnings means every app on your iPhone has to ask for your permission again before it can use your current location.
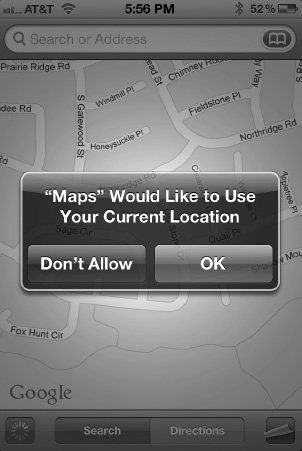
Figure 16–23. The Current Location warning pop-up
iCloud
As previously mentioned, iCloud is Apple’s cloud-based services that offers users free e-mail, calendar, and contacts on the Web. iCloud also allows you to automatically sync documents between all your devices, like your Mac or PC, your iPad, and your iPhone. iCloud works automatically and effortlessly in the background.
To enable iCloud on your iPhone, go to Settings ![]() iCloud and enter your Apple ID and password. That’s it. Now all your documents, e-mail, contacts, and calendars are synced wirelessly across all your iCloud-capable devices.
iCloud and enter your Apple ID and password. That’s it. Now all your documents, e-mail, contacts, and calendars are synced wirelessly across all your iCloud-capable devices.
Third-Party App Settings
The remainder of the settings in the Settings app deal with third-party application settings. Any apps that adhere to Apple’s developer policies keep their settings here (see Figure 16–24). Most apps do, but some don’t. A lot of users think an app’s settings should be contained in the app itself, and many developers end up doing just that. With that in mind, it’s a good idea to check the Settings app to see whether you favorite apps have additional settings that aren’t contained in the app. Also, note that virtually all games have their settings stored within the app, rather than under the iPhone Settings app.
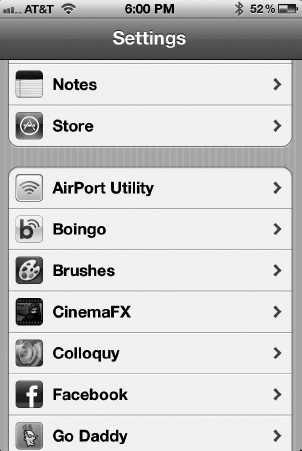
Figure 16–24. The Settings app houses most third-party app settings as well.
Summary
The settings screens discussed in this chapter allow you to customize your iPhone to your personal needs and conditions. Here are a few thoughts to take away with you from this overview:
- The Settings app also contains the settings screens for many third-party apps.
- If younger children have access to the iPhone, you might want to seriously consider activating the Restrictions settings.
- Your Auto-Lock settings are a highly personal choice. Delay locking for long enough that you don’t get frustrated with screen locks, but keep the autolock time short enough that you don’t needlessly kill your battery.
- Don’t sell or pass along your iPhone without using the Reset settings to erase your personal data. You can also do a complete system restore via iTunes.
- Use the General
 About screen to quickly access your iPhone’s serial number. This is handy if you are talking to AppleCare over the phone and need the serial number to identify your device.
The iPhone has a number of accessibility options for people who are hard of sight or hearing.