
Chapter 9
Shopping at the iTunes Store
The iTunes Store realizes the promise of mobile commerce on handheld devices. The program is beautiful to look at and easy to use. It integrates itself seamlessly into your normal iTunes experience. That being said, it is admittedly a contrivance to sell you things. But these are things that you presumably want and can use while on the road. Stuck at an airport or a coffee shop? Download some new music to enjoy, catch up on last week's episode or your favorite TV show, or watch that Hollywood blockbuster you never saw in theaters. Yes, the iTunes Store is a point of sale, but it's also a fascinating place to spend some time and an interesting application for your iPhone.
Connecting to the iTunes Store
The iTunes icon on the button bar at the bottom of your iPhone's home screen launches the iTunes Store application. It is colored purple and shows a white music note with a circle around it (see Figure 9–1).
Figure 9–1. The iTunes application icon
When you tap the iTunes icon, the application attempts to connect to Apple's storefront web server. Because of this, you must be located near a Wi-Fi hotspot and be connected to the Internet to use this application.
When your connection is not active or not strong enough to carry a signal, the iTunes Store application displays an error message saying your iPhone can't connect to the store. To resolve this problem, return to your home screen, and tap Settings > Wi-Fi. Make sure your iPhone is connected to a 3G or wireless network and that the signal registers at the top left of your screen with at least one arc or bar (and preferably three arcs or five bars).
Unfortunately, sometimes and iTunes Store connection issue is an Apple problem. Sometimes Apple's servers go down for a minute or two. When this happens, your only option is to check back frequently to see whether you can connect.
Signing in to Your iTunes Account
Before you can purchase anything from the iTunes Store, you need to sign in to it. To sign in, scroll to the bottom of any iTunes Store page in the app until you see the Sign In button. Tap it, and you'll be presented with two options, as shown in Figure 9–2: Use Existing Apple ID or Create New Apple ID.
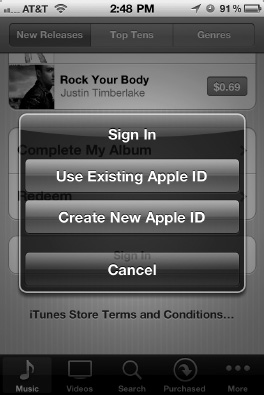
Figure 9–2. The iTunes Store sign-in screen
If you are signing in using an existing account, all you have to do is enter your account name (usually your e-mail address) and password. You'll then be logged in and able to purchase songs and videos. If you are creating a new account, the process is quick and easy. Choose what country you are in, agree to the license agreement, and create your user name and password.
NOTE: You may want to think about logging out of the iTunes Store if you have children who might use your iPhone and, knowingly or unknowingly, download music or video that costs you money. To log out, scroll to the bottom of a page until you see your account name. Tap it, and then tap Sign Out.
Browsing Through the iTunes Store
Figure 9–3 shows the iTunes Store application screen. At the bottom of the screen you'll see shortcut buttons to different sections of the store. By default you'll see the Music, Videos, Search, Purchased and More buttons.
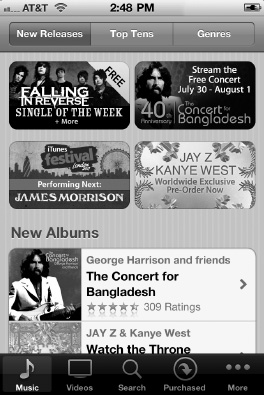
Figure 9–3. The iTunes Store offers many ways to browse, find, and purchase music.
If you tap More, you'll be taken to a screen that also links to the Genius, Ping, Ringtones, Podcasts, Audiobooks, and iTunes U sections of the store, as well as your current downloads. We'll talk about all those sections of the store later in this chapter. On the More screen, tap the Edit button to rearrange icons on the shortcuts bar at the bottom of the screen (Figure 9–4). You can, for example, replace the Videos shortcut button with the Audiobooks shortcut button.
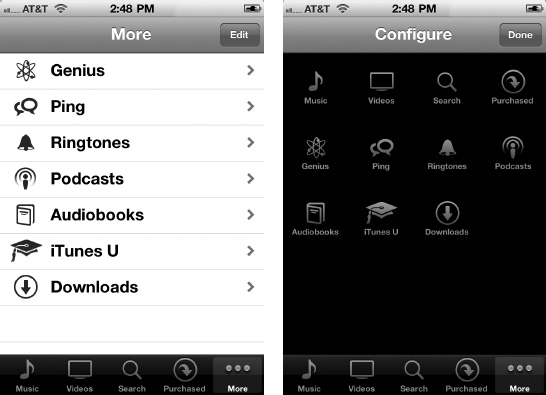
Figure 9–4. The More screen (left) lets you access other areas of the iTunes Store. You can also rearrange shortcut buttons by pressing the Edit button (right).
Additionally, when you're in a Starbucks coffee shop, you may see a special option. Tap the Starbucks icon in the button bar to discover which song is currently playing in your location. You can also browse the special Starbucks catalog. These Starbucks features are only available to U.S. iTunes account holders in U.S. Starbucks locations. Now, let's explore the different sections of the iTunes Store.
The Music Store
The Music section of the iTunes Store is the first one you'll see (see Figure 9–3). This section is broken down into three categories: New Releases, Top Tens, and Genres. You'll also see banner ads and album promotions.
Tap any of the buttons at the top of your screen to access the following sections:
New Releases: The New Releases section includes a list of albums with recent release dates. Tap any item to open the album page and find track-by-track listings.
Top Tens: The most popular-selling albums and tracks in more than 20 categories ranging from Alternative to World appear in the Top Tens section. Tap any item to move to its feature page. As you can see in Figure 9–5, Top Tens breaks down the categories into Top Songs or Top Albums.
Genres: Use the Genres list to limit your featured selections to a particular genre, such as Hip-Hop/Rap, Country, or Pop. Choosing a genre opens a screen dedicated to the biggest current hits for that kind of music (see Figure 9–5). Think of the genre sections as mini-stores for your current mood.
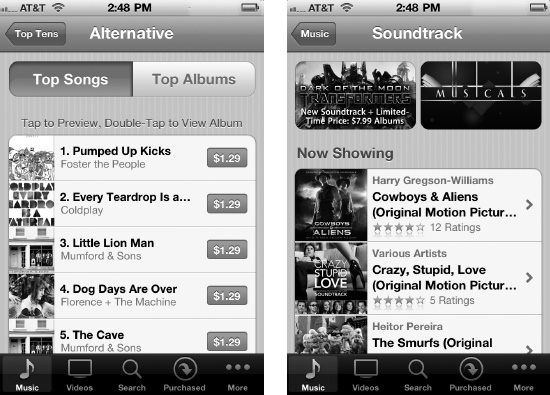
Figure 9–5. The Top Tens section (left) allows you to view the most popular items by album or songs. This is the top-ten listing for the Alternative genre. The Genres section (right) allows you to view songs and albums in mini-stores according to genre. This is the mini-store for the Soundtrack genre.
Exploring the Top Tens
The Top Tens section lists the best-selling albums and songs by genre, such as Alternative or Rock. It's also our favorite section and behaves like the rest of the sections in the iTunes Store, so it's a perfect place to get acquainted with. Tap any genre name to open a top-ten listing (see Figure 9–5), and then tap either Top Songs or Top Albums.
Here are a few tips for making the most of the Top Tens section:
- When viewing songs, tap any song to preview it, or double-tap to open its album.
- When viewing albums, tap the album name to open a track list, and then tap a song to preview. Previews play back for up to 30 seconds.
- View the most popular songs storewide by tapping iTunes instead of a genre. (Figure 9–5 shows the list for the Alternative genre.) It's listed as the first item in the Top Tens section before the actual genres.
- If you do not find your favorite genre on the main Top Tens screen (only Pop, Alternative, Hip-Hop/Rap, Rock, and Country are listed for the U.S. store), scroll down and tap More Top Tens for the complete list. You'll discover Reggae, R&B/Soul, and more.
- What is popular and “top” changes over time. As you navigate through these lists, you may actually see new items as the store downloads updated lists from the iTunes server.
Previewing and Buying Music
Figure 9–6 shows the layout when browsing a typical album. You're shown the cover art, the name of the artist and album, and the option to buy the entire album (in this case, for $9.99). Below the option to buy the entire album, you'll see a Like and Post button. Tapping either one of these allows you to “like” or post a link to the album on your Ping wall (we discuss Ping later in this chapter). Below the Like and Post buttons are the average user ratingsand reviews. Tap the stars to read through individual reviews. You can also create your own review. Reviews are tied to your iTunes account, so you have to authenticate to leave a review. Apple does this so a single person can't leave multiple negative (or positive) reviews.
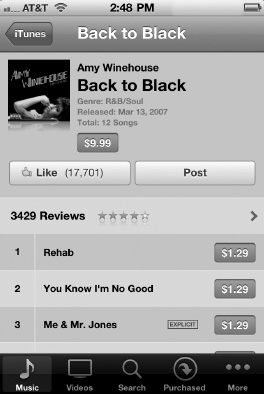
Figure 9–6. Previewing and buying emusic is fun and easy.
Tap the name of any song to listen to a preview. You'll see the track number or album image next to the name flip around to show the playback control, as shown in Figure 9–7.
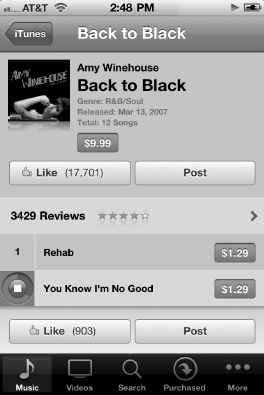
Figure 9–7. Each song listing allows you to play a 30 to 90-second preview and lists the purchase price for the track.
Here are a few pointers about previewing music:
- Previews are 30 to 90 seconds long seconds long, depending on the song, and generally start playback 30 seconds into the song. If a song is shorter than 30 seconds, it plays back for as long as it can. For example, search for Monty Python's “Spam” song. Select it, and its “preview” plays back the entire track.
- The dark pie wedge shows how much of the preview has played. The wedge grows over time until the preview has finished, and the wedge is a complete dark circle.
- The Stop button in the center of the control allows you to stop playback.
- You cannot pause and resume playback. Playback always starts at the same point.
- When you are previewing a song you'll have the option to “like” or post a link to that single song on your Ping wall.
To purchase music, tap the price to the right of the track name. The button expands, turns green, and changes from the price to BUY SONG. If you are purchasing an entire album, the price button examnds to say BUY ALBUM. Tap a second time to confirm that you really do want to buy the selection. In a delightful animation, your new song jumps directly into the Downloads icon at the bottom of the screen (or the More button if you don't have the Downloads shortcut showing at the bottom of the screen), and a red badge with the number of currently downloading items will appear.
If you haven't recently entered your password, the iTunes Store app prompts you to do so by opening a little dialog box alert. Type in your password, and tap OK. Pay special care while typing, because you will not be able to see the text. It appears as a series of dots instead to protect your security. Once you've entered the proper password and tapped OK, your download begins.
The Video Store
The great thing about the iTunes Store application is that all sections look and behave in the same manner. As you can see in Figure 9–8, the Video store has the same layout as the music store. The difference between the Music and Video stores are that in addition to purchasing content, in the Video store you can also rent movies and TV shows.
Figure 9–8. The Video store has a similar look and feel as the other iTunes Stores.
The video store is divided into three categories along the top: Movies, TV Shows, and Music Videos. All three categories allow you to preview and purchase videos in much the same way. Let's look at your typical movie information page.
In Figure 9–9 we've selected the excellent documentary The Corporation. From the The Corporation page, you can choose to buy or rent the movie by clicking the respective buttons. Some movies you can only buy, not rent. If you do rent a movie, you have 30 days to begin watching it, but once you begin watching it, you must complete it within 24 hours. After the 30-day and 24-hour time limits are reached, the movie is automatically deleted.
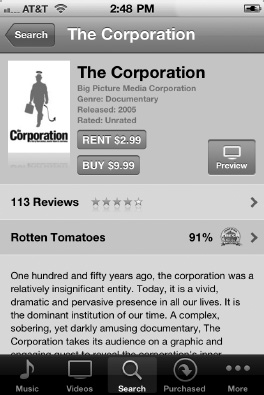
Figure 9–9. The movie information page
NOTE: Your iPhone is nice enough to remind you about the rental state. You'll be notified when the period is about to expire and when the periods have expired. Let's see Blockbuster do that!
You can view the movie's theatrical trailer by tapping the preview button. The movie preview will play full-screen and will automatically return you to the movie's information page when it is done playing. On the information page you can read user reviews or Rotten Tomatoes critic reviews. Finally, the summery of the movie and a list of major cast and crew are presented.
While the previews for movies are usually the full theatrical trailer, previews for television episodes and music videos run 30 seconds only.
Once you have found a video you want to purchase, simply tap the Buy button. The button expands, turns green, and changes from the price to BUY MOVIE. Tap a second time to confirm that you really do want to buy the selection. Your new video jumps directly into the Downloads icon at the bottom of the screen (or the More button if you don't have the Downloads shortcut showing at the bottom of the screen), and a red badge with the number of currently downloading items will appear.
TIP: Download times can be enormous, especially when you're on the road. Factor slow hotel Wi-Fi into your rental and purchase choices. Want to catch a nice movie on Saturday night? Your download might not finish until Sunday afternoon.
The Podcasts, Audiobooks, and iTunes U Stores
If you understand how to navigate the music and video stores, the remaining Ringtones, Podcasts, Audiobooks, and iTunes U stores will be a breeze. They are virtually arranged in the same way. One cool difference, however, is that when you preview a podcast or iTunes U lesson, you can actually watch or listen to the entire episode just by streaming it. So, if you are low on available space on your iPhone, you don't actually need to download the episode to view it. Also note that you use the iTunes Store app to buy audiobooks only, not regular books. To purchase regular books, you use the iBooks app discussed in Chapter11.
Searching the iTunes Store
The Search screen, shown in Figure 9–10, allows you to perform a live search with instant feedback. Start typing, and the iTunes Store application shows all the matches to your search string, updating whenever you type a new character.
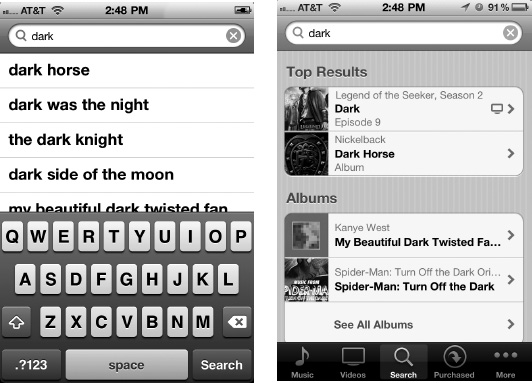
Figure 9–10. The iTunes Store application matches your search string to available tracks as you type (left) and presents your results to you by category (right).
When you locate an item you were searching for, simply tap its search suggestion. The store moves you to the search results page that lists all the results by categories. Tap the item you are looking for to go to its information page.
Purchased
The Purchased screen allows you to see all the songs, videos, and audiobooks you've ever bought from the iTunes Store. It doesn't matter if you bought them through iTunes on your computer, through the iTunes Store on your iPhone, or through the iTunes Store on another iOS device. If you bought any items with the Apple ID you are using on the iTunes Store on your iPhone, your entire purchase history will show up when you tap on the Purchased button (Figure 9–11).
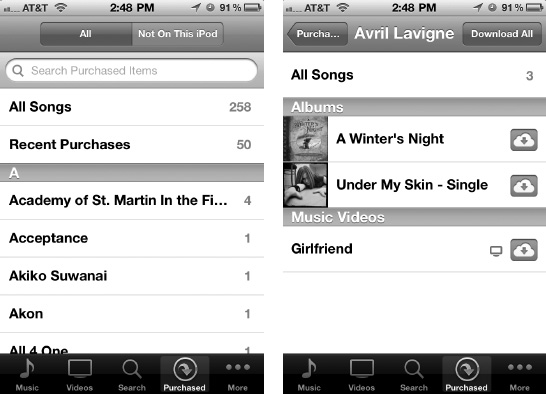
Figure 9–11. Viewing your purchase history
You can sort through all your purchase history, or just your purchase history for items not currently on your iPhone by tapping the “All” or “Not on this iPhone” tabs at the top of the Purchased screen (Figure 9–11 left). If you scroll through your Purchased list, you can select any item, an artist, for example, and see all the songs you've bought by that artist (Figure 9–11, right).
To redownload those songs (or videos) for free, simply tap on the button with the downward arrow in a cloud button, or to download all the items by that artist, select the “Download All” button at the top of the screen. You will not be charged again for downloading the items you already bought. This is a great feature if you're away from your computer and find you really want to listen to a song you've purchased but you forgot to sync it to your iPhone.
Downloads
The Downloads screen (see Figure 9–12) tracks the download progress for your recent purchases. Once you've completely downloaded a track, it disappears from this screen and adds itself to your iPhone's library.
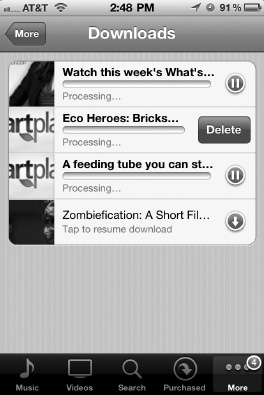
Figure 9–12. The Downloads screen allows you to track progress as newly purchased tracks arrive on your iPhone. The red bubble on the More or Downloads button indicates the number of tracks left to download.
You can interact with currently downloading items in three ways:
- Pause a download: Press the blue-and-white pause buttons (the two vertical lines) while a download is in progress. This pauses the download while the next item to be download automatically begins downloading.
- Resume a download: Press the blue-and-white arrow button to resume a paused download.
- Delete a download: Swipe your finger left to right over the download item, and a Delete button will appear. Tap the button to remove the downloading item.
At times, you may be unable to connect properly from your iPhone to the iTunes Store to complete a purchase. Then your downloads start to back up a bit. This has happened to us on numerous times. The tracks simply collect in the Downloads screen until you get a better connection or until the store resumes regular download service.
NOTE: The iPhone has a 20 MB download limit over a 3G connection. If a file is larger than that, you'll have to download it over a Wi-Fi connection. This limitation is in place for a few reasons, specifically, to help you avoid data-overages charges and to help the wireless providers keep their networks from crashing.
Redeeming Codes
You can redeem gift certificates and codes on your iPhone. On the Music screen, scroll all the way to the bottom of the page until you see a blue Redeem button. Tap the Redeem button; enter your iTunes gift card, gift certificate, or other iTunes code into the text box; and tap Redeem. Your iTunes account will update, and you will be able to spend those funds directly in the iPhone iTunes Store.
Transferring Purchased Items to Your Computer
Transfering something you've purchased on your iPhone back to your computer is as simple as connecting your iPhone via the USB cable to your computer. All music, videos, and podcasts bought on your iPhone transfer back to your computer when you next sync. The tracks appear in a special playlist, which appears in the Store section of your iTunes source list. The playlist is called “Purchased on your iPhone name”—in my case, “Purchased on Michael's iPhone” (the name of the iPhone used), as shown in Figure 9–13.
Figure 9–13. All iPhone purchases transfer to your computer on your next sync. You'll find all your new songs in the “Purchased on” playlist, which is automatically created during synchronization.
NOTE: The iTunes Store application is smart enough to know about the Complete My Album feature. If you've already purchased tracks on a given album, you'll be given the option to purchase individual tracks. Bonus content, such as liner notes, will be available to you when you return to your home computer, but they will not download to your iPhone.
Getting Free Music and Videos
The official iTunes Store for many countries (including the United States, Australia, New Zealand, Canada, France, Japan, the Netherlands, and the United Kingdom) offers a free single of the week each Tuesday. You can download these tracks onto your iPhone using the iTunes Store application, but you cannot find them easily. They aren't listed separately, and the application does not offer a freebies search.
Likewise with videos, there are many free video clips available on the iTunes Store; it's just rather hard finding them on your iPhone sometimes. Free videos usually are no longer than a few minutes and are really just commercials for an upcoming TV series or movie. Have a look around, but don't expect to find any truly free full-length movies or TV shows. A caveat to this are free Podcast or iTunes U videos.
Getting Social with Ping
You've probably noticed the chat bubble icon labeled Ping in some of the images in this chapter (see Figure 9–4). We've saved Ping to talk about until now because, frankly, it's not that cool. Ping is Apple's attempt at social media. Think of it as Facebook for iTunes account holders, except you can't share videos or photos or do most of the other things you can with Facebook.
What Ping allows you to do is follow your favorite artists to see what they're up to: concerts, new albums, and so on. You can also follow your friends to see what kind of music they are liking at the moment. To use Ping, you first have to sign into it using iTunes on your computer. To do this, open up iTunes 10.0 or newer on your computer, and select Ping from the source bar under the Store heading.
You'll be asked to turn Ping on (see Figure 9–14) and then be asked for your iTunes password. You'll then be taken to your Ping profile home page (Figure 9–15) where you can upload a profile picture, search for friends on Ping, and follow artists.
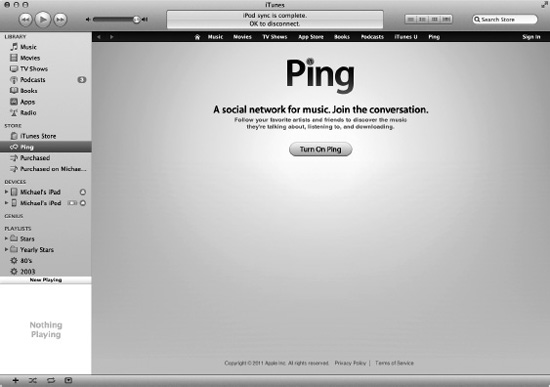
Figure 9–14. Ping in iTunes 10
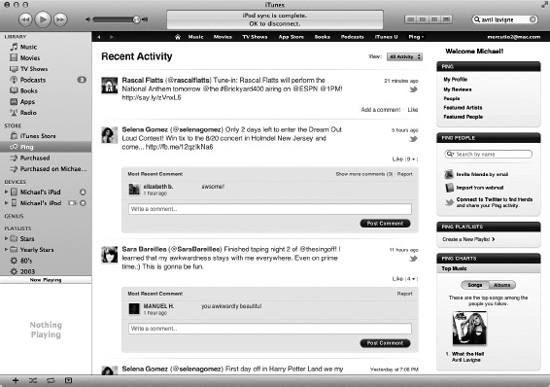
Figure 9–15. Ping. Meh.
Once you've set up Ping on iTunes on your computer, you can then go back to the iTunes Store app on your iPhone (Figure 9–16) and access Ping by tapping the Ping button in the bottom toolbar. From there you can browse through Ping using the three tabs at the top:
Activity: Shows you the latest status updates of the artists you are following.
People: Shows you a list of everyone you follow or who follows you. It also notifies you of any “follow” requests—in other words, people who have friended you.
My Profile: Shows you your Ping profile. It's kinda lame that you can't edit your profile from the app, but again, Ping is kinda lame.
Chances are, unless you are a huge music fan, Ping will not appeal to you. It's a social network for music fans; the rest of us can stick with Facebook.

Figure 9–16. Ping in the iTunes Store app. Still meh, unless it's important to you to know a Disney star had a Holiday in Harry Potter Land.
Summary
Not only does the iPhone's iTunes Store application allow you to buy music, videos, podcasts, and audiobooks from iTunes right now, it also shows a great deal of promise as the forerunner of a generation of future mobile points ofsale. This chapter has shown you how to use this application to search, select, preview, and purchase music. Here are a few points to take away from this chapter:
- Don't confuse the iTunes Store application with the Music application. The iTunes Store app is for downloading music and videos, and the Music app is for playing your music.
- If you know how to browse through one section of the iTunes Store, you know how to browse through all the sections. Apple has done a good job at making the iTunes Store app easy to navigate.
- Any item purchased on the iTunes Store app will automatically sync back to your iTunes library on your computer. This includes movie rentals! If you started watching a rented movie on your iPhone and want to finish it on your laptop, simply sync the iPhone to your computer. You can then finish watching the rental on your computer. Just be sure to finish the movie in the 24-hour time window! After that, it is automatically deleted from all your devices.
- Make sure to transfer purchases back to your computer. If you don't and you try to redownload the song or video from the iTunes store on your computer, you will be charged again!
- Play around with Ping, but don't expect to be blown away unless you are a music freak.