
Chapter 7
iPhone Mail
Unlike many other smartphones, your iPhone can send, receive, and browse e-mail without getting weighed down with compromise. The iPhone doesn't settle for cramped, odd presentations. Your e-mail looks the way it should—the way it would if you were reading it on your home computer. That's because the iPhone provides an HTML-compatible rich-text client. Mail looks better because the client is better. It's made to work right.
iPhone Mail works with most industry-standard e-mail systems. With it, you can send and receive photos; view Excel spreadsheets, PDF files, and Word documents; manage your accounts; and more. This chapter introduces you to many features of the iPhone Mail application. You'll discover how to set up and use your iPhone with new and existing e-mail accounts. You'll learn how to manage your mail, how to compose new mail, and how to get the most out of the iPhone's e-mail settings. If you have questions about using mail with your iPhone, this chapter is for you.
Compatibility
iPhone Mail is surprisingly compatible. It works with virtually all major e-mail providers, including Apple's own iCloud mail, Gmail, AOL, Yahoo!, and cable and DSL Internet providers. For businesses, iPhone plays well with Microsoft Exchange. This high level of provider support is because of the iPhone's support of industry-standard protocols. The iPhone understands the most popular e-mail standards, namely, POP, IMAP, SMTP, and Exchange. If you're not already familiar with these standards, here's a brief overview.
POP
POP (aka POP3) stands for Post Office Protocol. It's probably the most common e-mail retrieval protocol in use today. It allows mail clients to connect to a server such as Gmail or AOL, retrieve messages, and disconnect afterward. This usually happens on a set schedule, such as every ten minutes or every hour; you do not receive mail until your client connects to the server and requests that new mail.
POP works by checking in with a server, downloading your e-mail, and optionally leaving the original copies of your e-mail on the server. This leave-on-server option works well with the iPhone, because when you're on the go, you probably want to check your mail on the iPhone and retrieve it again later when you get back to the office or return home. POP also has its downsides. Unlike the newer and more sophisticated IMAP protocol, POP downloads entire messages all at once, so it's a bit of a space hog on portable devices.
NOTE: The 3 in POP3 indicates the third version of the protocol standard; POP1 and POP2 are obsolete.
SMTP
Mail clients use one protocol for receiving mail and another for sending mail. Your iPhone uses Simple Mail Transfer Protocol (SMTP) to send outgoing messages. SMTP contacts a mail server and transmits messages you've written along with any attachments including text, photos, and so forth. A common kind of SMTP, called SMTP-AUTH (AUTH stands for authorization), allows you to send secure, authorized mail. You provide your account name and a password. Your mail client authenticates itself to the server, and your e-mail is sent on its way.
The iPhone makes sending authenticated e-mail easy. Enter your account name and password into the Mail settings pane. Once you've done this, just use outgoing mail to send a note, share a web page's URL, or pass along a photo that you've just snapped with the iPhone's built-in camera. The iPhone takes care of all the protocol issues. You decide what to send and to whom to send it.
IMAP
IMAP stands for Internet Message Access Protocol. Like POP3, it allows you to receive e-mail on the iPhone. It's a newer and more flexible protocol. As the name suggests, IMAP was built around the Internet. It introduces advanced ways to connect to the mail server and use the limited bandwidth of mobile connections in the most efficient way. The key to understanding IMAP is to recognize that messages are meant to live on the server rather than go through a retrieve-and-delete cycle. You manage your mail on the IMAP server. You read your mail on a client, like the iPhone.
When you download mail with POP, you download entire messages. When you download mail with IMAP, you download headers instead, at least initially. Headers are the bit that tells you who the mail is from and what it's about. You don't download the main body of the message until you explicitly request it from the server. Since the header occupies only a fraction of the space of the message, you can download IMAP data a lot faster than you download POP. The rest of the message stays on the server until you're ready to read it.
The same thing goes for attachments. Say that someone sends you a 10MB video. It doesn't get downloaded to your iPhone. It stays on the server until you're ready to watch it on your home computer. If you'd downloaded the message with POP, the entire video would have transferred with the message. With IMAP, you can read the message that came along with the video without having to download the video file itself until you're ready to watch it. The video attachment waits for you on the mail server.
IMAP also offers a feature that's called push e-mail. Geeks will tell you that technically speaking IMAP is not exactly the same thing as push e-mail. True push e-mail reaches out and tells your e-mail client whenever new mail arrives in the system. Instead, your iPhone IMAP client connects to and checks the server until new mail arrives. This kind of always-on connection allows the iPhone to receive mail almost as soon as it arrives on the server. In practice, there's better intention there with push-style mail than actual results. Yahoo! and Gmail offer free IMAP accounts for iPhone users. To sign up for an account, point your browser to http://mail.yahoo.com or http://gmail.com.
Microsoft Exchange
Microsoft Exchange provides e-mail along with other enterprise-level services intended to support Outlook on the Web, personal computers, and mobile devices. Past versions of the iPhone did not support Exchange without, well, jumping through hoops. Exchange Server administrators had to open all sorts of security holes to get it to work, and they usually weren't too happy about doing that. Fortunately, iOS 5 provides much better compatibility with Microsoft Exchange, to the point that you can now configure multiple Microsoft Exchange ActiveSync accounts on your iPhone for business use.
Exchange is more than just e-mail, though—it's also about sharing calendars and contacts. Since iOS 4, iPhones can receive push e-mail from an Exchange Server, access a company-wide global address list, accept or create calendar invitations, and even search e-mails that are stored on the server.
If you're using your iPhone in a corporate setting that uses Microsoft Exchange Server, it's best to work with your IT department to ensure that your device is connected to the server in the most secure way possible. If they're not familiar with how the iPhone works with Exchange, Apple has provided a white paper on Exchange deployment that is free to download: http://images.apple.com/iphone/business/docs/iPhone_EAS.pdf.
Adding Mail Accounts to iPhone
You can add accounts to your iPhone in two ways. First, you can synchronize with iTunes. The first time you connect your iPhone to your computer and sync (whether through a USB cable connection or Wi-Fi), iTunes searches your computer for mail accounts and adds them to your phone. Second, you can add accounts directly on your iPhone using the Mail, Contacts, Calendars settings. It takes a few more steps than using iTunes, but it's not at all complicated. Here are both ways to do this.
Adding Accounts with iTunes
iTunes takes most of the work out of setting up your iPhone with your existing mail accounts. It looks at programs on your computer like Outlook and Apple Mail, finds account information, and offers to synchronize those account settings with your iPhone (see Figure 7–1). This makes it really easy to get your iPhone up to speed. A single sync puts these account details on your iPhone, and you're pretty much ready to roll.
NOTE: If you use a third-party e-mail app or web mail on your computer, this isn't going to work for you. Only those e-mail apps that are supported, like Apple Mail and Outlook, pass account information to iTunes.
To select which accounts to add, launch iTunes, and connect your iPhone. Select your iPhone from the source list—that's the column at the left of the iTunes window; your iPhone appears under the Devices heading. The iTunes screen updates and displays a summary of your iPhone, including its name, its phone number, the software version, and so forth. Locate the tabs at the top of this window, and select the Info tab. Scroll down the Info pane to Sync Mail Accounts.
The Sync Mail Accounts settings area allows you to choose whether to synchronize your Mail accounts to your iPhone. Ensure the Sync Mail Accounts check box is checked, and also check the accounts you want to use.
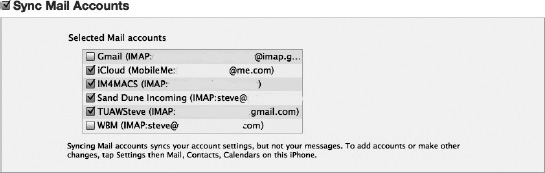
Figure 7–1. The Sync Mail Accounts settings appear on the Info tab in iTunes. Select your iPhone device, click Info, and scroll down to find the Sync Mail Accounts settings.
Next, scroll down further on the Info tab, below Sync Mail Accounts and Other, to the Advanced settings area (see Figure 7–2). As a rule, your iPhone won't add new accounts until you force things. Unlike normal syncs that just update data, when you select to replace your mail accounts on your iPhone, iTunes updates your iPhone with all the accounts you just selected in the Mail Accounts settings.
Replacing mail accounts isn't something you do all the time. You'll want to do this account replacement with new iPhones that you want to initialize, when you've moved your iPhone's home to a new computer, and after you've restored your iPhone's firmware to factory settings. If you just want to add a new e-mail account, add it directly on your iPhone rather than using iTunes. It's easier.
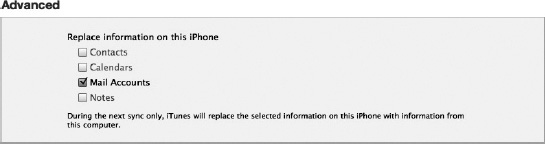
Figure 7–2. Use Advanced settings to replace mail accounts during the next sync. You can also choose to update Contacts, Calendars, and Notes from this settings pane.
Adding Accounts from Your Phone
It takes just a few steps to add a new account to your iPhone. It's especially easy when you use one of the preferred providers: iCloud, a Microsoft Exchange Server, Gmail, Yahoo!, Windows Live Hotmail, or AOL. Here are the steps to take, whether you're using a preferred provider or another provider that does not appear on the list:
- From the Home screen, tap Settings, and navigate to
Settings
Mail, Contacts, Calendars. - Tap Add Account.
- Select the kind of account you will use or tap Other if your provider is not listed (see Figure 7–3). Note that Apple's MobileMe is not visible in this figure but will remain available until July 2012 at which time all MobileMe e-mail accounts must be transferred to iCloud.
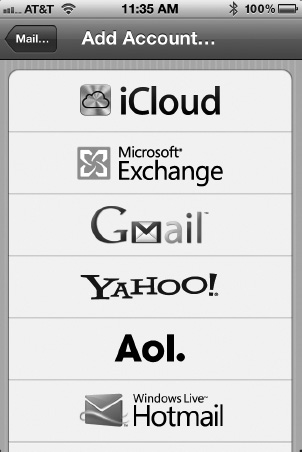
Figure 7–3. When you use a preferred provider, the e-mail setup process is vastly simplified to entering a few items of information. Tap Other to set up e-mail with another provider.
E-mail Provider Setup
Setting up account information for preferred providers is very easy. Your iPhone already knows how to contact the mail servers and which protocols they use.
- Preferred providers require just four items of information, as shown in Figure 7–4.
- For Name, enter the name you want to appear in your From line, usually your full personal name.
- For Address, enter your full e-mail address (for example,
[email protected]). - In the Password field, enter your password. Make sure to type carefully and slowly, and look at the key confirmations as you type. You will not be able to see the password itself as you type it. Try not to make mistakes.
- Finish by entering an account description. Your iPhone uses the text you type into the Description line as a label in the Accounts list, so enter something meaningful, such as Work Yahoo! Account or Home AOL.
- Tap Save, and wait as the iPhone verifies your account information. You automatically return to the Mail settings, and you are done setting up your account.
- For iCloud mail, only your Apple ID and password are required to set up a new account. If you don't already have an Apple ID (it's what you use to purchase items in the iTunes Store), Apple conveniently provides a button to acquire a free Apple ID.
- What if your e-mail provider isn't on the list? For example, I use Comcast Internet service, which provides e-mail accounts to customers. To add an e-mail provider that isn't listed on the main e-mail screen in Figure 7–3, tap the Other button. You'll be asked to enter the same information as in step 4, and when you're done, tap Save, and the iPhone verifies your account information.
- If the iPhone's automated setup doesn't work for you, you have several options:
- If the account is set up correctly on your Mac or Windows computer, use the method described earlier in “Adding Accounts with iTunes” to sync the settings to your iPhone.
- Still no luck? Tap the recalcitrant e-mail account in the list of accounts in
Settings Mail, Contacts, Calendars. On the screen that appears, tap Account. A display similar to Figure 7–4 appears.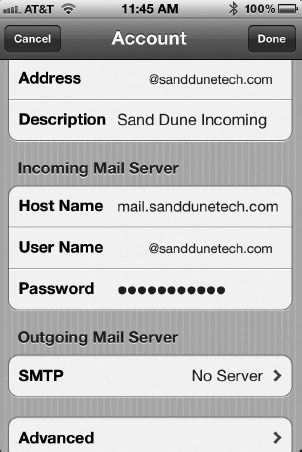
Figure 7–4. The Account Info screen is available for tweaking incoming or outgoing mail server settings and changing server port numbers.
- On this screen, you can change the name of the incoming and outgoing mail servers. You may need to contact your e-mail provider for the details of your account. Some important settings to know are the host (server) name, your full username (sometimes it's the full e-mail address instead of just the first part of the e-mail address), whether or not SSL is enabled, the type of authentication used by the server, and the server port number.
TIP: Setting up an Exchange account can be difficult, because no two Exchange Server configurations seem to be the same. We recommend contacting your IT department or mail service provider for specific instructions on the exact settings you should use to set up your Exchange account.
Removing Accounts from iPhone
To remove an e-mail account from your iPhone, go to Settings ![]()
Mail, Contacts, Calendars, and tap one of the items in your Accounts list. Scroll all the way down to the bottom of the account screen, and tap the red Delete Account button. To be safe, the iPhone prompts you to confirm account deletion. Tap Delete Account one more time to remove the account, or tap Cancel to leave the account alone.
At times, you may want to disable an account without removing it from your iPhone. To do this, go to Settings ![]()
Mail, Contacts, Calendars ![]()
the name of the account. Locate the Mail switch at the top of the screen. Set this from On to Off to disable the account or from off to on to reenable it.
Mail Basic Settings
You're ready to start using Mail, but there are just a few more steps you'll want to take first. Navigate to Settings ![]()
Mail, Contacts, Calendars, and scroll down to the Mail section (see Figure 7–5). Here, you'll find preferences that control the way your iPhone checks for and displays mail. You'll find that Mail works far more smoothly and predictably when you customize these settings before using your new accounts.

Figure 7–5. The Mail pane contains many basic settings you'll want to configure before using your mail accounts.
Here is a rundown of the settings you'll want to look over:
Show: How many messages should the iPhone download and display at once? Choose from 50, 100, 200, 500 or 1,000 recent messages. Choosing fewer messages speeds downloads of messages from your server and saves space on your device, but if you get a lot of e-mail, you may want to see them all in one fell swoop.
Preview: Your inbox, which you can see in Figure 7–9, displays information about each message. It shows who sent the message, the time it was sent, the message subject, and a brief preview of the message itself. In addition to all this information, you choose how many lines to show. Choices are None (no message preview), 1, 2, 3, 4, and 5 lines. The example in Figure 7–9 shows two lines per message. The more lines you choose to see of each message, the bigger the preview you get; however, fewer messages can fit on each screen.
Minimum Font Size: If your eyes have issues with small print, the default font size on the iPhone might be difficult to read. The iPhone lets you choose a minimum font size, so you can make sure text displays no smaller than what you can read. Choose from Small, Medium, Large, Extra Large, and Giant. I use Large.
Show To/Cc Label: By default, your iPhone does not show the To and Cc lines from e-mail. The iPhone normally hides them to save screen space. If you want to override this behavior for your mail, switch this option from Off to On.
TIP: You can view the To and Cc lines even if you haven't enabled this option. Tap Details in the From line of the e-mail to reveal the extra information. Tap Hide to hide them again.
Ask Before Deleting: You might think that asking for confirmation before allowing the iPhone to delete a message is a great idea. When working your way through 100 messages in your inbox, this idea quickly becomes less attractive. The iPhone allows you to delete e-mail without confirmation by default. If you want to add an extra layer of protection, switch this option on.
Load Remote Images: Many e-mail messages contain images. These images are not actually sent with the e-mail; instead, the image is actually a link to an image file on a server. Enabling Load Remote Images ensures that the images are downloaded from the server and displayed within the body of the e-mail message when you open it. The trade-off is speed; loading images can slow down the receipt of e-mail.
Organize by Thread: Do you ever get into e-mail conversations, with many e-mails flying back and forth? If so, enabling Organize by Thread can make some sense of your inbox. When it is enabled, e-mail conversations are signified by a number on the right side of the message indicating how many e-mails are in the thread (Figure 7–6, left). Tapping the number and arrow displays the messages in the thread (Figure 7–6, right).
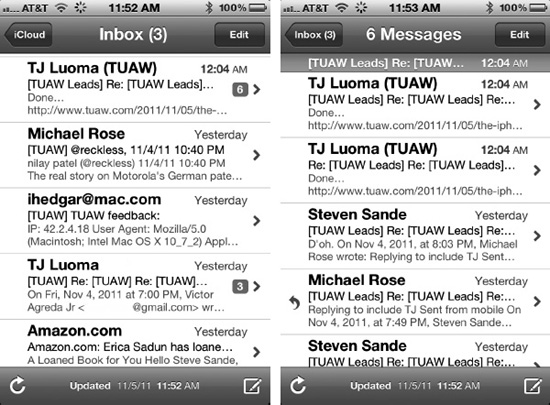
Figure 7–6. Organize by Thread makes it easy to follow e-mail conversations by aggregating all similar e-mails into one easy-to-read thread.
Always Bcc Myself: Some mail services put a copy of sent e-mails into a Sent Mail folder. Others do not. Enable this option to send a blind carbon copy to yourself when writing letters. The “blind” part of carbon copy means that you won't be visibly added to the recipient list. When correspondents “reply to all,” you won't (necessarily) receive multiple copies of those e-mails.
Increase Quote Level: When you forward or reply to a message, Increase Quote Level adds a level of indentation to text that was already in the message so that it is differentiated from any text that you've added. This setting can be enabled or disabled.
Signature: By default, iPhones add the words Sent from my iPhone to all outgoing messages. To remove this tag, erase the text in the signature. You can also customize this message or replace it entirely. Perhaps you might add contact information or a favorite quote. To do this, tap the current signature. A keyboard appears and allows you to edit the text. After making your edits, tap Mail to return to the
SettingsMail, Contacts, Calendarsscreen.Default Account: Choose the default account you want to use for sending mail. This applies only to non-Mail iPhone applications such as Safari or Photos. When you pass along a bookmark or a picture you've snapped, this option sets the account used to send that message.
Audible Mail Alerts
This final pair of settings appear in Settings![]()
Sounds, not Settings ![]()
Mail, Contacts, Calendars.
New Mail: Choose whether you want to hear an audible alert (Yes) or not (No) when your iPhone receives new mail. If you've enabled
SettingsSoundsSilentVibrate, your iPhone vibrates when it plays the new mail sound.Sent Mail: When enabled, this option plays a whoosh sound that indicates your e-mail has been successfully sent on its way to the server. It's a good idea to leave this option enabled. Sometimes, it takes time for mail to get going. You won't be able to send a new message until the first one has fully gone. By listening for the whoosh, you know when you're ready to send the next message.
Getting Started with iPhone Mail
The iPhone Mail application is initially located on the Home screen on the bottom line (see Figure 7–7). The icon is blue with clouds and a white envelope. Tap this icon to open the Mail application. As with the Phone and Messages applications, a red bubble appears to indicate the number of unread messages in all of your e-mail accounts.
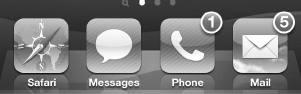
Figure 7–7. A red bubble superimposed on the Mail icon indicates the count of unread messages across all your e-mail accounts.
When you enter Mail for the first time (and after restarting your iPhone), you're greeted by the Mailboxes screen. This screen lists every inbox on your iPhone, as well as every account you've added to your iPhone. Each inbox and account displays the number of unread messages. Tap an inbox name to open any of the individual inboxes, or tap the account names to view individual folders within an account. Return by tapping the Accounts back button at the top-left corner of that screen.
Inboxes
Each e-mail account has a number of mailboxes; Inbox, Outbox, Drafts, Sent Mail, Trash, and Junk are some of the common mailboxes you'll find. Apple separates the Mailboxes screen into an Inboxes list and an Accounts list. Most of the time, you're going to be working in the inboxes, reading and responding to mail, so they're listed on the Mailboxes screen first (Figure 7–8).
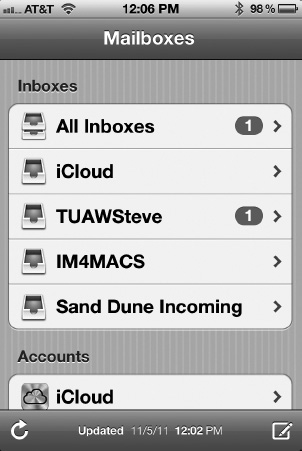
Figure 7–8. The Mailboxes screen displays all e-mail inboxes first, followed by the accounts. All Inboxes is a global inbox that accumulates all incoming e-mail for all accounts. Numbers indicate how many unread messages are in each inbox. The Accounts section lists all the other mailboxes (including Drafts, Trash, and Sent Mail, among others), for each account.
If you're looking for one place to read all your new e-mail, All Inboxes is that place. It is a global inbox for all of your accounts, containing all recent read and unread e-mail in a chronological order. To see only the e-mail that has come into a particular inbox, tap the inbox with the name of that account. The numbers that are listed on the right side of the inboxes indicate how many unread messages are contained in each inbox.
Accounts
Below the Inboxes list is a list of accounts. Each account may include some or many of the following standard mailboxes:
Inbox: All new messages load into your inbox. You have an inbox for each account.
Drafts: Messages that are written but not yet sent get saved to Drafts.
Sent: If your mail account saves copies of outgoing mail, they're placed in a Sent folder.
Trash: The iPhone stores deleted mail in Trash folders. Use
SettingsMail, Contacts, CalendarsAccount NameAdvancedDeleted Messagesto decide if and when to remove deleted messages from Trash mailboxes. Your choices are to never remove the deleted messages from the mailbox or to remove them after one day, one week, or one month.Other folders: Additional folders such as Gmail's Starred folder are a feature of the mail provider and not of iPhone. Note that you can add a new mailbox in which to organize messages by tapping the Edit button while looking at your mailboxes and then tapping the New Mailbox button.
Using Mailboxes
When viewing an account's mailboxes, you can open a mailbox and view the messages stored inside by tapping the mailbox name. This links you to a new screen (see Figure 7–9) that displays the list of messages stored in that mailbox. From here, you can choose messages to display and manage your mailbox. Here are the actions you can take from this screen:
View a Message: Tap an e-mail to open it for viewing.
Refresh Mail: Tap the icon at the bottom left of the screen. It looks like a semicircular arrow. When tapped, your iPhone contacts your mail provider and requests new mail.
Compose new messages: Tap the icon on the bottom right (a square with a pencil through it) to start writing a new message.
Edit messages: Tap Edit to enter Edit mode. In Edit mode, you can tap the circle next to any message to delete, mark, or move it. To delete a message, select one or more messages, and then tap the red Delete button. To move a message from one existing mailbox to another, select it by tapping the circle, and then tap Move. A list of the mailboxes appears on the screen; tap any one of them to designate the location you're moving the message to. Finally, marking a message lets you either flag a message for future reference or mark a message as unread.
TIP: You don't need edit mode to delete mail. Just swipe your finger through any message to instantly bring up the Delete button, or when displaying a message, tap the garbage pail at the bottom of the screen. Some people have trouble mastering the swipe at first—they open their messages instead of deleting them. Keep trying and persist. The swipe becomes second nature after a while.
Return to the mailbox list: Tap the Back button at the top left of the screen to return from this mailbox to your account screen. The button name varies, but it's always shaped like a pentagon on its side, with the pointy bit facing left.
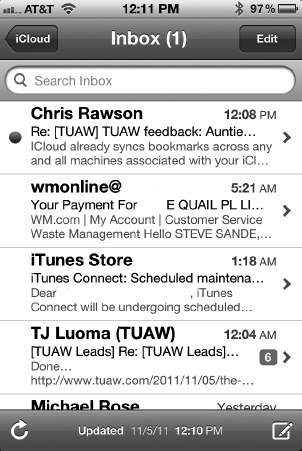
Figure 7–9. The dot indicates an unread message on this inbox listing screen. Each message shows the recipient, the subject, and the date or time the message was sent. You control how many lines of text are shown for each message in Settings ![]()
Mail, Contacts, Calendars ![]()
Mail ![]()
Preview.
Reading and Navigating Through Mail
If you're used to reading e-mail on older portable devices, the iPhone's mail-viewing capabilities comes as a welcome relief. Instead of arbitrary word wrapping, missing attachments, and odd formatting, mail on the iPhone just looks...right. This being the iPhone, you can scroll up and down your e-mail—flicking if needed to move more quickly—and zoom in and out using all the standard pinching and tapping tricks described in Chapter 2.
And, as with Safari, it's not watered-down, text-only e-mail. It is fully functional e-mail that behaves the way it should. Sure, there are some missing features; you can't add attachments at will, for example, and you can't play back video files sent to you by mail without saving them to your Photo library first, but iPhone mail viewing performs to a much higher standard than most other gadgets. Unfortunately, as Figure 7–10 shows, the mail-viewing screen is littered with a proliferation of buttons and unlabeled icons. Here's a quick-and-dirty guide to your screen.
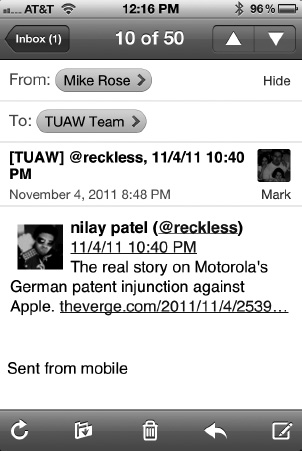
Figure 7–10. The message display screen offers many unlabeled icons for your mail management pleasure.
Bottom Icons
The icons at the bottom of the message display screen, from left to right, are as follows:
Refresh: The Refresh button appears at the bottom left of the screen and looks like a semicircular arrow. Tap this to request new mail from your provider.
File This Message: The folder with a small down arrow allows you to move messages from one mailbox to another. When tapped, the iPhone prompts you to “Move this message to a new mailbox.” Select the mailbox you want to transfer to, and the iPhone rewards you with one of its most adorable animations. The message flies from one mailbox to the other. If you'd rather not transfer the message, tap Cancel instead.
Trash Can: Tap the small trash can in the bottom center to delete the currently displayed message. The trash lid flips up; your animated message moves down into the can. It's visually delightful. Your message moves from the Inbox mailbox (or whatever mailbox you're displaying) to the Trash mailbox.
TIP: To undelete, navigate to Trash (Back, Back, Trash), select the deleted message, and file it back to the original mailbox.
Reply/Forward: The Reply/Forward icon appears just to the right of the trash can icon. It looks like a backward-pointing arrow. Tap this, and a menu appears. Tap Reply to reply to the currently displayed message, tap Reply All to respond to the sender and all of the original recipients of the message, or tap Forward to pass it along to a new recipient. There's also a Print button for printing an e-mail to any AirPrint-enabled printer.
Compose: This rightmost icon looks like a square with a pencil on it. Tap this to compose a new message.
Top Icons
The icons at the top of the message display screen, from left to right, are as follows:
Back button: Tap the Back button in the top-left corner to return from the message display to the Mailboxes screen. The button looks a signpost pointing left. The text inside the button varies according to the name of the mailbox.
Message number display: This isn't, strictly speaking, an icon. The iPhone displays the number of the current message at the top of the screen (for example, 10 of 50). Tapping an e-mail conversation (a thread of e-mails to and from you that all refer to the same topic) displays the individual messages and a header that displays the number of messages in the conversation.
Next Message/Previous Message: These two buttons appear at the top right of the screen. Tap the up triangle to move to the previous message in the current mailbox, and tap the down triangle to move to the next.
Details/Hide: This button appears just below the Next Message arrow. Tap Display to reveal your message's To and Cc lines. Tap Hide to hide them again. Details also reveals a Mark as Unread button, which does exactly what the name implies. It restores the blue dot to the message and updates the unread message count.
Embedded Links
iPhone Mail supports embedded links that you can tap from within a message. These allow you to automatically open web links in Safari or do a number of other tasks using information from message text:
Embedded Web Address: When someone sends you an embedded web address (also known as an URL), you can tap it to open it in Safari. Better yet, tap and hold that address for a second or two. A dialog box appears allowing you to either open the web page in Safari or copy the address for pasting elsewhere.
Phone Numbers: Mail is smart enough to recognize when someone has included phone numbers in a message. It underlines the number and displays it in blue—just like a normal web address link. To place a call, just tap the number. Tap and hold the phone number, and up to four buttons appear (Figure 7–11).
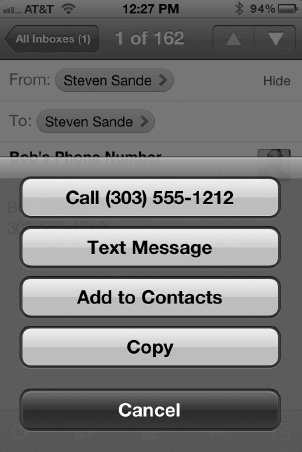
Figure 7–11. Tap and hold a phone number in an e-mail message, and you can call that number, send a text message to it, add it to your contacts (if a name is included), or copy it.
Addresses: If someone sends you a street address in an e-mail message, Mail can do a number of useful things. Tapping the address opens the Maps app to a map of the address, while a tap and hold displays the four buttons shown in Figure 7–12.
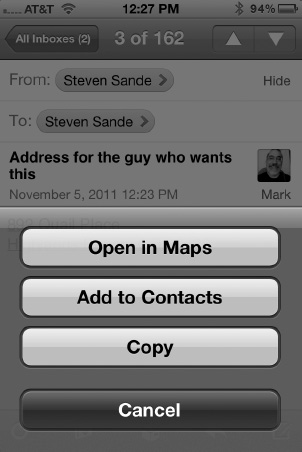
Figure 7–12. Tap and hold an address in an e-mail, and you can open the address in the Maps app, add it to your contacts, or copy the address for pasting elsewhere.
Events: One of the coolest things you can do with embedded links in e-mails is to automatically create events for your iPhone Calendar. The iPhone recognizes terms like “next Thursday at 7:30 PM” and displays them as links. Tapping that link displays a Create Event button to add the event to your calendar. It even gets the date and time from the e-mail and prefills that information in the Calendar app (Figure 7–13). To view the event, tap the Show in Calendar button. There's also a Copy button for grabbing the event information for pasting into another app.
Tracking Info: When you receive an e-mail with a USPS, UPS, or FedEx tracking number, tapping the tracking number launches Safari and opens a package tracking information page. This is very useful if you're away from your home temporarily and see a notice that a package is “out for delivery.”
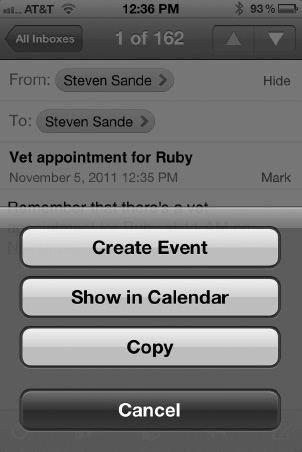
Figure 7–13. Mail on the iPhone makes it a snap to add appointments to your calendar with a few taps.
TRIVIA: The iPhone's ability to understand and act upon words like “next Thursday” is nothing new for Apple. The Apple Newton MessagePad (1993–1998) also understood similar phrases and would create calendar events from them. This feature is also available in Mac OS X, and Siri on the iPhone 4S knows exactly what you're saying when you tell it about time-related events.
Viewing Attachments
iPhones support many e-mail attachment file formats including Word files (.doc, .docx), Excel spreadsheets (.xls, .xlsx), PowerPoint presentations, (.ppt, .pptx), Pages documents (.pages), Keynote presentations (.key), Numbers spreadsheets (.numbers), many image file formats (.jpg, .png, .gif), some video formats (.mov), and PDF documents. When a message arrives with a large attachment, the iPhone shows you that the attachment is available (see Figure 7–14) and lets you choose whether to download it. If you choose to do so, tap the attachment, and wait for it to load in a new screen. After, tap Message to return to the message from the attachment viewer.
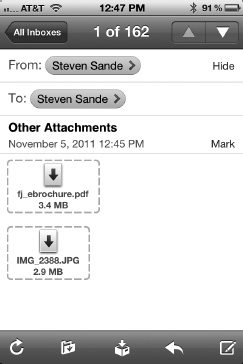
Figure 7–14. Documents over about 1MB in size are not immediately downloaded to your iPhone. Instead, a download button appears. Tapping the button downloads the file and makes it available for viewing on your iPhone.
Smaller documents are downloaded to Mail immediately, and they appear with buttons to tap for viewing (Figure 7–15).
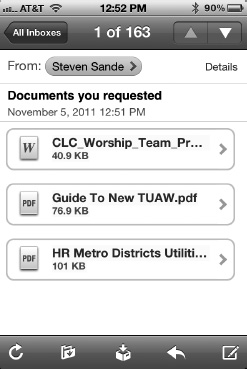
Figure 7–15. Smaller documents attached to e-mails appear as buttons. Tap the buttons to view the documents.
Attachments can be viewed in Mail, but if you want to edit the documents that have been sent to you, a compatible app must be installed on your iPhone. Fortunately, these apps register themselves to your iPhone, and if a compatible app is available for a certain document type, an Open In… button appears when you tap and hold the attachment button. Tapping the Open In… button displays buttons for any apps that can edit the document, and tapping one of those buttons launches a compatible app and opens the document for editing (Figure 7–16).
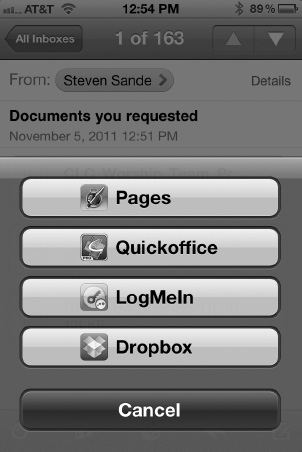
Figure 7–16. Tapping the Open In… button displays a list of any applications that can open the document for viewing or editing. In this example, a .doc (Microsoft Word) document is readable in Pages but can also be opened in the Quickoffice, LogMeIn, or Dropbox apps.
Sending Mail
The iPhone offers many ways to send mail. Unfortunately, consistency is not a strong point here. You'd imagine Apple would have designed a single universally recognized compose e-mail button and placed it more or less in the same place for each application. You'd be wrong. Here's a quick rundown of the most popular ways to ask your iPhone to create a new message across several programs:
Compose button: The Compose button, which looks like a square with a pencil through it, appears at the bottom right of many Mail screens (see Figure 7–10) and in the Messages application at the top right of the screen. In the Mail application, it creates a new letter. In Messages, it creates a new iMessage, SMS text, or MMS multimedia message.
Reply/Forward button: The Reply/Forward button appears just to the left of the Compose icon in open e-mail messages. Tap this to reply to a message or forward it on to another party.
Share icon: The Share icon appears at the bottom left of the screen in Photos and many other apps. It looks like a rectangle with an arrow jumping out of it—the arrow is basically a mirror of the Reply/Forward button. To send a picture, tap this, and then select Email Photo from the pop-up menu. As mentioned earlier, there isn't a consistent look for the icon, so in some apps, it may appear as an envelope.
Each of these (various, assorted, and inconsistent) methods requests Mail to open a new message, ready to be addressed, personalized, and sent.
Addressing E-mail
When you reach the New Message screen shown in Figure 7–17, you're ready to address your message. Start by tapping either the To or Cc/Bcc line on the New Message screen. The iPhone opens a keyboard so you can enter text. As you type, the iPhone searches its contacts list to match what you're typing to the contacts in its list. Tap in a few letters until you see the name of the contact you want to use. Tap that contact, and the iPhone automatically adds it to the field (To, Cc, Bcc) you selected.
You do not have to use an address from your contacts list. You can type in the full e-mail address (the iPhone helpfully provides you with the @ sign on the main keyboard for e-mail) and address your e-mail by hand. Also, it remembers the e-mail addresses you use. So, the second time you type [email protected], the proper address pops up by the time you type a and l. As with normal contacts names, just tap an e-mail address to add it to your recipient list.
To remove a recipient from the message, select one of the blue recipient bubbles—they're labeled with a name or e-mail address—and tap Backspace.
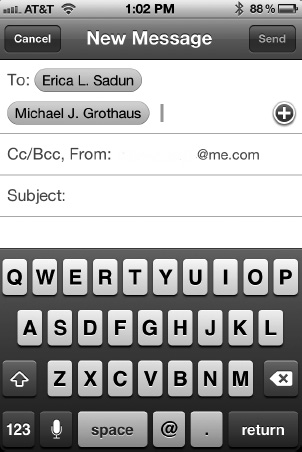
Figure 7–17. The New Message screen allows you to address and personalize your e-mail.
Entering a Subject
Tap the Subject line to move the cursor to that field. Use the keyboard to enter a meaningful subject for your message.
Editing the Message
Tap in the message area to begin editing your message. A blinking cursor indicates this is where the keyboard will enter text. Use the typing skills covered in Chapter 2 to type your message. Remember to use the magnifying glass trick to move the cursor if you need to back up and make corrections.
TIP: To remove an attached photo or other file from e-mail, position the cursor right after the picture, and tap Backspace.
Saving a Draft
At any time, you can take a break from editing a message and return to it later. To do this, tap Cancel. It's at the top left of the message-entry screen. A pop-up menu appears. Tap Save Draft to save the message for later, Delete Draft to abandon the message, or Cancel to return to the editing screen. When you choose Save Draft, the iPhone creates a copy of your message in the Drafts (or sometimes Sent) mailbox for your default account. Return to that mailbox when it's convenient to continue editing the message and/or to send it.
Sending E-mail
When you are done addressing and composing your letter, you can send it on its way by tapping Send. If you haven't disabled the feature, the iPhone alerts you with a whoosh sound to indicate that the message has been sent successfully to the outgoing mail server. You don't need to remain in the Mail app, because your message delivery takes place whether your phone is asleep or you are in another app. As soon as you've finished tapping Send, you can move on to another task.
Writing and Sending Mail with Siri
Siri provides new way of sending and reading e-mail messages that have been sent to you. If you have an iPhone 4S, no longer do you need to hunt and peck on the iPhone keyboard to assemble an e-mail.
Creating Mail
To create a blank mail message that is addressed to someone in your contacts, invoke Siri and say “E-mail name or nickname about subject.” Telling Siri to “E-mail Erica about the book” produces the following conversation (Figure 7–18).

Figure 7–18. A quick conversation with Siri creates a Mail message that's ready to send at your command.
Next, Siri asks what you want in the body of the e-mail. This enables dictation, and Siri listens as you speak your message. Complete your conversation, and Siri asks if you want to send the message, at which time saying “Yes” or “Send” sends the e-mail on its way.
For people without a nickname in your Contacts, use their first and last names (e.g., Erica Sadun) to get theire-mail address. If there is more than a singlee-mail address for a person, Siri prompts you to select one.
To shortcut the conversation required to create a message, tell Siri to “Mail contact about subject and say message.” As an example, I could say, “Mail Barb about exercising and say you are doing well period keep up the good work exclamation point.” That long statement creates a message that looks like the one shown in Figure 7–19.
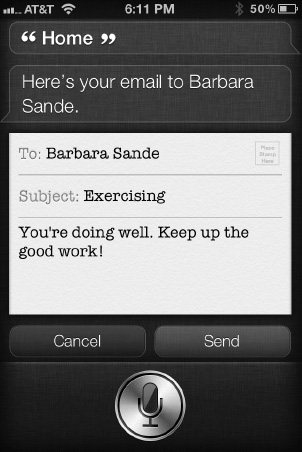
Figure 7–19. It's possible to address an e-mail, enter the subject, dictate the text, and send it, all without touching the iPhone's virtual keyboard.
Checking Mail
Siri can also check for incoming mail and display it on your iPhone screen, although it cannot read it to you aloud. Here are some sample phrases you can try with Siri:
- Check e-mail.
- Any new e-mail from Barb today?
- Show new e-mail about the wedding.
- Show the e-mail from Michael yesterday.
At this point in time, Siri responds to requests to delete mail with a terse “I'm not allowed to delete e-mails for you” message.
Responding to Mail
When reading a Mail message, you can use Siri to respond to it several different ways. To send a reply via Mail, say something like “Reply Dear Mom thanks for sending the flowers to the hospital.”If you want to call the person who sent you the message, say, “Call [him/her/name] at [work/home/iPhone].” Siri dials the phone number of the person, and within seconds you're talking to them.
Summary
iPhone's Mail program removes many burdens associated with checking and responding to e-mail on a portable device. It provides a fully capable e-mail client that displays messages the way your senders intended you to view them. With its powerful attachment handling, the iPhone brings you one step closer to the ideal of bringing along your work or home computer in your pocket. Here are a few key points from this chapter that you might want to think about:
- Make sure to use your full iPhone interaction vocabulary of touches, pinches, and so forth, to get the most out of viewing attachments.
- It's really easy to add preexisting mail accounts using iTunes and add new ones using iPhone the Mail, Contacts, Calendars settings.
- Many corporations use Microsoft Exchange Server for mail and other groupware tasks. Be sure to ask your IT department for access to your work e-mail system if you so desire.
- If you see an underlined blue link in an e-mail, be sure to take advantage of Mail's abilities to understand the information contained in the link. This makes it easy to add new contacts or update existing contact information with a tap.
- Remember that there are many different icons and buttons used to denote how to send messages. Become familiar with these buttons in your favorite apps, because it makes it much easier to share information with the world.
- Siri is useful for creating and sending short mail messages without touching the virtual keyboard on your iPhone.