
Chapter 15
Using Your Desk Set: Contacts, Calculator, Notes, Weather, Stocks, Voice Memos, and Reminders
The iPhone is your digital gateway to more tools and apps than you could ever imagine. Chapter 10 taught you how to navigate and download apps from the App Store; this chapter shows you how to use many of the productivity apps that come preinstalled on the iPhone, namely, Contacts, Calculator, Notes, Weather, Stocks, Voice Memos, and Reminders.
Synchronizing Your Address Book with Your Computer
Before you even get to the iPhone, start thinking about your contacts while you’re at your computer. In iTunes, the Info tab controls how and when your iPhone syncs its contacts with those stored on your computer. You can sync your iPhone with contact information from Windows Address Book or Microsoft Outlook (Windows) or Address Book or Microsoft Entourage (Mac).
Choosing Sync Options
In Chapter 2, we already told you how to sync your contacts from your computer with your iPhone, but let’s quickly look at it again. In iTunes, click the Info tab, and locate the Contacts section—it’s near the top of the screen, as shown in Figure 15–1. To synchronize your address book, you must select the “Sync contacts” check box. Then all the grayed-out options turn dark black, and you can select your settings.
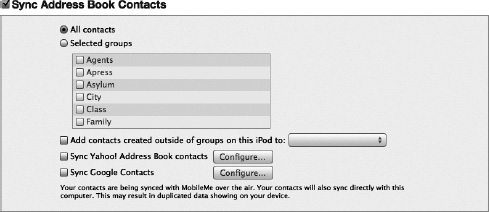
Figure 15–1. Unless you check the “Sync contacts” check box, your contacts will not copy over to your iPhone.
Choose where to sync your contacts from (and, for that matter, to). iTunes looks for address books on your system and lists those available in a drop-down list. The list varies by system and by your installed software.
Then choose whether to use all contacts or select a group like Home or Work to sync. If you do not divide your contacts into groups, just leave the default option, “All contacts.” You can also sync contacts from your online Yahoo! or Google contacts. Select either box, and then enter your Yahoo! or Google ID and password.
After making your choices, tap Apply to save your changes. The button is located at the bottom right of the iTunes screen.
NOTE: If you are syncing your contacts through iCloud (see Chapter 2), you don’t need to worry about any of these steps.
Replacing Contacts
At times, you may want to replace the information on your iPhone entirely with the contact information from a computer. For example, you may be reparenting your iPhone after upgrading your system to a new machine, or you might be reassigning the iPhone from one employee to another.
Start by locating the Advanced Info options for your iPhone, at the very bottom of the Info tab. Scroll all the way down using the scroller at the right side of the iTunes window. In that section, select the Contacts box under “Replace information on this iPhone,” and then click Apply.
During the next sync—and the next sync only—iTunes will completely wipe the contact information off your iPhone and replace it with the information found on the computer.
Working with the Contacts Application
The Contacts application appears on the top row of your iPhone home screen. It looks like a brown, spiral-bound address book with tabs (see Figure 15–2). Tap this icon to open the Contacts application.

Figure 15–2. Use the Contacts application as a palm-top address book. You can search for existing contact information and add new contacts directly from your iPhone.
Finding Contacts
When you launch the Contacts app the first time, you’ll be presented either with the Groups screen, which lists all your contacts by groups, or with the All Contacts screen, which lists all your contacts alphabetically. The screen you see will depend on whether you have contact groups set up. If you do not, then you will be presented with the All Contacts screen. As Figure 15–3 shows, both the Groups and All Contacts screens are quite basic. The Groups screen consists of an alphabetical listing on all your groups, while the All Contacts screen consists of a scrolling list of names, an alphabetic index, and an Add button. You can scroll, drag, or flick up and down the screen to move through your entire groups or contacts collections. On the contacts screen you can also tap a letter to move instantly to that part of the address book or drag your finger up and down the alphabet to jump through the names. Tap the refresh button in the upper-left corner to make sure you’ve synced the latest contacts.
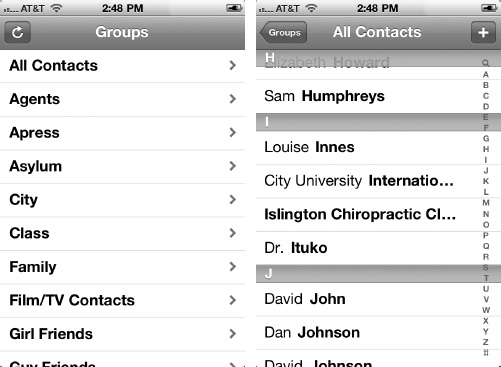
Figure 15–3. The Groups (left) and Contacts (right) application screens
Ordering Your List
You can choose how Contacts orders your contacts list: by first name and then last, or by last name and then first. How you set this up depends on whether you want to search for your friends and business acquaintances informally or formally or whether your country uses a non-English ordering method, as in Japan or China.
To change your settings, navigate to Settings ![]() Mail, Contacts, Calendars, and choose an ordering method for sorting and for displaying.
Mail, Contacts, Calendars, and choose an ordering method for sorting and for displaying.
Viewing Contact Details
Tap any contact name to view its information screen. Figure 15–4 shows a contact information screen for Apple’s mythical John Appleseed. The level of detail and the amount of information shown depends on how much information you’ve entered into the address book. A contact may include a physical address, a web site URL, e-mail address, phone numbers, and more.
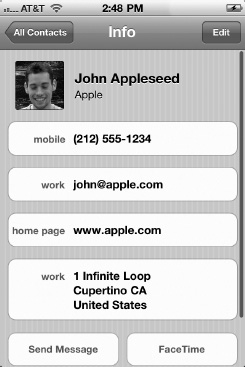
Figure 15–4. The Info screens contains as much or as little contact information as you have set.
A contact’s info screen isn’t just to be looked at; it’s interactive. Tap and hold a phone number to copy it to the clipboard. Tap and e-mail address to be taken to a new compose mail message screen with the e-mail address filled in the To field. Tap a web link to open the Safari browser to that web address. Tap a physical address to open the address in the Maps app. Tap and hold other information on the page to copy its text to the clipboard. Finally, tap Share Contact to compose an e-mail with the contact’s information attached as a VCF (virtual business card file) to the body of the e-mail. The recipient of the e-mail can then add the card to their address book.
Adding Contacts
One of my favorite iPhone features is its ability to add contacts on the go. When I’m talking with another parent and trying to set up a play date or when I’m in a business meeting, I can pull out my iPhone and enter contact information right where I am. When I return to my computer or sync to iCloud, I sync that information into my main computer-based address book.
Contacts you create or edit on your iPhone will sync back to your computer and update the information there. If you’ve set the Sync contacts option in iTunes, all changes made on your touch will synchronize to your computer and reflect your updates.
Tap the (+) button at the top right of the screen to create a new contact. A detail screen opens, as shown in Figure 15–5. Here, you can enter all the information for your new contact. Fill in the fields, as described in the following sections, and then tap Done to add your new contact to the list.
TIP: Once you’ve added a field to your contact, the green + next to each defined field turns into a red –. Erase any field by tapping the red button and then tapping Delete.
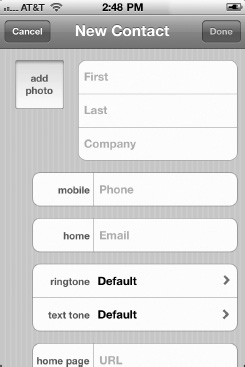
Figure 15–5. Use the New Contact screen to add information about your new contact.
Adding a Contact Name
As you can see, adding a contact name is straightforward. Type in their first name, and then touch the last name field to enter their last name. One caveat is when you are entering a business name. Here you have a choice. You can enter a name and a company ID, just one, or just the other. For example, you might add a contact for your favorite pizza parlor using just its company name, without adding a contact name for that establishment.
After entering the new information, tap Done. This returns you to the New Contact screen.
NOTE: The iPhone expects you to separate a contact’s first and last names into separate fields so that it can properly alphabetize the results.
Adding a Contact Photo
The Contacts application can take advantage of any photos you have synchronized to your iPhone. Tap the Add Photo box at the top left of the New Contact screen, and then tap Choose Photo from the pop-up menu that appears to assign a photo to your new contact. The Photo Albums screen opens. From there, navigate to a photo thumbnail, and tap it to display it. Move and scale that photo as desired, and then tap Set Photo. The iPhone saves the picture and adds it to your contact.
You can also take a photo on the contact if you happen to be with them. Tap the Add Photo box at the top left of the New Contact screen, and then tap Take Photo from the pop-up menu that appears. Snap your pic, move and scale it, and then tap Use Photo to assign the photo to your new contact.
Adding Phone Numbers
The Contacts application supports not one or two but eight different kinds of phone numbers. And on top of that, it also offers a free-form phone number label. You can enter almost unlimited quantities of phone numbers and assign them to standard types, including mobile, home, work, pager, and more.
Tap the Phone field, and the iPhone opens an Edit Phone screen. Enter a phone number. You can then tap the current label of that phone number (such as “mobile” or “iPhone”) to get a pop-up list of labels you can choose from. The label defines the kind of number you’re using, such as “work” for work numbers and “home” for home numbers. In addition to the standard labels (mobile, home, work, main, home fax, work fax, and page), you can also add custom labels to your heart’s content. See the upcoming section on managing custom labels to learn more about adding and editing labels.
Tap Done to save your new phone number for the contact, or tap Cancel to go back to the New Contact screen without adding that number.
Adding E-mail Addresses and URLs
The E-mail and URL fields allow you to add Internet addresses for your contacts. Tap either option, enter the e-mail or web address desired, and tap Done. As with phone numbers, you can set standard labels for these items or enter custom ones as needed.
Adding Addresses
The address fields refer to a contact’s physical location, including street address and city. As with all the other contact information, you can add more than one address to a contact and label these items as home or work or with a custom label.
The Contacts application is smart enough to adjust the address fields based on the country you pick. So for Australian addresses, you’re prompted for suburb, state, and postal code. Japanese addresses include postal code, prefecture, and county/city.
Adding Other Fields
In addition to the standard name, phone, and address fields, you can add a number of other predefined fields to a contact’s information. Tap Add Field, and choose from Prefix, Middle, Suffix, Phonetic First Name, Phonetic Last Name, Nickname, Job Title, Department, Birthday, Date, and Note. The Note field allows you to enter a free-form note and can prove very handy.
Adding Outside Data to an Existing Contact
If someone who is already in your contacts list sends you an e-mail with their address or phone number or if you find contact information on the Web for someone you already have in your address book, tap and hold that information, be it a phone number or address, and wait for the Add to Existing Contact menu pops up. Tap Add to Existing Contact, and then choose your contact from your address book. When their address card opens, the new phone number or address will populate the respective field. Add more information if you like, and then press the Done button.
Managing Custom Labels
There’s a big world out there that goes beyond “home fax” and “work address.” The Contacts application allows you to add custom labels to your phone numbers, e-mail addresses, URLs, and physical addresses. Manage these labels using any of the label-selection screens, each of which contains an Edit button. Tap this Edit button—it is at the top-right corner of the screen—to switch to edit mode, as shown in Figure 15–6.
In edit mode, you can perform the following actions to add and remove custom fields to and from your iPhone:
Add a field: Tap the green + button at the bottom of the edit list to add a new custom field. A Custom Label screen opens. Here, you can type in the name for the new label. Tap Save to add the label.
Remove a field: Tap the red button next to any custom field you want to remove. A Delete button appears at the field’s right. Tap Delete to confirm deletion, or tap anywhere else on the screen to cancel. Once removed, all phone numbers, e-mail addresses, and so forth, that have been labeled with that custom item are renamed to the generic “label.” You will not lose phone numbers and other data items you’ve entered.
To finish making your edits, tap Done.
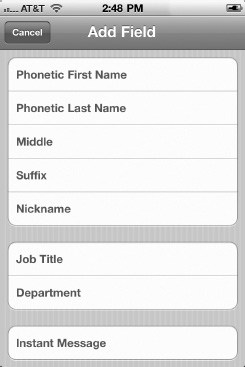
Figure 15–6. Contacts allows you to interactively manage your custom fields.
Editing and Removing Contacts
To edit a contact, first select it in the contacts list, and tap it to open its Info tab. There, tap the Edit button in the top-right corner. This sends you to an edit screen that is functionally nearly identical to the New Contact screen (Figure 15–5). Make your changes, and then tap Done to finish and save them.
A Delete Contact button appears at the bottom of the edit screen. To remove a contact from your address book, scroll down to the red button, and tap it. A confirmation dialog box appears. Tap Delete Contact again, and Contacts removes the item from your address book. Tap Cancel to retain the contact.
As you can see, Contacts are a big part of the iPhone experience. Not only does the app help you manage all your contacts, it’s fully integrated into iOS itself. You contacts appear in other Apple and third-party iOS apps such as Maps, Messages, Calendars, Facebook, and more. Get used to adding and organizing your contacts because the payoff in user experience is huge! Now, let’s move on to some other desk set apps, which will help you in your everyday tasks.
Using the Calculator
iPhone’s Calculator app provides a thorough interactive calculator with a simple memory. The icon on your home screen looks like four calculator buttons. It appears on the second row of the home screen, the second icon in. You can see this icon in Figure 15–7.
Figure 15–7. The Calculator icon
When you launch the Calculator app, you’ll see a simple calculator that allows you to add, subtract, multiply, and divide (Figure 15–8). When you tap an operation button, a white circle appears around the button to let you know which operation will be carried out. But remember, many apps have multiple views depending on which way you are holding your iPhone. Rotate the iPhone into landscape mode to reveal the built-in scientific calculator!
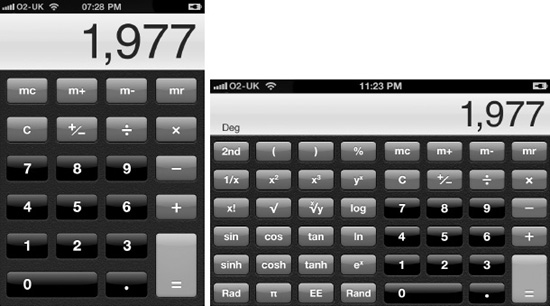
Figure 15–8. The iPhone Calculator application allows you to use your iPhone as a calculator (left) when you’re on the go. Rotate the iPhone vertically to reveal the scientific calculator (right).
The Calculator application allows you to add, subtract, multiply, and divide (and much more if you’re in scientific mode). When you tap an operation button, a white circle appears around the button to let you know which operation will be carried out.
Use the memory buttons to add to the stored number (m+) or subtract (m–). Once a number is stored in memory, the button highlights with a white circle. Tap mr to recall the stored number. Tap mc to clear the number from memory.
TIP: If you’re more interested in splitting a restaurant bill with friends than doing advanced math, you may want to use one of the many free online tip and bill-splitter calculators instead when visiting restaurants. Search the App Store for tip calculator.
Taking Notes
The iPhone Notes application allows you to jot down quick notes on the go. This application isn’t meant to be a full-powered word processor. It just provides a simple way to create notes and bring them with you.
To launch Notes, tap the yellow notepad-styled icon on your home screen (Figure 15–9).
Figure 15–9. The Notes icon
Figure 15–10 shows the Notes screen. From this screen, you can add and manage notes as follows.

Figure 15–10. Use the Notes screen to write quick notes. You can e-mail your notes to others.
Create new notes: Tap the + button to add a new note.
Enter and edit text: Tapping in the text area summons the keyboard. Type your note, make any changes, and then tap Done to dismiss the keyboard.
Delete a note: Tap the garbage can icon, and then tap Delete Note.
Navigate between notes: Use the left and right arrows to move between notes, or tap Notes in the upper-left corner and select the note you want to view from the list.
E-mail notes: Tap the envelope, enter an address, and tap Send. The text from the note will be pasted into the body of the e-mail.
In Chapter 2, we talk about setting up a Bluetooth keyboard. If you are using Notes a lot, you might want to think about investing in one.
Syncing Notes
If you like, you can sync notes between your iPhone and your computer. To sync notes, you’ll need to be using Mail.app, Entourage 2008, or Outlook 2011 on a Mac or Microsoft Outlook 2003 or newer on a Windows computer. Again, if you are using iCloud, your Notes will sync over the air automatically. You can also sync notes with various e-mail providers such as Gmail, Yahoo!, and AOL. To sync notes with those e-mail accounts, navigate to Settings ![]() Mail, Contacts, Calendars, and choose your e-mail account. Where you see the Notes icon, tap the switch to ON. Syncing notes allows your notes to be viewed and edited in Mac OS X’s Mail app or Windows Outlook.
Mail, Contacts, Calendars, and choose your e-mail account. Where you see the Notes icon, tap the switch to ON. Syncing notes allows your notes to be viewed and edited in Mac OS X’s Mail app or Windows Outlook.
If you are using multiple note accounts, you’ll see the option of viewing all notes together or just notes from a certain account on the Accounts screen (Figure 15–11).
Here are some tips on using the Notes application:
- Although your Notes files are backed up, you cannot sync your notes to text files on your personal computer. Use e-mail to send yourself your notes if you want to sync them to your computer.
- To search through your notes, navigate to a notes list screen (the second image in Figure 15–11), and swipe down to reveal the search field at the top. The results screen will populate with any notes that match your search criteria.
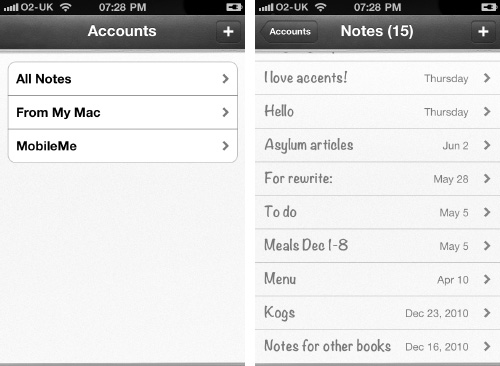
Figure 15–11. Use the Accounts screen (left) to view all your notes together (right) or on a per-account basis.
NOTE: Unfortunately, there’s no easy way to change the dreadful default font for Notes. Also, currently, you cannot print your notes directly from the iPhone to a printer.
Checking the Weather
The iPhone Weather application allows you to view the current temperature and six-day forecast for each of your favorite cities. Weather uses forecast data from Yahoo! and the Weather Channel to provide up-to-the-minute data on your iPhone. To launch Weather, tap the blue icon with the sun on your home screen (Figure 15–12).

Figure 15–12. The Weather icon
Viewing Weather Info
Figure 15–13 shows a typical Weather screen. From here, you can flick left and right to scroll between your cities. The bright dot at the bottom of the screen shows which item you’re viewing. The dim dots show the other cities you’ve added to the Weather app. The arrowhead in front of the line of dots is the current location weather. This weather screen shows you the wether for whatever location you are currently located in. Cities that are experiencing daylight have a blue background, and cities where it is already dark have a purple background. Tap any weather screen to see an hourly forecast for the selected city.
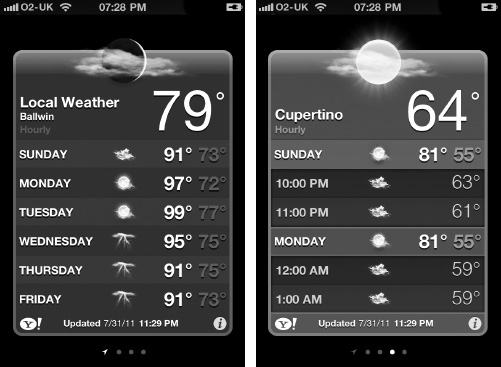
Figure 15–13. The iPhone Weather application provides six-day forecasts for your favorite cities and your current location. Tap the weather screen to see an hourly forecast.
When you’re ready to specify your cities, tap the small i at the bottom right of any Weather screen. This flips from the forecast to the city-management screen. From this screen, you can customize your cities:
Local Weather: Toggle this On or Off to show the current location weather screen.
Add a city: Tap the + button, enter the city name, tap Search, and then tap the city you want to add. You cannot find every city. Only those supported by Yahoo! and the Weather Channel are available.
Remove a city: Tap the red – button next to any city name, and then tap Delete.
Reorder cities: Use the grab controls to the right of each name to drag your cities into a new order.
Switch between Fahrenheit and Celsius: Tap °F or °C.
Tap Done to return to the forecast screen.
Weather Tips
Here are some tips for using the Weather application:
- As Figure 15–13 shows, based on the dots at the bottom represent how many cities you’ve added. The first “dot” will be an arrowhead, which is the weather for your current location..
- Tap the Y! icon to visit Yahoo Weather in Safari.
- You don’t need to keep the Cupertino forecast. Although the iPhone offers Cupertino as its default forecast, feel free to add your own city and remove Cupertino from the list. Apple will never know.
Monitoring Stocks
You can use your iPhone to keep track of the stock market so you could see how much you’ve made (or lost!) that day. The Stocks icon looks like a blue-and-gray stock ticker (Figure 15–14). Tap it to go to the application that monitors your favorite stocks using 20-minute delayed data from Yahoo!

Figure 15–14. The Stocks icon
The Stocks screen, shown in Figure 15–15, consists of a list of stocks above a historic graph. Current prices appear to the right of each name, with the changes listed in green (positive) or red (negative). From this screen, you can view and customize stock information as follows.
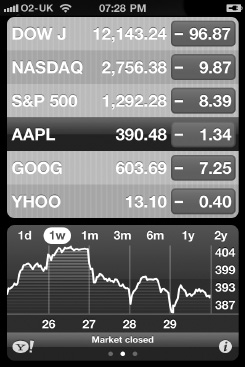
Figure 15–15. Yahoo! Finance powers the iPhone Stocks application using 20-minute-delayed data.
View a stock: Tap any stock to load its associated graph.
Choose the history length: Choose the length of time over which you want to view a stock’s history. Pick from one day (1d), one week (1w), one month (1m), three months (3m), six months (6m), one year (1y), and two years (2y).
Customize: You can add or remove stocks from your list by tapping the i icon at the bottom right of your screen. This opens the customization screen (Figure 15–16).
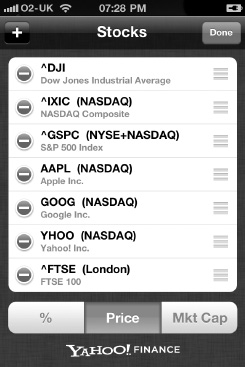
Figure 15–16. Customizing the stocks app
- To add a stock, tap the + button and either search for a company name or enter the stock symbol directly.
- To remove a stock, tap the red – button, and then tap Delete.
- Reorder stocks by using the drag controls to the right of each stock name.
- The %, Price, and Mkt Cap buttons switch between the percentage gained or lost, the current price, and the market cap of the stocks.
- Tap Done to return to the main Stocks screen.
Notice the three dots below the chart in the stocks app (see Figure 15–15)? If you swipe left or right, you can also view the summary and news headlines for a specific stock (Figure 15–17). When viewing the news headlines, scroll up or down to see more. Tapping a headline will open up the news article in the Safari browser.
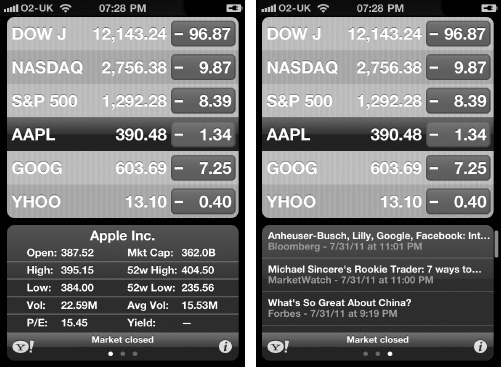
Figure 15–17. You can view the summary (left), chart, or news (right) for a particular stock by swiping left or right.
The Stocks app also support landscape mode. Turn your iPhone on its side to be presented with an interactive chart of a particular stock (Figure 15–18).

Figure 15–18. Rotate the iPhone to landscape mode to see the interactive chart.
Use the time buttons (1 day, 3 months, and so on) to show a specific time frame. Drag your finger across the chart to see the precise stock price for any given time. Drag two fingers along the chart (Figure 15–19) to show the price difference between any two different points in time. Finally, swipe left or right to switch to another stock’s chart.
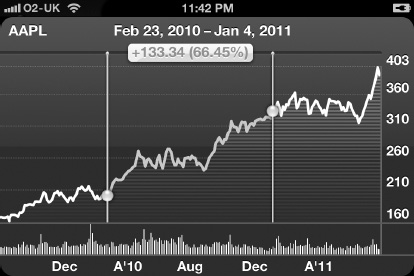
Figure 15–19. Place and drag two fingers on the chart to see the price difference between any two points.
Here are some tips for using the Stocks application:
- Tap Yahoo! Finance at the bottom of the customization screen to jump directly to the Yahoo! Finance web site. You can also tap Y! at the bottom left of the main Stocks screen to get to this web site.
- Stock quotes are delayed according to the rules of the stock exchange. This provides an advantage to on-floor traders and allows vendors to charge for premium real-time quotes.
- You don’t need to press the customization button to switch between percentage, price, and market cap views; you can just tap the value column (red and green squares) to switch between views.
We are sure there’s a limit to how many stocks you can add to your list, but we have yet to personally encounter that limit.
Dictating Voice Memos
When Apple decided to include the Voice Memos app (Figure 15–20) on the iPhone, we thought we would never use it. Now, however, it’s one of the apps we turn to most. With voice memos, you can quickly record ideas or entire classes or meetings with the tap of a button.
To use the Voice Memo app, your iPhone will need a microphone. Obviously, all iPhones have a built-in microphone that enables you to talk, but the earbuds that came with the iPhones also have built-in mics for hands-free talking. Other hands-free iPhone-compatible mics can be purchased at http://store.apple.com.

Figure 15–20. The Voice Memos icon
Tap the Voice Memos icon to launch that app. You’ll be presented with a screen that shows a large, old-fashioned radio mic from the 1930s. The radio mic is just for show. You interact with the Voice Memos app using the two buttons, situated on either side of the audio level meter (Figure 15–21).

Figure 15–21. The Voice Memos app
To record a memo, tap the red-and-silver record button on the left of the screen. A red bar will appear at the top of the screen with the word Recording in it followed by the recording time that has elapsed (Figure 15–22). You’ll also notice that the record button has changed to a pause button. Tap it to pause the current recording. Tap it again to resume recording. To stop a recording, tap the silver-and-black stop button on the right side of the screen.

Figure 15–22. Recording a memo
To view and listen to all your recordings, tap the Memos button. The Memos button has three horizontal lines and rests in the lower-right corner in Figure 15–21. The Voice Memos screen will appear (Figure 15–23).
From the Voice Memos screen, you can play back any memo you’ve recorded.
Play a Memo: Tap the memo you want to play so it is highlighted in blue. Then tap the memo again to play it.
Scrub through a memo: Use the slider at the bottom of the screen to scrub through your memos. This is particularly helpful for long recordings.
Share a memo: Select a memo, and then tap the Share button. A pop-up menu will appear asking you whether you want to share your memo using e-mail or in a message. Tap E-mail, and a new email compose screen will appear with the recording attached to the body of the e-mail. Tap Message, and a new message compose screen will appear with the recording attached to the body of the message. We discuss the Messages app in Chapter 6.
Deleting a memo: Select a memo, and then tap the Delete button. Tap the Delete Voice Memo pop-up that appears to confirm your deletion.
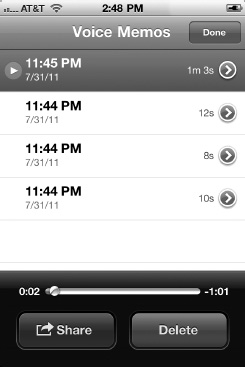
Figure 15–23. The Voice Memos screen lists all your memos.
You can also label and edit voice memos by navigating to their information screen. To do this, tap the blue-and-white > button next to a voice memo. You’ll be taken to that voice memo’s information page (Figure 15–24).

Figure 15–24. A memo’s information page (left) and trimming options (right)
From this page you can do the following:
Label the voice memo: Tap the field with the microphone icon in it (next to the time stamps) to be taken to the labels screen. From this screen you can select from the following labels: Podcast, Interview, Lecture, Idea, Meeting, or Memo. You can also name your memo anything you want by tapping the Custom button and entering a name. To keep length of time of the memo as its name, select None as the label.
Trim the voice memo: You can actually edit your voice memos right on the iPhone. Tap Trim Memo, and a black-and-yellow trim menu will appear (Figure 15–25). Adjust the beginning and end times by using the yellow and blue slider, and tap Trim Voice Memo to trim the selection. The trim feature is a great way to cut out the usual dead air times at the beginning or ending of a recording. However, you cannot edit out snippets of the recording piecemeal. You can only trim its edges. Also, note that edits you make cannot be undone.
Share: This button functions the same as the Share button on the main information page. Tap Share, and then tap E-mail, and a new message compose screen will appear with the recording attached to the body of the e-mail.
iTunes automatically syncs any voice memos you have created the next time you connect your iPhone to your computer. The memos are stored under a playlist that is created called Voice Memos (see Figure 15–25).
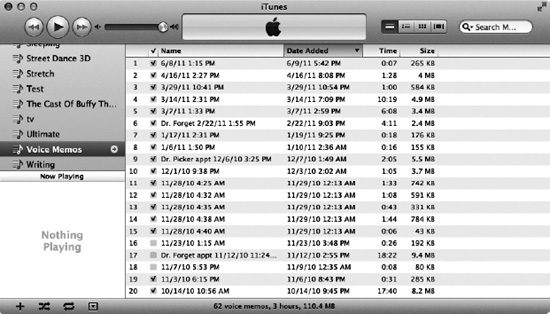
Figure 15–25. iTunes automatically creates a playlist called Voice Memos when it detects a voice memo on your iPhone.
When you sync voice memos to iTunes, they still remain on the iPhone until you delete them. Deleting them on the IPhone will not delete them from iTunes; however, deleting a voice memo from iTunes will also delete it from the iPhone on the next sync.
Setting Reminders
Reminders is a brand new app included on every iPhone. It’s a to-do app that lets you create lists and set reminders so you never forget anything again. To launch Reminders, tap its on your home screen (Figure 15–26).
Figure 15–26. The Reminders icon
When you launch the app you’ll first see a looseleaf piece of paper with the title “Reminders” at the top. This is your main reminders list (Figure 15–27). To create a reminder, tap the + button and enter a name or description for the reminder. Tap Done when you have finished naming the reminder. In Figure 15–27, one of our reminders is to “Buy flowers.”
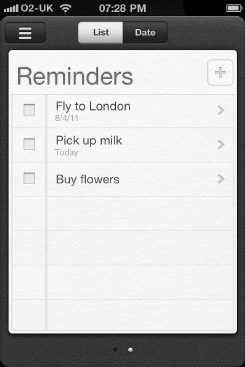
Figure 15–27. The Reminders app
But Reminders isn’t just an app that helps you create lists. It’s called “Reminders” for a reason. You can set a number of ways to be reminded to do something on your list. Reminders will remind you of your to-do list items via the notifcations center and you can set reminders to notify you based on date and time.
To set details and notifications for your reminders, tap an item from your Reminders list. On the details screen that appears (Figure 15–28) you can set the time and date you want to be reminded at, the time and date the item is due, whether the item on your list is a one-time even or a repeating event (such as weekly), when to end the repeating reminders, the priority of the to-do item (None, Low, Medium, High), and even add notes to the reminder to give it more details.
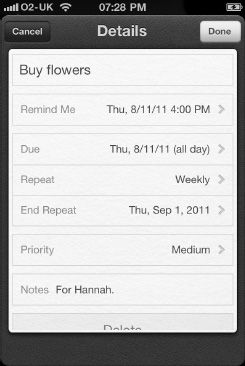
Figure 15–28. Setting the details of a Reminders event
When you are done entering details about a reminder event, tap the Done button. To delete a reminder, tap the red delete button that appears at the bottom of the Details screen.
Besides viewing your reminders as a list, you can also view them by date. Simply tap the Date button at the top of the screen (Figure 15–27) and you’ll be taken to the date view (Figure 15–29). In date view you can swipe left and right between days, or tap the calendar button in the top-left corner to view monthly calendars. Tap any date on the calendar to be taken to its date page.
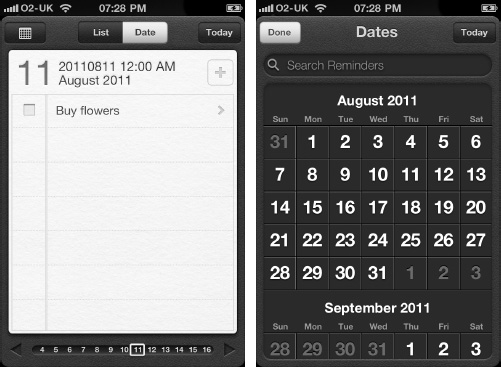
Figure 15–29. Browsing Reminders by date. Day view, left; calendar view, right.
When you complete an event in your reminders list, tap the checkbox to mark it off (Figure 15–27). The event will be removed from your Reminders list and added to your Completed list (Figure 15–30). To view your Completed list, swipe right on the Reminders screen or tap the lists button.
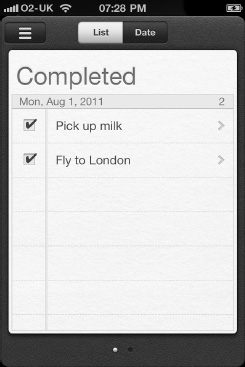
Figure 15–30. The Completed list
The lists button appears at the top-left corner of the screen and has three lines on it. Tap it to reveal all your lists (Figure 15–31). Tap a list to jump right to that list. To create a new list, tap the edit button on the list screen and then tap “Creat New List.” Multiple lists can be very handy. You can create on for work, one for groceries, one for your personal life, etc.
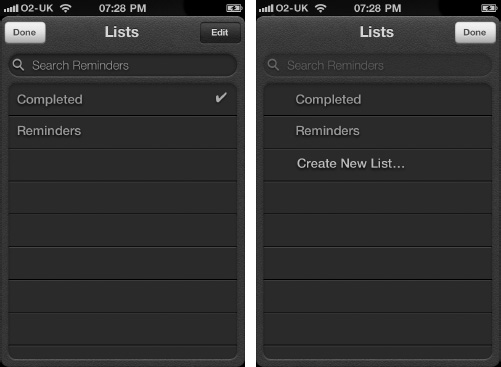
Figure 15–31. The lists screen shows you all your lists (left). Add new lists by tapping the “Create New List” button, right.
Summary
As you can now see, the iPhone includes several useful tools for the user, whether they are a business professional or a student. The Notes, Voice Memos, and Reminders applications provide helpful on-hand references for when you need a quick jog to your memory in written or audio form. The Contacts app also lets you expand your address book while on the go and synchronize it to your home computer. The Calculator is always there to get you out of a jam when you realize you didn’t pay attention in Algebra 101 and Stocks and Weather lets you check both your current and future financial and climate forecasts.
Here are a few last thoughts:
- Although the iPhone does not have an onboard phone, it’s easy enough to look up numbers on the iPhone and type them into your cell phone.
- It’s really nice to have all your numbers and addresses in one place. Because our iPhones sync to our computers, we don’t have to keep a half dozen separate address books, each on a separate device. We can rely on the iPhone’s version instead.
- The iPhone’s calculator is a lifesaver when you realize math isn’t your strong suit.
- The Stocks and Weather applications provide great ways to keep up with real-time information using classic Apple design.
- Although the Notes application is limited, it offers a convenient way to jot down notes in a central and easy-to-remember location.
- How many times have you been in a class or meeting and wish you had a voice recorder with you? With your iPhone, now you do.
- Reminders is a wonderful app that can help those of us with poor memories when things need to get done.