
Chapter 5
Browsing with Mobile Safari
Every iPhone has 3G and Wi-Fi networking capabilities. With these networks, you can connect to the Internet and view web pages directly on your iPhone.
The iPhone's mobile version of Safari is a near twin to the computer-based version that runs on both Mac and Windows. The iPhone's Retina display touch screen shows web pages just as their designers intended. When it comes to browsing, there's nothing else like Safari on any other smart phone.
In this chapter, you'll discover how to get the most from Safari with all its awesome full-browser powers. You'll learn how to navigate to pages, manage bookmarks, and use both portrait and landscape orientations. You'll also discover some great finger-tap shortcuts, useful Safari web sites, and Safari's handy Reader and Reading List functions.
Whether you use the slower, but ubiquitous 3G cellular data network or choose to stay near a Wi-Fi hotspot for your Internet connection, the iPhone and Safari make handheld web browsing a pleasurable experience. In the next section, I'll describe how to get connected to a Wi-Fi network. After that, I'll focus on making a 3G data connection.
Getting Started with Wi-Fi
With your iPhone's Wi-Fi connectivity, you can connect to web sites such as YouTube and the iTunes Music Store, and you can pretty much do everything over the Internet that you desire. Read on to learn more about setting up your iPhone to connect to a Wi-Fi network.
NOTE: Wi-Fi is a wireless networking technology. Your iPhone is compatible with three kinds of Wi-Fi standards known as IEEE 802.11b, 802.11g, and 802.11n. What's the difference? 802.11n is the newest standard and provides both the best speed and highest levels of security, while b and g are slower, less secure networking standards.
Checking Your Wi-Fi Connection
Before you use Safari, you need to have a Wi-Fi or 3G connection. You cannot connect to the Internet without it. In this section, I'll talk about the faster Wi-Fi connection.
You can tell in an instant whether your Wi-Fi connection is up and running. Look at the very top-left corner of your screen. When you see the three semicircle-like arcs next to the name of your cellular carrier, as shown in Figure 5–1, you have a live connection. When the arcs are more blue (and less black or gray), you have the strongest connection possible. Having three blue arcs is ideal. Seeing one or more black—or worse, gray—arcs means that your connection is weak. Moving closer to the Wi-Fi source is the best way to ensure a strong connection.
Figure 5–1. The three arcs shown here indicate a strong Wi-Fi connection. Blue arcs indicate the strongest connection. Black arcs mean a weak connection. Very light gray arcs show the worst connection.
Choosing a Wi-Fi Network
If your iPhone shows no Wi-Fi service, you'll need to connect to a local network. Navigate to the Settings ![]() Wi-Fi screen, shown in Figure 5–2. From here, you can enable your Wi-Fi service and specify whether you want your iPhone to search for local networks.
Wi-Fi screen, shown in Figure 5–2. From here, you can enable your Wi-Fi service and specify whether you want your iPhone to search for local networks.
To connect to any network, set Wi-Fi to On. When Wi-Fi is switched to On, your iPhone scans the immediate area and lists all active networks. When it is Off, your iPhone shuts down Wi-Fi service and does not actively seek connections.
You can connect to any Wi-Fi network listed by tapping its name. As with the network strength indicator in the iPhone title bar, the arcs next to each network indicate the strength of its signal.
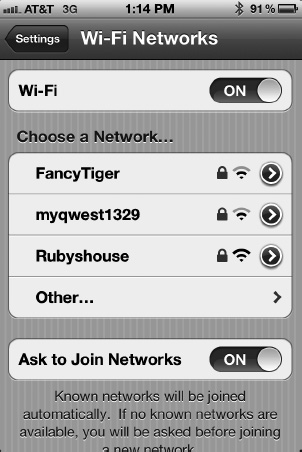
Figure 5–2. Set Wi-Fi to On to connect to local networks. A lock icon next to a network name indicates that you must use authentication to connect.
Tap the blue > buttons to see information about each network, including IP addresses, Domain Name System (DNS) server information, and so forth. You'll find all the standard kinds of information you would expect to see on any computer client for any Wi-Fi network. The iPhone offers the same information and capabilities in a handheld package.
Connecting to a Protected Network
When you see a lock next to the network name on the Wi-Fi Networks settings screen (Figure 5–2), this indicates that the network is protected and requires authentication. When you select a protected network, you must log in to the network with a password to use it.
Figure 5–3 shows a typical authentication screen. Enter the network password, and click Join. If you succeed, just go ahead and start using your connection. If you fail, make sure your password is up-to-date and that you typed it correctly. Be aware that you can only briefly see the last letter that you just typed before it changes into a black dot. This is a security feature so people can't steal your password by looking over your shoulder as you type it. Use extra care, and check the keyboard feedback carefully as you type.
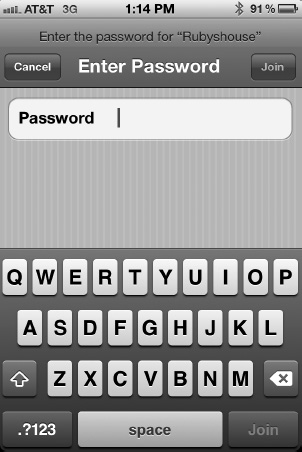
Figure 5–3. The password-entry screen allows you to join networks using WEP, WPA, or WPA2 authentication.
You can also add an unlisted network to your iPhone network list. Tap Other on your main Wi-Fi settings screen. Enter the network name, choose the kind of encryption in use (None, WEP, WPA, WPA2, WPA Enterprise, WPA2 Enterprise), and then tap Join.
NOTE: The WEP, WPA, and WPA2 acronyms refer to three common data encryption standards, listed in order of their security and strength from weakest to strongest: Wired Equivalent Privacy, Wi-Fi Protected Access, and Wi-Fi Protected Access version 2. Each standard was created to enhance wireless network security. Enterprise WPA encryption is used in business settings.
Asking to Join a Network
Your Wi-Fi Networks settings screen offers an option at the very bottom that prompts you to “Ask to Join Networks,” as shown in Figure 5–4. This option allows your iPhone to automatically scan the local area and search for available networks. When it finds one, it offers to join it—with your permission. If you've already joined that network before, it automatically goes ahead and does so again.
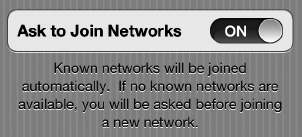
Figure 5–4. The Ask to Join Networks feature facilitates rejoining known networks and searching for networks in areas where you haven't previously made a connection.
This option is both a bonus and a possible security problem. On one hand, it's extremely convenient to join networks you already know about and trust. On the other hand, airports and other high-traffic transit areas are known for offering free Wi-Fi services that are easily pirated. Another possible threat comes from Wi-Fi traffic sniffers (also called packet sniffers), which are devices that track your online activity while you're connected via Wi-Fi. Both services that masquerade as official service providers and Wi-Fi traffic sniffers are designed to compromise your security and might endanger personal information and passwords. Fortunately, such exploits are rare.
In the end, the decision of when and whether to enable the Ask to Join Networks feature is up to you. For the most part, places like Starbucks, Panera Bread cafes, and many airports offer safe connections, but be aware that your iPhone network activity can be tracked.
Getting Started with 3G Data Connections
While you're out and about, you can still be connected to the world via the 3G (GPRS) data network. An easy rule of thumb to remember when you're going to use the 3G data connection—is that any time you are able to make a phone call via 3G, you also have access to the 3G data network.
How can you tell that you're connected to the network? In the top-left corner of your iPhone screen are several indicators (Figure 5–5). The first shows one to five bars of increasing height. This is your 3G network signal strength, with one bar being a barely acceptable connection and five bars indicating a strong, fast network connection. The next indicator shows the carrier you're connected to (in the figure, it's AT&T), and the final indicator shows the type of network connection.
Figure 5–5. On the status bar at the top of this image, you see the bars indicating the cellular network signal strength (four bars), the carrier name (AT&T), and the type of network the iPhone is connected to (3G).
Most of the time, you'll see the letters 3G in this spot, but occasionally—most likely when you're out of a major urban area—an E appears. That stands for EDGE, an older and slower cellular wireless networking standard. On increasingly rare occasions, you may see an “o” in the network type—that indicates that you're currently connected to a 2G GPRS (General Packet Radio System) network.
Any time you're on a 3G data connection, you're going to be paying for the privilege. If you use a lot of Internet service, you may want to get an “unlimited” data plan with your wireless provider. These plans are generally more expensive but usually do allow you to use as much data as you want. The reason I say “usually” is that some providers throttle (slow down) your data speeds after you've reached a specified level of usage. Be sure to read the fine print on your data plan.
If you're ever in the mood to spend a ridiculous amount of money, use your 3G data connection overseas to do “data roaming” on a network other than the one you usually use. I recommend that you disable data roaming unless you absolutely must have a data connection and spending money is not an issue. To do this, launch the Settings app and select General ![]() Network
Network ![]() Data Roaming
Data Roaming ![]() Off.
Off.
Getting Started with the Safari Web Browser
Once you're assured of a strong Wi-Fi or 3G data connection, tap the Safari application icon to open the program. It's the icon on your Home screen marked with a white compass on a blue background (see Figure 5–6). The Safari application launches and opens a new Internet browser window.

Figure 5–6. The Safari icon
Many elements of the Safari window may look familiar, especially to anyone experienced using web browsers. Familiar items include the address bar, the reload icon, the search field, and the history navigation arrows. Figure 5–7 shows a typical Safari browser window in portrait and landscape modes.

Figure 5–7. The Safari browser window displays many familiar features, including the address bar, the Reload button, and the History button. Portrait orientation (left) allows you to see further down the page, while landscape (right) provides a wider page view.
Here are interactive elements you'll find arranged around the screen and what they do:
Address bar: Use the address bar at the top center of the Safari window to enter a new web address (URL).
Reload button: The arrow bent in a semicircle to the right in the address bar is the Reload button. Tap it to refresh the current screen.
Stop button: As a page loads, Safari replaces the Reload button with a small X (you cannot see this in Figure 5–7). If you change your mind after navigating to a page, tap this button. It stops the current page from loading any further.
Search field:This is the white field with the word Google in it next to the address bar. Tap this field to enter your search query. You can also change your default search provider to Yahoo! Search or Microsoft's Bing using a process I'll describe shortly.
History buttons: Located at the bottom of the screen, the two triangles, facing left and right, navigate through your page history. When grayed out, you haven't yet created a history. The arrows turn from gray to white once you start browsing, and you can move back and forth through your history to the previous and next pages. Each page maintains its own history.
Share button: Found just to the right of the history buttons, this arrow breaking out of a box-shaped button adds the current page to your bookmark collection as well as gives you other sharing options. You can read more about bookmark creation and management in the “Working with Bookmarks” section later in this chapter.
NOTE: You cannot use the History button to go back to a page you were viewing in another window. Use the Pages button to select another window, and then use the arrows there to navigate through that page history.
Bookmarks button: Tap the book-shaped icon to open your Bookmarks screen.
Pages button: The button at the bottom right that looks like two squares superimposed on one another allows you to open the page-selection browser and select one of your Safari sessions. You can open up to eight browser windows at a time. With more than one session active, a number appears on this icon. It indicates how many sessions are in use. You can read more about viewing and adding pages in the “Working with Pages” section later in this chapter.
Safari lets you do all the normal things you expect to do in a browser. You can tap links and buttons, enter text into forms, and so forth. In addition, Safari offers iPhone-specific features you won't find on your home computer; for example, tilting the iPhone on its side toggles the browser window from portrait to landscape orientation. The following how-to sections guide you through Safari's basic features.
NOTE: Although Safari allows you to browse the Web in full resolution, some web sites detect that you're surfing with an iPhone and (wrongly) present a lighter, mobile version of their web pages. This should change as the iPhone's capabilities become better known and web sites become accustomed to receiving visits from iPhone users.
Entering URLs
Tap the address bar to open the URL entry screen, as shown in Figure 5–8. The navigation section appears at the top of your screen, and a keyboard opens from below. Between these, the screen dims, and you can still see part of the current page.
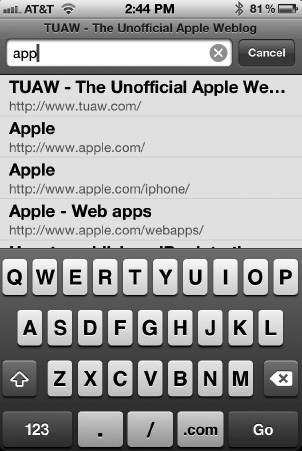
Figure 5–8. The URL-entry screen allows you to enter the address that you want Safari to visit.
Tap the white URL field, and use the keyboard to enter a new URL. Apple provides both the forward slash (/) and a .com key to help you type, but not a colon (:) key. Safari is smart enough to know about http://, so you don't need to type it each time.
TIP: To access secure web pages, be sure to type the full address, including the https:// prefix. Mobile Safari assumes that any address without a prefix uses http://. Secure web sites using the https prefix encrypt data being sent to and received from your computer using a Secure Socket Layer (SSL) certificate.
When you're finished typing, tap Go, and Safari navigates to the address you've entered. To return to the browser screen without entering a new URL, tap Cancel instead.
As you type, Safari matches your keystrokes to its existing collection of bookmarks. The space between the top of the keyboard and the bottom of the URL field turns white and displays a list of possible matches. To select one, just tap it. Safari automatically navigates to the selected URL. This matching ability is much more useful in portrait orientation than in landscape orientation, because there's more vertical space in which to view matches.
When entering URLs, you can use the tap-and-hold trick discussed in Chapter 2 to invoke the magnifying glass. Use the magnifying glass to move the insertion point and edit URLs to fix any mistakes made while typing.
TIP: When you see a white X in a gray circle in a text-entry field, you can tap it to clear the field.
Searching the Web
A search bar appears just to the right of the address bar, as shown in Figure 5–9. Tap it to begin entering text into the URL field. As you do, search suggestions start to appear between the search field and the keyboard. To use a search suggestion, tap it—you don't need to finish typing the entire query. To start a search query of your own, tap the Search button next to the spacebar. Safari navigates to the search page of your selected search engine (for example, www.google.com) and searches for that term.
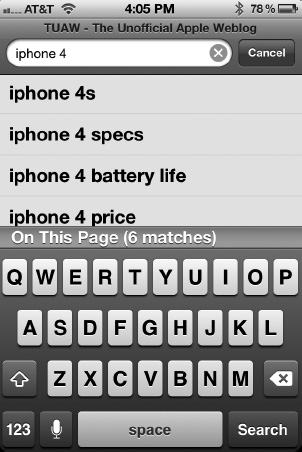
Figure 5–9. Type in the search field for easy access to the Google, Yahoo!, or Bing search engines.
If you would rather search with Yahoo! or Bing than Google, use Settings ![]() Safari to change your default search engine.
Safari to change your default search engine.
Searching for Text on a Web Page
Safari also allows you to search for specific text on a web page. To search for text, tap inside the Google search field and enter the word or words you are looking for on the Web. At the bottom of the list of possible search terms is the phrase “On This Page (X Matches)” (Figure 5–9). Tap that and scroll up just a bit, and you'll see Find [search term]. Tap the search term, and Safari displays the web page with the first occurrence of the text you're searching for highlighted in yellow (Figure 5–10).
Figure 5–10. Searching for text on a web page
If there is more than one match for the search term on the current web page, a set of arrows for the next (right arrow) or previous (left arrow) match appears at the bottom of the display. When you're finished searching for text on a web page, tap the blue Done button.
Entering Text
To edit a text entry (other than in the address bar), tap any text field on the currently displayed web page. Safari opens a new text-entry screen (Figure 5–11). Although this screen is superficially similar to the URL-entry screen (Figure 5–8), it presents a few differences, notably the text-entry buttons in a black bar above the keyboard:
- A Done button hides the keyboard and returns you to the web page after you have entered your text.
- Previous and Next buttons search for other text fields on your web page so you can jump to them without having to tap into each new field. Enter text in one field, tap Next, enter more text, and so on.
- An AutoFill button uses information from your address book card to fill in relevant information such as your name, phone number, and e-mail address. The AutoFill button saves you time.
To submit a form after you've entered all the text, tap the Go or Search button next to the spacebar instead of the Done button in the text-entry bar. This is like pressing the Enter or Return key on a computer.
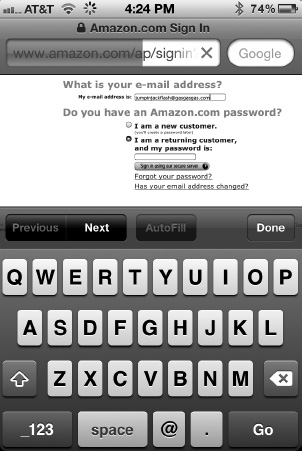
Figure 5–11. Entering text in text-entry fields on a web page. Note the text-entry bar above the keyboard.
Following Links
Hypertext links are used throughout the World Wide Web. Text links are marked with underlines and are usually a different color from the main text. Image links are subtler, but they can also move you to a new location.
Tap a link to navigate to a new web page or, for certain special links, to open a new e-mail message or view a map. When a link leads to an audio or video file with a format that the iPhone understands, it plays that file. Supported audio formats include AAC, M4A, M4B, M4P, MP3, WAV, and AIFF. Video formats include H.264 and MPEG-4.
To preview a link's address, touch and hold the link for a second or two. A link screen slides up, showing you the full URL. Below the URL you'll see four buttons, as shown in Figure 5–12:
Open: Opens the link in the current Safari window
Open in New Page: Opens the link in a new Safari page
Add to Reading List: Adds the selected page to your Reading List (discussed later in this chapter)
Copy: Copies the URL so you can paste it in another document later
Cancel: Returns you to the page you were just on
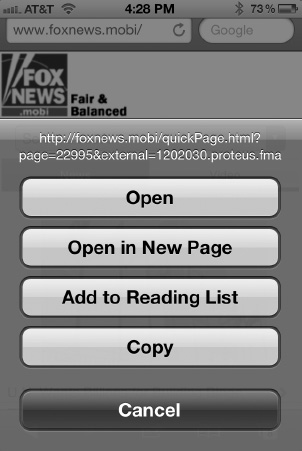
Figure 5–12. Touch and hold either an image or a text link for a second or two to view the URL link screen. This bubble reveals the link's full URL and allows you to choose whether to continue following the link or to stop.
TIP: To detect image links on the screen, tap and hold an image. If the image is also a link, a dialog similar to the one in Figure 5–12 appears and allows you to decide what you want to do with the link, including saving the image to your Photo Library. If the image is just an image, your only choices are to save the image or copy it to your iPhone clipboard.
Changing Orientation
One of the iPhone's standout features is its flexible orientation support. When you turn your iPhone on its side, it flips its display to match, as you can see in Figure 5–7. A built-in acceleration sensor detects the iPhone's tilt and adjusts the display. Tilt back to vertical, and the iPhone returns to portrait orientation. It takes just a second for the iPhone to detect the orientation change and to update the display.
The iPhone's landscape view offers a relatively wider display. This is particularly good for side-to-side tasks such as reading text. The wider screen allows you to use bigger fonts and view wider columns without scrolling sideways. The portrait view provides a longer presentation. This is great for reading web content with more narrow columns. You don't need to keep scrolling quite as much as you do in landscape view.
Whether in landscape or portrait view, Safari features work the same, including the same buttons in the same positions. In landscape view, you enter text using a wider, sideways keyboard. In portrait view, the smaller keyboard provides more space for you to view possible address completions while entering URLs.
Scrolling, Zooming, and Other Viewing Skills
Safari responds to the complete vocabulary of taps, flicks, and drags discussed in Chapter 2. You can zoom into pictures, squeeze on columns, and more. Here's a quick review of the essential ways to interact with your screen:
Drag: Touch the screen, and drag your finger to reposition web pages. If you think of your iPhone as a window onto a web page, dragging allows you to move the window around the web page.
Flick: When dealing with long pages, you can flick the display up and down to scroll rapidly. This is especially helpful when navigating through search engine results and news sites.
Double-tap: Double-tap any column or image to zoom in, automatically sizing it to the width of your display. Double-tap again to zoom back out. Use this option to instantly zoom into a web page's text. The iPhone recognizes how wide the text is and perfectly matches that width.
Double-drag: When you need to scroll a text entry field in a form or a scrollable frame in a multiframe web site, use two fingers to drag at once. This tells your iPhone to scroll just that page element and not the entire web page at once.
Pinch: Use pinching to manually zoom in or out. This allows you to make fine zoom adjustments as needed.
Tap: Tap buttons and links to select them. Use tapping to move from site to site and to submit forms.
Page down: When zoomed in on a column, double-tap toward the bottom of the screen while staying within the column. The page recenters around your tap. Make sure not to tap a link!
Jump to the top: Tap the very top of the screen (for instance, between the Wi-Fi signal strength indicator and the time display) to pop instantly back to the top of the page.
Stop a scroll: After flicking a page to get it to scroll, you can tap the page at any time to stop that movement. Don't forget that you can also manually drag the screen display to reset the part you're viewing.
Working with Pages
Safari allows you to open up to eight concurrent browser sessions at once. To review your open windows, tap the Pages button (the two squares) at the bottom-right corner of your browser. Safari's pages viewer opens, as shown in Figure 5–13.

Figure 5–13. The pages viewer allows you to select which browser session to display.
This viewer allows you to interactively select a browser session:
- To select a window, scroll horizontally from one window to the next. The brightest dot along the line of dots shows which item you're currently viewing. In Figure 5–13, the viewer is showing the sixth of eight open pages. Tap either the window or the Done button to select that window and display it full-screen.
- To close a window, tap the Close button—the red circle with an X in it at the top left of each page. The pages viewer slides the remaining pages into the gap left by the closed window.
- To add a new page, tap New Page. Safari creates a new session and opens a new, blank page. You can add up to eight pages, after which Safari grays out the New Page button.
Working with Bookmarks
One of the great things about the iPhone is that it lets you take your world with you: contacts, calendars, and bookmarks. You don't need to reenter all your favorite web pages into Safari on the iPhone. It loads them through iCloud.
Once you've set up your iPhone to sync to your other devices through iCloud, look at Settings ![]() iCloud and make sure that the toggle next to Bookmarks is set to On. On your Mac, open System Preferences
iCloud and make sure that the toggle next to Bookmarks is set to On. On your Mac, open System Preferences ![]() iCloud and make sure that there's a check mark next to Bookmarks. Now any time you edit, add, or delete a bookmark on either your Mac or your iPhone, the changes are synchronized through iCloud. You'll always have the same bookmarks on all of your Apple devices.
iCloud and make sure that there's a check mark next to Bookmarks. Now any time you edit, add, or delete a bookmark on either your Mac or your iPhone, the changes are synchronized through iCloud. You'll always have the same bookmarks on all of your Apple devices.
For Windows PCs, install and configure the iCloud Control Panel (it's a free download from http://support.apple.com/kb/DL1455). You have the choice of syncing your bookmarks with either Safari for Windows or Internet Explorer 8. On the iPhone, you just need to check that Settings ![]() iCloud shows Bookmarks as On. On the Windows PC, check the box next to Bookmarks in the iCloud Control Panel (Figure 5–14) and use the Options button to select the browser you want to sync to.
iCloud shows Bookmarks as On. On the Windows PC, check the box next to Bookmarks in the iCloud Control Panel (Figure 5–14) and use the Options button to select the browser you want to sync to.
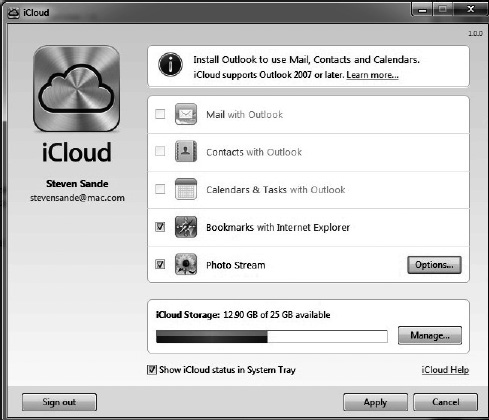
Figure 5–14. Syncing bookmarks between your iPhone and Windows PC. Install the iCloud Control Panel for Windows, and then make sure that the check box next to Bookmarks is selected.
Selecting Bookmarks
Most standard bookmark collections contain dozens of individual URLs. That's one reason I really appreciate Safari's simple bookmarks browser, shown in Figure 5–15. It uses the same folder structure that you've set up on your personal computer. You can tap folders to open them and tap the Back button (top-left corner) to return to the parent folder. To access your bookmarks, tap the bookmarks icon in the lower part of any Safari window.
Identifying bookmarks is easy. Folders look like folders, and each bookmark is marked with a small, open book symbol. Tap one of these, and Safari takes you directly to the associated page.
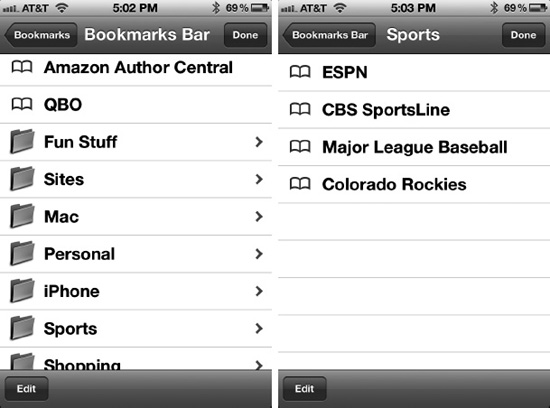
Figure 5–15. Use Mobile Safari's interactive bookmarks navigation to locate and open your favorite bookmarks. This figure shows folders full of bookmarks (left) and individual bookmarks in those folders (right).
Editing Bookmarks
As Figure 5–13 shows, an Edit button appears at the bottom left of the Bookmarks screen. Tap this to enter edit mode, as shown in Figure 5–16.
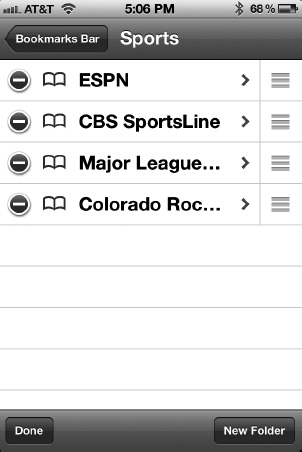
Figure 5–16. Safari contains a built-in bookmark-management system that allows you to edit and reorder your bookmarks.
Edit mode allows you to manage your bookmarks on your iPhone just as you would on your personal computer:
Deleting bookmarks: Tap the red delete circle to the left of a bookmark to delete it. Tap Delete to confirm, or tap elsewhere on the screen to cancel.
Reordering bookmarks: Use the gray grab handles (the three lines on the far right) to move folders and bookmarks into new positions. Grab, drag, and then release.
Editing names: Tap the gray reveal arrow (the > symbol to the right of each name) to open the Edit Bookmark or Edit Folder screen. Use the keyboard to make your changes. Tap the Back button to return to the bookmarks editor.
Reparenting items: You can move items from one folder to another by tapping the gray reveal arrow and selecting a new parent from the bookmark folder list (just below the name-editing field). Select a folder, and then tap the Back button to return to the bookmarks editor.
Adding folders: Tap New Folder to create a folder in the currently displayed bookmark folder list. The iPhone automatically opens the Edit Folder screen. Here, you can edit the name and, if needed, reparent your new folder. Tap the Back button to return to the editor.
Finishing: Return to the top-level bookmarks list (tap the Back key until you reach it), and then tap Done. This closes the editor and returns to Safari.
Saving Bookmarks and Sharing Web Pages
To save a new bookmark, tap the Share button at the bottom of any Safari web page. The Sharingmenu appears, giving you six choices (see Figure 5–17).
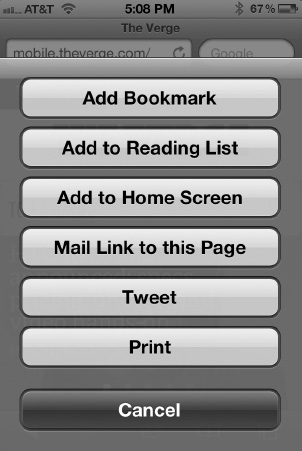
Figure 5–17. The bookmark creation menu
Add Bookmark: Tapping this lets you enter a title for the bookmark and then optionally select a folder to save to (Figure 5–18). Tap the currently displayed folder to view a list of all available folders. The root of the bookmark tree is called Bookmarks. After making your selection, tap Save. Safari adds the new bookmark to your collection. If you want to return to Safari without saving, tap Cancel.

Figure 5–18. Add Bookmark allows you to rename the bookmark before you save it.
Add to Reading List: Tapping this adds the current page to your Reading List. I'll talk about Reading List in a moment.
Add to Home Screen: This is a cool feature. Tapping this adds an icon of the web page to your iPhone Home screen. Apple calls these web page icons Web Clips. Before you save a Web Clip, you have the option of renaming it. Keep the names short so you can see the entire name under the Web Clip icon on the Home screen.
NOTE: Some web sites create an iPhone-optimized site icon when you add a Web Clip to your Home screen. Others just show you a thumbnail of the page in the shape of an iPhone app icon.
The Web Clips look just like app icons, and when tapped, they launch Safari and automatically take you to the web page. One handy hint is to keep a Home screen on your iPhone full of your favorite Web Clips so you can quickly navigate directly to your most frequently visited web sites. In many cases, this is much faster than using the bookmarks feature of Safari.
In iTunes, the Web Clips appear in the virtual iPhone screen on the Apps tab (see Chapter 2), but you cannot delete them from within iTunes; you can only rearrange them. To delete a Web Clip icon on the iPhone, press and hold it until it jiggles, and tap the X in the upper-left corner.
Mail Link to this Page: Tapping this button opens a new mail message window in Safari and automatically inserts the link into the body of the message.
Tweet: Tapping this button composes a Twitter message to send to all your followers (Figure 5–19). You must have a Twitter account to use this feature.

Figure 5–19. Tweeting a web page
Print: This allows you to print the web page to an AirPlay-compatible wireless printer.
Eliminating Clutter with Reader
Safari has an awesome built-in feature that all other mobile web browsers lack. It's called Reader (not to be confused with Reading List—another awesome feature that I'll explain shortly). Reader allows you to eliminate all the clutter on web pages—the ads, the comments, the links—and read the content of that page as if you were reading it from a piece of paper. You can see Reader in action in Figure 5–20.

Figure 5–20. Safari's Reader feature. Left: a web page as it normally appears. Right: the same web page when viewed through Reader.
As shown in Figure 5–20, viewing the text on a web page through Reader is much easier because all the distractions are eliminated. To activate reader, click the gray Reader button that appears in the address bar. The Reader document slides up onto the screen. To exit Reader mode, click the Done button. Notice that the Reader button appears only when you are on a web page that has a single article. You won't see a Reader button on the front page of The Unofficial Apple Weblog web site, for example; you'll see it only when viewing single articles on the site.
Building Up Your Reading List
Reading List is another new feature of Safari in iOS 5 on the iPhone. It allows you to save web pages to read when you have the time, even when you're not connected to the Internet. I know, that sounds a lot like adding a bookmark, right? It's similar, but Reading List is more of a temporary bookmark. It's for that cool article you find about a small town in Andorra, which you want to read but don't have time to right now. It's not a bookmark you want to keep forever; it's just something you want to make sure you read.
To activate Reading List, tap the Share button at the bottom of Safari's window. The Sharingmenu appears. Tap Add to Reading List. The web page has now been added to your Reading List.
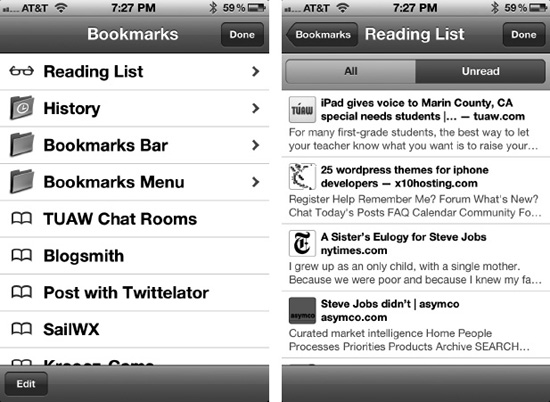
Figure 5–21. Safari's Reading List
To access your Reading List, tap the Bookmarks button in Safari. In the bookmarks screen you'll see an icon that looks like a pair of reading glasses labeled Reading List at the top (Figure 5–21, left). Tap it to view your Reading List. The Reading List panel contains all the web articles you've added to it. You can tap a tab to see all the articles you've added or just the ones you haven't read yet. Tap an article in the Reading List to read the saved web page.
Once you've read a page on the Reading List in its entirety, it disappears from the list of Unread items on your list. To permanently remove pages from the Reading, swipe left or right over an article description, and then tap the red Delete button that appears.
One of the best features about Reading List is that is synced across all your computers and iOS devices that use Safari. This allows you to find an interesting article on Safari on your iPhone, save it to Reading List, and then read it on your iPad or Mac when you get home. Just open up Safari, and the article appears in Reading List no matter what device you are on. It does this by syncing Reading List via your iCloud account.
Customizing Safari Settings
Like many of the apps on the iPhone, Safari can be customized. Customize your Safari settings by launching the Settings app on your iPhone Home screen, and then tap Safari. This screen, shown in Figure 5–22, allows you to control a number of features, mostly security-related. Here's a quick rundown of those features and what they mean:
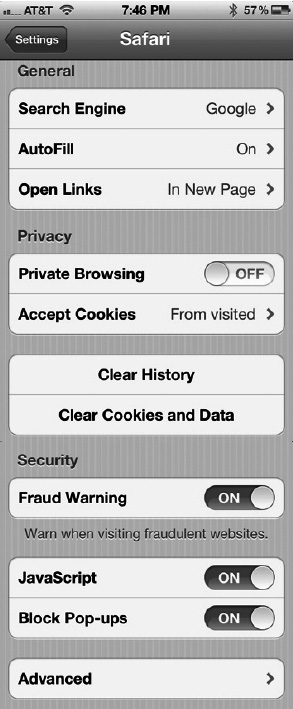
Figure 5–22. The Safari Settings window is primarily concerned with security features.
Search Engine: This setting determines which search engine is used for the search field you saw back in Figure 5–9. Choose from Google, Yahoo!, or Bing.
AutoFill: This allows you to turn on AutoFill for use in filling out forms on web pages. In the My Info box, select your address book card to take the AutoFill information from. Here you can also select to turn on Names & Passwords. With this on, Safari remembers login names and passwords to web sites you visit. You might not want to enable name and password saving if you share your iPhone with people because they could then easily access your personal web accounts such as e-mail and bank accounts. Tap Clear All to wipe all saved names and passwords from your iPhone.
Open Links: Here you can choose to open links in a new browser page or in the background. When New Page is selected, tapping a link in an e-mail, for instance, causes you to jump immediately to the Safari app. When In Background is selected, tapping a link in an e-mail opens the page in Safari in the background while you remain in the Mail app.
Private Browsing: When private browsing is enabled, your web history is not saved, nor are any of the user names, passwords, web searches, or text you enter on a web page.
Accept Cookies: Cookies refer to data stored on your iPhone by the web sites you visit. Cookies allow web sites to remember you and to store information about your visit. You can choose to always accept cookies, never accept cookies, or accept cookies only “from visited” web sites.
Clear History: Tap and confirm to empty the page navigation history from your iPhone. This keeps your personal browsing habits private to some extent, although other people are still able scan through your bookmarks if they so desire.
CAUTION: Clearing your history does not affect Safari's page history. You can still tap its Back button and see the sites you've visited.
Clear Cookies and Data: Tap and confirm to clear all existing cookies and cache from your iPhone. Your iPhone's browser cache stores text and graphics from many of the web sites you visit. It uses the cached information to speed up page loading the next time you visit. As with cookies and history, your cache may reveal personal information that you'd rather not share. Tap Clear Cache and Confirm to clear your cache.
TIP: Clearing your cache may also help correct problem pages that are having trouble loading. By clearing the cache, you remove page items that may be corrupted or only partially downloaded.
Fraud Warning: Turn this preference on, and you'll be presented with a warning before navigating to potentially fraudulent web sites. Unfortunately, fraudulent sites are rampant on the Internet (like bogus PayPal sites). This feature helps you recognize and avoid those sites.
JavaScript: JavaScript allows web pages to run programs when you visit. Disabling JavaScript means you increase overall surfing safety, but you also lose many cool and worthy web features. Most pages are safe to visit, but some, sadly, are not. To disable JavaScript, switch from On to Off.
Block Pop-ups: Many web sites use pop-up windows for advertising. It's an annoying reality of surfing the Web. By default, Safari pop-up blocking is On. Switch this setting to Off to allow pop-up window creation.
Advanced: This preference gives you control over databases and debugging. Most people never use this preference. Some sites like Gmail use databases to store local information on your iPhone for offline browsing. Emptying databases can clear up problems you may be having on certain web sites. The debug console helps developers who are working to optimize their web sites for the iPhone.
The iPhone and Flash Videos
If you've ever watched a video or animation on the Web, chances are the video was encoded using Adobe Flash. Ever since Apple unveiled the iPhone to the world, there has been growing tension between Apple and Adobe. The reason is because Apple does not allow Adobe's proprietary and resource-intensive Flash plug-in to run on the iPhone.
Flash, in Apple's estimation, is a slow, buggy, and archaic technology. The late Apple CEO Steve Jobs even posted a letter on Apple's web site effectively telling the world the same thing (www.apple.com/hotnews/thoughts-on-flash/). His letter was the final word for anyone hoping to see Flash on the iPhone.
What many people misunderstand when they hear “no Flash on the iPhone” is that they think the iPhone can't play web videos. There's nothing further from the truth. Sure, if a video is encoded in Flash, you can't view it on the iPhone, but most videos on the Web (about 75 percent of them, according to former Apple CEO Steve Jobs) are encoded in Flash but also in a new, universal web standard called HTML5. HTML5 videos don't require a plug-in to play. HTML5 is also much less power hungry than Flash—an important feature when dealing with mobile devices that consume battery power.
The world is moving to HTML5, and Apple chose to support it—and open standards—instead of Adobe's aging and proprietary Flash. Most of YouTube's videos have already been reencoded to support HTML5, and many other major web sites have chosen to drop Flash in favor of the new HTML5 web standard. Apple even has a dedicated page to spotlight the advantages of the new HTML5 web standard: www.apple.com/hmtl5/.
Should you need to view Flash-enabled web sites, there are third-party browser apps that you may want to install on your iPhone. These apps usually work through a server that is able to play Flash on the fly and then translate it to a format that is visible on your iPhone. Examples of Flash-friendly browsers are Skyfire (www.skyfire.com/en/for-consumers/iphone/iphone) and Puffin (www.cloudmosa.com/puffinios.php).
Summary
Safari on the iPhone puts the power of a real Internet browser into your pocket. There's nothing half-cocked or watered down about it. You can browse the real Web and read real sites without major compromise. It's such an amazing step forward in technology that you'll find yourself shaking your head with disdain when you remember the old days when your cell phone could only make phone calls.
Here are a few tips to keep in mind as you move on from this chapter:
- iPhones work in more orientations than just vertical. Go ahead and flip your iPhone on its side. Your Safari pages automatically adjust.
- Nope, there's no Flash support. There never will be. And you don't need it.
- Web Clips are a great way to access your favorite web sites right from your iPhone's Home screen.
- Lost your address bar? Use the “double-tap to the top” trick.
- Use the power of iCloud to sync your Bookmarks between your iPhone, iPad, Mac, or Windows PC.
- Safari's page management tool lets you navigate back and forth between several Safari windows at once. This functions like the way tabs function on desktop browsers.
- Don't confuse Reader and Reading List. Reader lets you strip away ads and read a web page's text as if you were reading a newspaper. Reading List allows you to save interesting articles to come back to at your leisure.