
Chapter 3
Interacting with Your New iPhone
If your previous mobile phones have not been iPhones, you're in for a treat. Your iPhone's touchscreen uses a revolutionary new way to interact. It responds to the language of your touch. Its vocabulary includes taps, drags, pinches, and flicks. With these motions, you control your iPhone as easily as using a trackpad or mouse with your personal computer.
There's more to those touch gestures than just single-finger interactions; the iPhone offers multitouch technology. That means the iPhone can recognize and respond to more than one touch at a time. In this chapter, you're about to discover different ways you can interact with your iPhone—zooming in and out of maps and photos, using the iPhone's built-in touch keyboards, and playing with its sensors. You'll learn how all these features work and how to take advantage of some secret ways of interacting with your iPhone.
Interaction Basics
Whether you're a Windows user, a friend of the Linux penguin, or a Mac fan, you know that a mouse or trackpad is the way to interact with a computer. On the iPhone and iPad, your fingers provide the tools for interacting with the device. The iPhone requires real finger contact. It doesn't sense pressure; it detects the small electrical charge transferred from your skin. You can use your iPhone with your fingers, your knuckles, your toes, or, if you're feeling up to it, your nose, but you can't use a pencil eraser, Q-tip, or one of those old nonconductive plastic PDA styluses. The electrical charges in your touch make it possible for the iPhone to detect and respond to one or more contacts at a time, otherwise known as Multi-Touch technology.
The iPhone Language
The ways in which you touch your iPhone screen are the words in your communication vocabulary. Here's a quick rundown of the many ways you can speak to your iPhone:
Pressing the Home button: The iPhone's Home button lives below the touchscreen and is marked with a white or gray square. Press the Home button at any time to return to your Home screen with its list of applications. Double-pressing the Home button displays icons in a row at the bottom of the screen for all apps that are currently running and, with a flick to the right, displays a set of controls for operating the iPod app. Press and hold the Home button to launch Siri, the iPhone's voice navigator. (On older devices, pressing and holding Home launches VoiceControl instead. Siri was launched exclusively on the iPhone 4S and newer.) If you've enabled VoiceOver, the iPhone's screen narration accessibility feature for the visually impaired, a triple-click of the Home button can jump into or out from VoiceOver mode.
Tapping: Tap your iPhone by touching your finger to the screen and removing it quickly. Tapping selects web links, activates buttons on the screen, and launches iPhone apps. When typing text on the iPhone's virtual keyboard, you may want to tap with your forefinger or, if it's more comfortable, your thumb.
Double-tapping: Double-tapping means tapping your iPhone's screen twice in quick succession. Double-clicking may be important on your personal computer, but double-tapping isn't used all that much on the iPhone. In Safari, you can zoom into columns of text or pictures on a web page by double-tapping them, and then you can zoom back out by double-tapping again. In the Photos app, double-tapping is used to zoom into and out from pictures.
Two-fingered tap: The iPhone's Multi-Touch technology means you can tap the screen with more than one finger at a time. To do this, tap the iPhone display with your forefinger and middle finger at the same time. In Maps, double-tapping zooms into the map, while a two-fingered tap zooms out.
Rotoring is a variation of the two-fingered tap. To rotor, you place two fingers on the screen and rotate them as if you were turning a wheel with both fingers. You can rotor in the Photos app while cropping images to align the picture just so.
Holding: This gesture consists of putting your finger on the screen and leaving it there until something happens. Holding brings up the magnifying glass while you're typing. You can also move app icons around on your iPhone by holding an icon until the app icons begin to “wiggle.” They can then be moved around the display and between Home screens to organize your apps, and they can be fixed in place by pressing the Home button. For apps that you've installed on your iPhone, holding an app icon also displays a small circle with an X in it in the upper-left corner of the icon. Tap that icon to delete the app from your iPhone.
Dragging: Drag your finger by pressing it to the screen and moving it in any direction before lifting it. Use dragging to position the view in Maps or to scroll up or down a list of messages in Mail. Some apps offer an alphabetical index on the right side, such as the one shown in Figure 3–1. To use this index, drag your finger along it until the item you want becomes visible.
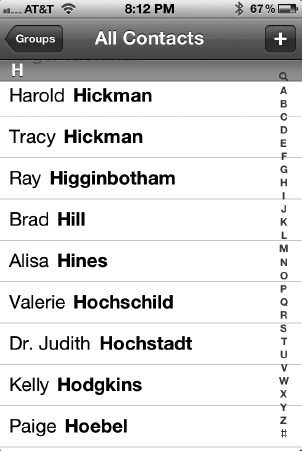
Figure 3–1. Use dragging to move quickly through an index. In the Contacts screen shown here, dragging on the index allows you to jump through the alphabet to find the name you're searching for. You can also tap a letter to jump to it.
Flicking: When you're dealing with long lists, you can give the list a quick flick. Place your finger onto the screen, and then move it rapidly in one direction—up, down, left, or right. The display responds by scrolling quickly in the direction you've indicated. Use flicking to move the names in your Contacts appquickly.
Stopping: During a scroll, press and hold your finger to the screen to stop the scroll. Apple's legal text provides a great place to practice flicking, dragging, and stopping. To get there, select Settings
General
Swiping: To swipe your iPhone, drag a finger from the left side of the screen toward the right or from the right side to the left. Swiping is used to unlock your phone and to indicate you want to delete list items, such as an e-mail item or contact (see Figure 3–2). You can also swipe notifications on your iPhone's lock screen. Each notification, when swiped, opens up the application that created the notification in the first place. If you missed a call, swiping returns you to the Phone app. If you received a text, swipes lead to the Messages app.

Figure 3–2. To swipe, drag your finger from left to right or right to left across an item you want to delete. After, the Delete button (shown here) appears for the item you swiped. To delete, tap Delete. Otherwise, tap anywhere else to hide the Delete button again.
TIP: Flicking and dragging will not select or activate items on the iPhone's display. You can try this yourself by dragging and flicking on the Home screen.
Pinching: On the iPhone, you pinch by placing your thumb and forefinger onto the screen with a space between them. Then, with the fingers touching the screen, move the two fingers together as if you're pinching the screen. Pinching allows you to zoom out in many iPhone programs, including the photo viewer, Safari, and Maps.
Unpinching: To unpinch, you perform the pinch in reverse. Start with your thumb and forefinger placed together on your screen and, with the fingers touching the screen, spread them apart. Unpinching allows you to zoom into those same iPhone applications that pinching zooms out of.
NOTE: Several multitouch gestures that appeared in iOS 5 beta versions failed to make it to release on the iPhone 4S, specifically four-fingered swipes to move between applications and to reveal recent applications. One further gesture, a four-fingered pinch would have taken you back to your home page. Ideally these gestures will reappear in future iOS releases because they were extremely handy to use.
About the iPhone Home Screen
The iPhone's Home screen allows you to launch any application with a single tap. The Home screen, named SpringBoard internally in iOS, provides app-launching abilities. Tap the Home button to return to the Home screen at any time.
A Back button appears on many iPhone screens in the upper-left corner. Tap this button to return to the previous screen in the application. This is different from pressing Home. A Back button moves you between screens within an application. The Home button leaves an application and returns you to the Home screen.
Returning to the Home screen from an app does not necessarily quit the app. Later in this chapter, you'll read how to properly quit apps that are running.
The iPhone Sensors
In addition to the touchscreen, your iPhone contains a variety of important sensors. These sensors vary depending on the model. The iPhone 3GS and newer contain a proximity sensor, an ambient light sensor, a tilt sensor (also known as an accelerometer), a digital compass, and a Global Positioning System (GPS) receiver. The iPhone 4 and newer also add a built-in three-axis gyroscope and a noise-cancellation microphone to the mix. These sensors give your iPhone some science-fiction-grade features that set it apart from the crowd.
Proximity Sensor
The proximity sensor is located on your iPhone right near the earpiece. Its job is to blank the screen when the iPhone is held up to your ear. This means your ear and chin won't accidentally hang up your calls with their stray touches, and it means you'll save some power during those phone calls.
You can see the proximity sensor in action by going to Phone ![]() Voicemail. Set Speaker to off (on is a brighter blue; off a dimmer blue), and then play a voicemail message by tapping the name or phone number of the person who left it. With the speaker off, place a finger just above the earpiece. The iPhone display goes dark. Remove the finger, and the screen returns.
Voicemail. Set Speaker to off (on is a brighter blue; off a dimmer blue), and then play a voicemail message by tapping the name or phone number of the person who left it. With the speaker off, place a finger just above the earpiece. The iPhone display goes dark. Remove the finger, and the screen returns.
Test the sensor range by placing your iPhone on a flat surface and holding your finger in the air about an inch above the earpiece. Move the finger up and down slightly, and you'll discover exactly where the sensor gets triggered.
The proximity sensor works by shooting out an infrared (IR) beam, which is reflected back and picked up by the iPhone's light sensor. If the range is short enough, the iPhone switches off the screen.
You can also see the IR source for the proximity sensor by using a digital camera. The IR beam is visible to the camera's CCD detector. To take the picture shown in Figure 3–3, we switched off a camera's flash, enabled its Macro settings (because we needed the camera to be pretty close to the iPhone), and waited for the source to flash red. You can't see it with your eyes, but you can with your camera's IR-sensitive detectors.
Figure 3–3. You can “see” the iPhone's IR light from its proximity sensor if you own a digital camera. Its IR beam is visible to the camera's detector. Make sure to cover the iPhone's screen when you take the photograph, because it's bright and the IR light is dim.
Tilt Sensor
The iPhone uses an accelerometer (what we're going to call the tilt sensor) to detect when your iPhone tilts. Many apps, including Safari, update their displays when you turn the iPhone on its side. This allows you to use your iPhone in both portrait and landscape modes.
If you feel like playing with the tilt sensor, try this: go into Photos, and select a favorite picture. Hold the iPhone up normally in portrait orientation, press one finger onto the screen, and then tilt the phone into landscape orientation. The picture will not change. Now, lift the finger off the screen. Presto—the iPhone finally rotates the display.
Many iPhone games use the accelerometer for user interaction. For example, with the very popular Flick Fishing game, you “cast” a line out to catch fish by moving your hand and arm in the motion of casting. Many driving games let you use your iPhone as a steering wheel as you drive along a virtual course.
Ambient Light Sensor
The ambient light sensor detects whether you're in bright or dark lighting conditions and then adjusts the overall brightness of your iPhone display to match. For example, if it's extremely bright outside and you pull out your iPhone to make a call, the light sensor will judge the surrounding brightness when you unlock the phone and let the iPhone know that it needs to compensate by making the display brighter so you can read it. Going the other way, the screen will dim when you're in a dark room to protect your eyes from the glare of a bright screen as well as save some battery power.
Want to have fun with this sensor? When you cover the sensor (found just above the ear speaker on the top front of the phone) with a finger and then unlock the phone, you'll find that the screen brightness is quite dim. On the other hand, if you shine a bright light at the sensor when you unlock the iPhone, you'll see the screen at a very bright setting.
You can toggle the autobrightness feature off and on in Settings ![]() Brightness. This setting also offers direct control over the brightness of the iPhone's screen, which is handy when you need immediate results instead of playing with bright lights, fingers, and unlocking your iPhone.
Brightness. This setting also offers direct control over the brightness of the iPhone's screen, which is handy when you need immediate results instead of playing with bright lights, fingers, and unlocking your iPhone.
Digital Compass
The digital compass (also known as a magnetometer; see Figure 3–4) built into the iPhone 3GS and newer models is similar to a magnetic compass. In other words, if you happen to be near a strong magnetic field such as the magnets contained in the iPhone earbuds, the compass needle may not be pointing toward true or magnetic north. On occasion, the digital compass may need recalibrating.

Figure 3–4. The iPhone's digital compass can get you pointed in the right direction, but be sure to recalibrate it when it asks you to do so.
The iPhone Compass app informs you of those rare occasions by displaying a message that says “Re-calibrate compass. Wave in a figure 8 motion.” That's your cue to hold the iPhone out in front of you and draw a big figure eight, with the eight lying on its side. Keep moving the iPhone until the calibration message disappears. Yes, you look like a total geek while doing this, but it's better than getting lost, right?
If you're in a car and driving around, you don't need to wave the iPhone at the windshield. Just make a few turns, and the compass recalibrates itself. That's much safer for everyone in and outside of your car.
GPS Receiver
Not only is your iPhone an amazing, powerful pocket computer and a very capable phone, but it's also a state-of-the-art navigation tool. Built inside the latest iPhones is a GPS receiver that is capable of pinpointing your exact location on the globe within about 30 feet (10 meters).
NOTE: The Global Positioning System consists of a constellation of 24 to 32 satellites in precisely known orbits about 12,550 miles above the earth's surface, all equipped with extremely accurate clocks and powerful radio transmitters. GPS receivers determine their location by timing the reception of signals from four or more satellites and then performing a series of complex calculations.
In fact, your iPhone has an advantage that many dedicated GPS receivers do not. Since it is constantly in touch with cell phone towers with precisely known locations, it can determine your approximate location within several seconds of being turned on. Once the iPhone has locked onto several GPS satellites, it pinpoints the location with even more accuracy. This capability of blending the GPS satellite signals and known cell tower locations is known as Assisted GPS (A-GPS).
The GPS receiver is used in most iPhone apps that contain some sort of geolocation feature. Some examples of these apps include Maps, the Navigon, Tom Tom, and AT&T navigation apps, and the official Geocaching (www.geocaching.com) app.
Three-Axis Gyroscope
The iPhone 4 was the first mobile phone to contain a miniaturized three-axis gyroscope. The iPhone 4S continues that tradition, offering a sensor that can determine the precise orientation of the phone at every moment. This is handy in gaming apps that may need to track the motion of the phone more accurately than the tilt sensors can. That's because the gyroscope can sense motion to the left and right, not just tilting. It's highlighted in apps such as You Gotta See This! (www.boinx.com/seethis). The latter is an iPhone 4 (and newer) app that creates photo collages simply by waving the phone around in front of you. The iPhone shoots photos as it is moving, and since the app knows the orientation of the iPhone's camera as each photo is being taken, it can easily stitch them into an attractive collage in seconds.
The gyroscope can be used by iPhone developers to capture movement that isn't sensed by the accelerometer, specifically nontilted motion along the major axes. Although the accelerometer does a good job of detecting whether the iPhone has been tilted one way or another, the gyroscope allows the device to be moved left or right, up and down, or forward and back, and that motion can be understood by apps. These additional movements provide another layer of precise control to the gestures that the iPhone understands.
Noise Cancellation Microphone
A glance at the top of a recent iPhone reveals a tiny hole next to the headset jack. This hole is actually a microphone, given the name top microphone by Apple. What's it used for? It's for improving the quality of your voice phone calls.
The Noise Cancellation microphone samples the ambient noise level around you. It then subtracts much of that ambient noise from the signal being sent to the person on the receiving end of your phone call. The result is much more clarity when you're making phone calls in noisy conditions.
iPhone Power Tricks
There are many ways to switch your iPhone on and off. The following are the most important methods that every iPhone owner should know.
Unlocking Your iPhone
When your iPhone has been idle for a while, it automatically locks, and the screen goes dark. When this happens, press Home. The locked iPhone screen shown in Figure 3–5 appears. To unlock your phone, swipe the slider from the left to the right. The lock screen clears, and the Home screen springs into place.
Screen locking is a form of power saving. If your iPhone never turned off its bright display, it would go through a battery charge much faster. Shutting down the screen and going into lock mode extends your battery life and optionally allows you to protect your iPhone by requiring a passcode to use the device after it has been locked.
If it seems like your iPhone is locking too frequently, you can adjust how long it should wait before locking. Tap your way to Settings ![]() General
General ![]() Auto-Lock, and select how many minutes you want your iPhone to wait before going dark. Sometimes you may want to just power the iPhone off by yourself and disable autolocking. There's a choice for that in the autolock settings, when you set the duration to Never. Make sure you have a good power source available at all times if you disable autolocking, since autolocking is a power-saving feature. Disabling it means your iPhone will use up battery power more rapidly.
Auto-Lock, and select how many minutes you want your iPhone to wait before going dark. Sometimes you may want to just power the iPhone off by yourself and disable autolocking. There's a choice for that in the autolock settings, when you set the duration to Never. Make sure you have a good power source available at all times if you disable autolocking, since autolocking is a power-saving feature. Disabling it means your iPhone will use up battery power more rapidly.
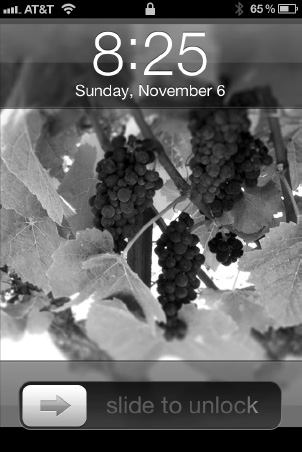
Figure 3–5. This is the lock screen from an iPhone with a custom wallpaper. To unlock your phone, swipe the slider from left to right. If the default wallpaper that is installed on new iPhones is too boring for your tastes, you can change it in Settings ![]() Wallpaper
Wallpaper
Putting Your iPhone to Sleep
For iPhones, sleep mode offers a power-saving way to use your device. Press the Sleep/Wake button once. The screen turns off, and your iPhone locks and enters its low-power mode. You can still listen to music and receive phone calls and incoming text messages. Your device alerts you for timers, calendar appointments, and reminders. You can even take photos from the lock screen. The volume control buttons on the left side of your iPhone work, and the switch on your iPhone headset continues to control music playback and allows you to answer calls.
Some apps can continue to run in the background even when the device is asleep, including most run tracking applications like RunMeter and RunKeeper. As an example, some location-aware apps continuously update the location of the iPhone although it is asleep.
To wake up your iPhone again, press Home, and swipe to unlock.
NOTE: You can use Siri from your iPhone's lock screen by pressingandholding the Home button even though the unit has been locked. You may be required to authenticate if your unit is set to use a passcode. Passcodes are discussed in the following section. As shown in Figure 3–6, you can also disable this capability in Settings to prevent access to Siri from the lock screen.
Securing Your iPhone with a Passcode Lock
For security, you can assign a passcode lock for your iPhone. There are two types of passcodes: a simple passcode, which consists of four easily remembered and typed numbers, and a regular passcode, which can include text. When locked, your iPhone cannot be used except for emergency calls. Go to Settings ![]() General, and tap Passcode Lock to establish a new passcode. As you can see in Figure 3–6, there's a button that turns the passcode lock feature on and off. If a four-digit simple passcode is all you'd like to enter, make sure that the Simple Passcode switch is set to the default value of on. If you'd rather enter a text passcode, flip that switch to the off position.
General, and tap Passcode Lock to establish a new passcode. As you can see in Figure 3–6, there's a button that turns the passcode lock feature on and off. If a four-digit simple passcode is all you'd like to enter, make sure that the Simple Passcode switch is set to the default value of on. If you'd rather enter a text passcode, flip that switch to the off position.

Figure 3–6. Securing your iPhone with a passcode lock is a good idea so that personal information isn't compromised in case of loss or theft of your phone.
Once you've decided what kind of passcode you want, tap Turn Passcode On to enter it. If you have chosen a simple passcode, you're prompted to enter four digits twice—once to enter the numbers and again to verify that you entered it correctly the first time (see Figure 3–7, left). For regular passcodes, you're prompted to enter your passcode with text, symbols, and numbers (Figure 3–7, right). Once again, you'll have to enter the passcode twice to make sure it has been entered properly.
As soon as you've set a passcode, you can change some other settings that are related to the passcode lock. Tap the Require Passcode button to set the time interval before your iPhone requests the passcode. Shorter times are more secure, although you'll need to enter your passcode more frequently as a result.
If you like to use Voice Control and your iPhone or Bluetooth headset to do voice dialing or control the iPod app, slide the Voice Dial switch to on to make sure that Voice Control is always enabled, even when the phone is locked. This makes it handy for you to use a Bluetooth headset to dial and control your phone, even when it's sitting in your pocket or in a briefcase or purse.
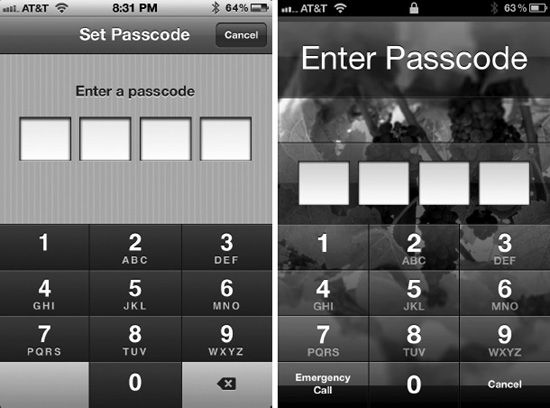
Figure 3–7. On the left is the standard keypad for entering a simple passcode, while the full iPhone keyboard appears for typing a regular passcode.
The final button on the Passcode Lock screen ensures absolute security in case your iPhone is lost or stolen. Sliding the Erase Data button to on will erase the contents of the iPhone if someone incorrectly enters the passcode ten times. Before you engage this setting, be sure that you know your password.
How can you test your passcode? Press the Sleep/Wake button once to put your iPhone to sleep, wait for the time interval to pass, and then wake the iPhone by either pressing the Sleep/Wake button again or pressing the Home button. A passcode challenge screen appears (Figure 3–8 shows the challenge screen for a simple passcode). Enter your passcode correctly, and your iPhone unlocks.
To remove the passcode from your iPhone, go back to the Passcode Lock screen. Tap the Turn Passcode Off button, and then reenter the passcode one more time to confirm that the rightful owner of the iPhone is making the request.
What can you do if you forget your passcode or a mean-spirited colleague adds one to your iPhone without telling you? Unfortunately, you will have to connect the iPhone to your computer and use iTunes to restore the iPhone to factory defaults. Why? Well, for security reasons, there's absolutely no way to reset the passcode since that would defeat the purpose of the passcode.
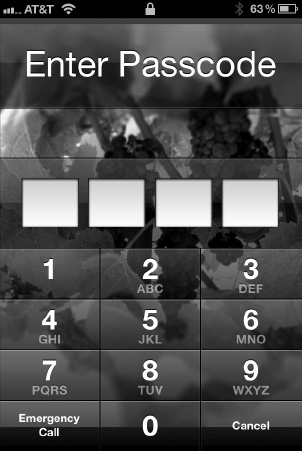
Figure 3–8. With passcode lock enabled, you'll be prompted to enter the passcode before you can use your iPhone to do anything other than make an emergency phone call. This figure shows the passcode keypad for a simple passcode.
Multitasking and Quitting Applications
Prior to iOS 4, iPhones could not perform more than one task at a time. Well, they could play music from the Music app while performing some other tasks, but that was about it.
iOS now acts more like a modern multitasking operating system by allowing multiple apps to run simultaneously. One example that many people pointed at as proof of the need for iOS multitasking was being able to play tunes using the popular Pandora music-streaming app while performing other tasks, such as reading e-mail, at the same time.
When you're using an app, pressing the Home button returns you to the Home screen, but the app is either suspended or may actually be running. In fact, if the app has been written to take advantage of backgrounding, it will continue to run when you're viewing the Home screen or running other apps. In other words, don't assume that when an app is out of sight, it's shut down.
To see what's currently running on your iPhone, double-click the Home button. The current Home screen becomes transparent, and a side-scrolling list of active and recent apps appears at the bottom of the screen.
Flicking the active apps to the right, you'll eventually get to a control panel for whatever music app happens to be active at the time. This control panel is equipped with play, pause, fast-forward, and fast-reverse buttons, as well as a screen orientation lock button. The far-right icon on the control panel shows which music app you're currently controlling.
Flick once more to reveal the AirPlay mirroring controls, which are to the left of the music playback controls. AirPlay allows you to play music and video wirelessly to AirPlay-enabled devices including the Apple TV (audio and video) and numerous audio-only AirPlay-enabled speakers. AirPlay also allows you to wirelessly mirror your iPhone 4S's display to Apple TV. It's a great way to demonstrate applications or use your HDTV as a wireless external monitor. Many games now take advantage of AirPlay video connections to transform your iPhone into a game controller, as you watch the actual game play on a large-screen TV.
Having multiple apps running in background can increase usage of the processor to the point that your iPhone heats up, the device uses much more power, and the response of the phone becomes sluggish. Even with the fast and powerful processors on newer iPhones, too many apps running simultaneously can slow things down dramatically. Idle applications occupy your iPhone's memory, which may eventually cause it to balk when you try to open another app.
So, how do you quit apps? Double-click the Home button, and at the bottom of the iPhone display you'll see a side-scrolling list of all the apps that are currently running (Figure 3–9). To turn off an app, tap and hold an app icon in the list until it begins to jiggle. A small minus sign in a red circle appears at the top-left corner of the icon. Tap the minus sign to quit the application.
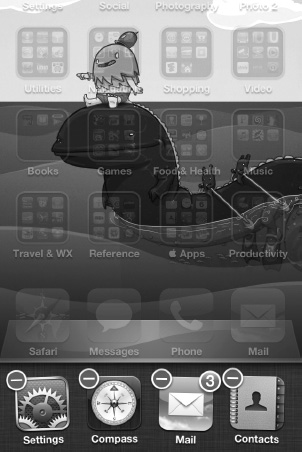
Figure 3–9. To quit an app that is running, double-click the Home button to display all the currently active apps, and then tap and hold one of the apps. When the small minus sign in the red circle appears, tap it to quit the app. Some apps appear in this list that are neither running nor suspended. This list includes all recent apps that have been used in order they were last accessed. If so, the red circle minus sign simply removes that app from the recent apps list.
Powering Your iPhone Off and On
To power off your iPhone, press and hold the Sleep/Wake button for about five seconds. A slider appears prompting you to slide the red button that appears to the right in order to power off. To cancel, either tap Cancel or just wait about ten seconds. The iPhone automatically returns you to the Home screen if you don't power down within that time.
When your iPhone is powered off, it ceases to function. You cannot listen to music. You cannot receive phone calls. You must power your iPhone back on for it to do these things.
To power on your iPhone, press and hold Sleep/Wake for two to three seconds. Release the button when you see the white Apple icon. The iPhone starts up and returns you automatically to the unlock screen.
Rebooting Your iPhone
At times, you may need to reboot your iPhone. Although you can reboot just by powering down and then powering back up, Apple provides a much easier way do this. Press and hold the Sleep/Wake button for eight to ten seconds. Ignore the “slide to power off” message, and keep holding the button until the white Apple logo appears. Once it shows up, release the button, and let the iPhone finish its reboot. You will return automatically to the unlock screen.
Changing iPhone Wallpapers
An iPhone comes out of its box with a default picture installed as “wallpaper.” Wallpapers are the pictures that are used as a background on your iPhone's Home and lock screens. On the iPhone 4, the standard wallpaper looks like glass with raindrops on it. Although it does a great job of showing just how good the iPhone 4's Retina Display is, since it looks like real water on your screen, it's not unique to you.
Changing the wallpapers is an easy way to customize your iPhone:
- If you have a favorite artwork or photo that you want as wallpaper on your iPhone, make sure it's in the Photo Library first. You can move photos and artwork to your iPhone by e-mailing them to your phone's e-mail address and then tapping and holding the photo. A Save Image button appears; tap that, and the photo is saved into your iPhone's Photo Library.
- Select Settings Wallpaper. A screen appears showing the current lock screen and Home screen wallpapers.
- Tap the image of the current wallpapers. Two buttons appear; one is marked Wallpaper and contains a number of built-in textures and photos that can be used as wallpapers, while the other is marked Camera Roll and includes the photos that are in your Photo Library.
- Tap either one of the buttons to preview the pictures that can be used as wallpaper. If you select a photo from your Photo Library, you'll be asked to move and scale the photo before you tap Set to assign it to a wallpaper (Figure 3–10).

Figure 3–10. When you assign one of the images in your Photo Library to be a wallpaper, you'll be asked to move and scale the image so that it looks its best. Once that's done, tap the Set button.
- If you choose one of the built-in wallpapers or have moved and scaled your photo, you're now asked whether you want to make the picture your wallpaper for your Home or lock screen or for both. Tap the appropriate button, and the image appears as wallpaper.
Organizing Apps with Folders
iOS 4 brought a smile to the face of many longtime iPhone users with the addition of folders. Previously, app icons could not be organized except by locating them all on the same page. Each page could contain up to 16 apps, so if you had a lot of apps, you were often flipping through ten or more screens of apps to find the one you needed.
iOS 5 also provides folders. Each folder can hold up to 12 apps, and each Home screen can have up to 12 folders—that's 144 apps per screen, not including those in the Home row at the bottom of the iPhone display.
Here are some tips on creating and using folders:
- To organize similar apps into folders, tap and hold one app until it begins to wiggle, and then drag and drop it on another app of the same type. For example, to create a game folder, you can tap and hold the Angry Birds app icon until it wiggles and then drag it over to the Chopper 2 icon and drop it. Since both apps are in the Games category of the iTunes App Store, the iPhone automatically selects Games as the name of the folder.
- Once a folder is created, you can add any other app (up to a total of 12) to it by repeating the process of dragging and dropping icons. You cannot add the Newsstand to folders; we encourage you not to try. The Newsstand is a special kind of folder.
- To rename a folder, tap and hold the folder icon until it wiggles. Tap the folder icon, and the folder opens with an editable title at the top. When you're done renaming the folder, press the Home button to save the new name.
- You can also organize your apps and folders in iTunes. With your iPhone connected to your computer, click its name under Devices in the iTunes sidebar, and then click the Apps tab. In the image on the right side of the iTunes screen (Figure 3–11), drag and drop app icons to organize them the way that you want them.
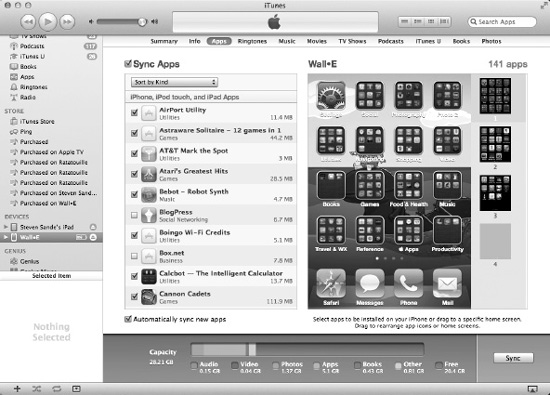
Figure 3–11. That simulation of your iPhone display on the right side of the iTunes screen is a fast way to organize your apps into folders or pages.
Using the iPhone Keyboard
Let's start talking about the iPhone keyboard by quoting verbatim from an early iPhone e-mail written by one of the authors:
I would like to sat that the iPhone has turned me into a tupong expert, but that would ne far farfar from the truth. The fact is that I type on the iPhone like a cow, working with the iPhone keyboard is norm hard and frustrating. Foe all this Rhine is supposed to be smart and press five, I find that in actual use it is slow and mistake-prone. Will my accuracy improve as I get more experience? Probably. Will my fingers become smaller and less oqlike? almost certainly nor.
That e-mail was written within the first 24 hours of ownership, causing a lot of consternation about the whole iPhone keyboard thing. Within a week, however, iPhone typing progressed from horrible to readable, and within another week, from readable to pretty darn good. The entire paragraph in Figure 3–12 was written on an iPhone and transferred to this manuscript (see Figure 3–12).
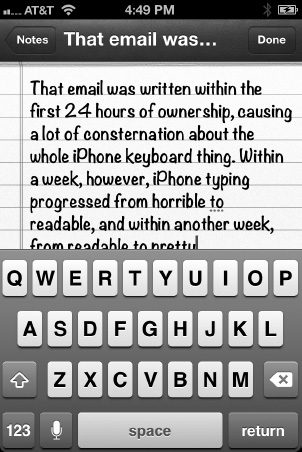
Figure 3–12. The iPhone keyboard grows easier to use with more experience. Within a couple of weeks, you'll master its quirks. Notice the Shift key (arrow pointing up) to the left of the Z key and the Backspace/Delete key (pentagon pointing left with an X in it) to the right of the letter M. The .?123 button switches the keyboard to a number and symbols layout, and the Return button lets you add carriage returns to your text. The microphone to the left of the spacebar is new to the iPhone 4S and represents a voice dictation option provided by the Siri service.
The secret to success is that the iPhone keyboard is smart—so smart, in fact, that it corrects a lot of typos and compensates for misaligned fingers. It automatically capitalizes the beginning of sentences. It suggests corrections for misspelled words and uses something called predictive zones to make it easier to hit the right keys. Here are some of the key technologies that make the iPhone keyboard work:
Dictionary: The iPhone has an onboard dictionary that learns frequently used words as you type. It also picks up names and spellings from your address book. This means it gets better at guessing your intention as it builds its data.
Automatic correction: As you type, the iPhone looks for words similar to what you're typing and guesses them, placing the guess just below the word you're typing. To accept the word, tap the spacebar. (You don't have to finish typing the word. The iPhone puts it in there for you.) To decline the correction, tap the word itself. The iPhone will not make a substitution, even when you press the spacebar.
Predictive mapping: The iPhone uses its dictionary to predict which word you're about to type. It then readjusts the keyboard response zones to make it easier for you to hit the right letters. Likely letters get bigger tap zones; unlikely letters smaller ones.
Offset correction: The iPhone understands that people sometimes misalign fingers. So, if you mean to type pizza but you press O instead of P and U instead of I (that is, ouzza), the iPhone is smart enough to know that the typing pattern you used matches a known word in its dictionary.
Getting Started
When you're new to the iPhone, start by typing slowly. Pay attention to those confirmation pop-ups that appear every time you tap a key. We find it easiest to use our fingertips to type. Others prefer to use their thumbs. Whatever method you use, make sure to go at a pace that allows you to keep track of what you're typing and make corrections on the go.
Automatic corrections: The iPhone displays suggested corrections just below the word you're typing (see Figure 3–13). To accept the suggestion, tap the spacebar. To disable correction for the current word, tap the word itself in the text area, and iPhone will leave the word exactly as you have entered it. You can also turn off autocorrection by opening Settings
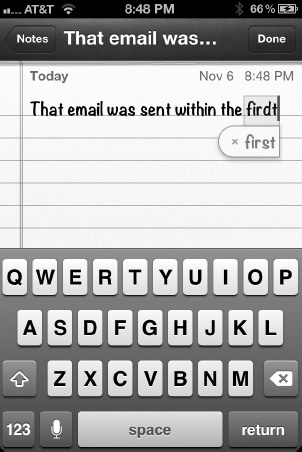
Figure 3–13. iPhone suggestions appear just below the word you type. Tap the spacebar to accept the suggestion, or tap the word you're typing to disable autocorrection for that word.
Using the magnifying glass (loupe): While you're typing, you can adjust the cursor by using the iPhone's built-in magnifying glass feature, also known as the loupe (see Figure 3–14). Hold your finger somewhere in the text area until the loupe appears, and then use the magnified view to drag the cursor exactly where you need it.
Summoning the keyboard: To make the keyboard appear, tap in any editable text area on the iPhone screen.
Dismissing the keyboard: There's no standard way to dismiss the keyboard, but many programs offer a Done button indicating that you're done typing. In Safari, tap Go instead of Done.
Select/Select All: You can select either a single word or all text in an editable area on the iPhone by using Select or Select All. In a text area, tap and hold your finger until the loupe appears. When you remove your finger, a small pop-up menu appears (Figure 3–15), allowing you to select either a single word or all the text on the page. If any text has been copied or cut, you may also see the Paste command in the menu (see next item).
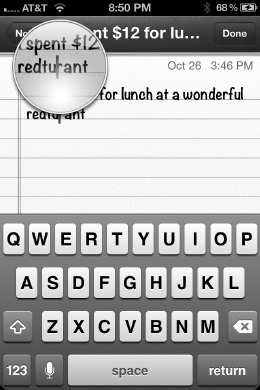
Figure 3–14. iPhone's loupe offers a magnified view that makes it easy to position the cursor exactly where you need it to be.

Figure 3–15. If you need to select a word or phrase to copy, double-tap a word to bring up this pop-up menu. You can copy the word, select all text on the page, or tap Define to get a dictionary definition of the selected word.
Cut/Copy/Paste/Suggest: Like a computer, there are functions within the iPhone that allow you to cut, copy, and paste text. To enable these, double-tap a word in a text area. The word is selected, with small “handles” on either side that can be moved left or right to expand the area that is selected. In addition, a pop-up menu appears with the commands Cut, Copy, Paste, and Suggest to select from (Figure 3–16).

Figure 3–16. Just like in a word processing application on a computer, the iPhone can cut, copy, and paste text. It can suggest similarly spelled words.
Cut removes the selected text and keeps it stored in the iPhone's clipboard until you paste it somewhere else. Copy saves a copy of the selected text in the clipboard but does not remove it from the existing text file. Paste takes whatever text is currently in the clipboard and pastes it at the cursor point in any text field. Suggest (Figure 3–17) displays a list of words that are spelled similarly to the selected word so that accidentally misspelled words can be replaced with the correct word with a tap of a finger.
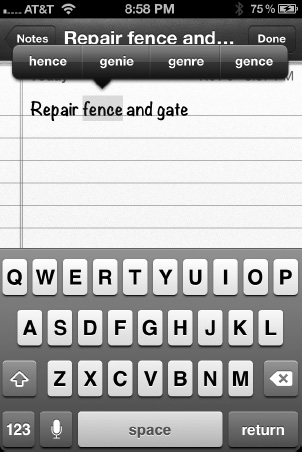
Figure 3–17. If the app you're typing in has replaced your word with something that is spelled similarly, use the Suggest command to display a list of words that you can insert with a tap of a finger.
iPhone Typing Tricks
Once you're comfortable with the keyboard, there are further ways to make typing easier. Here are a few more iPhone typing tricks you can use to make your keyboard entry faster and easier.
Contractions
When you want to type a contraction like can't or shouldn't, don't bother putting in the apostrophe. The iPhone is smart enough to guess that cant is can't. Of course, if you're referring to a slope or tilt, be sure to tap the word itself to decline the change from the noun to the contraction.
If you're typing a word like we'll, where the uncontracted word well is a common word, just add an extra l. The iPhone corrects welll to we'll and shelll to she'll.
TIP: Other contraction tricks include itsa, which gets corrected to its, and weree, which gets corrected to we're.
Punctuation Dragging
If you plan to use only one item of punctuation at a time, such as a comma or period, save time by dragging. Drag from the 123 button to the item you want to include. By starting the drag at 123, the iPhone switches momentarily to the numbers and punctuation view. After selecting your item, the keyboard automatically bounces back to the alphabet.
TIP: Another punctuation trick for the end of sentences is to tap 123, the punctuation item you want to use, and then the spacebar. The iPhone is smart enough to recognize the end of a sentence and put you back in alphabet mode. You can also double-tap the spacebar to add a period followed by a space.
Accents
Tap and hold any keyboard letter to view accented versions of that letter. For example, tapping and holding N presents you with the option of adding n, ´n, or ñ. This shortcut makes it much easier to type foreign words.
If you need to do a lot of typing in a foreign language, you can add new keyboards to your iPhone by going to Settings ![]() General
General ![]() Keyboard, tapping International Keyboards, and then adding the keyboards you need from a palette of 51 that are available. To use the keyboards to enter text, open a keyboard, and then tap the small globe to the left of the spacebar, which will display a list of the international keyboards you have installed. Yes, you too can write in Russian on any iPhone (Figure 3–18).
Keyboard, tapping International Keyboards, and then adding the keyboards you need from a palette of 51 that are available. To use the keyboards to enter text, open a keyboard, and then tap the small globe to the left of the spacebar, which will display a list of the international keyboards you have installed. Yes, you too can write in Russian on any iPhone (Figure 3–18).
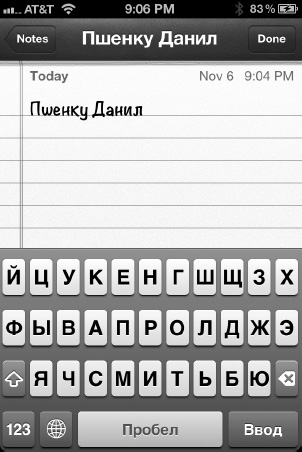
Figure 3–18. The Russian keyboard has been enabled in Notes, and the keyboard is full of Cyrillic characters. Tap the globe to the left of the spacebar to choose another keyboard or return to your default keyboard.
Caps Lock
To enable Caps Lock, go to Settings ![]() General
General ![]() Keyboard Preferences. When that's enabled, you can double-tap the Caps button to toggle the lock on and off.
Keyboard Preferences. When that's enabled, you can double-tap the Caps button to toggle the lock on and off.
Deleting Multiple Words at a Time
When you press and hold the Delete key, it starts off by deleting one letter and then the next. But if you hold it for longer than about a line of text, it switches to word deletion and starts removing entire words at a time, making it easier to clear text quickly.
Autocapitalization
Autocapitalization means the iPhone automatically capitalizes the start of sentences. So, you can type the day has begun, and the iPhone is smart enough to capitalize the: “The day has begun.” This means you don't have to worry about pressing the Shift key at the beginning of every sentence or even when you type i because i went to the park becomes I went to the park.
iPhone Typing Test
You may be curious just how fast you can type on your iPhone keyboard. There are several apps in the App Store that can test your typing speed. Search the App Store for typing test to find those apps.
Dictating Text
The microphone button, found just to the left of the space bar on the iPhone 4S, allows you to dictate text instead of typing it. To use this option, tap the microphone button, speak, and then tap the Done button. As you speak, a purple microphone shows you the levels as you speak. Once you tap Done, your audio is sent over the Internet to Apple's data processing center and is returned to you as text.
When dictating to your iPhone, speak slowly and clearly. Over enunciate words and pause more than might feel natural. If you want to include punctuation, you must speak it as part of your dictation. For example, you'd say “Hello there comma Steven full stop” to produce the sentence “Hello there, Steven.”
You can dictate up to about 30 seconds at a time; a beep interrupts you when you have filled the talk buffer. We recommend taking things slowly and speaking one phrase at a time. Although you can go on longer, it's easier to catch and respond to errors when working in stages than trying to proofread and correct longer dictations.
iPhone dictation follows many of the same rules used by the popular Dragon Dictation software. If you want to learn more about the finer points of dictation, consult the Dragon Dictation Users Manual on the Nuance web site (http://support.nuance.com).
At times, the iPhone may encounter trouble choosing between multiple interpretations. In this case, you'll see a blue underline under words. Tap that phrase to open a bubble showing the alternate interpretation. Tap that bubble to accept the alternate or tap the background to continue using the original text.
Speech-to-text on the iPhone 4S is phenomenal, to the point where you'll find yourself typing less and less and using dictation more and more in your e-mails, notes, and other typed material. You can dictate into any text element on your iPhone. The microphone on the keyboard does not care which application is running. If you can type with the keyboard, you can speak with the microphone button.
Using a Bluetooth Keyboard with Your iPhone
That little iPhone virtual keyboard can be annoying for typing large amounts of text. Can you imagine writing a book on an iPhone, tapping away with one finger or two thumbs?
Thankfully, iPhones running iOS 4 or higher can use with Bluetooth keyboards. Apple's Wireless Keyboard is a perfect example of a compact, battery-powered keyboard that links to the iPhone and works well for typing e-mails or writing books. Here are some instructions on setting up your Bluetooth keyboard with your iPhone:
Make sure that your Bluetooth keyboard is not paired with another device: Pairing is the act of making the two devices (a computer and a keyboard) aware of each other. If you've been using your Apple Wireless Keyboard with a Mac, for example, you'll want to unpair the two before pairing the iPhone and the keyboard. To do that, open System Preferences
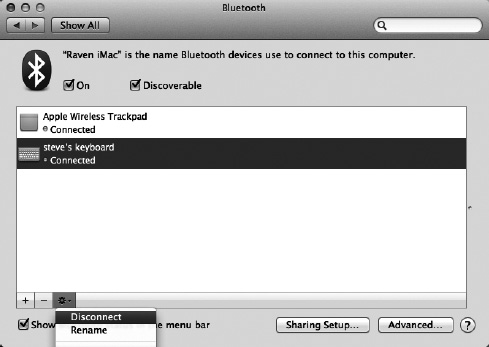
Figure 3–19. To unpair your Bluetooth keyboard from a Mac, disconnect it first, and then click the minus sign to delete the keyboard from the list of Bluetooth devices.
Make your Bluetooth keyboard discoverable: When a Bluetooth device is discoverable, it can be discovered by other devices like your iPhone and paired to them. Continuing the previous example with the Apple Wireless Keyboard, you make the keyboard discoverable simply by pressing the power button on the right side of the keyboard. The tiny green LED on the keyboard begins to blink, signaling that the keyboard is now discoverable.
Pair your iPhone and the Bluetooth keyboard: Once more using the Apple Wireless Keyboard example, go to Settings
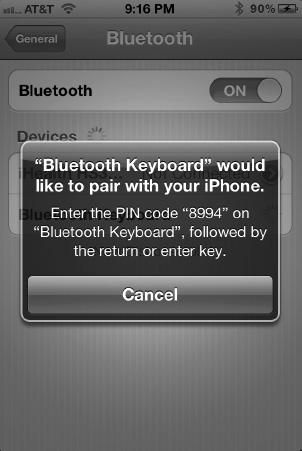
Figure 3–20. To pair your iPhone to a Bluetooth keyboard, make the keyboard discoverable, find it in the iPhone's Bluetooth settings, and then tap the keyboard name. To consummate the pairing, you'll need to type in a random passkey created by the iPhone.
The standard Apple Wireless Keyboard works much like it does on a Mac when it's being used on an iPhone. The brightness keys (F1 and F2) brighten and dim the iPhone screen, the play/pause/fast-forward/rewind keys F7 through F9 work with the iPod app, and the volume keys (F10 through F12) adjust the volume of sounds playing on the iPhone. If at any point you need to use the iPhone's virtual keyboard, just tap the Eject button (top-right corner of the keyboard), and it appears. Tap it again to make the virtual keyboard disappear.
Used with an app like Pages (www.apple.com/iphone/from-the-app-store/apps-by-apple/pages.html) or Quickoffice Pro (www.quickoffice.com/quickoffice_pro_iphone/), a Bluetooth keyboard makes writing large documents on an iPhone a reality.
Using the iPhone Stereo Headset
If you look carefully at the headset packaged with your iPhone, you'll discover a small, thin cylinder about 6 inches below one of the two earpieces. This cylinder contains both a microphone and a switch. Go ahead and squeeze it, and you can feel the switch react. This switch has several functions:
Music: When listening to music, squeeze once to pause the music; squeeze again to resume playback. Double-squeeze (two quick squeezes in a row) to skip to the next song.
TIP: You can also pause your music by pulling out the headset plug from the iPhone jack.
Phone calls: When an incoming call rings on your iPhone, squeeze once to answer the call. Squeeze again to hang up. In theory, you can double-squeeze to send the call to voicemail, but I find that really difficult to do. It's much easier in my opinion to use the Sleep/Wake button. Press the Sleep/Wake button once to silence an incoming call and twice to send the incoming call to voicemail.
Siri and Voice Control: Did you know that it's possible to control your iPhone by talking to it? If you squeeze the headset switch until you hear a double-tone in the ear buds, you can talk to Siri on the iPhone 4S or command the iPhone to either make a phone call or play music using older iPhone units. Siri is introduced in the next section, but here are a few words first about Voice Control, which appears on a wider range of iPhone device installations. If you are looking at the iPhone screen when it goes into Voice Control mode, the various voice commands are visible floating across a blue background (Figure 3– 21).
For example, squeezing the switch until you hear the prompt and then saying “Call Joe Smith at Home” causes the phone to call Joe at his home phone number, provided that his name and home number are in your Contacts list.
If you simply say “Call Joe Smith” and Joe has more than one phone number, you'll be asked which number to call—”Home, Work, or iPhone?” The iPhone prefers for you to tell it which number to call, and voice recognition is improved drastically. Use the short form of this voice command only in those situations where you aren't sure that there are multiple numbers for a contact.
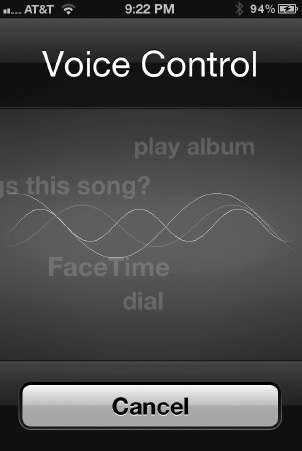
Figure 3–21. The iPhone's Voice Control capability is a futuristic and useful way to call people or listen to music on older iPhones that do not have access to the new 4S Siri feature.
Voice Control can be very useful when you are walking or running. Rather than stopping to pick a song in the iPod app, just squeeze the headset switch, and tell your iPhone what you want to hear. The following is a list of the voice commands that your iPhone understands:
- “Call [contact name]”
- “Dial [name or phone number]”
- “Shuffle”
- “Pause music”
- “Play more music like this”
- “Play playlist”
- “Next song”
- “Play songs by”
- “Next track”/“previous track”
- “What group is this song by?”
- “What is this song?”
Talking to Siri
Debuting on the iPhone 4S, the voice-operated Siri assistant uses natural-language processing to answer questions, respond to commands, and provide other kinds of assistance. With Siri, you can set up meetings, call friends, ask about appointments, check e-mail, find friends, and do a lot more.
Siri is incredibly convenient, going way beyond what you can do with Voice Control. You'll find yourself using your iPhone in ways you never did before because Siri makes things so much simpler. “Wake me up at 8:30 a.m.,” “Tell my wife I'm on my way home,” “Remind me to stop by the dry cleaners when I leave here”: Siri offers virtual concierge services that simplify your life.
You launch Siri by pressing and holding the Home button or by squeezing the control button on your iPhone headset. (You can also use Bluetooth headsets to launch the Siri assistant.) A chime tells you that Siri is listening and ready to follow your commands. Make sure that Siri is enabled and that you have a good Internet connection. You'll be ready to take off and start exploring this amazing voice-driven service.
To enable Siri, navigate to Settings ![]() General
General ![]() Siri. Switch Siri to ON. When disabled, you can still use the older Voice Control technology but you miss out on all of Siri's amazing features.
Siri. Switch Siri to ON. When disabled, you can still use the older Voice Control technology but you miss out on all of Siri's amazing features.
The more you use Siri, the better it becomes at recognizing your speech and responding to your particular tones, inflections, and accents. That's because Siri sets up a personal account for you at Apple's servers and learns your vocabulary as well as the names of the songs in your music library and those of your contacts and acquaintances. Siri builds up a profiles of you and your data, so its recognition improves over time.
To find out what Siri can do for you, say “Help.” Siri will respond with a screen like the one shown in Figure 3–22. Here, you'll see examples of things you can see to place phone calls (tap the phone option) or to adjust your calendar (tap the Calendar one). Each sample phrase leads to another screen full of examples.
Take messages, for example. If you have a meeting, you can say “Tell Susan, I'll be right there.” Or you might “Send a message to Jason saying how about tomorrow.” Got a conference call early tomorrow morning? Tell Siri to “Wake me up tomorrow at 7:30 a.m.” and “Remind me to check my schedule at 8 a.m. tomorrow.”
If Siri ever misunderstands what you've said, you can tap the talk bubble that represents your side of the conversation. There, you can re-dictate your request or use the keyboard to edit it directly. You can always tell Siri to “Cancel” what you've said or to “Change it” to some other choice.
It is our personal opinion that Siri is truly the stand-out feature on the iPhone 4S and the one most likely to make people consider early upgrades from older equipment.
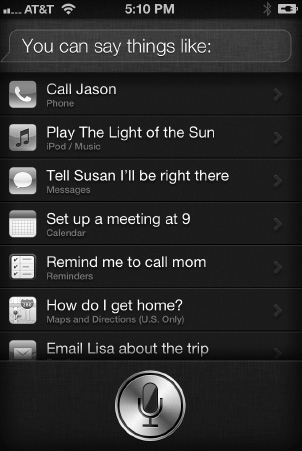
Figure 3–22. If you're new to Siri, you can ask for suggestions of what to say. Say “Help,” and Siri presents this screen, which leads to category-by-category examples.
Summary
This chapter has explored many of the ways you can interact with your iPhone from taps to buttons to switches to dictation. You've read about the touchscreen and how you can communicate with it as well as about other sensors built into the phone. You've discovered how to put your phone to sleep, how to lock it, and how to power it off completely. After finishing this chapter, you will have been introduced to all the basic ways you and your iPhone can communicate with each other. Here are a few key lessons to carry away with you:
- Build up your working iPhone interaction vocabulary. You'd be surprised how often one of the lesser-known gestures, such as the two-fingered tap, will prove useful.
- Understand how the iPhone sensors are supposed to work so you won't be surprised when they're doing their job. Are you wondering why the iPhone is so dim when you wake it up in a dark room? Knowing about the light sensor will put you on the path to adjusting the phone to the brightness you need.
- Know the difference between powering your iPhone down and putting it to sleep. When it's powered off, you can't receive any calls, but you'll conserve battery power. When it's asleep, you can still listen to music and take calls.
- If you forget your iPhone's passcode, you'll need to restore the iPhone at your computer.
- Do you need to do a lot of text entry on an iPhone? Consider using a Bluetooth keyboard with the iPhone to make fast and more accurate typing a breeze. Dictation is a big timesaver as well, as long as you use your iPhone in a relatively quiet place. Trying to dictate on mass transit during rush hour is going to be difficult.
- On older devices, Voice Control can do the job of dialing a number or playing music when your hands are too busy to keep them on the iPhone. Just remember that Voice Control's ability to recognize your voice isn't perfect and that your iPhone may not necessarily do what you intend it to do.
- On newer systems, Siri is the answer. It does everything that Voice Control does and adds a huge range of concierge features that make your iPhone understand your appointments, text messages, calendars, contacts, and more. Siri is the assistant you never knew you needed, making life simpler for you on your iPhone.