Chapter 2
Putting Your Data and Media on the iPod touch
In Chapter 1, I briefly discussed syncing your iPod touch with your music, movies, photos, and other data via iTunes. In this chapter, I explore the many options you have in syncing data with your iPod touch.
The first time you sync your iPod touch with your iTunes library, you need to do it via the USB docking cable. After that, you can sync it with your iTunes library via the USB cable that came with it or do so wirelessly as long as the iPod touch is on the same wireless network as your computer. Once connected via either of these ways, your iPod appears in the list on the left side of the iTunes window (you can see it later in Figure 2–3). This light blue column, called the source list, is divided into several sections for your media library, the iTunes Store, your devices, and your playlists.
If you do not see your iPod in this list, make sure you’ve physically connected your iPod through the USB cable and that the cable is firmly inserted into both the computer and the iPod if you are doing a hardline connection, or make sure that your iPod touch and computer are both connected to the same wireless network. Next, make sure your iPod is powered on. Your iPod will be listed when it’s active or asleep, but it won’t show up when it’s powered down.
The iPod touch iTunes Device Window
When the iPod touch is plugged into your computer, it automatically appears in your iTunes source list under Devices. Click the name of your iPod touch in the source list to open its preferences in the main iTunes window (see Figure 2–1). You’ll see a series of tabs along the top of the window that allow you to set options associated with your iPod touch. The tabs you’ll see (from left to right) are Summary, Apps, Ringtones, Music, Movies, TV Shows, Podcasts, Books, Photos, and Info.

Figure 2–1. iTunes allows you to manage the content loaded onto and synchronized with your iPod touch. Each tab at the top of the window offers a variety of controls, allowing you to choose what information is loaded onto your iPod touch at each sync.
Along the bottom of the iPod touch preferences window you’ll see a long, colorful Capacity bar (see Figure 2–2). This bar appears regardless of what tab you have selected. The bar displays the total storage capacity of the iPod touch and breaks down the amount of data you have on the iPod touch in color-coded squares along the Capacity bar. Blue is for Audio, purple is for Video, yellow is for Other, green is for Apps, pink is for Books, orange is for Photos, and gray is for the remaining free space you have on your iPod touch.

Figure 2–2. The Capacity bar is a visual representation of the different types of files occupying space on your iPod touch.
NOTE: The Capacity bar breakdown is pretty self-explanatory. Still, some people are thrown by yellow—the color that represents “Other.” What is “Other,” exactly? Other includes database files (which keep track of your music, video, and podcast libraries), which can be 100MB to 200MB in size; album artwork (which can be 500KB per track); and preference files for the applications you have on your iPod touch. Preference files let the apps remember in-app settings you’ve configured every time you launch them.
A Word on Syncing Your Data
The current iPod touch devices hold a lot of data. But many of us have music or movie libraries that are far larger than even the storage in the most capacious iPod touch. Apple devised sync preferences to help organize and select your most important data and move it to the iPod touch.
If you have a 32GB iPod touch and a 40GB music library, not only will you not be able to fit all your music onto the device, but if you settled for 32GB of your music library, that would mean you’d have no room for photos, movies, books, or apps. The following tabs that I discuss can help in selecting what to sync to your iPod touch.
Although you most likely won’t be able to fit all of your music, photos, and movies onto the iPod touch, you don’t have to do so. You can keep changing what you put on the iPod touch. For example, once you’ve watched a movie on your iPod touch, you can remove it and replace it with another one. Also, some files are larger than others. Although movies are typically the largest, don’t worry about syncing all of your contacts, calendars, and book collections onto your iPod touch. These are all text-based files, and text takes up very little storage.
Where Do You I Get My Media From?
The iPod touch is a great device for consuming media. But where do you get that media? The easiest and most direct way to get movies, music, TV shows, and books onto your iPod touch is through the iTunes Store (see Figure 2–3). In the iTunes Store, you can buy music (a song or an entire album), rent or purchase movies, download your favorite TV shows by the episode or subscribe to a Season Pass, and download free podcasts and iTunes U content.

Figure 2–3. The iTunes Store is the world’s largest music store. You can also download movies, TV shows, apps, podcasts, and books from it.
You can also import music and movies from your own collections. Importing music from CDs is straightforward using iTunes, as is importing video. One way to get movies onto your iPod touch is to rip them from your DVD collection.
NOTE: Ripping a DVD means copying content from the disc into a format that’s playable on other devices, including iPod touch devices. To load video from your DVDs onto your iPod touch, download a copy of HandBrake from http://handbrake.m0k.org (for both Windows and Mac), and convert your DVD content to an iPod touch–friendly format. HandBrake is free and easy to use. Insert your DVD into your computer, run the application, and follow the directions in the program. After your movie has finished ripping, you must then add it to iTunes by dragging and dropping the movie file onto your Movies library in the source list.
The only way to get applications onto your iPod touch is by using the iTunes App Store. You can easily browse for apps from the desktop version of iTunes or in the dedicated App Store app on the iPod touch (we’ll talk about that app in a later chapter).
There are several ways to get e-books for the iPod touch. Perhaps the easiest is to buy them through Apple’s iBookstore (see Chapter 8 for details), which is part of the free iBooks app Apple offers for download. Another way is to download from the collection of more than 30,000 free e-books at Project Gutenberg (www.gutenberg.org) and drag the books from your downloads folder into iTunes. There are also many other e-book stores that you can buy from. For a good list of websites that sell e-books, go to www.epubbooks.com/buy-epub-books.
NOTE: E-books come in many formats. The format compatible with the iPod touch’s iBooks app is ePub. Make sure when buying an e-book outside the iBookstore that it is in ePub or PDF format, or else you’ll need to find another app that reads the format your e-book is in. Books from Amazon’s Kindle Store are an example of this. Kindle books can be read on the iPod touch, but not in the iBooks app. You need to download Amazon’s Kindle app for the iPod touch to read e-books purchased from Amazon or view them in Amazon’s browser-based Cloud Reader (www.read.amazon.com).
Remember to Apply Your Changes
After making any of the choices we discuss in the following sections, note that they do not become finalized until you click the gray Apply button to the right of the Capacity bar (see Figure 2–4). Don’t worry if you forget to click it, because iTunes automatically reminds you before you navigate away from the iPod touch preferences window. Don’t panic if you make a change in the preferences by mistake; you can always click the Revert button that sits above the Apply button.

Figure 2–4. The Revert and Apply buttons (boxed) allow you to accept or negate any of the changes you have made in iTunes’ iPod touch preferences window.
The Tabs
The tabs (see Figure 2–5) running along the top of the iPod touch preferences window are how you navigate all your iPod touch settings. There are 10 tabs in total: Summary, Apps, Ringtones, Music, Movies, TV Shows, Podcasts, Books, Photos, and Info. To begin configuring the settings under any tab, just click the tab to select it.
Figure 2–5. The tabs. Learn ’em, love ’em.
The Summary Tab
The Summary tab (see Figure 2–6) is the first tab visible in the iPod touch preferences window. It displays an overview of your iPod touch including its name, capacity, currently installed firmware version, and serial number. From this page, it’s also possible to check for firmware updates, restore your iPod touch to a pristine factory-installed condition, and set options to help you manage the way your data is synced. The page is broken up into three boxes: iPod, Version, and Options.

Figure 2–6. The Summary tab provides an overview of your iPod touch’s make and model.
iPod
In this box, an image of your iPod touch is displayed along with its name, capacity, software version, and serial number.
The only things that could ever change in this box are your iPod touch’s software version number and your iPod touch’s name. When you perform a software update on the iPod touch, the new version number appears in this box. It’s an easy way to tell which version of iOS (the operating system used on Apple’s iPod touch devices, iPhones, and iPads) you are using. If you change the name of your iPod touch by double-clicking its name in the iTunes source list (see Figure 2–7), the name change is updated here. Your iPod touch’s capacity and serial number will never change.

Figure 2–7. Double-click your iPod touch’s name in the iTunes source list. You can rename it to anything you want. The name change will be reflected on the Summary tab.
NOTE: You bought a 32GB iPod touch, but you notice that the capacity states your iPod touch has only 29.28GB of storage. What gives? Whenever you buy an electronics device that offers storage capacity, the advertised amount of storage is always more than the actual storage available to you. Why? Several reasons. One is because the device’s operating system must be stored on the same disk as your files. Without the OS, your device could not function. In this case, the iPod touch’s OS takes up almost 2GB of space. Another, more technical reason is because storage size can be measured in binary or decimal measurements. Binary says 1KB is equal to 1,024 bytes, while decimal says 1KB is equal to 1,000 bytes. When advertising storage space, companies choose to use the decimal measurement, which ends up showing more space than is actually available to you.
Version
The Version box allows you to manually check for iOS software updates by clicking the Check for Update button. Next to the button is text notifying you if your iPod touch software is up-to-date or if there is an update available. Sometimes iTunes notifies you that there is a software update available before you’ve even clicked the Check for Update button. It knows this because iTunes automatically checks for iOS updates once a week. You’ll also see text to your right that tells you when the next time iTunes is going to automatically check for an update. If there is an iOS software update available, always install it. Sometimes updates provide new features; other times they provide simple bug fixes. Apple rigorously tests these updates before releasing them to the public, so it’s usually safe to assume the updates will improve your device (whether you notice it or not).
NOTE: Just what is iOS? iOS is the name Apple gave to the operating system that runs on all of its touchscreen mobile devices (iPhones, iPod touch devices, and iPads). The latest version of iOS is iOS 5. Versions before iOS 4 were referred to as “iPhone OS” 1, 2, or 3 since the iPod touch’s operating system was based on it. Thankfully, Apple decided to take “iPhone” out of the OS name; it just makes referring to the operating system easier. This book explores everything you can do with your iPod touch running iOS 5.
Below the Check for Update button is the Restore button. Clicking the restore button allows you to restore your iPod touch to a factory-new condition. You will rarely, if ever, use this feature. The only time to restore your iPod touch is if you are having technical difficulties with it or if you decide to sell the iPod touch or give it away and want to make sure all your personal data is removed from the device. Before the restore commences, you’ll be shown a dialog box asking you to confirm the restore (see Figure 2–8).

Figure 2–8. After a restore, you have the option of putting all your data back onto the iPod touch.
Backup
Every time your iPod touch syncs to iTunes, a backup of all the files and settings on your device is created. This backup is handy if you ever need to restore your iPod touch. Once the restore is complete and you’ve synced your iPod touch to iTunes again, you have the option of restoring the iPod touch from this backup, which, once completed, enables you to retain all your old settings and files.
The Backup section of the Summery tab is where you decide where you want that backup to reside. If you want to store the backup on iCloud so you can access it from any iOS device wirelessly (such as when you want to restore), select Back Up to iCloud.
Alternately, you can choose to save your backups to your computer. If you want to do that, select Backup to this comptuer. You can also choose to encrypte backups to the computer or not. With the “Encrypt iPod backup” option selected, your backups, and thus all your data, are encrypted and protected by a password. To back up from an encrypted data file, you must know the password to the file. Next to this selection is a Change Password button, which allows you to change the password to your encrypted data at any time.
NOTE: Do not forget your password! If you encrypt your backups and you forget your password, your backed-up data cannot be restored, and you will have to resync all your data from scratch. You’ll also have to reconfigure all the settings on your iPod touch to the way you had them, including rearranging the iPod touch’s app icons to their desired locations. If you have lots of custom settings on your iPod touch, this can take a long time. Remember your passwords!
All iPod backups stored on iCloud are automatically encrypted and the only thing you need to access them is your iCloud password. Also note that with iOS 5, your iPod will atuomatically backup whenever it’s plugged in to a power connection and is on your Wi-Fi network.
Options
You have several preferences in the Options box. To enable or disable any of the features, simply check or uncheck the box next to it.
- Open iTunes when this iPod is connected: This option is selected by default. It tells your computer to open iTunes when it detects that your iPod touch is connected via USB. If this option is not selected, iTunes doesn’t open when you connect your iPod touch, and no data is synced to your device until you manually open iTunes and click the Sync button next to the Capacity bar.
NOTE: Even though iTunes does not launch or sync your data when this box is not selected, the iPod touch is still charged.
- Sync with this iPod over Wi-Fi : This box must be checked if you want to sync the iPod touch with your iTunes library over a Wi-Fi connection. This is why you need to sync your iPod touch via a wired connection (the USB-dock connector cable) the first time, so you can select this Sync over Wi-Fi connection box. Without this box being checked, your iTunes library has no way of knowing that it should be syncing with your iPod over Wi-Fi.
- Sync only checked songs and videos: When this option is selected, iTunes only syncs the songs in your library and playlists that have a check mark next to them in the iTunes library (see Figure 2–9).
- Let’s say you have a Greatest Hits playlist set to sync with the iPod touch. In the playlist you have two copies of Michael Jackson’s “Man in the Mirror” from two separate albums. You want to have only one copy of the song on the iPod touch, but you don’t want to remove the extra copy from the playlist. If you deselect one version of “Man in the Mirror” in the playlist and have “Sync only selected songs and videos” selected, the playlist syncs to your iPod touch minus the extra “Man in the Mirror,” but the song remains in your playlist in your iTunes library.

Figure 2–9. Selected songs and an unselected song in iTunes
- Prefer standard definition video: When this box is checked, only the standard definition version of any video in your iTunes library that has both standard- and high-definition copies is synced. It’s a good idea to keep this checked if you don’t have a lot of space on your iPod touch. A standard-definition version of a movie can save you up to four times the space of a high-definition movie.
- Convert higher bit rate songs to 128 kbps AAC: Digital music comes in many formats and sizes, with the most popular being MP3 and AAC. Depending on how you obtained your music, whether buying it from the iTunes store or ripping your collection from old CDs, your songs most likely have different encoding settings. A song encoded at 256Kbps takes up twice the space as a song encoded at 128Kbps. With the “Convert higher bit rate songs to 128 kbps AAC” option selected, any music synced to your iPod touch is converted on the fly to the 128Kbps AAC format. The advantage of doing this is to save space on your iPod touch by reducing higher bit rate songs to a perfectly acceptable 128Kbps.
- Manually manage music and videos: With this option selected, music and videos are never automatically synced with your iPod touch. The only way to add music and videos on the iPod touch under this option is by dragging the songs or videos from the iTunes library onto the iPod touch in the iTunes source list. Likewise, with this option selected, the only way to remove music or videos from your iPod touch is by clicking the drop-down triangle next to the iPod touch in iTunes’ source list, navigating to your playlists selecting the song or video, and then pressing the Delete key on your computer’s keyboard.
NOTE: Manually adding or removing music or video from your iPod touch does not affect the files on your computer. Whenever a file is added to or deleted from the iPod touch, it is just a copy of the file in your iTunes library. The original file always resides in your iTunes library until you delete it from there.
- Configure Universal Access: The last thing on the Summary page is a Configure Universal Access button. Clicking this button opens a Universal Access box (see Figure 2–10) for setting visual and audio device assistance options for people who are hard of sight or hearing.

Figure 2–10. The Universal Access settings
- Seeing: You have the option of selecting one of three radio buttons: Voice Over, Zoom, or Neither.
- VoiceOver makes your iPod touch speak the name of a button or its function when the user touches it. It also speaks text. We explore the VoiceOver features in Chapter 15 of this book.
- Zoom allows the user to zoom into parts of the screen that normally don’t support a magnifying or zoom function. When this option is selected, the user can double-tap any part of the iPod touch’s screen with three fingers to automatically zoom in 200 percent. When zoomed in, you must drag or flick the screen with three fingers. Also, when you go to a new screen, Zoom always returns to the top middle of the screen.
- Use white-on-black display: Selecting this option inverts the colors of the iPod touch’s screen so text appears white on a black background. The iPod touch’s entire screen will look like a photograph negative.
- Speak Auto-text: With this option selected, any autocorrection text (like the spell check pop-ups that appear when you are typing) is spoken aloud.
- Hearing: There are two accessibility features for the hearing impaired.
- Use mono audio: When this is selected, the stereo sounds of the left and right speakers are combined into a mono (single) signal. This option lets users who have a hearing impairment in one ear hear the entire sound signal with the other ear.
- Show closed captions when available: When this is selected, any video you have on your iPod touch automatically displays closed captions if that video has captions embedded in it.
The Apps Tab
This is my favorite tab. It’s the place where you get to decide which apps you want to put on your iPod touch and arrange them with drag-and-drop simplicity. This tab is composed of two main sections: Sync Apps (see Figure 2–11) and File Sharing (see Figure 2–13). Let’s get started.

Figure 2–11. This is where you choose what apps to put on your iPod touch and how to arrange them.
Sync Apps
Under the Sync Apps heading is a scrollable list of all the applications you have in your apps library in iTunes. You can sort the list by name, kind, category, size, or date downloaded. There’s also a search field in the upper-right corner of iTunes if you’re one of those people who has downloaded thousands of apps and can’t scroll through all of them quickly.
In the apps list there is a check box to the left of the app’s icon. To the right of the icon is the app’s name, and below that are the app’s category listing and the file size of the individual application. Any app that has a selected check box means the application is set to sync with the iPod touch. Below the apps list is a a check box labeled “Automatically sync new apps.” When this is selected, any new apps you’ve downloaded through iTunes are automatically synced with your iPod touch on the next connection.
Next to the apps list is a a visual representation of the screen of your iPod touch. To the right of that are one or more smaller black screens with icons representing apps that are already on, or set to be synced with, your iPod touch. You’ll also see a completely gray screen below the last black one.
The easiest way to get apps on your iPod touch is to find them in the apps list and simply drag them onto the virtual screen. As soon as you do, the app’s check box is automatically selected in the app list.
You can drag around the apps on the virtual iPod touch screen until you’ve arranged them in the order you like. It’s also possible to grab the smaller black screens and move them up or down in the list, rearranging entire pages of apps on your iPod touch. The black screen at the top of the list is the home page on your iPod touch, and each one below that is a subsequent swipe away. The gray screen at the bottom is an extra screen should you want to create a new screen with apps.
To remove an app, hover your computer cursor over the app, and a little X appears in the upper-left corner. Click the X, and the app disappears from the screen. On the next sync, the app is removed from your iPod touch. Don’t worry; you can always get an app back by dragging it to the virtual iPod touch’s screen or by clicking the app in the list to the left.
NOTE: Apps that Apple ships on the iPod touch cannot be removed from the device—they can only be repositioned.
Creating Folders
There’s a way to create folders of apps on your iPod home screen as well. Folders help you avoid constantly swiping screens to the left or right and make it easy to group similar apps together. To create a folder in the Apps tab, drag one app onto another on the virtual iPod screen and release it. A folder is created with the two apps in it, and you can name the folder whatever you want. Drag more apps to the folder and release them to add them. In the folder in Figure 2–12, I’ve created a folder called Travel, and it contains some of my favorite travel apps.
To remove apps from the folder, drag them out or click the X that appears when you move your pointer over the app’s icon. Folders contain up to 12 applications, and there can be up to 20 folders on a page. Similarly, each screen holds 20 apps (or folders of apps) including the ones docked at the bottom of the screen. The dock holds anywhere between zero and four apps. Any apps placed in the dock appear at the bottom of the iPod touch no matter what app screen you’ve swiped to. Since the docked apps always appear at the bottom of any app screen, it’s best to put the ones you use most frequently down there for quick access.

Figure 2–12. Creating a folder full of apps
File Sharing
Starting with iOS 4, Apple introduced a way to easily share files between the iPod touch and your computer. Beneath the File Sharing heading is an Apps box and a Documents box (see Figure 2–13). Any apps that are currently on your iPod touch that support drag-and-drop file sharing appear in the Apps list here. To share a file with an application, select the application in the Apps list, find the file on your computer you want to share, and drag it into the Documents list. You can also click the Add button at the bottom of the Documents list to browse for the file on your computer.
To transfer a file from your iPod touch back to your computer, select the file in the Documents list, click the “Save to” button at the bottom, and choose where you want to save the file on your computer. Alternatively, drag the file from the Documents list to your desktop.
To delete a file from an app that contains it, select the file in the document list, and press the Delete key on your computer. iTunes prompts for confirmation when deleting or replacing files. Click the Delete button in the confirmation dialog to complete the deletion. At this time, you cannot delete folders or read the contents of files stored in folders in the documents list.
As long as a file is shared inside an app, it is always backed up when you sync your iPod touch to your computer.

Figure 2–13. Apps that support drag-and-drop file sharing and their enclosed documents
NOTE: Just because you can drag a file to an app’s Documents box doesn’t mean that the app can open it. Apps are limited to working with files that the iPod touch supports. For example, the iPod touch does not support Microsoft’s WMV video files. If you drag a WMV movie to an app, the app contains it but is still not able to play it. There is a workaround to this, however. If you download an app called Yxplayer (http://itunes.apple.com/us/app/yxplayer/id373751560?mt=8), those WMV files are playable!
The Ringtones Tab
You might see this tab and wonder why it’s there (Figure 2–14). After all, you have an iPod touch and not an iPhone. Well, the Ringtones tab is here because you can now make FaceTime video calls over Wi-Fi. When you receive a call, a ringtone notifies you. The Ringtones tab allows you to import custom ringtones you’ve purchased from the iTunes Store.

Figure 2–14. The Ringtones tab
To sync ringtones, select the Sync Ringtones box. Next, choose whether you want to sync all of your ringtones or just selected ones. If you choose “Selected ringtones,” the Ringtones box appears, listing all of the ringtones you have stored in iTunes. Check the ringtones you want to sync.
The Music Tab
The Music tab is pretty easy to understand (see Figure 2–15). Make sure the Sync Music check box is selected at the top. In the box below it are two radio buttons.

Figure 2–15. The Music tab allows you to select which songs, playlists, and artists you want to sync to your iPod touch.
Entire music library: When this is selected, the entire music library is synced to your iPod touch. Note that your entire library is synced only if you have the storage space available on your iPod touch. If you have more music than the iPod touch can hold, the remainder of the music stops syncing once the iPod touch is full.
Selected playlists, artists, albums and genres: Selecting this option displays four boxes listing all of the playlists, artists, and genres in your iTunes library. Go through and select the check boxes of the playlists, artists, and genres you want on your iPod touch.
Include music videos: Selecting this check box transfers any music videos associated with playlists, artists, or genres to the iPod touch.
Include voice memos: If you select this check box, any voice memos stored in your iTunes library are synced with your iPod touch.
Automatically fill free space with songs: This check box appears only if you’ve chosen the “Selected playlists, artists, and genres” radio button. If it’s selected, once all your other files (movies, books, photos, and so on) have been synced to your iPod touch, any leftover free space is filled with music. I don’t recommend selecting this option. It severely limits your ability to create any new documents on your iPod touch since there won’t be any space left in which to store them.
The Movies Tab
The iTunes Store offers a large collection of movies for rent or purchase that you can download and sync to your iPod touch. The Movies tab, shown in Figure 2–16, provides several ways of getting your movies onto the iPod touch.

Figure 2–16. The Movies tab allows you to select which movies you want to sync to your iPod touch.
To sync your movies, first make sure the Sync Movies check box is selected (see Figure 2–16). Three checkboxes are displayed on the Movies tab:
Automatically include: If this check box is selected, you’ll be able to access a drop-down list of preset options to make your movie syncing experience easier. From the drop-down list, you can choose to sync all your movies (not a good idea because one hour of video can take up to half a gigabyte of space) or decide to save some space.
If you’d like to go the space-saving route, select the 1, 3, 5, or 10 “most recent movies” preset. You also have the option of selecting the “all unwatched” movies preset, which adds all the movies in your library that have not been watched yet. Other preset options include syncing 1, 3, 5, or 10 of your “most recent unwatched movies” or 1, 3, 5, or 10 of your “least recent unwatched movies.”
Movies: If the “automatically include” check box is selected and the drop-down list is set to anything but “all,” you also have the option of selecting additional movies from your iTunes library. With the “automatically include” box unchecked, you can manually select as many of your movies as you want (see Figure 2–17).

Figure 2–17. The Movies check box allows you to select individual movies to sync to your iPod touch.
Include Movies from Playlists: This box, shown in Figure 2–18, provides the option of including movies found in your iTunes playlists.

Figure 2–18. This box allows you to sync movies from your iTunes playlists.
The TV Shows Tab
The iTunes Store offers large collections of TV shows available for purchase and download. All of these shows can be synchronized to your iPod touch for viewing. You can purchase individual episodes à la carte or buy a Season Pass. With the latter choice, you pay for the entire season at once, often at a slight discount, and new episodes are automatically downloaded as they become available.

Figure 2–19. The TV Shows tab allows you to select the shows you want to sync to your iPod touch.
To sync TV shows, first make sure that the Sync TV Shows check box is selected (see Figure 2–19). On the TV Shows tab below are three check boxes similar to those on the Movies tab.
Automatically include: Select this check box to access a drop-down list of preset options to simplify your TV show syncing experience. From the drop-down list, you can choose to sync all your TV shows; again, this is not a good idea if you have a lot of shows because one hour of video can occupy up to half a gigabyte of space. There is also an “all unwatched” option and several presets including syncing only the newest shows, the newest unwatched shows, or the oldest unwatched shows. With all these options, you can apply the preset to all shows or just selected TV shows.
The Shows and Episodes boxes: If the “automatically include” check box is selected and set to anything but “all,” you also have the option of selecting additional TV shows from your iTunes library (see Figure 2–20). With the “automatically include” check box deselected, you are able to manually select as many of your TV shows as you want.

Figure 2–20. The Shows check box allows you to select TV series to sync to your iPod touch. In the box to the left you can select the episodes to sync.
Include Episodes from Playlists: This box gives you the option of including any TV show episodes found in your iTunes playlists (see Figure 2–21).

Figure 2–21. This box allows you to sync any TV shows found in your iTunes playlists.
The Podcasts Tab
Many people use iTunes to subscribe to their favorite podcasts. Podcasts are audio programs delivered over the Internet, much as TV shows are delivered over the airways. Numerous podcasts are available, with topics ranging from entertainment and advice to how-to shows, politics, news, and much more. iTunes monitors your podcast subscriptions and can automatically download new shows when they become available. The Podcasts tab gives you control over which shows are synchronized to your iPod touch.

Figure 2–22. The Podcasts tab allows you to select the podcasts to sync to your iPod touch.
The Podcasts tab (see Figure 2–22) has a similar look and feel to the Movies and TV Shows tabs. To sync podcasts, first make sure the Sync Podcasts check box is selected. Below the check box are three boxes on the Podcasts tab.
Automatically include: Select this check box to access a drop-down list of preset options and customize your podcast syncing experience. From the drop-down list, you can select to sync all your podcasts. Syncing all your podcasts won’t take up as much room as movies and TV shows do if the podcasts in question are audio-only. However, if you are downloading video podcasts, the same space requirements apply as with movies.
In addition to the “all” option, there are “all unplayed” and “all new” options as well as several presets including syncing only the newest podcasts, the most recent/least recent unplayed podcasts, or the most recent/least recent new podcasts. These presets can be applied to all or just selected podcasts.
The Podcasts and Episodes boxes: If the “automatically include” check box is selected and set to anything but “all,” you also have the option of selecting additional podcasts from your iTunes library in this box (see Figure 2–23). With the “automatically include” check box deselected, manually select as many or as few of your podcasts as you want.

Figure 2–23. The Podcasts check box allows you to select podcasts to sync to your iPod touch. In the box to the left you can select which episodes of the podcast series to sync.
Include Episodes from Playlists: This box (see Figure 2–24) provides the option of including any podcast episodes found in your iTunes playlists.

Figure 2–24. This box allows you to sync any podcasts found in your iTunes playlists.
The Books Tab
One of the coolest features of the iPod touch is the ability to buy and read e-books or view your own PDFs in the iBooks app. We’ll delve into the iBookstore and the iBooks app in Chapter 8, but for now all you need to know is that the Books tab in the iPod touch preferences window is where you control what books and PDFs are synced to your iPod touch (Figure 2–25).

Figure 2–25. The Books tab allows you to select which books you want to sync to your iPod touch.
Make sure the Sync Books check box is selected. In the box below it are two radio buttons: “All books” syncs every book in your iTunes library, and “Selected books” allows you to sync only the books and/or PDFs selected in the Books box further down the page (see Figure 2–26).
NOTE: Even if you have 300 books in your iTunes library, you might as well sync them all. An e-book takes up very little storage. As a matter of fact, War and Peace, one of the largest ever written (and also one of the greatest), takes up only 1.2MB of storage. That’s more than 50 percent less than a single three-minute 128Kbps AAC music file. Illustrated books take up more space, but even then they won’t take up any more storage than a few MP3s would. Don’t worry about a cluttered library, either. You’ll learn how to organize your books in Chapter 9.

Figure 2–26. The Books check box allows you to select individual books to sync to your iPod touch.
Below the Books box is a check box in front of Sync Audiobooks (see Figure 2–27). Again, there are two options: “All audiobooks” or “Selected audiobooks.”

Figure 2–27. The Sync Audiobooks interface
With “All audiobooks” selected, the audiobooks in your iTunes library are synced with your iPod touch. If you choose “Selected audiobooks,” you’re presented with the familiar layout you’ve seen on the other media tabs.
The Audiobooks and Parts boxes: In the Audiobooks box, you can manually select which audiobooks you want to sync. Some audiobooks have separate files, or parts, that designate chapters (see Figure 2–27). You can select only the parts you want to sync for any audiobook in the Parts box. If the “automatically include” check box is selected and set to anything but “all,” you also have the option of selecting additional audiobooks from your iTunes library. With the “automatically include” check box deselected, feel free to manually select as many or as few of your audiobooks and their chapters as you want.
Include Audiobooks from Playlists: This box gives you the option of including any audiobooks found in your iTunes playlists (see Figure 2–28).

Figure 2–28. This box allows you to sync any audiobooks found in your iTunes playlists.
NOTE: Unlike e-books, audiobooks can be quite large since they are basically very long audio files. If you have dozens of audiobooks, you may want to transfer only a select few to save space.
The Photos Tab
The ability to view my photos on the iPod touch was pretty low on my list of reasons to buy one. Ironically, viewing photos is now one of my favorite things to do with my iPod touch. I’ll discuss viewing photos on your iPod touch in Chapter 11, but for now I’ll say that the experience is so much better than viewing photos on your desktop. There’s nothing like physically holding digital photos in your hand and swiping through them on the gorgeous display of the iPod touch.
To get photos onto your iPod touch, make sure the “Sync Photos from” check box on the Photos tab is selected (see Figure 2–29), and then choose where you want to sync your photos from. On the Mac, your options will be iPhoto 4.0.3 or newer, Aperture 3.0.2 or newer, or any folder on your computer. On a Windows computer, your options will be Adobe Photoshop Elements 3.0 or newer or any folder on your computer.

Figure 2–29. The Photos tab allows you to select which photos you want to sync to your iPod touch.
In the box below the check box, there are three options:
All photos, albums, events, and faces: Selecting this option syncs every photo from your selected photo application or folder onto the iPod touch. Again, I recommend against this if your photo collections are as large as mine (I have somewhere around 80GB of travel photos on my Mac). If you have only a few thousand photos, load ’em up!
NOTE: The first-generation iPod touch devices do not have a built-in camera, but you can still add photos from another digital camera to your iPod touch via the Camera Connection Kit. The $29 kit (available at www.store.apple.com) includes two adapters—one for connecting a camera through a USB 2.0 cable and the other for reading SD memory cards.
Selected albums, events, and faces, and automatically include: Selecting this option displays boxes for albums, events, and faces further down the page (see Figure 2–30). From these boxes you can choose which iPhoto photo albums and events to sync. You can also choose whether you want to sync faces. Faces is a feature in iPhoto that uses facial recognition capabilities to create collections of photos in which a certain person appears.
When you select any of the check boxes next to a certain album, event, or face, the photo count of that selection is displayed to the right. Choosing the “Selected albums, events, and faces, and automatically include” option, you are presented with a drop-down list of options allowing you to select all, none, or a preset date-specific range of iPhoto event collections.
Include video: When this check box is selected, any videos made with your digital camera that appear in any of your selected albums are transferred to the iPod touch. Keep in mind that video can quickly use up storage space.

Figure 2–30. Choose which iPhoto photo albums, events, and faces to sync.
The Info Tab
The last tab is the Info tab (see Figure 2–31), and it’s all about you. This is the tab that allows you to get your most personal information synced with the iPod touch, including contacts, calendars, and e-mail. This tab has five sections: Sync Address Book Contacts, Sync iCal Calendars, Sync Mail Accounts, Other, and Advanced.

Figure 2–31. The Info tab allows you to sync your mail accounts, contacts, calendars, bookmarks, and notes.
If you have been using Outlook on Windows or Mail, iCal, and Address Book on a Mac, then you’ll already have everything you need to sync your information to your iPod touch. You just need to tell the iPod touch how you want to sync that information.
NOTE: If you are using Apple’s iCloud service (www.icloud.com), the Sync Address Book Contacts and Sync iCal Calendars options are unselected after your first iPod touch sync, and a message states that your contacts and calendars are being synced over the air via iCloud.
Sync Address Book Contacts
To sync your address book contacts, you need to be using one of the following applications: Address Book, Microsoft Entourage 2004, Microsoft Entourage 2008, or Microsoft Outlook 2011 on a Mac or Windows Address Book, Microsoft Outlook 2003, or Microsoft Outlook 2007 on Windows.
Select the Sync Address Book Contacts check box (see Figure 2–32), which gives you the option of syncing all the contacts in your address book or just those from selected groups.
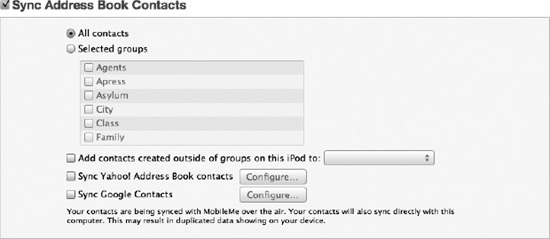
Figure 2–32. Your address book syncing options
Add contacts created outside of groups on this iPod to: When this check box is selected, a drop-down list of all your address book groups appears. If you create a new contact on your iPod touch and don’t assign the contact to a group, that contact is automatically put into the group you select here.
Sync Yahoo! Address Book contacts: When this check box is selected, Yahoo! Address Book contacts are automatically synced with your iPod touch address book. You must agree with the dialog box that asks you to acknowledge that you are allowing the iPod touch to sync to your Yahoo! account. Next, you are asked to enter your Yahoo! ID and password. Once you’ve done this, your contacts are set to sync. Clicking the Configure button allows you to enter a different Yahoo! ID.
Sync Google Contacts: When this check box is selected, Google contacts are automatically synced with your iPod touch address book. You must agree with the dialog box that asks you to acknowledge that you are allowing your iPod touch to sync to your Google account. Next, you are prompted to enter your Google ID and password. Once you’ve done this, your contacts are ready to sync. Clicking the Configure button allows you to enter a different Google ID.
Sync iCal Calendars
To sync your calendars, you need to be using one of the following: iCal, Microsoft Entourage 2004, Microsoft Entourage 2008, or Microsoft Outlook 2011 on a Mac or Microsoft Outlook 2003 or Microsoft Outlook 2007 on Windows.
To set up calendar syncing, select the Sync iCal Calendars check box (see Figure 2–33). Just like with contacts, you then have the option of syncing all your calendars or just selected ones.

Figure 2–33. Your calendar syncing options
Do not sync events older than: With this check box selected, events that are more than a specified number of days old are not synced. The default number of days is 30, but you can enter anything up to 99,999 days.
NOTE: A great place to find premade calendars for holidays, school events, or your favorite sporting teams is at www.icalshare.com.
Sync Mail Accounts
All of the mail accounts you have set up in Mac OS X’s Mail or Microsoft’s Outlook appear here (Figure 2–34). You have the option of selecting or deselecting any of the accounts. Accounts that are not selected do not appear in the iPod touch’s Mail app.

Figure 2–34. Your e-mail account syncing options
Other
Apple should really have named this section “Bookmark and Notes Syncing,” but it opted for “Other.” Here you can sync bookmarks from the web browser on your computer to the Safari web browser on the iPod touch (see Figure 2–35). Again, if you have a MobileMe or iCloud account, your bookmarks are synced over the air. If not, select the Sync Bookmarks check box, and choose your browser from the drop-down menu. On the Mac, bookmark syncing is supported for Safari. On a Windows computer, bookmark syncing supports Safari and Microsoft Internet Explorer 7 and newer.

Figure 2–35. Your bookmark and note syncing options
This section also allows you to sync notes to your iPod touch. Note syncing works only with Mac OS X Mail or Microsoft Outlook 2011 on a Mac or Microsoft Outlook 2003 or 2007 on Windows. To enable note syncing, select the check box.
Advanced
When selected, this section allows you to replace contacts, calendars, mail accounts, and notes on the iPod touch with information from your computer (see Figure 2–36). This is a handy feature if your information gets out of sync and you want to make sure that everything you see on your computer matches what is on the iPod touch.

Figure 2–36. Your advanced syncing options
When you select the respective check boxes, iTunes overwrites the information on your iPod touch during the next sync only. After that sync, normal syncing resumes between your iPod touch and computer.
NOTE: If your calendars and contacts are being synced via iCloud, you will not be able to select their check boxes in the Advanced section.
iTunes Device Settings
iTunes has several preferences for the iPod touch. To access these on a Mac, launch iTunes and select iTunes ![]() Preferences from the menu bar, or select Edit
Preferences from the menu bar, or select Edit ![]() Preferences from the menu bar if you are using Windows. The Preferences window pops up with a series of icons running along the top. The only one we are interested in for the iPod touch is the Devices icon. Click the Devices icon (it looks like an iPod touch), and you’ll be presented with the Devices preferences window (see Figure 2–37).
Preferences from the menu bar if you are using Windows. The Preferences window pops up with a series of icons running along the top. The only one we are interested in for the iPod touch is the Devices icon. Click the Devices icon (it looks like an iPod touch), and you’ll be presented with the Devices preferences window (see Figure 2–37).
Here you’ll find settings for devices that interact with iTunes. These devices can include the iPod touch, iPad, iPhone, Apple TV, and AirPort Express.
Device backups: Any time your iPod touch is synced, iTunes creates a backup of its contents. Any backups of iPad, iPhone, or iPod touch devices are listed here. The name of the device is listed along with the date it was last backed up. Hover your cursor over the name of the iPod touch to view its serial number.
Although iTunes keeps multiple dated, partial backups of your device, it’s still a good idea to make copies of your backups on an external hard drive. iTunes places the original backup files in the following locations:

Figure 2–37. The iTunes Devices preferences window
Mac: ~/Library/Application Support/MobileSync/Backup/
Windows XP: Documents and Settings(username)Application DataApple ComputerMobileSyncBackup
Windows Vista: Users(username)AppDataRoamingApple ComputerMobileSyncBackup
The list of information backed up by iTunes is a long one:
- Safari bookmarks, cookies, history, and currently open pages
- Map bookmarks, recent searches, and the current location displayed in Maps
- Application settings, preferences, and data
- Contacts
- Calendars
- CalDAV and subscribed calendar accounts
- YouTube favorites
- Wallpapers
- Notes
- Mail accounts
- Autocorrect dictionaries
- Camera Roll
- Home screen layout and web clips
- Network settings (saved Wi-Fi hotspots, VPN settings, network preferences)
- Paired Bluetooth devices (which can be used only if restored to the same iPod touch that did the backup)
- Keychain (This includes e-mail account passwords, Wi-Fi passwords, and passwords you enter into web sites and some other applications. The keychain can only be restored from backup to the same iPod touch. If you are restoring to a new device, you will need to fill in these passwords again.)
- Managed configurations/profiles
- MobileMe and Microsoft Exchange account configurations
- App Store application data (except the application itself and its tmp and Caches folders).
- Per-app preferences allowing use of location services
- Offline web application cache/database
- Autofill for web pages
- Trusted hosts that have certificates that cannot be verified
- Web sites approved to get the location of the device
- In-app purchases
To delete an iPod touch backup, select it from the device backups list, and click the Delete Backup button. Confirm the deletion by clicking the Delete Backup button in the dialog that appears.
Prevent iPods, iPhones, and iPads from syncing automatically: Select this box if you want to disable automatic syncing when the iPod touch is connected to your computer. In order to sync, you’ll need to manually press the Sync button at the bottom of the iTunes preferences window for iPod touch.
Restoring
If you ever experience problems with your iPod touch, you can choose to restore it. There are two restore options: restore to factory default and restore from backup. Restoring to factory default restores your iPod touch to its original factory settings, as if you’ve just turned it on for the first time. Restoring from backup restores the iPod touch from its last saved backup file.
To restore to factory settings, select the iPod touch from the devices list in iTunes, select the Summary tab, and then click Restore (this deletes all data on iPod touch and restores to factory settings). When prompted by iTunes, select the option to restore your settings.
To restore from backup, right-click (or Ctrl+click) the iPod touch in the devices list in iTunes and select Restore from Backup. The iPod touch is restored from the backup selected from the “Device backups” list.
NOTE: If you’ve set up password encryption on your iPod touch backups (covered earlier in this chapter), you cannot restore from the encrypted backup if you forget the password. Be sure to choose passwords that are easy to remember!
Welcome to the Cloud
Along side iOS 5, Apple introduced two new cloud-based services: iCloud and iTunes Match. Before we discuss each of those, lets talk about what the “cloud” is exactly.
Cloud computing simply means that your data resides on external servers and not your computer’s hard drive. Though you may have created a document on your computer, it’s actually synced with an external server, so two perfectly identical copies of it exist simultaneously: one in the cloud and one on your computer.
As we get more devices like iPhones, iPods, Macs, and iPad, its nice to be able to pick up any device and be able to see all our music, documents, and photos on that device no matter if we created them on it or not. This is exactly what could computing allows us to do.
iCloud
Apple’s implementation of cloud computing is called iCloud. Put simply, iCloud stores all of your music, documents, TV shows, photos, and more and pushes them all to your different devices automatically. So if you create a document on your Mac in Pages, you can pick up you iPod touch, open the Pages app (if you’ve downloaded it) and see and edit the document you were just working on on your Mac.
There’s actually quite a bit of technology behind iCloud, but Apple doesn’t want users to think about that, so they designed it as simply as possible. All you need to do to take advantage of iCloud is set up a free iCloud account at www.icloud.com. Once you’ve done that, open up the Settings app on your iPod touch and select “iCloud.” Enter in your iCloud user name and password and you’re good to go.
We’ll discuss iCloud and all it’s feature throughout this book as it relates to the various apps in iOS 5. Until then, here is a brief overview of everything iCloud offers:
- iTunes in the Cloud: This feature allows you to download all your paid iTunes song purchases on any device. It will also automatically download a purchased song from one device onto all your other iCloud devices. No syncing needed.
- Apps and Books: Like your purchased music, and apps or books purchased from the App Store or iBookstore are download to all your devices automatically.
- Photo Stream: Any photo you take with an iCloud-enabled device is automatically pushed to all your other devices be they iPhones, iPod touches, Macs, or PCs.
- Documents in the Cloud: As mentioned before, and document you are working on in an iWork app, like Pages, Keynote, or Numbers, will automatically be pushed to all your deices.
- Backup: iCloud automatically stores backups of all of your purchased music, TV shows, apps, and books, photos and video in the Camera Roll, device settings, app data, home screen and app organization, messages (iMessage, SMS, and MMS), and ringtones in the cloud. Should you ever need to restore your iPod touch, all your information and data is waiting for you no matter if you are away from your computer.
- Email, calendars, address book, bookmarks, notes, and reminders: All iCloud members get a free email account with calendars and an address book as well. In addition to that, iCloud members can sync notes, reminders, and bookmarks across devices.
- Find My Friends: This is an app that allows you to share your location and see the location of your friends on a map.
- Find My iPod touch: This app allows you to track down your lost or stolen iPod.
As mentioned earlier, we’ll discuss all the features of iCloud as they relate to your apps throughout this book. The only thing left to mention here is iCloud’s system requirements: Users need an iPhone 3GS or later, iPod touch third generation or later, iPad, iPad 2, a Mac running OS X 10.7 or later, or a PC with Windows Vista or Windows 7 or later. iCloud also requires iOS 5.
iTunes Match
Another new cloud feature Apple introduced alongside iCloud is iTunes Match. iTunes Match is a paid service that costs $24.99 per year. It allows you to move your entire iTunes library to the cloud – even songs that you didn’t buy in iTunes.
So, if you’ve imported years worth of old CD’s, iTunes Match will “match” all the songs on your computer, and give you the latest versions encoded in high-quality 256-Kbps AAC DRM-free files. Whatever songs it can’t match in yoru library, it will then upload to the cloud, enabling you to automatically access all those songs from any iCloud device. Pretty cool, huh?
Summary
In this chapter, you explored options for syncing media and data with your iPod touch. You discovered where to get your media and how to make sure your iPod touch/iTunes sync preferences stick. To wind things up, here is a quick overview of some key points from this chapter:
- The preference selections and the way your iPod touch connects with iTunes are going to be familiar to you if you’ve used an iPhone or iPod before; however, there are some important differences with the iPod touch.
- The Capacity bar is always visible in the iPod touch preferences and is an easy indicator of how much storage is available on your iPod touch.
- No change made to the iPod touch preferences is complete until you click the Apply button. Likewise, if you accidentally make a change you don’t want, you can always click the Cancel button.
- It is important to manage what data you sync with your iPod touch. Syncing all of your music may not leave enough storage for photos and videos.
- Syncing apps is fun and easy using the visual representation of your iPod touch under the Apps tab. If you have a lot of apps, syncing can be a slow process. Waiting can be a pain, but it’s best never to interrupt a sync.
- Syncing of movies, music, TV shows, podcasts, books, and photos is pretty straightforward, and once you’ve mastered how to sync one form of media, the rest are a cinch.