Chapter 5
Touching Your Photos and Videos
With the iPod's Photos application, you can free your photos from your home computer and pass them around the room like you used to do with photos of old. Hand your iPod to your friends, and they can swipe through your photos in their hands without the need to huddle around a computer screen. In this chapter, you'll discover how to navigate your photo collections and share them with friends and family. You'll also become familiarized with all the video capabilities of the iPod touch.
The iPod touch's wide-screen playback offers beautiful, clear images at higher resolutions than ever before. Its touchscreen provides intuitive interaction controls. Its wireless Internet capabilities allow you to access a huge range of content—from YouTube to the Internet Archive to your own personal computer. Video on your iPod isn't just about buying a TV show on iTunes and synchronizing it. With your iPod touch, video has entered the Internet age. This chapter introduces you to both the expected and unexpected ways you can use video on your iPod.
Working with Photos
Before you can view your photos on the iPod touch, you first need to transfer them to the device. There are many ways you can do this: syncing photos from your computer, saving photos from e-mailed messages, saving images found on web pages, capturing screenshots, and taking photos with the iPod touch's camera. We discuss all but taking photos in this chapter. Taking photos and all of the iPod's camera features are covered in Chapter 13.
Syncing Photos from Your Computer
We discussed syncing photos to your iPod touch in Chapter 2, but let's touch upon it briefly again. iTunes can synchronize your iPod touch with pictures stored on your computer. This allows you to bring your photo collection with you and share it using the iPod's unique touch-based interface. Who needs to carry around thick and heavy physical photo albums when you have an iPod touch with its thin body and vibrant display?
To get started, connect your iPod touch to your computer, and launch iTunes. Select your iPod touch from the source list (the blue column at the left side of the iTunes window), and open the Photos tab. Check the box labeled “Sync photos,” and then choose the location of the photos you want to sync (see Figure 5–1). Your choices depend on your operating system.
On a Windows computer, your options are Adobe Photoshop Elements 3.0 or newer or any folder on your computer, such as My Pictures. On the Mac, your options are iPhoto 4.0.3 or newer, Aperture 3.0.2 or newer, or any folder on your computer. On a Mac you'll also need iPhoto 5.0 or newer, if you want to sync videos you've taken with your digital still camera.
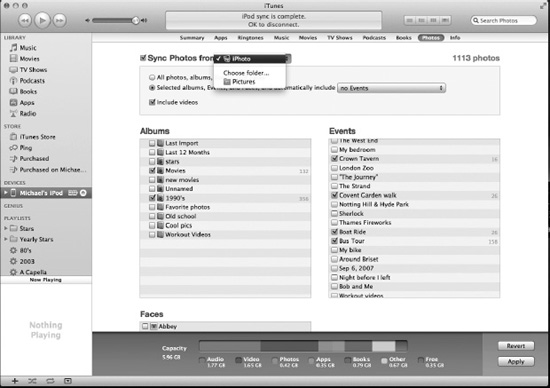
Figure 5–1. Syncing your photos through iTunes 10
After you choose where to sync your photos from, choose to sync your entire photo collection (a good choice for relatively small libraries) or individual albums (better for large libraries that might not fit on the iPod touch's limited storage space). In the latter case, pick only those albums you want to copy to your iPod touch.
If you are using a Mac and iPhoto or Aperture, you'll also have the option to sync Faces (iPhoto '09 or later) and Events (iPhoto '08 or later) albums. Faces are smart photo albums that contain all the photos that have a selected individual's face in them. iPhoto does this by using built-in facial recognition software. The software “learns” as you tell it that it has or hasn't matched the right image to the person. In my tests, Faces in iPhoto doesn't get the right match all of the time, but its accuracy isn't too bad. Events are another type of smart album that groups photos together that were taken on the same day. This helps eliminate clutter and keeps your photo library organized.
To finish, click Apply to save your changes and then sync.
Saving Photos from Mail and Safari
You can also store photos on your iPod touch without importing them from your computer or taking them with the iPod's camera. If someone e-mails you a photo, you'll see the photos appear in the body of the e-mail message in the iPod touch's Mail app. Tap and hold your finger on any photo, and a pop-up appears allowing you to save that one photo or all the photos contained in the e-mail (see Figure 5–2). The photo or photos you've selected to save appear in the Camera Roll in the iPod touch's Photos app.
Similarly, in the iPod touch's Safari web browser, you can tap and hold your finger on any photo in a web page and select the Save Image pop-up that appears (see Figure 5–2). That photo is saved to the Camera Roll in the iPod touch's Photos app.
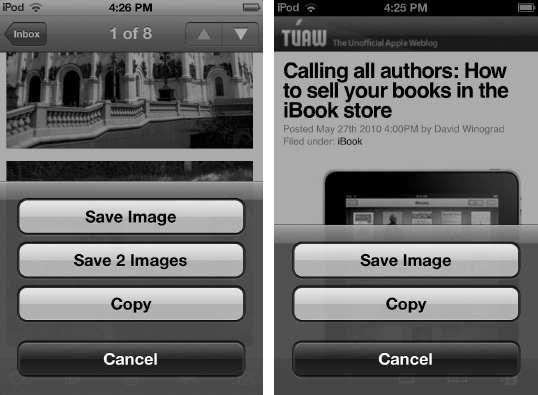
Figure 5–2. Saving photos from an e-mail (left) or a web page (right)
NOTE: Many third-party apps (like web browsers and magazines) also allow you to save images to your iPod touch. Some apps may have their own, unique way of saving images, but most methods should be fairly similar to the way you save images in Mail or Safari.
Navigating Your Photos in the Photo App
Now that you have photos on our iPod touch, let's start exploring the Photos app. To launch the app, tap the Photo icons on the home screen. It's the one with a yellow sunflower on it (Figure 5–3).
Figure 5–3. The Photos app icon has a yellow sunflower on it.
This is where the fun begins. When you touch your digital photos for the first time, you feel like you've finally stepped into the 21st century—that promised utopian future where technology merges with our fondest memories and we can go back and relive and explore them like never before. When you start pinching, dragging, and expanding your photos and albums, you'll feel like a child again who's just been given his first bag of marbles, spread them on the ground, and is staring wide-eyed at the colors and shapes that he can control before him.
To launch the Photos app, tap its icon on the home screen (see Figure 5–3). Once launched, the Photos app displays a list of albums, as shown in Figure 5–4.
Running along the bottom of the app is a toolbar that allows you to switch between the different ways your photos are organized. To select a view, tap its button in the toolbar.
NOTE: Did you know you can take screenshots of your iPod touch? A screenshot, or a screen capture, is an image taken of whatever appears on the iPod touch's screen at the moment you are taking it. To take a screenshot, press and hold the power button on the iPod touch, and then press and release the home button while still holding the power button. The iPod touch's screen flashes white, and you'll hear a shutter click sound effect. Once you hear the sound, you can let go of the power button. The captured screenshot appears in the Camera Roll album. You can use screenshots to save images of entire web pages or show off that high score in a video game. Most of the images in this book were taken using the iPod touch's screen capture function.
Albums: This view displays your photos in their albums as you've arranged them on your computer (see Figure 5–4). You will also see a Camera Roll album if you've saved images from the Web or if you've received them in e-mail on your iPod touch. If your iPod has a camera and you've taken any photos with it, they also appear in the Camera Roll along with any screen captures you may have taken.
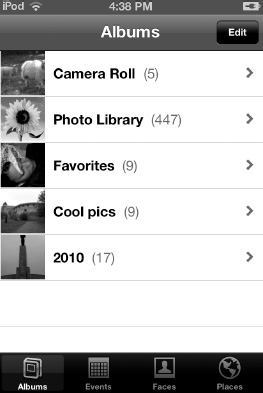
Figure 5–4. The Photos app in album view
NOTE: If you are using iCloud's Photo Stream feature, you'll see another album titled “Photo Stream.” Any photo you take with your iPod touch will appear here and be pushed to your other iOS devices and Macs and PCs automatically.
Events: This view displays your photos in events (see Figure 5–5). Events are used in Aperture 2 and iPhoto '08 and newer as a way to automatically arrange your photos by the date they were taken. This helps people automatically keep large photo libraries in easy-to-navigate shape. Events is a Mac-only feature. You will not see this tab if you are syncing your iPod touch with a Windows computer.

Figure 5–5. Events view
Faces: This view displays your photos grouped into an individual's “face” album (see Figure 5–6). If you are using iPhoto '09 or Aperture 3 on a Mac, the programs have built-in facial recognition software that creates albums of individuals and groups all the photos they appear in. It's an amazing and fun way to see all the photos of a certain friend or family member. Faces also works to some extent on cats and dogs. You will not see this tab if you are syncing your iPod touch with a Windows; Faces is a Mac-only feature.

Places: Many cameras today, including the one on the iPod touch, feature geotagging, which codes the photo with the location coordinates where it was taken. What the Places tab does is take the coordinates of your photos and display them on a Google map (see Figure 5–7). This is arguably the snazziest feature of Photos on iPod touch because it lets you navigate your photos on a map that you can view from a global level to a street level. It's an especially cool feature for travelers: you can see at a glance where you have been and just how much of the world is left to explore.

Red pins appear on the map signifying the geographic location of your photos. You can pinch and zoom on the map to get closer. As you do, you may see more pins appear on the map, signifying greater accuracy of the photo's coordinates (see Figure 5–8).
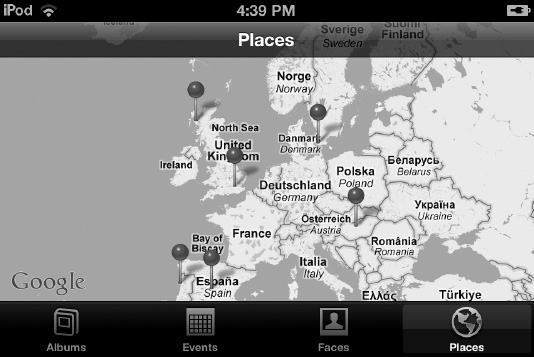
Figure 5–8. Note that more pins appear as you zoom into an area of the map, signifying greater accuracy of the photo's coordinates.
Tap a pin to see an album pop-up appear (see Figure 5–9). Tap the blue-and-white > to view that Places album. You can then explore all the photos that were taken in that location. Places requires an Internet connection to display the Google map.
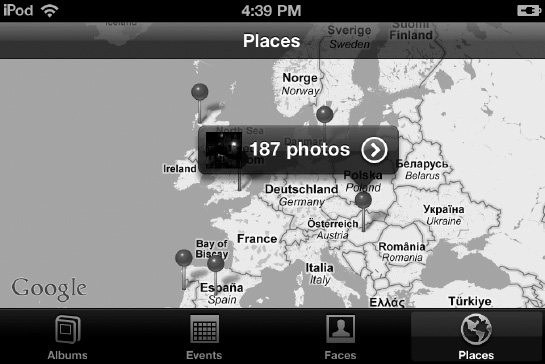
Figure 5–9. Tap a pin to see an album and thumbnail of photos that were taken at that location.
As you can now see, the iPod touch's Photos app organizes your photos into four views for easy navigation. It is important to note that you may not see all the views on your iPod touch. The view categories you see depend on whether you are using a Mac or a Windows computer, whether you have chosen to sync albums from each category view, and whether your photos are tagged with geocoordinates.
As long as you have one photo on your iPod touch, you'll always see the Albums tab. To see Events, or Faces, or Places, you'll need to sync them from your computer. You don't need to do anything to sync Places; its tab will appear automatically if you have any photos tagged with geocoordinates.
Touching and Viewing Your Albums and Photos
Now that you know how to navigate your photo collections, let's learn how to touch and view them. Remember all the gestures covered in Chapter 3? When viewing a collection of albums or a single image full-screen, the iPod touch allows you to interact with that album or photo using a number of these gestures.
Touching and Viewing Albums
For this section, an album will refer to a regular album, an Events album, or a Faces album, since the interactions with these are all the same. As you can see in Figure 5–4, there are a series of albums. To open the album, tap it, and you'll be taken to the album page (Figure 5–10).
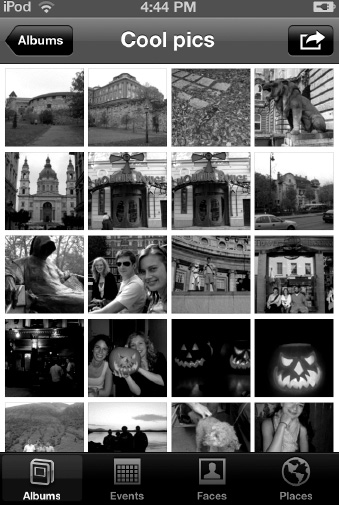
Figure 5–10. Photos inside an album
You'll notice the menu bar at the top of the screen. It displays the name of the album, with a back button that takes you to the category view you were previously in. It also shows a Share button (the arrow in the box in the top-right corner), which allows you to present your photos and share them with others (we'll talk the Share button a little later).
To exit the album, tap the back button (which is named after the category the album is in; in Figure 5–10, the album “Favorite photos” is contained in the Albums category, Albums being the back button in this example).
Remember, while on the Places tab, the red pins on the map act as albums containing all the photos taken there. Tap the pin to be presented with an album thumbnail (see Figure 5–9), and then tap the thumbnail to view the album of that location.
Touching and Viewing Photos
When in an album, you see thumbnails of the photos it contains (see Figure 5–10). To view a photo full-screen, tap the photo once to view it full-screen. As you can see from Figure 5–11, you can view the photo in portrait or landscape mode.
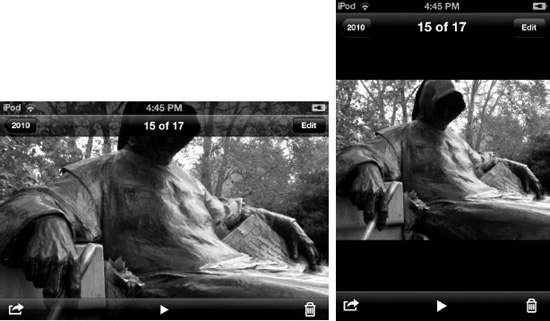
Figure 5–11. Viewing a photo in landscape and portrait mode
Once you display a photo full-screen, you have several ways to interact with it:
- Pinch to zoom into and out of the photo.
- Double-tap to zoom into the photo. Double-tap again to zoom out.
- When your image is displayed at the normal zoomed-out size, drag to the left or right to move to the previous or next image in the album. When zoomed into an image, dragging the photo pans across it.
While viewing individual photos, flip your iPod touch onto its side to have your photo reorient itself. If the photo was shot using landscape orientation, it fits itself to the wider view. Tap any image once to bring up the image overlay, as shown in Figure 5–11. The image overlay features a menu bar at the top and bottom of the screen.
The image overlay menu bar at the top of the screen displays the number of the selected image out of the total number of images in the album and the back button to return to the album. At the bottom of the screen is the Share button and also back, play, and forward buttons. The back and forward buttons move the photos in your album back or forth one at a time. The play button allows you to start a slide show, which we will discuss next.
Viewing Your Photos as a Slide Show
When viewing the contents of any album or a single image in any album, you'll see the Share and Slideshow buttons at the bottom of the screen. As the name suggests, the Slideshow buttons display the contents of a photo album, one image after another. We'll discuss the Share button after describing the slide show features.
Playing a Slide Show
Playing slide shows on your iPod touch is as easy as tapping a single button, namely, the play button that resides at the bottom center of the screen. When you tap it, your slide show begins displaying one photo in the selected album after the next. To stop a slide show, tap the screen.
Slide Show Settings
You do have some limited settings for controlling how your slide show is presented. To adjust these settings, you need to leave the Photos app and launch the Settings app on the home screen. Once in the Settings app, navigate to the Photo settings (Figure 5–12).
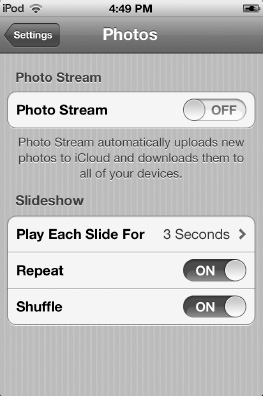
Figure 5–12. The slide show's settings
The Photos app slideshow settings:
Play Each Slide For: Here, you can set the amount of time each slide remains on the display. Your choices are 2 seconds, 3 seconds (the default, which works really well for most people), 5 seconds, 10 seconds (which starts to get boring fast), and 20 seconds (which is probably recognized officially by Amnesty International as torture for most humans; seriously, don't do this to your friends and family).
Repeat: When set to ON, the slide show plays continuously. In other words, when you get to the last slide in the slide show, it begins again at the first one.
Shuffle: Show your pictures in a random order by switching Shuffle from OFF to ON. When Shuffle is disabled, your pictures display in album order.
I'll talk about the Photo Stream setting in Chapter 13.
Slide Show Tips
Slide shows are an awesome way to share your photos with your friends and family. Remember, however, that our images are associated with our personal memories, so they are always going to be more pleasant for us to watch than for others. All you have to do is remember a time you were stuck looking at someone else's photos and the seconds ticked by as if they were hours. To keep slide shows exciting for your viewers, keep a few things in mind:
- Shorter is better: The average shot (a clip of video displayed between cutting away to another shot) in a movie or TV show is less than two seconds nowadays. Back in the 1950s, the average shot was 30 seconds long. Watch an episode of Friends and then an episode of I Love Lucy, and you'll see exactly what we mean. Lucy seems to trudge along so slowly by today's standards. As the world—and media—got faster, our attention spans shrunk. This applies to viewing still images too. People can take in a lot from an image in just two or three seconds. If they are forced to look at an image any longer, they start to get bored. Keep the time a single image is displayed short. Also, keep the entire length of the slide show short. When you watch a movie trailer in the cinema, its time is exactly two minutes and twenty seconds—a perfect amount to whet the appetite, show people the best shots, and leave them feeling fulfilled but not exhausted.
- Transitions help too: A transition is the effect that occurs when moving from one image to the next. It adds some visual flare to the change of images. Photo's slide shows allow you to choose between five transitions. Use them as eye candy to keep your audience entertained, but don't use any of the flashier ones if your slide show is really long. Stick to dissolve; others will get tiring.
- If you are having a party, a great way to show off your photos without wrangling up all your guests and forcing them to sit and watch is to project your slide show on a TV and set it to repeat. That way, your slide show is constantly playing in the background, and your guests can continue to catch glimpses of it as they mingle. Images on slide shows playing in the background are great conversation starters and allow you to play much longer slide shows and display individual images for longer, since you don't have to worry about a captive audience. If you are going to play your slide shows in the background, you can choose to show several thousand images for as long as five or ten seconds each; the entire show could run for hours, and it won't get boring or tedious.
Sharing Your Photos
You have a number of ways to share photos you have on your iPod touch. To access all the ways you can share your photos, bring up a photo full-screen, and tap the Share button, which looks like an arrow breaking free from a small box (see Figure 5–11). You'll be presented with a pop-up menu of sharing options (see Figure 5–13).
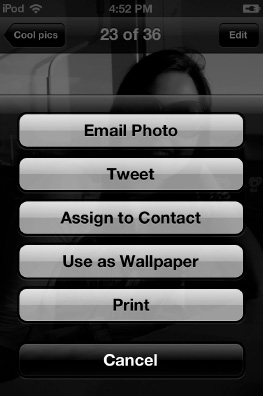
Figure 5–13. The sharing photos menu
E-mail Photo: Tap this to see an e-mail compose window appear on the screen. You'll notice the photo has been copied into the body of the e-mail already. Enter the recipient's e-mail, a subject, and some body text, and then tap Send; your photo is on its way!
Alternatively, you can e-mail up to five photos at a time from within the Photos app. While in an album, tap the Share button, and you'll see the album menu renamed to Select Photos. Tap up to five photos that you want to send, and then tap the Share button at the bottom of the screen (see Figure 5–14). A pop-up menu appears with a button that says E-mail. Tap this button, and an e-mail compose window appears on the screen with the photos in the body of the message.
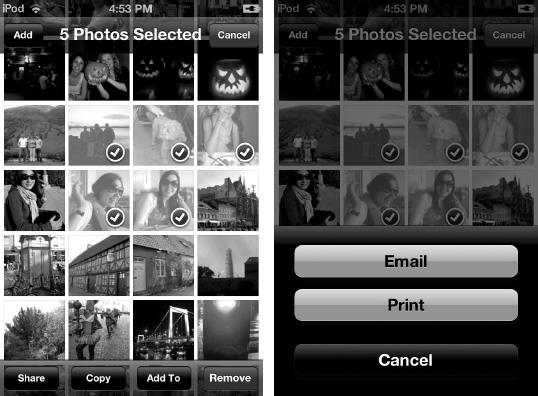
Figure 5–14. You can e-mail up to five photos at a time from within the Photos app.
Tweet: Tapping Tweet opens a Twitter upload screen. This allows you to tweet your picture directly to your Twitter account. You can also add a short message to the photo and your current location (see Figure 5–15).

Assign to Contact: This option allows you to assign a photo to an address book contact. Tap Assign to Contact, and then select the contact's address book entry from the pop-up menu. Move and scale the thumbnail of the photo that appears, and then tap the Set Photo button.
The next time you view the contact in the iPod touch's Contacts app, the image you selected for them appears next to their name. This image syncs with their contact info in Address Book, Entourage, and Outlook on a Mac, and Outlook on a Windows computer.
Use as Wallpaper: Tap this button to use the selected image as wallpaper on your iPod touch. Move and scale the image, and then tap Set. From the pop-up menu (see Figure 5–16), you can select whether you want to use the image for the iPod touch's lock screen, the home screen, or both. This isn't the only way to set your iPod touch's wallpaper options. We'll talk about the other way in Chapter 15.
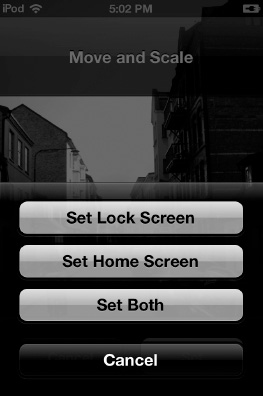
Figure 5–16. The wallpaper menu bar options let you select which screen you want to use the photo as wallpaper for.
Print: Tapping this prints your selected photo to an AirPrint wireless printer. Alternatively, you can print multiple photos from within the Photos app. While in an album, tap the Share button, and you'll see the album menu renamed to Select Photos. Tap as many photos as you want to print, and then tap the Share button at the bottom of the screen (see Figure 5–14). A pop-up menu appears with a Print button. The photos are sent to your wireless AirPrint printer.
Copying Photos
You can copy up to five photos at a time in your photo albums. To do this, go into a photo album, and tap the Share button. Tap up to five of the photos in the album. A check mark appears on each selected photo (see Figure 5–17). After you have selected all your photos, tap the Copy button in the lower-right corner of the screen. This saves the images to your clipboard for use in pasting into other things (such as an e-mail or document) later.
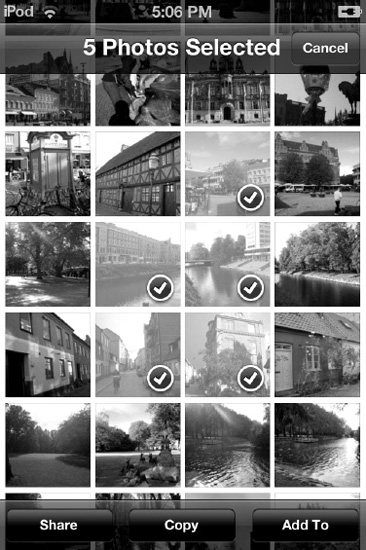
Figure 5–17. Copying photos. You can copy only up to five at a time.
Adding Photos to an Album
You can add photos on your iPod touch to other albums on your device. You can also create new albums right on your iPod touch. To add photos to an existing album or create a new album, go into a photo album, and tap the Share button. Tap all the photos that you want to move to an existing album. A check mark appears on each selected photo (see Figure 5–17). After you have selected all your photos, tap the Add To button in the lower-right corner of the screen. The pop-up menu shown in Figure 5–18 appears.
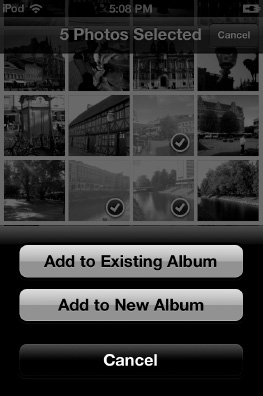
Figure 5–18. Adding photos to new or existing albums
To add photos to an existing album, tap Add to Existing Album and then choose the album you want to add your photos to from the album list that appears on the screen. To create a new album with photos on your iPod touch, tap Add to New Album and then enter the name of the new album in the dialog box that appears. The new album appears in your albums list.
Deleting Your Photos
Apple made it so you can only delete photos that are part of the Camera Roll album. This album contains any photos you have saved from the web or an e-mail or that you took with your iPod touch's camera. Apple disabled deletion of photos from your other albums synced to your iPod touch because they didn't want users accidentally deleting photos they had stored on their computer.
To delete the photos, navigate to your Camera Roll album, and tap the Share button. Tap the photos you want to delete to make a check mark appear on them, and then tap the red Delete button (see Figure 5–19). Alternately, while displaying a photo full-screen in your Camera Roll album, you'll notice a garbage pail icon next to the Share button (see Figure 5–20). Tapping this button causes a Delete Photo confirmation pop-up to appear. Tap Delete Photo to delete the selected photo from your iPod touch.
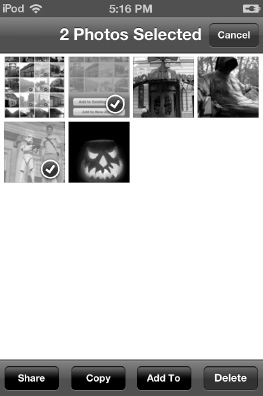
Figure 5–19. You can only delete photos on the iPod touch from the Camera Roll.

Figure 5–20. The trash can icon in the lower-right corner of a photo in the Camera Roll album.
To delete other photos on your iPod touch, you must delete them on your computer first and then resync the iPod touch.
Editing Your Photos
With iOS 5, Apple has introduced photo editing to the Photos app. The photo-editing features aren't too advanced, but they do allow you to make some nice adjustments to your photos. Apple has including four editing tools: rotate, enhance, redeye reduction, and cropping. To edit a photo, select a photo from your albums, and then click the Edit button in the top-right corner to enter Edit mode.
Figure 5–21 shows you what edit mode looks like in the Photos app. Your four editing tools are displayed along the bottom of the screen.

Figure 5–21. Editing a photo. The tools, from left to right: rotate, enhance, redeye reduction, and crop.
Rotate: Rotating a photo is something almost everyone has done or needs to do. Usually when a photo needs to be rotated, it's because you took it in portrait, or vertical, orientation with your camera, but it was imported in the standard landscape, or horizontal, orientation. Tap this button (it looks like a curved arrow) to rotate the photo in 90-degree increments. Click the yellow Save button when you've finished rotating your photo.
Auto-Enhance: Sometimes you might take a beautifully composed photo, but the color or exposure may be off. When this happens, there's no need to panic! The Photos app has a one-click fix for most photos with ailments such as poor saturation or contrast. It's called the Enhance button, and it works almost like magic. Tap the Enhance button (it looks like a magic wand) to auto-enhance your photo. Enhancing a photo can really bring out details that would normally have remained hidden without doing advanced manual adjustment techniques on it in a dedicated photo-editing app. Click the yellow Save button when finished enhancing your photo.
Red-eye reduction: Ah, red-eye -- the scourge of photographers everywhere. We're all familiar with red-eye. It's the thing that makes us look like demons in photographs: the red halo that appears in people's eyes that is caused by the way the human eye reflects the camera's flash. Luckily, most of the cameras on the market today offer built-in red-eye reduction, but the iPod touch does not. However, if your iPod touch takes photos in which your friends look like they're about to unleash some heat vision, the Photo app's red-eye reduction tool makes it easy to eliminate the red tint.
To eradicate red-eye in your photos, tap the red-eye tool (it looks like a red dot with a line through it). Next, tap each eye of the person (Figure 5–22). Like magic, their red eyes gain a more natural color. Click the yellow Apply button when finished.

Figure 5–22. Reducing red-eye in your photos. In this photo, the right eye has had red-eye reduction applied, while the left eye has not.
Crop: You can crop your photos to remove unwanted portions of them. To crop a photo, tap the Crop button (it looks like a square), and crop gridlines appear (Figure 5–23). Drag the gridlines around until you've selected the portion of the photo you want to crop. Click the yellow Crop button to apply the crop.
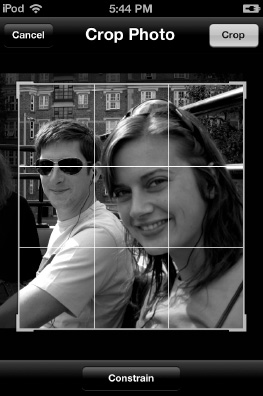
You can also constrain the aspect ratio of the crop so you'll know the exact ratio between the height and width of the photo once you are done cropping it. To constrain a photo's aspect ratio, click the Constrain button at the bottom of the crop screen (Figure 5–23). The Constrain screen appears (Figure 5–24).
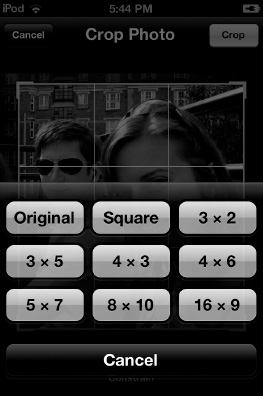
Figure 5–24. Constraining a crop's aspect ratio
Tap the desired aspect ratio. That locks the crop box to that specific ratio. You can then drag the constrained crop box around knowing that no matter where you crop, the photo has the selected ratio. Tap the yellow Crop button when ready to crop your photo, and then tap the yellow Save button to save your cropped photo.
iPod Video Applications
Video forms such a basic component of your iPod that you shouldn't think about it as just a single application. Apple provides the base technology used by several different programs. You'll find several applications that support video playback on your iPod (see Figure 5–25).

Figure 5–25. Your iPod touch provides not one but three different applications that support video playback: Safari, YouTube, and Videos.
Videos: The Videos application appears on the home screen of your iPod. The icon looks like a traditional clapperboard, with a black-and-white striped top over a blue base. This application plays back TV shows, movies, podcasts, iTunes U lessons, and music videos you've synchronized from your home iTunes library.
YouTube: You'll find the YouTube application icon next to the Videos app in Figure 7-1. The icon looks like an old-fashioned TV, complete with a greenish screen and brown dials. YouTube connects to the Internet and allows you to view videos from YouTube.com. You can navigate to http://youtube.com in Safari on the iPod and browse YouTube videos that way, but the iPod's YouTube app wraps http://youtube.com in such a nice and easy-to-navigate package, you'll find it is leaps and bounds better than using YouTube in a web browser.
Safari: Safari, which you read about in depth in Chapter 4, offers a third way to view videos. Like its computer-based equivalents, the Safari app allows you to watch embedded movie files. Safari's icon looks like a light blue compass with a needle pointing to the northeast.
In addition to the three apps that play video that come with the iPod, there are thousands of other apps that play video. You can discover all these apps in the iTunes Store. Some of my personal favorites are the BBC News app to view news footage and the Weather Channel app to watch weather-related news stories and Doppler video.
NOTE: Apple's iPod touch officially supports H.264 video, up to 720p, 30 frames per second, in .m4v, .mp4, and .mov file formats.
For all that the iPod brings to video, it has limits. Your iPod plays H.264 MPEG-4 video, and that's pretty much it. As we talked about in the previous chapter, you cannot use your iPod to view Flash/Shockwave videos or animation. You cannot play AVI videos. You cannot play DivX, Xvid, or any of the other dozens of popular formats. If your video isn't in MPEG-4 H.264 format, your iPod won't understand it.
Video Playback
iPod video is primarily a wide-screen feature, unlike audio, which plays back in both portrait and landscape orientations. You must usually flip your iPod on its side to view TV shows, video podcasts, movies, and music videos. Select any video—from Safari, YouTube, or Videos—to begin playback, and then flip your iPod on its side to watch. The Home button goes to your right. Safari and YouTube provide exceptions to the landscape-only rule; in those applications, you can also watch videos in portrait orientation.
Depending on the app you are watching it in, you may see more options for the video being played or for the app itself. However, most apps display the same elements in the video interface, meaning once you know how to control video playback in one app, you know how to do it in the rest of them. Here is a quick overview of those controls, which are shown in Figure 5–26.

Figure 5–26. The iPod's video playback controls allow you to control playback as you watch.
Play/Pause: Play/Pause appears as either a right-pointing triangle (Play) or a pair of vertical lines (Pause). Tap this button to pause or resume video playback.
Rewind: The Rewind button appears as two triangles pointing left to a line. Tap it to return to the start of the video, or press and hold the button to scan backward.
Fast-Forward: The reverse of Rewind, the Fast-Forward button's triangles point to the right instead of the left. Press and hold this button to scan forward. Tap it to skip to the next video track.
Scrubber bar: The scrubber bar appears at the top of your screen. It is a long line with a small knob that you can drag. (The volume control is the thicker bar at the bottom.) Drag the playhead along the scrubber bar to set the current playback time.
Zoom: The Zoom button looks like two arrows pointing away from each other, at the top-right of your screen. Either double-tap the screen or tap the Zoom button to switch between full-screen mode and original aspect ratio. To get back into the original aspect ratio's view, double-tap the screen again, or tap the zoom button again. You'll note that the zoom button changes slightly when viewing a video full-screen: the arrows have turned into a letterbox icon. When viewing in full-screen mode, you use the entire iPod screen, but some video may be clipped from the top or sides of the video. In original aspect ratio, you may see either letterboxing (black bars above and below) or pillarboxing (black bars to either side), which results from preserving the video's original aspect ratio.
Volume: The volume control is the large line below the play/pause buttons. Drag the volume control knob to adjust playback volume. Of course, you can always use the dedicated physical volume button on the side of the iPod as well.
Audio tracks and Subtitles: If alternate audio tracks or subtitles are available in the video you are watching, you'll see an icon that looks like a speech bubble, appear in the play/pause bar. Tap this icon to select from a pop-up list of audio tracks and subtitles.
Done: The Done button appears on all video application screens. Tap Done to exit video playback. Press the physical Home button on the iPod's bezel to quit the app and return to your home screen.
While you're playing a video, the iPod automatically hides your video controls after a second or two. This allows you to watch your video without the distraction of on-screen buttons. Tap the screen to bring back the controls. Tap the screen again to hide them, or leave them untouched for a few seconds, and they once again fadeaway.
YouTube
The YouTube app requires an Internet connection, so as long as you have a Wi-Fi connection, you're all set. But to take full advantage of the YouTube app, you'll want to have a YouTube account. You don't need a YouTube account to use the app, but having one makes the app that much more powerful. With a YouTube account, you can view and bookmark your favorite videos; subscribe to YouTube users videos; see all the videos you've uploaded to YouTube with the tap of a button; and share, rate, and flag videos—all from within the YouTube app. Creating a YouTube account takes only a few minutes and can be done at www.youtube.com/create_account.
To launch the application, tap the YouTube icon, which looks like a retro-styled TV set (see Figure 5–27). When launched for the first time, the application displays the Featured screen, as shown in Figure 5–28. This screen showcases YouTube's notable videos.

Figure 5–27. The YouTube app

Figure 5–28. YouTube's Featured screen provides a video showcase.
Here are a few items you'll find on most YouTube video-listing screens:
Play a video: Tap the image or name of a video to begin playback. Your iPod connects to YouTube, downloads the video, and plays it for you.
View a video's info screen: Tap the More Info button (the blue circle with the right arrow) to learn more about the video. Read more about the info screen later in this chapter, in the “Viewing Video Info Screens” section.
Select another listing screen: Choose any button along the bar at the bottom of your screen. You'll jump to the associated built-in YouTube screens: Most Viewed, Search, Favorites, and so on. Each of these screens helps you find and view YouTube videos. You can customize this buttons bar to change the buttons it contains.
Playing YouTube Videos
To play a video, tap the name or image of the video. The video appears in full-screen, as shown in Figure 5–29.

Figure 5–29. Playing a YouTube video
From this screen you can interact with the video in the following ways:
Scrubber: At the top of the screen you'll see the scrubber bar. This allows you to scrub, or advance or go back, through a video. The silver dot symbolizes where you are in the video, and the white part of the scrubber bar symbolizes how much of the video has downloaded. You can skip ahead to undownloaded portions of the video, and the YouTube app starts downloading the video from that point on.
Bookmark: The bookmark button looks like a book and allows you to save a video to your favorites for easy, quick access.
Rewind, play/pause, and fast-forward: These standard buttons allow you to rewind, play or pause, and fast-forward through a video.
Share: This Share button allows you to send an e-mail with a link to the YouTube video in the body of the message. You can also add the video to your Favorites or tweet a link to the video. This allows you to share your favorites immediately after you watch them.
Volume slider: Located at the bottom of the screen, this allows you to adjust the volume of the video to the most comfortable audio levels.
Done: Tap this button in the upper-left corner to exit the video and return to its Info page.
Finding YouTube Videos
Each button on the buttons bar offers a different way to list YouTube videos. To find videos, tap any of these buttons:
Featured: This screen lists videos reviewed and recommended by YouTube staff. These are usually pretty high quality and worth checking out.
Most Viewed: This screen lists the most popular videos of the day, week, or all time. The All Time screen is great, because it's interesting to see a list of the planet's most-viewed videos.
Search: On this screen, enter a keyword or two, and then tap Search to look through YouTube's entire collection.
Favorites: This screen is for a collection of videos you've selected and bookmarked. Easy access to your favorite videos is always a plus because it saves you time from searching for them again.
More: Choose from six more viewing choices or customize the display:
Most Recent: Showcases YouTube's newest items. Some might be good; others not.
Top Rated: Lists YouTube's collection of videos that have garnered the most viewer support. This is the wisdom of the masses, so starred videos might not equal quality in every case.
History: Displays recently viewed items. This is handy if you remember you watched a hilarious video but can't remember the exact name of it.
My Videos: Displays all the videos you've uploaded to YouTube. This feature requires you to be logged in to your YouTube account.
Subscriptions: Allows you to subscribe to another YouTube user's videos so you can keep up-to-date with the latest videos they've posted. Any subscriptions you have show up on this screen. Tap the name of the user to see all their videos displayed to the left of the list. This feature requires you to be logged in to your YouTube account.
Playlists: Creates playlists of videos. When signed in, you can see any playlists you've created on YouTube.com. Playlists are handy because it lets you group related videos together (for example, exercise videos).
Edit lets you choose which items appear on your shortcuts bar and which appear on the More screen.
On each of these screens, you can scroll up and down the listings and play back any video by tapping its name or icon.
Customizing the YouTube Buttons Bar
The buttons bar at the bottom of your screen is fully customizable, so it can provide quick access to the categories you view the most. Tap More ![]() Edit to make changes. Available categories appear in the screen above the bar, as shown in Figure 5–30. Select the ones you want to use, drag them down to the buttons bar, and then tap Done.
Edit to make changes. Available categories appear in the screen above the bar, as shown in Figure 5–30. Select the ones you want to use, drag them down to the buttons bar, and then tap Done.

Figure 5–30. Use this Configure screen to choose which buttons appear in the bar at the bottom of the YouTube application.
Here are a few pointers about how this customization works:
- The buttons bar always contains four category buttons plus the More button. You cannot add more buttons or remove buttons to display fewer options.
- You cannot replace More with another button.
- If you replace a button with an item already in the buttons bar, the two items switch positions.
- There is no “revert to defaults” option. The original order is Featured, Most Viewed, Search, and Favorites.
- The items you do not include in the buttons bar appear as a list when you tap More. You can select them from that list. It's an extra step, but all the options are still available.
Viewing Video Info Screens
Video information screens provide a detail view for each video. Figure 5–31 shows a typical info screen. Here, you'll find the name of the video, its rating (in stars, from zero to five), the number of times the video has been viewed, its run time, and more. Scroll down the screen to find YouTube's suggestions for related videos.
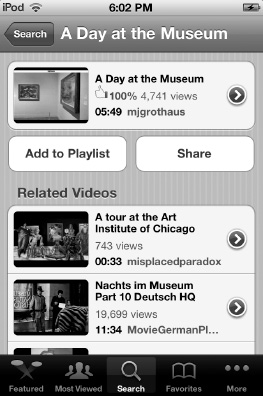
Figure 5–31. A video info screen offers information about the video and the option to bookmark the video.
Here is also where you'll find the Add to Playlist and Share buttons.
Add to Playlist: Adds the video to one of your YouTube playlists
Share Video: Creates an e-mail with a link to the YouTube video in the body of the e-mail. You can also tweet a link to the video.
To get more information about the video, tap the blue-and-white arrow button. Doing so takes you to the More Info screen (Figure 5–32). From this screen you can read more about the video; read comments; and rate, comment, or flag the video. Tap the More Videos tab to see move videos from the user.
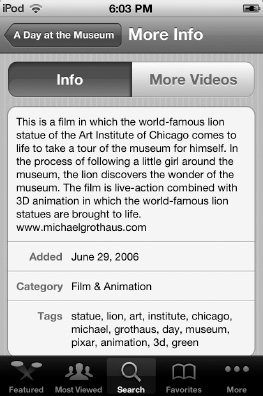
Figure 5–32. A video's More Info screen
The Videos App
Gone are the days when keeping entertained on long car trips required a portable DVD player and a case of discs. The iPod touch's Video app lets you carry around your favorite movies, TV shows, and podcasts in your pocket and switch between them with a tap of your finger. Let's explore the Videos app now.
The Videos application icon (Figure 5–33) is colored blue and has a traditional, striped clapperboard top. Tap it to launch the program. This opens the screen shown in Figure 5–34.

Figure 5–33. The Videos app
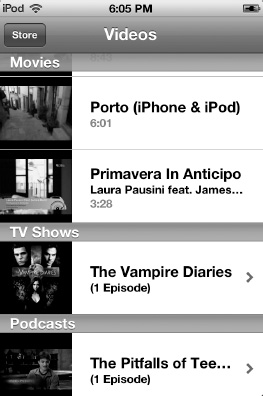
Figure 5–34. The Videos app offers a list of music videos, TV shows, and movies you've synchronized to your iPod.
As you can see, the Videos interface couldn't be simpler. It displays a series of thumbnail images representing the music videos, TV shows, podcasts, and movies you've synchronized to your iPod (synchronizing these items is discussed in Chapter 2). Tap any item to begin playback. Your screen clears, and the video loads and automatically begins playing. Tap Done to return to the list screen, or press Home to quit and go to your home screen.
Tapping the Store button in the top-left corner of the screen takes you to the iTunes Store app (discussed in Chapter 7) where you can buy music and videos.
If you tap a TV show or podcast, you'll be taken to an additional page (Figure 5–35) that lists all the episodes for the TV show or podcast that you have on your iPod before the video begins playing. From this screen, tap the episode you want to play or tap the Get More Episodes… button to be taken to the show's iTunes Store page where you can download additional episodes.
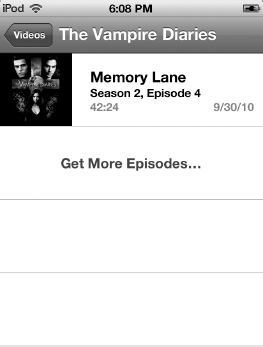
Figure 5–35. A TV show's page in the Videos app
Deleting Videos on the Go
The iPod allows you to recover space on the go by deleting videos after you've watched them. To take advantage of this feature, go to the Videos screen and swipe through the name of any video. A red Delete button appears to the right of the video name. Tap Delete to remove the video, or tap anywhere else on the screen to cancel and keep the video.
Choose your videos wisely. Even with newer iPods with expanded memory, videos can quickly eat up your free space. And don't be shy about deleting your videos on the go. You can always sync them back on your home computer.
Getting Videos
The easiest way to get videos on your iPod touch is to buy or rent them from the iTunes Store. Check out Chapter 7 for more details on buying and renting movies. You can also rip DVDs you own using desktop applications like Handbrake (http://handbrake.fr). Keep in mind local laws may prevent you from ripping DVDs, even if you own them.
Video Settings
You can adjust several settings that affect your video playback. These settings are accessed through the iPod touch's Settings application (see Figure 5–36) and affect how your video is played on your iPod and when your iPod is connected to your TV.
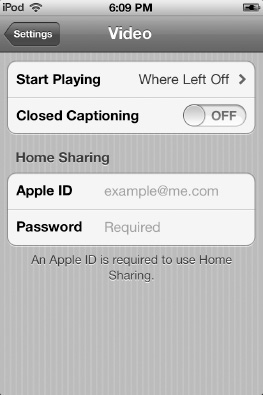
Figure 5–36. The Video app's settings
For your iPod video settings:
Start Playing: choose whether to start playing videos from the beginning or where you left off.
Closed Captioning: If your video contains embedded closed captions, you can view them by switching on the Closed Captioning option. Switch the option from OFF to ON.
For your Home Sharing settings, enter your Apple ID and password to enable video home sharing on your iPod touch. Home sharing allows you to stream videos from iTunes on your computer and watch them on your iPod touch. Your iPod touch and computer must be connected to the same wireless network and iTunes must be open on your computer for your iPod to see its videos.
NOTE: Unfortunately, the iPod touch does not allow you to turn off your screen and continue listening to the audio track from your video. Tap the Sleep/Wake button, and your video playback ends. You can, however, diminish the screen brightness levels in Settings ![]() Brightness. This is not much of a win. Your iPod continues using (energy-consuming) video decoding to play back video as well as audio.
Brightness. This is not much of a win. Your iPod continues using (energy-consuming) video decoding to play back video as well as audio.
Watching Videos on the Web with Safari
Video on the iPod isn't limited to special-purpose applications. You can also watch MPEG-4 movie files with the iPod's Safari application. Chapter 4 introduced Safari. Here you'll see how you can connect to video on the World Wide Web and watch it in your Safari browser.
Many web sites besides YouTube feature embedded video. For example, go to virtually any news site, and you're sure to find embedded video. As we mentioned in Chapter 4, the iPod, and thus Safari, does not support Flash playback, which limits the iPod's ability to display every single video on the Web. However, many web sites serve HTML5 and MPEG-4 videos, and these are fully iPod-compliant. HTML5 is particularly exciting because it's an open web standard that allows developers to create fully interactive content that is optimized and compatible to today's (and tomorrow's) touchscreen devices. HTML5, unlike Flash, does not require that the user download and install a special plug-in to view video content.
For example, the web site TED (www.ted.com) where you can watch videos of some of today's greatest minds talk about science, education, technology, and art is fully iPod-compatible, and it achieves this by being written in and having the videos encoded in HTML5. Figure 5–37 shows this site's video of author Elizabeth Gilbert talking about creativity playing back in the iPod's Safari web browser.
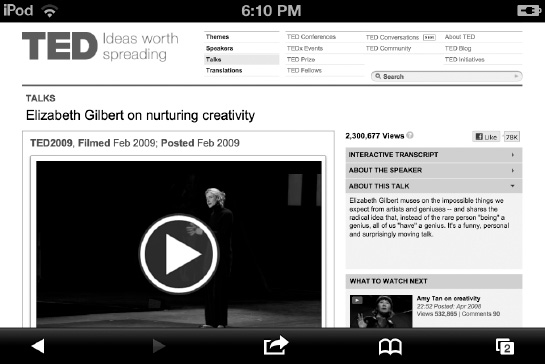
Figure 5–37. Many videos on the Web can be played natively in the Safari web browser.
Tap an embedded video to begin playing it. The video opens in the usual video playback window (see Figure 5–26). Depending on the speed of your Internet connection, it may take a few seconds before the video begins playing. Watch the video, and when you're done, tap the Done button in the video playback screen to return to the Safari web page.
Streaming Video to Your Apple TV with AirPlay
Just as Home Sharing allows you to stream video from your iTunes library on your computer to your iPod touch, another technology called AirPlay lets you stream video from your iPod touch to your AppleTV.
An Apple TV is an inexpensive (US$99) set-top box that you plug into your HDTV. With this box, you can rent movies and TV shows from the iTunes Store directly on your TV. The Apple TV connects to the Internet wirelessly and also communicates with your computer, iPod touch, iPhone, or iPad wirelessly as well. Once you have your Apple TV set up, start watching a video on your iPod, and then tap the AirPlay icon (Figure 5–38) that appears in a video's control bar to instantly stream that video to your TV.

Figure 5–38. The AirPlay icon that appears in a video's control bar when your iPod touch detects nearby AppleTVs
AirPlay is a really cool feature because you can start watching a video on your iPod on your commute home from work, and when you get home, you can finish watching the video on your TV with the tap of a button.
Video Accessories
As far as video goes, there are several iPod touch accessories besides the AppleTV you should consider purchasing:
Stands: Several companies make them, and they range in price from $5 to $30. Whatever stand you choose, if you are planning to prop the iPod up while watching video, make sure it holds the iPod in landscape mode.
iPad Dock Connector to VGA Adapter ($29): Yes, its name says “iPad,” but it works just fine with the iPod touch. The VGA end of the adapter can be connected to external monitors, some TVs, and PC projectors. You'll need this or the cables below to connect your iPod to your home television.
Apple Component AV Cable ($49) and Composite AV Cable ($49): These also work with the iPod, providing two more methods of linking external monitors and projectors to the device.
Apple Digital AV Adapter ($39): This cable allows you to attach your iPod touch to your HD TV through the HDMI port. You can then play your videos and slideshows in crystal-clear digital quality on your TV.
Don't worry if you don't know the difference between VGA, Composite, Component, and HDMI. All three are types of physical video connectors that link devices to TVs.
VGA is a 15–pin connector that you can still find on the back of many PCs. It supports resolutions up to 2048×1536.
Composite is a video connector that channels three video source signals through a single connection. It's the oldest of the three technologies but still supports a resolution of up to 720×576i.
Component is a video connector that takes three video source signals and outputs them through three different connections. It's basically a Composite cable with three heads, but Component offers a much better resolution, up to 1920×1080p (otherwise known as “Full HD”).
HDMI is the new standard for high-definition televisions. It kind of looks like a USB cable and allow you to connect devices to your TV through a pristine digital connection.
Many modern TVs support all four connections. Check your TV's manual to see which yours supports.
Summary
This chapter introduced you to the iPhotos app of the iPod touch and showed you how to navigate your photo collections in a variety of ways. I also demonstrated how your iPod's wide-screen video features and interactive touchscreen are in a class of their own. They offer clear, easy-to-watch video on a (relatively) large screen. In this chapter, you've seen how to watch video from YouTube, the Videos application, and Safari. Here are a few points you should take away and consider:
- The iPod touch's Photos application offers some of the most instantly appealing ways to show off the power of your iPod touch. You can scroll through your albums, zoom in and out with a pinch or double-tap, and flip the unit on its side. These features all deliver the iPod touch wow factor.
- You aren't limited to just viewing photos on your iPod touch; you can also apply simple edits to them to make them look their best!
- You have several ways to navigate your photos: by album, by face, by event, or by place. By far the coolest way is Places, which shows you your photos on a map, based on the location where they were taken.
- Consider investing in an inexpensive business card holder as a stand for your iPod touch. It makes watching slide shows on your iPod touch a lot easier, especially for more than one person at a time. A video-out cable from Apple increases the fun by sending the slide shows to a TV screen.
- Pick the YouTube listings that you like best. The buttons bar at the bottom of the screen is fully customizable. If you prefer to view the Top Rated videos over the Most Viewed, feel free to drag that option to your bar.
- Use the red Clear button at the top-right corner of the History screen to erase your YouTube viewing history. People don't have to know you've been watching that skateboarding dog