
Chapter 14
Staying in Touch with FaceTime and iMessage
In the previous chapter, I introduced you to the iPod's front and rear cameras. Although those cameras are for taking pictures and recording video, they have another useful purpose. Perhaps the coolest new feature introduced to the iPod touch is FaceTime. FaceTime is a technology that brings easy and intuitive video calling to the masses. But video chatting isn't the only way you can stay in touch. In iOS 5, Apple introduced iMessage, which allows you to send free text messages to any other person with an iOS device.
In this chapter, you'll learn what the future feels like. I'll show you how to set up a FaceTime account, how to use the front and rear cameras for video calling, and how to explore the settings in the FaceTime app. I'll also show you how to send text messages through the iMessage app. Let's get started.
Getting Started with FaceTime
With the FaceTime app on the iPod touch, you can video call anyone with an iPhone 4 (or newer), an iPad 2 (or newer), a fourth-generation iPod touch (or newer), or a Mac running OS X 10.6 or newer.
Apple wants to make FaceTime the de facto standard for video calling, and in order to do so, the company has made the FaceTime technology an open standard. That means other phone manufacturers can build the technology into their phones, so one day, ideally, you'll be able to make a FaceTime video call on your iPod to someone with an Android phone.
Besides your iPod touch, you'll need to have a Wi-Fi Internet connection and an Apple ID to use FaceTime. The person who you are calling must also have a Wi-Fi connection, even if you are calling them on an iPhone 4. At this time, iPhone 4 owners can only use FaceTime over Wi-Fi, not over their service provider's 3G network. The service providers most likely put this limitation in place, since streaming live video over a 3G network takes a lot of bandwidth—something that is very costly for customers and service providers alike. It's would also be very taxing on the network itself if hundreds or thousands of iPod touch and iPhone users all tried to make FaceTime calls at the same time from the same location.
Signing In
To begin using FaceTime, tap the FaceTime icon on your home screen. The icon has the image of a video camera stamped on a metal background (Figure 14–1). If this is the very first time you've launched the app, you'll be presented with the FaceTime Get Started screen (Figure 14–2).

Figure 14–1. The FaceTime icon

Figure 14–2. The FaceTime Get Started screen
I love this screen a lot because Apple practically brags how cool FaceTime is. Apple writes: “People have been dreaming about video calling for decades. Now it's a reality.” We get it, Apple. FaceTime is very cool. But as anyone can tell you (or perhaps, tell Apple), video calling is nothing new. People have been able to video chat via webcams on their computers for more than a decade now. What makes FaceTime so awesome is its mobility and ease of use.
If you click the “Learn more about FaceTime” link, Safari launches, and you are taken to Apple's iPod touch FaceTime web page.
Once you are ready to sign in, tap the Get Started button. The sign-in screen (Figure 14–3) appears; this is where you can sign in with your existing Apple ID or create a new account.
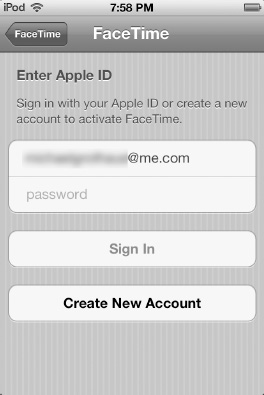
Figure 14–3. The FaceTime sign-in screen
Signing In with Your Existing Apple ID
To sign in with your existing Apple ID, fill in the e-mail and password fields, and tap Sign In. You already have an Apple ID if you use the iTunes Store, the App Store, or the iBookstore. You also have an Apple ID if you have a MobileMe or iCloud account.
When you sign in for the first time, Apple notifies you that people will call you on FaceTime using your e-mail address (Figure 14–4). They ask you which e-mail address you would like to use. You can use the same e-mail address that is your Apple ID, or you can enter another e-mail address.
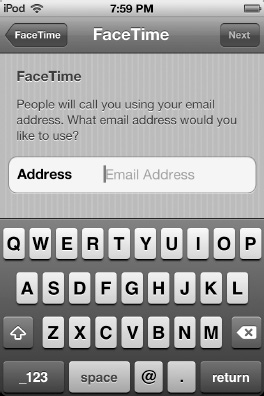
Figure 14–4. Choosing which e-mail address you want to act as your FaceTime “phone number” (left).
Once you have selected the e-mail address you want associated with FaceTime calls, tap the Next button. A short verification screen appears so Apple can verify that your e-mail address is authentic. A Check Mail button is displayed; tapping it opens the selected e-mail account in the iPod's mail app. Look for an e-mail with the subject “Please verify the contact e-mail address for your Apple ID,” and then tap the Verify Now link in the e-mail. A Safari window opens displaying the My Apple ID page. There you'll be asked to enter your Apple ID and password to verify your FaceTime e-mail address.
Once you are presented with the “Email address verified” web page, return to the FaceTime app. You'll automatically be presented with the standard FaceTime screen (Figure 14–5), which you'll see every time you launch the app from now on. On this screen is a list of your contacts. You'll learn more about the FaceTime home screen in a bit.
The first time you sign in, the process is arduous and time-consuming, but fear not! Once you have signed in, you won't have to do it again, even if you leave the app or shut down and restart your iPod.
Please be aware that this was the authorization procedure for FaceTime at the time the book was being written. Apple could always change its account creation and authorization process in the future.
Creating an Account
If you don't have some form of Apple ID, you can create one by tapping the Create New Account button (Figure 14–3). The New Account screen slides up (Figure 14–6). On this screen, enter your first and last name, your e-mail address (which becomes your new Apple ID), and a password of at least eight characters. This password does not have to be the same as the password for your e-mail account.
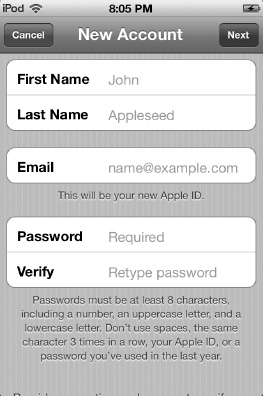
Figure 14–6. The New Account screen
On the New Account screen, you also need to choose a question and enter the answer. The question and answer are used in case you forget your Apple ID password. Finally, enter your month and day of birth and the country you reside in, and then decide whether you want to subscribe to the Apple e-mail list.
Once you have entered this information, tap the Next button. You are returned to the Sign In screen with your Apple ID and password already entered, and the sign-in commences. A short verification screen appears as Apple verifies that your e-mail address is authentic. A Check Mail button then appears; tapping it opens the selected e-mail account in the iPod's mail app. Look for an e-mail with the subject “Please verify the contact email address for your Apple ID,” and then tap the Verify Now link in the e-mail. A Safari window opens and displays the My Apple ID page. There you need to enter your Apple ID and password to verify your FaceTime e-mail address.
Once you are presented with the “Email address verified” web page, return to the FaceTime app. You'll automatically be presented with the standard FaceTime screen (Figure 14–5), which you'll see every time you launch the app from now on.
Navigating Your FaceTime Contacts
When you launch the FaceTime app, you are presented with your contacts screen (Figure 14–5). The contacts screen is divided into three sections, all of which are accessible by tapping the buttons in the contact bar at the bottom of the screen.
Favorites: This screen allows you to add your favorite contacts to it. It's handy as a shortcut to the people you call the most.
Recents: This screen lists the recent FaceTime calls you've made or received.
Contacts: This screen lists all the contacts in your address book.
Let's look closer at each of these contact sections.
Favorites
The Favorites screen (Figure 14–7) lets you create and maintain a list of your favorite contacts. Favorite contacts generally encompass anyone you call the most, such as family, friends, and important work contacts. This screen acts as a shortcut to their FaceTime e-mail addresses or phone numbers.
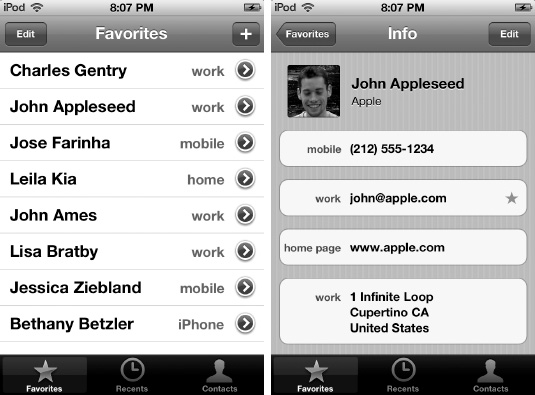
Figure 14–7. The Favorites screen (left). Selecting the e-mail or phone number of a Favorites contact (right).
Adding a contact to Favorites: Tap the + button in the upper-right corner, and then select a contact from the address book list that appears on screen.
Choosing the contact's FaceTime info: From your selected contact's information screen, tap the FaceTime e-mail address or phone number for the contact. If your contact is using an iPod touch, you must choose their associated FaceTime e-mail. If you contact is using an iPhone 4, you must choose their iPhone 4 phone number. Once you have chosen your contact's FaceTime info, a blue star (Figure 14–7) appears by their FaceTime e-mail or number.
Calling a Favorite: Once you have set up your favorites, simply tap their name in the Favorites list, and a FaceTime call will be initiated.
Tap the blue-and-white arrow next to a favorite's name to view or edit their contact information.
Recents
The Recents screen (Figure 14–8) displays a list of recently made or received FaceTime calls. This list can be sorted into two categories via the tabs at the top of the screen:
All: Shows you all the FaceTime calls you have made, received, or missed. Missed calls show up in red. The time of the call is shown to the right of the name of the person called. You can tap the blue-and-white arrow next to a favorite's name to view or edit their contact information.
Missed: Shows only the FaceTime calls you have missed.
To clear your Recents list, tap the Edit button in the upper-right corner of the screen.

Figure 14–8. The Recents list
Contacts
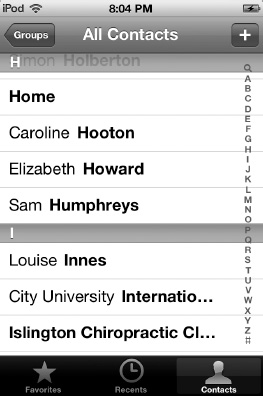
The contacts screen features your entire address book (Figure 14–9). You can navigate it by all the contacts or by selecting just a group of contacts.
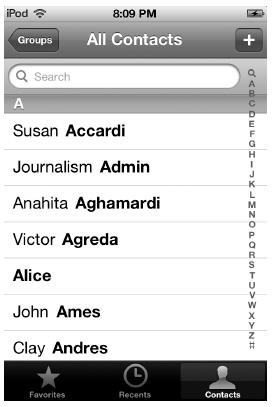
Figure 14–9. The contacts screen
When you find the contact you want to call, tap the name, and a contact information card ID displayed. Flick down the screen until you see their FaceTime e-mail or FaceTime phone number. Tap the correct one, and your FaceTime call begins.
Making a FaceTime Call
To make a FaceTime call, select a contact from your Favorites, Recents, or Contacts list. As I stated earlier, if you are selecting a contact from your Favorites or Recents list, tapping their name initiates the FaceTime call (Figure 14–10). To start a call using your Contacts list, tap the contact's name, then tap their FaceTime phone number or e-mail address. To cancel a call before the person has picked up, tap the red END button.
NOTE: You can change your incoming FaceTime ringtone by navigating to the Settings app and then choosing Sounds ![]() Ringtone.
Ringtone.

Figure 14–10. Initiating a FaceTime call (left) and receiving a FaceTime call (right)
When you receive a FaceTime call, a message appears on-screen telling you that a friend would like to share a little FaceTime with you (Figure 14–10). The front camera automatically activates so you can see if you look presentable. To accept the call, tap the green Accept button. To reject the call, tap the red Decline button.
Figure 14–11 demonstrates what a FaceTime call looks like. The image of the person you are talking to takes up a majority of the screen, while your image appears in a rectangle in a corner of the screen. Below the images is the FaceTime control bar, which gives you several options.

Figure 14–11. A FaceTime video call.
Mute: Tap the microphone icon to switch between muting and unmuting a call. While the call is muted, you can still hear the person you are calling, but they cannot hear you. While a call is muted, the other person can still see you, so be careful what you do!
Switching cameras: Tap the Switch Camera icon in the bottom right of the screen to switch between the front and rear cameras. The icon looks like a traditional still camera with swirling arrows on either side. Switching cameras changes what the person you are talking to is able to see. When the camera is switched, your friend sees whatever the rear camera on the iPod touch is pointed at.
Switching cameras during a call is an awesome feature. It allows your friend to see what you are looking at, like your newborn crawling on all fours, for example.
Ending the call: To end a FaceTime call, tap the End button.
NOTE: You know that the iPod touch has two cameras, but did you know the front one has been specifically designed for FaceTime? Apple made sure it has just the right focal length and field of view to focus on your face at arm's length.
Other FaceTime Calling Options
FaceTime gives you several advanced calling options that help with its usability:
Change orientation: You can rotate your iPod into landscape mode, and the image your caller sees changes to match. Landscape mode is useful during FaceTime calls if you want to show your caller a wide shot of something using the rear camera, like a beautiful sunset from your backyard.
TIP: To avoid unwanted orientation changes as you move the camera around, lock your iPod touch in portrait orientation by pressing the Home button twice and flicking right until you see the portrait lock button.
Moving picture-in-picture: That little square in the corner that shows you what your caller is seeing can be moved around. Tap and hold the square and drag it to any of the four corners of the screen. This is useful if the square is blocking something on the screen that you want to see.
Multitasking during a FaceTime call: You can use any app on your iPod touch while on a FaceTime call. To do so, while in a FaceTime call, press your iPod's Home button once to be taken to the home screen. You can then launch any app you want. To return to your FaceTime call, tap the glowing green “Touch to resume FaceTime” bar at the top of the screen (Figure 14–12).
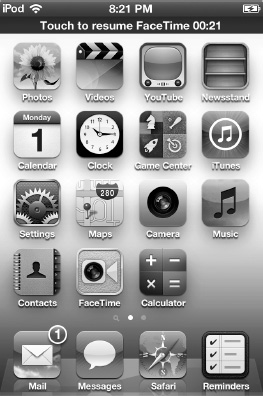
Figure 14–12. You can use other apps while on a FaceTime call. Touch the green bar at the top of the screen to return to the FaceTime call when you're done.
The multitasking feature is particularly nice when you are on a FaceTime call. It allows you to check the Yelp app for restaurants while you're making dinner plans with your FaceTime caller, for example.
While you are multitasking, you can still talk to your FaceTime caller, but neither of you can see the other.
FaceTime Settings
FaceTime has several settings. You can find them in the Settings app under FaceTime (Figure 14–13).
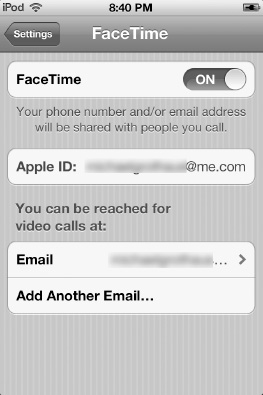
Figure 14–13. FaceTime settings
Turn FaceTime on or off: Tap the FaceTime switch to ON or OFF. While off, you cannot make or receive FaceTime calls.
Change your FaceTime geographic location: Tap your Account e-mail. From the pop-up menu, tap Change Location. Choose your location's new region from the list of regions.
View your FaceTime account settings: Tap the e-mail address associated with your FaceTime account. From the pop-up menu, tap View Account. The account settings screen from Figure 14–6 shows up on-screen. Tap any field to change your account settings, such as your name or security question.
Sign out of FaceTime: Tap your Account e-mail. From the pop-up menu, tap Sign Out. This immediately signs you out of FaceTime without any more warnings. To sign back in, reenter your Apple ID password on the Sign In screen.
Remove a FaceTime e-mail address: You can unlink your FaceTime e-mail address by tapping it and then tapping the Remove This Email button.
Adding more e-mail addresses: FaceTime allows you to associate more than one e-mail address with your FaceTime account. This is handy if you use more than a single e-mail address; one for friends and one for work colleagues, for example. If multiple e-mails are associated with your FaceTime account, people can initiate a FaceTime video call with you using any of your e-mails.
To add additional e-mails, tap the Add Another Email button, and then enter your other e-mail address. Repeat this step for each e-mail address you have. With each e-mail added, you'll need to check that account for the FaceTime verification message from Apple and click the link in that message before the address can be added to your FaceTime account.
Getting Started with iMessage
Now with iOS 5 you can send free text messages to anyone with an iPod touch, iPhone, or iPad running iOS 5 or newer. Apple calls this feature iMessage. If you've ever sent an SMS or MMS text message from an iPhone before, you know exactly how to use iMessages because both traditional texting and iMessages are done through the exact same app: Messages (Figure 14–14).

Figure 14–14. Use the Messages app to send iMessages.
When you launch the Messages app, you'll be presented with a list of any previous iMessage conversations (Figure 14–15). The most recent message received moves that conversation to the top of the screen.

Figure 14–15. All your iMessages in one place
Reading Conversations
To read any past conversation, tap it in the Messages list shown in Figure 14–15. The conversation window appears (Figure 14–16). As you can see, conversations consist of individual iMessages with the same person. Your messages appear on the right of the screen, and your friend's messages appear on the left.

Figure 14–16. Reading conversations
From an iMessage conversation screen, you can simply tap the reply field at the bottom of the screen and enter your reply. Tap send to send it. I'll describe how to create an iMessage from scratch in a bit.
Deleting and Forwarding Individual iMessages
From an iMessage conversation window you can also delete or forward individual iMessages. Tap the Edit button at the top of a conversation window (Figure 14–16). Dots appear next to each iMessage along with a red Delete button and a blue Forward button at the bottom of the screen (Figure 14–17).

Figure 14–17. Deleting and forwarding conversations
To delete one or more iMessages, tap each message so a red dot appears next to it, and then tap Delete. WARNING: the messages are deleted instantly.
To forward one or more iMessages, tap each message so a red dot appears next to it, and then tap Forward. You'll be taken to a new iMessage screen that allows you to forward the selected iMessage to one or more people.
NOTE: When you are in an active conversation and someone is typing a reply, you'll see a grayed-out chat bubble with three dots in it. That way you know that the person on the other end is in the middle of replying to you.
Deleting Entire Conversations
Besides displaying all your previous iMessage conversations, the main iMessages screen (Figure 14–15) is where you can also delete entire conversations. Tap the Edit button, and then tap the red-and-white minus sign that appears next to the conversation you want to delete. Tap the red Delete button to confirm the deletion.
Sending a New iMessage
On the main iMessage screen (Figure 14–15), tap the new iMessage button that's in the top-right corner. It looks like a pencil over a piece of paper. The new message screen appears (Figure 14–18).
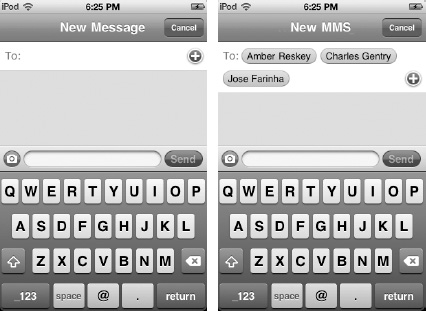
Figure 14–18. Creating a new iMessage. A blank message, left, and sending a group message, right.
At the top of the screen, start typing the name of the message recipient. The Messages app automatically fills in their information from your contacts. You can also tap the blue + button to display a list of all your contacts. As you can see in Figure 14–18, you can send iMessages to a group of people.
Tap the text field above the keyboard and start entering your text (Figure 14–19). When you are done, tap the Send button, and your message is on its way!

Figure 14–19. Composing your iMessage
Attaching a Photo, Video, or Contact to an iMessage
With iMessages, you can send, photos, videos, and contacts to friends with or without an accompanying text message. Adding any of these attachments is done with a few taps. To add an attachment to an iMessage, tap the camera icon next to the text entry field (Figure 14–19). The attachment dialog box appears (Figure 14–20).
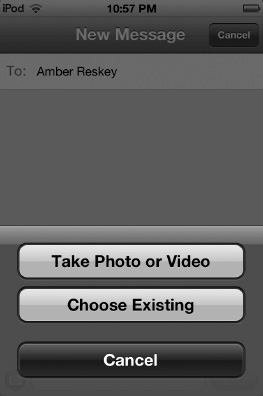
Figure 14–20. Attaching a photo or video to your iMessage
Choose Take Photo or Video to record a new video or take a new picture with your camera, or select Choose Existing and grab a photo or video from the photo albums or Camera Roll on your iPod touch. After you have selected your attachment, it appears as a thumbnail in the text entry field (Figure 14–21). Tap the Send button to send the message.
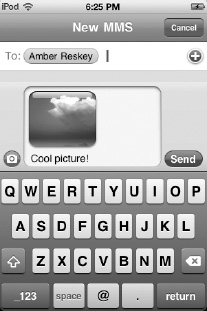
Figure 14–21. An attached photo in an iMessage
iMessage Settings
iMessages have some settings that you can use to further increase their functionality. They can be found in the Settings app under Messages (Figure 14–22).
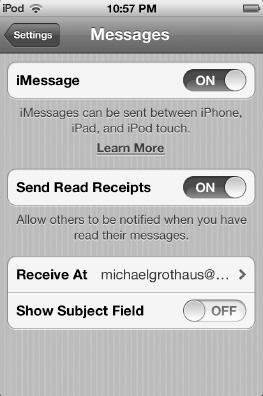
Figure 14–22. The Messages settings are where you configure read receipts, enable iMessages, and more.
iMessage: You can turn iMessages on or off. Toggle the switch to OFF to disable iMessages. Doing so prevents messages from being sent from or received on your iPod touch.
Send Read Receipts: When this is set to ON, others are notified when you have read a message they've sent.
Receive at: iMessages work by using your iPhone phone number or an e-mail address. iMessages also allows you to associate more than one e-mail address with your iMessage account. This is handy if you use more than a single e-mail account, one for friends and one for work colleagues, for example. If multiple e-mails are associated with your iMessage account, people can initiate a iMessage chat with you using any of your e-mail addresses.
To add additional e-mail addresses, tap Receive At, tap the Add Another Email button, and then enter your other e-mail address. Repeat this step for each e-mail address you want to add. You'll need to check each e-mail account added for a iMessage verification message from Apple and then click the link in that message before the e-mail address can be added to your iMessage account.
Show subject field: When this is set to ON, you have the option of adding a subject field to your iMessages. This is handy if you are sending iMessages in a more formal manner, say to professional contacts.
Summary
FaceTime is an awesome feature, and its popularity is sure to grow as more devices become FaceTime-compatible. iMessages brings free texting and chatting to any device running iOS 5 or newer. In this chapter, you learned how to set up your FaceTime account to send and receive video calls, and also how to send and receive messages using iMessages. Here are a few more tips for using FaceTime and iMessages:
- If you are planning to make a lot of FaceTime calls at home or in the office, you may want to invest in an iPod dock so you don't have to keep holding your iPod at arm's length. A dock helps you eliminate those horrible up-the-nose and double-chin points of view that happen when holding the iPod at arm's length.
- Use FaceTime from the sky! If you're on a plane that offers Wi-Fi service, you can use FaceTime to talk to your friends and family back on the ground!
- Don't forget to use the rear camera to show your caller what you are looking at. You don't have to turn your iPod touch around to show them!
- FaceTime is an amazing feature for those who can't speak. The screen resolution is crisp enough where sign language can easily be read.
- Watch out for bright backgrounds. If light is glaring in through the window behind you, it's likely to cause your viewer to see you in silhouette. To fix this, move your iPod's camera just a tiny way away from the light source, and your face should show up clearly.
- Using iMessages is a great way to keep in touch with friends who live far away. It's like instant messaging but is always on. Individual messages are delivered for free as texts to your friends no matter whether they are on an iPod touch, iPad, or iPhone. The only requirement is a Wi-Fi connection (or 3G if your contacts are using an iPhone).