Chapter 1
Bringing Home the iPod touch
Since 2001, the iPod has changed the way we listen to our music. It has allowed us to carry virtually our entire music collection around with us in a beautiful little package, and thanks to its unique scroll wheel, it has made that beautiful little package easy to navigate. Each year the iPod has evolved, getting physically smaller while its storage capacity and popularity have grown. Then came the iPod touch, and Apple reinvented what the MP3 player was capable of. The iPod touch, like its predecessor, quickly became the most popular MP3 player on the market, but it was so much more than just an MP3 player. It added Internet capabilities, a Multi-Touch display, and hundreds of thousands of apps for almost anything you could imagine. Now Apple's iPod touch offers amazing features such as front and rear cameras with FaceTime video calling, a high-resolution Retina display, and Apple's incredibly fast A4 processor.
You're about to read how to select and purchase your iPod touch and how to get started using it. This chapter covers the first steps you'll need to take and the decisions you'll need to make.
Buying Your iPod touch
If you don't already have an iPod touch, your first two decisions are which model to buy and where to buy it. The following sections cover some things to consider in the decision-making process.
Picking Your iPod touch
In the world of the touch, the choices aren't wide. As with other iPods, usually only a couple of models are available at a particular time. In the iPod touch's case, there are six different models. That sounds like a lot, but that's only because there are white and black models to choose from. When you take the color choice out of the equation, there are actually only three different iPod touch models to choose from and their only difference is the size of their storage capacity.
So, how do you choose the model that is right for you? It all comes down to the storage capacity. Do you want to pay more for a few more gigabytes of storage? It's not as if those extra gigabytes offer an inexhaustible resource. With enough videos and movies, you can easily run out of storage on a 160GB iPod classic, let alone the flash-memory-based iPod touch. Here are some questions you need to ask yourself:
How big is your music library? If it's large, the extra space on some iPod models helps store additional music and podcasts. Remember that you don't need to bring your entire media collection with you—and with the iTunes Music Store, you can buy music and movies on the go.
How many videos do you want to carry around? A single two-hour movie can occupy more than a gigabyte of storage. If you travel a lot, especially on airplanes, you may want to pay more to store additional movies and TV shows with those extra gigabytes. A few extra gigabytes can make a big difference in deciding whether you have the space to rent or buy a video on the go.
Do you plan to carry a lot of pictures? Although pictures are pretty small, if you carry a few thousand of them around, they do add up to some serious storage consumption. Did you laugh at the idea of carrying that many pictures around on your iPod? Apple's built-in iPhoto support makes it simple to put years of photo archives onto your touch with a single synchronization option.
Do you plan to take a lot of pictures or record a lot of video? The iPod touch can both take and record still photos and HD video. Recording a lot of HD video takes up space. The larger the storage capacity of the iPod touch, the more video you can record.
Are you going to download a lot of apps? There are hundreds of thousands apps available on Apple's App Store. Some apps are very small, taking up less than 1MB of disk space. Other apps—notably games—can take up hundreds of megabytes, even gigabytes, of space. What's more, apps can consume additional space by saving documents, downloading data, and so on. It's not just about the initial download.
The more apps you have on your iPod, the more space you take up.
Do you need to carry a lot of data? You might not think of your iPod as a data storage device, but there are ways to use it to bring data along with you on the road. If you think you might need to do this, those extra gigabytes could be put to good use. Of course, if you are going to use Apple's online iCloud storage, you might not need as much physical storage space on yoruu iPod as you think. We'll talk about iCloud in Chapter 2.
How long do you plan to use this iPod? If you're an early adopter who plans to trade up at the earliest possible opportunity whenever Apple offers a new unit, you may want to save your pennies now and trade space for the fiscal liquidity to support your little habit. But if you want to get the most use out of the iPod for the longest period of time, paying more up front means you won't outgrow the memory quite as fast.
Considering System Requirements
In order to effectively use your iPod touch, you must have a computer with an Internet connection, a Universal Serial Bus (USB) 2.0 port, and iTunes 10.5 or newer. While iPods no longer need to be connected to your computer to sync, they still need to be charged via a USB cable. Your computer's USB port will act as a charging station when the iPod is connected. You need iTunes for loading media onto your iPod and synchronizing it to your computer-based calendar and bookmarks. At the time this book was written, you'll also need to be running a Mac with 10.5.8 or newer or a PC with Windows Vista, Windows 7, Windows XP Home, or Professional (SP3) or newer.
NOTE: If you haven't yet put iTunes on your computer, grab your free copy from www.apple.com/itunes. Versions are available for both OS X and Windows systems, and installing iTunes is quick and easy.
Deciding Where to Buy Your iPod
After deciding which model you want, you're probably ready to pull out your credit card and get that iPod (see Figure 1–1). Where should you go? To an Apple Store? To another retailer like Target? Or should you buy online? Here are some points to consider.
- Availability: Non-Apple retailers may or may not have the most up-to-date Apple units. Apple retail stores and Apple's online store always do. Third-party retailers often have a better repository of cheaper out-of-date units, though. And it's not that Target/Costco doesn't carry new iPods; it's that there's usually a few weeks or month delay in stocking new stuff.
- Price: As far as the online/offline question goes, price-wise it's mostly a wash. At a store or online, you'll pay the same amount for your iPod. The taxes are the same, and shipping is free. Non-Apple retailers rarely offer price breaks on Apple products, although they sometimes offer deals, such as included gift cards, that provide extra value for your money.
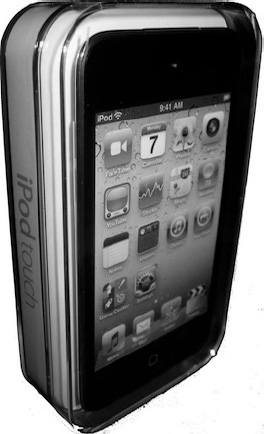
Figure 1–1. The iPod touch in its acrylic packaging. You can purchase your touch online at http://store.apple.com, at a brick-and-mortar Apple Store, or at third-party retailers.
- Refurbs: If you want to buy a refurbished iPod touch, select retailers sell refurbished models. Refurbished models usually debut a few months after product rollout. Refurbs also usually have a full one-year warranty. Not a bad deal!
- Wait time: Buying at a store means you don't need to wait—the iPod is in your hands immediately. Buying online means your product must be shipped, and you'll need to pay extra if you want expedited service.
- Engraving: If you want your iPod engraved, you can do so at the online Apple Store. Apple offers free laser engraving with your iPod purchase. This allows you to add a personal message or identifying information, such as an e-mail address or phone number, that will help your iPod make its way back to you if lost.
- Hands-on testing: Whether you make your purchase online or at a retail location, you can always walk into an Apple retail store and test an iPod in person before you buy one. Of course, once you're there, it's pretty easy to hand over a credit card and walk out of the store with a new iPod touch right there and then.
- The personal touch: Unless you need an online-only feature (such as engraving), we recommend buying in person at a store. You can ask questions. You can make human connections. If something goes wrong with your purchase, a person is there to help you work through it. This is not to say that calling Apple's support line is insufficient, but being face-to-face with a real person makes solutions happen more readily.
NOTE: A significant, although small, percentage of iPod purchases do not go smoothly. Some people end up with a screen flaw, such as dead screen pixels, which appear as small, black dots on your display. If such a problem is found soon after purchase, it may involve a trade for a new unit. The chances of resolving issues increase significantly when you talk to someone in person. The chances increase further when you deal with certain retailers with superior consumer-protection policies. Apple or (even better) Costco policies generally produce more satisfactory results than Target or Best Buy policies.
Understanding Return and Exchange Policies
When your touch is purchased from Apple, standard iPod return and exchange policies are in effect. These policies are distinct from the ones that apply to iPod touch's cousin, the iPhone. The touch policies are, instead, in line with other iPods:
- You have 14 days from the time of purchase to return or exchange your unit.
- A 10 percent open box fee will be assessed on any opened hardware or accessory.
- You cannot return the iPod if it has been engraved.
In addition to these policies, Apple will usually swap out, without penalty, any unit that's clearly defective because of manufacturing issues.
Bringing Your iPod Home
Once you buy your iPod touch, it's time to take it home and get it set up. This involves several steps. The following sections walk you through this process.
Unpacking Your iPod touch
iPod packaging (see Figure 1–1) is a small work of art. The touch ships in an acrylic package that contains the player, a USB connector cable, those famous white earbuds, and a packet of documentation. Each of these items is important and helps you in the day-to-day use of your iPod.
Here's a rundown of what's in the box (Figure 1–2):
- Cable: The USB cable attaches your iPod to your computer.
- Stereo headset (earbuds): It wouldn't be an iPod without those iconic white earbuds. Seriously, you can do better both in terms of audio quality and protecting your ears, but people do love those white earbuds. They tell the world that you're listening to an iPod.
- Documentation: A quick start guide that tells you how to get your iPod up and running.
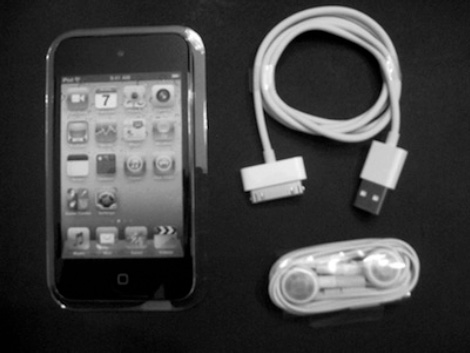
Figure 1–2. The iPod touch package combines compactness with beauty. It contains your new iPod as well documentation, earbuds, and more.
Reviewing the iPod touch Features
After unpacking your iPod, take a few minutes to discover more about your new purchase. Figure 1–3 identifies the basic features on your touch.
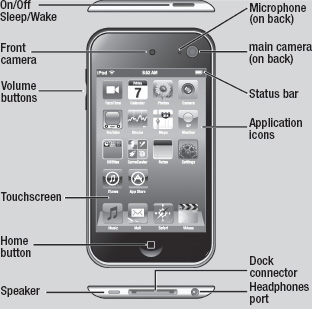
Figure 1–3. Some important iPod touch features include the Sleep/Wake button, which allows you to conserve energy by sleeping the screen; the Home button, which takes you to your iPod's home screen from any application; and the dock connector at the bottom, which allows you to connect your iPod to your personal computer.
The bottom of the iPod houses a jack (or, as Apple calls it, the “headphones port”), into which you can plug your earbuds; a dock connector port for connecting to your USB cable; and a speaker. The top of the iPod offers a Sleep/Wake button that is used to power on and off certain features. The iPod's front has a large touchscreen, a single Home button at the bottom, and a camera at the top center. Turn your iPod touch over to see the rear camera at the top corner. On the left side of the iPod are the volume control buttons.
Preparing for a Fresh Start
You've unpacked your iPod but haven't yet turned it on. Now is a good time to review the data on your computer. When you eventually connect your iPod to iTunes, it synchronizes itself to your media library and, depending on your computer, to your bookmarks, your calendars, and so forth. Before you go forward, here are some items you may want to either expand or clean up so your iPod starts its life with the freshest possible data:
- Contacts: iPod can sync with Outlook or Outlook Express on Windows, Address Book or Entourage on a Macintosh, and Yahoo! Address Book and Google Contacts on the Internet. To prepare for your first sync, review your existing contacts to make sure they're up-to-date with current phone numbers and e-mail addresses. If you use another program to manage contacts, consider migrating your contacts to one of these solutions. If you would rather not, that's OK, too.
- Calendar: Your iPod can also sync with computer-based calendars. The touch supports iCal and Entourage calendars on the Mac and Outlook calendars on Windows. Get your calendars into shape before your first sync, and you'll be ready to monitor your schedule.
- Bookmarks: Spend a little time reviewing and cleaning up your Internet Explorer or Safari bookmarks. Some housecleaning now makes it much easier for you to find your favorite web sites from your iPod touch.
- Music: iPod touch models offer relatively small storage space when compared to, for example, iPod classic's generous 160GB hard drive. To make the most of this limited space, set up playlists for your favorite songs and podcasts. Since, in all likelihood, you won't be able to synchronize your entire library to your new iPod, invest time now in weeding through your media to find those items you most want to have on hand.
- Videos: iPod touch can import any videos you have in iTunes that you've purchased from the iTunes Store. It also imports any videos you have on your computer in your iTunes library as long as you've converted those videos to an iPod-compatible format. Compatible formats are MP4, MOV, and M4V.
- Books and PDFs: Make sure any ePub books or PDFs you have on your computer have been added to your iTunes library. This allows you to sync them with Apple's iBooks app.
CAUTION: Make sure you've authorized your computer in iTunes (Store ![]() Authorize Computer) before synchronizing your music. If you don't, your music won't be copied to your iPod. Also note that you can't copy music from more than five accounts.
Authorize Computer) before synchronizing your music. If you don't, your music won't be copied to your iPod. Also note that you can't copy music from more than five accounts.
- Software and operating system: Make sure you've updated to iTunes 10.5 or newer. And, if you're using a Mac, make sure you've updated your operating system to at least OS X 10.5.8. If you're using Windows, you need to make sure you are using Windows 7, Windows Vista, or Windows XP Home or Professional with Service Pack 3 or newer. You can download the latest version of iTunes from Apple at
www.apple.com/itunes/download. - iTunes Account: If you plan to purchase music using the iPod's iTunes Music Store, Apple requires a current iTunes account. If you don't already have one, you can sign up for a U.S. account, as described next.
Creating a New Apple Account
Creating a new Apple account requires a U.S. address and credit card. Here are the steps you'll need to follow in order to create that account:
- Launch the iTunes application, and wait for it to load.
- Click the iTunes Store entry in the column on the left side of the window, and wait for the store screen to load. You must be connected to the Internet for this to happen, because all the storefront information is stored at Apple.
- Click the Sign In button at the top-right corner of the screen. iTunes opens the sign-in dialog box (see Figure 1–4), which will allow you to either sign in with an existing account or create a new one.
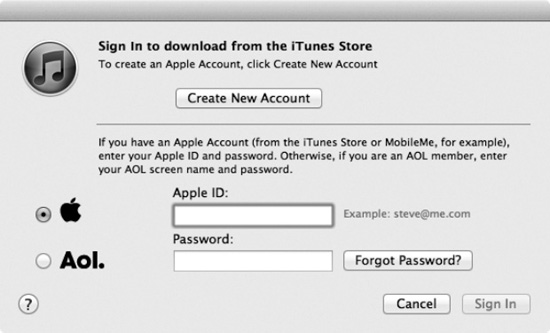
Figure 1–4. The iTunes sign-in dialog box allows you to sign in to iTunes with your existing account or begin the process of creating a new account. This figure shows the Sign In screen on a Mac. It will be the same, though Windows-looking, on a PC.
- Click Create New Account. The screen clears, and a message welcoming you to the iTunes Store is displayed. Click Continue.
- Review the terms of service, and then click Agree. A new dialog box appears, prompting you to create your account.
- Enter your e-mail address and a password (you must enter the password twice for verification). Also enter a question and answer that will help verify your identity and the month and day of your birth. Review the other options on the page, and adjust them as desired before clicking Continue. Again, the screen will clear, and you'll move on to the final account-creation step.
- Enter a valid U.S. credit card and the billing information for that credit card. These must match to finish creating your account. When you have entered the information, click Continue.
After following these steps, you will receive a confirmation e-mail at the address you specified while signing up. The e-mail welcomes you to the iTunes Store and provides you with the customer service web address (www.apple.com/support/itunes/store).
Configuring Your iPod touch
With iOS 5, Apple has cut the cord from your iPod touch to your computer. This new “PC Free” world of iOS devices is a new era in computing technology. Oh, you still have to plug the iPod into your computer or charger to recharge the battery all right, but now you no longer need to plug the iPod into your computer to begin using it. You can buy it in the store, open it up right there, and go through a simple setup procedure right on the iPod.
Follow the steps in this section to set up your iPod right out of the box:
- Take your iPod touch out of its packaging.
- Press the power button on top of the iPod touch to turn it on. You'll see the screen in Figure 1–5. If your iPod does not automatically power on and display this screen, press and hold the Sleep/Wake button. With the main screen facing toward you, you can find this button at the top left of the iPod. After a few seconds, the iPod should wake up and display the white Apple logo as it powers on. If the iPod does not respond and does not display either the white Apple logo or the Connect to iTunes screen, contact the store where you purchased the iPod.
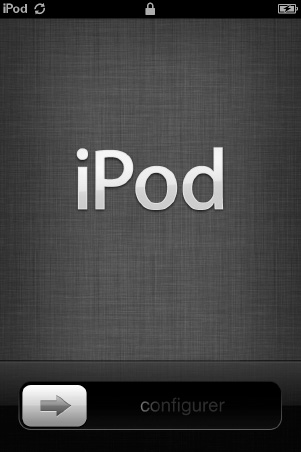
Figure 1–5. The iPod setup welcome screen
- Slide the configure slider to begin setting up your iPod.
- On the next screen you'll get a choice to enable or disable location services. Location services allow the iPod touch and its apps to estimate your current location. After you have chosen to enable or disable location services, tap the “next” button.
- The Wi-Fi Networks screen appears next. Select your wireless network and enter your Wi-Fi password. This will allow you iPod to join your Wi-Fi network and make use of its Internet connection for a number of things, like connecting to iCloud or using the Maps app.
- On the next screen you can choose to set up your iPod touch as a new device or restore it from an iCloud or iTunes backup. If you've never owned an iPod before, select “Set Up as New iPod touch.” If you are restoring from a previous iPod touch, select the iCloud or iTunes backup options.
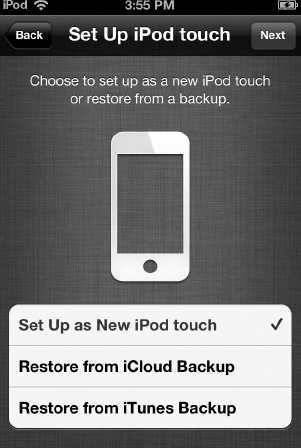
Figure 1–6. The iPod touch restore option screen.
- On the next screen, enter your Apple ID. You have an Apple ID if you've ever bought anything from the iTunes Store. If you don't have an Apple ID, tap the Create a Free Apple ID button. Alternately, you can skip this step. When finished entering your Apple ID, tap the “next” button. You'll have to agree to Apple's Term and Conditions. Read them if you want, then tap Next again.
- Once you've entered your Apple ID you are taken to the Set Up iCloud screen. We'll talk all about iCloud in Chapter 2. For now just choose if you want to use iCloud or not, then tap Next.
- If you've chosen to use iCloud, the backup screen appears next. Select whether you want to back up your iPod touch to iCloud or to your computer, then tap Next.
- As part of iCloud, Apple lets users track their iOS devices and Macs using a feature called Find My iPod touch. Select whether you want to allow you iPod touch to be found using your iCloud account. This free service is part of your iCloud account and allows you to track down your iPod touch should it become lost or stolen. We'll talk more about Find My iPod touch in Chapter 11. Click Next after you've made your selection.
- On the next screen, choose whether you want to send anonymous diagnostics to Apple to help them improve the iOS and iPod experience. Tap the Next button after making your selection.
- After you've successfully navigated all those setup screens, you'll see the one pictured in Figure 1–7. Congratulations! You've set up your iPod touch. Simply tap the “Start using iPod touch” button to begin playing with your new favorite toy!
Once you've set up your iPod touch, you can begin using it right away if you have most of your media stored in the cloud through iCloud. However, if you are still storing most of your media on your computer, you'll need to pair your iPod touch with your computer in order to get yoru music, movies, and tv shows on it.
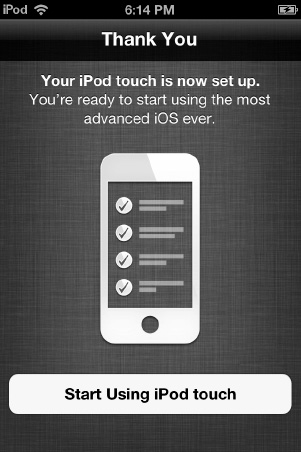
Figure 1–7. Completing the iPod touch setup process
Pairing Your iPod touch to Your Computer
As we mentioned earlier, a big feature of iOS 5 is that it's “PC Free.” That means it has the ability for your iPod touch to sync wirelessly with your computer. But before you can sync wirelessly, you must pair your iPod to your computer. This must be done through the USB cable that came with your iPod touch. You need to do this only once.
To pair your iPod touch to your computer, follow these steps:
- Locate the two ends of the USB cable that was included with your iPod touch. One is thin and marked with a standard three-pronged USB symbol. The other is wide and marked with a rectangle with a line in it.
- Orient your iPod. On the back of your iPod, the Apple logo and the word iPod show you which way is up (Figure 1–8). The dock connector is at the bottom of your iPod touch.
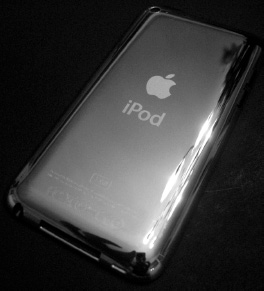
Figure 1–8. Orient your iPod by locating the Apple symbol and the word iPod on its back. In this figure you can see the dock connector. It's the long, thin, rectangular opening on the bottom.
- Connect the wide end of the USB cable to the bottom of your iPod touch. Be gentle but firm, without twisting or forcing the connection. Connect the thin end to a spare USB 2.0 port on your computer (for a direct-connected sync) or a USB power adapter (for a Wi-Fi sync).
iTunes launches, and your iPod chimes softly. - Since this is the first time you are pairing your iPod touch with your computer, the iPod Setup Assistant appears in iTunes (Figure 1–9). The iPod setup assistant asks you whether you want to enable your iPod touch as a new device or whether you want to restore it and its contents from the backup of an older iPod touch. Be aware that these steps may vary slightly as Apple updates and changes iTunes.
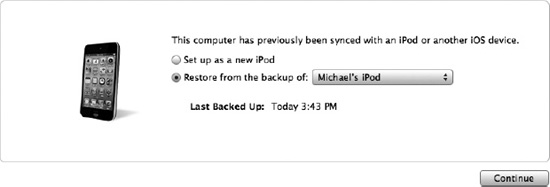
Figure 1–9. The iPod Setup Assistant lets you name your iPod and decide which items to automatically synchronize to it.
- Choose between “Set up as new iPod” or “Restore from the backup of.” You won't see the “Restore from the backup of” option if you've never owned an iPod touch before. If you have, this option allows you to move all your personal settings of the old iPod over to the new one. If you are setting up this iPod for the first time and have never owned a previous one, choose “Set up as new iPod,” and click the Continue button.
- The next screen allows you to name your iPod and choose what items to automatically sync to it. If you want to name your iPod something other than “your name's iPod,” enter a new name into the “The name of my iPod is” field. Do not press Enter or Return, and do not click the Done button.
- We recommend you uncheck both boxes: “Automatically sync songs to my iPod” and “Automatically sync photos to my iPod.” It's far easier to manage these choices manually.
- Click the Done button. iTunes closes the Setup Assistant.
Once you've paired your new iPod touch, you're ready to perform your first synchronization. In the iTunes source list, which is the light blue column on the left side of the iTunes screen, locate the Devices section, and click the name of your iPod. This opens its Preferences window (see Figure 1–10). The tabs along the top of the Preferences window allow you to set each of the options associated with your iPod. We go into what each of these tabs does in detail in Chapter 2.
TIP: Click your iPod's name a second time to open a text edit field that allows you to edit the name. You can name your iPod more creatively than the default (your name and “iPod”).
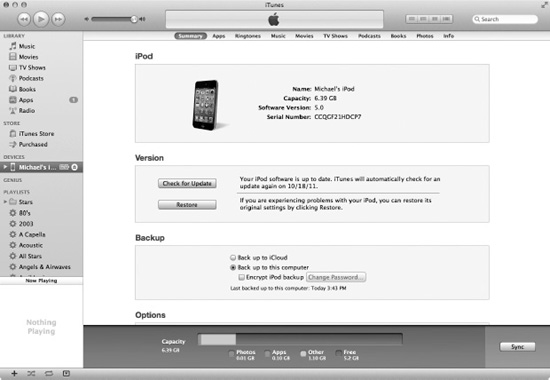
Figure 1–10. iTunes lets you manage the content loaded onto and synchronized with your iPod. Each tab at the top of the screen offers a variety of controls, allowing you to choose the information that is loaded onto your touch at each sync.
Syncing the iPod touch to Your Computer
After you have initially paired your iPod touch to your computer, you can choose to sync your iPod touch wirelessly or directly (by connecting it to your computer) for all future syncs. However, if you want to sync wirelessly, you first have to enable wireless syncing.
Do this by checking the box that says “Sync with this iPod over Wi-Fi connection” (Figure 1–11) on your iPod touch's Summary page in iTunes. After you've done this, the steps to sync your iPod wirelessly or through a USB cable are pretty much the same.
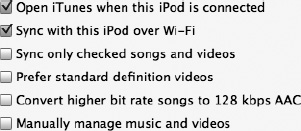
Figure 1–11. Check “Sync over Wi-Fi connection” to enable Wi-Fi syncing.
To sync via a USB cable, follow these steps:
- Plug your iPod touch in to your computer via the USB-dock connector cable. Your iPod begins syncing.
- Unplug the iPod when the sync is finished.
To sync wirelessly, follow these steps:
- Both your iPod touch and computer must be turned on and connected to the same Wi-Fi network.
- When your iPod appears under the Device header in the iTunes source list, click the Sync button in iTunes to begin your sync.
- Don't leave the Wi-Fi network until the sync notification in your iPod touch's status bar disappears (Figure 1–12). When it does, you know your sync is complete.

Figure 1–12. The rotating arrows in the status bar tell you your iPod touch is syncing to your iTunes library.
No matter which way you choose to sync, you can continue to use your iPod while it syncs to your library. We discuss all your syncing options in detail in the next chapter.
Insuring and Repairing Your iPod
Your iPod is covered under Apple's Limited Warranty for 90 days. This includes one complimentary support incident within the first 90 days of product ownership.
You can add iPod touch AppleCare for $59. This extends your hardware repair coverage to two years in total from the date of purchase. If you're interested, you can purchase AppleCare online at the Apple Store (http://store.apple.com).
Once the warranty expires, iPod touch repair costs vary depending on the unit's defect. Taxes and $29.95 for shipping and handling are also added to the cost. Apple will replace your iPod touch battery for $79 (plus taxes and $6.95 for shipping and handling) if your unit is out of warranty.
You can find a complete list of ways to contact Apple Support at www.apple.com/support/contact/.
CAUTION: If you plan to hack your iPod touch, be aware that unauthorized modifications will void your warranty. Apple also excludes coverage for damages from accidents (such as dropping your iPod onto a concrete floor), unauthorized service (such as trying to replace your own battery), and misuse (don't use your iPod as a hammer).
Regarding insuring your iPod, check with your renter's or home insurance carrier to see how much you'll need to pay for an iPod touch rider (a rider is placed on top of an existing policy, adding coverage for a specific item not covered under the standard plan). Allstate, GEICO, and State Farm quote about $5 to $20 per year on top of an existing policy.
If you can, be sure to back up your iPod by synchronizing it to iTunes before bringing it in for service. Apple restores your touch to factory condition, which means you'll lose any data stored on it during the repair and service process.
NOTE: Unlike with an iPhone, Apple does not offer loaner iPods when you bring in your iPod for service.
Accessorizing Your iPod
If you like accessorizing things, then you'll be in heaven with all the accessories that are available for the iPod touch! You can choose from a virtually unlimited number of cases, headphones, screen protectors, car-integration kits, home speaker systems, and more. If we talked about every accessory available, this book would be the size of five phone books!
Although there are almost limitless accessories, generally there are a few things everyone who buys an iPod touch should think about owning:
- Case: It's always good to have a case to protect your investment. Griffin makes a number of beautiful cases, as does Belkin. The hard part about buying a case is not finding one, it's choosing one!
- Armband: If you are a cyclist or a runner, an armband is a must for your iPod touch. Again, you've got a wide variety to choose from.
- USB power adapter: Your iPod charges any time it's connected to a computer's USB 2.0 port. However, you may go on a trip and not have your computer with you. In this case, it's wise to purchase a USB power adapter. These adapters plug into any wall outlet and charge your iPod on the spot.
- Car charger: Like to go on long drives? Think about investing in a car charger for the iPod touch. Like the USB power adapter, a car charger lets you power up your iPod wherever the road takes you.
- iPod speaker system: If you throw a lot of parties or just like listening to music around the house, an iPod speaker system is a must. An iPod speaker system is simply a set of speakers with a built-in iPod dock. Simply drop your iPod into the speaker's dock and listen to the glorious music that comes out. Like all iPod accessories, you can choose from a wide variety of iPod speaker systems.
For all these accessories, a good place to start shopping is http://store.apple.com. You can also walk into any Best Buy or Walmart to get a sense of what's out there for your iPod touch!
Summary
In this chapter, you've seen how to select and purchase your iPod touch. You've discovered what's involved in setting up an iTunes account, activating your iPod, and pairing your iPod touch to your computer. To wind things up, here is a quick overview of some key points from this chapter:
- There are several models of the iPod touch, but whichever unit you choose, you'll probably want to buy it in person at a store, unless you need an online-only feature such as engraving.
- To use your iPod, you no longer need to own a computer. You can buy your iPod and configure it right out of the box. However, it's always helpful to sync your iPod with iTunes on a computer so it is loaded with all of the media you already own.
- iPods are not cheap. Protect your investment by insuring your touch, and consider adding AppleCare for two years of coverage (from the date of purchase) against hardware repairs.
- Your iPod touch purchase entitles you to one complimentary support incident within the first 90 days of product ownership.
- There are almost as many accessories for the iPod touch as there are songs in the iTunes Store. You may have to do a lot of browsing before you know which accessories are right for you.