Chapter 13
Photographing and Recording the World Around You
The iPod touch features two cameras—one in the front and one in the rear. These cameras allow for the most significant features of the iPod touch: the ability to capture photos and high-definition video, as well as make FaceTime video calls.
Are you lucky enough to have one of the latest iPods? If not, this chapter is really not for you, at least until you’re ready to upgrade. But if you've been able to purchase one of the newest-generation iPods, then here are some great ways to take photos and record video.
The Camera Hardware
As mentioned, the newest iPod touch's features two cameras—one front and one rear—with which to take photos and record video. The cameras aren't created equal, however. As you'll see, each one has been designed for different uses.
Front Camera
The front iPod touch camera is located at the top of the iPod, directly in the center of the iPod's upper bezel. If you shine a light directly on your iPod, you can make out a tiny opaque dot about the size of a pencil tip. Behind this dot lies the front-facing camera.
You'll be using this front-facing camera primarily for FaceTime video calls (see Chapter 14), but you can also take photos and record video with it. The front-facing camera particularly makes a great tool for taking self-snapshots for profile pictures for your Facebook account. No more shooting your picture in a bathroom mirror or turning the camera around and hoping you get yourself in the shot! With the front camera, you can see and compose the shot as you take it.
It's important to note that the front-facing camera isn't as powerful as the rear camera. The front-facing camera does not record high-definition (HD) video. High-definition video is defined as video that has at least 720 lines of resolution. The more lines of resolution, the sharper the picture. Although the front camera can record video, its resolution is limited to standard-definition (SD) video. SD video has a resolution of 640x480.
Why didn't Apple use an HD camera in the front? Well, it would be unnecessary. The front camera was designed for FaceTime video calling, not recording video. The image quality while video calling on a small device like the iPod touch is more than good enough using an SD camera and requires less bandwidth for transmission.
Rear Camera
The rear camera is the primary one used to take photos and record video. If you flip your iPod touch over, you'll see the rear camera in the top-left corner of the device.
The rear camera records video in 720p HD resolution at 30 frames a second; that's 1280 horizontal pixels x 720 vertical pixels. Although its still-camera capabilities are better than the front-facing camera, the rear-facing camera is still limited to taking still pictures in 960x720 resolution. If that doesn't sound like a lot, it's because it isn't. 960x720 resolution isn't even equivalent to a 1-megapixel camera; or, if you want to get specific, the iPod touch's still capabilities record photos in 0.69 megapixels.
The less than 1-megapixel resolution is fine for simple snapshots for e-mailing or posting to Facebook, but if you are at an important event like a wedding or a child's birthday and want to take some good-quality pictures suitable for framing, leave the iPod touch at home and bring your digital camera.
NOTE: What's the “p” stand for in 720p, you ask? P means progressive. When HD video is displayed on a screen, it shows either all 720 lines of resolution at a time or just half of them. If it only shows half of them, this is known as interlaced video and is denoted with an i. Simply put, progressive video generally looks sharper because it shows you all the data (or lines of resolution) in a single frame at a time, and interlaced shows you only half the data at a time (followed quickly by the other half). Interlaced video used to be the norm when bandwidth issues were more of a factor, but as bandwidth increased, progressive video slowly took over.
Real-World Use
In real-world use, the iPod touch does a great job at recording HD video in good lighting conditions. While developing this chapter for the book, all the video I shot outdoors in the daytime or inside with good lighting looked gorgeous when I played it back on my HDTV. The iPod touch uses a light-sensitive sensor, which can be used in a wide range of lighting situations. This sensor allows for the best video quality the hardware can record. Because of this sensor, the video quality was still very good even in low-light conditions.
As for taking still images, the iPod touch is great to have when you're out and about and might not necessarily have your digital camera on you. However, because of its 0.69-megapixel images and lack of a camera flash, the iPod touch is in no way a replacement for your standard digital point-and-shoot camera. That being said, Apple didn't set out to design the best camera possible; Apple set out to design the best iPod possible at the best possible price—and at that, Apple excelled. The iPod isn't about taking great art; it's about social use. So, it's a trade-off. If you want a really good camera, then buy a camera or an iPhone or wait for a newer-generation iPod touch with a better camera when these components prices go down.
Navigating the Camera App
To launch the Camera application, tap the Camera icon. It looks like a gray button with a camera lens on it (see Figure 13–1). The camera can be used in either portrait or landscape mode. Simply rotate your iPod to switch between the two orientations.
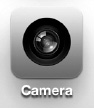
Figure 13–1. The Camera app
Figure 13–2 shows the standard layout of the Camera app. With the exception of the Switch Camera and Options button at the top of the screen, all the camera controls reside in the gray bar at the bottom of the screen in portrait orientation. When you rotate into landscape orientation, the Switch Camera and Options buttons remain at the top of the screen, but the camera control bar shifts to the left (or right) of the screen. The icons on the control bar rotate to match your iPod's orientation.
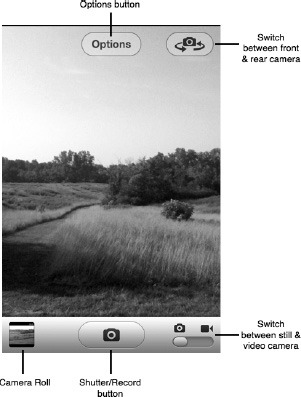
Figure 13–2. The camera controls
The camera controls are as follows:
Switch between still and video camera mode: Tap the slider that lies below icons of a still and video camera in the right of the control bar. The slider button is beneath either the still or the video camera, and the position of the slider indicates the camera that it currently in use (in Figure 13–2, the slider is below the still camera, so you know that you are in still-camera mode).
Switch between cameras: Tap the Switch Camera icon in the top right of the screen to switch between the front and rear cameras. The icon looks like a traditional still camera with swirling arrows on either side. You'll see a 2D animation of the screen flipping between cameras.
Options: This button allows you to access the camera gridline overlay (discussed later).
Shutter button: Tap the oval button with the icon of a traditional still camera in the center of the control bar to take a still photograph. This button changes to show a red dot in the center when you are in video camera mode. Tap the button to record video, and then tap again to stop recording. If you have your finger on the Shutter/Record button but then change your mind about photographing or recording your subject, you can slide your finger off the button and no image or video is captured.
Access the Camera Roll: Tap the square button on the left of the control bar. The square is filled with an icon of the last image or video recorded. Once tapped, your Camera Roll slides up on the screen. This is a great feature for reviewing your last photo or video. It saves you a lot of time since you don't have to leave the Camera app to check out your Camera Roll in the Photos app.
Taking Still Pictures
Taking a still photograph couldn't be easier. Point your camera at what you want to take a picture of, and tap the shutter button. You can also press the topmost volume button on the side of your iPod. While in camera mode, the topmost volume button acts as a shutter button. You'll hear a shutter click sound effect and see a cool animation of a lens's iris quickly closing and then opening. After that, the still image you just took jumps down into the Camera Roll icon.
NOTE: Some people find that tapping the on-screen shutter button to take a still photo causes their composition to get messed up. A neat trick Apple included to counteract any accidental nudging when you tap the shutter button is this: tap and hold the shutter button and then compose your shot. When you are ready to take the photo, simply remove your finger from the shutter button, and the shot is recorded.
Autofocus and Exposure
You can set the exposure of the camera by tapping anywhere on the screen. You'll see a white box with crosshairs quickly appear. The iPod's camera reads the exposure setting of the part of the image inside the box and adjusts the image accordingly.
Figure 13–3. Tap the screen to autofocus and set the exposure.
Setting the exposure helps when you are shooting an image of a cloudy sky, for example. If you want the sky to appear other than blinding white, tap the area of the image on your iPods screen, and the exposure adjusts accordingly. When you tap any portion of the image, the camera also autofocuses on that part of the image.
Composing Shots with Gridlines
There's a tenet in photography called the “rule of thirds.” Basically it states that if you divide your shot into nine imaginary grids by placing three horizontal and three vertical lines “over” the image and keep the subjects of your shots sequestered to one of those lines, preferably the outer ones, it makes for a much more interesting shot. This sequestering, or composition, can be helped when you can see a grid on your screen.
With this in mind, Apple built gridlines into the Camera app. To turn on gridlines, tap the Options button (Figure 13–2), and set Grid to ON (Figure 13–4). Gridlines appear on your screen, dividing it into nine squares. Tap Done to exit the options menu. To turn off gridlines, go back into options and set Grid to OFF. While gridlines appear on your iPod touchscreen, they do not appear in your photographs.
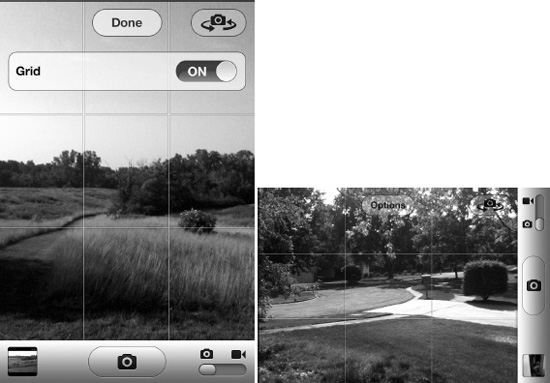
Figure 13–4. Turning on gridlines can help you compose your shots.
Pinch to Zoom In and Out
To zoom in or out, simply pinch the screen with two fingers. The zoom slider appears. (Figure 13–5). This zoom bar allows you to adjust the digital zoom settings of the photograph; it lets you zoom in and out on your subject. Slide your finger along the bar to zoom in or out. You can also tap the + or – button to zoom in or out in increments or simply continue pinching in or out.
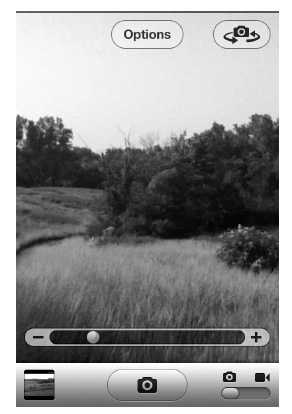
Figure 13–5. The zoom controls appear above the control bar while tapping the screen in still-camera mode.
NOTE: You can only zoom on while in still camera mode using the rear camera. You cannot zoom using the front-facing camera or while in video camera mode.
Recording Video
To record video, set the slider in the control bar to video camera mode. The camera's shutter button is replaced with a recording button (see Figure 13–6). Tap the record button to begin recording your video. The red dot on the record button begins to pulse, and a time code stamp appears in the upper right of the screen showing the hours, minutes, and seconds that have elapsed since recording began. To stop recording, tap the record button again. Before or during recording, double-tap the screen to enter a 16:9 wide-screen aspect ratio.
Just how much video can you record on your iPod touch? That depends on the size of your iPod touch and how much space you have available. If you have a 32GB iPod touch but only have 10GB of free space on it, you'll be able to record only 10GB of video.
720p/30fps video takes up about 120MB per minute. If you think in terms of gigabytes, one hour of 720p/30fps video will take about 7GB of space on your iPod. One hour of video is a lot, but so is 7GB of storage space. If you are going to be recording a lot of video, it's helpful to be close to your computer or have your laptop with you so you can easily dump your video onto your computer's hard drive and then wipe it from your iPod touch, freeing up space for more video.
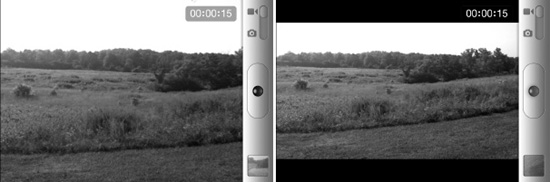
Figure 13–6. The video-recording screen shows the time elapsed while recording. Double-tap the screen to enter a 16:9 aspect ratio.
TIP: If you are going to be using the recorded video in a movie or be viewing it on your TV, you might want to make sure you are recording in landscape mode. You can record in portrait mode, but portrait mode is a weird aspect ratio to view videos in.
Changing the Autofocus and Exposure
As with still images, you can set the autofocus and exposure of recorded video. You'll see a white box with crosshairs quickly appear. The iPod's camera reads the exposure setting of the part of the image inside the box and adjusts the video's exposure settings accordingly. When you tap any portion of the image, the camera autofocuses on that part of the image.
Accessing Your Camera from the Lock Screen
An amazing new feature of iOS 5 is the ability to quickly access your camera from your iPod touch's lock screen. This feature eliminates precious time wasted from having to unlock your iPod, swipe to the camera app, and then tap its icon to open it. Now you can access the camera from the lock screen and get that spontaneous shot.
To access your camera from the lock screen, double-press the home button on your iPod touch. Doing so brings up audio playback controls on the lock screen and a shortened slider bar. As you can see in Figure 13–7, there's also a camera icon next to the slider bar. Tap it to be immediately taken to your camera.
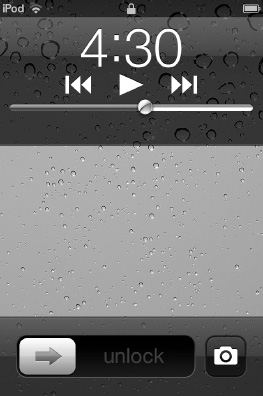
Figure 13–7. Accessing the camera from your iPod touch's lock screen
Viewing Your Camera Roll
To view all the photos and videos you have captured, tap the Camera Roll icon in the left of the control bar. The last image or video you recorded appears on the screen. Tap the Camera Roll arrow to be taken to the Camera Roll (Figure 13–8).
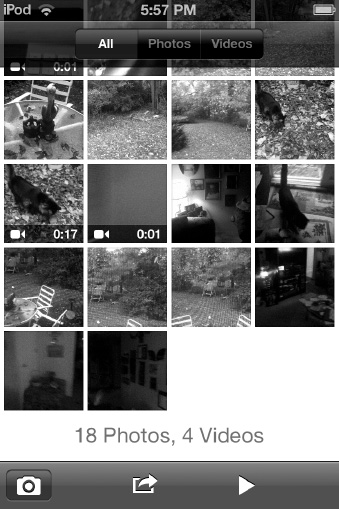
Figure 13–8. The Camera Roll contains all the photos and videos you have taken with the iPod's camera.
As you can see in Figure 13–8, the Camera Roll allows you to sort through your recordings in three ways:
- All: Displays all of your photographs and videos
- Photos: Shows just the photos you have taken
- Videos: Exhibits just the videos you have recorded
To view any individual photo or video, tap its thumbnail. Photo thumbnails appear as a picture square, while video thumbnails appear as squares with a single frame of the recording representing the video. A small camera icon with the length of the video in minutes and seconds overlays a video thumbnail's image.
Tap the blue camera button at the bottom of the screen to return to your camera.
NOTE: When accessing the Camera from the lock screen, you'll only be able to view Camera Roll items taken from the lock screen. Other items in your Camera Roll remain hidden for privacy purposes when you access your camera from the lock screen.
Viewing Individual Photos
When in your Camera Roll, you will see thumbnails of the photos it contains (see Figure 13–8). To view a photo full-screen, tap the photo once. As you can see from Figure 13–9, you can view the photo in portrait or landscape mode.
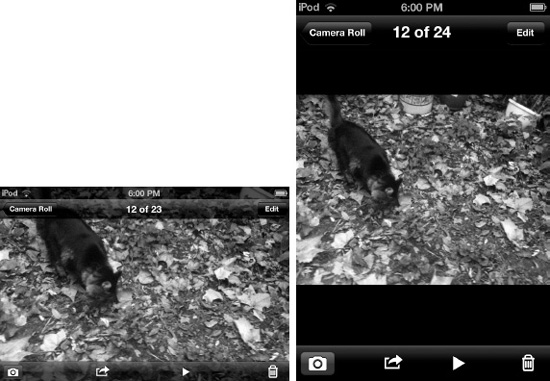
Figure 13–9. Viewing a photo in landscape and portrait modes
Once you display a photo full-screen, you have several ways to interact with it:
- Pinch to zoom into and out of the photo.
- Double-tap to zoom into the photo. Double-tap again to zoom out.
- When your image is displayed at the normal zoomed-out size, drag to the left or right to move to the previous or next image in the album. When zoomed into an image, dragging the photo pans across it.
While viewing individual photos, flip your iPod touch onto its side to have your photo reorient itself. If the photo was taken in landscape orientation, it fits itself to the wider view. Tap any image once to bring up the image overlay, as shown in Figure 13–9. The image overlay features a menu bar at the top and bottom of the screen.
The image overlay menu bar at the top of the screen displays the number of the selected image out of the total number of items in the Camera Roll and the back button, labeled Camera Roll, to return to the album. Tap the Edit button to access your photo editing tools (see Chapter 5).
At the bottom of the screen you'll see the Camera button that returns you to your camera, the Share button (it looks like an arrow breaking free from a small box) and also a play button. The play button allows you to start a slide show, and tapping the trashcan icon displays a deletion confirmation menu. Tap the red Delete Photo button to delete the selected photo.
Playing a Slide Show
Playing slide shows on your iPod touch is as easy as tapping a single button, namely, the play button that resides at the bottom center of the screen. When you tap it, the Slideshow Options screen appears (Figure 13–10).
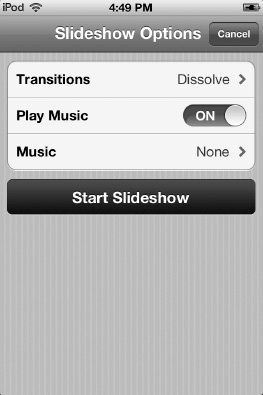
Figure 13–10. The Camera Roll slide show settings
Transition: By default, the slide show transition is Dissolve, but here you can also choose from Cube, Ripple, Wipe Across, or Wipe Down. The advantage of transitions is that they keep things lively. The disadvantage is that they get old really, really fast. For this reason, you probably want to skip nondissolve transitions in long slide shows.
Play Music: When set to ON, you can select music from the music library on your iPod that plays in the background of the slide show.
Music: Tap to select the song you'd like to play during your slide show.
Start Slideshow: Tap this button to begin your slide show. To stop a slide show, tap the screen.
Sharing Your Photos
You have a number of ways to share the photos you have in your Camera Roll. If these options seem familiar to you, it's because they're identical to the photo-sharing options I went over in my description of the Photos app in Chapter 5.
To access all the ways you can share your photos, bring up a photo full-screen, and tap the Share button, which looks like an arrow breaking free from a small box (see Figure 13–9). You are presented with a pop-up menu of sharing options (see Figure 13–11).
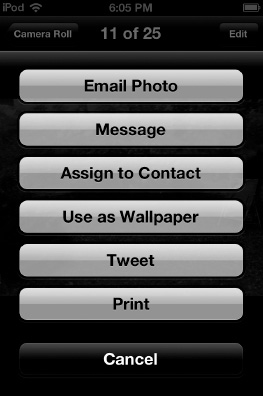
Figure 13–11. The sharing photos menu
Email Photo: Tap this to see an e-mail compose window appear on the screen. You'll notice that the photo has been copied into the body of the e-mail already. Enter the recipient's e-mail, a subject, and some body text, and then tap Send—your photo is on its way!
Alternatively, you can e-mail up to five photos at a time from within the Camera Roll. I discuss this option later in the chapter.
Message: This allows you to attach your photo to an iMessage (see Chapter 14). A new iMessage compose window will appear where you can write a message along with the atached photo.
Assign to Contact: This option allows you to assign a photo to an address book contact. Tap Assign to Contact, and then select the contact's address book entry from the pop-up menu. Move and scale the thumbnail of the photo that appears, and then tap the Set Photo button.
The next time you view the contact in the iPod touch's Contacts app, the image you selected for them will appear next to their name. This image will sync with their contact information in Address Book and Entourage on a Mac and Outlook on a Windows computer.
Use as Wallpaper: Tap this button to use the selected image as wallpaper on your iPod touch. Move and scale the image, and then tap Set. From the pop-up menu, you'll be able to select whether you want to use the image for the iPod touch's lock screen, the home screen, or both. This isn't the only way to set your iPod touch's wallpaper options. I'll talk about the other way in Chapter 15.
Tweet: Tapping Tweet opens a Twitter upload screen. This allows you to Tweet your picture directly to your Twitter account. You can also add a short message to the photo and your current location
Print: Tapping this prints your selected photo to an AirPrint wireless printer.
Viewing Videos
To view any video you have recorded, tap its thumbnail in the Camera Roll. The video will appear with a big play button in the center. Tap any area of the screen once to bring up the on-screen video controls (Figure 13–12).

Figure 13–12. Displaying video from the Camera Roll. Tap once to bring up the on-screen menus.
Once you display a video full-screen, you have several ways to interact with it:
- Tap the video once to play it. Tap again to pause it.
- Scrub through the video by tapping and holding the silver drag bar in the scrubber bar. The scrub bar shows you segments of the video represented by thumbnails for those segments.
- Hold your finger on the scrub bar for a few seconds, and you'll see the scrub bar stretch out. This gives you finer control over finding a specific spot in the video.
The video overlay menu bar at the top of the screen shows you the number of the selected video out of the total number of items in the Camera Roll and shows you the back button, labeled Camera Roll, to return to the main Camera Roll.
At the bottom of the screen you can tap the blue Camera button to exit the Camera Roll and return to the Camera app. Also you'll find the Share and Play buttons. The Play button enables you to start playing the video. Tapping the trash can icon brings up a deletion confirmation dialog. Tap the red Delete Video button to delete the selected video.
Editing Your Video
Apple has included limited video-editing functionality in the Camera app. Video editing isn't exactly the right word, though. Trimming is more accurate because you can shorten, or trim, the video at the front and end of the clip.
To trim a video, bring up the video menu overlays (see Figure 13–12). Next, grab the beginning of the scrub bar, and pull it to the right. This activates trim mode (Figure 13–13).

Figure 13–13. Video trim mode
In trim mode, you can drag the ends of the scrub bar, now outlined in yellow, toward the center. Dragging the ends shortens the clip at the beginning and the end.
Trimming is a great feature that allows you to highlight just the really good portions of your video clips. When you've adjusted your trim commands, tap the yellow Trim button to bring up a Trim dialog (Figure 13–14).
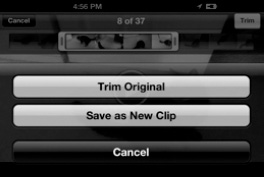
Figure 13–14. The Trim pop-up menu lets you trim the original or save the trim as a new clip.
This dialog provides three options:
Trim Original: This actually changes the original video recording. It permanently deletes the sections of video you have trimmed out.
Save as New Clip: This leaves your original video intact and creates a completely new video file of just the trim you specified.
Cancel: This closes the menu and returns to the clip with your trim points still set.
Remember that if you choose to keep the original clip, storage space on your iPod can quickly fill up. A one-minute clip filled up 120MB of space on my iPod.
Sharing Your Video
While viewing any single video clip, you have several sharing options. To bring up the sharing menu, tap the Share button, which looks like an arrow breaking free from a small box (see Figure 13–12). You are presented with a dialog showing three sharing options (see Figure 13–15).
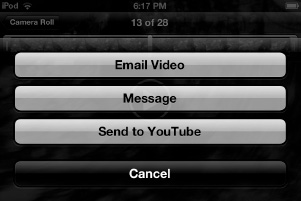
Figure 13–15. The video sharing options
Email Video: Selecting this command compresses the video clip as a QuickTime movie file. A new e-mail message window appears with the movie clip attached to the body of the message.
Depending on the length of the video clip, you may see an error message that says “Video is Too Long.” If you see this, you are asked if you want to select a smaller clip from the video to e-mail. Tap OK to enter Trim mode and cut down the length of the clip.
What's interesting about trim mode is that the yellow trim selection bar is fixed to 54 seconds. You can shorten it or drag the 54-second trim selection bar around, but you can't increase the video length to more than 54 seconds. As of now, 54 seconds seems to be the longest clip length for e-mailing. Apple might change this with a future software update.
Once you have trimmed your video, tap the yellow Email button above the scrub bar. A blank e-mail with the video in the body of the message should appear.
Message: This allows you to attach your video to an iMessage (see Chapter 14). A new iMessage compose window will appear where you can write a message along with the atached video.
Send to YouTube: Selecting this option will allow you to upload your video to YouTube right from your iPod. On the screen that appears (Figure 13–16), enter a name and description for your video, select to upload it in standard- or high-definition, add tags, and finally select a YouTube category and then tap Publish. You must have a YouTube account to upload videos to YouTube.
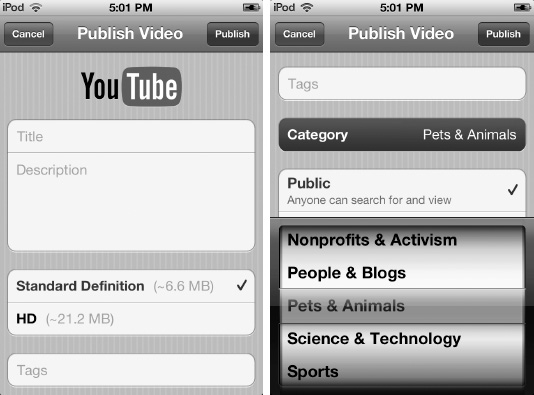
Figure 13–16. Publishing a video to YouTube
Sharing Multiple Pictures and Videos from the Camera Roll
As I mentioned earlier, you don't have to share your photos or videos one at a time; you can share multiple photos and videos by using the share and copy options on the Camera Roll screen:
- Play a slide show: Press the play arrowhead at the bottom of the screen. Your photos and videos are displayed in a slide show (Figure 13–8).
- E-mail, copy, or delete your photos and videos: While in the Camera Roll, tap the Share button in the lower-left corner. You'll see the All/Photos/Video sort menu at the top of the screen renamed to Select Items (Figure 13–17).
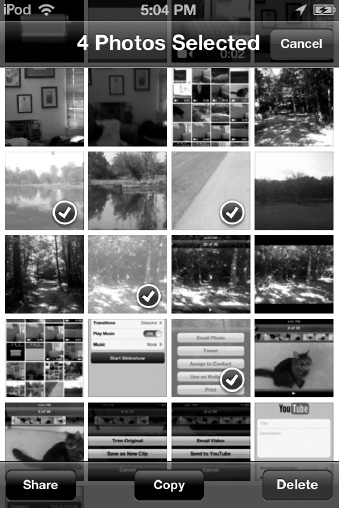
Figure 13–17. The Select Items screen
To e-mail: Tap up to five photos. A check mark appear on the photos once you have done so. Next, tap the Share button at the bottom of the screen. A pop-up menu appears with an Email button; tap it, and a new message compose window appears with the images pasted into the body of the e-mail.
You can only e-mail one video at a time, provided it is less than 54 seconds long.
To Print: Tap up to five photos. A check mark appears on the photos once you have done so. Next, tap the Share button at the bottom of the screen. A pop-up menu appears with a Print button; tap it to print the photos to an AirPrint wireless printer.
To copy: Tap up to five items, which can be a combination of photographs and videos. A check mark appears on each selected photo or video (see Figure 13–17). After you have selected all your photos, tap the Copy button in the lower-right corner of the screen. This saves the images and videos to your clipboard to paste into other things (like an e-mail or document) later.
To delete: From the Select Items screen (Figure 13–17), select as many photos and videos as you want, and then press the red delete button in the lower-right corner. A Delete Selected Items pop-up warning appears. Tap it to delete the items, or tap Cancel to cancel the delete.
Uploading Images to Your Computer
Although it's nice to have the options to e-mail and tweet our photos and upload our videos to YouTube, many of you will be primarily viewing your images on your computers. It's easy to get your pictures and videos off your iPod touch and onto your computer. Just plug your iPod into your computer via the USB-to-dock cable.
If you are on a Windows computer, your photo software such as Picasa or Adobe Photoshop Albums should recognize the iPod touch as just another camera and import the photos and videos as the application normally would. If you are on a Mac and iPhoto is open, iPhoto detects that your iPod is connected and asks whether you want to import the videos and photos from the iPod touch's Camera Roll.
Alternately, a feature of Apple's new iCloud service is called Photo Stream. If you have a free iCloud account, the 1,000 most recent photos and videos you take on your iPod touch will automatically be pushed to your other iOS devices and Macs and PCs.
Photo Stream relies on a Wi-Fi connection, but once you have that, the second you take a photo on your iPod touch, it will also appear in your iPhoto library on your Macs, your Pictures libraries on your PCs, and in the Photos app of every iOS device you own. Photo Stream is a pretty cool way to share all your pictures with all your devices simultaneously.
Summary
The front and rear cameras add some nice features to the iPod touch. The HD video-recording capabilities are amazing, but the still photography leaves something to be desired. Here are a few key tips for you to carry away with you:
- If you're going on vacation, leave your bulky HD video camera at home. Your iPod touch lets you record great-quality video at 720p. Just be sure to bring a laptop along so you can dump your video off onto its hard drive and make room for more video on your iPod touch.
- Do not leave your regular digital still camera at home if you are going on vacation. Yes, you can take still photos with the iPod touch, but it's more for social use, such as taking quick snaps of friends or self-portraits. If you want to catch that beautiful sunset over the ocean, do it on a point-and-shoot camera.
- Need a new profile picture for Facebook? The front camera on the iPod touch makes it easy to take self-shots.
- You can zoom while in still camera mode, but there is no zoom option while recording video.
- One minute of 720p video takes up about 120MB. Keep this in mind if you are going to be recording a lot of video because you'll need a lot of free space on your iPod.
- Apple has imposed a seemingly arbitrary limit on e-mailing videos. A video clip must be 54 seconds or less in length in order for you to e-mail it. If it's 55 seconds or longer, you'll be asked to trim the clip before you e-mail it.
- If you are taking pictures or recording video within range of a Wi-Fi network, the iPod's Camera app tags your photos and videos with geodata. Applications such as Apple's iPhoto can then display your photos on a map.
- With iCloud's Photo Stream feature, the photos you take with your iPod touch are automatically pushed to your other Macs, PCs, and iOS devices the moment you take them, provided your iPod touch has a Wi-Fi connection.