Chapter 10
Setting Up and Using Mail
Unlike many other MP3 players, your iPod touch can send, receive, and browse e-mail without getting weighed down with compromise. The iPod doesn't settle for cramped, odd presentations the way you have to deal with on some lesser “smartphones.” Your e-mail looks the way it should—the way it would if you were reading it on your home computer. That's because the iPod provides an HTML-compatible rich-text client. Mail looks better because the client is better. It's made to work right.
Getting Started with iPod Mail
As you can see in Figure 10–1, the Mail icon looks like a white envelope floating in a pleasant blue sky. The iPod's Mail app is surprisingly compatible. It works with most major e-mail providers, including Yahoo!, Gmail, AOL, Hotmail, and of course Apple's own iCloud mail services. This high level of provider support is because of the iPod's protocol support. The iPod understands the most popular e-mail standards: POP, IMAP, SMTP, and even Microsoft Exchange. If you're not already familiar with these types of e-mail, you can read a brief overview of them in the “Kinds of E-mail” section later in this chapter.
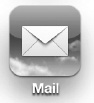
Figure 10–1. The Mail icon
Adding Mail Accounts to Your iPod touch
You can add accounts to your iPod in two ways. First, you can synchronize with iTunes. The first time you connect your iPod to your computer and sync, iTunes searches your computer for mail accounts and adds them to your unit. Second, you can add accounts directly on your iPod using Mail settings. It takes a few more steps than using iTunes, but it's not at all complicated. Let's look at both ways to add accounts.
Adding Accounts with iTunes
iTunes takes most of the work out of setting up your iPod with your existing mail accounts. It looks through your computer at programs like Outlook Express and Apple Mail, finds account information, and offers to synchronize those account settings with your iPod (see Figure 10–2). This makes it really easy to get your iPod up to speed. A single sync puts these account details on your iPod, and you're pretty much ready to get going.
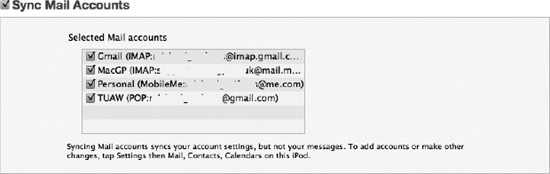
Figure 10–2. The iPod Mail Accounts settings appear on the Info tab in iTunes.
To select which accounts to add, launch iTunes and connect your iPod. Select your iPod from the source list (the column at the left of the iTunes window; your iPod appears under the Devices heading). The iTunes window updates and displays a summary of your iPod, including its name, the software version, and so forth. Click the Info tab at the top of this window. Scroll down the Info tab to the Sync Mail Accounts section. Here, you can choose whether to synchronize your mail accounts to your iPod. Check the “Selected Mail accounts” check box, and pick the accounts you want to use. In Figure 10–2 you can see I've selected to sync four accounts.
Next, scroll down on the Info tab, below the Mail Accounts and Other sections, to the Advanced section (see Figure 10–3). As a rule, your iPod won't add new accounts until you force things. Unlike normal syncs that just update data, when you select to replace your mail accounts on your iPod using the Advanced settings, iTunes updates your iPod with all the accounts you just selected in the Mail Accounts settings.
Figure 10–3. Use Advanced settings to replace mail accounts during the next sync. You can also choose to update your contacts, calendars, and bookmarks from this settings section.
Replacing mail accounts isn't something you do all the time. You'll want to do this account replacement with new iPods that you want to initialize, when you've moved your iPod's home to a new computer, or after you've restored your iPod's firmware to factory settings. If you just want to add a new e-mail account, add it directly on your iPod rather than using iTunes. It's easier.
Adding a Preferred Provider Account from Your iPod
- Adding a new mail account to your iPod is especially easy when you use one of the preferred providers: Microsoft Exchange, MobileMe, Gmail, Yahoo!, or America Online (AOL). Your iPod already knows how to contact the mail servers and which protocols they use. Here are the steps to take to add a preferred provider account:
- From the home screen, tap Settings, and navigate to
Settings
Mail, Contacts, Calendars Addaccount. - The Add Account screen appears, as shown in Figure 10–4.
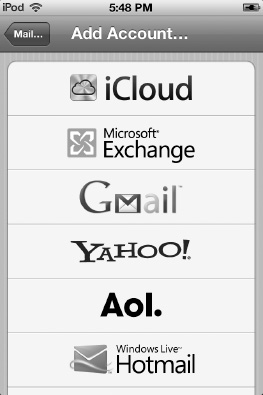
Figure 10–4. When you use a preferred provider, the e-mail setup process is vastly simplified to entering a few items of information. Tap Other to set up e-mail with another provider. You will see this Add Account screen the first time you run the Mail application if you haven't already set up your accounts.
- Select the kind of account you will use.
- For Name, enter the name you want to appear in your From line, usually your full personal name.
- For Address, enter your full e-mail address (such as,
[email protected]). - In the Password field, enter your password. Make sure to type carefully and slowly, and look at the key confirmations as you type. You will not see the password itself as you type it. Try not to make mistakes. If you mistype your password, your e-mail account will not show up in Mail.
- Finish by entering an account description. Your iPod uses the text you type in the Description field as a label in the Accounts list, so enter something meaningful, like “Work Yahoo! Account” or “Home AOL.”
- Tap Next, and wait as the iPod verifies your account information. You can then choose whether to sync just your e-mail for the account or your calendars and notes as well (if your e-mail provider offers those features). Tap Save, and you will then return to the Mail settings screen, and you are finished setting up your account.
Adding an Other Provider Account from Your iPod
Adding accounts from other providers, such as Comcast or EarthLink, requires a few more steps. Here's how to add such an account:
- From the home screen, tap Settings, and navigate to
SettingsäMail, Contacts, Calendars. - Tap Add Account.
- On the New Account screen (see Figure 10–4), tap Other. The Other screen appears, as shown in Figure 10–5.
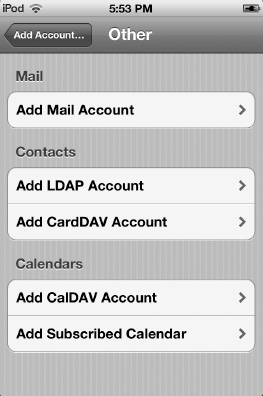
Figure 10–5. The Other screen
- Tap Add Mail Account. The New Account screen appears (see Figure 10–6).
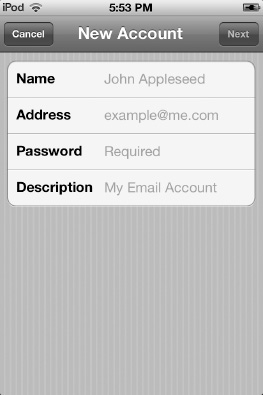
- Enter the name, address, password, and a description, such as “work,” “home,” and so on, of the account. Tap Next.
- Tap the button that describes the kind of e-mail account you'll use, either IMAP or POP (Figure 10–7). If you're unsure which account type to use, contact your Internet service provider (ISP) or your organization's information technology (IT) support group to get the information you need to work through these steps.
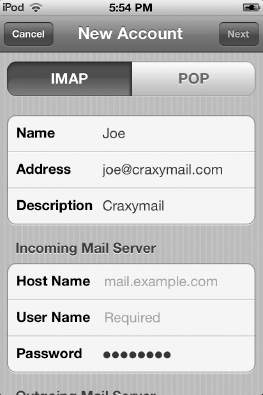
- Determine the incoming and outgoing e-mail servers for your provider. You'll need this information to set up your account. Most providers, including ISPs and IT departments, offer web pages with this information, or you can call their technical support line. For example, my personal EarthLink account uses
pop.mindspring.comfor incoming mail andsmtpauth.earthlink.net:587for outgoing mail. Notice the colon and the number, which refers to the port used by the mail server. Make sure you get a full host address, which may or may not include a port number.NOTE: If you find that setting up your iPod touch e-mail account with these steps exceeds your tech comfort zone, I strongly encourage you to physically bring the iPod to your in-house IT department. This can save you a lot of grief and headaches.
- Enter the name you want to appear in your From line, usually your full personal name, in the Name field. This name appears in all your outgoing messages. For Address, enter your full e-mail address (such as
yourname@earthlink.net). Enter an account description. Your iPod uses the text you type in the Description field as a label in the Accounts list, so enter something meaningful, like “Work EarthLink Account” or “Comcast from Home.” - In the Incoming Mail Server section, type the incoming mail server host address in the Host Name field. Enter your account address (such as
yourname@comcast.net) in the User Name field. Type your password in the Password field. Make sure to type carefully and slowly, and look at the key confirmations as you type. You will not see the password as you type it. - Repeat the previous step for the Outgoing Mail Server section, entering the outgoing host address in the Host Name field. For outgoing mail, the User Name and Password fields are optional. You'll need them if your mail server uses authorized SMTP.
- Tap Save, and wait as the iPod verifies your account information. You automatically return to the Mail settings screen, and you are finished setting up your account.
NOTE: By default, the iPod attempts to connect to a password-protected account using the Secure Sockets Layer (SSL) protocol. If this fails during the verification process, the iPod prompts you to confirm whether it should try again without SSL. Feel free to agree.
Removing and Disabling Accounts from the iPod
To remove an account from your iPod, go to Settings ![]()
Mail, Contacts, Calendars, and tap one of the items in your Accounts list. Scroll all the way down to the bottom of the account screen, and tap Delete Account. The iPod prompts you to confirm the account deletion (Figure 10–8). Tap Delete Account one more time to remove the account, or tap Cancel to keep the account.
At times, you may want to disable an account without removing it from your iPod. To do this, go to Settings ![]()
Mail, Contacts, Calendars.Locate and select the account you want to disable, and switch the Mail button to OFF (Figure 10–8). This disables the account. Switch it back to ON to reenable it.
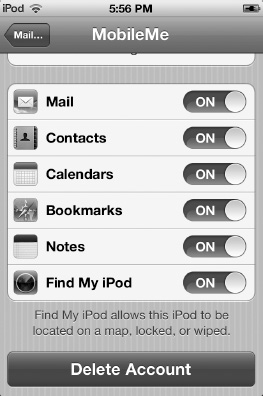
Figure 10–8. Deleting or disabling Mail accounts. The Notes button allows you to sync notes with your e-mail account if your e-mail provider has a notes function.
Choosing E-mail Check Intervals and Other Settings
You're ready to start using Mail, but I suggest that you check your application settings before diving in. Navigate to Settings ![]()
Mail, Contacts, Calendars, and scroll down to the Fetch New Data. The Fetch New Data settings (Figure 10–9) allow you to choose between push e-mail and fetch e-mail.
Push: When this is turned on, any new e-mails you receive are automatically sent to your iPod immediately. Push is like someone telling you that you have a letter waiting the moment it arrives.
Fetch: If your e-mail account doesn't support push (or even if it does, but you don't want to use it), fetch gives you several options as to the intervals that the Mail app will check to see whether you have new messages. You can set Fetch to check for new mail every 15 or 30 minutes, on every hour, or manually. When you set fetch to manually, you'll have to open the Mail app to check to see whether you've gotten any new e-mails. When your Mail is set to Push or Fetch (excluding Manually), you'll see a red badge over the Mail icon (see Figure 10–10) on your iPod home screen that shows the number of new messages you have received.
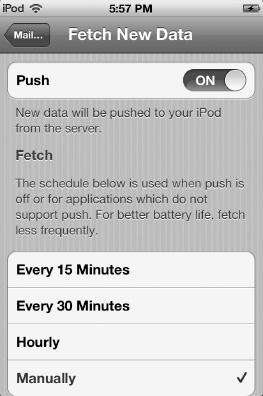
Figure 10–9. The Fetch New Data settings
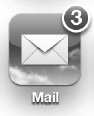
Figure 10–10. A red badge with a number in it means that's how many new e-mail messages you have waiting for you.
Mail has many other options besides Fetch and Push. Navigate to Settings ![]()
Mail, Contacts, Calendars, and scroll down to the Mail section (see Figure 10–11). Here, you'll find preferences that control the way your iPod displays e-mail. You'll find that Mail works far more smoothly and predictably when you customize these settings before using your new accounts.
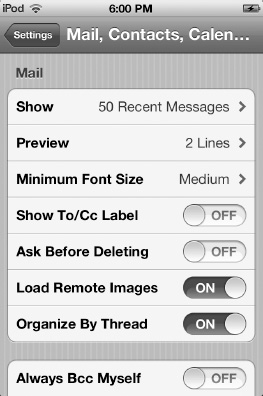
Figure 10–11. The Mail settings screen contains many basic settings you'll want to configure before using your e-mail accounts.
Here is a rundown of the Mail settings you'll want to look over:
Show: How many messages should the iPod download and display at once? Choose from 50,100, 200, 500, and 1,000 recent messages.
Preview: Your inbox displays information about each message. It shows who sent the message, the time it was sent, the message subject, and, depending on your setting here, a brief preview of the message itself. For the preview, you can choose how many lines to show: None (no message preview), 1, 2, 3, 4, or 5. The example in Figure 10–12 shows two lines per message.
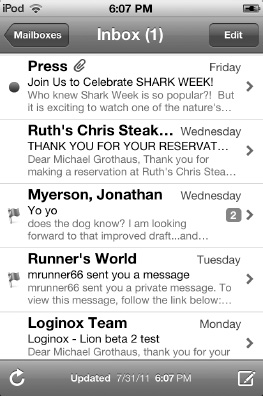
Figure 10–12. Each message in the inbox shows the recipient, the subject, the date or time the message was sent, and a message preview. You can control how many lines of text are shown for each message preview in Settings ![]()
Mail, Contacts, Calendars ![]()
Messages ![]()
Preview. Blue dots indicate unread mail on this screen. Red flags indicate messages you have flagged.
Minimum Font Size: My eyes are pretty bad. Fortunately, the iPod has a choice for minimum font size, so I can make sure that the text displays in a size that I can read. Choose from Small, Medium, Large, Extra Large, and Giant. I use Large.
Show To/Cc Label: By default, your iPod does not show the To or Cc lines from e-mail. The iPod normally hides them to save screen space. If you want to override this behavior for your mail, switch this option from OFF to ON.
TIP: You can view the To and Cc lines even if you haven't enabled the option to show them on the Mail settings screen. From the e-mail message screen, tap Details to reveal the lines. Tap Hide to hide them again.
Ask Before Deleting: You might think that asking for confirmation before allowing the iPod to delete a message is a great idea. When working your way through 100 messages in your inbox, this idea quickly becomes less attractive. The iPod allows you to delete e-mail without confirmation by default. If you want to add an extra layer of protection, switch this option to ON.
Load Remote Images: Sometimes e-mails have HTML images embedded in them. If load remote images is set to OFF, those images are not displayed when viewing your e-mail.
Organize By Thread: When this is set to ON, related messages appear in their own threads. Related messages are e-mails in which the subject is the same. So if you've been having a back-and-forth e-mail conversation about your birthday, all the e-mails related to that thread are grouped together. A small, gray, boxed number next to the e-mail message denotes threads. The number signifies how many e-mails are in that thread.
Always Bcc Myself: Some mail services, such as Gmail and Yahoo!, always create copies of sent mail. Others do not. Enable this option to send a blind carbon copy (Bcc) to yourself when writing letters. The “blind” part of carbon copy means that you won't be visibly added to the recipient list. When correspondents “reply to all,” you won't (necessarily) receive multiple copies of those e-mail messages.
Increase Quote Level: When ON, a level of indentation is added when you forward or reply to a message.
Signature: By default, the iPod adds “Sent from my iPod” to all outgoing e-mail. To remove this tag, erase the text in the Signature line here. You can also customize this message or replace it entirely. Perhaps you might want to add contact information or a favorite quote. To do this, tap the current signature. A keyboard appears. Use it to edit the text. After making your edits, tap Mail to return to the Settings ![]()
Mail, Contacts, Calendars screen.
Default Account: Choose the default account you want to use for sending mail. This applies only to non-Mail iPod applications such as Safari or Photos. When you pass along a bookmark or a picture you've snapped, this option sets the account used to send that message.
Working with Mailboxes
When you enter Mail for the first time (and after reboots), you're greeted by the Mailboxes screen (Figure 10–13). The Mailboxes screen is divided into two sections: Inboxes and Accounts.
Inboxes: This section lists two or more inboxes, depending on how many e-mail accounts you have set up. All Inboxes will take you to a unified inbox. A unified inbox shows you all your messages across all your e-mail accounts. This is handy if you frequently work with more than one e-mail account. It allows you to check one place for all of your newest messages. Below All Inboxes you'll see the inboxes listed for all your other e-mail accounts. In Figure 10–13 you can see I have two e-mail accounts set up, Personal, and TUAW. You can tap on either of those to only see the inbox from that single account.
Accounts: Under this heading you'll see all the e-mail accounts you've set up. Clicking any e-mail account under the Accounts heading will take you to a screen that lets you navigate further to that account's inbox, drafts, sent messages, trash, and any other subfolders you have for that e-mail account (see Figure 10–14).
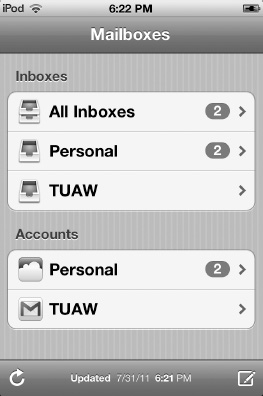
Figure 10–13. The Mailboxes screen lets you quickly jump to a unified inbox and also lets you explore your e-mail on a per-account basis.
Tap an account name to open any of the individual account screens. Return to the Mailboxes screen by tapping the Mailboxes button at the top-left corner of that screen.
Each account screen presents one or more mailboxes and folders, as shown in the example in Figure 10–14. When a mailbox contains unread mail, a blue number appears to the right of that box. Tap a mailbox to open it and display the messages stored inside.
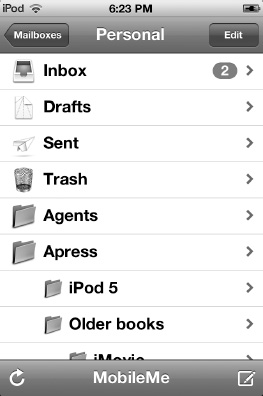
Figure 10–14. Each mail account uses one or more mailboxes and folders. The account screen lists these, allowing you to access each with a single tap. Mailbox types may include Inbox, Drafts, and Trash, as well as others. Blue numbers indicate the number of unread messages in that mailbox.
Each account may include some or many of the following standard mailboxes and folders:
Inbox: All new messages load into your inbox. You have an inbox for each account.
Drafts: Messages that are written but not yet sent get saved to Drafts.
Sent: When your mail account saves copies of outgoing mail, they're placed in a Sent folder.
Trash: The iPod stores deleted mail in Trash folders. To permanently delete messages from the trash, select your Trash folder, tap the edit button, and then tap the Delete All button at the bottom of the screen.
Additional folders (or mailboxes, as Apple calls them), such as the Agents folder shown in Figure 10–14, were created in the Mail app itself.
To create a new folder/mailbox, follow these steps:
- Tap the Edit button at the top of the screen in your chosen Mail account (Figure 10–14).
- Tap the New Mailbox button that appears at the bottom of the screen (Figure 10–15).
- Enter the name of the folder you want to create (Figure 10–15); then tap the Mailbox Location field, and choose where you want to place the folder. Tap Done.
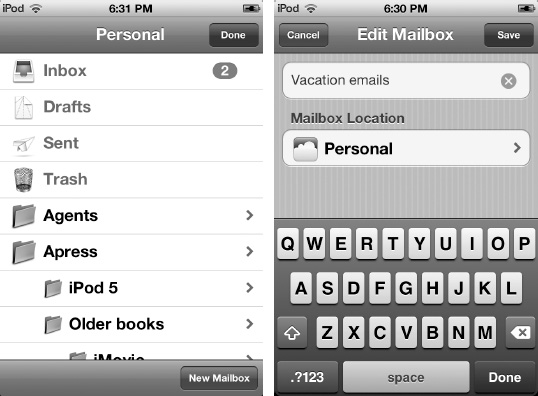
Figure 10–15. Creating mailbox folders inside the Mail app
You can open a mailbox or folder and view the messages stored inside by tapping its name. For example, tap Inbox to see the list of messages stored in that mailbox (see Figure 10–12). From here, you can choose messages to display and manage your mailbox. Here are the actions you can take from this screen:
View a message: Tap an e-mail to open it for viewing.
Refresh mail: Tap the icon that looks like a semicircular arrow, at the bottom-left side of the screen, to have your iPod contact your mail provider and request new mail.
Compose a new message: Tap the icon that shows a square with a pencil through it, at the bottom-right side of the screen, to start writing a new message.
Edit a message: Tap Edit to enter edit mode (see Figure 10–16). In edit mode, you can tap the red circle next to any message to delete it. Confirm by tapping Delete, or tap anywhere else to cancel. You can also move messages to other folders using the edit button. Tap the circle next to the message you want to move and tap the move button. A screen appears listing all the folders you have in your e-mail accounts. Tap the folder you want to move the message to, and you'll see a little animation of an envelope dropping into the folder. You can also move messages between e-mail accounts by tapping the Accounts arrow in the folder list. Finally, you can mark e-mail messages in Edit mode. Marking an e-mail allows you to flag it or change the status of an e-mail to unread. Flagging an e-mail places a red flag next to it, and marking an e-mail as unread places a blue unread dot next to it (Figure 10–12 shows an example of both).
Tap Done to leave edit mode.
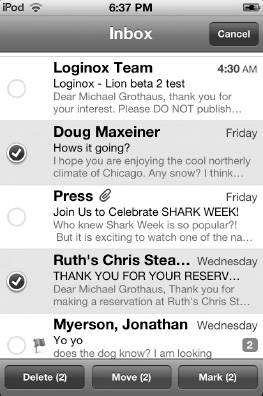
Figure 10–16. Edit mode allows you to delete or move a single or multiple e-mails at once as well as flag and mark messages as unread.
TIP: You don't need to be in edit mode to delete mail. Just swipe your finger through any message to instantly bring up the Delete button; or, when displaying a message, tap the trash can icon at the bottom of the screen. Some people have trouble mastering the swipe at first—they open their messages instead of deleting them. Keep trying. The swipe becomes second nature after a while.
Return to the mailbox list: Tap the button at the top-left side of the screen to return from this mailbox to your account screen. The button name varies, but it's always shaped like a pentagon on its side, with the point facing left.
Reading Your Mail
If you're used to reading e-mail on another portable device, the iPod's mail-viewing capabilities come as a welcome relief. It's not watered-down, odd-looking e-mail. It's fully loaded e-mail that behaves the way it should. Sure, there are some missing features. Save for copying and pasting a photo into the body of an e-mail, you cannot add other kinds of attachments such as documents. Still, when it comes to mail viewing, the iPod performs to a much higher standard than any other pocket-sized gadget I've used.
TIP: You can scroll up and down your message—flicking if needed to move more quickly—and zoom in and out using all the standard pinching and tapping tricks described in Chapter 2.
Figure 10–17 shows you the typical e-mail message screen. I'll break it down in parts.
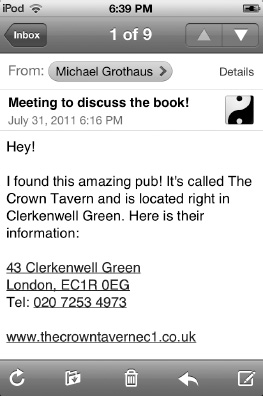
Figure 10–17. The message-display screen offers many unlabeled icons for your mail-management pleasure.
Starting with the icons at the bottom of the message-display screen, from left to right, are as follows:
Mail Refresh: As on other account screens, tap the semicircular arrow icon to request new mail from your provider.
File This Message: Tap the icon that shows a folder with a small down arrow to move messages from one mailbox to another. The iPod prompts you to “Move this message to a new mailbox.” Select the mailbox to which you want to transfer the message, and the iPod rewards you with one of its most adorable animations. The message flies from one mailbox to the other. If you would rather not transfer the message, tap Cancel instead.
Garbage Can: Tap the small garbage can in the bottom center to delete the currently displayed message. The lid flips up, and your animated message moves down into the can. It's visually delightful. Your message moves from the Inbox folder (or whatever folder you're displaying) to the Trash folder.
TIP: To undelete a message, navigate to the Trash folder (tap Back, Back, Trash), select the deleted message, and tap the File This Message button to return it to the original mailbox.
Reply/Forward: Tap the icon that looks like a backward-pointing arrow, just to the right of the garbage can icon, to reply to or forward a message. From the menu that appears, select Reply to reply to the currently displayed message, or tap Forward to pass it along to a new recipient.
Compose: As on other account screens, tap the icon that looks like a square with a pencil on it to compose a new message.
The icons at the top of the message display screen, from left to right, are as follows:
Back: Tap the button in the top-left corner to return from the message display to the mailbox screen. The button looks like a pentagon on its side, pointing left. The text inside the button varies according to the name of the mailbox.
Message number display: The iPod displays the number of the current message at the top of the screen (for example, 1 of 9).
Next Message/Previous Message: Tap the up triangle to move to the previous message in the current mailbox, and tap the down triangle to move to the next.
Details/Hide: This button appears just below the Next Message arrow. Tap Display to reveal your message's To and Cc lines. Tap Hide to hide them again.
Mark as Unread/Flag: Appearing to the right of the date and time when you've tapped the Details button, the Mark as Unread button allows you to do exactly what the name implies. It restores the little blue dot to the message and updates the unread message count to include this message. You can also choose to flag your message.
Following Embedded Data Detectors
The iPod's Mail app supports embedded data detectors within a message. Data detectors are text or images with hyperlinks, phone numbers, addresses, e-mail addresses, calendar events, and package tracking numbers.
Hyperlinks: When someone sends you an embedded URL in a text or image link, you can tap it to open it in Safari (see Chapter 3 for details on using Safari). If you aren't sure where the link goes, tap and hold it for a second or two. A menu pops up showing a preview of where that URL leads—convenient when you don't know (or trust) the party who sent you the message. To continue to Safari and open the URL, tap Open. You can also copy the URL by pressing the Copy button. To cancel and stay in the Mail app, tap Cancel.
Phone numbers: Mail makes phone numbers into clickable links. Tap any phone number to bring up a pop-up menu that allows you to create a new contact based on the phone number or add the number to an existing contact.
Addresses: If someone sends you an address in an e-mail, tap the address to be taking to the Maps app. A drop pin appears on the map showing you where the address is located. In Chapter 11 I go into more detail about the Maps app.
E-mail addresses: You can click an e-mail address in the body of a message to create a new e-mail with that address in the To field. Alternatively, if you click and hold the e-mail address, a pop-up menu appears allowing you to create a new message (the same action as if you just tapped the e-mail address), create a new contact, add the e-mail to an existing contact, or copy the e-mail address to the clipboard.
Calendar events: If someone sends you an e-mail with a date and time mentioned in the body of the message, you can tap the date and time to create an event in the iPod's Calendar app. There's more on Calendar in Chapter 11.
Tracking numbers: If you have an e-mail with a package tracking number in it, tap the tracking number to open the carrier's tracking web page in Safari to see where you package is. Right now, this feature works only in the United States.
Viewing Attachments
The iPod touch supports many e-mail attachment file formats including Word files (.doc and .docx), Excel spreadsheets (.xls and .xlsx), and PDF files. When a message arrives with an attachment, the iPod shows you that the attachment is available (see Figure 10–18). To view it, tap the attachment and wait for it to load in a new screen. Tap Message to return to the message from the attachment viewer.
NOTE: At the time of this writing, Apple supports these attachment file formats: .c, .cpp, .diff, .doc, .docx, .h, .hpp, .htm, .html, .key, .m, .mm, .numbers, .pages, .patch, .pdf, .ppt, .pptx,.rtf, .txt, .vcf, .xls, and .xlsx.

Figure 10–18. When attachments appear in e-mail, tap (left) to open them in a separate viewer (right).
Writing an E-mail Message
To write an e-mail message, tap the icon showing a square with a pencil at the bottom-right corner of the screen. You'll see the New Message screen, as shown in Figure 10–19.
Start by tapping either the To or Cc line on the New Message screen. The iPod opens a keyboard so you can enter text. As you type, the iPod searches its contacts list to match what you're typing to the contacts in its list. Tap in a few letters until you see the name of the contact you want to use. Tap that contact, and the iPod automatically adds it to the field (To or Cc) you selected.
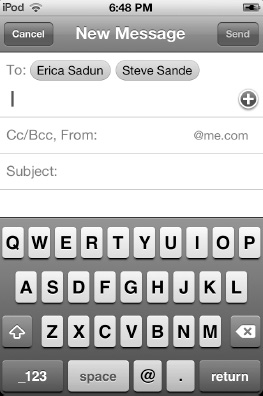
Figure 10–19. The New Message screen allows you to address and personalize your e-mail.
You do not need to use an address from your contacts list. You can type in the full e-mail address (the iPod helpfully provides you with the @ sign on the main keyboard for e-mail) and address your e-mail by hand. Also, it remembers the e-mail addresses you use. So, the second time you type “[email protected],” the proper address pops up by the time you type a and l. Just tap that e-mail address to add it to the To or Cc field.
To remove a recipient from the message, select one of the blue recipient bubbles—they're labeled with a name or e-mail address—and tap the Backspace key on the keyboard. You can also drag the e-mail addresses between the To, Cc, and Bcc fields. To do so, touch and hold an e-mail until is expands a little and then drag it to the appropriate field.
Tap the Subject line to move the cursor to that field. Use the keyboard to enter a meaningful subject for your message.
Tap in the message area to begin writing your message. A blinking cursor indicates where the keyboard will enter text. Use the typing skills covered in Chapter 2 to type your message. Remember to use the magnifying glass trick to move the cursor if you need to back up and make corrections.
Mail gives you a few extra formatting options that you won't find in other text entry apps on your iPod. In Mail, you can format text using bold, italics, and underlining. To format your text, follow these steps (See Figure 10–20):
- Select the text you want to format.
- In the Cut/Copy/Paste contextual menu, tap the right-facing arrow.
- In the next contextual menu, tap the B/U button.
- The format contextual menu appears. Tap the buttons of the formatting you want to apply.
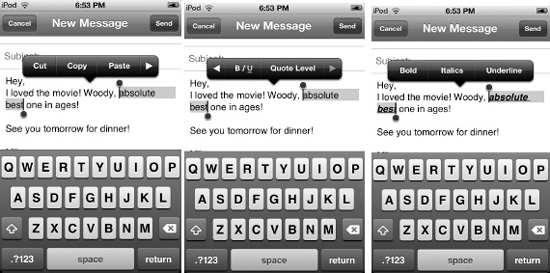
Figure 10–20. Formatting text in Mail
TIP: To remove an attached photo from e-mail, position the cursor right after the picture and tap Backspace.
You can also increase the quote level, or indentation, of text in a Mail message. To do so, follow these steps:
- Move the cursor to the beginning of the text you want to indent.
- In the Cut/Copy/Paste contextual menu, tap the right-facing arrow.
- In the next contextual menu, tap the Quote Level button.
- The Quote Level contextual menu appears. Tap Decrease or Increase to adjust the level of indentation.
Saving a Draft
At any time, you can take a break from composing a message and return to it later by saving it as a draft. This is one of my pet peeves about the Mail app. Saving a message as a draft isn't exactly the most intuitive thing to do because there is no visible Save as Draft button. Instead, you need to tap the Cancel button at the top left of the New Message screen. A pop-up menu appears. Tap Save Draft to save the message for later, Delete Draft to abandon the message, or Cancel to return to the message without doing either. When you choose Save Draft, the iPod creates a copy of your message in the Drafts folder for your default account. Return to that folder when it's convenient to continue composing the message and/or to send it.
TIP: You can set the default names for the Drafts, Sent, and Deleted folders in Settings ![]()
Mail, Contacts, Calendars ![]() account name
account name ![]()
Account ![]()
Advanced ![]()
Advanced.
Sending E-mail
When you are finished addressing and composing your letter, you can send it on its way by tapping Send. If you haven't disabled the feature, the iPod alerts you with a whoosh sound to indicate that the message has been sent to the outgoing mail server.
Searching Your E-mail
Mail allows you to search for an e-mail by sender, receiver, subject, or the body of the message. To search, scroll to the top of the screen in any e-mail inbox or folder (see Figure 10–21). Tap the search field, and select one of the buttons labeled From, To, Subject, or All (All searches From, To, Subject, and the body of the e-mail message). You can also search messages on the server with MobileMe, Exchange, and some IMAP e-mail accounts.
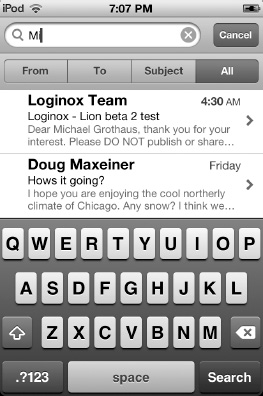
Figure 10–21. Searching your e-mail
Kinds of E-mail
For your reference, here's a quick roundup of the various kinds of e-mail services that can be used with your iPod. If you need to contact your personal e-mail provider, this section should help you get up to speed so you recognize the important terms.
POP
POP (sometimes POP3) stands for Post Office Protocol. It's probably the most common e-mail retrieval protocol in use today. It allows mail clients to connect to a server such as Gmail or AOL, retrieve messages, and disconnect afterward. This usually happens on a set schedule, such as every ten minutes or every hour. You do not receive mail until your client connects to the server and requests that new mail.
NOTE: The 3 in POP3 indicates the third version of the protocol standard. POP1 and POP2 are obsolete.
POP works by checking in with a server, downloading your e-mail, and optionally leaving the original copies of your e-mail on the server. This leave-on-server option works well with the iPod, because when you're on the go, you probably want to check your mail on the iPod and retrieve it again later, when you get back to the office or return home.
POP also has its downsides. Unlike the newer and improved IMAP protocol, POP downloads entire messages all once, so it's a bit of a space hog on portable devices.
SMTP
Mail clients use one protocol for receiving mail and another for sending mail. Your iPod uses SMTP to send outgoing messages. SMTP stands for Simple Mail Transfer Protocol. SMTP contacts a mail server and transmits whatever messages you've written, along with any attachments (text files, photos, and so forth). A common kind of SMTP, called SMTP-AUTH (AUTH stands for authorization), allows you to send secure, authorized mail. You provide your account name and a password. Your mail client authenticates itself to the server, and your e-mail gets sent on its way.
The iPod makes sending authenticated e-mail easy. Enter your account name and password into the Mail settings screen. Once you've done this, just use outgoing mail to send a note or share a web page's URL. The iPod takes care of all the protocol issues.
IMAP
IMAP stands for Internet Message Access Protocol. Like POP, it allows you to receive e-mail on the iPod. It's a newer and more flexible protocol. As the name suggests, IMAP was built around the Internet. It introduces advanced ways to connect to the mail server and use limited bandwidth in the most efficient way.
Yahoo! offers free IMAP accounts for iPod users. To sign up for an account, point your browser to http://mail.yahoo.com.
NOTE: The Yahoo! iPod IMAP service runs off http://imap.apple.mail.yahoo.com. You can connect with a normal web browser, but the web site brushes you off with a “do you yahoo?” message. In other words, move along—nothing to see here if you're not using an iPod or iPhone.
The key to understanding IMAP is to recognize that messages are meant to live on the server rather than go through a retrieve-and-delete cycle. You manage your mail on the IMAP server. You read your mail on a client, like the iPod.
When you download mail with POP, you download entire messages. When you download mail with IMAP, you download headers instead, at least initially. Headers are the bits that tell you who the mail is from and what it's about. You don't download the main body of the message until you explicitly request it from the server. Since the header occupies only a fraction of the space of the message, you can download IMAP data a lot faster than you download POP data. The rest of the message stays on the server until you're ready to read it.
The same thing goes for attachments. Say that someone sends you a 10MB video. It doesn't get downloaded to your iPod. It stays on the server until you're ready to watch it on your home computer. If you downloaded the message with POP instead, the entire video would be transferred with the message. With IMAP, you get to read the message that came along with the video without needing to download the video file itself.
NOTE: IMAP also offers a feature that's called push e-mail. Geeks will tell you that technically speaking, IMAP is not exactly the same thing as push e-mail. True push e-mail reaches out and tells your e-mail client whenever new mail arrives in the system. Instead, your iPod IMAP client connects to and gently tickles the server until new mail arrives. This kind of always-on connection allows the iPod to receive mail as soon as it arrives—or nearly as soon. In practice, there's better intention there with push-style mail than actual results.
Microsoft Exchange
Microsoft Exchange provides e-mail along with other enterprise-level services intended to support Outlook on the Web, personal computers, and mobile devices. With iOS 4, the iPod fully supports Exchange accounts.
What else can you do to access your Exchange mail? If your IT department has enabled Outlook Web Access (OWA), you can access your Exchange mail in iPod Safari. Limitations aside, this works almost as well as running Outlook on Windows. The most important thing about setting up Exchange accounts is getting instructions and details from a system administrator at your workplace. Doing so will guarantee you'll get your Exchange account up and running fully on your iPod touch.
Summary
Using Mail on your iPod is just as user-friendly and powerful as using a desktop e-mail client. After you play around with it for a week, you'll find yourself using your iPod to check your e-mail more and more. Here are some things to take away with you from this chapter:
- Although Mail attachments introduce occasional difficulties, the rest of the time they work really well. Make sure to use your full iPod interaction vocabulary of touches, pinches, and so forth, to get the most out of viewing attachments.
- It's really easy to add preexisting mail accounts using iTunes, but it's not difficult to add new ones directly in your iPod.
- Remember and use the URL-preview trick. Make sure that e-mail links really take you where you think you're going. This is a good way to avoid “phishing” Internet scams.
- You can change the “Sent from my iPod” signature in the Mail settings.
- Mail in iOS 4 supports a unified inbox so you can see all the message from your various e-mail account inboxes all in one place.
- Don't forget, there is no Save as Draft button. You need to tap Cancel and then Save Draft.