Are you looking for a way to enhance your Web site layout? Frames can help you present multiple pages to your Web site visitors all on one screen. This chapter shows you how to create framesets and add frames to your Web site.

Understanding Frames 142
Create Frames 144
Customize Frame Borders 146
Control Frame Margins 148
Add Alternative Text 149
Prevent Frame Resizing 150
Hide or Display Frame Scroll Bars 151
Target a Link 152
Create a Nested Frameset 154
Create an Inline Frame 155
You can use frames to divide your Web page into sections and allow users to access different pages in your Web site from one screen. Although frames are not as widely used as they once were, they can still serve as a valuable tool to help you create a dynamic structure for your Web site.


You can use frames to divide the Web browser window into panes. This allows you to display different pages in the browser window at the same time. For example, you might use one frame to display a navigational page that lists links to different pages on your Web site and show the result of a clicked link in another frame.
You can use the <FRAMESET> and <FRAME> tags to define the frame structure. The <FRAMESET> tag creates a frameset, dividing the window into sections, while the <FRAME> tag specifies which page goes into which frame.
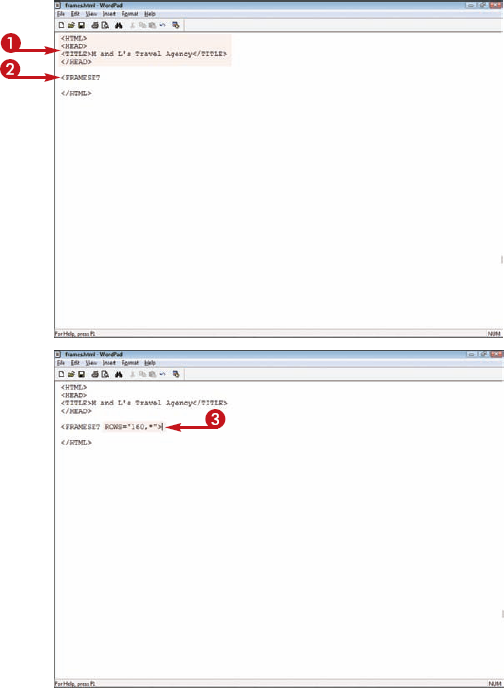
Create Frames
1 Create and save a new HTML document, including only the basic <HTML>, <HEAD>, and <TITLE> tags.
Note
To learn how to create HTML documents, see Chapter 2.
2 Below the </HEAD> tag, type <FRAMESET and a space.
3 Define the frameset to include two or more rows or columns and specify a size in pixels for the rows or columns.
To create frames in rows, type ROWS="?,?">, replacing ? with the height of each row in your frameset.
To create frames in columns, type COLS="?,?">, replacing ? with the width of each column in your frameset.
You can also set a row or column size as a percentage by typing the value followed by a percentage sign, such as 30%.
4 Type <FRAME NAME=" ? ", replacing ? with a name for the frame.
5 Type a space and SRC="?">, replacing ? with the name and location of the Web page you want to appear in the frame.
6 Repeat steps 4 and 5 for each frame you specified in step 3.
The Web browser displays the frames.
• In this example, two row frames appear in the browser window.
You can use a nested frameset to combine rows and columns in a frameset.
Note
To create a frameset with both rows and columns, see the section "Create a Nested Frameset."

Tip
Do I need to declare a frameset document for my framed pages?

It is good practice to include a document declaration in your pages. You can specify that your frameset page is of type Frameset at the top of your HTML code. The declaration might look like this:
<!DOCTYPE HTML PUBLIC "-//W3C/DTD HTML 4.01 Frameset//EN" "http://www.w3.org/TR/REC-html40/frameset.dtd">
See Chapter 2 to learn more about document declarations.
Do I have to specify a row height or column width for each frame?
Yes, but the height or width can be a wildcard character. After you define the first frame size, you can use an asterisk (*) to assign the remaining window space to other frames. For example:

<FRAMESET ROWS="65,*,60">
In this frameset, the middle frame is sized to take up whatever space remains after the other two frames are sized.
You can change the thickness of your frame borders using the BORDER attribute. By default, Web browsers display the borders around your frames at a thickness of 6 pixels. You can set your frame borders to another size as well as control the color of the borders.

Customize Frame Borders
CHANGE THE FRAME BORDERS
1 Within the <FRAMESET> tag, type BORDER=" ?", replacing ? with a thickness value in pixels.
• The Web browser displays the frames with the designated border thickness.

1 Within the <FRAMESET> tag, type BORDERCOLOR=" ?", replacing ? with a color value.
Note
You can learn more about HTML colors in Chapter 4.
• The Web browser displays the frames with the designated color.

Tip
How do I hide my frame borders completely?
To hide all the frame borders, type FRAMEBORDER="0" in the <FRAMESET> tag. This coding makes the content of each frame blend together, creating what appears to be one large Web page. In some browsers, you may still see a small space between the panes. To remove this space, type BORDER="0" in the <FRAMESET> tag.

Is there another way I can control frame border thickness?
You can use the FRAMESPACING attribute to control the thickness of frame borders. However, only Internet Explorer supports this attribute; it is not part of the formal HTML standard. To set a border thickness, type FRAMESPACING=" ?" in the <FRAMESET> tag, replacing ? with the thickness value you want to set. Border thickness is measured in pixels.

You can control the amount of space that appears between a frame border and the contents of the frame. Using the MARGINWIDTH and MARGINHEIGHT attributes, you can set margins for the top, bottom, left, and right sides of your frames. Margin space is measured in pixels.

Control Frame Margins
1 Within the <FRAME> tag, type MARGINWIDTH=" ?", replacing ? with the amount of space you want to set for the left and right margins.
2 Type a space and MARGINHEIGHT="?", replacing ? with the amount of space you want to set for the top and bottom margins.
The Web browser displays the frames with the designated margins.
• In this example, the bottom frame now has increased margins all around the inside of the frame.
In the example, the bottom frame features content in a white table on a teal background.

You can use the <NOFRAMES> tag to insert alternative text for users whose browsers do not support frames. In some cases, the user may have decided to turn off frame display. Alternative text can alert them to the content they are missing.
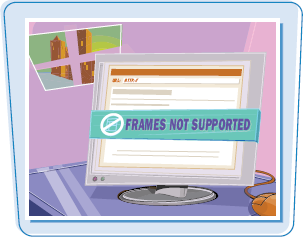
Add Alternative Text
1 Directly above the </FRAMESET> tag, add a line and type <NOFRAMES>.
2 Type any alternative text you want to appear.
3 Type </NOFRAMES>.
If the user's browser does not support frames, or the frame display is turned off, a page appears with the alternative text.

By default, users can resize the frames in your Web page, allowing them to view more information in a frame. You can control your page layout by restricting frame resizing. This can be useful if you need the frame dimensions to remain fixed so that the content is viewed correctly.

Prevent Frame Resizing
1 Type NORESIZE inside the <FRAME> tag of the frame you want to control. You do not assign a value to the NORESIZE attribute.
You can repeat step 1 for any other frames for which you want to prevent resizing.
The user is not able to resize the frame in the browser window.
• In this example, resizing is turned off in the top frame.
Web browsers automatically display scroll bars if a frame's content exceeds the size of the frame. You can use the SCROLLING attribute to control when scroll bars appear. A yes value displays scroll bars, while a no value hides the scroll bars.

Hide or Display Frame Scroll Bars
1 Click inside the <FRAME> tag of the frame you want to control.
2 Type SCROLLING=" ?", replacing ? with yes to display scroll bars or no to hide scroll bars.
You can repeat steps 1 and 2 to control the scroll bars in other frames.
The browser displays or hides scroll bars as instructed.
• In this example, the scroll bars are hidden for the bottom frame.

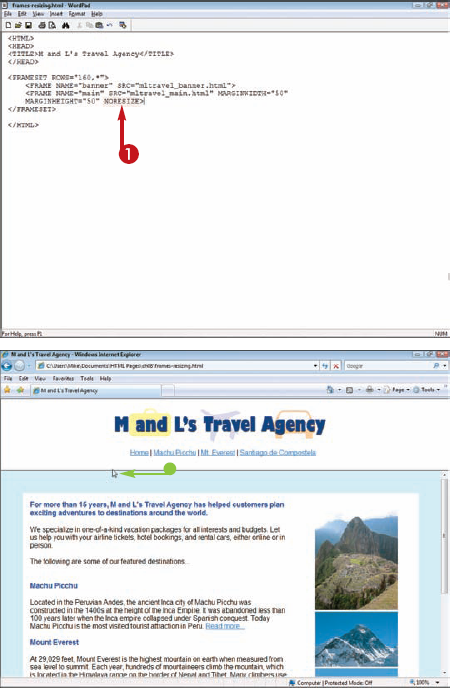
You can make links on your pages open content in specific frames. To target links to particular frames, you must identify each frame with a unique name and then reference that name with the <A> tag's TARGET attribute. You can also open a page into the entire browser window by using a TARGET value of "_top". This breaks the user out of the current frameset.

To learn how to assign names to frames, see the section "Create Frames."
Target a Link
OPEN IN A FRAME
1 Open the HTML file where the link should appear.
2 Type <A HREF=" ?", replacing ? with the target page.
3 Type a space and TARGET="?">, replacing ? with the frame name.
Note
To name frames, see the section "Create Frames."
4 Type the link text.
5 Type </A>.
• The browser displays the link.
• When the user clicks the link, the page opens in the frame you specified.
1 Open the HTML file where the link should appear.
2 Type <A HREF=" ?", replacing ? with the target page.
3 Type a space and TARGET="_top">.
Note
To name frames, see the section "Create Frames."
4 Type the link text.
5 Type </A>.
• When the user clicks the link, the page opens on top of the existing frameset.
In step 3, you can type TARGET="_parent"> to open the page in the parent frameset of a nested frameset.

Tip
How do I make all the links open in the same frame?
To make all page links open in the same frame, you can add the target frame information to the <HEAD> tag. Inside the <HEAD> tag, type <BASE TARGET=" ?">, replacing ? with the name of the target frame. You must name the target frame in the frameset document in order to reference the name with the TARGET attribute.

Can I make the target link open in a new window?

Yes. You can use the TARGET attribute to instruct the browser to open the target link in a new window. To open the linked page in a new, unnamed window, use the _blank value. For example:
<A HREF="mypage.html" TARGET="_blank">Click here to view the page</A>
In this code, when the user clicks the link, the document mypage.html opens in a new browser window.
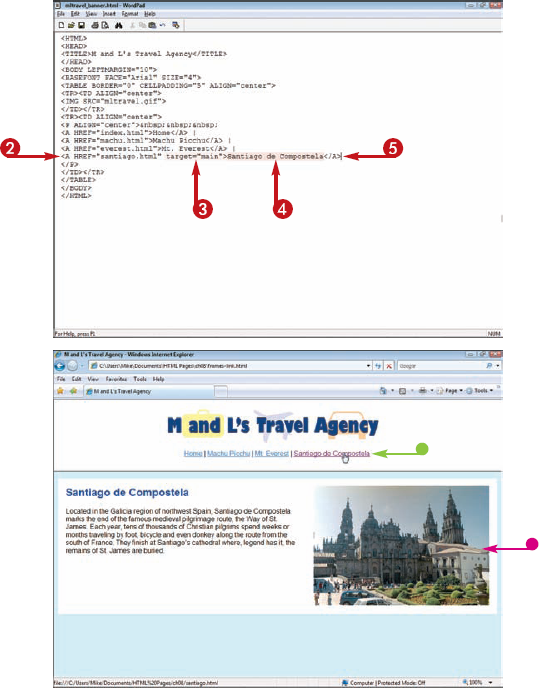
You can nest a frameset within another frameset, creating a combined frameset. For example, you might place a two-frame frameset within the largest frame of your main frameset.

You create a nested frameset the same way you created the initial frameset. See the section "Create Frames" to learn more about creating a frameset document and defining frames.
Create a Nested Frameset
1 In the frameset document, add a line where you want to insert a nested frameset.
2 Type <FRAMESET ROWS=" ?, ?"> to insert rows, or type <FRAMESET COLS=" ?, ?"> to insert columns, replacing ? with the row or column values for your frames.
3 Add the frame tags to define the frame names and source pages.
4 Type </FRAMESET> to complete the nested frameset.
The Web browser displays the frameset within the original frameset.
• In this example, the nested frameset consists of two columns that appear below a row frame.
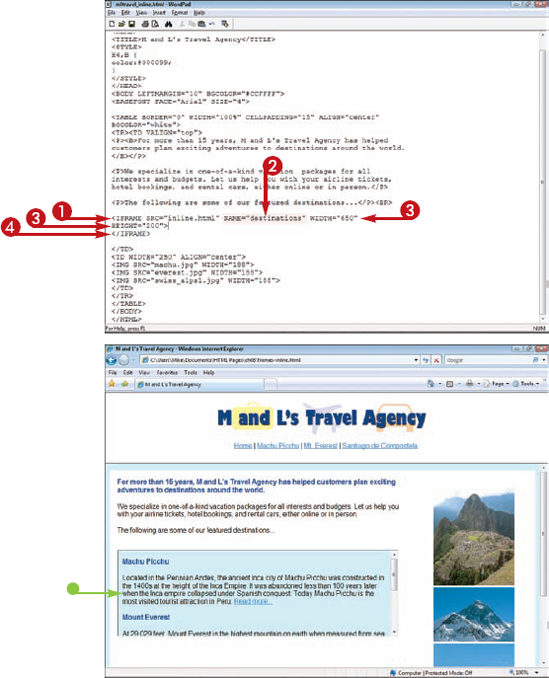
You can create a floating frame, also called an inline frame, that appears within the content of a Web page. Inline frames do not require a frameset.

Create an Inline Frame
1 Type <IFRAME SRC=" ?" where you want to insert an inline frame, replacing ? with the name and location of the page you want to appear within the inline frame.
2 Type a space and NAME="?", replacing ? with the name of the inline frame.
3 Type a space and WIDTH="?" HEIGHT=" ?">, replacing ? with width and height values.
4 Type </IFRAME>.
• The Web browser displays the inline frame.
Inline frames can be useful for inserting long passages of legal text, such as terms and conditions.