Are you ready to begin building your Web page by adding text? This chapter shows you how to add different types of text elements to a document.

Create a New Paragraph 34
Change Paragraph Alignment 35
Add a Line Break 36
Insert a Blank Space 37
Insert Preformatted Text 38
Insert a Heading 39
Add Block Quotes 40
Insert a Comment 41
Create a Numbered List 42
Create a Bulleted List 44
Create a Nested List 46
Create a Definition List 47
Insert Special Characters 48
Special Characters 49
You can use paragraph tags to start new paragraphs in an HTML document. In a word processing program, you press Enter or Return to separate blocks of text. Web browsers do not read these line breaks. Instead, you must insert a <P> tag in your HTML any time you want to start a new paragraph in your Web page.
Paragraphs are left-aligned by default, but you can choose a different alignment using the align tags. See the section "Change Paragraph Alignment" to learn more.

Create a New Paragraph
1 Type <P> to start a new paragraph.
2 Type your text.
3 Type </P> at the end of the paragraph.
When displayed in a Web browser, the text appears as a paragraph with extra space above and below it.
Note
To create paragraphs that are indented at the sides, see the section "Add Block Quotes."

You can control the horizontal positioning, or alignment, of your paragraphs using the ALIGN attribute. You can choose to align a paragraph to the left, right, or center, or justify the text so it is aligned on both the left and the right. Paragraphs are left-aligned by default.
You can use the ALIGN attribute within numerous tag elements, including headings and lists. For example, you can center a heading or right-align a bulleted list.

Change Paragraph Alignment
1 Click inside the <P> tag in which you want to change the alignment.
2 Type a space and then ALIGN="?", replacing ? with Left, Center, Right, or Justify.
Note
You can type HTML commands in upper- or lowercase letters, or a combination of the two.
When displayed in a Web browser, the text aligns as specified.
• In this example, the line of text is centered on the page.
Note
To control the width of a paragraph using style sheets, see Chapter 12 for more information.

You can use the line break tag, <BR>, to control where your text breaks. Web browsers normally wrap text automatically; when a line of text reaches the right side of the browser window, it breaks and continues on the next line. You can insert a line break to instruct the browser to break the text and go to a new line.
You can also use the <BR> tag to add blank lines between paragraphs. This is useful if you want to add extra space above or below a block of text or a heading.

Add a Line Break
1 Type <BR> in front of the line of text that you want to appear as a new line.
2 Type additional <BR> tags wherever you want a line break.
Note
You do not need a closing tag for the <BR> tag.
• When the page is displayed in a Web browser, each instance of the tag creates a new text line.

You can insert blank spaces within a line of text to indent or add emphasis to your text. You can also use blank spaces to help position an element on a Web page, such as a graphic or photo.

Insert a Blank Space
1 Type in the line where you want to add a blank space.
To add multiple spaces, type the code multiple times.
The code stands for nonbreaking space. Web browsers will not create a line break where you insert these characters.
The browser displays blank spaces in the line.
• In this example, the blank spaces cause a paragraph to be indented.
The code is a type of HTML entity. For more about entities, see the section "Insert Special Characters."

You can use the preformatted tags, <PRE> and </PRE>, to keep the line breaks and spaces you enter for a paragraph or block of text. Web browsers ignore hard returns, line breaks, and extra spaces between words unless you insert the preformatted tags. If you type a paragraph with spacing just the way you want it, you can assign the preformatted tags to keep the spacing in place.

1 Type <PRE> above the text you want to keep intact.
2 Type </PRE> below the text.
• When displayed in a Web browser, the text retains all your original line breaks and spacing.
Browsers display preformatted text in a monospace font by default. This can help you align elements within the text into columns.

You can use headings to help clarify information on a page, organize text, and create visual structure. You can choose from six heading levels for a document, ranging from heading level 1 (<H1>), the largest, to heading level 6 (<H6>), the smallest. Headings appear as bold text on a Web page.
You can use the ALIGN attribute to change the horizontal alignment of a heading, such as <H1 ALIGN="right">. See the section "Change Paragraph Alignment" to learn more about inserting alignment controls within your HTML tags.

Insert a Heading
1 Type <H?> in front of the text you want to turn into a heading, replacing? with the heading level number you want to assign.
You can set a heading level from 1 to 6.
2 Type </H ?> at the end of the heading text, replacing ? with the corresponding heading level.
3 Type additional heading tags for any other text that you want to emphasize on the page.
• The heading appears in bold text in the Web browser.
This figure shows an example of each heading size in descending order.

You can use block quotes to set off a paragraph from the rest of the document page. Block quotes are commonly used with quoted text or excerpts from other sources.

Add Block Quotes
1 Type <BLOCKQUOTE> in front of the text you want to turn into a block quote.
2 Type </BLOCKQUOTE> at the end of the text.
• The Web browser displays the block quote as inset text on the document page.
You can place text inside multiple <BLOCKQUOTE> tags to add more indenting.

You can use comments to write notes to yourself within an HTML document. Comments do not appear when a browser displays a Web page. For example, you might leave a comment about a future editing task or leave a note to other Web developers viewing your HTML source code.
You can also place comments around HTML code to turn that code off. HTML tags inside comments are not interpreted by the browser.

Insert a Comment
1 Type <!- - where you want to place a comment.
2 Type the comment text.
3 Type - ->.
The comment does not appear on the page when viewed in a Web browser.

You can use numbered lists on your Web page to display all kinds of ordered lists. For example, you can use numbered lists to show steps or prioritize items.

Create a Numbered List
PLACE TEXT IN A NUMBERED LIST
1 Type <OL> above the text you want to turn into a numbered list.
2 Type <LI> in front of each item in the list.
3 Type </LI> after each list item.
4 Type </OL> after the list text.
• The text appears as a numbered list on the Web page.

1 Type TYPE="?" within the <OL> tag, replacing ? with a number style code:
A: A, B, C
a: a, b, c
I: I, II, III
i: i, ii, iii
1: 1, 2, 3
The numbered list is displayed in the style you selected.
• In this example, the list uses letters rather than numbers.

Tip
How do I add another item to my numbered list?
Simply insert the text where you want it to appear in the list and add the <LI> and </LI> tags before and after the text. The Web browser displays the updated list the next time you view the page.

How do I start my numbered list with numbering that is different from the default?
By default, a Web browser reads your numbered list coding and starts with the number 1. To start with a different number, you must add a START attribute to the <OL> tag. For example, if the numbering is to start at 5, the coding would read <OL START="5" TYPE="1">.

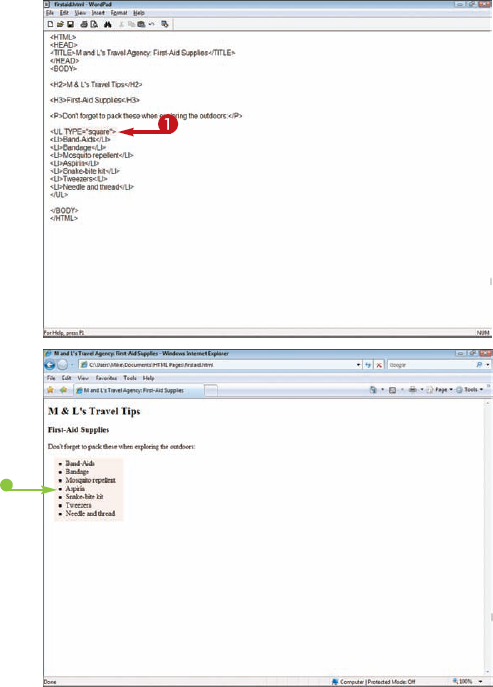
You can add a bulleted list to your document to set a list of items apart from the rest of the page of text. You can use a bulleted list, also called an unordered list, when you do not need to show the items in a particular order.
By default, bullets appear as solid circles. If you want to use another bullet style, you must add a TYPE attribute to the <UL> tag.

Create a Bulleted List
PLACE TEXT IN A BULLETED LIST
1 Type <UL> above the text you want to turn into a bulleted list.
2 Type <LI> in front of each item in the list.
3 Type </LI> after each list item.
4 Type </UL> after the list text.
• The text appears as a bulleted list on the Web page.

SET A BULLET STYLE
1 Type TYPE=" ?" within the <UL> tag, replacing ? with a bullet style code; for example, circle, disc, or square.
The bulleted list is displayed in the style you selected.
• In this example, the bulleted list uses square bullets.

Tip
Can I stop a bulleted list for one line of text and continue it on the following line?
Yes. If you leave off the <LI> and </LI> tags for a line of text within the list, a Web browser reads the line as regular text. However, you can insert a line break (<BR>) or use the paragraph or heading tags before the nonbulleted text line so that it appears as a separate line in the list. For example:
<UL>
<LI>Dogs</LI>
<LI>Cats</LI>
<BR>and the ever-popular
<LI>Potbellied pigs</LI>
</UL>

You can use a nested list to add a list within a list to your Web page. Nested lists allow you to display listed text at different levels within the list hierarchy. You can use both numbered and bulleted lists within an existing list.

Create a Nested List
1 Click where you want to insert a nested list, or add a new line within the existing list and type <OL> for a numbered list or <UL> for an unordered list.
Note
To create a numbered list, see the section "Create a Numbered List." To create a bulleted list, see the section "Create a Bulleted List."
2 Type the new list text, including the <LI> and </LI> tags, using the same technique you used to create the original list.
3 Type </OL> or </UL> at the end of the nested list.
• The text appears as a nested list on the Web page.
Browsers usually set off nested lists with different bullet styles. In this example, a nested list gets an open circle.

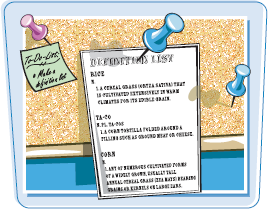
You can use a definition list in your document to set text apart in the format of a glossary or dictionary.

Create a Definition List
1 Type <DL> above the text you want to set as a definition list.
2 Type <DT> in front of each term and </DT> after each term.
3 Type <DD> in front of each definition and </DD> after each definition.
4 Type </DL> after the definition list text.
• The text appears as a definition list on the Web page.

You can use HTML code to insert special characters into your Web page text. Special characters are characters that do not usually appear on your keyboard.
The codes used to insert special characters are called entities. Entities consist of number or name codes preceded by an ampersand and ending with a semicolon, such as ½ for the fraction ½ or ¶ for a paragraph symbol.

Insert Special Characters
1 Click where you want to insert a special character.
2 Type the number or name code for the character, with an ampersand (&) before the code and a semicolon (;) following the code.
• The Web browser displays the designated character in the text.

To properly insert many special characters into your Web page text, you need to know their entity codes. The following table lists the common special characters you can insert. For more on inserting these special characters, see the section "Insert Special Characters."
description | Special Character | Code |
|---|---|---|
copyright | © |
|
registered trademark | ® |
|
trademark | ™ |
|
paragraph mark | ¶ |
|
nonbreaking space |
| |
quotation mark | " |
|
left angle quote | « |
|
right angle quote | » |
|
ampersand | & |
|
inverted exclamation | ¡ |
|
inverted question mark | ¿ |
|
broken vertical bar | ¦ |
|
section sign | § |
|
not sign | ¬ |
|
acute accent | ´ |
|
cedilla | ¸ |
|
bullet | • |
|
capital N, tilde | ñ |
|
small n, tilde | ñ |
|
capital A, tilde | Ã |
|
small a, tilde | ã |
|
capital A, grave accent | À |
|
small a, grave accent | à |
|
capital O, slash | Ø |
|
small o, slash | ø |
|
em dash | — |
|
en dash | – |
|
micro sign | µ |
|
macron | ¯ |
|
superscript one | 1 |
|
superscript two | 2 |
|
superscript three | 3 |
|
one-half fraction | ½ |
|
one-fourth fraction | ¼ |
|
three-fourths fraction | ¾ |
|
degree sign | ° |
|
multiply sign | × |
|
division sign | ÷ |
|
plus-or-minus sign | ± |
|
less-than sign | < |
|
greater-than sign | > |
|
dagger | † |
|
double dagger | ‡ |
|
cent sign | ¢ |
|
pound sterling | £ |
|
euro | & |
|
yen sign | ¥ |
|
general currency | ¤ |
|
