
Chapter 13: Monetizing Your Website
The main reason for SEO is to get more traffic and a higher ranking for your website. This traffic turns to potential customers for your product or service. Also, visitors can click advertising banners and promotional links that you can add to your website and get revenues when visitors view or click on it. This concept is known as monetizing your website.
Explore Advertising Revenue Types
Block AdSense Advertisers’ URLs
Block Ads Using the Ad Review Center
Work with Commission Conjunction
Explore Advertising Revenue Types
While you can direct traffic that comes to your website toward buying a product or service, some websites, particularly magazines and blogs, earn revenue other ways. One is to include advertising spots that promote other sites and services. These spots can be banners, video, text links, or specific articles on your website, such as product reviews. When building your website, you have to consider how to earn revenue from your website or blog and the different types of advertisements that you can place within the website structure. With strategic planning, you can monetize your website, maximizing your profits.
Cost Per Click
In this revenue model, the user clicks an advertising text link or banner, such as an image, text, or video. The advertiser pays the website owner each time users click the mouse and visit the advertiser’s product or service website. The Cost Per Click (CPC) varies based on many factors, such as the type of visitors coming to the website and website competitors. For example, you can set the cost of a banner click at thirty cents each time a visitor clicks this banner, the advertiser pays you this amount of money. This model does not include how the visitor interacts with the advertiser’s product or website; the payment process is complete once the user clicks the banner. Usually, this model is suitable for websites of all sizes that would like to generate revenue from advertising. Visitors with the potential to click banners on your site have the potential to click other links on your site, which can lead to possible revenue. Ad providers such as Google AdSense, Yahoo Publisher Network, and Facebook handle the CPC campaigns for your website.
Cost Per Mille
The Cost Per Mille (CPM), or the cost per thousand, impressions model refers to the cost that an advertiser pays a website owner to display the advertiser’s banner on the website owner’s site to visitors a thousand times. For example, an advertiser pays you to display his banner for a number of website users regardless
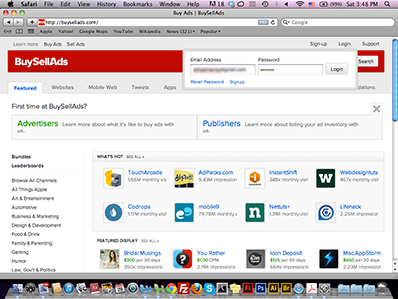
of whether they click the banner or not; these displays are known as banner impressions. These impressions do not include actions such as refreshing the page from the user’s browser. Therefore, if you sell 1,000 impressions on your website for $2 and the advertiser buys 10,000 impressions, he will pay a total of $20 to you for displaying the banner to 10,000 of your website visitors. CPM is most profitable if your website receives a lot of traffic or page views because you can sell large numbers of impressions to different advertisers, and use rotating ads methods to display multiple ads in the same advertising area. CPM ad providers include Facebook and BuySellAds that deliver advertising banners to your website.
Cost Per Action
The Cost Per Action (CPA) is commonly used by advertising networks and it refers to an advertising campaign that pays you when your website visitors click the advertiser’s banner, which links them to the advertiser’s site, and then conducts a specific process. This process can be buying a product from the advertiser’s store, which is known as Cost Per Sale (CPS), or it can be completing a form to sign up for a service or information or completing a survey page, which is known as Cost Per Lead (CPL). Most affiliate marketing campaigns are based on this model: they only pay the website owner once visitors respond to the ad by buying a product or completing a form or survey. If your website is new and does not have much potential traffic, you will not be able to generate good revenue from this type of ad. You first must build trust with website visitors in order for them to click links on your website and trust the products being advertised.
Effective Cost Per Mille
While the Cost Per Mille (CPM) equals the display of a banner a thousand times to clients, the Effective Cost Per Mille (eCPM) refers to the action a user takes after clicking the banner. The eCPM is calculated by dividing the total earnings by the total number of impressions in thousands. For example, if an advertiser earns $3 from users’ actions, and the ad appears 1,000 times, the formula for calculating the eCPM is $3/1,000 *1,000 where 1,000 is constant, and the results of the Cost-Per-Click in this model is $3.
Fixed-Price Banners
The fixed-price banner model means the advertiser pays a fixed amount for placing their banners on your website for a period of time that is usually one month or more. In this case, the cost is paid in advance regardless of the number of clicks or impressions the banner receives. The more clicks the banner receives, the greater the possibility that the advertisers renew their banner placements for additional months. The advertisers choose which websites to place their ads on based on a number of factors, such as the amount of traffic the website receives, the category of the website, and the impressions that each page receives. The fixed-price model is one of the easiest advertising models because you do not need to join an advertising network to implement it; all you need to do is contact advertisers and invite them to advertise on your website. There are some networks, such as BuySellAds, that help you market your website banner zones and provide easy management platform for your banners.
Consider the Advertising Formats
You can choose from a variety of web advertisement formats when choosing the ads that will appear on your website. Each ad format can have a different impact on the website visitors. You may notice that users click a specific ad format more than the others. Subsequently, you can test each format and decide which is best for your website based on the number of user clicks and overall traffic responding to the ad format. Generally, the ad format is an image, text, video, or specific HTML page that appears before displaying the targeted website or a new web page for the advertiser.
Text Ads
Text ads are text-based hyperlinks on your website that advertisers buy, and when visitors click them, they go to the advertiser’s website. Text ads do not include graphical images but sometimes include text descriptions that appear under the main link. Text ads are sold directly to the advertiser by the website owner or through ad networks such as AdSense.
Image Ads
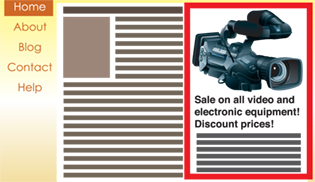
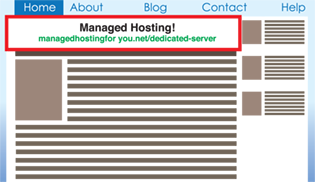
Image ads, or display ads, are ad banners that use graphic images instead of text links. Image ads are available in several standard sizes. While you can create banners without restricting them to standard sizes, it is recommended you follow the standard dimensions so you create banner areas that are suitable for different customers. Image ads attract the visitor’s eyes to a banner, often leading them to click it.
Flash Ads

Flash ads refer to banners that use Flash technology to create animated ads and motion graphics. Flash ads are more attractive than the ordinary still images or text ads. However, they do not appear in smartphone and tablet devices that do not support Flash, which makes this format undesirable for clients targeting smartphone and tablet users. Alternatively, some clients use HTML5 animated ads as a substitution for Flash ads because it viewable on smartphones and devices that do not support Flash.
Video Ads

As the Internet speeds increase, making it easier to use rich media such as video, many advertisers create video ads to attract users and deliver direct, interactive messages. However, it is not recommended you use a video ad more than once on a website page; otherwise it may cause the page to load slowly and distract the website visitor.
E-mail Ads

With the increase in the value of e-mail marketing, many advertisers are considering sponsoring e-mail newsletters as a marketing method for their products. This is done by sending e-mail newsletters that advise users to use a specific product or service. Also, the e-mail ads can list advertiser services or products with a link to purchase it. A popular directory is the Yahoo Directory at http://dir.yahoo.com.
Create AdSense Ads
Google AdSense is the most commonly used ad provider. You can use it to earn revenue from your website blog by placing AdSense text and image ads. These ads are delivered through the Google Display Network, where advertisers create ads using Google AdWords, and display them on your website. AdSense allows you to create ad zones, filter ads, and handle payments. Google AdSense displays ads on your website based on a number of factors, such as the category of the website and the keywords that appear in the web page content. You can also use AdSense to deliver advertisements to mobile sites.
Create AdSense Ads
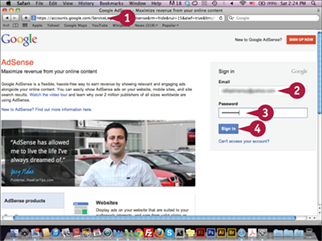
![]() Type www.google.com/adsense in your web browser and press
Type www.google.com/adsense in your web browser and press ![]() .
.
![]() Type your e-mail address.
Type your e-mail address.
![]() Type your password.
Type your password.
![]() Click Sign in.
Click Sign in.
Note: If you do not have an account, click Sign Up Now. It can take up to a week for the account to be approved.
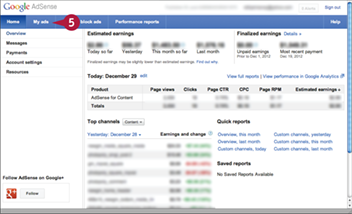
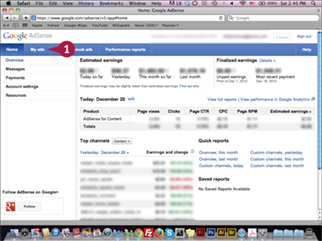
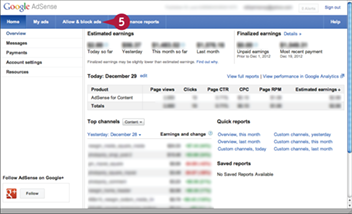
The AdSense home page appears.
![]() Click My ads.
Click My ads.
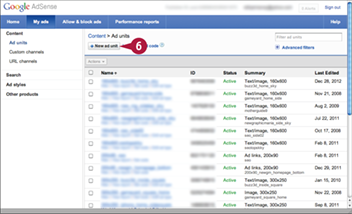
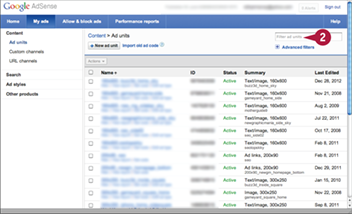
The My ads page appears.
![]() Click New ad unit.
Click New ad unit.
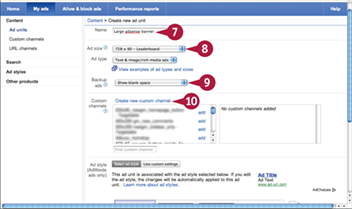
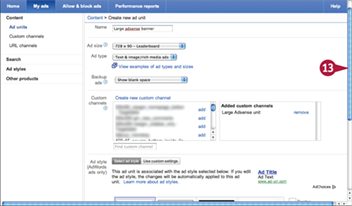
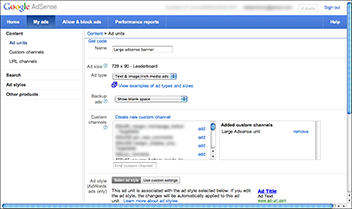
The Create new ad unit page appears.
![]() Type the name of the AdSense unit.
Type the name of the AdSense unit.
![]() Click the Ad size pop-up menu and select the size of the AdSense unit.
Click the Ad size pop-up menu and select the size of the AdSense unit.
![]() Click the Backup ads pop-up menu and select Show blank space.
Click the Backup ads pop-up menu and select Show blank space.
![]() Click the Create new custom channel link.
Click the Create new custom channel link.
Google AdSense provides two main advertisement choices and you can display either or both on your website or blog. One is text ads, which appear as text links in the AdSense advertising spots and include promotional descriptions about a product. With text ads, you can display more than one ad in the same advertising spot. The other is image ads, which are image banners with still and animated images. While the image ads are more attractive, each AdSense spot includes only one ad. This can narrow your chances of getting clicks on the ad banner.
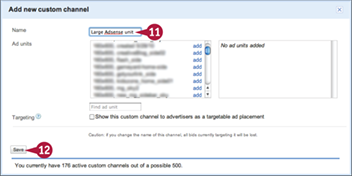
The Add new custom channel dialog box appears.
![]() Type the name of the channel.
Type the name of the channel.
![]() Click Save.
Click Save.
The Create new ad unit page reappears.
![]() Scroll down.
Scroll down.
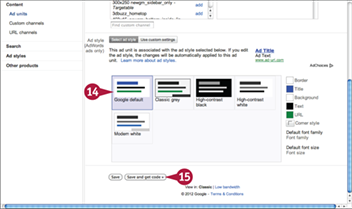
The Ad style section comes into view.
![]() Click an ad style.
Click an ad style.
![]() Click Save and get code.
Click Save and get code.
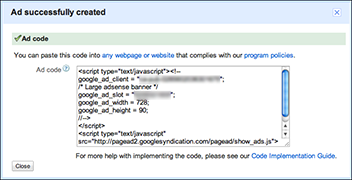
The code appears. You can copy the code and paste it in your website where you want the AdSense ad to appear.
Modify Existing AdSense Ads
One of the advantages of using AdSense that it lets you easily handle and manage the ads from their platform without having to edit the ad code manually. When you create an AdSense ad, you can easily modify it, even after you add it to your website or page. When you click the My ads page, you can filter different AdSense ads or search for specific ads by name, edit them, and set them up to display either text, images, or both. Also, you can get the ad code by clicking Get Code.
Modify Existing AdSense Ads
![]() Click My ads on the AdSense home page.
Click My ads on the AdSense home page.
The My Ads page appears
![]() Type the name of the ad in the Filter ad units field.
Type the name of the ad in the Filter ad units field.
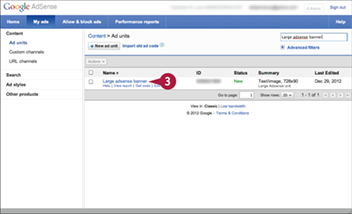
The specified ad appears.
![]() Click the ad name.
Click the ad name.
The ad settings page appears where you can modify your ad options.
Block AdSense Advertisers’ URLs
You may need to block inappropriate ads from your website. Google AdSense enables you to block up to 500 domain names. When you block a main domain, all its pages and subdomains are also blocked. You can learn about blocking URLs at https://support.google.com/adsense/bin/answer.py?hl=en&utm_medium=link&utm_campaign=ww-ww-et-asfe_&utm_source=aso&answer=164657. It is very important not to click the AdSense ads on your website. This can cause the suspending of your entire AdSense account. Instead, you can preview the ads using the Google Publisher toolbar at https://support.google.com/adsense/bin/answer.py?hl=en&answer=2415249&topic=2414281&ctx=topic.
Block AdSense Advertisers’ URLs

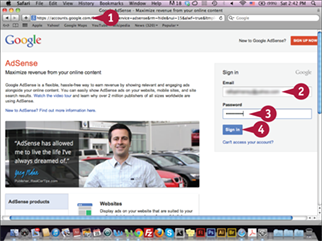
![]() Type www.google.com/adsense in your web browser and press
Type www.google.com/adsense in your web browser and press ![]() .
.
![]() Type your e-mail address.
Type your e-mail address.
![]() Type your password.
Type your password.
![]() Click Sign in.
Click Sign in.
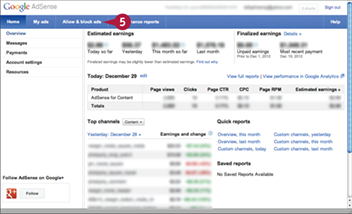
The AdSense home page appears.
![]() Click Allow & block ads.
Click Allow & block ads.

The Advertiser URLs tab appears.
![]() Type the URL of the ad you would like to block.
Type the URL of the ad you would like to block.
![]() Click Block URLs.
Click Block URLs.
Note: You can add multiple URLs, each on a separate line.
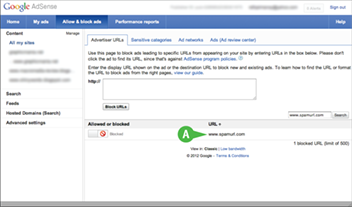
A The ad appears in the blocked URLs list.
Block Ads Using the Ad Review Center
Given Google can ban your account if you click your own website, it makes it difficult to review different ads on your website or blog. The Ad review center in AdSense enables you to review the ads that appear in your website, as well as block and unblock ads. You can also filter the ad view to display image ads, text ads, or rich media ads that refer to animated Flash banners. You can also filter the ads based on their similarities with specific ads or banner images or based on their display dates.
Block Ads Using the Ad Review Center
![]() Type www.google.com/adsense in your web browser and press
Type www.google.com/adsense in your web browser and press ![]() .
.
![]() Type your e-mail address.
Type your e-mail address.
![]() Type your password.
Type your password.
![]() Click Sign in.
Click Sign in.
The AdSense home page appears.
![]() Click the Allow & block ads tab.
Click the Allow & block ads tab.

The Advertiser URLs tab appears.
![]() Click the Ads (Ad review center) tab.
Click the Ads (Ad review center) tab.
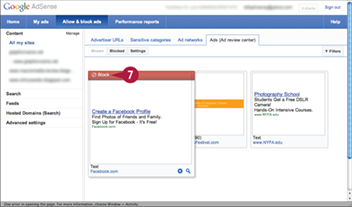
The Ad review center tab appears.
![]() Position your mouse pointer over an ad and click Block when it appears.
Position your mouse pointer over an ad and click Block when it appears.
The ad is blocked and hidden from your website.
Position AdSense Ads
Ad placement varies from website to website, but specific positions on websites can drive more clicks than others. Therefore, you should understand your website’s structure and which AdSense ad placement positions visitors will notice and then click. Research indicates you should place important elements above the web page fold, the portion of the website users see first, without needing to scroll down the page. Putting AdSense ads above the fold can result in more user clicks. The mobile devices have different screen sizes. Thus, you have to consider this in testing your adsense placement.
Position AdSense Ads
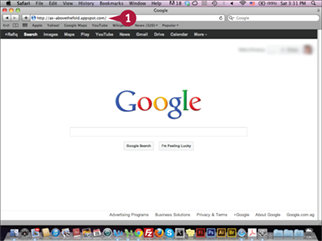
![]() Type http://as-abovethefold.appspot.com in your web browser and press
Type http://as-abovethefold.appspot.com in your web browser and press ![]() .
.
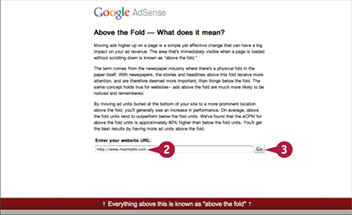
The Above the Fold page appears.
![]() Type the website name in the field.
Type the website name in the field.
![]() Click Go.
Click Go.
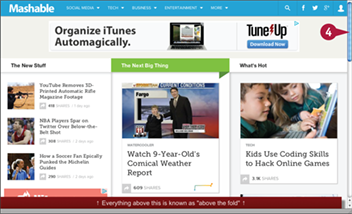
The website preview appears.
![]() Scroll down the page.
Scroll down the page.
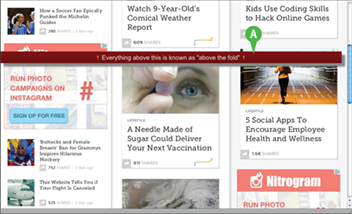
A The hidden sections of the website appear below the fold.
Create Chitika Ads
The ad network Chitika provides text and image advertisements based on Click-Per-Cost, similar to Google AdSense. You sign up on Chitika as a publisher (https://chitika.com/publishers), and create ads to match your website structure. Chitika works best for websites receiving most of their traffic from the United States. You can set up Chitika to display alternative ads when no ads are served from their network. The Chitika dashboard gives you detailed information about each ad’s performance, and you can create a channel for each ad to better track it.
Create Chitika Ads
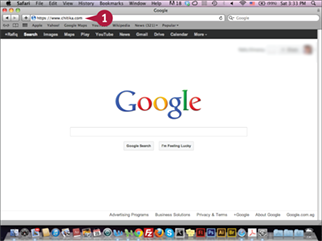
![]() Type http://chitika.com in your web browser and press
Type http://chitika.com in your web browser and press ![]() .
.

The Chitika website appears.
![]() Click My Account.
Click My Account.
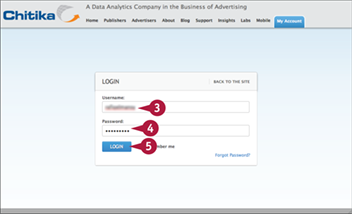
The Login page appears.
![]() Type your username.
Type your username.
![]() Type your password.
Type your password.
![]() Click Login.
Click Login.
Note: You can click Apply Now from the Publishers tab to create a new account.
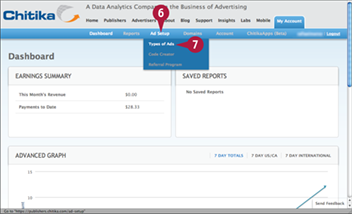
The account dashboard appears.
![]() Position your mouse pointer over Ad Setup.
Position your mouse pointer over Ad Setup.
![]() Click Types of Ads.
Click Types of Ads.
The Chitika ad set-up page includes different options for customizing your ad zone. In the first part, you customize the ad’s colors, such as the link color, text color, background color, and border color. In the second part, you choose the ad size from more than 20 size options, the type of ad, and the fallback, which refers to the content Chitika uses to fill the banner when no banner is served. You can fill the ad area with Chitika fallback links or alternative URL links. The third part is the reporting section, where you set up channel information.
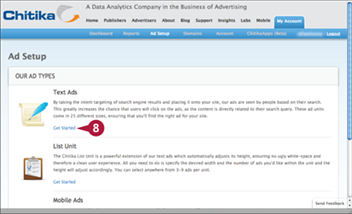
The Ad Setup/Our Ad Types page appears.
![]() Click Get Started.
Click Get Started.
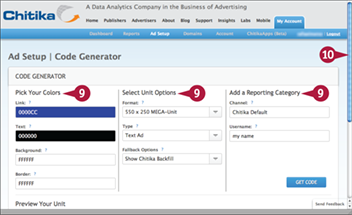
The Ad Setup/Code Generator page appears.
![]() Set up the ad properties by picking your colors, selecting unit options, and adding a reporting category.
Set up the ad properties by picking your colors, selecting unit options, and adding a reporting category.
![]() Scroll down the page.
Scroll down the page.
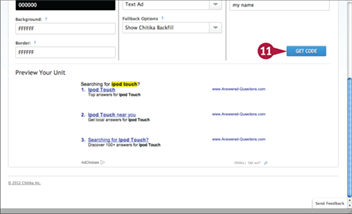
![]() Click Get Code.
Click Get Code.
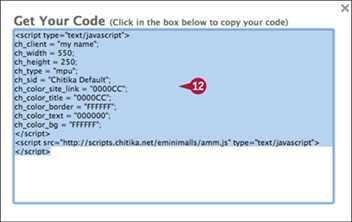
The Get Your Code dialog box appears.
![]() Click and drag to select the code and then press
Click and drag to select the code and then press ![]() +
+![]() (
(![]() +
+![]() ) to copy.
) to copy.
You can paste the ad code in your website HTML page to display the Chitika ad.
Work with Commission Conjunction
Commission Conjunction is a Click-Per-Action and Pay-Per-Call network that pays you when your website visitors click a banner or link and make a purchase. After you create a publisher account, you can join any of the advertisers’ campaigns to get revenues through their banners and use their different ad formats, which vary from image banners to promotional links. Each link or promotion gets a unique URL that you can track from the Commission Conjunction dashboard to check your revenue. This network works well for websites with a lot of targeted traffic.
Work with Commission Conjunction
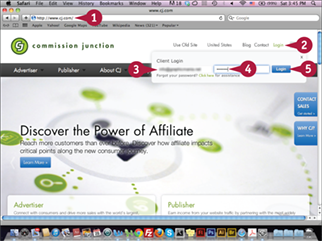
![]() Type www.cj.com in your web browser and press
Type www.cj.com in your web browser and press ![]() .
.
![]() Click Login.
Click Login.
![]() Type your username.
Type your username.
![]() Type your password.
Type your password.
![]() Click Login.
Click Login.
Note: If you do not have a publisher account, you can create an account at www.cj.com/publisher-signup-form.
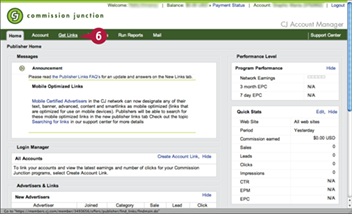
The Commission Junction home page appears.
![]() Click the Get Links tab.
Click the Get Links tab.
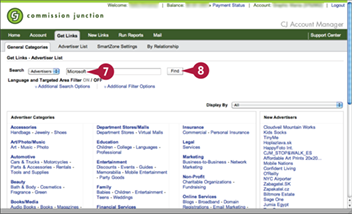
The General Categories tab appears.
![]() Type Microsoft in the Search Advertiser field.
Type Microsoft in the Search Advertiser field.
![]() Click Find.
Click Find.
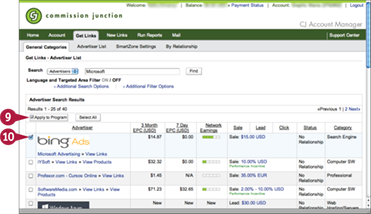
The Advertiser Search Results appear.
![]() Click the Apply to Program option next to any advertising campaign (
Click the Apply to Program option next to any advertising campaign (![]() changes to
changes to ![]() ).
).
![]() Click Apply to Program.
Click Apply to Program.
After you are approved to the advertiser program, you can choose one or more of the advertisers ads code to add in your website.
Work with BuySellAds
BuySellAds is an advertising network that includes a comprehensive marketplace for active advertisers and publishers in various categories. You can apply as a publisher based on the amount of traffic and impressions your website receives. BuySellAds delivers both Cost Per Mille (CPM) and fixed-price ads. You can sign up and submit your website, which is known as Property. Then, you can create multiple ad zones for each website, which are known as Inventory. Once you create an ad zone, you receive two snippets of codes to install on your website per the placement guidelines.
Work with BuySellAds
Submit a Website to BuySellAds
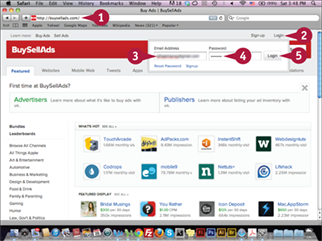
![]() Type http://buysellads.com in your web browser and press
Type http://buysellads.com in your web browser and press ![]() .
.
![]() Click Login.
Click Login.
![]() Type your e-mail address.
Type your e-mail address.
![]() Type your password.
Type your password.
![]() Click Login.
Click Login.
Note: If you do not have an account, click Sign-up to create an account.
The BuySellAds page appears.
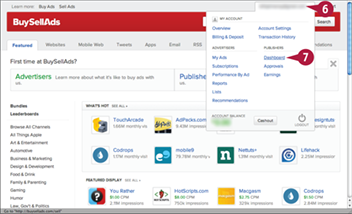
![]() Position your mouse pointer over your account name.
Position your mouse pointer over your account name.
![]() Click Dashboard.
Click Dashboard.
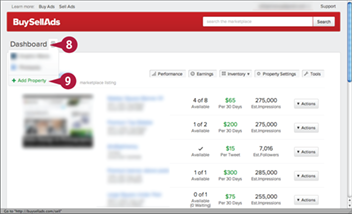
The Dashboard page appears.
![]() Click Dashboard.
Click Dashboard.
![]() Click Add Property.
Click Add Property.
The Add Property form appears.
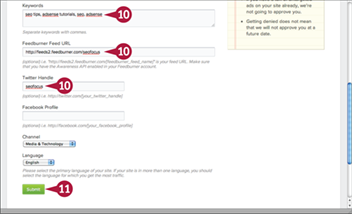
![]() Type the requested website information into the form, scrolling down as you go.
Type the requested website information into the form, scrolling down as you go.
![]() Click Submit.
Click Submit.
After your website is approved, you will see it listed in the Publisher Dashboard.
BuySellAds provides a wide range of types of ads, such as website ads, mobile-based ads, iOS and android app ads, RSS feed ads, desktop ads, e-mail ads, and Twitter-sponsored tweets. Each type has specific settings. Once you create an ad, you can set up ad requests from advertisers to be approved automatically or manually. Once an advertiser submits a placement request, you receive a notice. After you approve the ad, it appears in the ad zone on your website. In the automatic approval, you do not have to approve the ad manually, as it appears once the advertiser buys the ad zone.
Create an Advertising Zone
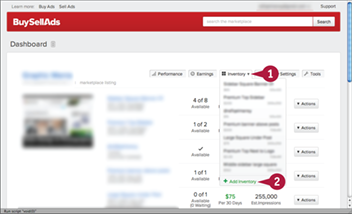
![]() On the Dashboard page, position your mouse pointer over Inventory.
On the Dashboard page, position your mouse pointer over Inventory.
![]() Click Add Inventory.
Click Add Inventory.
A new advertising zone form appears.
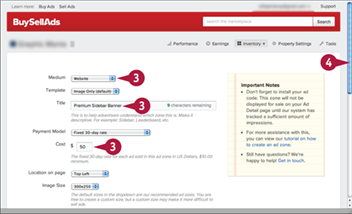
![]() Click the pop-up menus, select options, and then type the requested information to fill in the form.
Click the pop-up menus, select options, and then type the requested information to fill in the form.
![]() Scroll down the page.
Scroll down the page.
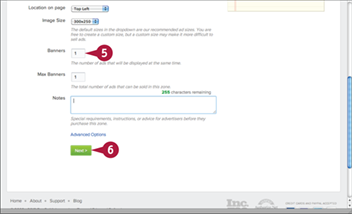
![]() Continue typing in the requested information and selecting options from the pop-up menus to complete the form.
Continue typing in the requested information and selecting options from the pop-up menus to complete the form.
![]() Click Next.
Click Next.
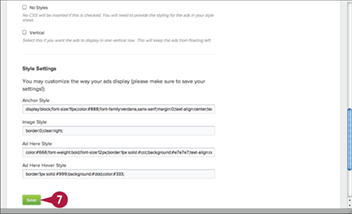
In the Style Settings section, the ad zone code appears.
![]() Click Save.
Click Save.
The ad zone is created. You can see the code that you will need to paste into your website HTML page.