
Chapter 12: Applying SEO to WordPress Blogs
Content Management Systems (CMS) are server-side platforms that allow you to build your website and add content easily using Graphic User Interface (GUI) elements such as text editors. WordPress is a commonly used CMS because it is easy to use and search engine friendly. You can use WordPress to create blogs, websites, and simple e-commerce stores.
Install the W3 Total Cache Plugin
Set Up the All in One SEO Plugin
Install the SEO Friendly Images Plugin
Understanding WordPress CMS
Although WordPress was originally a blogging CMS, it is now used to build corporate websites and e-commerce stores. You can either use www.wordpress.com to build a free blog where you can get free hosting and a blog name or you can install WordPress on your own server by following the steps outlined in this link: http://codex.wordpress.org/Installing_WordPress. Installing WordPress requires that you know how to set up domain names and servers. Each WordPress website has an admin page where you can add content, change the website layout, or add features and functions. WordPress is based on the PHP (Hypertext Processor) programming language that is used to create dynamic web pages.
WordPress Themes
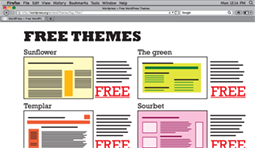
The website or blog design in WordPress depends on themes. These are groups of images, PHP files, and CSS (Cascading Style Sheets) files used to create the graphical style for the website menus, forms, and other features. You can upload the themes to the server in the folder /wp-content/themes/. To apply the uploaded theme, you activate it from the Themes section in the WordPress admin page. The layout of the website or blog plays an important role in SEO optimization; it has to be clear and ensure that the content loads easily. It can be difficult for search engine spiders to crawl large files. Further, the layout should be user friendly, display the content in the top portion of the page, and have balance between text and images. A wide variety of WordPress themes are available on the web for free as well as for a fee. You can find free themes in the WordPress Directory at www.wordpress.org/extend/themes.
WordPress Plugins

WordPress plugins are a group of PHP-based files that add features and functions to WordPress websites or blogs. Unlike themes, plugins include functions such as contact forms, social media buttons, and more. Different types of plugins can optimize your WordPress website with just a few clicks. There are two methods for installing plugins. The first one is to search for the plugin and install it directly from the Plugins section on the admin page, and the second one is to upload the plugin folder to /wp-content/themes/ on the WordPress website server, and enable the plugins from the admin page. Use plugins wisely because they include a lot of code, which can make a site slower than normal. You can find a huge number of plugins in WordPress Plugin Directory at http://wordpress.org/extend/plugin.
WordPress and SEO
WordPress is one of the common CMSs that works well with the SEO process. The WordPress site page and archive structure lends itself to optimal content crawling. Also, it is easy to customize each page or post URL to include important keywords for indexing, which are known as permalinks. If you choose an SEO-friendly theme, it can aid optimization for your website. WordPress plugins play a significant role in optimizing websites, with an array of different plugins to help you optimize content as well as files. Also, you can customize settings for comments and pingbacks to help increase the content optimization. Pingbacks occur when your website links to a specific site and sends updates to the site about the link.
WordPress Content
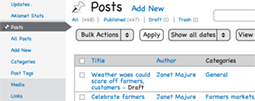
Content is an essential part of WordPress websites and you need to optimize it in order to appear in search engine results. You can add content to WordPress easily as posts or pages. Posts are content updates that you can add to your website every day, and they are archived on the blog home page. Pages contain static content that you do not change regularly, such as contact information and the company information. You can use the text editor in WordPress to format content and headings to meet with SEO guidelines. The content can be arranged in tags or categories, which are classified for your website content. Tags are keywords that you add to each post and you include the important keywords in each post or page.
WordPress Widgets

WordPress widgets are comments sections that you can add to the WordPress sidebar and footer areas. These widgets can include different features, such as recent posts, related posts, ad spaces, and social icons. You can add widgets to either the sidebar or the footer from the Widgets link in the Appearance section on the admin page. In this link, you will find many widgets that you can drag and drop to available areas in your blog or website. Not only are widgets easy to use, but also you can use them to increase the number of internal links on your home page, which can affect page rank and page views. Also, you can use them to display categories for the website content.
Install the W3 Total Cache Plugin
Website or blog loading speed is an essential factor in SEO. Ample speed can help search engine crawlers index more pages in less time, whereas with slow websites, crawlers may skip slow content. The W3 Total Cache Plugin is one of the plugins that you can install on WordPress and configure to create caches or recorded files from the website on the server. This means the user can access static site information without needing to load it again. This cached version of the website files can help speed content loading and result in a lighter network or bandwidth traffic load.
Install the W3 Total Cache Plugin
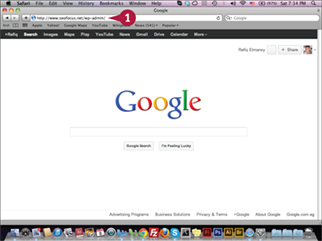
![]() Type www.seofocus.net/wp-admin/ in your web browser and press
Type www.seofocus.net/wp-admin/ in your web browser and press ![]() .
.
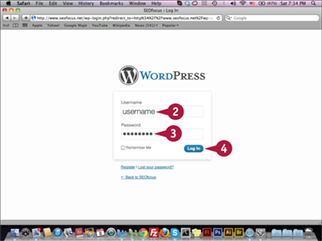
The WordPress Log In page appears.
![]() Type your username.
Type your username.
![]() Type your password.
Type your password.
![]() Click Log In.
Click Log In.
Note: The admin username and password is created when you install WordPress on the server. You may also ask your server administrator to install it.
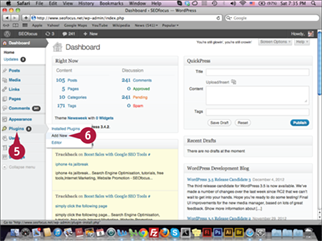
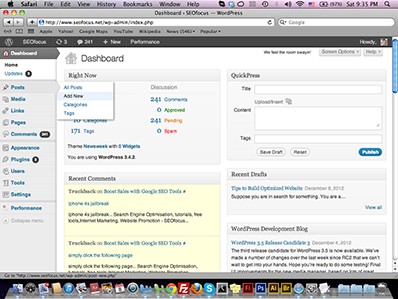
The WordPress Dashboard appears.
![]() Position your mouse pointer over Plugins.
Position your mouse pointer over Plugins.
The Plugins menu appears.
![]() Click Add New in the pop-up menu.
Click Add New in the pop-up menu.

The Install Plugins page appears.
![]() Type W3 Total Cache.
Type W3 Total Cache.
![]() Click Search Plugins.
Click Search Plugins.
While you can install the W3 Total Cache directly from the WordPress admin page, you can also download it to your computer and upload it directly to the server using any FTP client. You can download the W3 Total Cache from www.wordpress.org/extend/plugins/w3-total-cache. Download the plugin, extract its compressed file, and upload the plugin folder to /wp-content/plugins/. Then, go to Plugins in the admin page and activate the plugin from the new Plugins list. When you install the W3 Total Cache, it creates a number of files and folders in the plugins folder or in the wp-content folder.
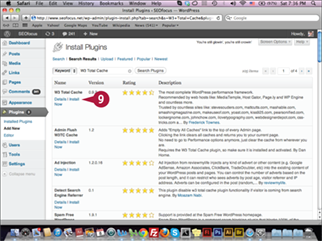
The plugins appear.
![]() Click Install Now below W3 Total Cache.
Click Install Now below W3 Total Cache.
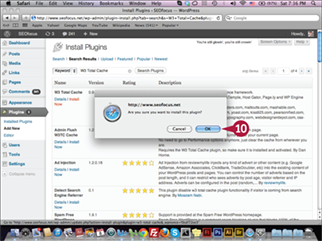
An alert message appears.
![]() Click OK.
Click OK.

The Plugin installation page appears.
![]() Click Activate Plugin.
Click Activate Plugin.
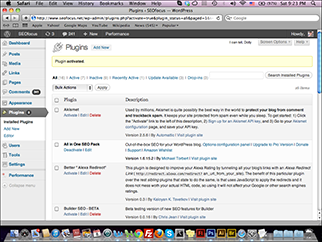
The plugin is activated.
Configure the W3 Total Cache
After installing the W3 Total Cache, it is important to configure it correctly in order to get the most out of it. Configuring the W3 Total Cache lets you set up the server files cache, minifying JavaScript and CSS files, which means you make them smaller and faster to load. Also, it allows you to configure the Content Delivery Network (CDN) that copies the server files onto servers from various locations so they reach users more quickly. The configuration process is pretty easy; you choose configuration options that allow server file caching.
Configure the W3 Total Cache
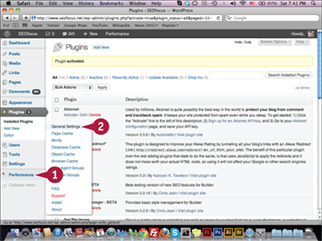
![]() Position your mouse pointer over Performance.
Position your mouse pointer over Performance.
![]() Click General Settings in the pop-up menu.
Click General Settings in the pop-up menu.
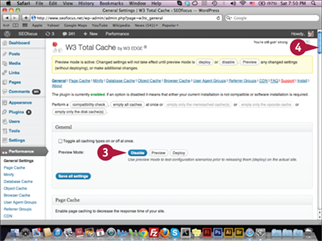
The W3 Total Cache settings appear.
![]() Click Disable in the General section.
Click Disable in the General section.
This disables the Preview mode.
![]() Scroll down to the Page Cache section.
Scroll down to the Page Cache section.
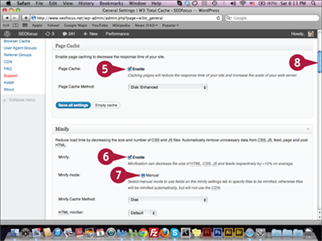
![]() In the Page Cache section, click the Enable option under the Page Cache section (
In the Page Cache section, click the Enable option under the Page Cache section (![]() changes to
changes to ![]() ).
).
![]() Click the Enable option under the Minify section (
Click the Enable option under the Minify section (![]() changes to
changes to ![]() ).
).
![]() Click the Manual option under the Minify mode (
Click the Manual option under the Minify mode (![]() changes to
changes to ![]() ).
).
![]() Scroll down to see more Minify settings.
Scroll down to see more Minify settings.
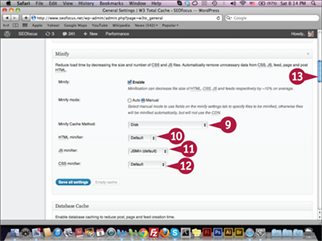
![]() Click the Minify Cache Method pop-up menu and select Disk.
Click the Minify Cache Method pop-up menu and select Disk.
![]() Click the HTML minifier pop-up menu and select Default.
Click the HTML minifier pop-up menu and select Default.
![]() Click the JS minified pop-up menu and select JSMin.
Click the JS minified pop-up menu and select JSMin.
![]() Click the CSS minified pop-up menu and select Default.
Click the CSS minified pop-up menu and select Default.
![]() Scroll down to the Database Cache section.
Scroll down to the Database Cache section.
In addition to the general settings in the W3 Total Cache plugin, you can find advanced settings at the top of the plugin settings page. These advanced settings include more options for server performance and handling files on the server. The advanced features include page cache options, minify options, database cache options, browser cache options, and CDN information that you can set by integrating the website with a CDN provider. If you are not familiar with the advanced options, you can simply set the plugins’ general information, which is good enough to improve your website performance.
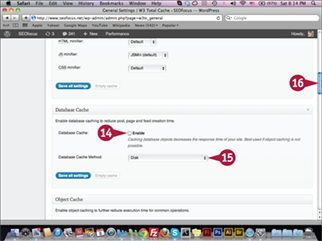
![]() In the Database Cache section, click the Enable option (
In the Database Cache section, click the Enable option (![]() changes to
changes to ![]() ).
).
![]() Click the Database Cache Method pop-up menu and select Disk.
Click the Database Cache Method pop-up menu and select Disk.
![]() Scroll down to the Object Cache section.
Scroll down to the Object Cache section.
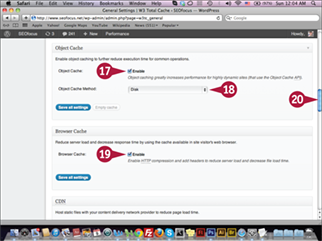
![]() In the Object Cache section, click the Enable option (
In the Object Cache section, click the Enable option (![]() changes to
changes to ![]() ).
).
![]() Click the Object Cache Method pop-up menu and select Disk.
Click the Object Cache Method pop-up menu and select Disk.
![]() Click the Enable option (
Click the Enable option (![]() changes to
changes to ![]() ) under the Browser Cache section.
) under the Browser Cache section.
![]() Scroll down to Miscellaneous.
Scroll down to Miscellaneous.
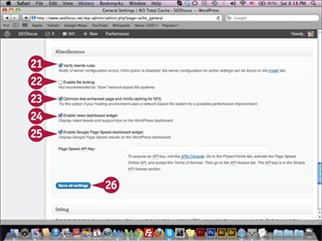
![]() In the Miscellaneous section, click the Verify rewrite rules option (
In the Miscellaneous section, click the Verify rewrite rules option (![]() changes to
changes to ![]() ).
).
![]() Click to deselect the Enable file locking option (
Click to deselect the Enable file locking option (![]() changes to
changes to ![]() ).
).
![]() Click the Optimize disk enhanced page and minify caching for NFS option (
Click the Optimize disk enhanced page and minify caching for NFS option (![]() changes to
changes to ![]() ).
).
![]() Click the Enable news dashboard widget option (
Click the Enable news dashboard widget option (![]() changes to
changes to ![]() ).
).
![]() Click the Enable Google Page Speed dashboard widget option (
Click the Enable Google Page Speed dashboard widget option (![]() changes to
changes to ![]() ).
).
![]() Click Save All settings.
Click Save All settings.

The plugin settings are saved.
Set Up the All in One SEO Plugin
The All in One SEO plugin is the best tool for optimizing not only the WordPress website home page, but also the inner post pages. It allows you to add a title, description, and keyword Metadata dynamically, without needing to add it manually for each page. You can set up the global options for the All in One SEO from the plugin settings page and you can set up the SEO Metadata for each individual post from each post-editing page. In order to use this plugin, you have to install it from the Plugins section on the WordPress admin page or through FTP.
Set Up the All in One SEO Plugin
Set the Global Metadata
Note: To perform this exercise, you must install the All in One SEO plugin.
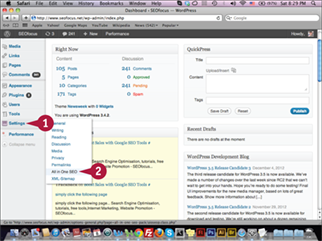
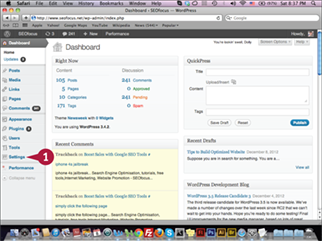
![]() Position your mouse pointer over Settings.
Position your mouse pointer over Settings.
![]() Click All in One SEO in the pop-up menu.
Click All in One SEO in the pop-up menu.
The Plugin settings appear.
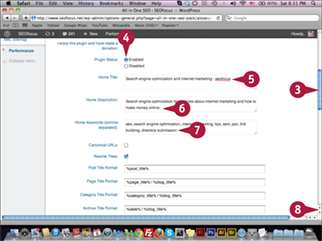
![]() Scroll down to the Plugin Status section.
Scroll down to the Plugin Status section.
![]() Click the Enabled option (
Click the Enabled option (![]() changes to
changes to ![]() ).
).
![]() Type the website title Metadata.
Type the website title Metadata.
![]() Type the website description.
Type the website description.
![]() Type the website keywords.
Type the website keywords.
![]() Scroll down to the usage checklist.
Scroll down to the usage checklist.
The usage checklist is revealed.
![]() Click to deselect the Use Categories for META keywords option (
Click to deselect the Use Categories for META keywords option (![]() changes to
changes to ![]() ).
).
![]() Click the Use Tags for META keywords option (
Click the Use Tags for META keywords option (![]() changes to
changes to ![]() ).
).
![]() Click the Dynamically Generate Keywords for Posts Page option (
Click the Dynamically Generate Keywords for Posts Page option (![]() changes to
changes to ![]() ).
).
![]() Click the Use noindex for Categories option (
Click the Use noindex for Categories option (![]() changes to
changes to ![]() ).
).
![]() Click the Use noindex for Archives option (
Click the Use noindex for Archives option (![]() changes to
changes to ![]() ).
).
![]() Click the Use noindex for Tag Archives option (
Click the Use noindex for Tag Archives option (![]() changes to
changes to ![]() ).
).
![]() Click to deselect the Autogenerate Descriptions option (
Click to deselect the Autogenerate Descriptions option (![]() changes to
changes to ![]() ).
).
![]() Click the Capitalize Category Titles option (
Click the Capitalize Category Titles option (![]() changes to
changes to ![]() ).
).
![]() Scroll down to the end of the page
Scroll down to the end of the page
The end of the setting page appears.
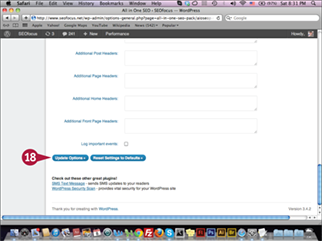
![]() Click Update Options.
Click Update Options.
The plugin settings are saved.
In addition to the All in One options in the plugin setting page, you can apply unique title, description, and keyword Metadata for each post or page that you create for the WordPress website or blog. In the new post page, you can find a section that enables you to set up unique Metadata for this specific post. This unique SEO information increases the page’s optimization and its chance of appearing in the search engine results page.
Set the Posts Metadata
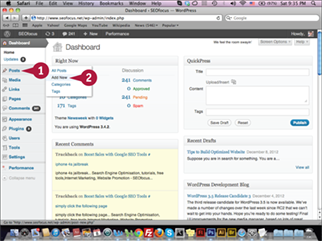
![]() Position your mouse pointer over Posts.
Position your mouse pointer over Posts.
![]() Click Add New in the pop-up menu.
Click Add New in the pop-up menu.
The Add New Post page appears.
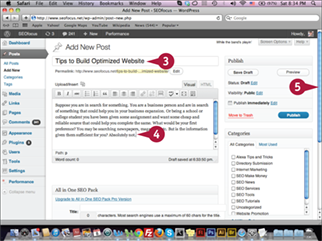
![]() Type the title of the post.
Type the title of the post.
![]() Type the content of the post.
Type the content of the post.
![]() Scroll down to the All in One SEO Pack section.
Scroll down to the All in One SEO Pack section.
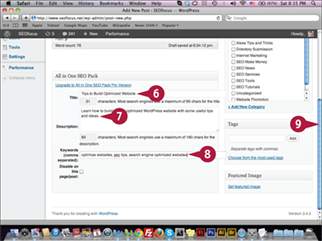
The All in One SEO Pack section appears.
![]() Type the title.
Type the title.
![]() Type the description.
Type the description.
![]() Type the keywords.
Type the keywords.
![]() Scroll up to the top of the page.
Scroll up to the top of the page.
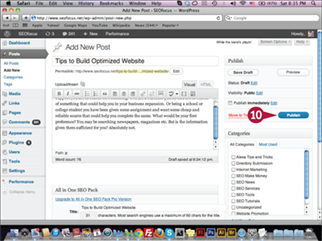
![]() At the top of the Add New Post page, click Publish.
At the top of the Add New Post page, click Publish.
The new post is published with the specified Metadata applied.
Set Up Permalinks
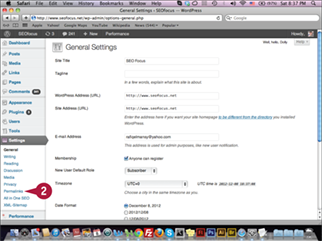
The default WordPress URLs are usually numbered and include question mark signs, which means they are search engine optimized less frequently and harder for visitors to recognize. Permalinks help you customize how WordPress generates the URLs for the new posts once you publish them. Instead of using numbers, you can set up WordPress to display the post title, category, or publishing date. You can access the Permalinks from the WordPress General Settings page and customize how you want the post and page URLs to appear.
Set Up Permalinks
![]() Click Settings on the WordPress admin page.
Click Settings on the WordPress admin page.
The WordPress General Settings page appears.
![]() Click Permalinks.
Click Permalinks.
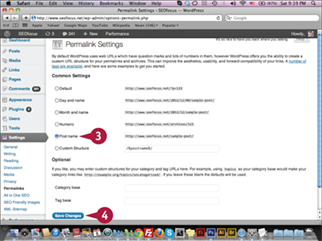
The Permalink Settings page appears.
![]() Click the Post name option (
Click the Post name option (![]() changes to
changes to ![]() ).
).
![]() Click Save Changes.
Click Save Changes.
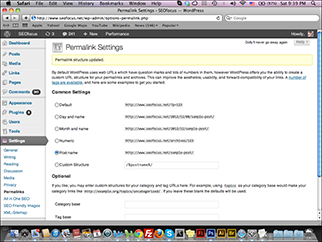
The Permalinks setting is saved.
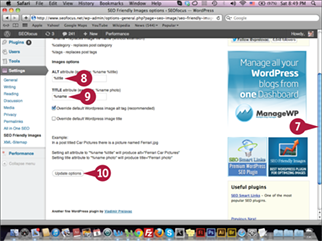
Install the SEO Friendly Images Plugin
Optimized images can help your website or blog to display in search engines when users type keywords related to your image. You can optimize the images through their image names, size, and Metadata, such as the Alt and Title tags. As with the All in One SEO plugin, you can use the SEO Friendly Images plugin to optimize the images in your WordPress website easily and automatically. You can also use it to automatically add Title and Alt tags for images and set up these tags to be the same as the name of the post or the image.
Install the SEO Friendly Images Plugin
Note: To perform this exercise, you must install the SEO Friendly Images plugin from the Add New page under the Plugins section.
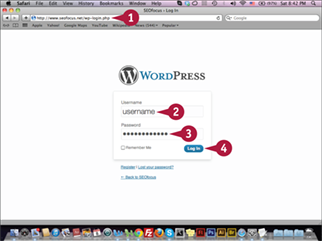
![]() Type www.seofocus.net/wp-login.php/ in your web browser and press
Type www.seofocus.net/wp-login.php/ in your web browser and press ![]() .
.
![]() Type your username.
Type your username.
![]() Type your password.
Type your password.
![]() Click Log In.
Click Log In.

The WordPress Dashboard page appears.
![]() Click Settings.
Click Settings.
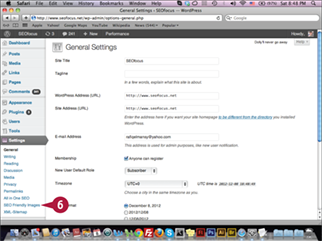
The General Settings page appears.
![]() Click SEO Friendly Images.
Click SEO Friendly Images.
The SEO Friendly Images plugin settings appear.
![]() Scroll down to the Images options section.
Scroll down to the Images options section.
![]() Type %title in the Alt field.
Type %title in the Alt field.
![]() Type %name in the Title field.
Type %name in the Title field.
![]() Click Update options.
Click Update options.
The plugin settings are saved.