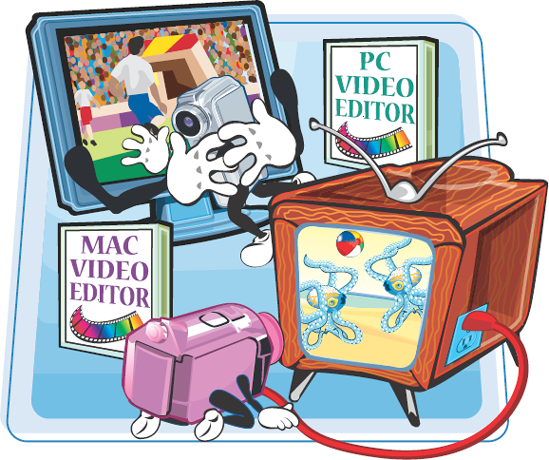
Shooting video is only the beginning of the video-making process. You can view the video footage you have shot on a TV monitor in a very straightforward process with just about any digital video camera. You can connect your video camera to a computer to transfer your recorded scenes and create incredible movies using graphics, music, and still images. One of the many benefits of digital video editing software is that it provides excellent means to organize those video clips and video projects on your computer hard drive.
Play Back Your Video on a TV Monitor 176
Connect Your Digital Video Camera to a Computer 178
Transfer Video from a File-Based Camcorder with iMovie 180
Capture Video from a Tape-Based Camcorder to a Computer with iMovie 182
Set Up a Project in Adobe Premiere Elements 184
Transfer Media from Still Cameras and File-Based Camcorders in Adobe Premiere Elements 186
Capture Video from a Tape-Based Camcorder to a Computer with Adobe Premiere Elements 188
Learn About Analog-to-Digital Conversions 190
Merge Events to Organize Clips in iMovie 192
Organize with Folders in Project View in Adobe Premiere Elements 194
Playing your video on a TV set is a very straightforward process. You need to first make sure that the camcorder and TV monitor have the necessary hardware connections. Depending on your video camera, you may also need to configure a play-out option in the camera menu. You have multiple options for connecting to a TV, each yielding a different playback quality.

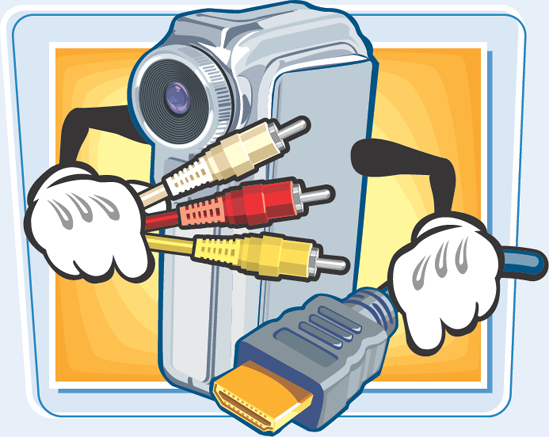
Set the Camera Mode and TV Type Some digital video cameras require that you place them into video playback mode before you can play back the video you shot. This can be a switch on the camera or a lever that reads Play, or VCR/VTR mode. If you have a high definition camera you may need to go into the camera's menu and change the TV type to match the TV you will be playing back the footage on, in order to play it in the correct aspect ratio. Your choices are 4:3 or 16:9.  | Locate Output and Input Terminals Depending on your camera, you may have an AV Out, S-Video, Component Out, or high definition HDMI terminal. A camera may also utilize a combination of these outputs. A high definition HDMI connection is available only on high definition cameras and can be connected only to an HDTV. This connection provides the highest picture quality. When you identify the corresponding input on the TV, you can connect the two with the proper cable. Component cables do not carry audio, so you will have to make an audio connection as well. 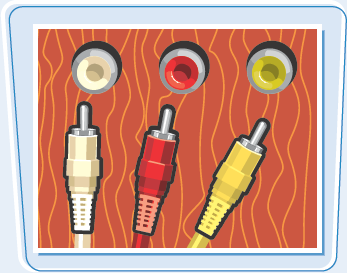 |
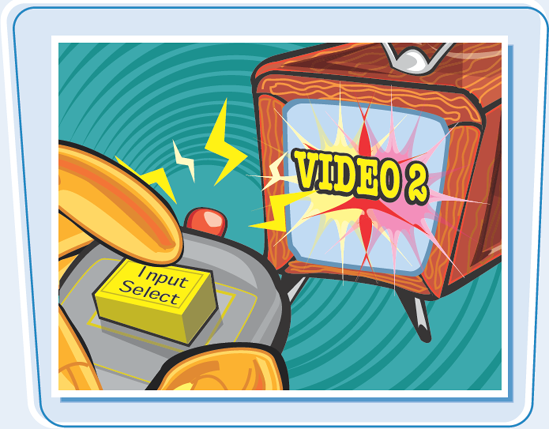
In order to view your camcorder's video on a TV set, you have to change the source or select an input device. The options may be VIDEO 1 or VIDEO 2 in the menu or actual connectors such as AV, Component, or HDMI. You can press play on the video camera and the video plays on the TV set.
Optimize Your Viewing Experience
You can optimize your viewing experience by using the best connection available for your particular TV. The quality of picture from each connection ranging from highest to lowest quality is HDMI, Component, S-Video, and Composite.
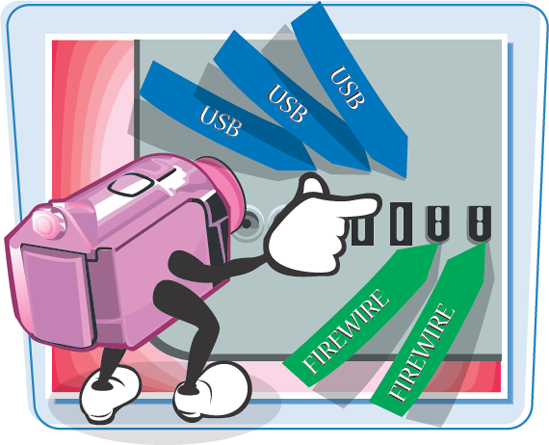
To transfer your video footage to a computer, you need the proper hardware connections. Depending on which type of camera you have, you may connect to your computer with a FireWire cable or USB cable. Either connection requires the computer to have that input port.
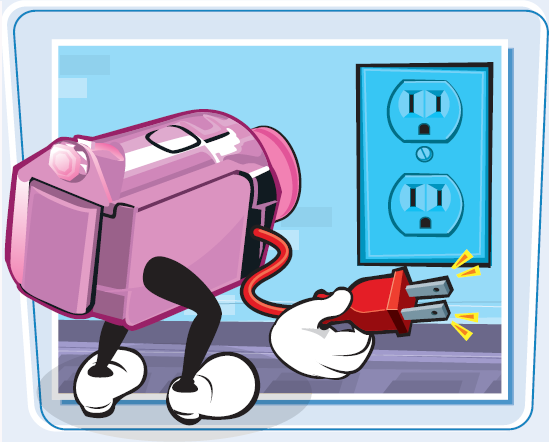
Power the Camera with the AC Adapter
Connect the power adapter to the digital video camera to power it. Some video cameras do not mount to a computer unless they are powered via the AC adapter. Using the AC adapter also enables you to conserve battery power while transferring images and editing video.
You may have to place the camera into the proper playback mode before you can successfully mount to a computer. A digital video camera could utilize a dial or a switch to place it in Play, VCR/VTR, or video playback mode. Read your camera's documentation to discover which method your camera uses.

Locate the Camera and Computer Inputs
Depending on your camera, you may have a FireWire or DV port, or a USB Port that can enable you to connect to a computer. These ports are often represented by symbols and concealed by a plastic covering on the camera body. Make sure that you insert the proper end of the cable into the camera and the computer. FireWire/DV cables are usually not shipped with digital video cameras, but you can buy one at any computer or electronics store.

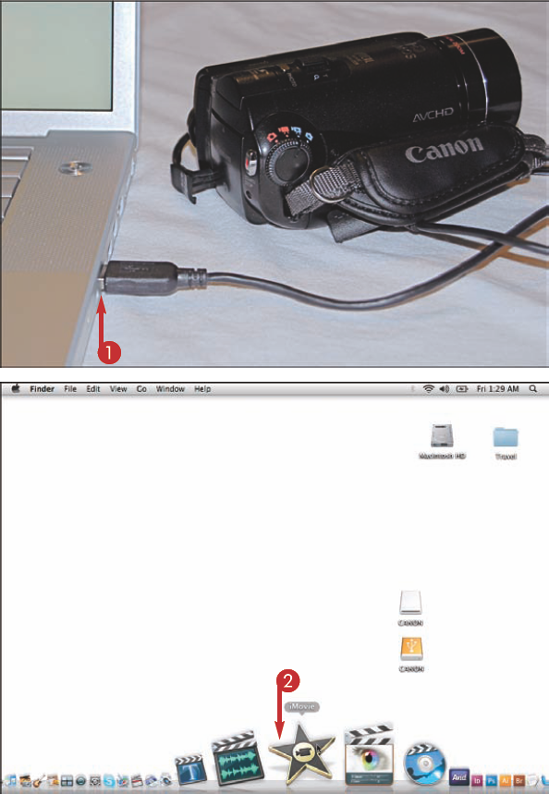
If you have one of the newer AVCHD cameras, you need to have one of the newer Intel-based Macs in order to use your camera with the iMovie software. Some of the newer video cameras record video to internal flash drives, memory cards, and hard disk drives as scene files. The method used in iPhoto for transferring file-based scenes from a video camera to a computer varies from a tape-based camera. iMovie uses Events, or categories, to organize your movies.

Transfer Video from a File-Based Camcorder with iMovie
The camera mounts to the desktop like an external hard drive.
Note
Connect the power adapter to the digital video camera to power it. Some cameras do not mount to the computer unless the AC adapter powers them.
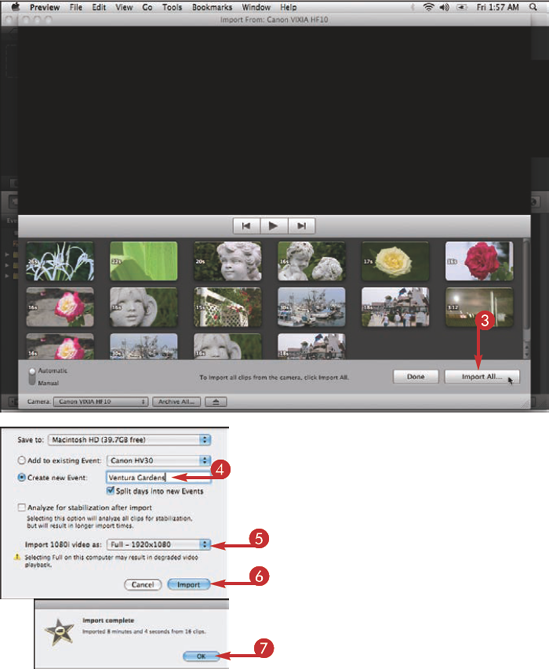
You are taken to the import window, and the Camera Detected Scanning Contents window closes. All video files on the camera are checked and ready for import.
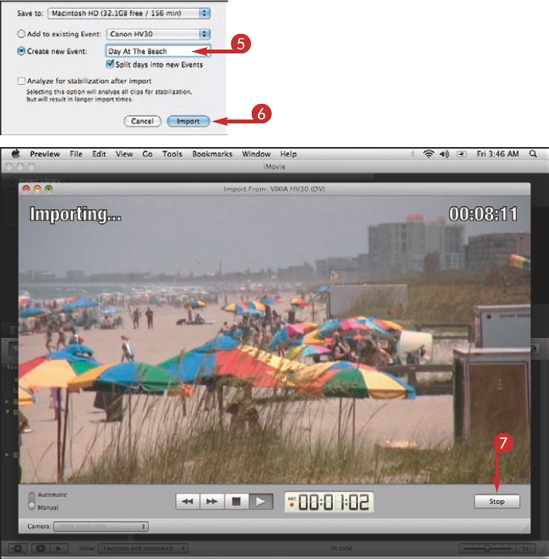
A dialog box opens prompting you to designate specifics about the import.
Note
By default, iMovie is set to create a new Event, which is named by the date of import.
Note
If importing from an HD camera you may be prompted to choose between Large-960x540 and Full-1920x1080. Be aware that choosing a larger video size takes up more disk space.
The scene files are downloaded one by one and are labeled as Imported when complete. A dialog box that reads Import Complete appears after the download is complete.
Tip
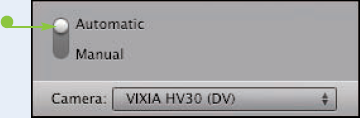
Can I choose only specific clips to import?
Yes, you can click Manual (

Can I preview clips before I import them?
Yes. Simply select the video file that you want to play and it appears in the preview area. Click Play (
The major difference between capturing video from a tape, as opposed to transferring from a file-based camcorder in iMovie, is the shuttling of tape. Capturing video from a tape in iMovie is also a very straightforward process, and you begin by connecting the camera to the computer. Some cameras are not recognized by the computer, unless the AC adapter powers them.

Capture Video from a Tape-Based Camcorder to a Computer with iMovie
The Import window opens.
Note
The
Note
You have to click
A dialog box opens prompting you to designate specifics about the import.
The import dialog box opens.

Note
By default, iMovie is set to create a new Event for each day the video was shot. You can uncheck Split days into new Events if you want iMovie to import the video into a single Event.
iMovie begins capturing the video from the tape.
The video is captured and another screen appears.
Note
You can use
Tip
Can I set iMovie to capture the entire tape for me?
Yes. Click to move the switch located at the bottom left side of the import window to Automatic (
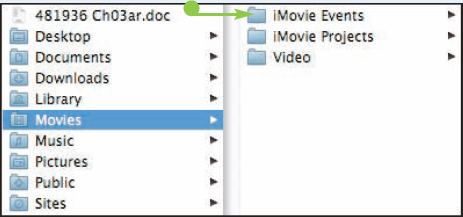
Where can I find the captured files on my hard drive?
You can find the captured files on your hard drive by navigating to Macintosh HD, Users (this is usually your user name), Movies, iMovie Events (
Setting up a project in Adobe Premiere Elements is a straightforward process. You set up projects depending on the device and the type of footage that you are importing, including AVCHD, HDV, or DV footage. Premiere Elements enables you to prepare your projects for both NTSC and PAL standards.
Note
Proceed with these steps after making the necessary hardware connections.
Set Up a Project in Adobe Premiere Elements
Note
If you downloaded the Premiere Elements software from the Adobe site, a dialog box may appear prompting you to install full content. You can either go to the specified Web site that it supplies or click OK.
The Welcome screen opens prompting you to start an Instant Movie, Open Project, or New Project.
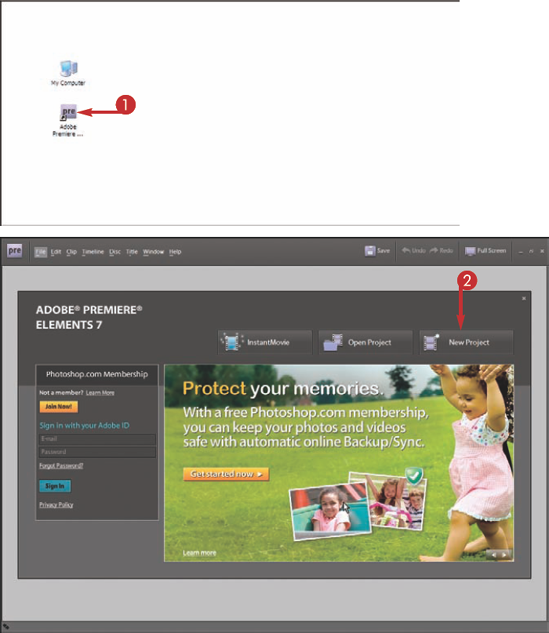
The new project dialog box opens.
Note
You can click Open Project if you want to capture the footage to an existing project.
The Setup options appear.
Note
The DV preset was chosen in this example.
The setup dialog closes.
The Premiere Elements interface opens.

Tip
Can I change the project preset after starting a project?
No. It is very important when creating a new project that you choose the correct project settings for your source material/video. The project specifies the frame rate, aspect ratio, audio sample rate, and other important characteristics of your project. Your project can run into problems if the preset does not match the source files.
Can I create a project preset while in an open project?
Yes, but creating a new preset does not change the setting for the project that you currently have open; you only create a new project preset. You can create a project preset by going to the top menu and choosing Edit, Project Settings, and General.

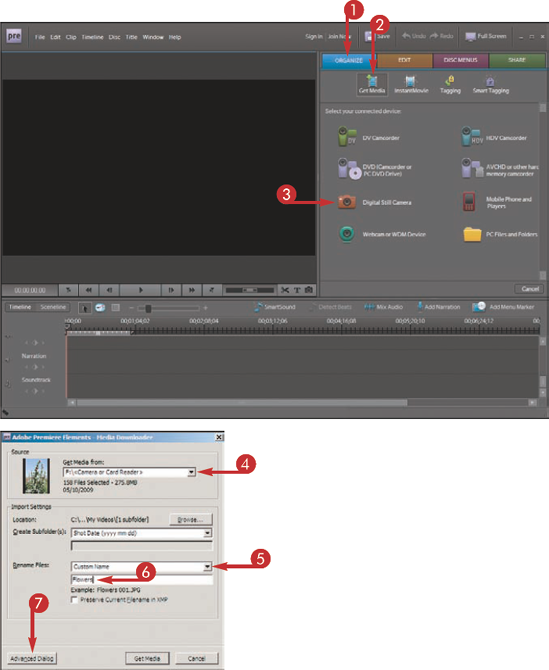
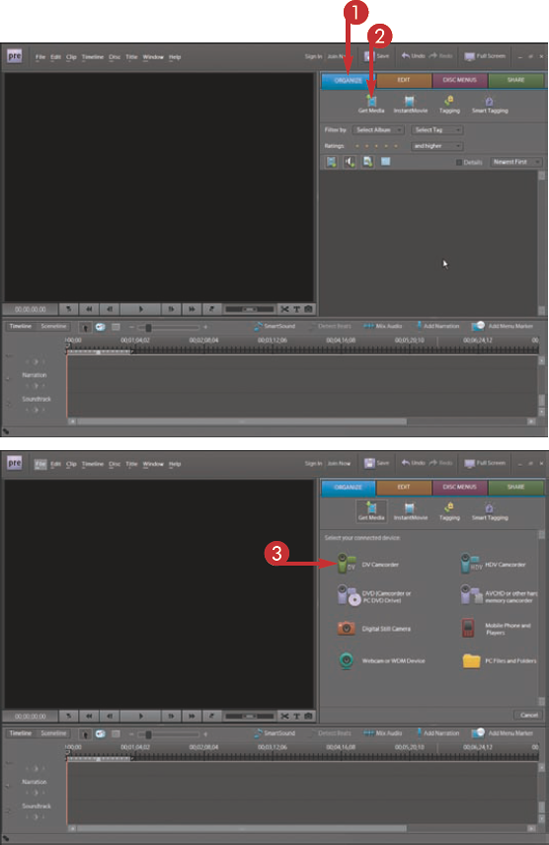
You can also download media from devices other than DV and HDV camcorders in Adobe Premiere Elements. Content from file-based devices such as memory cards, mobile phones, DVD-based, and hard disk drive (HDD) camcorders can also be used in projects. Whether you choose the DVD, AVCHD, Digital Still Camera, or Mobile Phone and Players option, the download process is the same.

Transfer Media from Still Cameras and File-Based Camcorders in Adobe Premiere Elements
Note
In this example I am downloading from a Digital Still Camera, but the process is the same for the DVD, AVCHD, Digital Still Camera, or Mobile Phone and Players options.
The Media Downloader opens.
Premiere Elements connects to the device.
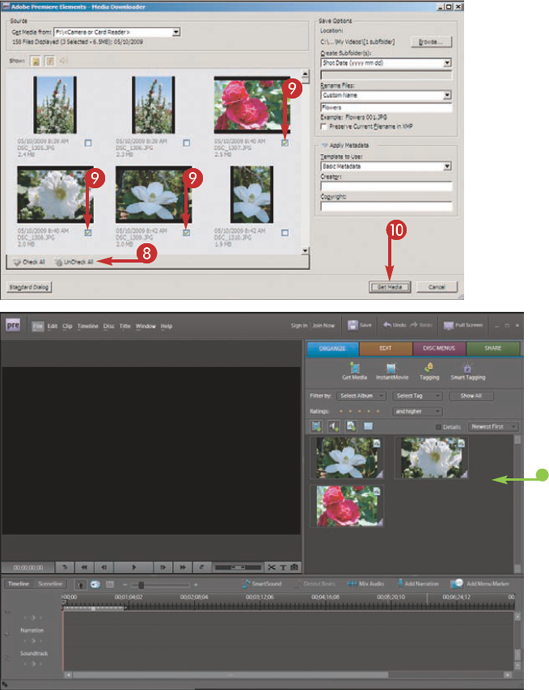
A window opens displaying thumbnails of the images located on the device. All of the images have a check mark next to them.
All the images are unchecked.
The images are downloaded and appear in the Organize view.
Tip
Can I capture images from my webcam?
Yes. You can click Get Media and then click the Webcam or WDM Device option to capture images from a webcam installed in your computer. The capture window opens and you are able to capture live video from the webcam. Close the capture window and the video appears with the other video files for that particular project.

Can I import a file located on my desktop?
Yes, you can import a file located on your computer hard drive by either clicking the Get Media (

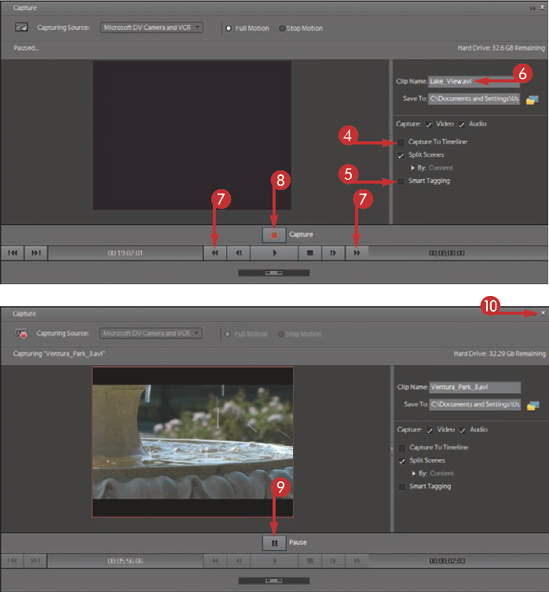
Adobe Premier Elements enables you to easily capture DV and HDV video from your tape-based camera to your computer. Understanding how to properly capture your video gives you more options for importing a variety of media for use in your projects.
Note
Follow these steps after making the necessary hardware connections.
Capture Video from a Tape-Based Camcorder to A Computer with Adobe Premiere Elements
The device options open.
The capture window opens.
Note
Click the HDV Camcorder option if you are capturing from an HDV camera.
Note
You can capture video from a USB or FireWire connection when you choose the DV Camcorder device option.
Note
The Capture To Timeline option captures the video directly to the timeline. If you know that your video will need considerable editing, consider deselecting this option.
Note
Smart Tagging analyzes and marks less-than-perfect video, such as shake, blur, and so on. You are the best judge of your video, so consider always deactivating this option.
Note
Each scene will now be numbered in increments such as Florida_1 and Florida_2 as Premiere Elements splits scenes by timecode according to when you started and stopped recording on the tape.
Note
A red outline appears around the capture preview to signify that Premiere Elements is capturing the video.
Tip
Where are my files stored, and can I change the location?
When you start a new project, you can click Browse in the New Project dialog box and navigate to a new location to save the captured files. You can also click the Save To icon (

How do I access capture settings for my project?
You can access capture settings by clicking the small arrows located at the upper right-hand corner of the Capture window. When you click the arrows, the Capture Settings and Device Control Settings options appear.
If you want to capture analog video from an analog source, such as a VCR or an old non-digital video camera, you need special hardware called a capture card. You can install a video capture card into a computer, or even use an external analog video converter that enables you to attach the analog device to the computer and convert the footage. Some video cameras allow you to do make analog to digital conversions.
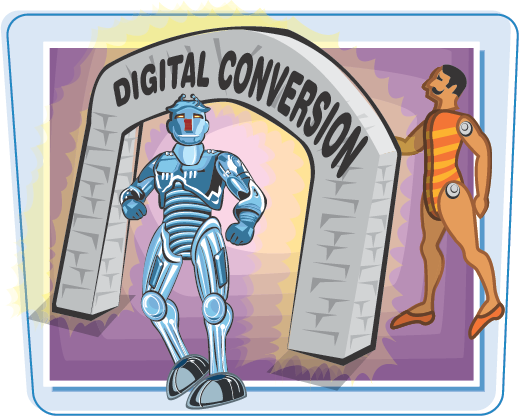
Learn About Analog-to-Digital Conversions
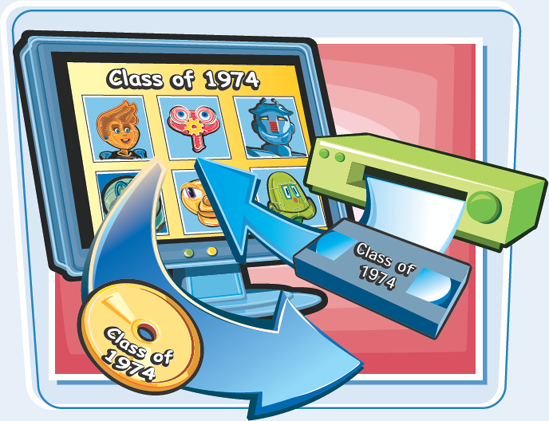
The ability to convert analog video into digital video enables you to preserve old videos that are slowly deteriorating on VHS tapes. You can capture the footage to your computer hard drive, securing your family's classic video memories for many years to come, in a format providing a much longer shelf life. You can take the converted footage and re-edit it in a video editing program and create DVDs to share with friends and family. There are many different analog-to-digital devices on the market. Keep in mind that not all converters are created equal, and you generally get what you pay for.
A video capture card can be installed in an empty PCI slot inside of the computer. Before you purchase a capture card, make sure that it actually captures analog video. Some FireWire cards are also labeled as video capture devices, but only capture digital video and will not capture from an analog source. Make sure that your particular computer supports the capture card you are considering. If the capture card you have purchased has an S-Video terminal, use it instead of the yellow RCA composite video jack for a higher-quality video conversion.

Use Your Camera for an Analog-to-Digital Conversion
Your tape-based digital video camera may provide you the added ability of creating analog line-in recordings, which enables you to convert analog video signal from a VCR into digital video. To perform the conversion, you need to make the necessary hardware connections. The analog video is recorded from the analog source, such as a VCR, onto the Mini-DV tape inside of the camera, where it can then be captured onto your computer hard drive using a video editing program.
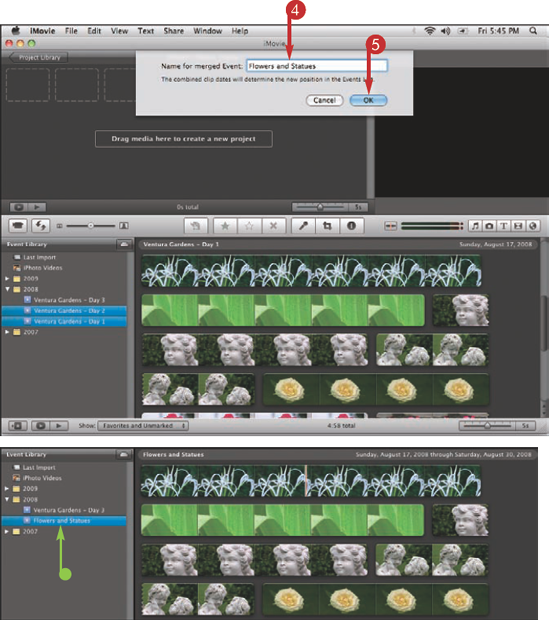
Upon import, iMovie keeps your videos in chronological order according to dates, and organizes them into categories called Events. You can choose to import the footage into an existing Event or create a new one. Be sure to give each import a descriptive name such as 21st Birthday Party, or Family Reunion 2010. If you import video taken over a period of days, iMovie breaks the video into separate Events and may list an import as Weekend Trip 1, Weekend Trip 2, and so on. You can further organize Events by merging/combining them.

Merge Events to Organize Clips in iMovie
Note
You can press and hold the Command key (

A dialog box opens prompting you to name the merged Event.
Note
You can also
Note
You can change the date of an event to change its chronological order in the Event Library. You can also delete an Event permanently.
The events are merged under the given name.
Tip
Can I split an Event?
Yes. It is not uncommon to have a group of video clips under one Event that you later want to split into more specific categories. You can simply highlight the Event in the Event Library, click the clip in the Event where you want the break to occur, then go to File in the main menu and choose Split Event Before Selected Clip.

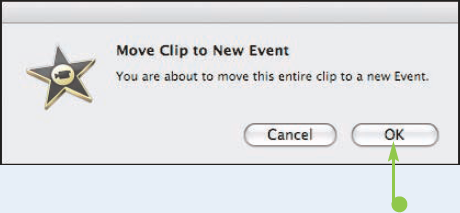
Can I move a clip from one Event to another?
Yes. You can press Option and click to select an entire clip, then simply drag it to another Event. Click OK (
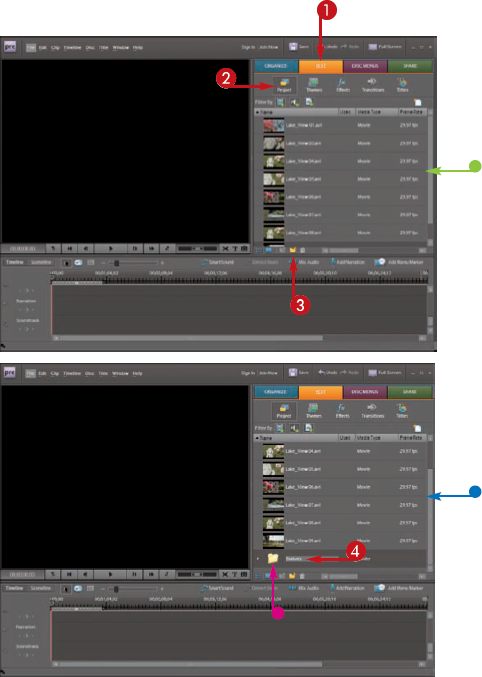
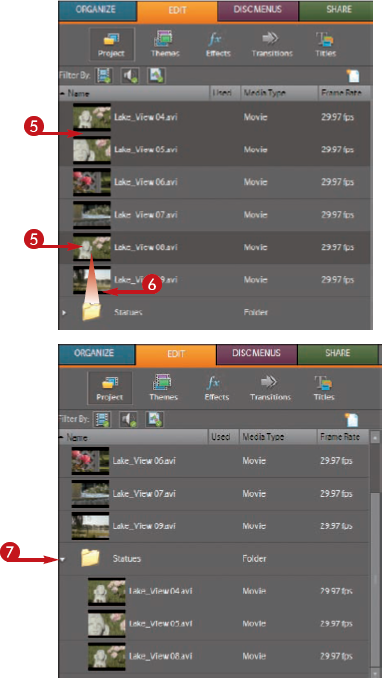
The typical video project may have dozens of video files, graphics, still photos, and audio files, so you must keep everything organized. Organizing your digital media in the Project view enables you to keep track of the many files used for a given video project and is one of the most practical means of media organization in Adobe Premiere Elements.

Organize with Folders in Project View in Adobe Premiere Elements
Project view opens, revealing the previously captured files.
Note
You can rearrange video clips alphabetically by clicking in the Name field.
Note
You can also rearrange the information fields such as Frame Rate and Media Type by dragging them to a new position. You can use the scroll bar at the bottom to move to the right and view more information regarding individual clips in the columns.
A new folder appears at the bottom of the list.
All of the clips for the project appear under the Project view.
Note
You can press the Ctrl key (
Tip
Can I filter which files I see in Project view?
Yes. In Project view, you can further organize your captured clips by filtering which types are viewable within the list. By default, all media are visible. Click the Hide Video (
Why are some of my video files in the Media Type column labeled movies, but others are labeled video?
Video clips that contain audio are listed as Movies and video clips that do not have audio are named Videos. You can use this information to create separate folders for videos that contain audio and videos that do not have audio.