There are many different options for you to share your video with friends and family. You can create high-quality DVDs for your finished movies; export to mobile devices such as the iPod and iPhone; or upload video to popular video sharing sites such as YouTube, MySpace, and many others. You can also create your own personal Web site to showcase your video works of art.
Burn a DVD 272
Create a DVD with Apple iLife 274
Put Your Video on the Internet 278
Bring Your Movie into iWeb 280
Publish Directly to YouTube in iMovie 284
Prepare a Project for DVD Burning in Adobe Premiere Elements 286
Create a DVD with Adobe Premiere Elements 290
Burn a Standard DVD or Blu-ray Disc with Adobe Premiere Elements 292
Share iMovie Projects to Your MobileMe Account 294
Send Movies to iTunes for Download to an iPod 296
Share to Mobile Devices with Adobe Premiere Elements 298
DVDs remain a very popular way to showcase and distribute your video work. DVDs provide higher quality and a longer shelf life than VHS tapes. Video editing software with built-in DVD recording capabilities has made it very easy to record DVDs, but before you begin, you should be aware of the hardware requirements. This section shows you what you need to create your own DVDs.
Get Ready to Make a DVD
You need a drive that not only plays DVDs, but can also burn DVDs installed on your computer. Most new computers have DVD burners built in. If your computer does not have a built-in DVD burner, you can either buy an internal DVD burner that replaces your CD-ROM drive or an external DVD burner that connects to your computer via FireWire or USB cable. Blu-ray Disc burners that enable you to burn Blu-ray discs are more expensive than conventional burners. Take note which format your burner supports: DVD-R or DVD+R. If possible, buy a drive that supports both formats. Double-layer drives enable you to use higher-capacity DVDs.
Purchase recordable DVDs that are compatible with your particular DVD burner. Some DVD drives may be compatible with the DVD-R (DVD-Recordable) format but not the DVD+R format. When shopping for DVDs, it is important to know the relevant acronyms. DVD-R (DVD-Recordable) discs allow you to record to them only once. DVD-RW (DVD-Rewritable) discs enable you to record something to the disc, erase it, and then record something else. Many of the new PCs and Macs come equipped with DVD burners that support both formats. Dual Layer (DL) DVDs possess almost twice the storage space as standard DVDs and are more expensive.
DVD Authoring Software
You need software on your computer to properly format and burn DVDs. Many video editing applications, ranging from beginner to professional, come equipped with DVD authoring capabilities that not only burn DVDs, but also enable you to build a high-quality DVD menu system. The more professional/expensive video editing applications offer a more complete and professional toolset for authoring high-end DVDs.
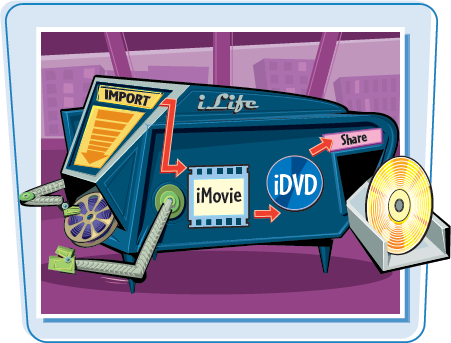
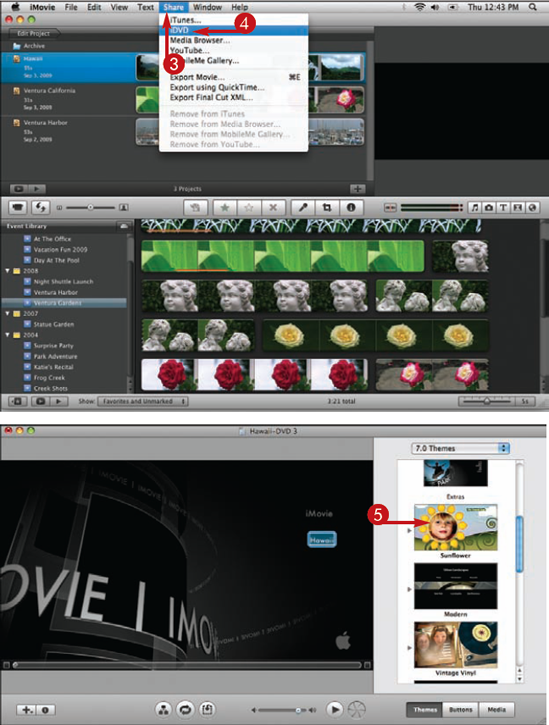
It is very easy to share your finished movie from within iMovie straight to iDVD, which is part of the iLife suite of applications. Sharing your videos to iDVD enables you to make sleek, high-end DVDs complete with menus. Within iDVD you can change menu themes, edit menus, and add more movies.
Create a DVD with Apple iLife
Note
You will need a blank DVD inserted into your computer for this task.
The movie is rendered and sent to iDVD; iDVD opens.
A button is automatically created in the DVD menu with the name of the iMovie project.
Note
Depending of the length of the movie, rendering can take a while.
The theme opens with the video included.
Note
If you are using standard 4:3 footage, a dialog box may appear, asking if you want to change the project aspect ratio from standard to widescreen. Click Keep if you will be viewing the disk in 4:3 standard format.
Tip
Can I preview the DVD before I burn the disk?
Yes. You can run a simulation of your DVD before burning it by following these steps:

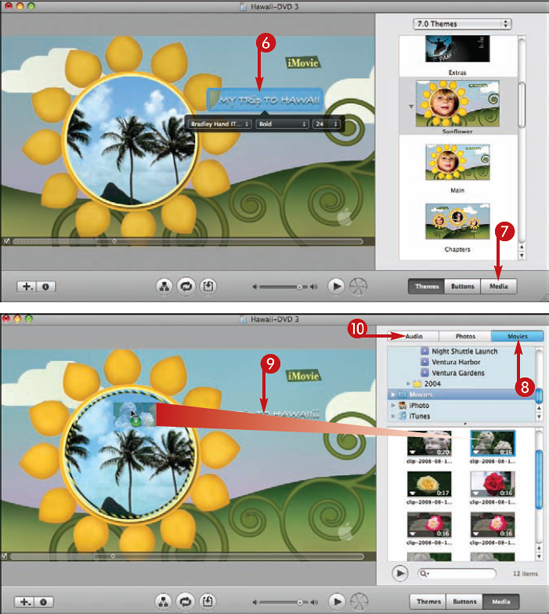
You can personalize the menu of your DVD by adding different video clips and music; and editing the text in the theme. Inserting a video clip or music file into a DVD menu is as simple as dragging it from the Media Browser and dropping it in the iDVD main viewing area.
As you begin to edit the text, the options for font type, typeface, and button size appear.
You can now browse for audio, photos, and movies on your computer hard drive.
The movies within the Movies folder appear.
The video now appears in the DVD menu.
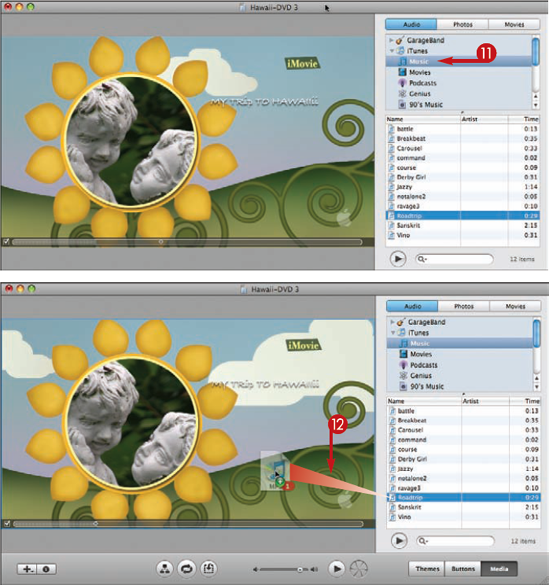
The files in your Music folder appear.
The new music plays.
The burning process begins.
Note
You can create high-quality labels for your DVDs. Some manufacturers' Web sites, such as Hewlett Packard's, offer templates for printing on CDs and DVDs.
Tip
Can I add a movie to an iDVD project already in progress?
Yes. Open the project you want to add. Click Share in the main iMovie menu and choose Media Browser. When iMovie prompts you, choose the largest movie size available. Your project is then rendered and is made accessible to all of the iLife applications. You can then open iDVD and add the movie to an iDVD project already in progress.

Placing your videos on the Internet for others to view and share may very well prove to be the second golden age of the Internet. In order for you to get involved, you need to know what services are available to you for posting your own movies online. In this section you receive information on Web hosting services, video sharing sites, and some tips on protecting your online identity.

Hosting Your Videos Online
In order for you to place your own Web page on the Internet and have others view and download your movies, you need a Web hosting service. Companies that provide Web hosting services, such as Apple's MobileMe, Godaddy.com, and HugeHost.com, provide space on a server that they lease to you for a monthly fee. Prices vary due to the amount of space you lease on the server. Many Internet Service Providers (ISPs) may offer free Web hosting services if they already provide your business or home access to the Internet. Hosting services come with e-mail accounts, security features, and a specified amount of storage space. Make sure you do your research to determine which is the best fit for you.
Upload Your Videos to Sharing Sites
Video sharing Web sites such as YouTube, MySpace, and Vimeo showcase a wide variety of user-generated video content such as short films, video blogs, and music videos 24 hours a day, 7 days a week. Users without accounts are free to watch videos but must register in order to upload content of their own. Video sites such as these have made reaching millions of people around the world accessible for the weekend video warrior as well as the seasoned professional. If your content is compelling, you could cultivate a following of loyal viewers. Some video editing applications provide a streamlined process to get your movies on popular video sharing Web sites such as YouTube.
Use Discretion When Posting Videos Online
The Internet is a powerful vehicle through which you can reach many viewers, but it can also offer an unintended eye into your personal life. Be mindful of the content that you post; you never know who is watching. Many employers often Google the names of prospective employees before meeting them. If you publish something controversial on the Internet, be prepared to live with the consequences. Avoid posting highly personal information about yourself such as addresses, phone numbers, or where you work. Consider withholding your real name and go by a user name, or just not revealing your last name.

You can create high-end Web sites with Apple's iWeb application, which is part of the iLife suite of applications. You can share your iMovie project to the Media Browser and then bring that movie into iWeb to design your very own Web site with video. The Media Browser enables you to use photos and movies to construct a Web site. In order to publish to a Web site you must have an online hosting account.
Bring Your Movie into iWeb
Note
Smaller movies reduce the download time on Web pages.
The movie is rendered and sent to the Media Browser.
Note
Depending on the length of the movie, rendering can take a while.
Note
If this is your first time opening iWeb you may be prompted to sign into your MobileMe account. MobileMe is a Web hosting service provided by Apple. You can publish sites using a hosting service other than MobileMe, but MobileMe is a great option for taking advantage of all the features of iWeb.
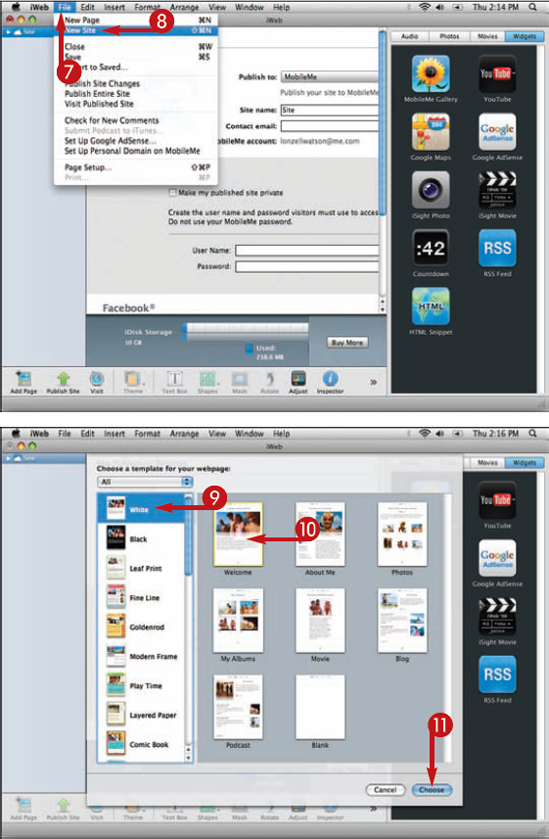
The site templates appear.
Note
You can navigate the many different iWeb themes by scrolling in the sidebar.
The new template page opens.
Tip
Can I change my theme once I have chosen one?
Yes. You can switch to a different theme simply by clicking the Theme button (

You can add photos and movies simply by dragging them from the Media Browser and dropping them into an iWeb template. By adding your Web hosting information into iMovie, you can publish to your Web site with a simple click.
The Media Browser opens.
Note
If the Media Browser is hidden, you may need to click the Show Media button (
The photo is placed in the template.
Note
You can double-click in the template text to personalize it.
The template options open.
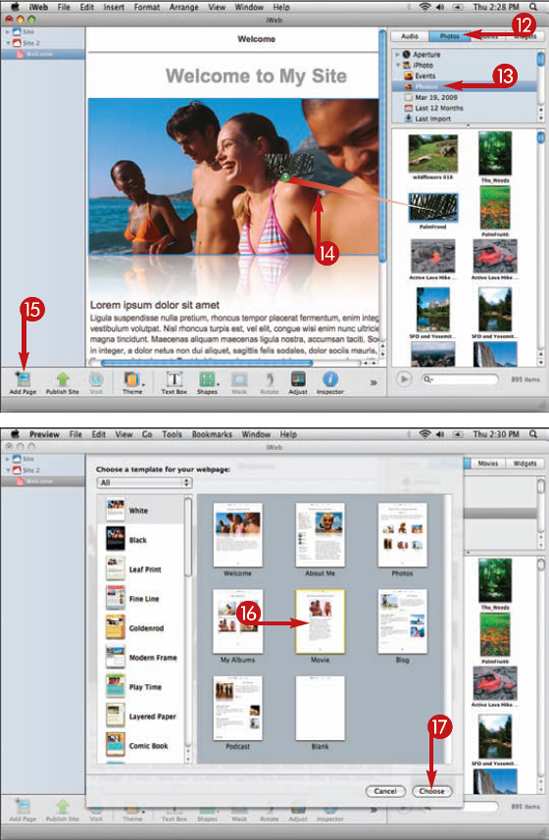
The new page template opens.
Note
The link for each new page appears at the top of the template and serves as a navigation bar for moving between pages.
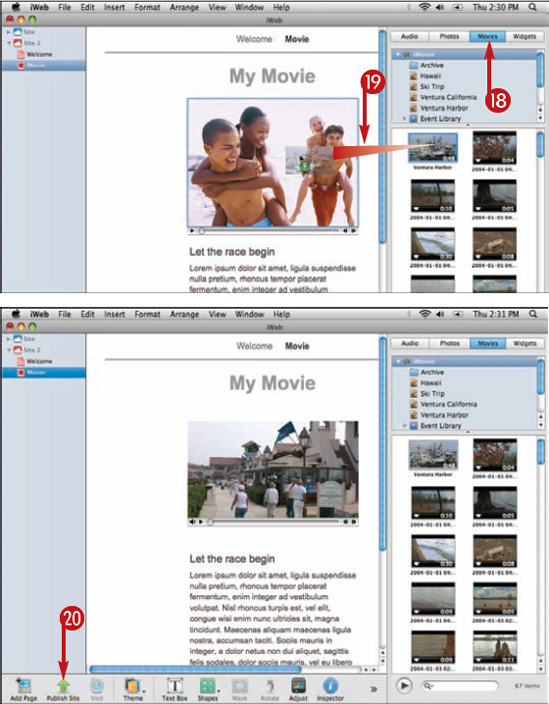
The Media Browser opens.
The movie appears in the template.
Note
If you drag a large file into the template, a dialog box may open stating that the file is large and may result in longer download times. You can click OK or export your project at a smaller size from iMovie.
Tip
How do I enter in my Web hosting information?
You can enter your Web hosting information by selecting the site in the sidebar. If you do not have a MobileMe account, you can choose your method of upload from the Publish To options. If you are using a MobileMe account, the process is a bit more streamlined.
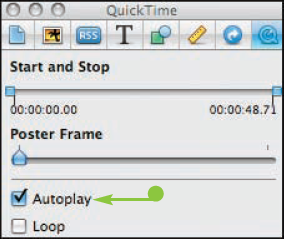
How do I set my movie to autoplay once the page is accessed?
You can set your video to autoplay by accessing the Inspector. Select the movie in the template. Click the Inspector button (
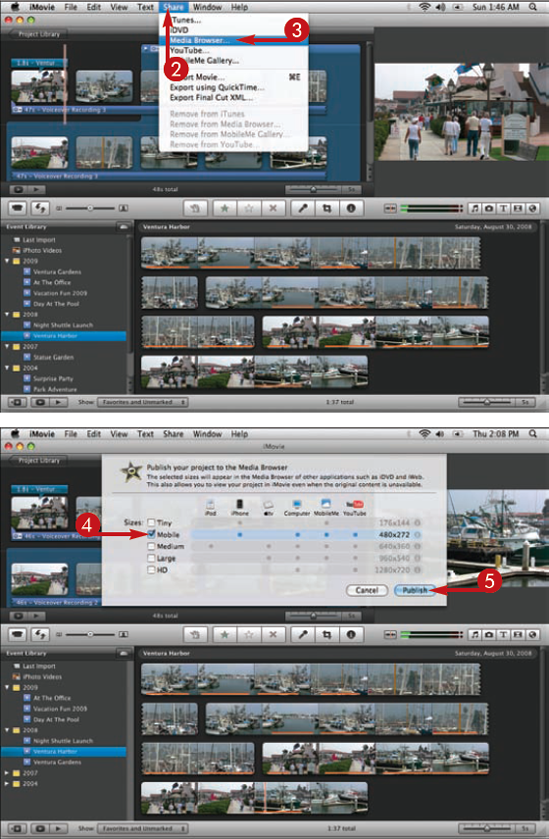
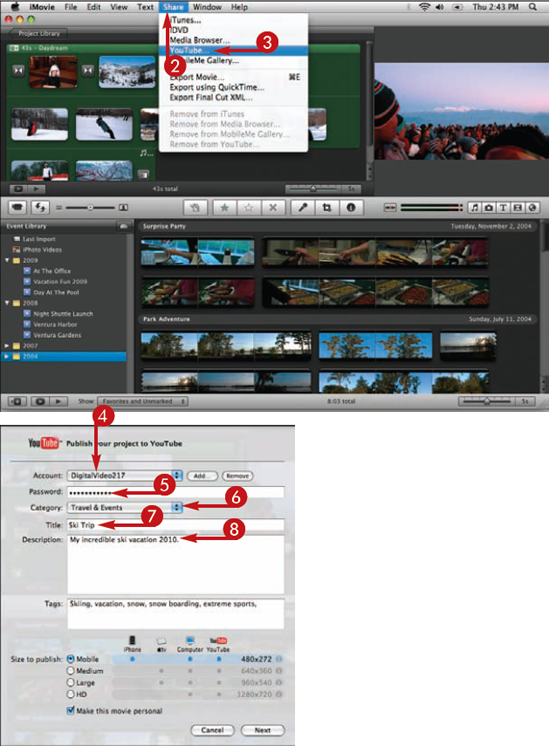
iMovie streamlines the process of publishing your videos to the popular video sharing Web site, YouTube. Before you can place your video on the site, you need to create an account. YouTube is an excellent way to get your videos seen by many people around the world.
Publish Directly to YouTube in iMovie
Note
If you do not have a YouTube account you can click Add to be guided through the process.
Note
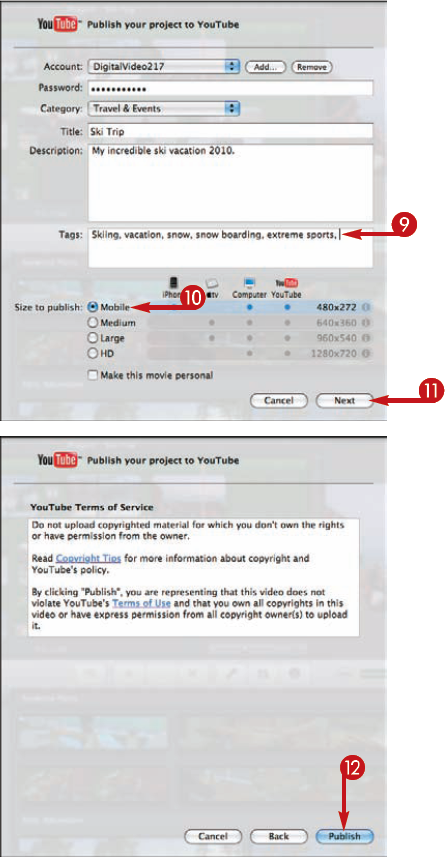
Keywords/tags help viewers find your video when conducting a search.
Note
The Mobile size is easier to watch for viewers with slow Internet connections.
Note
You can select Make this movie personal if you want your video to be viewable only by contacts you specify with your YouTube account. Deselecting this option makes your movie viewable to everyone.
Note
Read the terms of service so that you understand the types of content you are permitted to publish on YouTube.
The YouTube Terms of Service opens.
iMovie uploads the movie to YouTube. Published to YouTube appears in the title bar of the project.
Note
It could take a few minutes or hours before your video can actually be seen on YouTube.
Tip
How can I delete my movie from the YouTube Web site?
You can delete your movie from YouTube by selecting the published project within the Project Library and then clicking Share and Remove from YouTube in the main menu. Click Go to YouTube and log into your YouTube account. Click Done in iMovie to remove the published status from your project.
Will my movie be updated if I make changes to it in iMovie?
When you make new edits to a movie that has previously been posted on YouTube, iMovie alerts you that the project is out of date and needs to be published again. After you render the movie again, the old version of the project is deleted and replaced by the new project on YouTube.
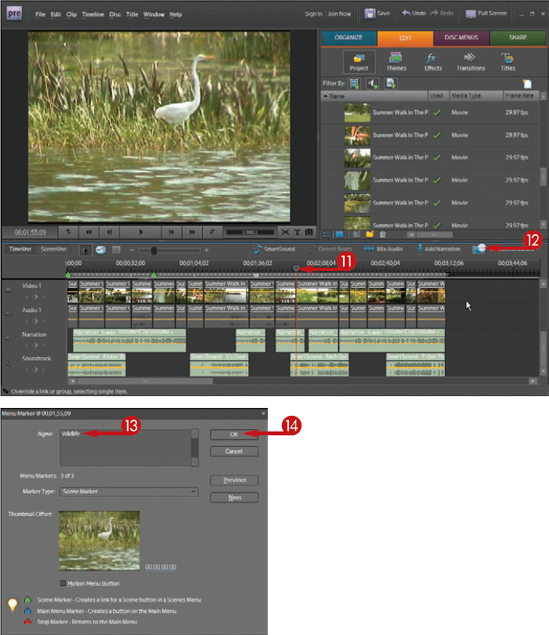
Before you burn a DVD, you can add markers in the timeline that instruct Premiere Elements on how to set up the DVD's menu system. A basic menu system for a DVD consists of a main menu and a scene menu. Scene markers enable viewers to quickly navigate to different points in the movie on the DVD.
Prepare a Project for DVD Burning in Adobe Premiere Elements
The Menu Marker dialog box opens.
Note
Adobe Premiere Elements uses the first frame of video on which the current-time indicator is parked to represent the scene button for the DVD menu.
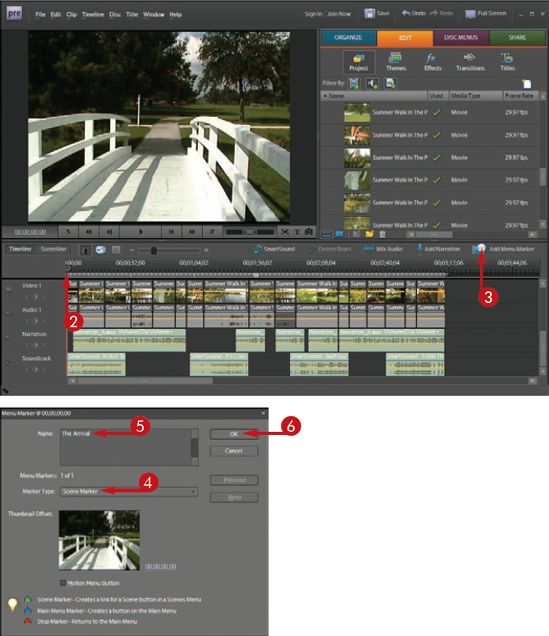
A green marker is placed in the timeline.
Note
You can use the Page Up and Page Down buttons on the keyboard to snap the current-time indicator to edit points.
Note
Think of scene markers as chapters in a book, and place scene markers at points in the movie where there is a clean break between actions.
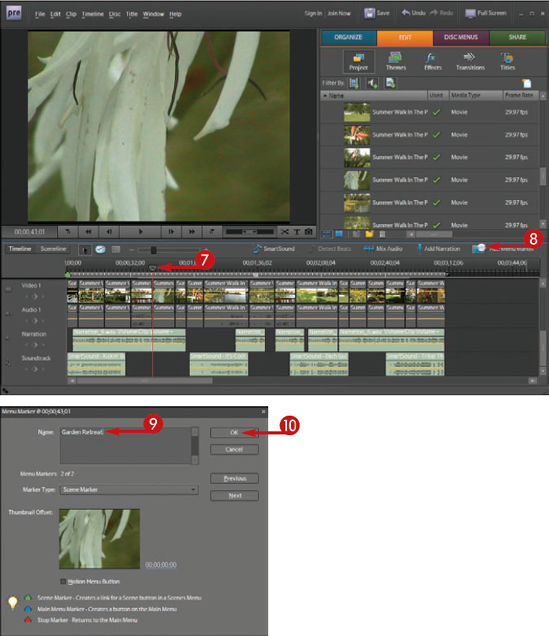
The Menu Marker dialog box opens.
A green marker is placed in the timeline.
Tip
How many scenes can I have on one scene menu?
The limit is four scenes per menu. If you create five or more scene markers, the extras are automatically placed on a second scene menu.

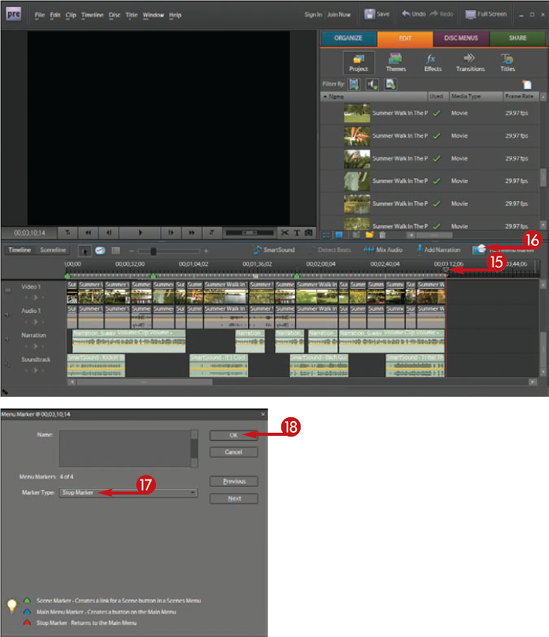
A stop marker lets Adobe Premiere know that the end of the program has been reached. Adobe Premiere then returns viewers to the main menu.
The Menu Marker dialog box opens.
A green marker is placed in the timeline.
Note
When you create the DVD, the scene selection menu will have three buttons representing scenes.
The Menu Marker dialog box opens.
Note
The Stop Marker tells Premiere Elements that this is the end of the video. Premiere Elements then returns to the main menu after playing the last frame of the video.
Note
The project is now prepared for creating automatic DVD menus.
Tip
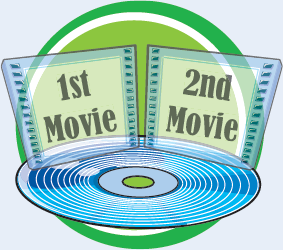
Can I place more than one movie in the timeline?
Yes. You can put some space between the first movie and the second movie, and add a second movie in the timeline. You then need to place a Main Menu Marker and a Scene Marker at the beginning of the new sequence. Later, you will need to rename the main menu, as Adobe Premiere Elements labels it as a Scene Menu after it automatically creates DVD menus for the project.
After placing the proper markers into the movie timeline, creating a main menu and a scene selection menu for your DVD is relatively simple. A well-planned DVD menu system enables viewers to navigate your DVD with ease.
Create a DVD with Adobe Premiere Elements
A library of menu templates appears.
The template options are filtered according to the specified category.
Adobe Premiere Elements analyzes the timeline and places the movie inside the Main menu and the designated movie scenes inside the Scene menu of the template.
The Main menu is loaded into the Monitor panel.
The Change Text box opens.
Note
You can adjust the size of the text box by clicking in the template and dragging the handles.
Note
When you select text in the template, the text settings appear. You can change the font type, style, size, and color.
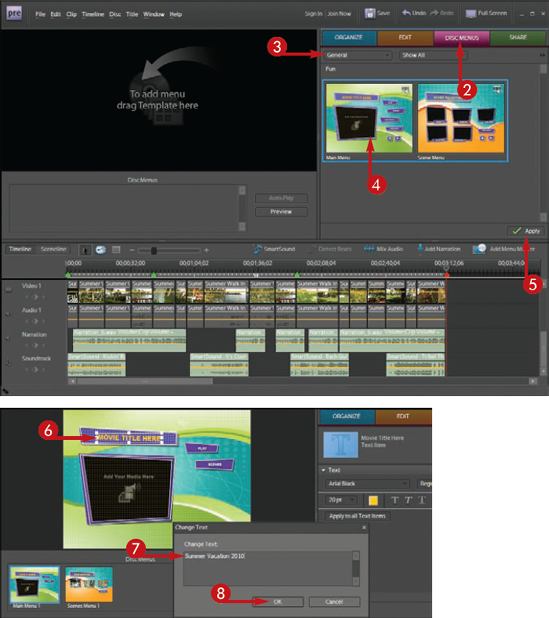
The text is updated in the template.
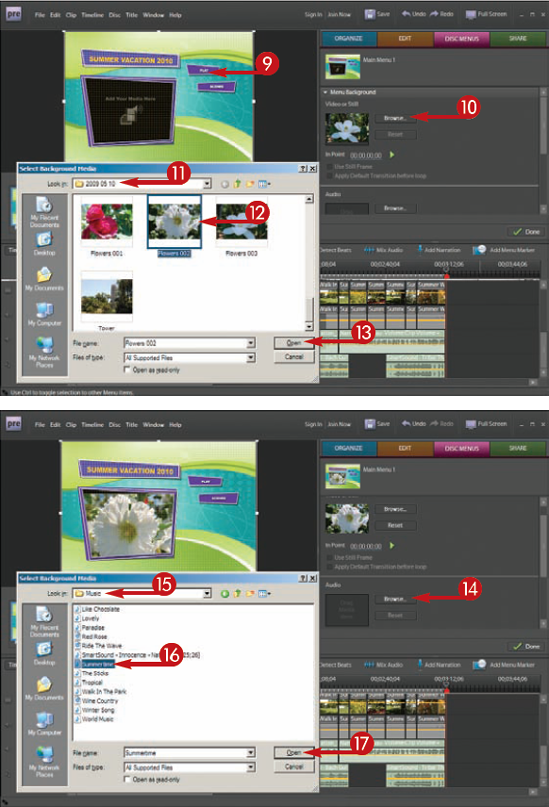
The Select Background Media window opens.
The background is replaced with the video clip or still image.
The audio file is added to the DVD template.
Note
You can click Preview at the bottom of the Monitor pane to play back the menu.
Note
You can use the same methods shown in the Main menu to construct the Scene menu.
Tip
Do I have to create a menu for my DVD?
No. You can create Auto-play discs, which contain no menus and begin playing as soon as you insert them into a DVD player. Click Share in the Tasks panel for your project that does not contain menus, and burn a disk. Auto-play discs work best when you have a single movie that you want to review from start to finish. Auto-play discs are the easiest discs to create.
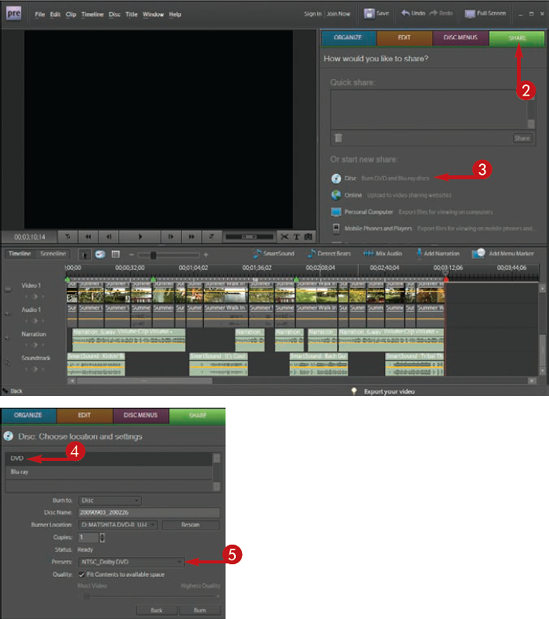
Adobe Premiere Elements enables you to burn a standard DVD or a Blu-ray disc to distribute your movie. The ability to burn a DVD of your work is not only convenient, but can also make a great gift for friends and family members to document momentous occasions.
Note
A recordable DVD should be inserted into the DVD burner before following these steps.
Burn a Standard DVD or Blu-ray Disc with Adobe Premiere Elements
The Share options open.
The option for burning a DVD opens.
Note
You can choose to create a DVD or a Blu-ray Disc.
Note
You will need a Blu-ray burner and a recordable Blu-ray disc to burn a Blu-ray DVD. You also need a Blu-Rry player to play back the disc.
Note
If your movie exceeds the capacity of the DVD, leave this option checked.
Note
Premiere gives you the space required to create a DVD at the highest quality underneath the slider.
The project is burned to the DVD.

Tip
What if I have a large project that exceeds the storage capacity of the DVD I am using?
If you have a massive project, you can check Fit Contents to available space in the Quality field of the DVD settings. Adobe Premiere Elements makes the content fit on the DVD. This option is checked by default and does not alter projects that fit on a disk when left checked. You can also use a dual layer disk that has a higher storage capacity.

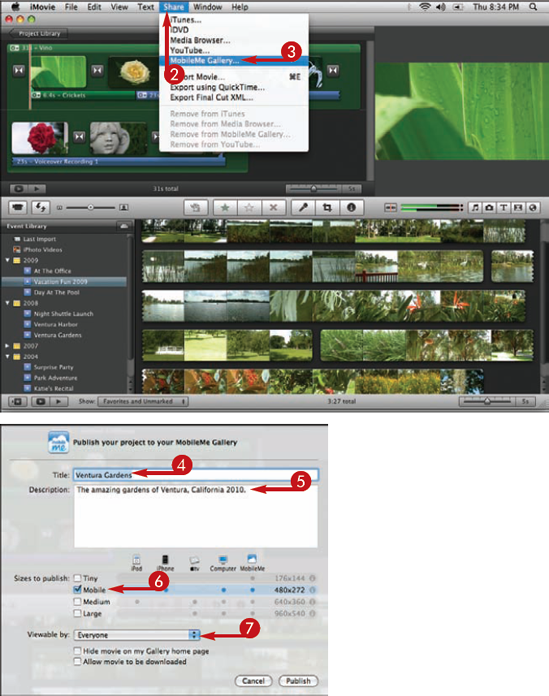
iMovie enables you to publish your videos directly to your MobileMe gallery. MobileMe galleries enable friends and family to actively participate in the sharing of your video by viewing and downloading your videos. If you do not have a MobileMe account, you can set one up during the sharing process.
Share iMovie Projects to Your MobileMe Account
Note
You can also select the project in the Project Library.
Note
If you do not have a MobileMe account, a dialog box asks if you want more information.
Note
You can also choose Only me, where users are required to enter your user name and password to view the video. You can also choose Edit Names and Passwords which allows you to create user names and passwords for friends and family so they can view your videos.
Note
This option allows those with access to your video to download it to their hard drive.
The movie is uploaded to your MobileMe Gallery and Published to MobileMe appears in the taskbar.
Note
You can choose to Alert your friends that you have uploaded a video.

Tip
Will my movie be updated if I make changes to it in iMovie?
When you make new edits to a movie that has previously been shared to your MobileMe account, iMovie alerts you that the project is out of date and needs to be rendered again. After you publish the movie again by clicking Share and Republish to MobileMe Gallery, the old version of the project is deleted and replaced with the new project.

How do I delete my video from the MobileMe Gallery?
You can delete your video from the MobileMe Gallery by choosing Share in the main iMovie menu and selecting Remove from MobileMe Gallery. The video is then deleted from the MobileMe Gallery.
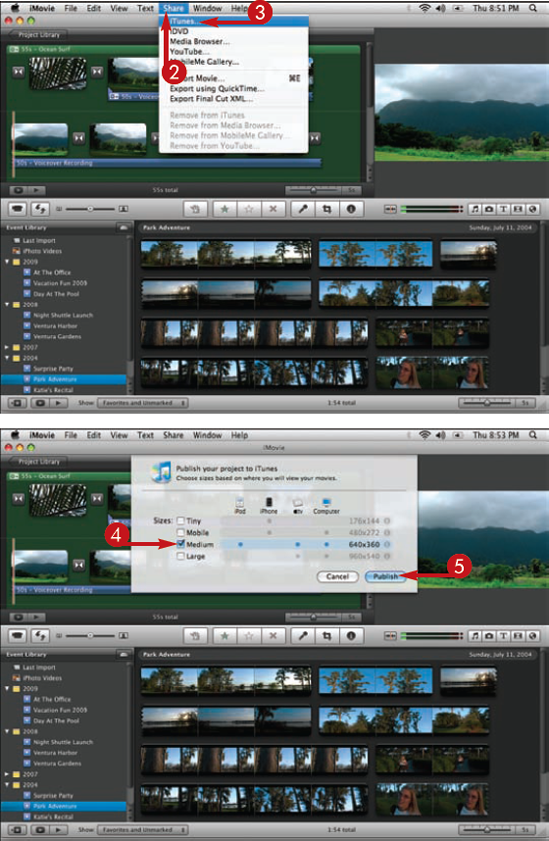
Before you can place your movie project onto your iPod or iPhone, you first need to send it to iTunes. When you share to iTunes, you can create one or several movies of various sizes. iMovie then optimizes the video for playback on targeted mobile devices. After sharing is complete, you can connect your iPod or iPhone to your computer and proceed to download the movies. Downloading your movies to an iPod is a great way to take your movies on the road and showcase them to others.
Send Movies to iTunes for Download to an iPod
Note
You can also select the project in the Project browser.
Note
You can select multiple sizes to accommodate more than one device.
Note
If the Large option is not available, the original project video is simply not large enough to accommodate that size.
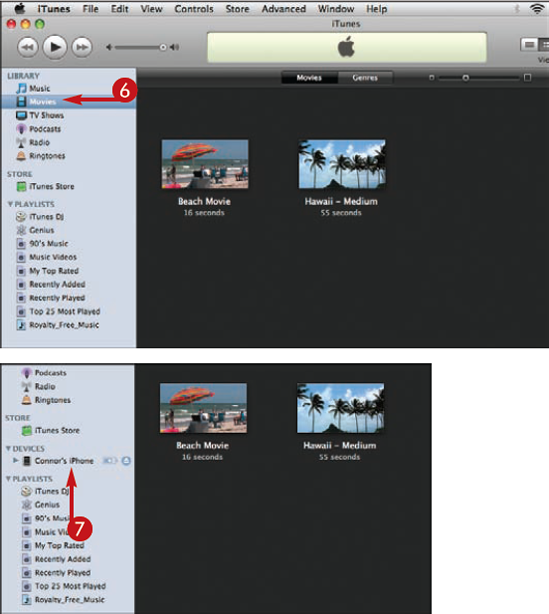
iTunes launches after sharing is complete.
Note
Now you can connect your iPod to the computer and download the movie.
Tip
Will my movie be updated if I make changes to it in iMovie?
When you make new edits to a movie that has previously been shared to iTunes, the title bar in the Project Library alerts you that the project is out of date and needs to be rendered again. After you render the movie again, the old version of the project is deleted and replaced with the new project in iTunes.

Are there other ways to view my movies on my iPod touch or iPhone?
Yes. If you have a MobileMe account or a YouTube account, you can publish your movies to those sites and stream them over the Internet for viewing on an iPod touch or iPhone.
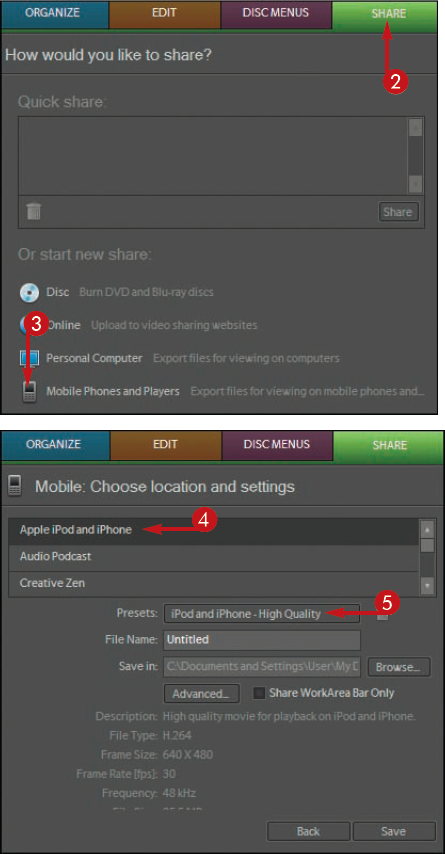
You can optimize your projects in Adobe Premiere Elements for devices such as an iPod, iPhone, mobile phones, and more. Sharing to portable devices is another convenient way to take your movies on the road and share them with others.
Share to Mobile Devices with Adobe Premiere Elements
The Share options open.
Note
You can optimize video for YouTube or upload to your own Web site via FTP by choosing the Online option.
Apple iPod and iPhone was chosen in this example.
Adobe Premiere renders the project that can then be copied to the mobile device.
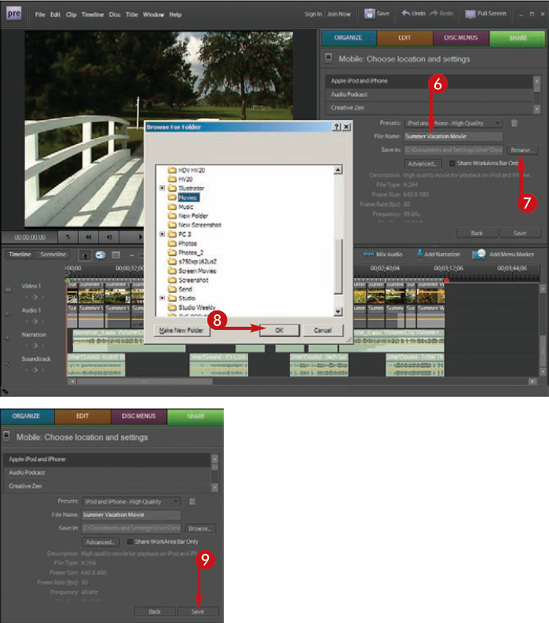
Tip
How do I access the export settings?
You can access the export settings by clicking Advanced in the Mobile settings. The Export Settings dialog box contains advanced settings for the current export such as video codecs, TV standard, frame rate, and pixel aspect ratio. Use the export settings to further customize your export to a mobile device.