You have captured some amazing images with your digital video camera; now it is time to create a high-quality video presentation that helps you uniquely capture those special moments. There are many options for video editing applications, which span across both PC and Mac platforms. This chapter focuses on Apple iMovie '09 for Mac users and Adobe Premiere Elements 7 for PC users, both of which are very capable video editing applications that enable you to burn your movies as a finished DVD. This chapter introduces you to the basics of video editing, along with making audio adjustments for your programs and creating your own voiceovers and soundtracks for your videos.
Explore Video Editing 198
Explore Video Editing Principles 200
Why Use a Video Editing Program? 202
Explore the iMovie Workspace 204
Edit Video in iMovie and Add Transitions 206
Fine-Tune Edits in iMovie 208
Add Music to Your iMovie Project 210
Pin Background Music in iMovie 211
Using Sound Effects in iMovie 212
Record a Voiceover in iMovie 214
Manage Multi-Track Audio Levels in iMovie 216
Use Still Images in iMovie 218
Set Up a Loops Project in Apple GarageBand 220
Create a Soundtrack with Apple GarageBand 222
Explore the Adobe Premiere Elements Workspace 226
Edit Video in Adobe Premiere Elements 228
Trim Video in the Timeline in Adobe Premiere Elements 230
Record a Voiceover in Adobe Premiere Elements 232
Mix Audio in Adobe Premiere Elements 234
Use Still Images in Adobe Premiere Elements 236
Create a Soundtrack with SmartSound in Adobe Premiere Elements 238
Video editing programs enable you to place your recorded video in sequence, add titles, and add music to create a movie. You are able to enhance your video images by color-correcting, adding effects, and using transitions. Video editing applications also enable you to organize your video clips on your hard drive, and some even allow you to distribute your movie by burning DVDs or uploading to video-sharing Web sites and galleries.

Video Editing
Video editing is the process of editing segments of your video, along with music and sound effects, into a carefully crafted presentation. Every edit, whether it is to music, narration, or an emotion, sets a rhythm. Making an edit is simple, but unfortunately, it takes practice to advance your message or story, purposefully framing the action contained within each cut, and hold your audience's attention. Essentially, editing is the act of framing the appropriate action at the appropriate moment in time for the appropriate amount of time.
Fundamental Video Editing Terms
A cut is the instantaneous change from one shot to another and is the most basic of video edits. If you do not use a transition effect between two clips, chances are you cut to the next shot. A cross dissolve, or simply dissolve, occurs when there is a simultaneous fade down of the previous clip and fade up of the preceding audio or video clip in the sequence. A fade can be used to slow the pace or for a soft transition into another scene. A cutaway is a shot of something other than the principal action in the scene. A good example of a cutaway would be a clip of the Rocky Mountains playing while a park ranger is being interviewed about the state park system.

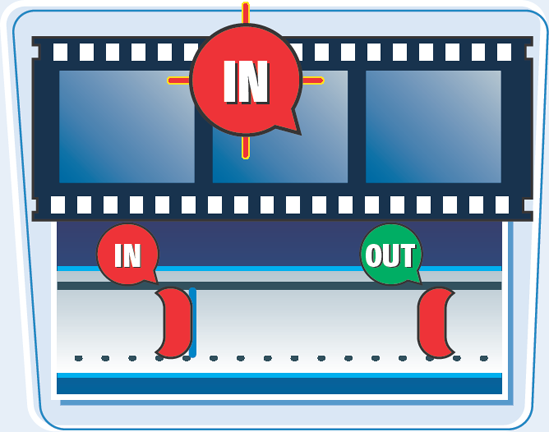
Three Point Editing
Three point editing is a methodology used by professional video editors and is supported by more-advanced video editing applications than iMovie and Premiere Elements. Three point editing uses three edit points to insert a video clip into the video editing timeline. The first two edit points define either the in and out points for the action in the clip or the in an out point in the timeline into which the clip will be edited. The third point can designate the in or out point for the action in the clip or the in or out point in the timeline if the other two points are located in the clip. If you require a more-advanced editing toolkit, consider upgrading to Apple Final Cut Express or Adobe Premiere Pro.
Editing your video into a presentation can prove a very exciting, yet taxing venture. If your approach is unorganized, it can prove to be a most frustrating experience. If you do not have a plan for how the presentation should look after your work is finished, editing your video can be a very time-consuming debacle. The following principals can help ensure the success of your video editing sessions.
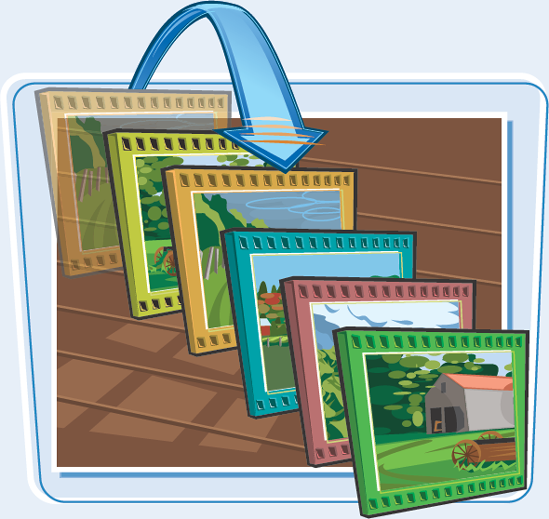
Organize the Footage As you acquire more and more video footage on your computer hard drive, solid organization of all your footage becomes an absolute necessity. Before you begin editing your movie, throw away any footage that you know you are not going to use, such as footage where you forgot to turn off the camera and were holding it to your side. You can save a lot of time by creating folders in which to place specific footage so that you do not have to go rummaging around for it while you are editing. That way, all of your interviews will be in one folder, and beauty shots, jet skiing footage, and so on will be in their respective folders. 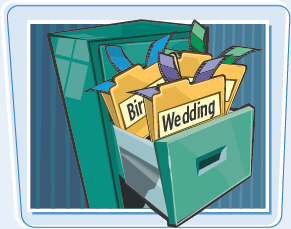 | Visualize the Edit Have an idea of how your video presentation will progress as you are shooting the video. A great way to visualize what happens in your movie is to use 3 × 5 note cards. Write the timeline for what scenes will appear from first to last. This way, you can shuffle around cards and insert scenes as the program builds. You can also create a folder system that reflects the timeline of the show and populate it with the appropriate videos as you lay out the movie.  |
Keep Notes and Log Recording Media
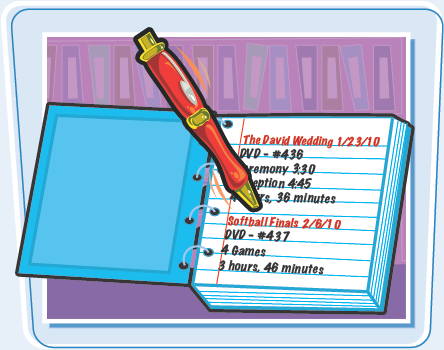
Another way to help you visualize the edit, and also to make sure you use all the best footage, is to keep a notepad handy. You can write down a list of shots that are essential to the show, as well as write an outline for how the action will occur. During a shoot where you have recorded a lot of footage, labeling your tapes, DVDs, or memory cards is also a good habit to get into. That way, if you are looking for the tape on which Dad fell out of the raft in class 3 rapids, you can easily identify the tape.
Make a Rough Cut
As your video presentation takes shape, consider laying down loosely edited clips rather than trying to lay down perfectly edited clips. Laying down a rough cut not only helps you to edit faster, but also helps you lay out the actual presentation. A common problem for many video editors is that they start their projects strong and finish weak. They lay in the best shots first, and by the end of the project, they have little left that is interesting. Try to spread your best footage evenly throughout the show to keep it interesting from beginning to end.
Fine-Tune the Edit
After you have laid down the rough cut you can go back and make sure the time is right by fine-tuning the edit. Many video editing programs possess tools that enable you to cut video frame-by-frame to ensure that the action is on cue. When you reach this stage, you are putting the finishing polish on your video presentation, and your work is just about ready to be viewed by friends and family.
Video editing programs provide you so many more options than simply connecting your camera to a TV set and watching the footage. Video editing programs provide the means to transfer video from a camera to a computer hard drive, but also enable you to organize your video footage, create sleek video presentations, and provide many avenues to distribute your videos to friends and family.
Video Editing Programs Many capable video editors are on the market that span both the PC and Mac platforms, and that offer a wide range of features as well as price points. Shop around and find which works best for you by using forums and downloading free test trials. Two comparable video editing applications that perform the same task can go about performing them quite differently. Give them a test drive before you buy, and as you are shopping always keep in mind that the software is just the tool. You are the artist. If you have an AVCHD camera, make sure that you purchase a video editor that can work with AVCHD video files.  | Enhance Your Video with Video Editing Programs Many video editing applications offer a host of color correction features and effects that can improve aesthetic mistakes that occurred during the acquisition of the footage, or just to enhance dull images. By taking advantage of the tools that video editing applications have to offer, you can take your creativity to a whole other level.  |
Organize Videos with Video Editing Programs
Video editing applications not only offer you a way to transfer video from your camera to a computer, freeing up space on record media such as memory cards, hard disk drives, and flash memory, but they also help to organize your video. Upon transfer from your video camera, video editing applications begin to organize your video in a logical manner on your hard drive, providing you easy access and improved searchability.
Deliver Your Video to Friends and Family
Many video editing applications provide export options for Web galleries, video blogs, and mobile devices, as well as DVD creation. You can conveniently build DVDs with professional menus complete with music that can be saved for later distribution. Not every video editing application is bundled with DVD software, so if DVD creation is your intention, make sure the one you purchase has the ability.
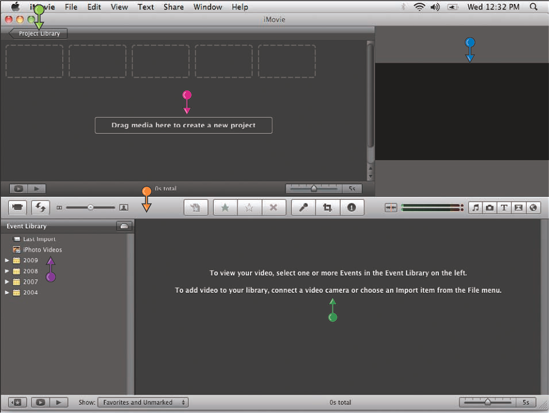
This section introduces you to the main parts of the iMovie workspace: the Project Library, Project window, viewer, iMovie toolbar, Event Library, and Event browser. Knowing your way around iMovie helps you to work quickly and more efficiently.
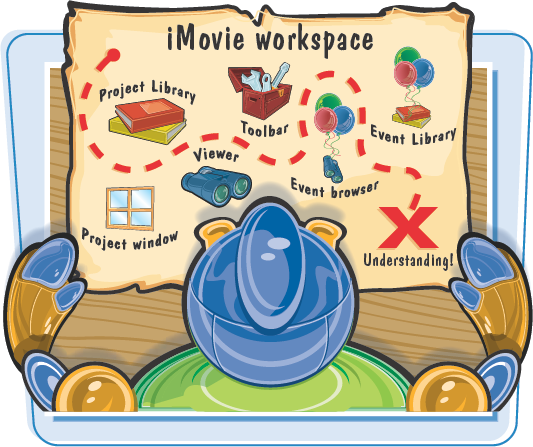
Project Library
The Project Library pane lists all of your movie projects so you can easily move from one project to the next. To better manage space, the Project Library is not revealed until you click the tab. Each project is depicted with a video frame from it, making the project easier to identify. You can also create a new project, identify projects you have exported, and select a project for playback in the Project Library.
Project Window
The Project window is where you assemble all of your video footage for a video project. The current project is portrayed as a series of filmstrips, frames from clips of the video you are editing, in the Project window. Controls in the Project window include playback options as well as the ability to zoom into filmstrips.
Viewer
The current frame of the current video clip is shown in the viewer. You can play the clip in the viewer by pressing the space bar on the keyboard or scrub through the video frames by moving the mouse pointer over a video clip. Depending on what action you are performing, the viewer can display controls as overlays for times when you may want to crop clips or apply pan and zoom effects to still images.
Toolbar
You can find most of the controls for manipulating content and for displaying hidden parts of the iMovie interface including the Music and Sound Effects browser, Titles browser, and Transitions browser. The toolbar contains three groups of buttons that enable you to perform functions such as importing video and manipulating selected clips.
The Event Library enables you to browse all of the imported clips that will be used in your movies. Click the Show or Hide button (
Event Browser
The Event browser displays the video clips housed in the selected Event as filmstrips. To edit video in iMovie, click and drag a selection around the video in the Event browser and drag that selection to the Project window to place it into the movie. You can position your mouse pointer (
After you have finished transferring video files and closed out of the import window, your imported video files appear in the Event browser. You can either position your cursor over the video in the Events browser to skim over footage, or press the space bar on the keyboard to play the video. From this point, editing your video is very simple.
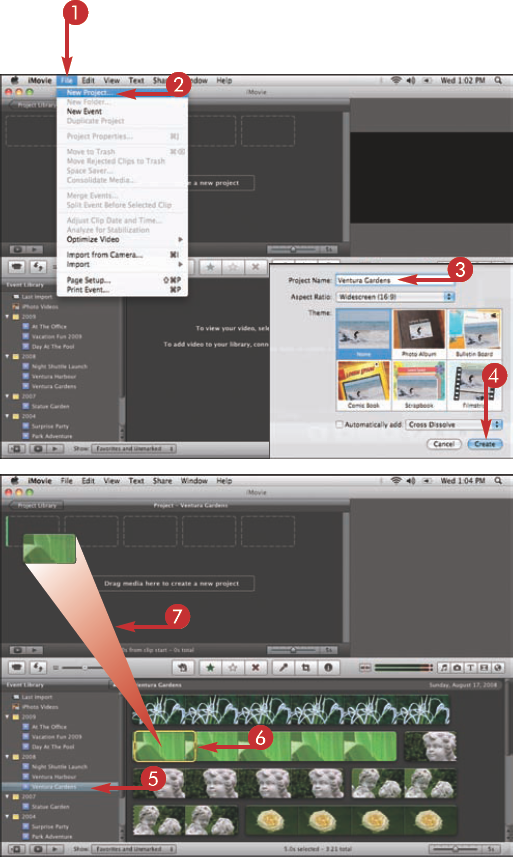
Edit Video In iMovie and Add Transitions
A dialog box opens.
Note
iMovie prompts you to choose a theme. Use the default None for this example.
Note
The Apple-designed themes enable you to make backdrops, titles, and transitions look like variations of a photo album, bulletin board, comic book, scrapbook, or filmstrip.
The new project is made.
The video contained in that Event appears in the Event browser.
A yellow overlay appears around the video that you select.
Note
You can also just click the video, and iMovie selects 4 seconds of the video.
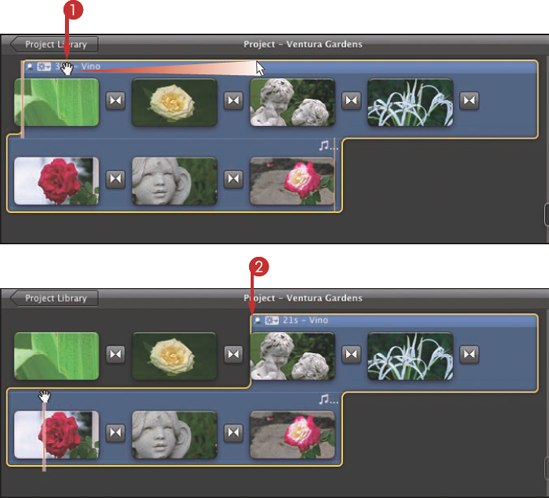
The video appears in the project, and an orange line appears under the video you have just used in the Event browser.
The video appears in the project and an orange line appears under the video you have just used in the Event browser.
Note
A green overlay appears as you hold the second clip over the Project window, letting you know where it will be placed if you release it.
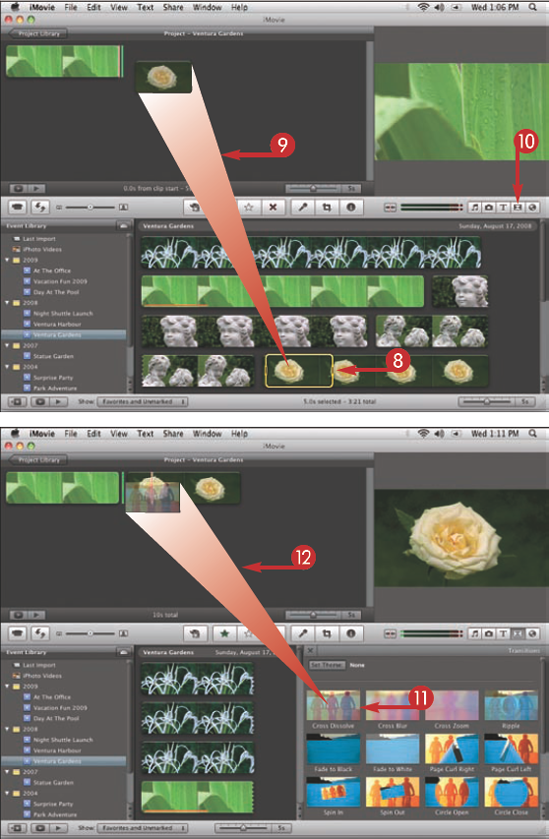
The Transition browser opens.
Cross Dissolve was chosen in this example.
The transition appears between the two edited clips.
You can now play back your two edits.
Note
You can place your
Note
When you have completed building your full iMovie project, you can add chapter markers within your video in preparation for burning a DVD. Chapter markers let viewers navigate quickly between points in the movie when viewing your project as a DVD.
Tip
What happens if I drop a video clip onto another one in the Project window?
After you select your video in the Event browser and then drag and drop it over another video in the Project window, iMovie provides you more editing options. An overlay appears, enabling you to choose from options including Replace the current clip with the new clip, Insert the clip into the current clip, and add Audio Only of the new clip to the movie. You also have the option to Cancel the operation.
Can I trim the video after it is placed into the timeline?
Yes. You can drag a selection around the video that you want to keep in the Project window. Go to the top menu and choose Edit, and then Trim to Selection. Only the highlighted parts of the video remain and the extra frames are removed. You can also
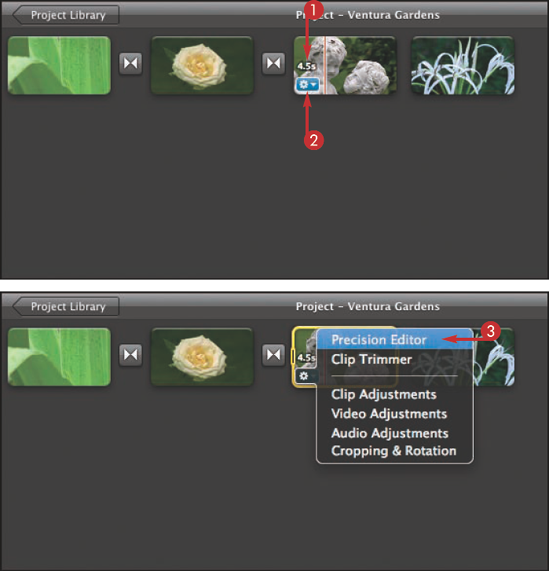
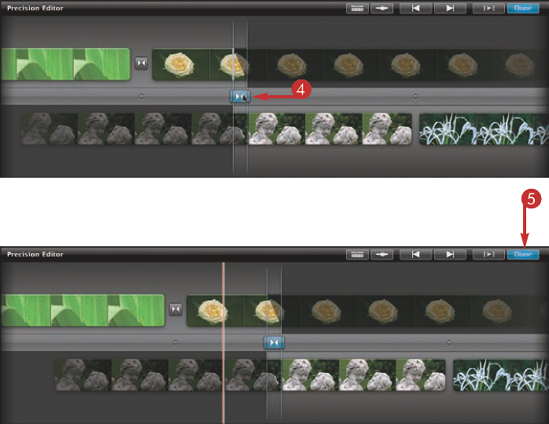
The Precision Editor in iMovie enables you to make exact edits in your video to ensure that the first clip ends and the second clip begins right when you want it. The Precision Editor pane replaces the Event pane at the bottom of the iMovie interface, enabling you to zoom into a cut between two clips and providing you frame-by-frame control over edits in your project.
Fine-Tune Edits in iMovie
An overlay appears in the bottom-left corner of the clip in the shape of a gear.
The Precision Editor opens below in the Event pane, displaying the transition between the clip you clicked and the previous clip.
Note
The top video displays frames from the first clip, and the bottom video displays frames from the second clip. The blue bar in the middle represents the transition effect. The highlighted frames represent video featured in the movie. The shaded frames represent footage that was recorded but does not appear in the movie.
Note
You can click and drag the left or right edges of the transition bar to adjust the start or end point of either clip.
Note
You can use the Show Next Edit (
The Precision Editor closes.
Tip
Does iMovie change the duration of my movie when I use the Precision Editor on a straight cut?
When you reposition the transition bar between two clips, frames are cut on one side of the transition while the clip is extended on the other side of the transition. The duration of your iMovie project does not change when using the Precision Editor. If you move the clips themselves while in the Precision Editor, you can affect the duration.

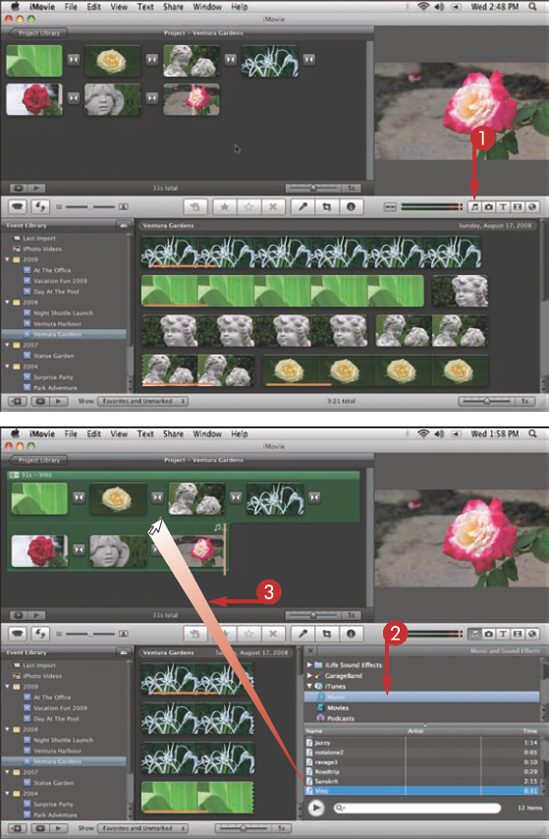
You can import music from your computer hard drive into iMovie to spice up your video project. Keep in mind that the music you have downloaded from iTunes as well as purchased on CDs is copyrighted material and you could get in plenty of trouble if you use them in your video projects. There are many online vendors selling royalty-free music that you can use in your projects. If you want to learn more about copyright laws visit www.copyright.gov to learn more about copyright laws.
Add Music to Your iMovie Project
The Music and Sound Effects browser opens inside of the Events browser.
The music files are listed in the browser.
A green overlay appears in the Project window signifying that the audio has been added to the project. When you play the movie, the audio begins at the very beginning of the movie.
Note
You can drag an audio file straight to a clip to have it play under a single clip only.
Note
You can select the green overlay and press
If you want the background music to start at a point other than the beginning of the movie, you can perform what is called pinning to have it start where you need it.
Pin Background Music in iMovie
The green overlay turns purple.
iMovie comes equipped with its own sound effects library. Under the Music and Sound Effects browser you can access sounds such as ambient noise, animal sounds, door knocks, and much more. Adding sound effects to your project is a great way to add an extra punch to your videos.

Using Sound Effects in iMovie
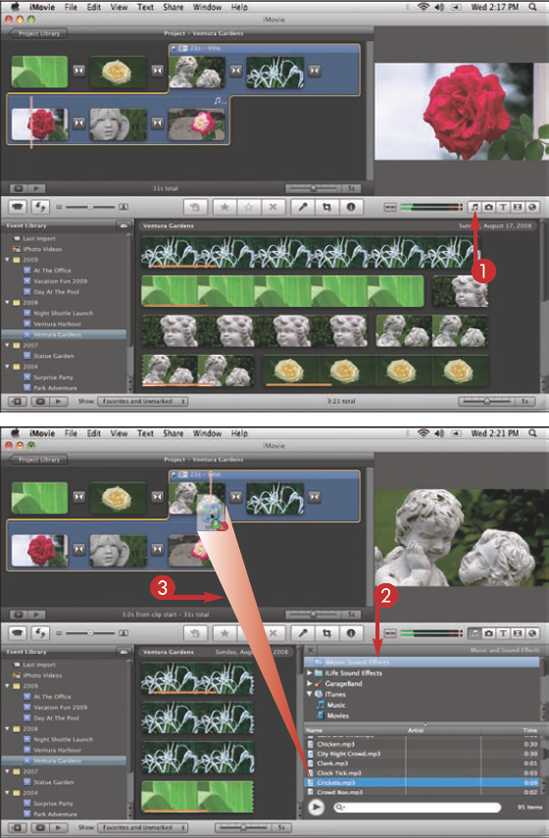
The Music and Sound Effects browser opens inside of the Events browser.
The music files are listed in the browser.
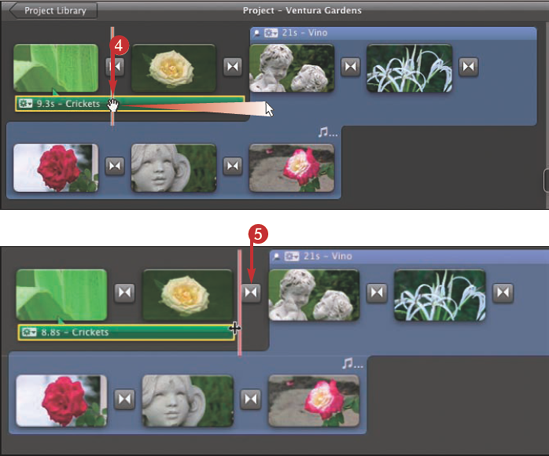
The sound effect is represented in the movie as a green bar.
Note
If you drop a sound effect into the gray area in the Project window and not on top of a clip, a green overlay encompasses the clips, instead of a green bar appearing beneath them, as seen in this example.
Note
Place the
Note
If the sound effect you are using is very short, such as a door closing, you may not be able to adjust its duration in the movie.
Tip
Can I lower the audio level for the sound effect?
Yes. You can lower the audio level of the effect by simply double-clicking the green sound effect icon that appears in the Project window. The Inspector opens, giving you the ability to change specific settings for the effect. Choose the audio option in the Inspector controls to gain access to audio level controls.

What if I cannot hear the sound effect over the background music?
You can lower the level of the background music by double-clicking the background music overlay in the Project window and accessing the Inspector controls. You can also choose an option in the Inspector called ducking that actually lowers the audio level of the background music when the sound effect plays.

Recording your own narration or voiceover in iMovie is a great way to enhance your video projects. Narrations are a great tool for helping your viewing audience follow a story. Before you can record audio, you need to have a microphone and make the necessary hardware connections.

Record a Voiceover in iMovie
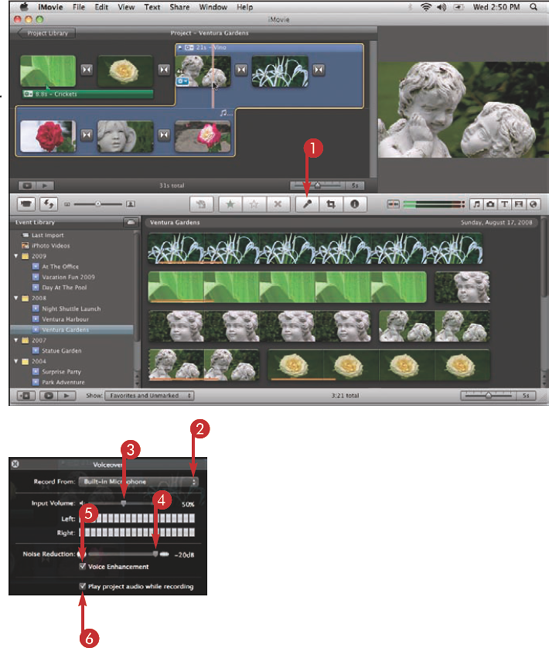
The Voiceover window opens.
Note
If your computer has a built-in microphone you can choose Built-in Microphone.
Note
If you speak softly, make sure that you increase the volume appropriately.
Note
Experiment with this feature before using it for a real project.
Note
The Play project audio while recording option lets you hear the movie's audio while recording. You can check this option if you need to take cues from the movie audio. You want to wear headphones if you use this option; otherwise you will be recording movie audio too.
iMovie begins to count down from three to one, and your audio recording begins.
Note
Speak clearly into the microphone.
The recorded voiceover is shown as a purple bar in the Project window.

Tip
Can I record multiple voiceovers for a project?
Yes. You can record more than one voiceover for an iMovie project. You can simply click another video frame within the Project window where you want the new voiceover to begin, record the voiceover, and click anywhere within the project to stop recording after you have finished. You can also move the voiceover to a different location and delete it just like a sound effect.

When working with multiple audio tracks within a project, such as voiceovers, background music, and sound effects, you often need to adjust the audio levels so that the mix sounds right. iMovie makes it easy for you to manage multi-track audio settings to find the perfect mix for your project.
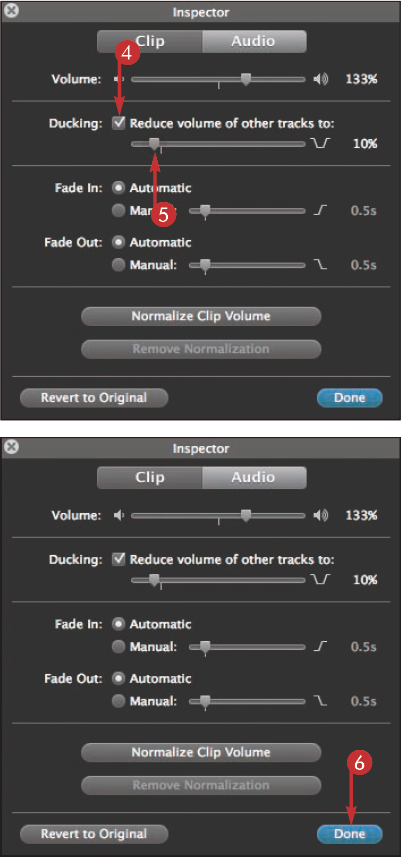
Manage Multi-Track Audio Levels in iMovie
The Inspector opens.
Note
You can choose any audio track including voiceovers, sound effects, and background music.
The audio controls open
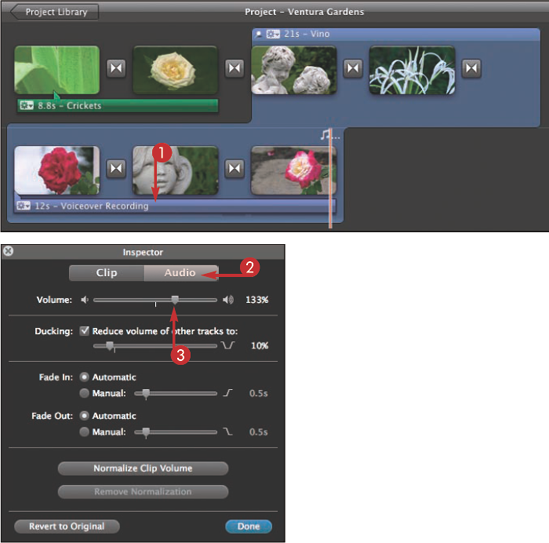
Note
This option tells iMovie to fade the audio for all other tracks while this track is playing. You can use this option to ensure that a given track is heard over all others at any given point.
Note
You may need to test the new level a few times until you have found the proper volume.
The Inspector closes.
Tip
Why are the Ducking controls grayed out when I select the background music in my project?
The Ducking controls are available only for sound effects and voiceovers, and not background music because you cannot duck other tracks against the background music. You can lower the overall audio level for the background music by dragging the main volume slider.

Can I make an audio track play softly in the beginning and slowly grow louder?
You cannot create a custom volume curve on a track in iMovie, but you can in GarageBand. What you can do is use the ducking feature in iMovie, which enables you to lower all other tracks so that your target track takes precedence.

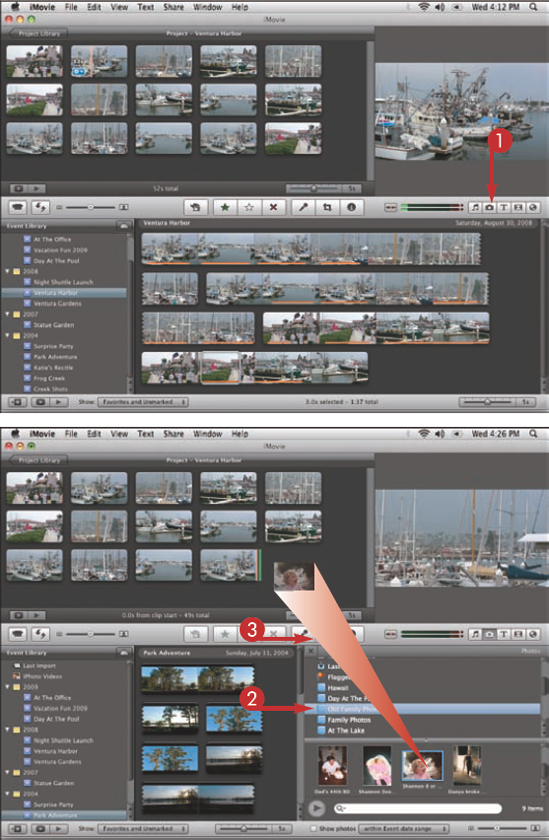
Still photos are a great way to supplement your video projects in iMovie. Each photo contained in your iPhoto library can be easily imported into iMovie and edited into the storyboard.
Use Still Images in iMovie
The Photos browser opens.
The photos contained in that album appear.
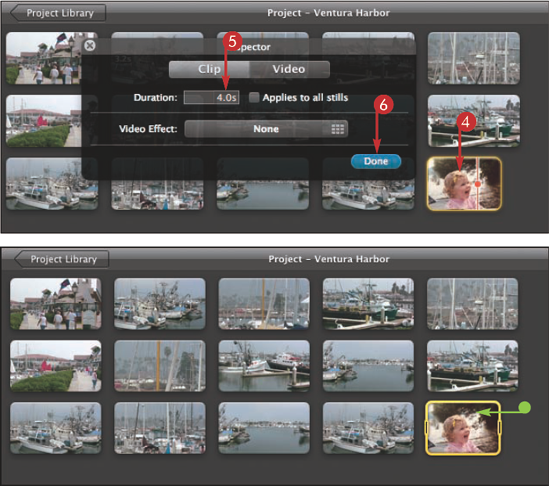
The photo is edited into the movie and is automatically animated.
The Inspector opens.
Note
You can click the Applies to all stills option to set the new default duration for all still photos.
The Inspector closes.
• The photo is inserted into the sequence with the specified duration.
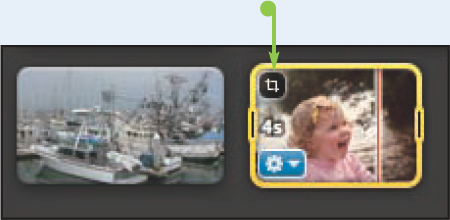
Tip
Can I crop photos after I have imported them?
Yes. You can crop your photos as well as add motion effects, and enhance photo images after they have been added to the project. Simply position the
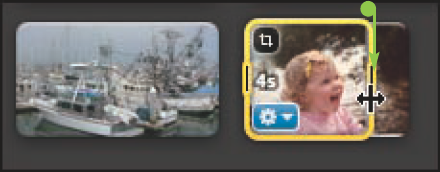
Is there another way to change the duration of a clip?
Yes. If you need to shorten the duration of a clip you can simply click the clip and drag either the right selection handle to the left or the left selection handle to the right. When you have achieved the length you want, press
GarageBand is part of the Apple iLife suite of applications that ships with each new Mac and enables you to create high-quality music for your videos. Using loops is the quickest and easiest way to create music in GarageBand. The great thing about this application is that you do not need to be a seasoned professional to begin making professional soundtracks.
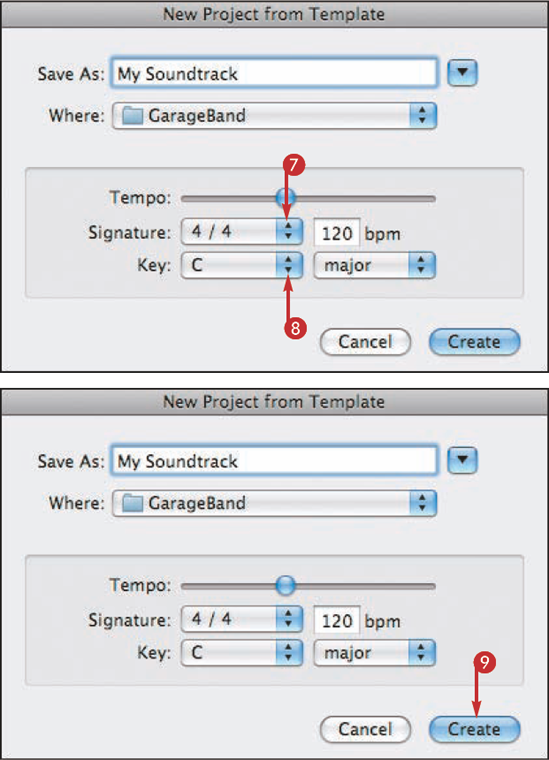
Set Up a Loops Project in Apple GarageBand
GarageBand prompts you to create a new music project.
Note
If you have not set the Welcome screen to not show when iPhoto is launched, click Close in the Welcome screen.
Note
If you have used GarageBand before, it may open straight into the interface. If so, go to File in the main menu and choose New Project to begin.
The New Project from Template dialog box opens.
Note
If you do not know what tempo to set for your project, leave the default setting. You can change the tempo later if needed. About 100 to 140 is a typical rock song.
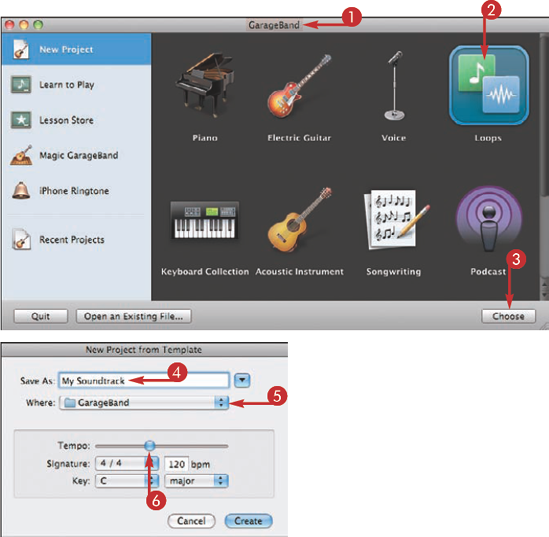
Note
If you are unsure how to configure this setting, you can leave it at the default setting and change it later.
Note
If you are unsure how to configure these settings, you can leave them at their default settings and change them later.
The New Project from Template dialog box closes and the project opens.
Tip
Am I locked into a particular template after I pick one?
No. You are not locked into any particular mode when choosing a project template. For example, if you chose the Podcast theme and later discovered that you wanted to work on a song that mainly involves the guitar, you can add guitar tracks and rearrange the project regardless of what you had previously chosen.

The ability to create your own soundtrack gives you more creative control over your video projects, and enables you to establish the tone, tempo, and overall feel. GarageBand offers a large library of prerecorded loops and also enables you to record your own music to use in your project.
Note
Launch both iMovie and set up a Loops project in GarageBand before beginning these steps.
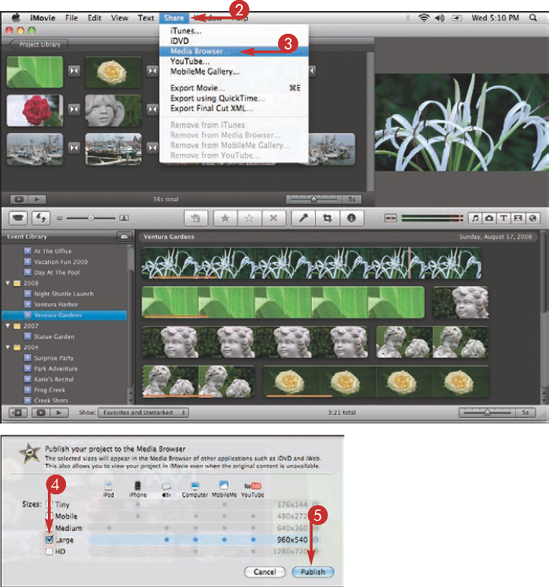
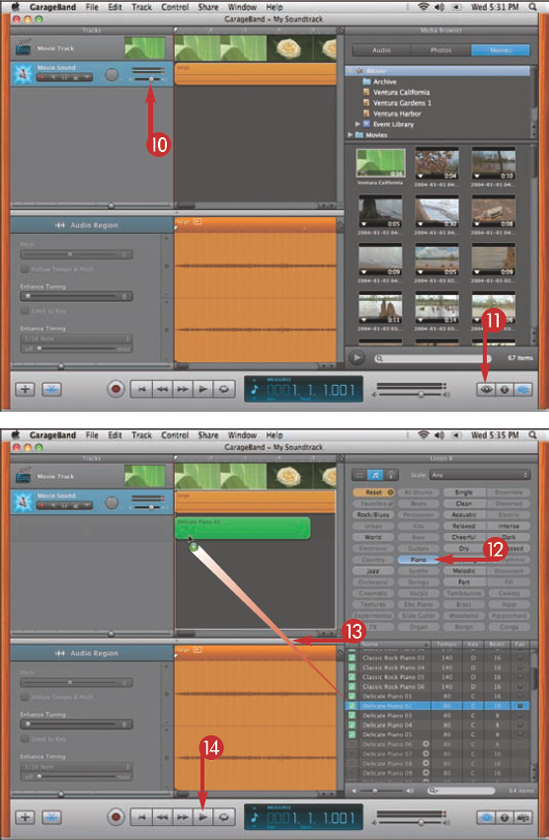
Create a Soundtrack with Apple GarageBand
Note
You can also select a project in the Project Library.
iMovie prepares the project.
Note
Depending on the size of your video, the publishing process can take a while.
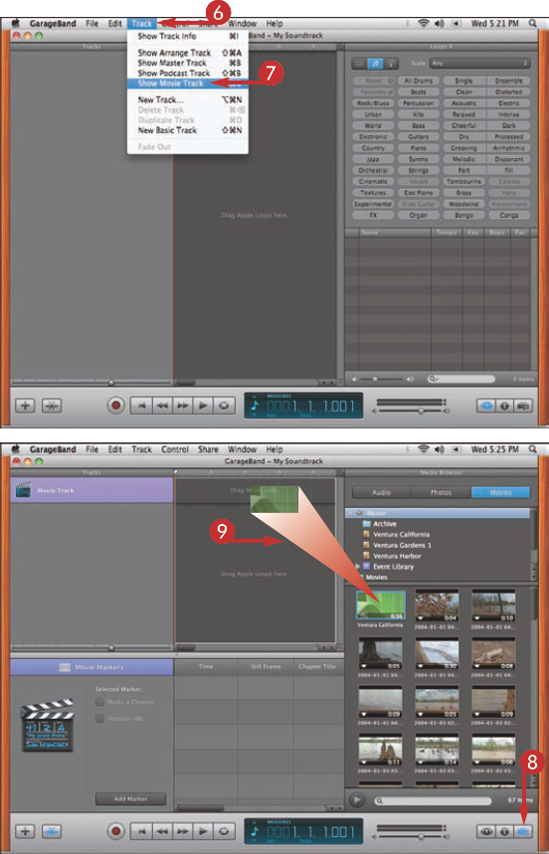
The movie track opens.
The Media browser opens, revealing the saved iMovie project.
GarageBand converts the movie and displays the thumbnails and soundtrack.
Note
GarageBand does not automatically save your projects like iMovie, so get in the habit of periodically saving your work.
Tip
Are there other ways to move video from iMovie into GarageBand?
Yes. You can drag clips directly from the Event Library in iMovie straight into the Movie track in GarageBand. What you have to keep in mind is that GarageBand does not have video editing capabilities, so any video clips that you drag from the Event Library possess only straight cuts. This drag-and-drop ability can sometimes be useful, but you will probably want to create a movie first in iMovie and then import it into GarageBand.
You can add your movie into the Movie Track within GarageBand and begin building the soundtrack with loops. The loops in GarageBand are grouped by musical genre, instrument, and themes.
Note
When you bring your iMovie project into GarageBand, you may need to lower or raise the movie sound so that you can create music for the project. You can even choose to mute or delete the movie sound.
The browser opens, revealing the prerecorded loops.
Note
You can use this method to drag more loops to the project.
Note
You can also drag the loop to a preexisting track. If you attempt to drag a loop to the wrong type of track, such as a Software Instrument loop to a Real Instrument track, GarageBand gives a warning.
Note
Move the playhead back to the beginning so you can play the entire region.
Note
You can choose Email, Web, Web Streaming, iPod, or iTV for specific use.

Tip
Are there other workflows for using GarageBand to create a soundtrack for my video?
Yes. You can create the music inside of GarageBand, and then export it for use in iMovie. Keep in mind that if you use this workflow you do not have the benefit of creating the music while cuing it to the video as it plays. Consider this method if your plan is to first create a great song and edit the video to the song, like for a highlight reel.
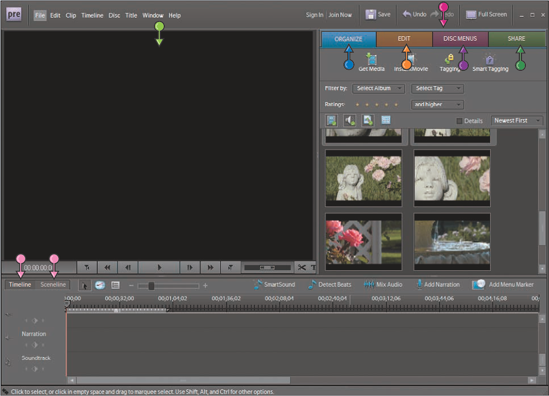
The Adobe Premiere Elements workspace is organized into the four major phases of a project: organizing media, editing the movie, creating DVD menus, and sharing your movies. The layout makes it easy for you to move between phases by clicking task buttons located at the top of the workspace. Knowing your way around Adobe Premiere Elements helps you to work more efficiently.

The Monitor Panel
The Monitor panel functions much like a TV and VCR by providing you options for viewing and playing back your video clips. You can also trim and split clips, apply effects, create titles, and position images. The Monitor panel switches its layout depending on what workspace you are in. The Monitor panel is available in all workspaces.
Tasks Panel
The Tasks panel is organized into four workspaces: Organize, Edit, Disc Menu, and Share. This pane is the central location for importing and organizing media, as well as locating, applying, and adjusting effects; creating DVD menus; and sharing finished projects. The Tasks panel is accessible in all workspaces.
Organize Workspace
The Organize workspace displays thumbnails of all of the video clips, still images, and audio files that you have imported into Adobe Premiere Elements. From the organize window you can access Get Media for importing, Instant Movie, Tagging, and Smart Tagging options.
Edit Workspace
The Edit workspace is where you spend most of your time. You can access your video clips and start editing them into the timeline from this workspace. The Edit workspace also gives you access to movie themes, visual effects, transitions, and titles for your project.
Disk Menus Workspace
After you have finished your movie and are ready to create a DVD, the Disk Menus workspace gives you access to preformatted menu templates along with your media.
When you are ready to share your video with the world, you can access the Share workspace to optimize your movie for online viewing, or viewing on a mobile phone, a computer, videotape, or other devices.
TimeLine and Sceneline Workspace
The Timeline and Sceneline workspace is where you begin assembling your video footage into an actual show. You can use the Sceneline workspace to quickly assemble video clips, add titles, transitions, and effects. The Timeline workspace enables you to fine-tune your edits by giving you the ability to trim, layer, and choreograph your media. You can switch between both workspaces at any time.
The Timeline workspace acts as a virtual storyboard, letting you place clips on it in the order in which you want them to occur, and giving you the flexibility to rearrange clips as the edit progresses. The Timeline is a quick and convenient way to put your movie together.
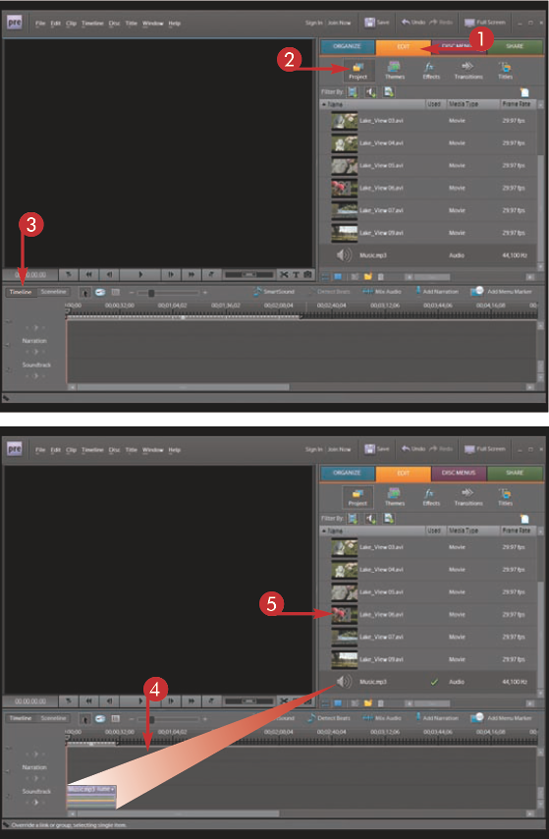
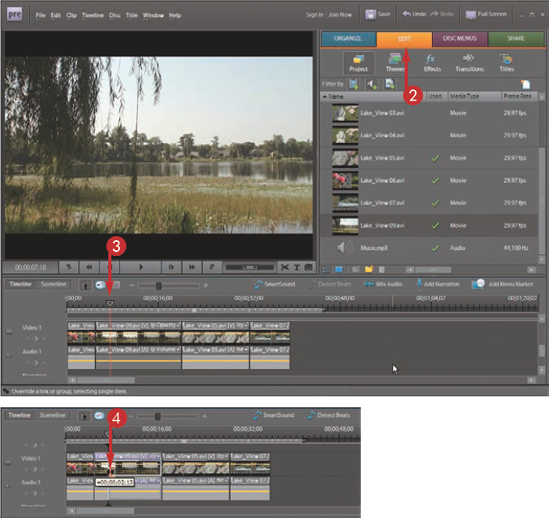
Edit Video in Adobe Premiere Elements
The Edit workspace opens.
Project view opens, revealing the previously captured files.
Note
You can rearrange video clips alphabetically by clicking in the column header.
Note
You can also rearrange the information columns such as Frame Rate and Media Type by dragging them to a new position. You can use the scroll bar at the bottom to move to the right and view more information regarding individual clips in the columns.
The music file appears in the track.
Note
If you look closely at the soundtrack you can see the actual waveform for the audio file. The peaks and valleys within the waveform represent changes in audio levels within the file, with peaks being high levels and valleys low levels. You can use the waveform as a visual cue for cuts to establish a rhythm for your edits.
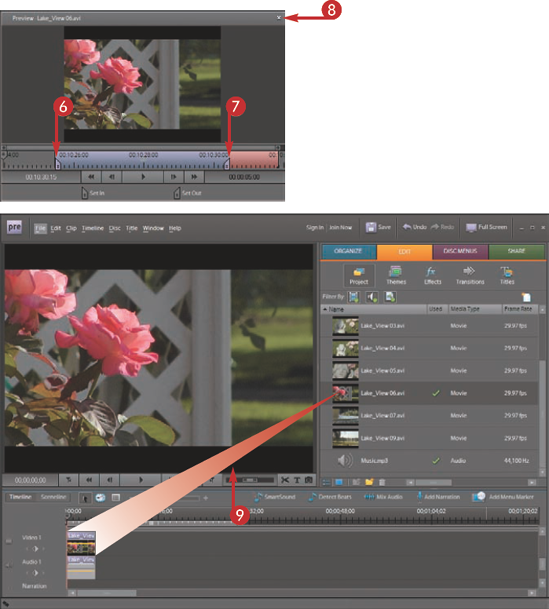
Note
You can play the clip in this window to determine the action you want to add to your movie.
The clip is now trimmed in the Project view.
The single clip appears in the timeline and is shown in the Monitor view.
Note
You can use this method to edit all of your clips into a movie.
Note
A green check mark is placed next to the clip in the Project view to signify that the clip has been added to the movie.
Note
You can play the entire clip in the Monitor view by clicking the Play button (
Tip
How can I insert a clip between two clips instead of at the end?
You can insert a video clip between two existing clips in the timeline by dragging and holding a clip over another clip — Premiere Elements shuffles the clips downward, making room for the new clip — and then dropping the clip (
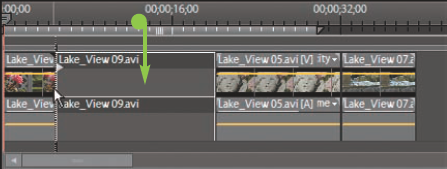
How can I rearrange my previously edited clips in the timeline?
You can rearrange clips in the timeline by simply dragging them to a new location and holding down
When you trim clips, you are removing the excess video to frame a specific action occurring within that clip. Trimming is the essence of video editing and is how you reveal the story contained within the video footage you have recorded. Trimming video is a straightforward process in Adobe Premiere Elements, but requires some practice in order to perfect.
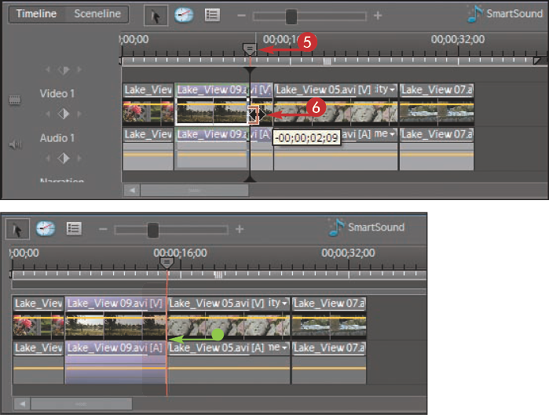
Trim Video in the Timeline in Adobe Premiere Elements
Note
Scrub, or drag, the current-time indicator back and forth so you can see where the In point should be in the clip by viewing it in the Monitor panel.
The clip snaps to the current-time indicator, and the In point of the clip is changed, shortening the clip.
Note
Adobe Premiere Elements proceeds to close the gap after the trim has been made and shortens the duration of the entire movie. This type of edit is known as a ripple edit.
Note
Scrub, or drag, the video back and forth so you can see where the Out point should be in the clip by viewing it in the Monitor panel.
• The clip snaps to the current-time indicator, and the Out point of the clip is changed, shortening the clip.
Note
Adobe Premiere Elements proceeds to close the gap after the trim has been made and shortens the duration of the entire movie.
Tip
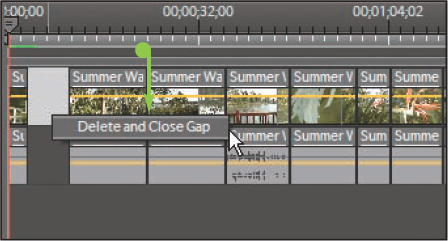
Why does a gap appear between my first and second clip when I change the In point for my first clip in the timeline?
This is an anomaly in Adobe Premiere Elements that occurs whether you are working in the Timeline or Sceneline workspace. When you change the In point of the first clip, Premiere Elements does not perform a ripple edit, and a gap is created that appears as black in the actual movie. Right-click within the gap and choose Delete and Close Gap from the pop-up menu (
Adding a voiceover can help your viewing audience follow the story and can add a personal touch to your videos. To record a voiceover in Adobe Premiere Elements you must first connect a microphone to your computer. When the microphone is connected properly, you can begin recording narration in real-time while previewing the movie.
Record a Voiceover in Adobe Premiere Elements
The Record Voice Narration controls open.
Note
Make sure that the Volume indicator moves when you talk into the microphone. As you talk into the microphone, if the meter hits in the yellow or red, lower the Level slider.
Note
You can uncheck Mute audio while recording, which un-mutes the sequence audio during the recording of the voiceover. Make sure that you wear headphones if you uncheck this option, or you will record the movie audio as well.
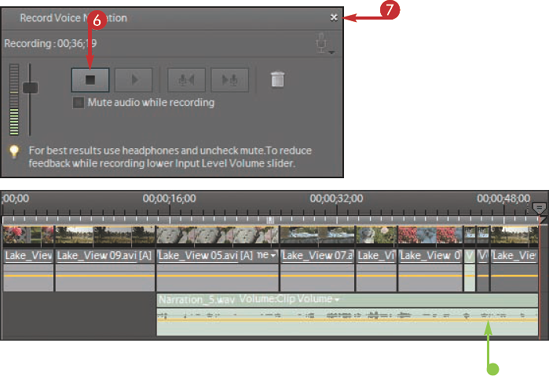
Premiere starts a countdown from three.
The video plays as Premiere Elements records the narration.
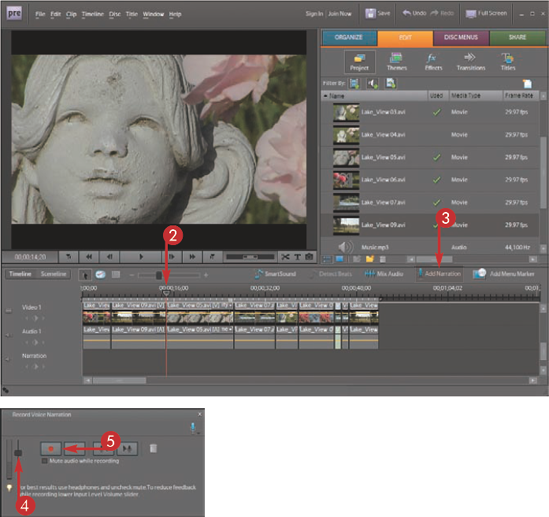
• The audio appears in the narration track in the timeline and in both the Organize and Project views.


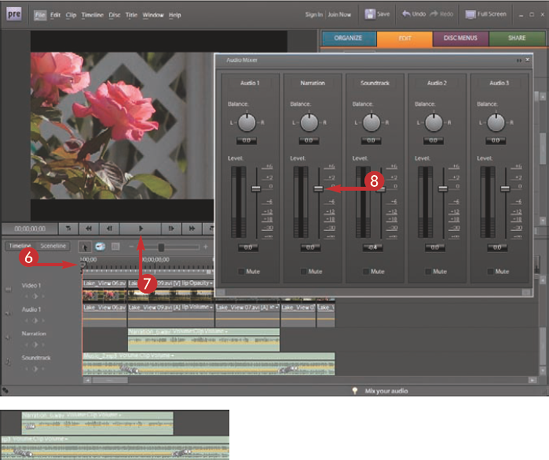
When working with multiple audio tracks within a project, such as voiceovers, a soundtrack, and clip audio, you often need to adjust the audio levels so that the mix sounds right. Adobe Premiere Elements makes it easy for you to manage multi-track audio settings to find the perfect audio mix for your project. The Audio Mixer makes it possible to fade audio up and down to accommodate other audio tracks.
Mix Audio in Adobe Premiere Elements
The Audio Mixer opens, displaying controls for all available audio tracks.
Note
Wherever you place the current-time indicator in the timeline is where the audio adjustments start.
The project plays in the Monitor panel.
The audio level adjusts in real time as the movie plays to the end. Key frames depicting the change in audio levels over time appear in the soundtrack.
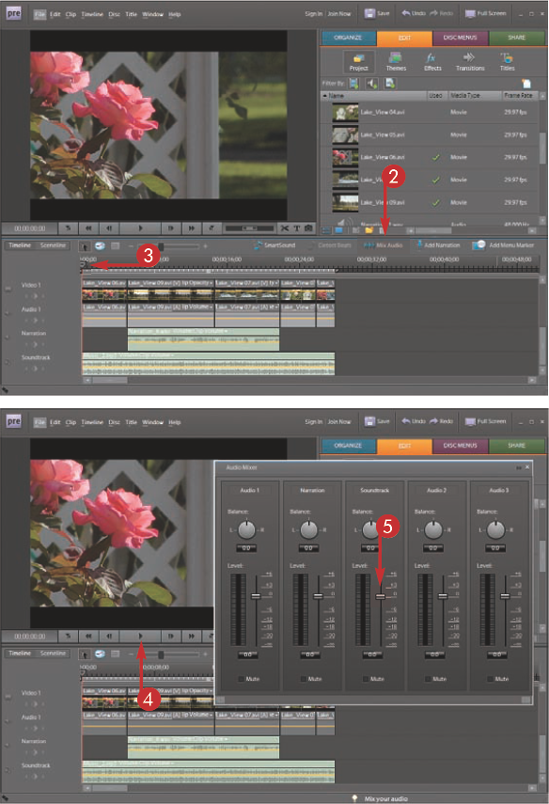
In this example, the Narration track is being adjusted.
The audio level adjusts in real time as the movie plays. Keyframes depicting the change in audio levels over time appear in the soundtrack.
Note
It is best to adjust each track from beginning to end one at a time. Do this for each track you want to adjust.
Note
One of the drawbacks to adjusting the audio in real time is that each time you adjust the sliders, attempting to find the right level, the audio for that particular section in the movie is changed, as the current-time indicator makes its way down the timeline.
Tip
Is there an alternative to using the Audio Mixer?
Yes. You can adjust the audio from the timeline. The yellow lines within each clip in the audio tracks represent the current audio level. You can drag the yellow overlays up or down to raise or lower the audio (
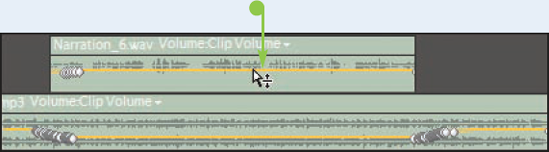
What if I only want to gradually fade my soundtrack up after the narration ends?
You can place the current-time indicator at the spot where you want the adjustment to occur, then click the Mix Audio button (
Still photos are a great way to supplement your video projects in Adobe Premiere Elements. Each photo contained on your hard drive can be easily imported into Adobe Premiere Elements and edited into the timeline.

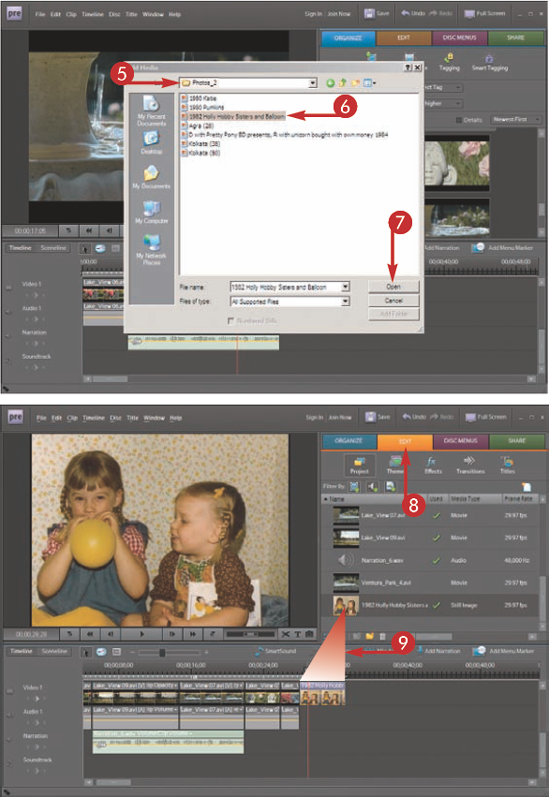
Use Still Images in Adobe Premiere Elements
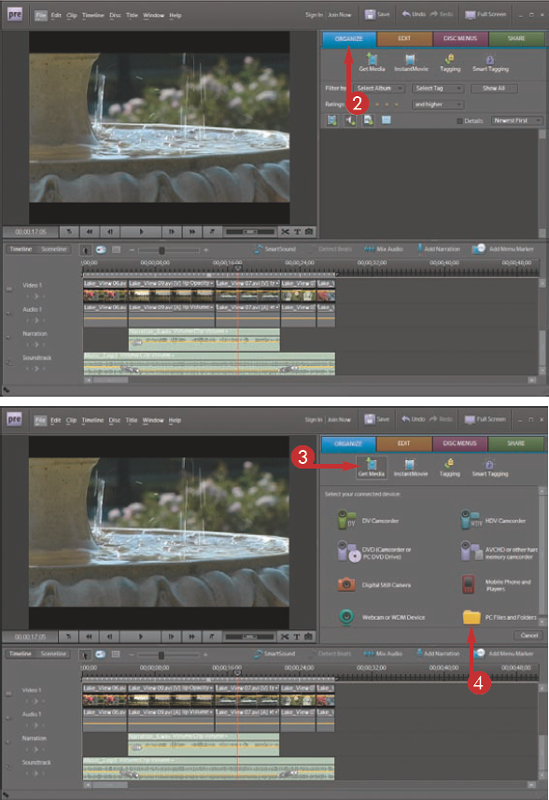
Note
Make sure that the photo is very high resolution or Premiere Elements will enlarge it, resulting in a low-quality still image in the movie.
Note
Prep your photos in an image editing program so that they are the same aspect ratio and dimensions as your video project or black may appear on the sides or at the top and bottom of your stills when edited into the movie.
The file is imported into the project and can be seen in the Organize and Edit views.
The still image is edited into the movie.
Tip
Is there a photo editor that you would recommend?
Yes. Consider purchasing Adobe Photoshop Elements to complement Adobe Premiere Elements. If you have not purchased either application, Adobe sells them as a bundle on its Web site. Photoshop Elements is a more scaled-down version of Adobe Photoshop, which is the industry leader in still image editing. Photoshop Elements can help you create graphics with dimensions and aspect ratios equal to those of your video project.
Why does my photo appear fuzzy or blurry when I play it back?
If the photo is high enough resolution for your project, it may just need rendering. A red bar may appear over the photo within the timeline to indicate that the clip requires processing (rendering) to display properly. If you play the timeline while this area is red, your photo will appear fuzzy. You can go to Timeline in the main menu and click Render Work Area. A green bar appears above the photo and it can now be played back properly.

SmartSound is a plug-in included with Adobe Premiere Elements that enables you to choose from a large collection of soundtracks to use in your video projects. SmartSound lets you customize the duration of the soundtrack to fit your movie so that the music begins and ends naturally for your project. Adding a soundtrack to your movies can take your video work to a whole other level creatively.

Edit a Soundtrack with SmartSound in Adobe Premiere Elements
Note
Take note of how long the movie is in the timeline. SmartSound enables you to create a soundtrack the same length.
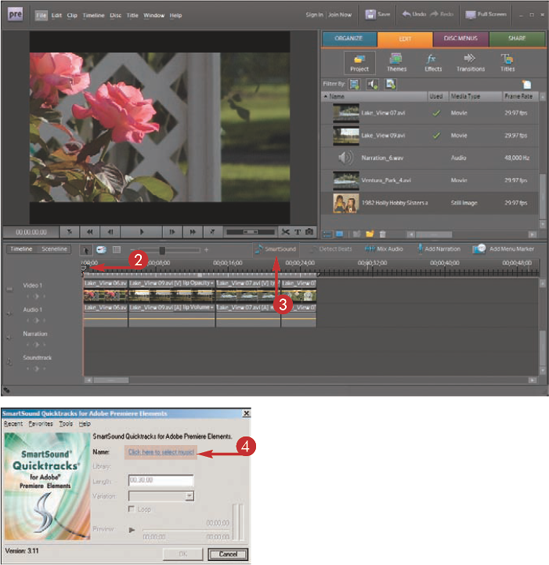
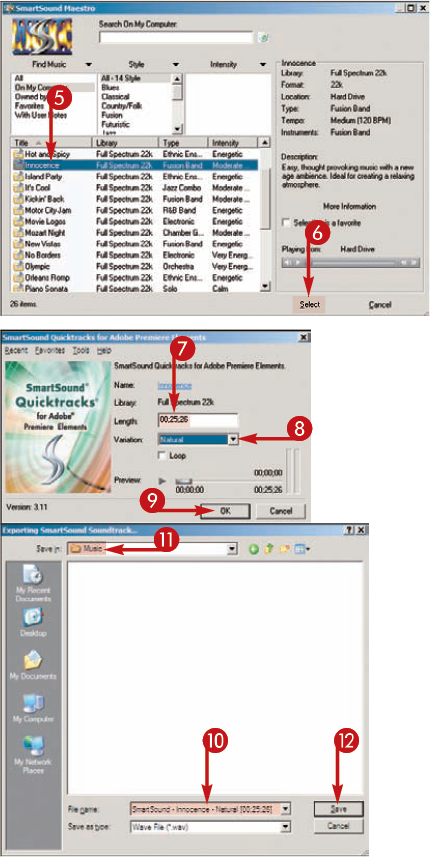
The SmartSound Maestro dialog box opens, displaying music selections.
Note
You can preview music tracks by double-clicking them.
Note
SmartSound offers variations for compositions. Each selection provides a different beginning, middle, and end for the track you selected, providing you a little uniqueness to the soundtrack.
Note
You can click the Play button (
The Exporting SmartSound Soundtrack dialog box opens.
The file is saved at that location and is added to the project in the track labeled Soundtrack.
Note
You can click and drag the Soundtrack audio file within the timeline to another track or simply move it to begin at a later time.
Tip
How do I adjust the audio level for my soundtrack?
You can drag the yellow overlays up or down in the audio tracking to lower or raise the audio. You can also adjust audio for the soundtrack in real time by clicking the Mix Audio button (