
2.3. Unit Testing
Unit testing is a very large topic and could easily be a book by itself. However, we want to provide you with a gentle introduction so that you'll have a firm foundation into the technique. Unit testing is when a developer verifies that a small isolated unit of code is working properly. Testing a small, isolated unit, for example, a method, is important for a number of reasons. First, unit tests are designed to be run often and as such they need to be fast. Some people run their tests hundreds of times a day and they need to be as quick to execute as possible. If a method accesses the file system or a database, for example, then the additional overhead can quickly add up and cause major problems. Smaller tests are generally easier to write and maintain, which will result in your being able to write them quicker with a lower cost of ownership.
Another advantage for isolated tests is that they are less dependent on a particular file or database being in the correct place at the correct time; this can lead to more fragile tests as they are more likely to fail because of environment issues rather than the code issues. We've found that this results in long debugging sessions attempting to identify why a particular test has failed.
The aim of unit testing is to have a suite of unit tests that each exercise the system in a certain fashion. Each unit test is used to verify a particular action about the system, but also have the positive side effect of providing examples of how to interact with the different objects. These examples could demonstrate the types of arguments, expected returns types, or scenarios when exceptions are thrown — this combines into an excellent form of documentation of the system for the team.
Unit tests are generally created with the support of a unit testing framework. There are various frameworks available for .NET, some of which are discussed in the next section. These frameworks provide the support for knowing which methods to execute as tests and provide additional functionality to support the developer when writing the tests. An example of a unit test for a particular framework might look similar to this:
[TestFixture]
public class Name_Of_The_TestClass_Goes_Here
{
  [Test]
  public void Name_Of_The_Test_Goes_Here()
  {
    //Test code goes here
  }
}
Fundamentally, there are a few key points to the previous example. First, the test methods must be within a public class that has the attribute TestFixture. Second, the test method itself needs to be public with the attribute of Test. We will discuss the test code in more depth throughout this book.
Different unit testing frameworks will have different syntax. In this book, we use nUnit. Try not to focus on the syntax in general, but on the concepts introduced in this book instead. After you have a firm understanding of the concepts that are involved in creating unit tests, you will be able to use different unit testing frameworks with ease.
When you have your tests, you will need some way to execute them to find out if they pass or fail. Most frameworks come with various different ways of executing their unit tests, some of which are discussed in more depth in the next section.
When creating unit tests, there are a series of best practices that should be followed. The most important practice is to treat test code with the same consideration and importance as you do for application code. This means checking it into source control, building the tests with your product, but also making sure they are readable, no duplicated code and shared logic broken into additional helper methods where required.
The next important factor is around the readability of the tests. Your tests exist for as long, if not longer, as the code they are testing so it is important that they are clear and understandable. The first step is by having a good name for the test. For example, consider these two tests:
[Test]
public void Test854()
{
       Assert.AreEqual(1, new Example().Count);
}
Compared to:
[Test]
public void When_New_Example_Object_Is_Created_The_Count_Should_Equal_One()
{
       Assert.AreEqual(1, new Example().Count);
}
Both tests do exactly the same thing, and both will passfail if count does not equal one. However, the second test tells you what you are expecting to happen and provides some context, which will help us when reading the test and identifying the reason why it failed. With the first test, you need to think and reverse-engineer the test code before you will know what to expect. This is why naming is important. It's a common practice when creating tests to separate words with underscores to improve readability; however, some people prefer to write the tests without the underscores in place. This is a personal choice between you and your team to decide what format is most readable.
Another important factor is how your tests are structured within the solution. One of our recommendations is to have a separate assembly that contains the tests for your implementation. For example, if your main assembly was called MyApplication.BusinessLogic, then your test assembly would be MyApplication.BusinessLogic.Tests. You should also indicate whether the assembly contained unit tests, integration tests, or UI tests, which we will discuss in later chapters. As a result, the full name would be MyAppliction.BusinessLogic.Tests.Unit. In terms of namespaces and classes, you should follow a similar approach. You should keep the namespaces the same, adding Tests to the end of the class name. If we were creating unit tests for the object Online, which existed in the namespace MyApplication.BusinessLogic.PaymentProcessing, the tests would be in the namespace MyApplication.BusinessLogic.Tests.Unit.PaymentProcess with the test fixture called OnlineTests. As a result, solution explorer would look similar to Figure 2-1.
Figure 2-1. Example structure
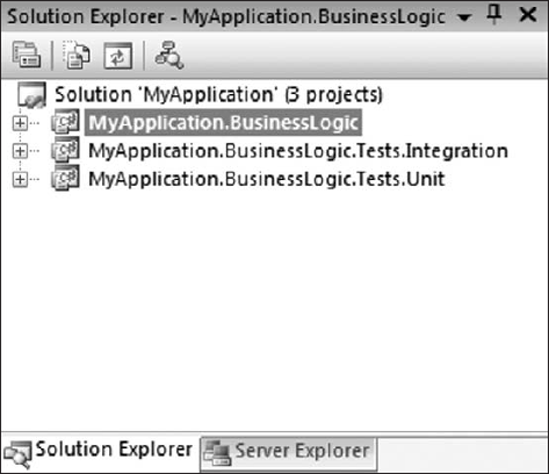
By having this strict structure, navigating between implementation and tests becomes much easier.
After naming, the next important fact is the test code itself. As previously mentioned, test code should be treated with as much importance as production code. One effective way to achieve this is by using test helper methods. These methods can contain the repetitive logic for use amongst your different tests. If these helper methods are named correctly, then they can actually improve readability. Next you'll see an example of a test helper method called CreateExampleWriter(). This method will construct the object that you use within your unit test. If this logic was located within the unit test itself, then maintenance costs would increase:
[Test]
public void When_New_Example_Object_Is_Created_The_Count_Should_Equal_One()
{
       Example e = new Example(CreateExampleWriter())
       Assert.AreEqual(1, e.Count);
}

Public ExampleWriter CreateExampleWriter()
{
       ExampleWriter ew = ExampleWriter();
       Ew.Output = new StringBuilder();
       Return ew;
}
An item often overlooked is the fact that each test should only be testing for one thing. This is for two reasons: The first is that if the test fails, identifying why it failed becomes much harder because there could be multiple causes. Ideally, you want the reason why a test failed to be very clear and apparent, because debugging your unit tests to identify the reason it failed is a huge drain on your energy levels and productivity. The second reason is maintainability: If you have large tests, then the maintenance costs will be higher as the code will be more difficult to understand.
After you have your tests in place, the next important question is how much you should test. Although we will discuss this in more detail in Chapter 3, it's important to introduce the concept of code coverage now. Code coverage is a percentage of how much code your tests cover. When you execute your tests with the support of a coverage tool, every line executed is tracked. As a result, the tool knows how much code is executed by your tests and the amount of code coverage is the "untested" amount. Different communities take different stances on code coverage and the ideal percentage for the applications codebase (all of the code for the application). Some developers will say that 100 percent coverage is a must; however, I have found that this is extremely difficult to achieve. Personally, I think 80 to 90 percent coverage is a good target to aim for, with 70 percent as the minimum. Although code coverage is a good metric, many people place too much reliance on it. You could very easily get high coverage, although your tests only actually verify the actions of one line of the code.
A more important consideration than coverage is how much confidence you have in your tests. Your tests are verifying that the system is working as expected, and it's important that you trust the result. If you don't trust that your tests are telling you the right result, then they are an expensive artifact to have. In addition, you will have to perform a significant amount of manual testing.
Gaining confidence in other people's and your own tests can be difficult. However, there are techniques you can use to offset these concerns. Each test you write should be self-verifying — meaning there is a check to verify whether the test passed or failed. If you have to manually check the results of a test, then it is definitely not a unit test. To make a test self-verifying, you will generally include an assertion which must hold true for the test to pass. If the assertion fails then the test fails.
Another factor that can help gain confidence in your tests is to include your unit tests in a code review process. Code reviews build confidence within the team and ensure that the tests are focusing on the correct items and following the best practices. The unit tests should also be a useful initial point when starting code reviews. As I mentioned before, unit tests are a form of documentation to describe what the code is doing. As such, they should be able to add value to code reviews.
No matter how good your unit tests are, they are wasted if they are never executed. They should be executed as often as possible, which is one reason why you need to keep them isolated and focused so that they can be run quickly. Ideally, after every change you make you should run your entire suite of tests on your local machine. There should also be a continuous integration server in place that will automatically detect when commits have been made to source control which results in the server automatically building the project and running the unit tests. If a test fails, then the build should fail, informing everyone on the team that something has gone wrong. The developer who caused the build to break should then fix the problem. This is one of the reasons why it is important for code reviews to include unit tests, as it is the team's responsibility to maintain the tests not just the original author.
When most developers/testers hear the phrase "continuous integration," they think of a tool such as Cruise Control or Team City. Continuous integration should be thought of as a process, where development teams integrate their small units of code frequently throughout the day to produce an application that builds successfully.
Tools such as Cruise Control support plug-in models that include tools that will build the application, run the unit tests, copy the build to a directory, send emails based on the status of the build, and even provide code coverage statistics.