
6 Sharpening and noise reduction
How to make full use of the capture sharpening and noise-reduction controls in the Detail panel

Photograph: Ashridge Forest, Hertfordshire, UK © 2016 Martin Evening
Sony A7rII | 165mm | 200 ISO | f9 @ 1/100
Digital capture undoubtedly offers photographers the potential to capture more detail than was previously possible with film, but it is also important to understand that presharpening has always been an integral part of the digital capture process. There are many reasons why it is necessary to sharpen. The process of converting the light information that hits the photosites on the sensor and subsequent digital data processing will result in an image with softer edge detail than would normally be considered desirable. It could be the lens on your camera is not particularly sharp. Therefore, a little sharpening at the post-capture stage is usually necessary to produce an image that is sharp enough to look good on the display. If a photograph is sharpened too much at this stage, you may end up with artifacts that will only be compounded as additional adjustments are made to the image. Presharpening should therefore be applied in moderation and to raw capture images only. It is all about striking the right balance between compensating for image softness in the raw file while avoiding the problems that can be caused by any oversharpening at the preliminary stage.
This chapter emphasizes the importance of sharpening digital photographs and how to reduce image noise. I explain how the Sharpening sliders in the Detail panel work and offer suggestions on which settings to use for sharper and less noisy photos.
Capture Sharpen for a Sharp Start
Before discussing the sharpening controls in Lightroom, I should briefly explain the principles behind capture sharpening and the difference between this and output sharpening.
For many years, the Unsharp Mask filter in Photoshop was considered the main tool for image sharpening, and it was ideally applied just prior to print. Over the years, our knowledge of sharpening improved and various techniques were devised to use the Unsharp Mask filter to its best advantage. In his lifetime, author and Photoshop guru Bruce Fraser did the industry a great service with his research into Photoshop sharpening. His recipes for optimum sharpening, based on whether you were sharpening for input—that is, capture sharpening—or sharpening for output, did a lot to improve our understanding of how to apply the most appropriate level of sharpening at each step of the image-editing and output process. It is also fair to say that Bruce’s research and writing affected the way some of the sharpening controls in Lightroom evolved. But more on this later.
Input/capture sharpening is all about adding sufficient sharpening to a photograph to correct for the inherent lack of sharpness all digital images suffer from. The main goal is to have your photographs look nicely sharpened on the display. At the same time, you don’t want to oversharpen, because this can lead to all sorts of problems later at the retouching stage in Photoshop. Photos that have been shot using the JPEG mode will have been presharpened in-camera and therefore shouldn’t need further sharpening. But if you shoot using raw mode, your photographs will most definitely need some degree of sharpening.
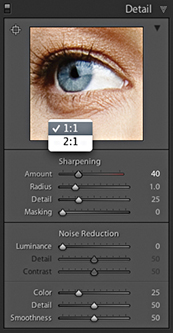
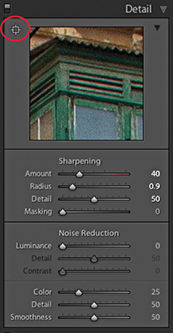
The Detail panel sharpening controls (Figure 6.1) can be used to manually control the capture sharpening process. To evaluate the sharpening correctly, you need to look at the image on the display using a 1:1 or 2:1 view setting. It is possible to view the sharpening effect at lower view ratios, but the sharpening and noise reduction are disabled below a certain zoom setting (this is done to speed up rendering times). The Detail panel controls are therefore designed to let you apply such sharpening in a controlled way so that only the edge detail gets sharpened and the flat-tone areas are preserved as much as possible. You will also read later how the Detail panel sharpening settings are linked to the Sharpen mode of the Adjustment tools. This means you can use the Adjustment Brush, Graduated Filter, and Radial Filters as creative sharpening tools to dial in more (or less) sharpness. Lastly, there is the Noise Reduction section, which has options for controlling the luminance and color noise in an image.
Improved Lightroom raw Image Processing
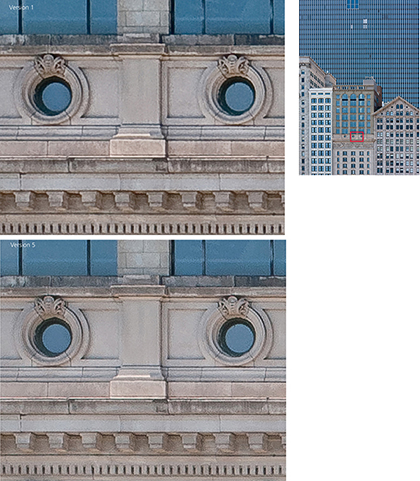
The image examples in Figure 6.2 show how the underlying demosaic processing and default Detail panel sharpening have improved in recent years. The top image shows a photograph processed using Version 1, and the bottom one shows the same image processed using Version 5 (which is essentially still the same as Version 3). These photos have been enlarged to 400% so that you can see the differences more clearly. The first thing to point out is that the Version 5 demosaic process is more “noise resistant,” which means that it does a better job of removing the types of noise that we find unpleasant, such as color artifacts and structured (or pattern) noise. At the same time, the aim is to preserve some of the residual, non-pattern noise that we do find appealing. The underlying principle at work here is that colored blotches or regular patterns tend to be more noticeable and obtrusive, whereas irregular patterns, such as fine, random noise, are more pleasing to the eye. The Version 5 demosaic process does a better job of handling color artifacts and filters the luminance noise to remove pattern noise, yet retains some of the fine, grain-like noise. The net result is that Lightroom is able to do a better job of preserving fine detail and texture.
Note
You can download a layered version of this close-up view from the book website.
Downloadable Content:
![]()
The next component is the sharpening, which is achieved by adding halos to the edges in an image. Generally speaking, sharpening halos add a light halo on one side and a dark halo on the other side of an edge. To quote Lightroom engineer Eric Chan, “good sharpening consists of halos that everybody sees but nobody notices.” To this end, the halo edges in Version 5 are very subtle and balanced such that the darker edges are a little less dark and the brighter edges are brighter. They are there and you notice them in the way they create the illusion of sharpness, but you are less likely to actually “see” them as visible halos in an image. Also, when you select a Sharpening Radius setting within the 0.5 to 1.0 range, the halos are narrow enough to sharpen fine-detailed subjects such as landscapes or fine textures more effectively.
Note
Did you know that your sensor may have dead pixels? This is something that is quite common, and you normally will not even be aware of this because the raw processing is good at spotting problem pixels and removing them during the conversion. You may notice them briefly, though, when editing particularly noisy photos. For example, if you edit a photo that was shot at night using a long exposure, you may initially see a few brightly colored pixels always appear in the same spot before the Develop module finishes updating the preview.
Tip
If you are importing new images into Lightroom, expecting to see the Adobe Color profile applied and the sharpening set to 40, but aren’t, it is most likely because you have existing Camera Raw defaults applied (using Develop ![]() Set Default Settings). To restore, click on “Reset all Default Develop settings” in the Presets Preferences dialog.
Set Default Settings). To restore, click on “Reset all Default Develop settings” in the Presets Preferences dialog.
Output Sharpening
Output sharpening is always done at the end, just prior to making a print, using the Print Sharpening options in the Print module Print Job panel. However, the print sharpening process is hidden from view, and the only way to evaluate print output sharpening is to judge the print output. The amount of sharpening that’s required at the print stage varies according to many factors, such as the print process, print size, print resolution, and type of paper used. Lightroom uses output sharpening processes based on PixelGenius PhotoKit™ SHARPENER to work this out automatically at the print stage.
Default Detail Panel Settings
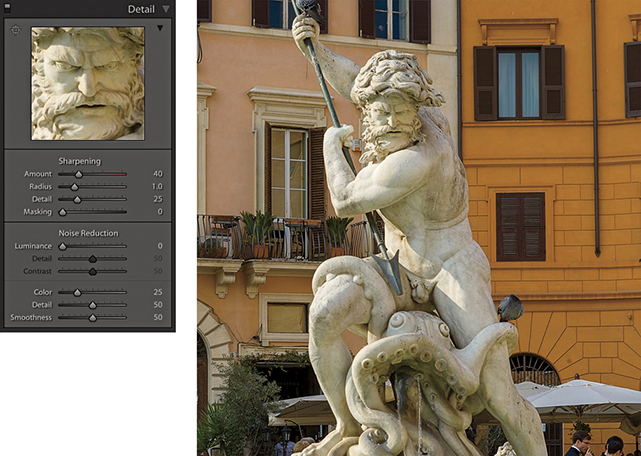
The default behavior is for Lightroom to apply sharpening adjustments to raw images only. Other images, such as JPEG, TIFF, PSD, and PNG, should not require any Detail panel sharpening (unless you are working on an unsharpened scanned image, of course). Basically, if a pixel image has already been sharpened, the last thing you want to do is add more sharpening after it has been imported into Lightroom. This is why the default sharpening is always set to zero for everything except raw images. The default Sharpening Amount setting for all new photos imported in Lightroom, using any of the new Adobe raw profiles, is 40 (Figure 6.3) (older photos that use Adobe Standard profile are set to an Amount of 25).

The exact amount of sharpening does actually vary from camera to camera. Basically, the amount of sharpening is adjusted such that all raw images should appear equally sharp at a 40 Amount setting. Lightroom’s approach is to apply standardized default tone, color, and Detail panel settings, which some may consider to be on the conservative side. Other raw processing programs may use different approaches. For example, there are those who have long claimed the sharpening from Phase One’s Capture One to be sharper. For many years this has been true, but it’s mainly been because the Capture One default sharpening settings just happened to be stronger than those applied in Lightroom. With Lightroom now applying a stronger sharpening by default, the difference is not so pronounced. To simulate Capture One’s default sharpening, you’ll probably want to set the Amount sharpening in Lightroom to somewhere between 45 and 75, set the Radius to 0.9, and the Detail slider to 15. That will get you fairly close, although there is also some additional Capture One processing that adds what can best be described as a wide-edge Clarity-type enhancement, which makes the high-contrast edges stand out more. This is only apparent on certain types of images. At a zero sharpening setting, there is not much difference between the underlying sharpness in both programs. I am not trying to put down Capture One’s capabilities, because it is a fine raw processing program with its own particular strengths. I would say Capture One’s approach produces a more optimized look. It is perhaps more important, therefore, to have an understanding of what the Sharpening sliders do and how and when to adjust them to suit the particular image you wish to sharpen, rather than simply use the default settings. The following sections explain how this can be done in Lightroom.
Sharpen Preset Settings
The Presets panel shown in Figure 6.4 contains different strength sharpening presets that simply vary the Sharpening Amount setting. These presets are also available via the Library module Quick Develop panel. They can be a useful starting point, but you will be better off saving the settings suggested in the following examples as custom sharpening presets.

Sharpening Portraits
The Figure 6.5 example below shows an optimum combination of settings to use when sharpening a portrait. These settings are the most appropriate to use when you wish to sharpen the important areas of detail, such as the eyes and lips, but protect the smooth areas (the skin) from being sharpened. You may wish to strengthen this setting by increasing the Amount setting, and you may also wish to increase the Masking slider if the skintones are looking a little too “crunchy”—a higher Masking setting should help preserve the smooth tone areas.
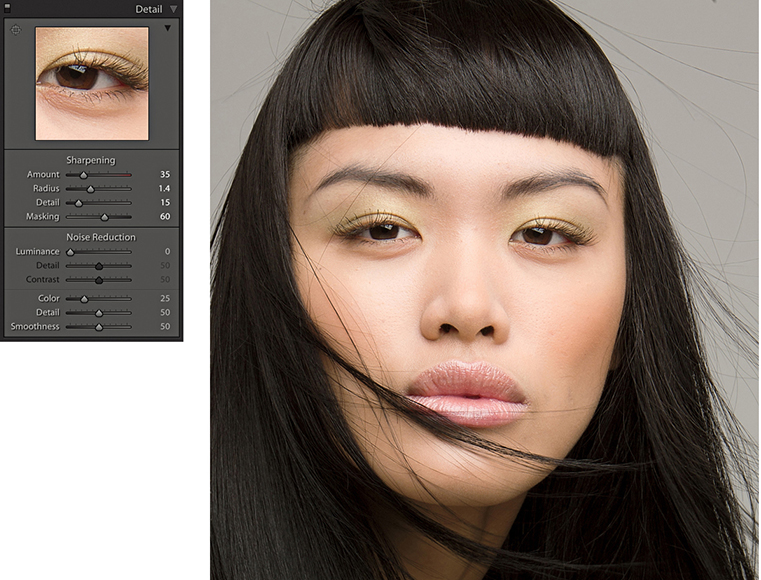
Note
The settings applied here correlate to the now defunct Lightroom preset for portrait sharpening.
Sharpening Landscapes
The Sharpening sliders settings shown in Figure 6.6 are most appropriate for subjects that contain a lot of edge detail. You could include quite a wide range of subject types in this category, such as architectural photography. Basically, you should use this particular preset when you needed to sharpen photographs that contain a lot of fine edge detail.

Note
The settings applied here correlate to the now defunct Lightroom preset for scenic sharpening.
Sample Sharpening Image
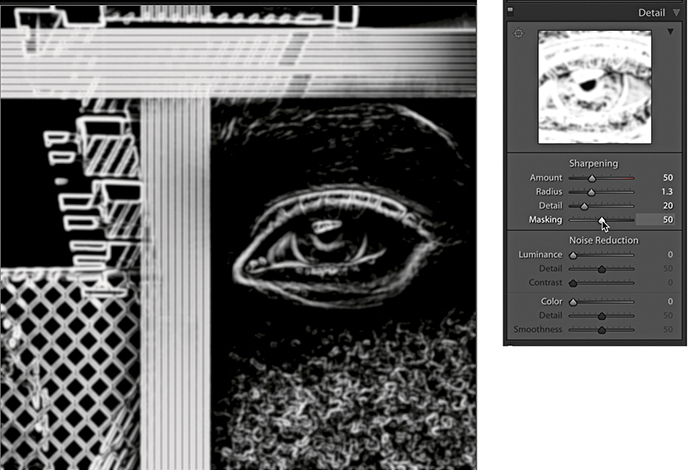
To help explain in more detail how the individual sliders work in the Detail panel, I prepared a test image to show some of the key aspects of Lightroom sharpening. You can download this image by going to the book’s website. You can then use it to follow the steps shown here to understand how the Lightroom sharpening works.
The Figure 6.7 image was specially designed to demonstrate several key aspects of sharpening. The eye and surrounding skin texture allow you to see the effects of portrait-style sharpening where the objective is to sharpen detail like the eyelashes (but avoid sharpening the skin texture). Conversely, the patchy texture in the bottom-right corner enables you to test the ability to sharpen smooth texture content, where you do want to emphasize the texture detail. The high-contrast detail content in the left section allows you to test the effects of sharpening on fine-detailed image areas, and the crisscross lines have been added to highlight the effects of the Radius slider adjustments.
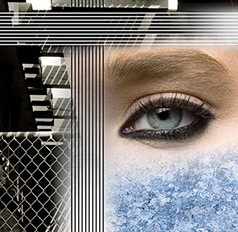
Downloadable Content:
![]()
Evaluate at a 1:1 View
As I mentioned earlier, the only way to properly evaluate the capture sharpening is to use a 1:1 view. You can view the sharpening effect at lower zoom settings, but this won’t help you make an accurate assessment of how much sharpening is required. When you go to the Detail panel, a warning sign (circled red in Figure 6.8) will appear if the selected photo is displayed at anything less than a 1:1 view. Click this, and it will immediately take you to a 1:1 preview (and the warning triangle goes away). You can also click on the disclosure triangle (circled in blue) to expand the Detail panel to reveal the Preview Target tool and preview window (Figure 6.9). If you click to activate the Preview Target tool, you can click on an area of interest in the image to see a close-up view displayed in the preview window. This, in turn, can be set to show a 1:1 or 2:1 view (Figure 6.1). You can then drag inside the preview window to scroll the image.

Luminance-Targeted Sharpening
Lightroom sharpening is applied to the luminance information in the photograph and filters out the color content when sharpening. This is a good thing, because sharpening the color information would enhance any color artifacts. In Photoshop, for example, you can convert an image to Lab mode and sharpen the Luminosity channel separately (although it is easier and less destructive to sharpen in RGB mode and use the Luminosity blending mode to restrict the sharpening to the luminance information only). What Lightroom does is kind of similar to that. It filters out the color content when sharpening. For this reason, it can be useful to inspect the image in Luminance mode when working with the slider controls. To do this, you can hold down the ![]() key as you drag the Amount slider in the Detail panel to see more clearly the effect the adjustment is having on the luminance information.
key as you drag the Amount slider in the Detail panel to see more clearly the effect the adjustment is having on the luminance information.
The Sharpening Effect Sliders
Let’s start by looking at the two main sharpening effect controls: Amount and Radius. These sliders control how much sharpening is applied and how the sharpening is distributed. Don’t forget to download the image shown in Figure 6.7 from the book’s website and import it into Lightroom to follow the steps described over the next few pages.
Amount Slider
The previews shown here and on the following pages were all captured with the ![]() key held down as I dragged the Sharpening sliders. The grayscale preview can help you concentrate on seeing how the sharpening effect is applied to the luminance image information.
key held down as I dragged the Sharpening sliders. The grayscale preview can help you concentrate on seeing how the sharpening effect is applied to the luminance image information.

1. The Amount slider is basically like a volume control. The more you apply, the more you sharpen the image, and in this respect it is similar to the Amount slider in the Unsharp Mask filter. The Amount range can go from 0 (which applies no sharpening) to a maximum sharpening setting of 150, where the slider scale goes into the red. The sharpening is somewhat excessive at 150, but you can always use the sharpen suppression controls (that are described later) to dampen the sharpening effect. You probably will not ever need to set the sharpening as high as 150, but the extra headroom is available should you need it. In this example, you can see how the sample image looked using the default 40 Amount sharpening.

2. As you increase the Amount sharpening to 100, you can see how the detail in the image looks crisper. On its own, the Amount slider is a fairly blunt instrument to work with, but it is the ability to modify the distribution of the sharpening and the ability to mask the edge halos that make Lightroom sharpening so special. The important thing to remember here is not to overdo the sharpening. The intention is to find the right amount of sharpening to correct for the lack of sharpness that is in the original raw image and not let any sharpening artifacts become noticeable at a 1:1 view.
Radius Slider
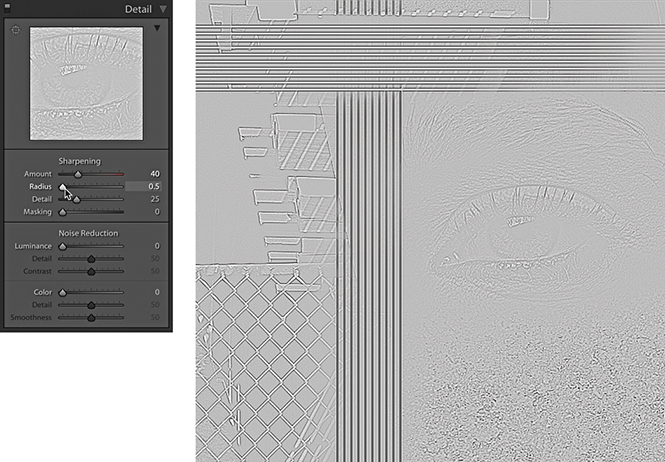
1. For this step and the next, I again held down the ![]() key to isolate the effect that the Radius setting would have on the image. At the minimum Radius setting, you can see how a small Radius has a greater effect on the narrow edge detail, such as the wire fence, but has very little effect on the soft edge detail, such as the eye and eyelashes. Notice also the effect a small Radius setting has here on the crisscross lines. This demonstrates that for high-frequency detailed subjects such as architecture photographs or landscapes, you will often benefit from choosing a Radius setting that is smaller than 1.0. With the latest process versions, the Radius edges values in the 0.5 to 1.0 range are calculated to produce finer halo edges than was previously the case with Version 1. This results in narrower, razor-sharp edges when sharpening fine-detailed images with a low Radius setting. If you toggle between using Version 1 and Version 5, you should see quite a difference here.
key to isolate the effect that the Radius setting would have on the image. At the minimum Radius setting, you can see how a small Radius has a greater effect on the narrow edge detail, such as the wire fence, but has very little effect on the soft edge detail, such as the eye and eyelashes. Notice also the effect a small Radius setting has here on the crisscross lines. This demonstrates that for high-frequency detailed subjects such as architecture photographs or landscapes, you will often benefit from choosing a Radius setting that is smaller than 1.0. With the latest process versions, the Radius edges values in the 0.5 to 1.0 range are calculated to produce finer halo edges than was previously the case with Version 1. This results in narrower, razor-sharp edges when sharpening fine-detailed images with a low Radius setting. If you toggle between using Version 1 and Version 5, you should see quite a difference here.
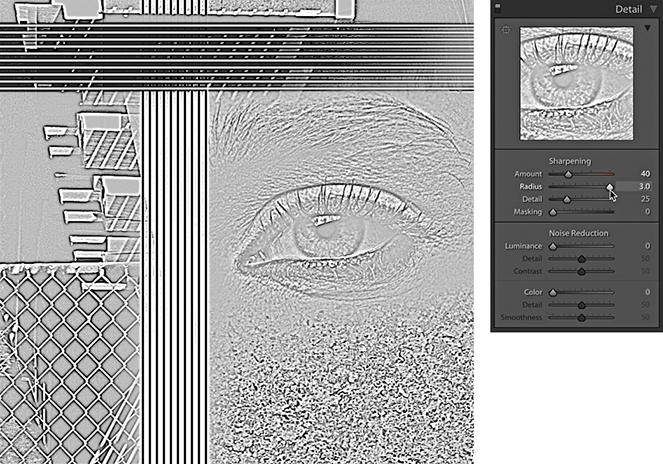
2. As you increase the Radius slider and set it to its maximum setting, you will notice how the halo width increases to the point where the halos have less real sharpening effect on the fine edge detail. The sharpening around the wire fence area looks kind of fuzzy, but at the wider setting, there is now more noticeable sharpening around the eyelashes and the eye pupil. For this reason, you will find it is usually more appropriate to select a Radius higher than 1.0 when sharpening photographs that contain a lot of soft-edged detail, such as portraits. The halo edge calculation in Version 5 is balanced such that the darker edges are a little less dark and the brighter edges are a little brighter. They are there and you notice them in the way they create the illusion of sharpness, but you are less likely to actually “see” them as visible halos in a sharpened image.
The Modifying Controls
The next two Sharpening section sliders act as modifying controls that can moderate or dampen the effect that the Amount and Radius sharpening settings have on an image.
Detail Slider
The Detail slider cleverly modifies the halo effect, letting you concentrate the sharpening on the edge areas. This, in turn, allows you to apply more sharpening with the Amount slider, adding sharpness to the edges, but without generating noticeable halos around them. The default setting for the Detail slider is 25. As you take the slider below this value, it suppresses the amount of contrast in the halos. As you set the Detail slider above 25, it acts as a “high-frequency concentrator,” which is to say it biases the amount of sharpening, applying more to areas of high frequency and less to areas of low frequency.
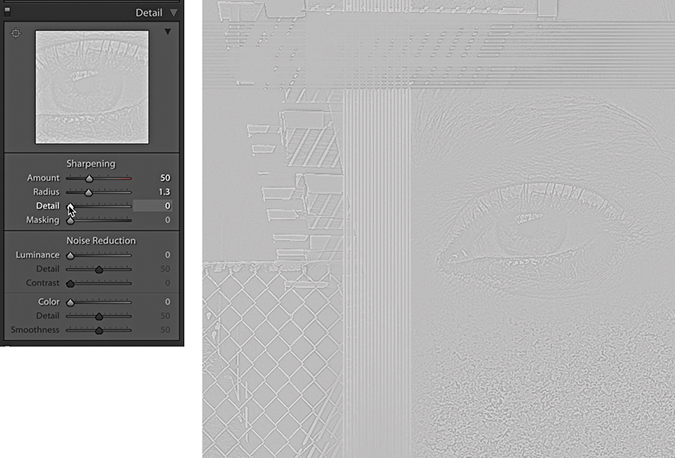
1. In this step, the Detail slider was set to 0 (I again held down the ![]() key to preview in isolation the effect this slider adjustment was having). When the Detail slider is at this lowest setting, nearly all the edge halos are suppressed. The combination of a low Detail setting and a medium-to-high Radius setting will allow you to apply a strong sharpening effect to bring out details like the eye and eyelashes while suppressing the halos on the smooth skintones.
key to preview in isolation the effect this slider adjustment was having). When the Detail slider is at this lowest setting, nearly all the edge halos are suppressed. The combination of a low Detail setting and a medium-to-high Radius setting will allow you to apply a strong sharpening effect to bring out details like the eye and eyelashes while suppressing the halos on the smooth skintones.

2. When the Detail slider is raised to the maximum setting, all of the sharpening effect is allowed to filter through, and the high-frequency areas will be further enhanced. Higher Detail slider settings tend to do more to exaggerate the highest-possible edge detail in the image. This can result in the Lightroom sharpening emphasizing more those areas with fine-textured detail (including noise). If this is likely to cause problems, you may want to avoid setting the Detail slider too high, or you can increase the amount of Masking that is applied. On the other hand, it is safe to set the Detail slider to a high setting if you think this is required, but I would recommend doing so only on low-ISO images where the inherent noise in the image you are sharpening is low enough not to cause a problem. For example, when sharpening landscape photographs shot at a low ISO setting, it’s often possible to increase the Detail slider, even to as high as 100.
3. When the Detail slider is set to a midpoint value between these two extremes, you’ll see how the Detail slider can be used to target the areas that need sharpening most. Refer back to the Faces sharpen preset used earlier: A lower setting of 15 is suitable for portrait sharpening, because it does a good job of suppressing the sharpening over the smooth tone areas. A higher Detail setting will carry out less halo edge suppression and is therefore more suitable for emphasizing fine edge detail.
Interpreting the Grayscale Sharpening Preview
This is a good point for me to explain what the grayscale previews are actually showing you. If you hold down the ![]() key as you drag the Amount slider, you see an accurate preview of the cumulative effect that all the sharpening sliders are having on the Luminosity information in an image. But when you
key as you drag the Amount slider, you see an accurate preview of the cumulative effect that all the sharpening sliders are having on the Luminosity information in an image. But when you ![]() -drag on the Radius and Detail sliders, you are seeing a different kind of preview, because with these you are able to preview the combined sharpening effect in isolation.
-drag on the Radius and Detail sliders, you are seeing a different kind of preview, because with these you are able to preview the combined sharpening effect in isolation.
What does this mean? Experienced Photoshop users will understand better if I explain that this is a little like the Photoshop sharpening technique where you apply the High Pass filter to a duplicate of the Background layer to pick out the edge detail and set the duplicate blend layer to Overlay mode. The High Pass filter turns most of the image a mid-gray, but when you set the layer to the Overlay blending mode, the mid-gray areas have no effect on the appearance of the photograph, while the lighter and darker areas in the Overlay blending mode layer build up the edge sharpness. The Radius and Detail ![]() mode previews are essentially showing you the edge enhancement effect as if it were on a separate sharpening layer (which, as I say, is like previewing a duplicate layer of the Background layer after you have just applied the High Pass filter). Basically, these previews are showing you an isolated view of the combined Amount, Radius, and Detail slider settings without being blended with the image.
mode previews are essentially showing you the edge enhancement effect as if it were on a separate sharpening layer (which, as I say, is like previewing a duplicate layer of the Background layer after you have just applied the High Pass filter). Basically, these previews are showing you an isolated view of the combined Amount, Radius, and Detail slider settings without being blended with the image.
Masking Slider
The Masking slider adjustment adds a final level of suppression control and was inspired by the late Bruce Fraser’s Photoshop sharpening techniques. If you want to read more about Bruce’s techniques for input and output sharpening, plus his creative sharpening techniques, I highly recommend you check out Real World Image Sharpening with Adobe Photoshop, Camera Raw, and Lightroom, 2nd Edition. This book was originally written by Bruce Fraser but has since been updated by Jeff Schewe.
The basic concept behind the masking control is that you can use the Masking slider to create a mask that is based on the image content and protects the areas you do not want to be sharpened. If you take the Masking slider down to 0, no mask is generated and the sharpening effect is applied without any masking. As you increase the Masking setting, more areas are protected. The mask is generated based on the image content; areas of the picture where there are high-contrast edges remain white (the sharpening effect is unmasked), and the flatter areas of the picture where there is smoother tone detail turn black (the sharpening effect is masked).
Masking Slider Preview Mode
The ![]() mode preview for the Masking slider shows a mask that limits the sharpening adjustment. The best way to interpret this preview is to imagine the preview of the sharpening adjustments as being like a sharpening layer above the image and think of the masking preview as a layer mask that has been applied to that sharpening layer.
mode preview for the Masking slider shows a mask that limits the sharpening adjustment. The best way to interpret this preview is to imagine the preview of the sharpening adjustments as being like a sharpening layer above the image and think of the masking preview as a layer mask that has been applied to that sharpening layer.

1. In this example, I set the Masking slider to 50 and held down the ![]() key to reveal the mask preview. At this midway setting, notice how the flatter areas of the picture are just beginning to get some mask protection, such as the skintone areas around the eye.
key to reveal the mask preview. At this midway setting, notice how the flatter areas of the picture are just beginning to get some mask protection, such as the skintone areas around the eye.
2. As the Masking setting is increased to the maximum setting of 100, you can see how more of the flatter tone areas are now protected while the high-contrast edges are preserved. At this extreme setting, the Lightroom sharpening is only applied to the white mask areas. The black portions of the mask are completely protected, and no sharpening is applied here. Generally, you set the Masking slider high for images that contain fine-detailed areas that you do not want to enhance (such as skin), and you set it low for images where you do wish to enhance the fine-textured areas. However, if you take into account the enhanced fine-detail sharpening that can be obtained using the Detail slider, most subjects can benefit from having at least a small amount of Masking applied to them.
Applying Custom Sharpening Adjustments
Now that I have given you a rundown on what the individual sharpening sliders do, let’s look at how you would use them in practice to sharpen an image.

1. For this first step, I adjusted the Sharpening sliders to provide the optimum amount of sharpening for the fine-detail areas. I applied a Radius of 0.7, which added fine halos around the edge details (such as the wire fence) and a Detail of 70, which limited the halo suppression. I applied an Amount of 33 to make the fine edge detail nice and crisp and set the Masking slider to 10, which meant only a small amount of masking was used to mask the sharpening effect. I also adjusted the Luminance slider (setting this to 10) because most images, even those that have been shot using a low ISO setting, may benefit from some Luminance noise reduction (see page 423).

2. In this second example, I adjusted the Sharpening sliders to provide the optimum amount of sharpening for the soft-edged detail around the eye. I applied a Radius of 1.4 to build wider halo edges around the eyelashes, but at the same time, I used a Detail setting of 20 to suppress the edge halos. The Radius setting still had an effect on the sharpening, but the Detail slider was nicely suppressing the halo edge effect to produce a smoother-looking sharpening effect. I took the Masking slider all the way up to 85, so I could target the sharpening on just those areas that needed sharpening most (that is, the details in the eye and eyelashes). You will note that the Amount was set to 70. This is a higher value than the default 40 setting, but the sharpening was being substantially suppressed by the Detail and Masking sliders, so it was necessary to apply a larger Amount setting here.
Creative Sharpening Using the Adjustment Tools
The golden rule when sharpening in Lightroom is to sharpen your images just enough so that they look sharp on the display, but not so sharp that you begin to see any sharpening halos. With some images, it can be tricky to find the settings that will work best across the whole picture, so this is where it can be useful to apply localized sharpening. Basically, you can adjust the Sharpness slider in the localized adjustment tools to add or reduce the sharpness, and this adjustment will then vary the sharpness Amount setting based on the other settings already established in the Detail panel Sharpening section.
In the following steps, you will notice in Step 2 that I set the Sharpness slider to 80. This is more than you would want to apply normally and, in this instance, was similar to applying 120 Amount sharpening in the Detail panel. Meanwhile, in Step 3, I applied a negative sharpening effect to blur the background. Negative sharpening is discussed in more detail in the following section.
1. In this photograph, I used the Detail panel to apply a global sharpen, but the statue was not quite as sharp as I would have liked.
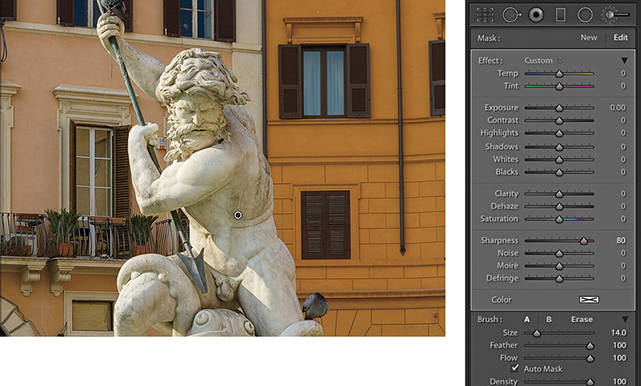
2. To address this, I selected the Adjustment Brush, set the Sharpness slider to 80, and painted over the statue to add some extra sharpening.

3. In this final version, I added a new brush group applying a blue Tint, a negative Exposure, and a –100 Sharpness. I then painted over the background to create more contrast between the sharpness of the statue and the background.
Adding Localized Blurring
Negative local sharpening in the 0 to –50 range can be used to fade existing sharpening. Therefore, if you apply –50 Sharpness as a localized adjustment, this will disable any capture sharpening. As you apply a negative Sharpness in the –50 to –100 range, you start to apply anti-sharpening, which is kind of like a gentle lens blur effect. But you can, in fact, go beyond the +100/–100 limit by applying multiple passes of negative sharpness. In other words, if you add multiple adjustments with a –100 Sharpness value, you can increase the amount of blur. However, with multiple negative Sharpness adjustments, the effect will eventually max out and the image will not become any more blurred beyond three passes.
There are a number of examples where a negative sharpening effect might come in handy. I sometimes use this technique to help create a shallow focus effect and therefore find it is best to apply a negative Sharpness adjustment via a Graduated Filter. Another popular technique is the use of a shallow focus effect at the post-processing stage to give video footage a miniaturized feel. I have seen a number of successful examples, but one in particular that stood out was “The Sandpit” by Sam O’Hare (vimeo.com/9679622). Now, according to O’Hare, the original raw files were color processed in Lightroom and the after-effect blurring was created using separate software. However, it could also be possible to carry out the blurring in Lightroom and synchronize the settings across all the photos in a time-lapse sequence.
1. This shows an image before I applied a localized blur effect.
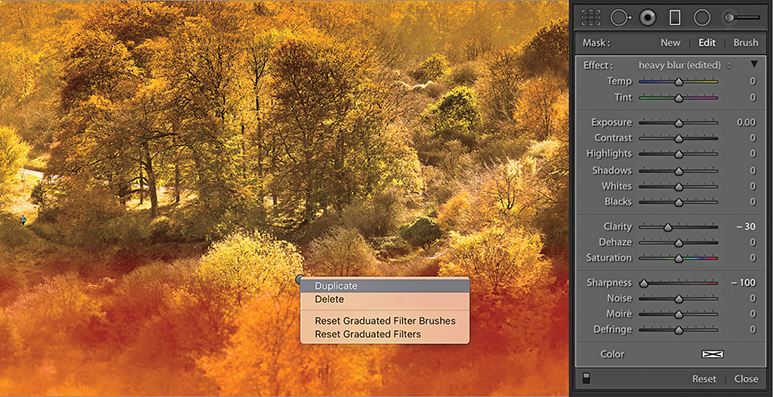
2. I selected the Graduated Filter tool and selected the heavy blur preset. I modified this by setting Clarity to −30 and dragged from the bottom to the middle. I right-clicked and selected Duplicate to achieve the cumulative blur seen here.

3. I then repeated the same thing for the top half of the picture, where I applied three Graduated Filter blur effects to achieve a maximum blur.
Noise Reduction
Noise in digital images is caused by a number of factors. For example, noise can be the result of too few photons reaching the sensor. This is known as shot noise, where the low number of photons result in sensor signal errors. You can see this for yourself when using a camera in live view mode under low light conditions. The screen image will be very noisy. Yet, when you capture an image using a correct exposure value at a low ISO setting, the image can appear noise-free. This is because shooting at the correct exposure (such as with a longer time exposure) allows enough photons to reach the sensor and generate a clean image. The characteristics of the sensor itself is another contributory factor. All digital captures will contain an underlying amount of noise that is generated by the sensor. It is only as the ISO is increased that the noise is amplified and becomes more apparent to the eye. Not all cameras are the same, and some sensors are particularly prone to showing noise, although the latest digital SLRs and mirrorless cameras perform exceptionally well in low-light conditions. The ISO speed itself is another important factor. As you increase the ISO setting, shadow noise will become an issue. It is like turning up the volume of an audio tape that was recorded at a low volume and hearing lots of hiss. This is an appropriate comparison because the camera sensor is an analog device and the digital file is created via the camera’s analog-to-digital converter. An amplified input signal will inevitably contain a lot of noise after it has been digitized.
Lightroom’s demosaic processing does a good job of filtering out the good noise from the bad, but it is not ideal that every trace of noise gets removed from the image at this stage. You might think this would be a good thing, but when viewed closely, the photograph would look rather plastic and over-smooth in appearance. The Camera Raw/Lightroom engineers determined it is better to concentrate on eradicating the noise we generally find obtrusive, such as color and luminance pattern sensor noise (which is always a problem), but leave in place the residual luminance noise that is random in nature. The result of this filtering should be an image that is free of ugly artifacts yet retains the ultra-fine-grain-like structure that photographers might be tempted to describe as being “film-like.” Extra help is then needed to further suppress the unwanted image noise that can be characterized as luminance and color noise. This is where the Noise Reduction sliders in the Detail panel come in.
Tip
Some cameras offer in-camera long exposure noise reduction for which, using a process known as dark frame subtraction, a second dark frame is captured and blended with the capture image to automatically remove hot pixels. This works for raw as well as JPEG captures. The downside is that when you make a long exposure capture of, say, 15 seconds, you have to wait a further 15 seconds while the camera records the second, dark frame image and blends this with the image capture.
Adjustments to the Noise Reduction sliders should ideally be assessed at a 1:1 view or higher. Although it is possible to preview the adjustments at lower zoom settings, you can only judge the effect the sliders are having by viewing the image at 1:1.
As with the Sharpening Amount slider, noise reduction in Lightroom is adaptive to different camera models and their respective ISO settings. The effective amount of noise reduction for the Luminance and Color settings therefore varies when processing files from different cameras, because the noise reduction is based on a noise profile for each individual camera. The end result is that the noise-reduction behavior feels roughly the same each time you adjust the noise-reduction controls, although under the hood the values applied are actually different.
Tip
If you use the Shadows slider in the Basic panel or the Tone Curve controls to bring out more shadow information, just be aware that this may emphasize any shadow noise in the image. It is therefore always worth inspecting the shadows close up after making a sharpening adjustment and check to see if Luminance and Color slider adjustments are needed to hide any noise. Many camera manufacturers are only too painfully aware of the problems of shadow noise and do their best to hide it by deliberately making the shadows darker in JPEG captures to help hide any shadow noise. Some camera manufacturers’ raw processor programs also apply a shadow contrast tone curve by default.
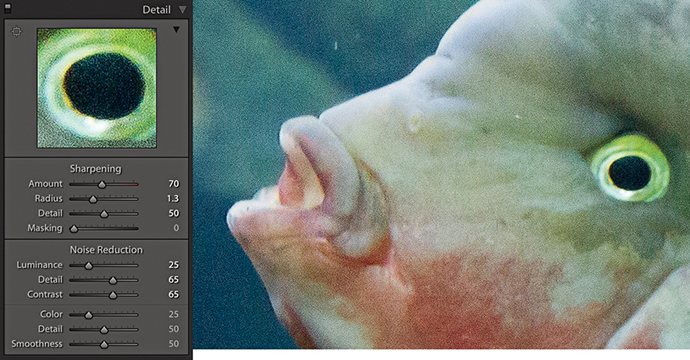
Luminance Noise Reduction
The Luminance slider in the Detail panel (Figure 6.10) can be used to smooth out luminance noise, which is the speckled noise that’s always present to some degree but is more noticeable in high-ISO captures. Lightroom happens to do a good job here of reducing any white speckles in the shadows to provide the smoothest luminance noise reduction possible.

The default Luminance setting is 0. You can try raising this to around 5 to 20, but it should not be necessary to go beyond 50 except in extreme circumstances. Jeff Schewe likes to describe the Luminance slider as “the fifth sharpening slider” because the sharpening process goes hand in hand with the luminance noise reduction. Because luminance noise reduction inevitably smoothes the image, it is all about finding the right balance between how much you set the Luminance slider to suppress the luminance noise and how much you sharpen to emphasize the edges (but without enhancing the noise).
The Noise Reduction Detail slider acts like a threshold control for the main Luminance slider in determining what is noise. The default setting is 50. As you drag to the right, this reduces the amount of smoothing and preserves more detail but may cause noisy areas of the image to be inappropriately detected as detail and therefore not get smoothed. As you drag to the left, it smooths the noise more, but be warned: Some detail areas may be inappropriately detected as noise, and important image detail may become smoothed.
Luminance noise tends to have a flattening effect at the macro level where the underlying texture of the noise grain also appears to be smoothed out. The Contrast slider therefore allows you to restore more fine-detail contrast, but it does so at the expense of making preserved noise blobs more noticeable. The smoothest results are achieved by leaving the Luminance Contrast slider at the default 0 setting. However, doing so can sometimes leave the noise reduction looking unnatural and plastic-like and the details may appear to remain too smoothed out. Dragging the slider to the right helps you preserve more of the contrast and texture in the image, but at the same time can lead to increased mottling in some high-ISO images. The Contrast slider, meanwhile, has the greatest effect when the Luminance Detail slider is set to a low value. As you increase the Luminance Detail slider, the Contrast slider will have less impact on the overall luminance noise reduction.
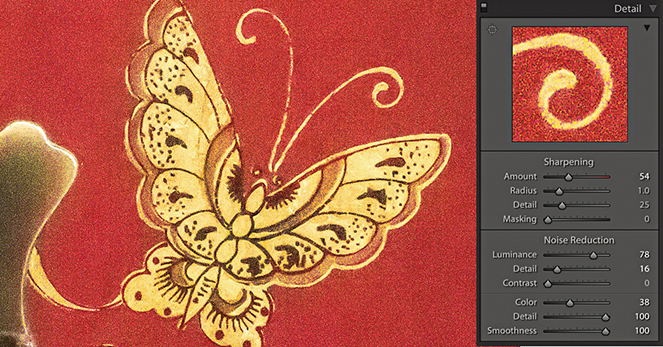
Color Noise Reduction
Color noise occurs due to the inability of the sensor in low light levels to differentiate color because the luminance is so low. As a result, you see errors in the way color is recorded and, hence, the appearance of color blobs in the demosaiced image. Color noise is usually the most noticeable aspect of image noise, and the Color slider’s default setting of 25 does do a fairly good job of suppressing the color noise artifacts while preserving the color edge detail. If necessary, you can take the slider all the way up to 100. However, as you increase the Noise Reduction Color slider, you do run the risk of color bleeding and the fine color details of an image becoming desaturated. This kind of problem is one that you are only likely to see with really noisy images that contain fine color edge details. Most of the time, it is not something you’ll need to be concerned with, but where this is a problem, the Color Detail slider can help. As you increase the Color Detail slider beyond the default setting of 50, you will notice how it preserves more detail and prevents the color edges from bleeding or becoming desaturated. Just be aware that as you increase the Color Detail setting, this can lead to color speckles appearing along the preserved edges. To understand the effect this slider is having, you may want to zoom in to see a 400% view as you adjust the slider to gauge the effect on the image.
Noise-Reduction Tips
I suggest you get to know your camera and how the sensor responds to different lighting conditions. Some cameras fare better than others in low-light conditions. There will always be a trade-off between shooting at a medium ISO setting with a wider lens aperture or slow shutter speed and shooting at a high ISO setting with a smaller lens aperture or faster shutter speed. Consider using a tripod or image-stabilizing lenses as an alternative to shooting at the highest ISO setting.
Setting the Luminance slider too high can make the image appear over-smooth, and doing so can compromise the sharpness. Instead of tweaking the Noise Reduction sliders on every image, you may find it worth following the advice on page 370 about saving camera-specific defaults that include ISO-specific defaults. This can help automate the process of applying the appropriate amount of noise reduction for each image and avoid the need for multiple presets.
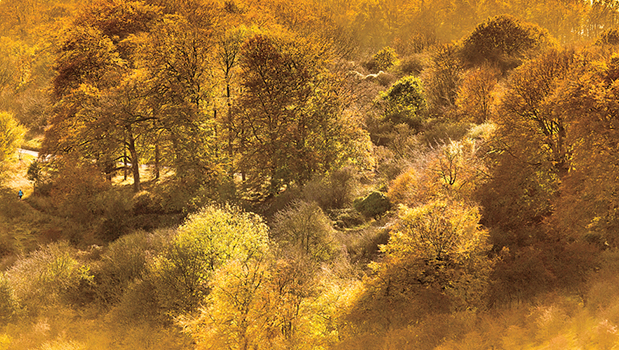
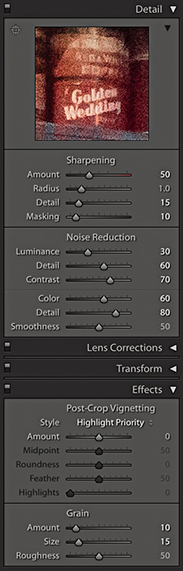
If after attempting to remove the Luminance and Color noise the image looks over-smooth, it can sometimes help to add a small amount of grain (Figure 6.11) to add a little texture back into the image. Adding grain in this way is a bit like extending the range of the Luminance Contrast slider described on the preceding page. Above all, do not be too paranoid about noise. There is no point in trying to remove every bit of noise, as the print process can be very forgiving!
Color noise corrections

1. Here is a 1:1 close-up view of a photograph using a 6400 ISO setting. All the Noise Reduction settings here were set to 0.

2. To begin, I set the Noise Reduction Color slider to 70. This was enough to remove the color speckles, but it also had the undesired effect of causing the colors in the image to bleed.

3. To counteract this, I set the Color Detail slider to 100. As you can see, the color edge detail was restored. I then applied the Luminance adjustments shown here to eradicate most of the luminance noise. On the left, you can see a direct comparison between this and the Step 2 settings.
Color Smoothness Slider
The Detail panel also has a Color Smoothness slider in the Noise Reduction section. This can be used to help deal with color mottling artifacts (or large colorful noise blobs). These are usually caused by low-frequency color noise and can be present in low-, as well as high-ISO images, especially in the shadow regions. The default setting is 50. Dragging to the right can help make these disappear, although this will, at the same time, cause the image to appear smoother, and at high settings may cause the image to desaturate slightly. For the example that’s shown opposite, I shot the photograph using a Pentax 645Z camera with the Sony 50-megapixel CMOS sensor, which was set to the maximum ISO 204,800 setting. As you can see, there was quite a big difference between the 0 and 100 settings, although not every image will show such a marked benefit from applying this adjustment. Also, you may notice that boosting the Color Smoothness slider can bring with it a hit in performance speed as you further edit in the Develop module.

1. In this close-up view (with the Color Smoothness slider set to 0), there are clear signs of color mottling.
2. To remove the mottling effect, I took the Color Smoothness slider all the way across to 100.
Selective Noise Reduction
There is also a Noise slider in the Adjustment Brush, Graduated Filter, and Radial Filter settings. As you increase the slider setting, you strengthen the noise reduction that can be applied to the selected area. As with the localized sharpening adjustments, this strengthening of the noise reduction effectively increases the settings for the Luminance and Color sliders by a proportional amount. Basically, you can use a Noise slider adjustment to apply additional noise reduction where it is needed most, which will most likely mean where you need help cleaning up the shadow areas. I see this tool being useful when you have used a localized adjustment to deliberately lighten the shadows in a scene. Instead of bumping up the overall noise reduction to compensate for the increased noise presence, it makes sense to do so locally by editing the Adjustment Brush, Graduated Filter, or Radial Filter settings to apply a positive Noise setting.
It is also possible to apply negative amounts of noise reduction with the Adjustment Brush. At first, this might seem odd, but this essentially allows you to tackle the problem of selective noise reduction in reverse. You can start off by applying a high amount of global noise reduction to tackle noise where large parts of the image need a strong noise-reduction treatment. You can then use the Adjustment Brush with a negative Noise setting to selectively reduce the noise reduction around the areas that do not need such a strong level of noise reduction and where you would like to preserve more detail in the image.
1. In this photo, the noise reduction did not eradicate all the noise in the image.

2. Here, I selected the Adjustment Brush, set the Noise slider to 100, and brushed over the affected areas to help reduce the noise in the background area.
Selective Moiré Reduction
Moiré is a problem that’s associated mainly with high-end backs (and digital SLRs, such as the Nikon D800E) where there is no anti-aliasing filter. When photographing areas of fine detail, such as the mesh in a fence, if the detail is more than 1 pixel wide, the sensor will not have any problem resolving this. Where the detail is less than 1 pixel wide, however, you are more likely to see the effects of moiré. It is a problem you will find more often with today’s high-resolution, medium-format sensors, but it is not completely unheard of with regular digital SLR cameras. The example shown on the next page is a close-up view of a photograph shot using the Kodak DCS Pro 14n.
To address this type of problem, Lightroom has a Moiré slider in the localized editing controls. As with the Noise slider, you will need to drag it to the right to apply a positive value that can help reduce the effects of moiré. The higher the setting, the stronger the effect will be. If necessary, you might want to apply a second-pass adjustment in situations where you are trying to remove really stubborn moiré artifacts. The thing to watch out for is that the stronger the moiré reduction effect, the more likely you are to see examples of color bleeding along the affected edges. As you use the Adjustment Brush to apply a moiré reduction, the brush references a broad area of pixels around where you are brushing in order to calculate what the true color should be where you are painting. So, when retouching a photograph such as the Sydney Opera House image shown here, it was important to maintain a hard edge to the brush in order to calculate a true color based on the color of the roof tiles and not allow the brush to sample the adjacent blue sky color (which would otherwise have spilled over here). Selecting the Auto Mask option can certainly help, too. Also, when fixing different sections of an image that are affected by moiré, you might want to consider creating new brush pins and working on these areas separately.
As with the Noise slider, you will note that you also have the ability to apply negative amounts of moiré. This means that you can apply multiple passes of positive moiré reduction in which subsequent applications of negative moiré can be used to reduce the previously applied moiré reduction effect.

1. In this close-up view of the Sydney Opera House, you can clearly see a noticeable moiré pattern in the roof area.
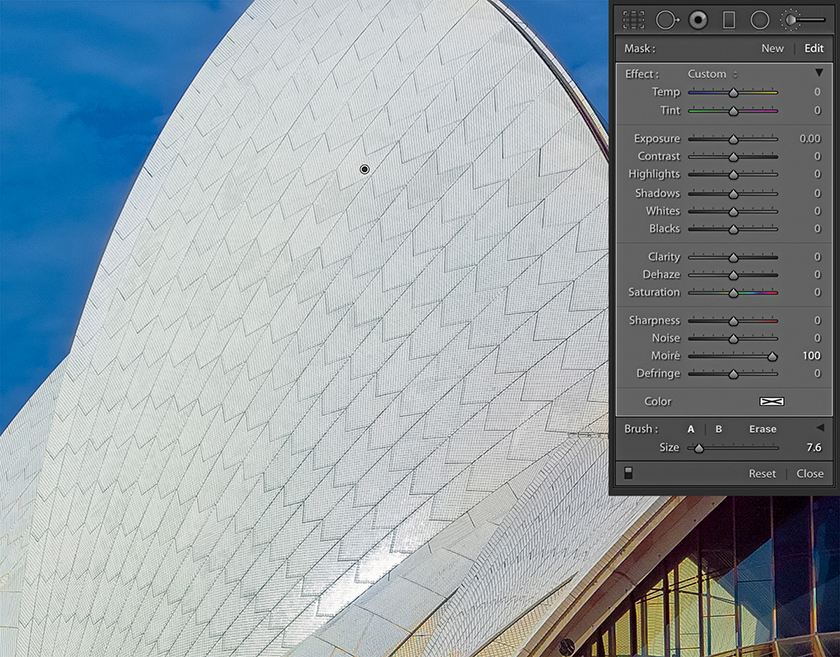
2. I selected the Adjustment Brush and set the Moiré slider to 100. I then used the brush to paint over the affected area, thereby completely removing all traces of the moiré interference pattern.
Moiré Removal on Non-Raw Images
Moiré removal is more effective at removing luminance artifacts on raw images than on JPEGs, because it can take advantage of the higher-resolution green channel (before color processing) to perform a fix. This is not possible with JPEGs as the green channel has already been fixed. It has already been “color processed” and therefore become “polluted” by the other three channels.