10 Managing your photos in Lightroom
How to use the metadata tools in Lightroom to manage your catalogs

Photograph: Ocean concrete works, Vancouver, Canada © 2018 Martin Evening
Sony A7rII | 50mm | ISO 200 | f/8 @ 1/200
Here is a quick test for you: Can you remember all the things you photographed last month? Were there any particular shots that stood out? Okay, so how about that same month five years ago? Many photographers think they can successfully rely on their memory when accessing pictures from their photo archives. The fact is, as we shoot more and more photographs, this kind of approach is doomed to failure, and as time goes by, it will only get worse.
Lightroom can help you organize and catalog your images from the very first moment you import them. It provides a flexible system of file management that can free you from the rigid process of having to organize your images within system folders.
On the face of it, image management might seem like a chore, but the time you invest now in rating your photos and adding custom metadata, such as keywords, can easily bring its own rewards and justify the time spent doing this. Adding custom metadata to your photos will add value. For working photographers, this can mean adding commercial value by making such photos more easily accessible to someone carrying out a keyword search. Even adding just a minimal amount of metadata to your personal photos can help prevent precious photographs of friends, family, and places visited from being lost among an ever-growing catalog of images.
Working with Metadata
In the early days of digital photography, many photographers relied solely on a folder-based organizational system. Even today I come across photographers who use named folders to manage their entire image library. With a folder-based organizational system, the degree to which you can successfully retrieve specific images depends on your ability to memorize the folder structure and know where everything is stored. Anyone who is responsible for maintaining a large image archive knows that this method of file management can soon become unwieldy. What is needed is a cataloging program that can help you keep track of everything. Therefore, the trend these days is to use file management by metadata, where you search for a file by searching its attributes rather than by trying to remember which folder you put the picture in.
At the heart of any digital asset management (DAM) system is the ability to manage the files stored on that system through the use of metadata. A good DAM system should allow you to filter files using the metadata that is already embedded, as well as add custom metadata tags that can be used to carry out refined file searches and organize files into custom groupings. Some examples have already been shown in this book, such as how the Filmstrip filter can narrow down a selection of photos and display only those images with ratings of one star or higher, or two stars or higher, and so on. We have also looked at how to use the Folders panel to manage the image library. But the real power behind Lightroom is the database engine, which lets you carry out specific searches and quickly find the photos you are looking for. Figure 10.1 shows an example of metadata applied to a personal photograph, while Figure 10.2 shows an example of metadata applied to a commercial photograph.


It is in no way mandatory that you follow all the advice offered in this chapter, as everyone will have their own particular image-management requirements. You may find you just want to use the Folders panel to catalog your library images, and that is enough to satisfy your needs. But, hopefully, one of the key things you will learn in this chapter is that the time invested in cataloging an image collection can pay huge dividends in terms of the time saved when tracking down those pictures later. The image-management tools in Lightroom are far from being a complete asset-management solution, but they do offer something for nearly everyone. Some may find the cataloging tools in Lightroom insufficient. But even so, the data you input via Lightroom will be fully accessible in other image-asset-management programs. Once you start adding metadata to your images and grasp the benefits of doing so, you’ll soon reap the rewards.
The Different types of Metadata
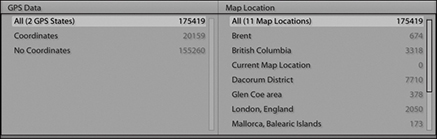
Metadata is usually described as being data about data, which is used to help categorize information. Most of us carry out metadata searches on a daily basis. Every time you use an Internet search engine such as Google, you are using metadata to find what you are looking for. For example, if you type in a search for “elephants” and then click the Images filter, you can quickly locate lots of photographs of elephants (over 11 million of them). But if you were to refine the search criteria to “Indian elephants ceremonial,” you could start to narrow the search down further. If you need to find an email that was sent to you a year ago, you can use the search tools in your mail program to quickly find what you are looking for. iTunes is able to make use of embedded metadata to help you locate specific music, and a cable TV system will typically allow you to search for movies in a variety of ways. You can probably search for a specific film title by genre, release date, or director.
Lightroom also lets you organize your image files by metadata. All digital image files will contain a certain amount of camera data (known as EXIF metadata) to describe such things as the camera and lens used, along with other technical information, such as the lens settings and image file type. The thing is, the information that we would consider most important, such as who or what was in the picture when the photograph was shot, cannot be included automatically (although the Lightroom People feature can sometimes help). For the most part, photographers have to add such custom metadata information manually by entering keywords that describe the image. Keywords can be used to categorize the photos in your catalog, and if you are skilled at keywording, this can really help you manage your photos efficiently, as well as improve sales if you are in the business of supplying photos to an agency.
It is true that you will need to spend time entering all this metadata information, although there are various tips coming up in this chapter that will show you how to avoid repetitively entering this data for every single image. The trade-off is that the time invested in cataloging your images in the early stages can help reap rewards later in the time saved retrieving your files. In most cases, you need to configure essential metadata only once to create a custom metadata template. You can then apply this bulk metadata automatically to a set of imported photos. You can take the metadata cataloging further and add extensive custom metadata information to individual images. It all depends whether this is important for the type of work you do. Basically, the amount of effort spent adding metadata should always be proportional to how useful that information may be later. There is no point in going overboard doing this. How much time you should devote to this task and the amount of detailed information you record will all come down to how important that information will be to you personally and/or the people you are supplying your images to.
There is a lot of detailed content coming up in this chapter about how to apply, edit, and use metadata. Therefore, I thought the best way to introduce this subject would be to provide a quick example of how metadata can be used to carry out a search of the Lightroom catalog.
A Quick Image Search Using Metadata
One of the key features in Library module is the Filter bar, which can be accessed at the top of the content area whenever you are in the Library Grid view mode. The Filter bar combines text search, file attribute, and metadata search functionality all in one. The following steps suggest just one of the ways you can use a metadata filter search to find photos quickly and thereby demonstrate the usefulness of tagging your photos with keywords.
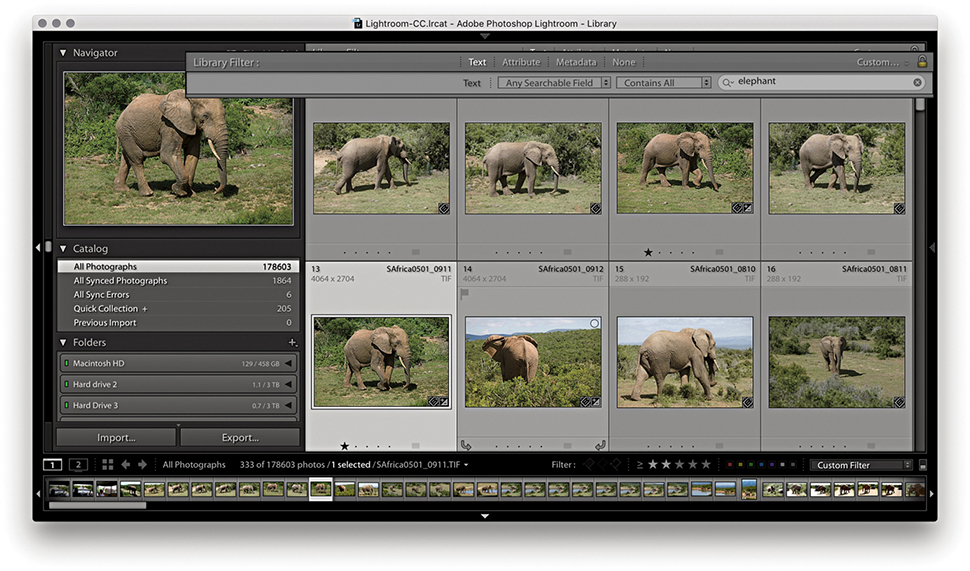
1. Let me start by showing how you can search for photos quickly, without needing to refer to the folders the images are kept in. In the example, I selected all of the photos in the catalog and used ![]() (Mac) or
(Mac) or ![]() (PC) to reveal the Library Filter bar with the Text search field activated. Here, I typed “elephant” and I allowed the search to search within Any Searchable Field using Contains All search criteria. This filtered the catalog view to reveal 271 images with a text match for “elephant.” This could be wherever there was a match in a keyword, caption, or filename. A filtered selection of 271 images was obviously a lot easier to sort through than a search of the entire catalog, but there are ways you can use Lightroom to further narrow down a search.
(PC) to reveal the Library Filter bar with the Text search field activated. Here, I typed “elephant” and I allowed the search to search within Any Searchable Field using Contains All search criteria. This filtered the catalog view to reveal 271 images with a text match for “elephant.” This could be wherever there was a match in a keyword, caption, or filename. A filtered selection of 271 images was obviously a lot easier to sort through than a search of the entire catalog, but there are ways you can use Lightroom to further narrow down a search.
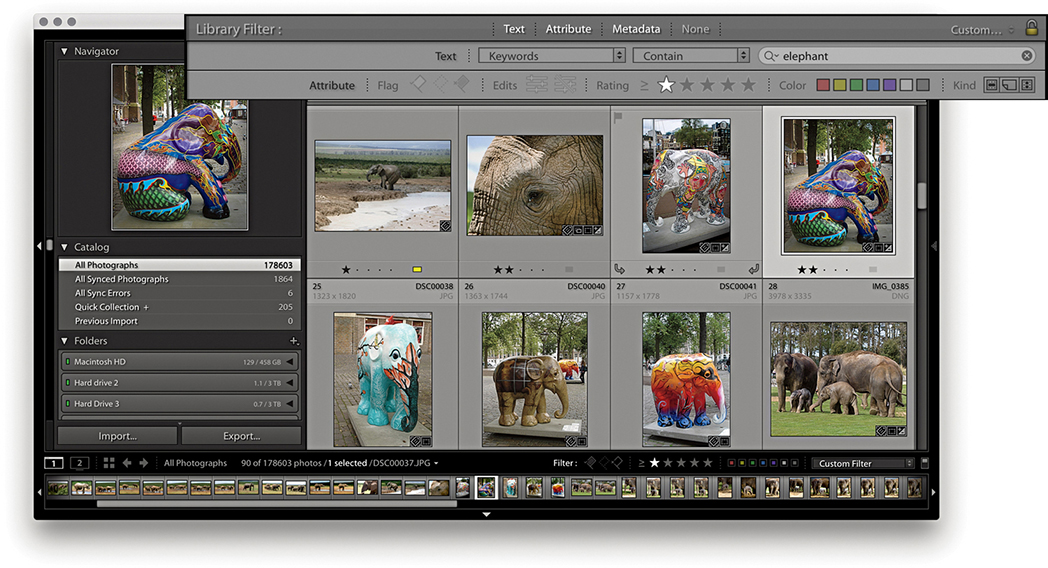
2. I then clicked the Attribute tab in the Filter bar and clicked the one-star button to narrow the search to elephant images with a rating of one star or higher. This reduced the selection to a more manageable 59 images.
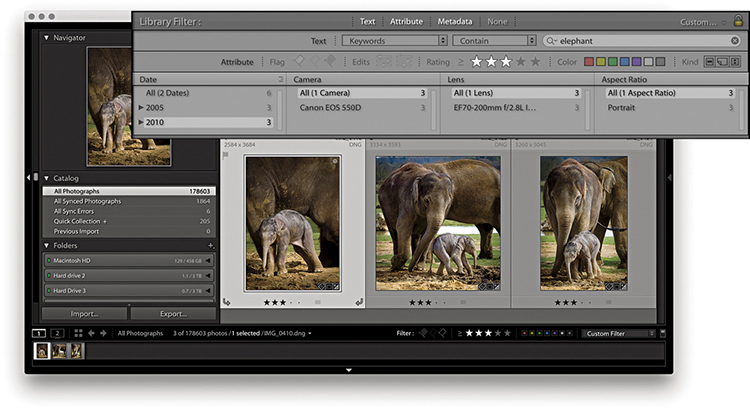
3. Lastly, I clicked the Metadata tab in the Filter bar and, in the Date column, clicked to select just those images that were shot in 2010. I also clicked the three-star button to display just those images with a rating of three stars or higher.
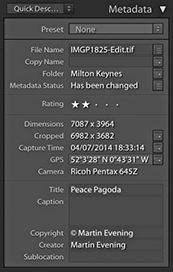
Metadata Panel
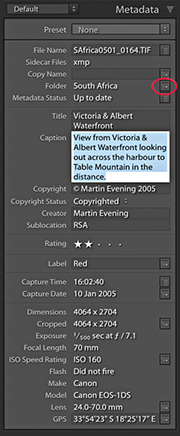
Let’s now look at the Metadata panel. Figure 10.3 shows the default Metadata panel view, which displays a condensed list of the file and camera information. At the top is the Preset menu with the same options as those found in the Import dialog Apply During Import panel (see also page 570 for more about creating and applying metadata presets). Below this are fields that show basic information about the file such as the File Name and Folder. Underneath that are the Title, Caption (elsewhere also referred to as “Description”), Copyright, Creator, and Location fields. These fields are all editable, and when you click a blank field, you can enter custom metadata, such as the image title and copyright information. Below this are Rating and Label, followed by the basic EXIF metadata items. This data is informational only and shows things like the file-size dimensions, camera used to take the photograph, camera settings, lens, and so forth. Some of the items in the Metadata panel have action arrows or other buttons to the right of the metadata item. These provide additional functions. For example, clicking the action arrow button next to Folder (circled in Figure 10.3) takes you directly to a Grid view of the source folder contents.
Metadata Panel View Modes
If the Metadata panel in your version of Lightroom looks different from the one shown in Figure 10.3, this is probably because you are using one of the 11 other Metadata panel layout views. If you click the View menu shown in Figure 10.4, you can access any of the alternative Metadata panel view options. In Figure 10.5, you can see a comparison of some of the main Metadata panel view modes. Each photo can contain a huge amount of metadata information, so if you want to see everything, you can select the EXIF and IPTC view. But if you want to work with a more manageable Metadata panel view, I suggest you select a Metadata panel view more suited to the task at hand. For example, the EXIF view mode displays all the non-editable EXIF metadata, whereas the IPTC view mode concentrates on displaying the IPTC custom metadata fields only. The IPTC Extension view can be selected to display additional IPTC Extension data. The Large Caption view mode displays a nice, large Caption metadata field, which gives you lots of room in which to write a text caption (the large caption space here does at least make the Caption field easy to target—click anywhere in the Caption field and you can start typing). While you are in data entry mode, pressing ![]() allows you to add a return character in this field section instead of committing the text.
allows you to add a return character in this field section instead of committing the text.

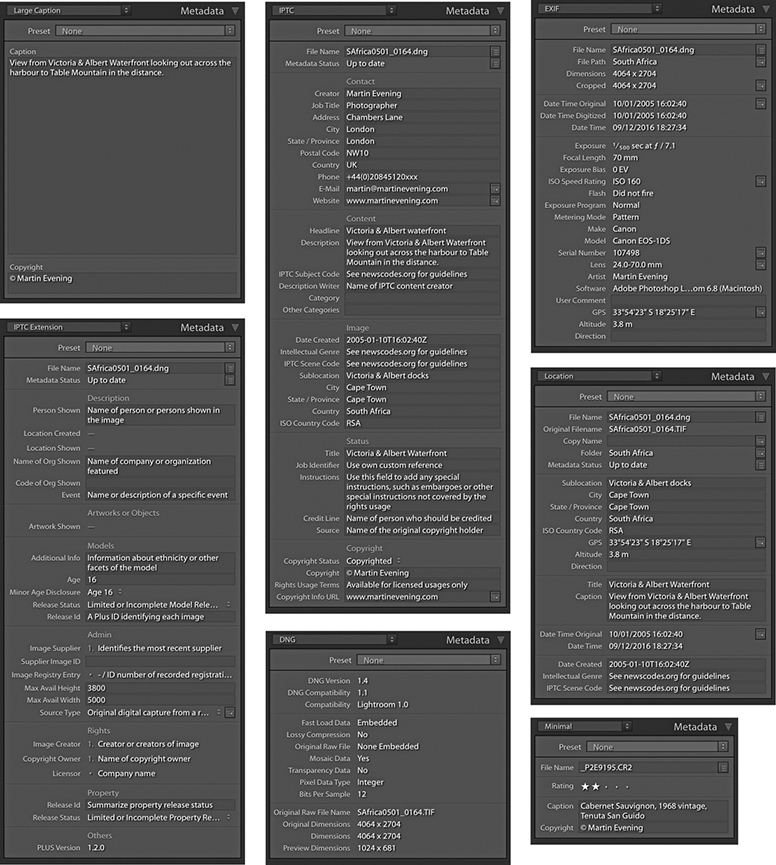
The Location panel mode provides a metadata view that is more useful for reviewing travel photographs. The Minimal and Quick Describe view modes are suited for compact Metadata panel viewing, such as when working on a small screen or laptop. And the DNG mode reveals specifics about the DNG data for selected DNG images. This lets you see specific DNG file information, such as whether lossy compression has been applied.
General and EXIF Metadata Items
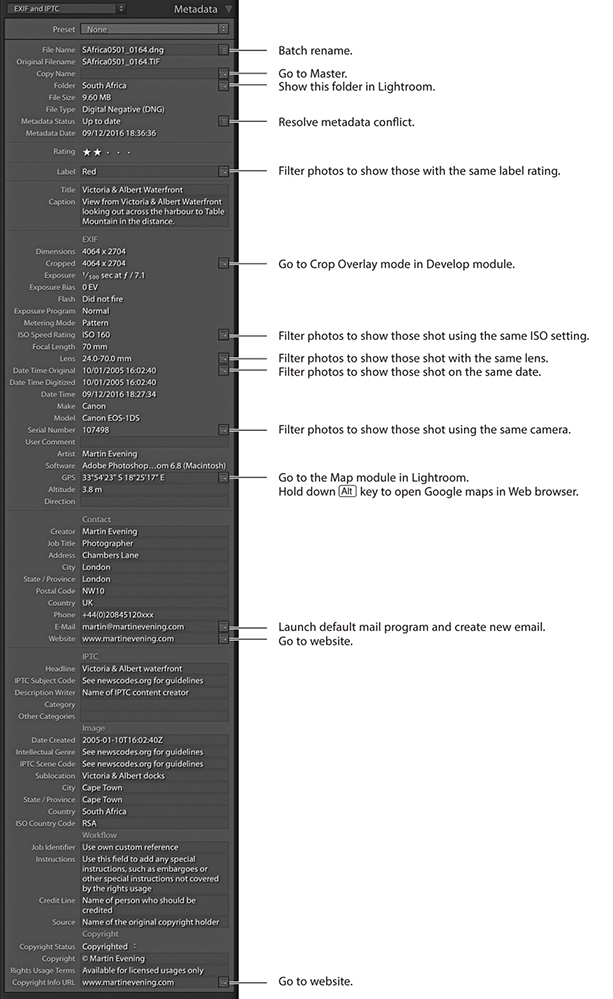
Let’s now look in more detail at the items that can be displayed in the Metadata panel. Figure 10.6 shows a fairly complete list of the items you might see listed when using the EXIF and IPTC view mode. Many metadata items can be displayed here and most are self-explanatory. As you roll over the items listed in the Metadata panel, the tooltips provide extended explanations of how to use each of the fields. You might not see everything listed here in your version of Lightroom; certain items require the metadata to be present before they can be displayed. For example, only if there is an audio sidecar present will it appear as a metadata item just below Metadata Status. If you click the action button next to this, you’ll be able to listen to the audio annotation. If no audio sidecar file is attached, you won’t see anything listed.
Tip
Making audio notes via the camera is useful should you wish to record information, such as the name of a person you have just photographed or other information that you might want to write up later as a caption.
File Name
This displays the filename for the currently selected photo. If you need to change the name of a file, click inside this field to make any name changes. If you want to carry out a batch-rename action, select the photos you want to rename and click the button to the right to open the Rename Photos dialog.
Sidecar Files
The Sidecar Files item shows up whenever a sidecar file is found associated with an image. Sidecar files are always hidden from view in Lightroom, so this extra item in the Metadata panel lets you know whether an XMP sidecar is present.
Copy Name
The Copy Name field refers to virtual copy images made in Lightroom. Each virtual copy image can provide an alternative version of the original master (or negative as it is sometimes described in Lightroom). By making virtual copies, you can apply different crops or color treatments. But because virtual copies all refer to the same master, they all share the same root filename. Whenever you create a new virtual copy, Lightroom labels each one as Copy 1, Copy 2, etc., but you may want to edit this name. In Figure 10.7, I renamed the virtual copy name Black and white. Virtual copy images can quite often end up being separated from the master, because you may have assigned a different star rating to the virtual copy version, they may be grouped in a collection, or they may have been removed from the master parent image. If you click the action button next to the copy name field (circled in Figure 10.7), you can quickly trace the master version of any virtual copy.

In Figure 10.8, you can see Grid view showing a master DNG image with two virtual copies to the right (see the page curl-icons circled in the bottom-left corners). The one on the right was renamed Black and white.

Metadata Status
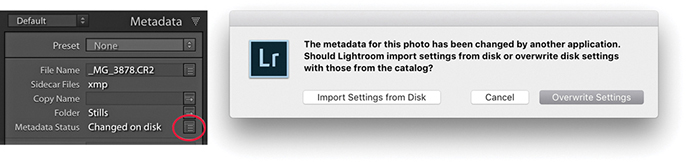
If there is no metadata status conflict, the Metadata Status field will say “Up to date.” If the metadata for the photo has been altered since it was last saved to the file’s XMP space, it will say “Has been changed.” Clicking the action button opens a dialog prompting you to save the changes to disk. If the metadata has been edited externally in Bridge, but the settings have not yet been read in Lightroom, it will say “Changed on disk,” while a “Conflict detected” message indicates the metadata has been changed both in Bridge and Lightroom. In both cases, clicking the action button opens the metadata status dialog shown in Figure 10.9, where you can choose Import Settings from Disk, Overwrite Settings, or Cancel. The ins and outs of metadata saving, XMP spaces, and Lightroom settings are quite a complex subject. For a more detailed explanation, see pages 628 to 634.
Cropped photos
If a photo has been cropped, the Cropped measurement will appear in the Metadata panel, showing the crop dimensions in pixels. If you click the action arrow next to it, this takes you directly to the Crop Overlay mode in the Develop module.
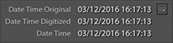
Date representation
Date Time Original and Date Time Digitized mean the date that a photo was captured or was first created, whereas the Date Time field indicates the time the file was last modified (such as a DNG conversion). Figures 10.10 through 10.12 explain the differences between these bits of metadata information.


Next to Date Time Original is the Go to Date action button (this applies only to digital capture images). Clicking this button filters the catalog view to show only those photos that have matching capture dates. To exit this filter view, use the ![]() (Mac) or
(Mac) or ![]() (PC) shortcut, which toggles the catalog filters on or off.
(PC) shortcut, which toggles the catalog filters on or off.
Capture time editing
Maintaining a capture time record of the photos you shoot should be more than just a matter of idle curiosity. A lot can depend on having your photos accurately time-stamped. For example, when importing photos from more than one camera, it is important that the internal clocks of both cameras are in sync. Doing so means the photos will be correctly ordered when sorted by the capture time. Perhaps the internal clock in your camera is wrong. Did you remember to set the internal clock correctly when you first bought your camera? For critical, time-sensitive work such as GPS tagging via a separate GPS device, you may want to keep a regular check on your camera’s internal clock to ensure it is accurate.
If you know that the camera time and date settings are incorrect, you can address this by choosing Metadata ![]() Edit Capture Time while working in the Library module. The Edit Capture Time dialog (Figure 10.13) lets you amend the Date Time Original setting for an individual image or a group of images.
Edit Capture Time while working in the Library module. The Edit Capture Time dialog (Figure 10.13) lets you amend the Date Time Original setting for an individual image or a group of images.
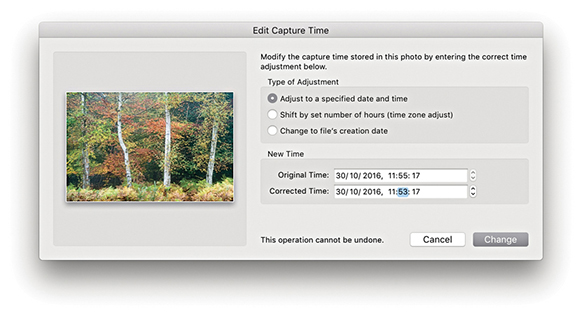
If you find out too late that the date and time are wrong, the Edit Capture Time feature can help you restore the correct time to your captures. If you are editing the capture time for a selection of images, the “Adjust to a specified date and time” option lets you set the date for the current most selected image (the one shown in the dialog preview) and the remaining selected images will all reset their dates and time relative to this image. If the internal camera clock is correct but you simply forgot to adjust the camera clock to a new time zone, you might want to select the “Shift by set number of hours (time zone adjust)” option and adjust for any time-zone difference. At the bottom of the dialog, there is a warning that “This operation cannot be undone.” However, if you later go to the Metadata menu in Lightroom, you can choose Revert Capture Time to Original. This allows you to reset the capture time metadata. Also, the “Change to file creation date for each image” option allows you to change the capture time for the capture time setting in the camera EXIF data back to the original creation date.
When you use the Edit Capture Time dialog to edit the original capture time settings for raw files, the changes made are applied to the XMP data only. If you go to the Metadata tab in the Lightroom Catalog Settings and go to the EXIF section at the bottom, you will see the option “Write data or time changes into proprietary raw files.” When this is checked, it lets you hardwire date changes into the EXIF field contained in the proprietary raw file (as opposed to simply writing to the XMP space). It is not normal practice to risk editing the internal metadata fields of undocumented proprietary raw files, so use with caution. The reason for having this preference is that when some workflows rely on external programs, it may be necessary to edit the EXIF field inside the actual raw file (for example, you may need to externally synchronize the raw files with a GPS log).
Tip
On the Mac, there is an application called A Better Finder Attributes to reset the Date Original and Date Time Digitized back to their actual times: publicspace.net/ABetterFinderAttributes. It works for a number of camera raw formats.
Camera model and serial number
These items instantly tell you which camera model and specific serial number were used to take a particular photograph. If you shoot using more than one digital camera body or have photos in the catalog taken by other photographers using the same camera type, this data can prove really useful, especially if you want to track down exactly which camera was used. Let’s say there is a problem with one of the cameras—there may be damage to the sensor or a camera focusing problem. Using this data, you can pinpoint which specific body is responsible.
Artist EXIF metadata
The Artist EXIF metadata will show up only if you have applied this as a custom user setting for your camera. This can be done quite easily on most cameras by searching for the Copyright menu item, where you can enter your personal copyright details (Figure 10.14). If there isn’t a Copyright menu item, you may find your camera comes with utility software. Connect it to the computer using a tethered connection and navigate to the section that allows you to enter and edit the Artist copyright field.

Embedding your name as the owner in the camera settings seems like a pretty good idea. This ensures the copyright name is always embedded in the capture file EXIF data. Just remember that if you borrow someone else’s camera or rent one, always check what the owner name metadata says. Once the owner metadata is embedded in the raw capture files, you will not be able to edit the EXIF data that easily. If you are feeling brave, it can be changed using an EXIF editor, such as ExifTool by Phil Harvey (sno.phy.queensu.ca/~phil/exiftool), but this is a command line-based editor and not particularly easy to use. While you can’t edit the Artist EXIF field directly, you can use Lightroom to edit the IPTC Creator field, which will work superficially because the two fields are linked in Lightroom.
Custom Information Metadata
So far, I have mostly described the fixed, embedded camera metadata that is displayed in the Metadata panel. We are now going to look at working with custom metadata, which is data that you can use to add image-specific information. This can broadly break down into information about the image, such as the caption, headline, and location details of where the picture was shot. You can also add custom metadata that includes contact information about who created the photograph, such as your name, address, phone number, email, and website. This information can also include how the photo might be classified and what copyright licensing restrictions might be in force. As you start applying metadata to individual photos or groups of images, you gain the ability to differentiate them further and can reap the benefits of having a carefully catalogued image database. Applying such metadata now will help you in the future. Not only can it allow people to contact you more easily, but it can also help when you are working in Lightroom and need to make a targeted image search.
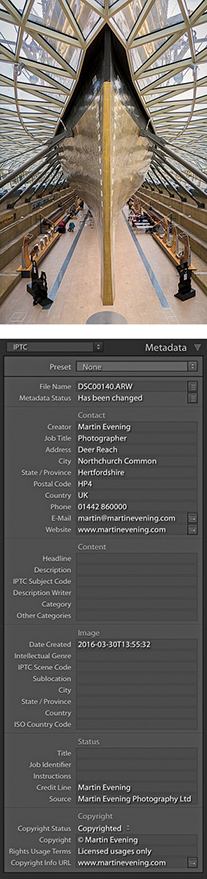
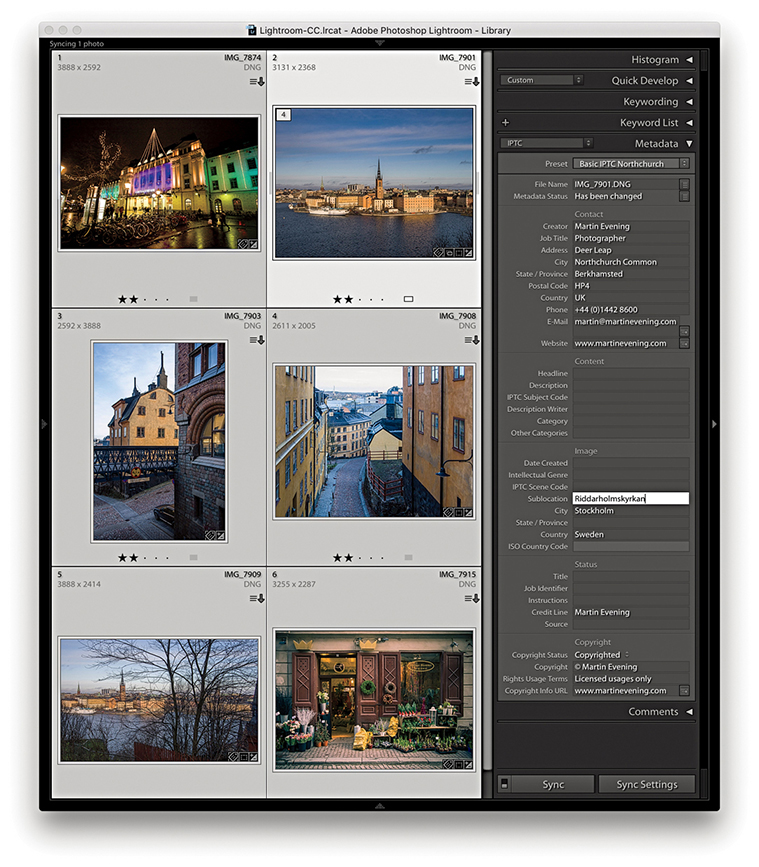
Figure 10.15 shows the Metadata panel in the IPTC view mode. You can see here that I have filled in the editable sections with examples of how you might use this panel to add descriptive information to a photo. You could, for example, select all the photos in a particular folder from the same shoot and add custom information to categorize them. Most of the items in this panel, such as Creator, Job Title, and Address, are self-explanatory, and this is data you would probably want to apply to nearly every photo. However, the Headline and Caption fields can be used to add image-specific information. The Headline field might be used to describe a photo shoot, such as Xmas catalog shoot 2018, or White-on-white fashion shoot, while the Caption field can be used to provide a brief description of a scene, such as Crowds line the streets at local festival to celebrate the Chinese New Year. These custom bits of information are essential when submitting images to a picture library, and they are particularly useful when you take into account that the value of an individual image is increased as more information is added. Even with a small-scale setup, you’ll find it rewarding to methodically catalog your photographs with basic metadata information in the Contact and other IPTC sections.

Metadata presets
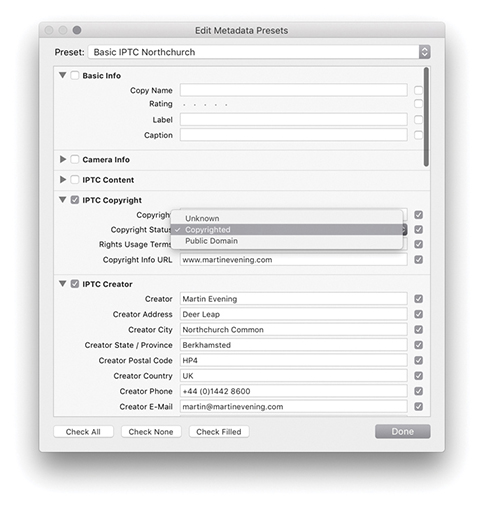
You certainly do not want to spend too much time entering repetitive metadata. This is where the metadata presets (also known as metadata templates) come in handy, because you can use them to apply the metadata information that needs to be input on a regular basis. To create a new metadata preset, click the Preset menu shown in Figure 10.16 and select Edit Presets. This opens the Edit Metadata Presets dialog (Figure 10.17). The fields here will be populated with the IPTC metadata already applied to the currently selected photo, which you can use as the basis for a new preset. You can then edit the fields in this dialog as well as check the individual boxes for the items you wish to include. Having done that, click the Done button at the bottom to open the Save Changes dialog, where you can select Save As to save these settings as a new metadata preset.


Metadata presets provide a useful way to batch-apply informational metadata either at the import stage or later via the Metadata panel. You might therefore find it useful to create several metadata templates for the different types of shoots you normally do. Let’s say you are a sports photographer and are often required to photograph the home football team whenever the team plays a game at the local stadium. You could save yourself a lot of time by creating a template with the name of the football team and the location information and apply this template every time you photograph a home game. Even though the Lightroom Metadata panel cannot display all the items that can be included in a Metadata preset, other programs may be able to do so.
Tip
If nothing else, make sure that every photo you create contains your contact details, is marked as copyrighted, and has a copyright notice. Photographers should always take steps to ensure that any photographs they release into the public domain do not become classified as orphan works.
If a photograph has no identification as to who shot it and it is “found” by someone on the Internet, that photo becomes classified as an orphan work. Currently, this does not give anyone the legal right to use such images. However, in some countries, there have been recent attempts to change the law so that orphan works can be legitimately used without needing to trace the owner.
The message here is to make sure everything you create is marked with your copyright and beware of uploading photos to sites that may strip the copyright metadata from your images.
Editing and deleting metadata presets
If you want to edit an existing preset, first choose the preset you want to edit and then select Edit Presets. Apply the edit changes you want to make, and click the Done button. This opens the Save Changes dialog, where you will have to select Save As and choose a new name for the preset (it must be a new name—you cannot overwrite an existing preset). To remove a metadata preset, choose Edit Presets and select Delete Preset.
IPTC metadata
The items listed in the Edit Metadata Presets dialog are not as comprehensive as those found in Photoshop, Bridge, or other programs, but the editable items you see listed in Figure 10.17 do conform with the latest International Press Telecommunications Council (IPTC) standard file information specifications, as used worldwide by the stock library and publishing industries. Therefore, the metadata information you input via Lightroom will be recognizable when you export a file for use in any of these other programs. Conversely, Lightroom is able to display only the metadata information it knows about. It will not be able to display all the data that might have been embedded via Bridge or Capture One. Should this be a cause for concern? For those who regard this as a shortcoming in Lightroom, it may well prove to be a deal breaker. But for others, the metadata options that are available should be ample. Figure 10.17 provides a useful overview and suggestions on how to complete the Basic and IPTC fields, and Figure 10.18 shows a practical example of a metadata preset that would be suitable for everyday use. For help in understanding how to complete some of the advanced IPTC fields (such as the IPTC Subject Codes), I suggest you try visiting newscodes.org.

It is not mandatory all the listed fields be completed; just fill in as many as you find useful. For example, the IPTC Content section can be used to enter headline information and details of who wrote the description. The Description Writer field refers to the person who entered the metadata information: This might be a picture library editor, a photographer’s assistant, or a work colleague. This type of information is not something that you would necessarily want to add as part of a metadata preset. However, the IPTC Copyright section can list information about who owns the copyright plus Rights Usage Terms. The IPTC Creator section can also contain contact details such as your address, telephone, email, and website. This information will most likely remain the same until you move or change email accounts. The IPTC Image section allows you to enter information that is more specific to the image, such as the intellectual genre. The remaining fields can be used to describe when and where the photograph was shot, job reference (such as a client art order), and so on.
Once you are done, you can save this template as a new metadata preset and apply it whenever you import new images into the catalog. Essentially, metadata presets are available and editable via the Import Photos dialog. You therefore have the choice of applying metadata presets either at the import stage or via the Metadata panel Preset menu. This way, you can ensure that after each new import, all newly added photos carry complete copyright and contact information (Figure 10.19).
In Figure 10.18, you will notice I did not enter data into all the fields, and for those that were empty, I deliberately left the check boxes deselected. This is because a selected check box is saying “Change me.” When you create a metadata preset, you will often want to devise a preset that is general enough to cover certain types of shoots but without including terms that will make a preset too specific. Also, if you create a metadata preset that is designed to add metadata to specific IPTC fields, you may not want to overwrite any of the other fields that contain important metadata.
When a field in the Edit Metadata Presets dialog is checked but left blank, its description will turn red. The placeholder text in the field will say “Type to add, leave blank to clear,” reminding you that if you select the box and do not add any text, it will act as an eraser, deleting any data for that field. Let’s say I had an image where the Caption, Color Label, and Rating information had already been added. If I applied the metadata preset shown in Figure 10.18 but with all the boxes checked, it would overwrite these existing metadata settings with null content, thereby erasing the Caption, Color Label, and Rating data. So, when you create a new preset, it is always worth confirming that you select only those items that you intend to change; otherwise, your metadata presets can soon start messing up the photos in the catalog rather than enhancing them. Of course, you can always edit an existing preset and deliberately set the preset to erase older metadata if you think that would be useful. Configure these presets carefully, and always test them to make sure they behave exactly as you expect them to.
IPTC Extension metadata
Lightroom incorporates the IPTC Extension schema for XMP, which is a supplemental schema to the IPTC Core. It provides additional fields with which to input metadata that can be useful to a commercial photography business. If you refer back to the example shown in Figure 10.17 on page 571, you will see brief explanations of how these fields may be utilized. Basically, the IPTC Extension schema can provide additional information about the content of the image, such as the name, organization, or event featured in a photograph. It provides you with further fields to improve administration, whereby you can apply a globally unique identifier (GUID). It offers fields for precisely defining the licensing and copyrights of a particular photograph. For example, instead of just saying “This photo is copyrighted by so and so,” it allows you to specify the name of the copyright holder, as well as whom to contact to obtain a license. This might well be a picture library or a photo agent rather than the photographer. The image supplier can also be identified separately. Again, it might be a photo library that supplies the image rather than the photographer directly. For more information, visit the PLUS website: useplus.com.
If you photograph people, you can record specific model information such as the age of the model, which might be particularly relevant if the subject was a minor when the photo was shot. You can also provide a summary of the current model release status. The same thing applies to photographs of private properties where, under some circumstances, a property release may be required.
A more efficient way to add metadata
One of the things that continues to irk me about Bridge is that if you select a photo, make the Description field active in the Metadata panel, and enter new text, you have to press ![]() to commit, select the next image, and then retarget the Description field all over again to add a new description for the next photo.
to commit, select the next image, and then retarget the Description field all over again to add a new description for the next photo.
Fortunately, this process is made a lot easier in Lightroom. Figure 10.20 shows a Library Grid view of photographs that were taken at a model casting. I tend to shoot model castings with the camera tethered to the computer and update the Caption field with the model’s name and model agency as I go along. In Figure 10.20, you can see that the Caption field is currently active and I have typed in the model’s details. Instead of pressing ![]() to commit this data entry, I could use the
to commit this data entry, I could use the ![]() key (Mac) or
key (Mac) or ![]() key (PC), and a Right or Left Arrow to progress to the next or previous image. This step commits the text entry and takes you directly to the next photo. It also keeps the metadata field active so you are now ready to carry on typing in new information for the next selected photo.
key (PC), and a Right or Left Arrow to progress to the next or previous image. This step commits the text entry and takes you directly to the next photo. It also keeps the metadata field active so you are now ready to carry on typing in new information for the next selected photo.

Metadata Editing and Target Photos
If you have a group of photos currently selected and go to the Metadata panel, whenever there are varied file attributes for the selected images, the metadata information will display <mixed> values (Figure 10.21). Only those values that are common to all the selected photos (such as the copyright information) will be displayed. When you are in this default mode of operation, you can edit individual fields in the Metadata panel to update the metadata you wish to be common to all the selected files. So, for example, if you want to apply the same title to everything, you can edit the Title field, and this will update all the selected images and apply to all.

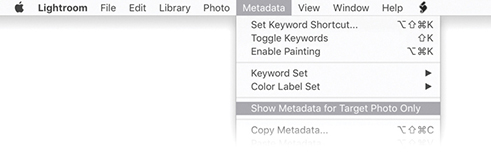
However, if Show Metadata for Target Photo Only is selected in the Metadata menu (Figure 10.22), the Metadata panel display will look like the version shown in Figure 10.23, which displays the metadata information for the most selected or target photo only, even though you may have more than one photo selected.
To show you how this feature might be used, in Figure 10.24, I selected all of the photos from a folder in the catalog. The Metadata panel displayed the information for the photo that was the most highlighted (the target photo). By using the ![]() + Arrow keys (Mac) or
+ Arrow keys (Mac) or ![]() + Arrow keys (PC), I was able to navigate from one photo to the next without deselecting the active photo selection and read the metadata information for each individual image as I did so.
+ Arrow keys (PC), I was able to navigate from one photo to the next without deselecting the active photo selection and read the metadata information for each individual image as I did so.
With the Show Metadata for Target Photo Only mode, the one thing you need to be aware of is that you will now only be able to edit the metadata on a per-image basis. This is a good thing, because it means that you can keep an image selection active and edit the metadata for each of the individual photos without losing the selection. However, many people will be accustomed to making image selections and then using the Metadata panel to edit the settings globally. So, just be aware that although this menu item can prove useful, you probably will not want to have it enabled all the time, as it could lead to confusion if you forgot this option was switched on.
Mail and web links
You can use the E-Mail field to enter your email address. Other Lightroom users viewing your photos can simply click the action button circled in Figure 10.25 to create a new mail message to this email address using the default mail program on their computers. If the email program is not currently running, Lightroom launches it automatically.
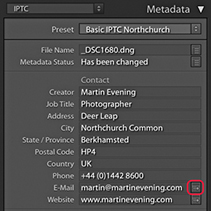
Similarly, clicking the action button next to the Website field launches the default web browser program and takes you directly to that website. The Website field can be used to enter your usual website address. But if you wanted to, you could use this field to enter a URL that takes people to a specific page on your website. For example, you could direct people to a specific web page informing people of the types of rights that are available for certain types of images. For instance, I could broadly divide the photos in my catalog collection as photos that have been exclusively licensed, those that have non-exclusive licenses (and are available for purchase), and those that are not for sale.
Copyright status
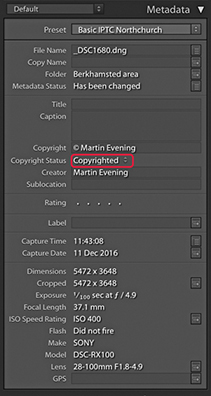
In the Copyright Status field (Figure 10.26), you can set the copyright status as being Unknown, Copyrighted, or Public Domain. You can edit the copyright status via the Metadata panel, or go to the Metadata panel Presets menu, choose Edit Presets, and create a new custom metadata preset via the Metadata Presets dialog where Copyrighted is selected by default (Figure 10.27). If you choose to use the Copyright field only to indicate this is your copyright, this statement will be clearly understood in nearly all countries and is all that you need to do to enforce your ownership rights. You will notice that whenever you open an image in Photoshop that is marked as being copyrighted, a © symbol appears at the beginning of the filename in the document window title bar.
When viewing a photo using the IPTC Metadata panel view, the action arrow next to the Copyright Info URL takes you directly to the website link entered into the accompanying Copyright URL field.
I highly recommend that, wherever appropriate, you mark all your images as being copyrighted. You can do this by applying a metadata preset during the import process (see Chapter 2). Unfortunately, marking an image as being copyrighted will not fully protect it from becoming an orphan work. For example, if you upload your images to certain social networking sites, the copyright tag is automatically stripped, so beware. For advice on how to format a copyright notice, go to en.wikipedia.org/wiki/copyright_notice.
Keywording and Keyword List Panels
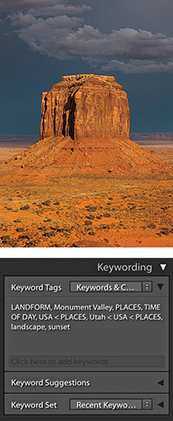
Keywording provides one of the easiest and most flexible ways to annotate your photos. In order to gain the maximum benefit, you will do well to apply a certain degree of discipline and consistency to the way you keyword your images. As I showed at the beginning of this chapter, keywording images can add value to any catalog. For professional photographers who sell photographs for a living, good keywording is essential for achieving maximum sales. For amateur photographers who are maintaining an archive of personal photographs, keywording can still add value in terms of making special photographs more easily accessible. It has taken a while to convince everyone of the importance of keywording, but now that many of us are shooting tens of thousands of photos each year, it is more important than ever to do what we can to keep our photo catalogs manageable. So, how much should you keyword? Professional colleagues of mine, such as Seth Resnick, claim that each image they supply to a picture library should have at least 50 keywords attached if it is to achieve any sales success. Seth generally carries out careful research to look for as many terms and related topics as possible for each of the images he submits. He will consider checking for variations in spelling, as well as looking out for hot topic words that might be relevant to something he has just shot. If you are not focused on library sales, then this kind of approach may seem like overkill. There is no point in overdoing things, and the key is to spend only as much time on the process of keywording as you are likely to benefit from in the future through the time saved when carrying out a file search. Okay, so it is hard to know exactly how much keywording is going to be necessary. I have to confess that I am still kind of catching up with the keywording of some of the older photos in my catalog, but I am at the stage now where every photo has at least one keyword term associated with it. But adding a few keywords that are relevant can add significant value to each image you annotate—even if it is just the photos you keep in a personal archive (Figure 10.28).
You can add keyword metadata via the Import Photos dialog as you import your images. The Figure 10.29 example shows relevant keywords being added to the Keywords field, which would then be applied to all the photos as they are imported. Lightroom can auto-complete keywords if it recognizes that the word you are typing might already belong to the keyword list.

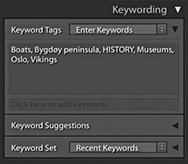
Or, you can add or edit the keywords at any time via the Keywording panel (Figure 10.30). However, I’ll first organize my keywords in the Keyword List panel into a hierarchy of keyword categories (also referred to as a controlled vocabulary). For example, in the Keyword List panel Places keyword category, I have a keyword subcategory called Europe. In Figure 10.30, I clicked in the highlighted Enter Keywords field (where it says “Click here to add keywords“) to add keywords to an image. In this instance, I wanted to add a subcategory of Europe titled Norway, and within that a subcategory: Bygdøy peninsula. The full keyword path here was: Bygdøy peninsula < Norway < Europe < Places. The keyword metadata is always entered in this hierarchical order, placing the child keyword before the parent. You will find that it pays to establish a proper keyword hierarchy that suits the content of your library and give some careful thought as to how you wish to structure a controlled vocabulary. For example, also included here were other keywords such as Seascapes < Nature subjects and Boats < Transportation.
Note
Lightroom Classic CC does not sync keywords to the cloud servers, so they won’t appear in Lightroom CC/Lightroom mobile. Similarly, keywords added via Lightroom CC will not show up in Lightroom Classic CC either. The only way to get keywords from Lightroom Classic CC to Lightroom CC is to migrate the catalog (as described in Chapter 11). During this one-time process flattened keywords are migrated to Lightroom CC.
Keywords can be used to describe anything you like. But do not forget that there are also IPTC fields that can and should be used to enter data, such as the location where a photo was shot. While keywords provide a single place for entering informational data, the fields in the IPTC data section are regarded as the formally correct place for entering such data. If you sell photos for a living, it makes sense to follow industry conventions and make sure you also fill out these sections rather than rely solely on keywording to do this.
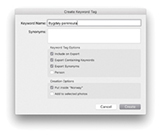
You can add keywords by clicking the plus button in the Keyword List panel, which is circled in Figure 10.31. And here, you can see I also right-clicked on the Norway keyword to reveal the context menu and chose Create Keyword Tag inside Norway. This opened the Create Keyword Tag dialog (Figure 10.32), where I added Bygdøy peninsula as a child of Norway.

When you roll over a keyword in the Keyword List panel, a check box appears to the left of the keyword. If you click this box, it adds a check mark and the keyword is added to the selected image or images (Figure 10.33). If you click the arrow to the right of the keyword count number, Lightroom filters the catalog to show all photos that share the same keyword.

If need be, you can use the Keyword List panel to manually edit the keyword list hierarchy, remove keywords that are no longer applicable, or create new hierarchy groupings. After a keyword has been added to the Lightroom keyword list, Lightroom will auto-complete keywords as you start typing in the first few letters for a new keyword entry. Apart from making it quicker to enter new data, this helps you avoid duplicating keyword entries through careless spelling or typos. Lightroom also auto-assigns the correct hierarchy. For example, the next time I might choose to add the keyword Seascapes, the Seascapes keyword will be automatically applied to the image using the Seascapes < Nature subjects keyword path (Figure 10.34). I will be coming back to this point later, but basically when you enter a keyword, Lightroom is able to auto-complete the keyword and at the same time knows to assign the correct keyword hierarchy. The only problem that can arise here is when a single keyword can have more than one context and therefore appears listed in more than one hierarchy.


Keeping metadata private
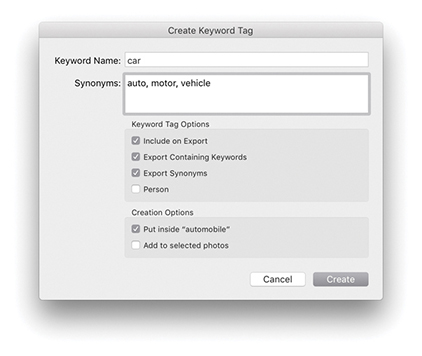
What about metadata you might wish to keep private? As you create new keyword tags or edit existing keywords, you can deselect the Include on Export option in the Create Keyword Tag dialog (Figure 10.36). This lets you prevent specified keywords from being exported. Let’s say you have been asked to take photographs at a number of high-security locations. For your own purposes it would be useful to keyword the photos to identify where each was taken and this would help when filtering the photos in Lightroom. But your client would most likely not want you to include this particular keyword information at the export stage.
Imagine you were in the business of supplying photographic location services to clients. Figure 10.35 shows an example of an image of a holiday property, for which you might want to keep the location metadata hidden. After all, it would not be in your interests to include the exact location details within the metadata. If you use the Export dialog to export your photos, you can select the Remove Location Info box in the Metadata section to remove all GPS and IPTC location metadata. Similarly, you can also select the Remove Person Info box to exclude including People keywords (I’ll be discussing People keywords later on page 592).
Synonyms: The hidden keywords
Within keywords, it is possible to include synonyms (Figure 10.36). Synonyms are basically alternative terms that can be used in place of the main keyword, which may or may not overlap with other keyword terms. The key difference between synonyms and keywords is that synonyms, although they are searchable the same way as keywords, actually remain hidden from view in the Keywording List panel. This may seem odd, but there is a good reason for this. Basically, keeping synonyms hidden can help keep the keyword list less cluttered. However, one issue with synonyms is that when you import an image that contains a synonym (and when Export Synonyms was selected), it will be treated as a separate keyword and appear orphaned in the Keyword List panel.
In the Figure 10.36 example, the keyword car uses the following hierarchy: car < automobile < land transportation < TRANSPORTATION. Because Export Containing Keywords is selected, when any file using this keyword is exported, the full keyword hierarchy will be included. However, there are other search terms that people might want to use when searching for cars, such as auto, motor, or vehicle. These can be added as synonyms. Consequently, any image that’s tagged using the single keyword car will be discoverable using any of the following search terms: car, automobile, land transportation, transportation, auto, motor, or vehicle. The benefit of using synonyms is that they allow you to include more potential keyword search terms within a single keyword in the keyword list, but without cluttering up the entire list with lots of different keywords that are essentially variations of a single keyword term. When creating keywords for locations, if it is important that other people find your photos, there are good reasons to consider including foreign-language versions of a name in order to reach a maximum audience. For example, English speakers might search “Venice,” whereas the Italians will (correctly) search “Venezia.” When I was photographing in Scotland recently, many of the places I photographed had both English and Gaelic names. Therefore, the Gaelic versions might be suitable for inclusion as synonyms.
Applying and managing existing keywords
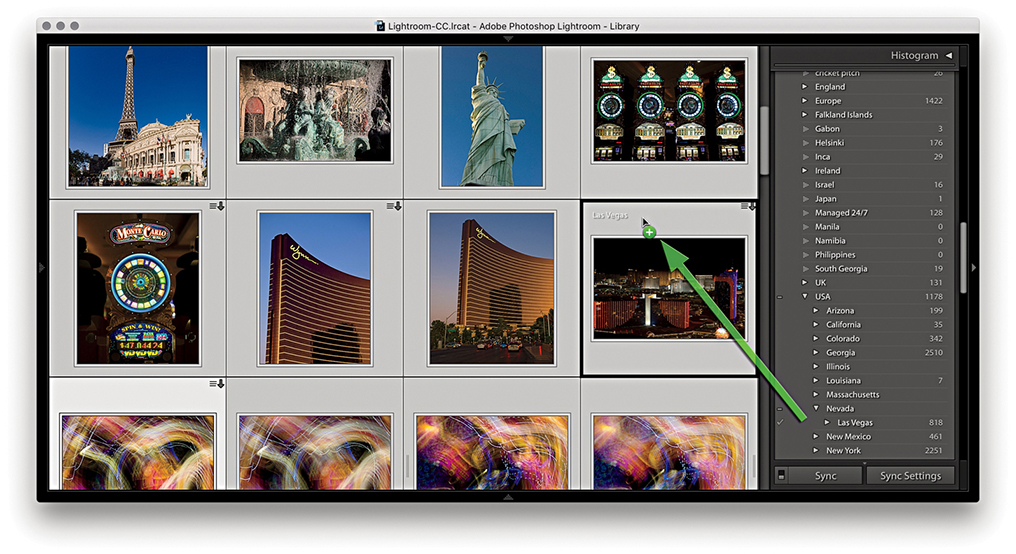
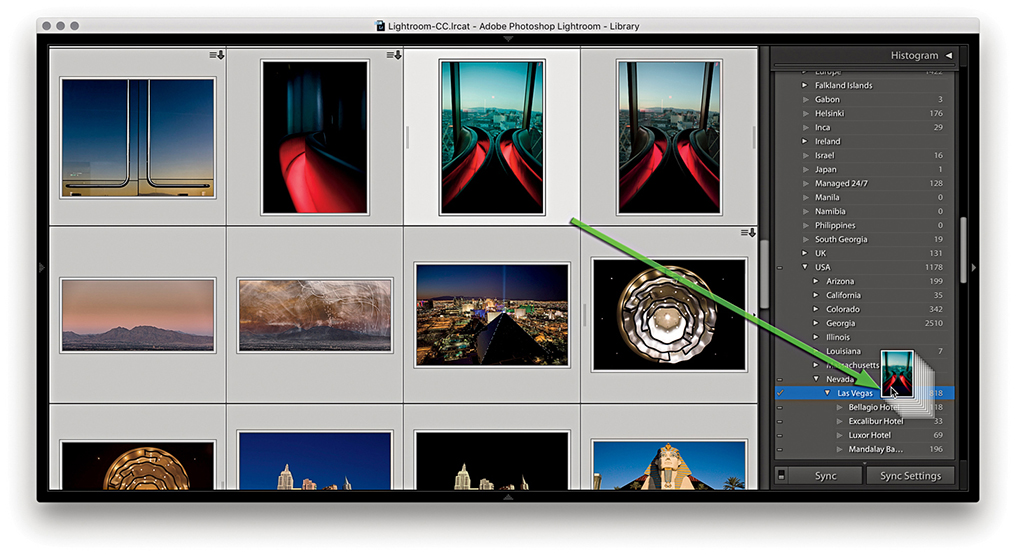
You can apply keywords to photos in the catalog in a number of ways. Figure 10.37 shows how you can apply a keyword to a selection of images by dragging a keyword to the image selection. The good thing about this method is that it is easy to hit the target as you drop the keyword. The other option is to make a selection first in the content area, and then drag the selection to the keyword. In Figure 10.38, I selected the same group of images and dragged the selection to the keyword Las Vegas.
When you select an image in the Library module, you will see all keywords associated with the photo listed in the Keywording panel, each separated by a comma. If multiple images are selected, the Keywording panel displays all the keywords that are active in the image selection. Those keywords that are common to all images in the selection are displayed as normal, while those keywords that apply only to a subselection of the images will be appended with an asterisk (Figure 10.39). If you want to unify a particular keyword across all the selected images, simply highlight the asterisk and press the ![]() key. This ensures all the selected images are now assigned with that keyword. If you want to change a particular keyword, you can always highlight it and type in a new word or press
key. This ensures all the selected images are now assigned with that keyword. If you want to change a particular keyword, you can always highlight it and type in a new word or press ![]() to remove it completely from the selection.
to remove it completely from the selection.

Auto-complete options
As you enter metadata for keywords and other editable metadata fields, it can save time to have the “Offer suggestions from recently entered values” option selected in the Catalog Settings dialog (Figure 10.95 on page 628), where you can also click the Clear All Suggestion Lists button to reset the memory and clear all memorized words. If you begin typing a keyword that has two or more possible sources, Lightroom will offer them as choices. I will discuss the reasons for this later in the implied keywords section on page 588.
Most of the time, auto-completion is a useful thing to have active. Sometimes, however, it can become a pain. For example, when I do a model casting and enter the names of models in the Caption field of the Metadata panel in the Library module, I don’t find auto-completion particularly helpful. What is useful with the Mac version is the ability to spell-check. The Edit ![]() Spelling submenu in the Library module contains the options Show Spelling and Grammar, Check Spelling, and Check Spelling as You Type. This can help you avoid mistakes as you add new metadata.
Spelling submenu in the Library module contains the options Show Spelling and Grammar, Check Spelling, and Check Spelling as You Type. This can help you avoid mistakes as you add new metadata.
Removing keywords
It is easy enough to remove keywords. You can go to the Keyword List panel, select the keyword or keywords you want to delete, and click the minus button at the top of the panel. This deletes the keyword from the Keyword List panel’s hierarchical list and also removes it from any photos that have had the keyword assigned to them. Understand though that when you remove a keyword via the Keyword List panel, you are deleting it from the Lightroom database only. If keyword metadata has already been saved to the file’s XMP space and you need to maintain compatibility with Bridge, you will want to force-save the metadata change (the keyword deletion) back to the file’s XMP space by choosing Metadata ![]() Save Metadata to Files. By the same token, if specific keywords are removed using an external program, those keywords will not appear removed when you view the photo in Lightroom until you explicitly read the revised metadata back from the image.
Save Metadata to Files. By the same token, if specific keywords are removed using an external program, those keywords will not appear removed when you view the photo in Lightroom until you explicitly read the revised metadata back from the image.
As photos are removed from the catalog, keywords that were formerly associated with those images will consequently become unused. You can remove these by selecting and deleting as I have just described, or clear them from the Keyword List panel. To do this, go to the Metadata menu and choose Purge Unused Keywords. Just so you don’t remove these keywords by accident, a warning dialog will ask you to confirm this action.
Keyword hierarchy
It is important to plan the keyword hierarchy you are going to use by adopting what is known as a controlled vocabulary of keywords. You can edit the keyword list by dragging the keywords into different keyword categories. It is possible to have several tiers of subcategories. For example, you could organize place name keywords in the following order: Town/City < State < Country < Places. When you are working in the Keywording panel, you can enter new keywords and assign a hierarchy by including a < character after the keyword, followed by the category. So, if you wanted to add a new keyword called elephants as a subcategory of mammals, vertebrates, and ANIMALS, you would type elephants < mammals < vertebrates < ANIMALS (or you could type ANIMALS > vertebrates > mammals > elephant). When you press ![]() , you will see the elephants keyword appear as a new subset keyword in the Keyword List panel. There are a few things to point out here. One is that you always enter new keywords using the above path directory methods. Second, once you have established a basic hierarchy, there is no need to type a complete path each time. In other words, once you have created the above path hierarchy to add, say, cat as a keyword, you do not have to type cat < mammals < vertebrates < ANIMALS. All you will need to type is cat or maybe cat < mammals, and Lightroom will know how to complete the remaining hierarchy.
, you will see the elephants keyword appear as a new subset keyword in the Keyword List panel. There are a few things to point out here. One is that you always enter new keywords using the above path directory methods. Second, once you have established a basic hierarchy, there is no need to type a complete path each time. In other words, once you have created the above path hierarchy to add, say, cat as a keyword, you do not have to type cat < mammals < vertebrates < ANIMALS. All you will need to type is cat or maybe cat < mammals, and Lightroom will know how to complete the remaining hierarchy.
How you categorize library images is entirely up to you, but if you submit work to an external photo library, you will most likely be given guidelines on the acceptable keywords and categories to use when keywording photographs for submission. These guidelines are normally supplied privately to photographers who work directly with the picture agencies, but there are online resources you can refer to that describe how best to establish and work with a controlled vocabulary. These ensure the keyword terms you use to describe your images conform to prescribed sets of words that are universally used by others working in the same branch of the photo industry. When you get into complex keywording, it is important to be methodical and precise about which terms are used and the hierarchy they belong to.
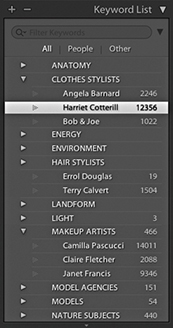
Keyword categories can also be used to catalog images in ways that are helpful to your business. For commercial shoots, I find it is useful to keep a record of who has worked on which shot. Some catalog programs let you set up a custom database template with user-defined fields. In Lightroom, you can set up keyword categories for the various types of personnel and add the individual names as a subset (or child) of the parent keyword category. Figure 10.40 shows how I have created keyword categories for Clothes stylists, Hair stylists, and Makeup artists. Within these categories I created subcategories of keywords listing the people I have worked with regularly. As I start typing in someone’s name as a new keyword entry, if Lightroom recognizes this as a possible match to one of the existing keywords in the keyword database, it auto-completes the keyword metadata entry in addition to correctly placing the keyword within the established hierarchy. This type of organization is also useful for separating library images by job/client names. When the keyword names are in place, you should find it fairly easy to keep your catalog of images updated.
Keyword filtering
The Keyword List panel can easily grow to contain hundreds of keywords. You can simplify the navigation by typing the keyword you are searching for in the Filter Keywords section at the top of the panel. Even if you type just the first few letters, this can help narrow the selection of keywords to choose from. You can use this feature to check if a keyword exists in more than one place and edit the keyword list accordingly. The filter options allow you to filter by All keywords, by People keywords, or by Other (exclude People keywords). If you click on the down arrow beside the magnifier in the Filter Keywords box (circled in Figure 10.41), you can select Show Keywords Inside Matches. This is helpful when you also want to show all the child keywords of the ones you have filtered.

You can also use the Keyword List panel to filter the photos that appear in the content area. As you roll over a particular keyword, you will see an arrow appear next to the keyword count number. When you click the arrow, this displays all the photos in the Lightroom catalog containing that keyword, regardless of whatever photo filter view you have currently active.
Importing and exporting keyword hierarchies
You can create your own keyword hierarchy from scratch or import one that has already been created (as in the Figure 10.41 example). To import keywords into Lightroom, you’ll need to do so from a tab-delimited keyword file. This is a plain text file with a tab between each indented level in the text so the data is arranged in a hierarchical format. David Riecks runs a website with tips and guidelines on how to work with a controlled vocabulary at controlledvocabulary.com, where you can purchase a ready-made vocabulary that is compatible with Lightroom. To install it, download the file, launch Lightroom, choose Import keywords from the Metadata menu, and select the file. That’s it—these keywords will be added to the Keyword List panel. Similarly, you can export a keyword hierarchy for sharing on other computer systems or catalogs by choosing Metadata ![]() Export Keywords. Likewise, this exports the keyword list as a text file using a tab-delimited format.
Export Keywords. Likewise, this exports the keyword list as a text file using a tab-delimited format.
Implied keywords
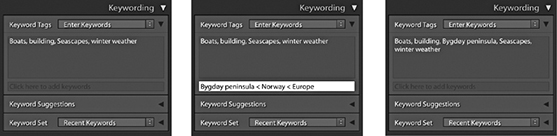
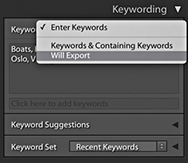
The Keywording panel lists keywords that have been applied explicitly to images via the Keyword Tags section. But as I mentioned, some of the keywords you enter will already have implicit keywords associated with them. So, if in the future, I apply the keyword Bygdøy peninsula, it will automatically include the implicit keywords: Places, Europe, and Norway. I don’t have to type in Bygdøy peninsula < Norway < Europe < Places if there is already a keyword with such a hierarchy in the database. It should only be necessary to type in the first few letters, such as Byg, and Lightroom will auto-complete the rest. If the Keyword Tags menu is set to display Enter Keywords (Figure 10.42), you can edit the keywords in this mode, but the implicit keywords will be hidden (although they will nonetheless remain effective when conducting searches). If you select Keywords & Containing Keywords or Will Export (Figure 10.43), you will see a flattened list of keywords that includes the implicit keywords, but you will not be able to edit them in the Keywording panel when using these two modes.
When you enter a new keyword, you use the < key to signify that this keyword is a child of the following keyword (such as train < land transportation < Transportation). This establishes the hierarchy, and as I explained, when you use the Enter Keywords mode, all you will see is the first keyword, and the parent keywords will be hidden. However, if you apply a keyword that is identical to another keyword but both have different parents, you will then see the full keyword path hierarchy appear in the Keywording dialog. For example, in Figure 10.44, you have two options for the Keyword Camilla Pascucci, because I added the keyword Camilla Pascucci in two separate contexts. In one context, Camilla Pascucci is a makeup artist I work with, but she is also my wife (so she can also be listed as a subset of PEOPLE as someone I know). This is why when you type in certain keywords, you will sometimes see more than one keyword path suggestion. It also explains why, when after you press ![]() to okay the choice, you may see a full keyword path directory in the Keywording panel rather than a single keyword.
to okay the choice, you may see a full keyword path directory in the Keywording panel rather than a single keyword.

Keyword suggestions
Expanding the Keyword Suggestions section reveals a number of suggested keywords. You can click on any of the keywords displayed here to add these to a selected photo or photos. When you select an image, Lightroom adapts the list of keywords that are available for use based upon the keywords already in neighboring images that have been captured around the same time. The suggested keywords are also prioritized based on how soon before or after the current photograph they were taken. The system works well when trying to guess what other keywords you might like to add to a particular photograph. In Figure 10.45, the selected image had the keywords Las Vegas, night, and Paris Hotel. From this, the Keyword Suggestions section was able to suggest adding other keywords such as Bellagio Hotel, Luxor Hotel, and MGM Hotel. These were common keywords that had been assigned to photos taken close to the time the selected image was captured. The more keywords you have in the source photo or neighboring photos, the more accurate the suggested keywords will be. The diversity of your keywording will also count. If all the keywords in a set of images are nearly identical, there is not much Lightroom can do when it comes to suggesting alternatives.

Keyword sets
The Keywording panel can also be used to display sets of keywords. When keywording certain types of photo projects, it can save you a lot of time to have commonly used keywords made quickly accessible. Keyword sets offer a quick method for adding commonly used keywords to selected images. To access a keyword set, click the disclosure triangle (circled in Figure 10.46) to reveal the Keyword Set section options. This will normally display the Recent Keywords keyword set, which, as I just showed, can be useful for most keywording jobs. Or, you can select one of the supplied keyword set presets such as Outdoor Photography, Portrait Photography, or Wedding Photography. In Figure 10.46, the Outdoor Photography keyword set was selected, offering suitable, outdoor keyword suggestions such as Landscape and Wildlife. Clicking the keyword set keyword suggestions is a toggle action. You can click once to add a keyword and click again to remove it. You can also use the ![]() key plus a number as a shortcut for assigning keyword set keywords. If you hold down the
key plus a number as a shortcut for assigning keyword set keywords. If you hold down the ![]() key, the number shortcuts will appear next to each keyword. So, for example, if I wanted to assign the Landscape keyword, I would use the
key, the number shortcuts will appear next to each keyword. So, for example, if I wanted to assign the Landscape keyword, I would use the ![]() shortcut (Figure 10.47).
shortcut (Figure 10.47).


Creating your own custom keyword sets

1. To create a custom keyword set, go to the Keyword Set section of the Keywording panel and click “Edit set.” This opens the Edit Keyword Set dialog using the current keyword set list. Just replace these with the keywords you would like to use when keyword-editing a particular project. Here, I created a keyword set that I could use when editing photographs taken in the Antarctic.

2. After you create a new custom keyword set, the keywords appear listed in the Metadata panel in the Keyword Set section. You can hold down the ![]() key to preview the keyboard shortcuts and use the
key to preview the keyboard shortcuts and use the ![]() key plus a number to quickly assign any of these keywords to selected photos.
key plus a number to quickly assign any of these keywords to selected photos.
If you have lots of photos to edit from a specific trip or you regularly photograph certain types of events, you may find it useful to create your own keyword sets for these types of shoots.
Tip
When the Painter tool is set to Target Collection mode, it can be used to add photos to whatever is the current target collection. This is normally the Quick Selection in the Catalog panel, but you can change this to any collection you like.
The Painter Tool
The Painter tool is located in the Library module Toolbar (Figure 10.48). It can be activated by clicking the tool, which will float it from its docked position. You can also access the Painter tool by going to the Metadata menu and choosing Enable Painting, or use the ![]() (Mac) or
(Mac) or ![]() (PC) shortcut.
(PC) shortcut.

You can then select which type of settings you want to apply with the Painter tool. The Painter tool is ideal for those times when you may want to repeatedly apply a keyword or combination of keywords to photos in the Library module Grid view. You can do this by clicking with the Painter tool on a photo, or you can click and drag over a number of photos at once. But as well as that, you can use the Painter tool to paint using labels, flags, ratings, metadata, Develop settings, or rotation settings, as well as add to the target collection. You can also load keywords from any of your keyword sets. To do this, hold down the ![]() key with the Painter tool selected to pop open the keyword sets list, select a desired keyword set, and then click individual keywords to add these to the keyword painter list. In Keywords mode, you can enter more than one single keyword into the Paint field. You will also notice in the Keyword List panel that keywords entered this way will appear with a + sign next to them.
key with the Painter tool selected to pop open the keyword sets list, select a desired keyword set, and then click individual keywords to add these to the keyword painter list. In Keywords mode, you can enter more than one single keyword into the Paint field. You will also notice in the Keyword List panel that keywords entered this way will appear with a + sign next to them.
The Painter tool appearance varies according to which mode you have selected. Figure 10.49 shows examples of all the different styles. As you can see, there are lots of potential uses for this tool—not just applying keywords, but other tasks such as painting with a saved Develop setting. To undo a Painter tool–applied setting, you need to hold down the ![]() key as you click to switch to the Eraser mode (
key as you click to switch to the Eraser mode (![]() ), which will undo a setting. Also keep in mind that you have to be careful to target the thumbnail and not just the cell area. For jobs where you are constantly applying the same instruction, like “rotate this photo 90 degrees” or “apply this set combination of keywords,” the Painter tool does have its uses, but it can often be much easier to just select the photos first and then apply a setting to all the photos in one step.
), which will undo a setting. Also keep in mind that you have to be careful to target the thumbnail and not just the cell area. For jobs where you are constantly applying the same instruction, like “rotate this photo 90 degrees” or “apply this set combination of keywords,” the Painter tool does have its uses, but it can often be much easier to just select the photos first and then apply a setting to all the photos in one step.
People View Mode
The face-tagging feature automatically identifies faces in the catalog images, adding face regions to individual photos. It can be trained to recognize named individuals and then to create and automatically add Person keywords to the Keyword List panel inside a designated parent keyword.
Before Lightroom can identify and recognize face shapes in each image, however, the photos in the catalog (or Filmstrip selection) must be indexed. During this stage, Lightroom builds a record of each image in a form that the face-recognition engine can use to detect and analyze faces in images. Indexing can be turned on for the whole catalog by checking the “Automatically detect faces in all photos” option in the Catalog Settings Metadata section, or you can click the Identity Plate to open the Activity Center and enable Face Detection. For photos that are currently offline, Lightroom automatically indexes them the next time they come back online and Lightroom is launched. If indexing is turned off, Lightroom indexes the selected source only when you enter the People view or you activate the Draw Face Region tool in the Loupe view for the current photo. For example, it can be useful to index faces for family and portrait photos of known people, but less so if you have photographs recording an event where there may be lots of unknown faces in a crowd. Therefore, it can pay to be selective about which photos you choose to index and those you don’t.
Tip
To trigger a face detection run again, select the photos, do a batch rotation, and then rotate them back.
When the initial indexing is complete, you can click the People button in the Library module Toolbar to go to the People view mode (click again to toggle returning to the Grid view). Or, choose View ![]() People or use the
People or use the ![]() shortcut. Once in the People view mode, Lightroom displays face thumbnails in the Unnamed People section showing all the possible face matches for that particular selection of images. If you hold down the
shortcut. Once in the People view mode, Lightroom displays face thumbnails in the Unnamed People section showing all the possible face matches for that particular selection of images. If you hold down the ![]() key and pan the pointer over a face stack, it shows a preview of all the faces that are in that stack. From there, it is up to you to identify the faces and enter the names manually. As you identify each face, Lightroom will attempt to identify similar faces. You can then click to approve the name suggestions as being correct, or rename them correctly.
key and pan the pointer over a face stack, it shows a preview of all the faces that are in that stack. From there, it is up to you to identify the faces and enter the names manually. As you identify each face, Lightroom will attempt to identify similar faces. You can then click to approve the name suggestions as being correct, or rename them correctly.
In Loupe view with the Draw Face Region tool active, face regions overlay each recognized face. For a photograph with a group of people, Lightroom will not just suggest the names of the people featured in the photo, but will identify each face individually. Lightroom seems mostly able to spot faces. On the other hand, it can still miss obvious matches, or incorrectly include all kinds of picture elements as faces, but you can always choose to delete the face region for such photos to remove them from the equation. In practice, you will have to decide whether the effort of all this training work is worth it compared to the manual method of visually identifying people and manually entering keywords. Ultimately, face-tagging requires a significant amount of user input in the early stages in order to familiarize Lightroom with the people you photograph most often. The more you use this feature, though, the easier it becomes for Lightroom to automatically recognize the people seen in your photographs and name and keyword them automatically.
You can monitor the indexing progress via the Activity Center. The indexing process involves reading the raw data from disk. Even if you happen to be doing something else that involves reading the raw data, such as converting to DNG, or building Smart Previews, the indexing process can happen simultaneously and get a free ride. Plus, the index will build faster if you have Smart Previews available. Failing that, if there are embedded previews that are sufficiently large enough (greater than 1024 pixels along the longest edge), Lightroom will use those. Face info search data is also included when importing from another catalog and when creating a virtual copy.
It is worth pointing out here that the underlying face-tagging engine in Lightroom has been significantly updated. The new face engine does a better job of picking up faces that the old engine might have missed and improves a little bit on detecting faces in profile. If you are working with a catalog that has already been face-indexed, Lightroom is able to re-index photographs that have existing face regions. These are the square overlays that appear in the Loupe view when the Draw Face Region button is activated in the Toolbar. The Face Regions are preserved while Lightroom recomputes the underlying face descriptor files that are used in face recognition. To initiate this, see the section below.
Find Faces Again
To reindex everything, first go to the Library module Catalog panel and click All Photographs. Next, select Edit ![]() Select All to select all the photos in the Grid view or the Filmstrip. Having done that, choose Library
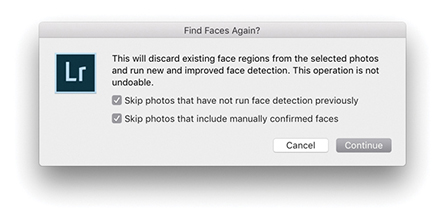
Select All to select all the photos in the Grid view or the Filmstrip. Having done that, choose Library ![]() Find Faces Again to pop open the Find Faces Again dialog (Figure 10.50). Here, you can choose to “Skip photos that have not run face-detection previously.” In this case, the reindexing process should not take too long, as Lightroom is only computing the face descriptors for already-indexed files, rather than analyzing the catalog all over again. However, until that process has been completed, you will see only those photos that have been reindexed using the new Face engine when carrying out a faces search. The other option is to “Skip photos that include manually confirmed faces.” This preserves all manually confirmed faces and does not reindex such photos all over again.
Find Faces Again to pop open the Find Faces Again dialog (Figure 10.50). Here, you can choose to “Skip photos that have not run face-detection previously.” In this case, the reindexing process should not take too long, as Lightroom is only computing the face descriptors for already-indexed files, rather than analyzing the catalog all over again. However, until that process has been completed, you will see only those photos that have been reindexed using the new Face engine when carrying out a faces search. The other option is to “Skip photos that include manually confirmed faces.” This preserves all manually confirmed faces and does not reindex such photos all over again.
Newly imported photos are analyzed for both the face detection and face recognition stages (providing face indexing is turned on for the catalog and the face regions have not simply been imported from the XMP).
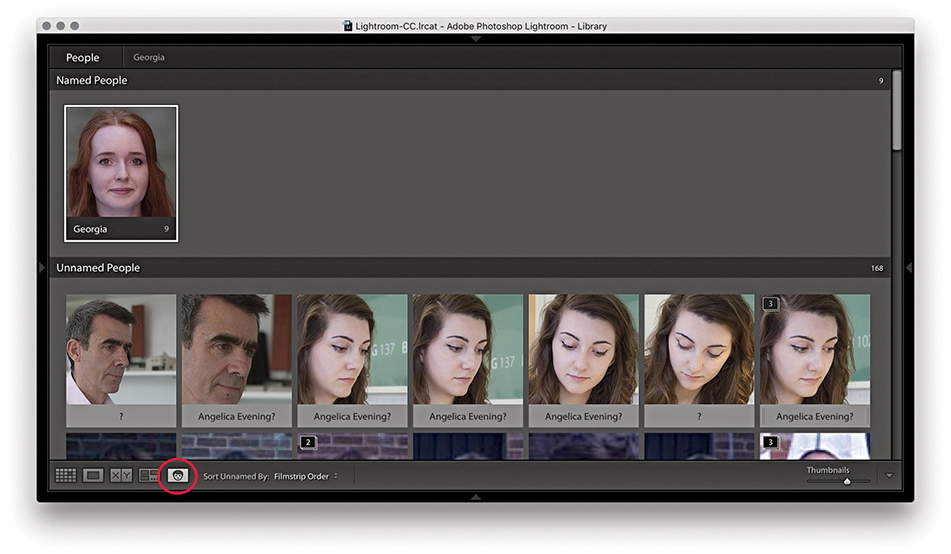
1. In the Library module, I switched to the People view by clicking the People view button. So far, Lightroom had recognized Georgia. I clicked to confirm and added her to the Named People section.

2. Here, I made a selection of matching faces in the Unnamed People section and clicked in the text field below (you can also use the ![]() shortcut to enter text) to identify Francesca as a new person and add her to the Named People section. Lightroom auto-completes as you type. When you are editing single faces, pressing
shortcut to enter text) to identify Francesca as a new person and add her to the Named People section. Lightroom auto-completes as you type. When you are editing single faces, pressing ![]() automatically selects the next face and highlights the text field. You can also use
automatically selects the next face and highlights the text field. You can also use ![]() (Mac)/
(Mac)/ ![]() (PC) plus an Arrow key to progress from one face to the next.
(PC) plus an Arrow key to progress from one face to the next.
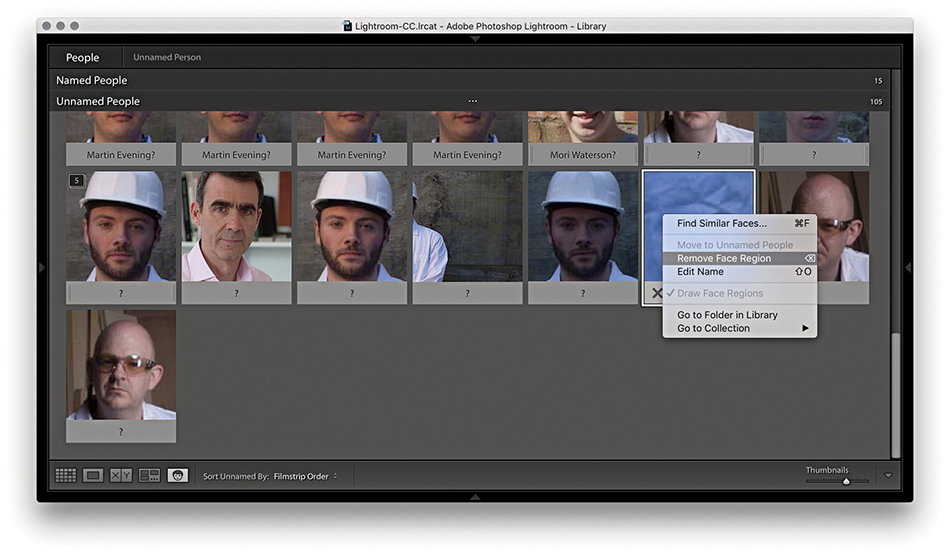
3. Lightroom will very likely produce some false results. You can manage these by pressing ![]() , clicking the X button on the bottom of the thumbnail, or making a selection and using the context menu to select Remove Face Region.
, clicking the X button on the bottom of the thumbnail, or making a selection and using the context menu to select Remove Face Region.

4. Having begun to train Lightroom to recognize certain faces, I could hover over a face in the People view and click the cancel icon to reject and delete the face region or click the check mark icon to confirm the named-face suggestion and add this face to the Named People section.

5. Another way to manage faces in the Unnamed People section is to make a selection of faces and drag these across to a named face in the Named People section. This names the selected photos. You can also drag photos between sections to take, say, a photo from the Named People section and drag it to the Unnamed People section (where it will become Unnamed again).
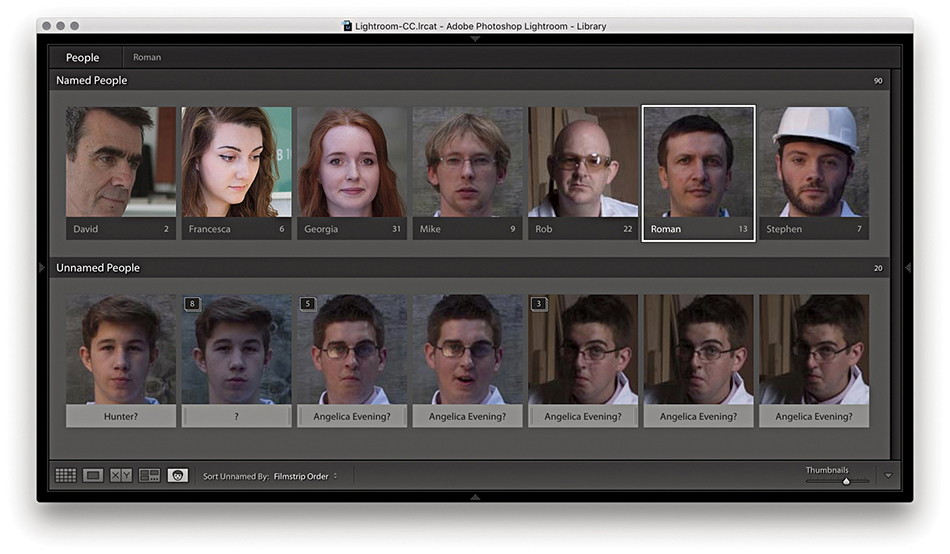
6. At this point, I had carried out most of the naming, but there were still some thumbnails left over in the Unnamed People section.
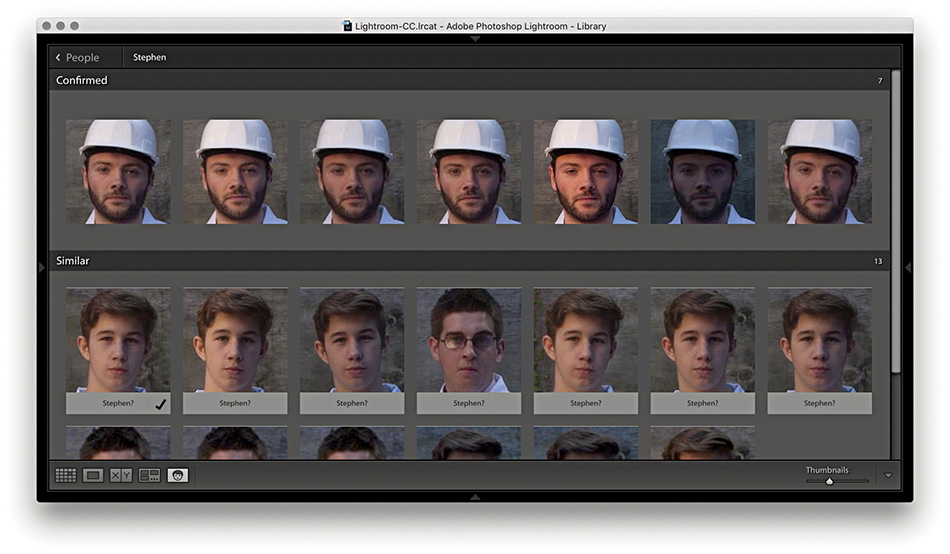
7. Here, I double-clicked a named face to go to the Single Person view. You can also do this by clicking the keyword name that appears at the top (circled in Step 6). Lightroom suggests similar face suggestions in the Similar section below.
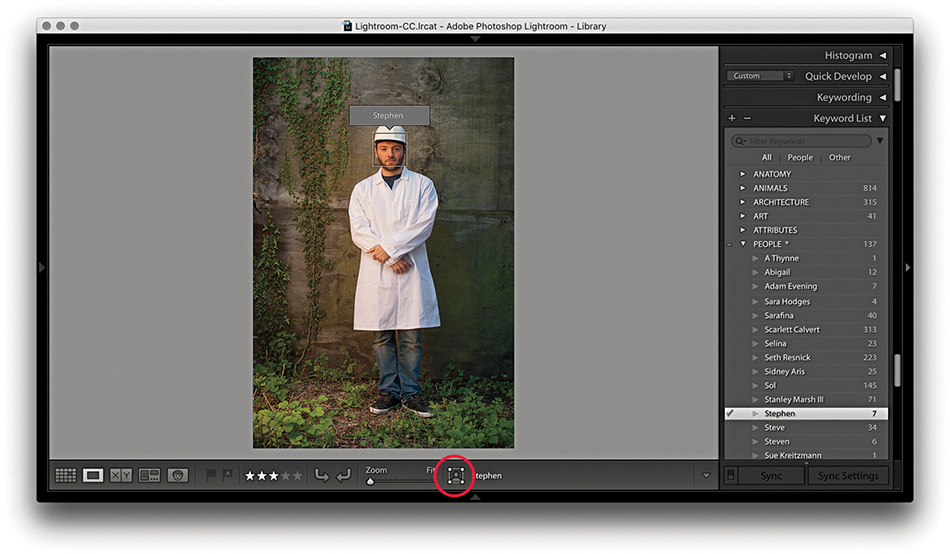
8. I then double-clicked a face in the Single Person view to switch to the Loupe view in the Library module to reveal the face regions, which as you can see, identifies individual faces and lets you confirm that keywords have been added.
Displaying face regions
In Step 8, the Draw Face tool button was activated (circled). Clicking this button allows you to toggle showing/hiding face regions and revert to the regular Loupe view mode zoom behavior. The draw face region bounding box is compliant with the Metadata Working Group standard specifications for face regions. So, faces metadata information can be exported from or imported into Lightroom. In fact, some cameras already encode detected faces this way.
Single Person view mode
As you manage photos in the People view mode, the name of the person (or persons) you have selected in the Named People section appears in the top bar (Figure 10.51). Clicking a name takes you to the Single Person view mode, where you can see the full number of confirmed faces (see Step 7). You can then click the arrow (circled) to return to the People view mode again. Below this is a Similar section, where, as you roll over the faces, you can click the Tick button to add a face to the Confirmed section (even if there is no name suggestion for the face).

Right-clicking a face in People view opens a context menu (Figure 10.52). You can use this to choose Find Similar Faces (![]() [Mac] or
[Mac] or ![]() [PC]), Move to Unamed People, Remove Face Region, Go to Folder in Library, or Go to Collection (the collection that contains the photo). The Find Similar Faces item is great as a tool for getting Lightroom to quickly locate similar-looking people even if you haven’t had a chance to keyword or face-tag them yet.
[PC]), Move to Unamed People, Remove Face Region, Go to Folder in Library, or Go to Collection (the collection that contains the photo). The Find Similar Faces item is great as a tool for getting Lightroom to quickly locate similar-looking people even if you haven’t had a chance to keyword or face-tag them yet.

Expanding and collapsing stacks
You can use the ![]() key to expand or collapse a stack in the People view, or click and hold
key to expand or collapse a stack in the People view, or click and hold ![]() to expand and release to collapse again. Use the Undo command to revert.
to expand and release to collapse again. Use the Undo command to revert.
People view mode Toolbar
The People view Toolbar is shown in Figure 10.53. The Sort menu can be used to manage how the faces are organized. From the menu here, you can choose to sort by Suggested Name, Filmstrip Order, Stack Size, or Popular Names.

Person keywords
As you add face names, you simultaneously create person keywords. These are a special class of keyword, which by default are added at the root level to the keyword list inside the PEOPLE keyword (Figure 10.54). With the default settings, all person keywords you create automatically become children of the PEOPLE keyword, and an asterisk appears after the target keyword name listed in the Keyword List panel. If you want, you can select any other specific keyword and use the context menu shown in Figure 10.55 to select Put New Person Keywords Inside this Keyword.


You can drag a face from the People view mode to the Keyword List panel as a shortcut for applying a correct people keyword. Similarly, you can drag a person keyword to a face in the People view mode to apply.
You will also notice in the context menu shown in Figure 10.55 that you can choose Convert Keywords to Person Keywords. This means if you have previously assigned a keyword with someone’s name, you can convert this to a person keyword. You can do this for single or multiple selected keywords. You can even select a parent keyword, convert it into a person keyword, and all the associated child keywords will also be converted. This step adds the keyword to the person keyword list, but will not necessarily always add face regions to the photos. But where a face region does get added and you enter the first few letters of that person’s name, Lightroom will now know to auto-complete this as a known person keyword.

1. In this example, I wanted to convert an existing, regular keyword to become a person keyword. First, I clicked the arrow next to the keyword Joel to load all of the photos with this keyword into Library Grid view. Next, I right-clicked the regular keyword to access the context menu and selected Convert Keywords to Person Keywords.
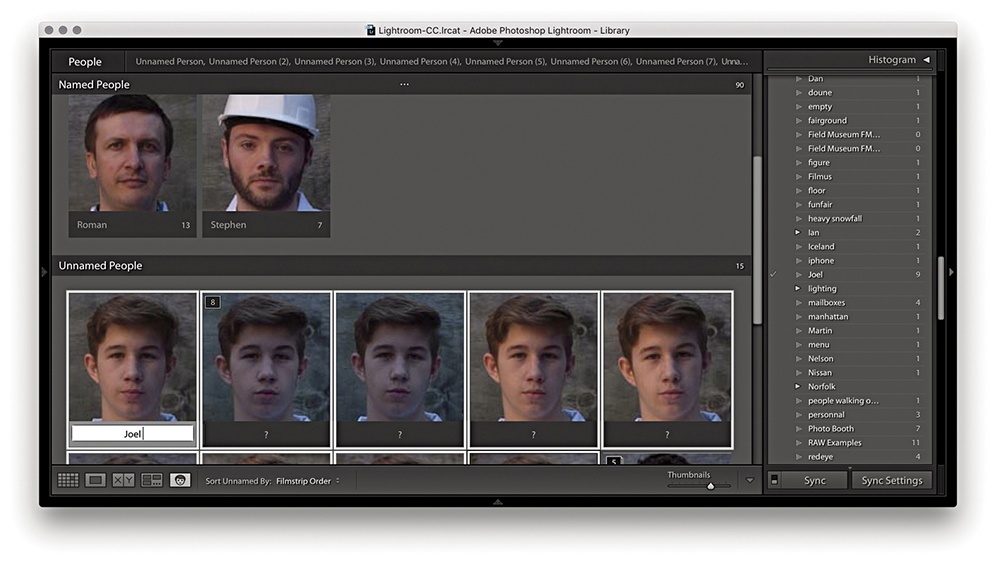
2. I then clicked the People button to switch to People view. At this stage in People view mode, Lightroom had assigned face regions to the photos, which now needed confirming. I selected all, typed Joel for one of the selected faces, and pressed ![]() .
.
As you use the Face tagging feature to identify people, you can train it to become better at recognizing people you photograph regularly. However, this happens only when there are clearly recognizable facial features. Photos you assign person keywords to that don’t happen to have recognizable features won’t confuse things. Therefore, if the subject you add a person keyword to happens to be wearing dark sunglasses or a mask, this won’t deprecate the Lightroom face-recognition process.
Exporting Person keywords
When you export photos from Lightroom (as discussed in Chapter 7), you have the option to exclude exporting the person keywords you have added. It does not matter how you choose to organize your keyword list hierarchy, because Lightroom identifies the (face-tag generated) person keywords as a separate class. By default, Lightroom does not include person keywords in an export. If you wish to override this privacy mode, you can do so by unchecking the Remove Person Info option shown in Figure 10.56. When this option is turned off, Lightroom saves the metadata as a keyword as well as to the Person Shown section of the IPTC metadata.
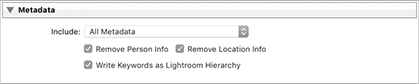
Photo Filtering and Searches
So far, we have looked at how to manage images by using folders to group the images in the catalog, as well as how to apply flags, star ratings, and color labels. I have also shown how to add metadata information, including keywords to add context. Now I will show you how to use the Library module to search for specific photos.
Filtering Photos in the Catalog
Once you have edited your photos using the star rating system, you can use these ratings in conjunction with folders, collections, keywords, and other types of metadata to refine an image selection. Figure 10.57 illustrates how the catalog contents can be seen as having a pyramid-shaped structure in which the zero-rated images are the most numerous, fewer images will have a one-star rating, and even fewer images will have a three-star or higher rating. The files in the catalog can be further filtered by first selecting a specific folder or collection or applying a keyword filter. Therefore, if you combine a ratings search with a specific collection/folder or keyword filter, you will always be able to quickly narrow down a selection of images from the catalog and find the specific photographs you are looking for.

When a filter is in effect, you can use Library ![]() Enable Filters to toggle it on and off, or use the
Enable Filters to toggle it on and off, or use the ![]() (Mac) or
(Mac) or ![]() (PC) keyboard shortcut (Figure 10.58). You can also manage filter behavior via the File
(PC) keyboard shortcut (Figure 10.58). You can also manage filter behavior via the File ![]() Library Filters menu (shown in Figure 10.59). The reason for this duplication is so you can access the same filter options when working in modules other than the Library module. Selecting the Lock Filters item makes a library filter persistent across all sources (i.e., all folders and collections). You then have to remember to use
Library Filters menu (shown in Figure 10.59). The reason for this duplication is so you can access the same filter options when working in modules other than the Library module. Selecting the Lock Filters item makes a library filter persistent across all sources (i.e., all folders and collections). You then have to remember to use ![]() (Mac) or
(Mac) or ![]() (PC) to toggle this sticky library filter setting on or off. When Lock Filters is selected, you can also select the Remember Each Source’s Filters Separately option. This allows you to make library filters sticky per folder/collection. When enabled, the filter settings are remembered for each specific folder or collection. There are times when this kind of behavior can be desirable, as long as you are aware when a filter is active and you know how to toggle the library filter setting on or off. Incidentally, if you select the “Show message when loading or rendering photos” option in the Loupe View options, a status message will remind you when a filter is currently active.
(PC) to toggle this sticky library filter setting on or off. When Lock Filters is selected, you can also select the Remember Each Source’s Filters Separately option. This allows you to make library filters sticky per folder/collection. When enabled, the filter settings are remembered for each specific folder or collection. There are times when this kind of behavior can be desirable, as long as you are aware when a filter is active and you know how to toggle the library filter setting on or off. Incidentally, if you select the “Show message when loading or rendering photos” option in the Loupe View options, a status message will remind you when a filter is currently active.

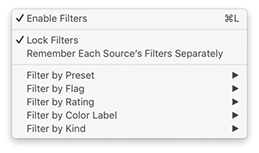
Three ways you can filter the catalog
I will focus on metadata and metadata filtering a little later, but for now let’s look at the filter options as they relate to flags, ratings, and color labels. Figure 10.60 shows the Library module Library menu where you can filter by things like Flag, Rating, or Color Label. These options are identical to those found in the Filters section of the Filmstrip (Figure 10.61) and the Attribute section of the Filter bar, which is accessible from the top of the content area whenever you are in the Library Grid view (Figure 10.62). For example, you could filter the photos displayed in the content area by choosing Library ![]() Filter by Rating
Filter by Rating ![]() One Star and higher, to make only those photos with a one-star rating or greater visible (Figure 10.60). Or, you could simply click the one-star button in the Filmstrip and select the “rating is greater than or equal to” option to make only the one-star or higher photos visible (Figure 10.61). Or, click the one-star button in the Filter bar and select the “rating is greater than or equal to” filter option (Figure 10.62).
One Star and higher, to make only those photos with a one-star rating or greater visible (Figure 10.60). Or, you could simply click the one-star button in the Filmstrip and select the “rating is greater than or equal to” option to make only the one-star or higher photos visible (Figure 10.61). Or, click the one-star button in the Filter bar and select the “rating is greater than or equal to” filter option (Figure 10.62).
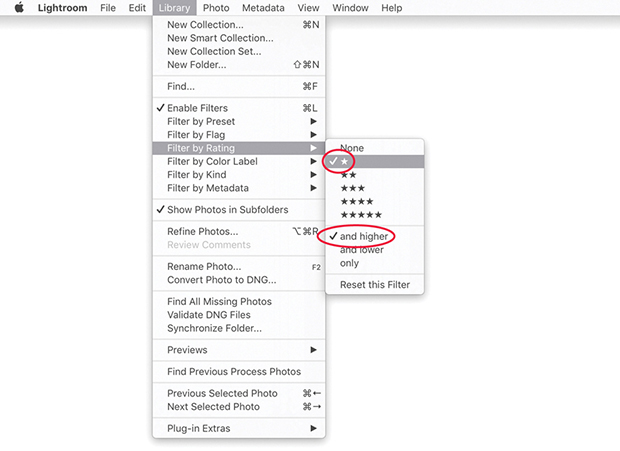


Filtering photos via the Filmstrip
Now let’s look at the top section of the Filmstrip in more detail, and in particular, how you can use the Filmstrip controls to filter images according to their rating, pick status, or label color. You can toggle between hiding/showing the Filmstrip by clicking the arrow at the bottom of the interface or by using the F6 function key (Figure 10.63). The Folder/Collection section displays the current folder path directory or collection name. Click anywhere here to view a list of favorite and recent sources, such as a recently visited folder or collection. The Filter section can be expanded or collapsed by clicking the word Filter (circled in red). This section contains the “Filter based on flag status” selectors, which can filter by showing “all picked images only,” “all unflagged images only,” or “all rejected images only.” Or by Edit status: edited/not edited. To use the “Filter based on rating,” click the icon circled in blue to reveal the star rating filter menu.

Adding folders as favorites
You can add folders as favorites via the Filmstrip source menu so that you can use this same menu to quickly locate favorite sources. To save a favorite, go to the source menu and select Add to Favorites (highlighted in Figure 10.63). The folder or collection will now appear in the Favorite Sources section at the top of the list.
Flagged photos filter options
You can click the Filter Picks Only button in the Filmstrip (![]() ) to view the Pick photos only. Likewise, you can use the Filter Rejects Only button (
) to view the Pick photos only. Likewise, you can use the Filter Rejects Only button (![]() ) to view the rejects only. This raises the question of what you do with the reject photos. Some people suggest the rejects could then be deleted, but I strongly advise against this because you never know when a reject photo may be useful. Perhaps there is an element in the shot you may find handy later? The Unflagged Photos Only filter button (
) to view the rejects only. This raises the question of what you do with the reject photos. Some people suggest the rejects could then be deleted, but I strongly advise against this because you never know when a reject photo may be useful. Perhaps there is an element in the shot you may find handy later? The Unflagged Photos Only filter button (![]() ) allows you to filter the unflagged photos.
) allows you to filter the unflagged photos.
Tip
The flag buttons in the Filmstrip can take a little getting used to. Start with all the flag buttons unselected. Click the first pick flag (![]() ) to filter the photos to display the picks only. Then click it again to turn off the filtering and reveal all the photos. Now click the middle flag (
) to filter the photos to display the picks only. Then click it again to turn off the filtering and reveal all the photos. Now click the middle flag (![]() ) to show the unflagged images only, and click it a second time to once more reveal all the photos. Next, click the reject flag (
) to show the unflagged images only, and click it a second time to once more reveal all the photos. Next, click the reject flag (![]() ) to display the rejects only, and click again to return to the all-photos view. Now try clicking both the pick and reject flag buttons. This reveals both the picks and rejects, but not the unflagged images.
) to display the rejects only, and click again to return to the all-photos view. Now try clicking both the pick and reject flag buttons. This reveals both the picks and rejects, but not the unflagged images.
Edited filter options
The Edit filter buttons allow you to filter by photos that have been edited (![]() ) or have yet to be edited (
) or have yet to be edited (![]() ).
).
Star rating filter options
Click the icon to the left of the star rating symbols (Figure 10.64) to choose from one of the following options to decide what the filtering rule should be: “Rating is greater than or equal to,” “Rating is less than or equal to,” or “Rating is equal to.”
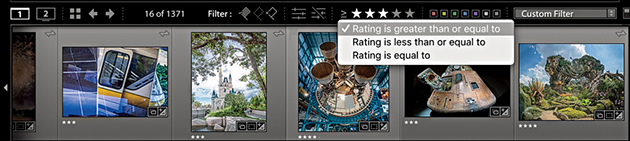
Creating refined selections via the Filmstrip
You can also use the Filmstrip buttons to create image selections based on the flag and color label status. If you hold down the ![]() key (Mac) or
key (Mac) or ![]() key (PC) as you click any of the flag, rating, or color label buttons, instead of filtering the photos, you can create an image selection based on the buttons clicked. If you hold down the
key (PC) as you click any of the flag, rating, or color label buttons, instead of filtering the photos, you can create an image selection based on the buttons clicked. If you hold down the ![]()
![]() key (Mac) or
key (Mac) or ![]()
![]() key (PC) as you click, you can add further photos to the selection. To remove photos from a selection, use
key (PC) as you click, you can add further photos to the selection. To remove photos from a selection, use ![]() (Mac) or
(Mac) or ![]() (PC) as you click the flag, rating, or color label buttons.
(PC) as you click the flag, rating, or color label buttons.
Color label filter options
To filter photos by color label, you can choose File ![]() Library Filters
Library Filters ![]() Filter by Color Label, go to the Library
Filter by Color Label, go to the Library ![]() Filter by Color Label menu, or click the color label buttons in the Filmstrip. The color label buttons in the Filmstrip (Figure 10.65) allow you to make quick selections based on color labels. The buttons work independently: Click the red button to display all red label images, click the yellow button to add yellow label images, and click the red button again to remove the red label images from the filter selection. The Filmstrip also includes Other Label and No Label filter options. If you apply an Other Label filter, it filters out the photos where the label color and label color text do not match the current color label set. The No Label filter option lets you quickly filter the unlabeled photos only. If you go to the Toolbar (
Filter by Color Label menu, or click the color label buttons in the Filmstrip. The color label buttons in the Filmstrip (Figure 10.65) allow you to make quick selections based on color labels. The buttons work independently: Click the red button to display all red label images, click the yellow button to add yellow label images, and click the red button again to remove the red label images from the filter selection. The Filmstrip also includes Other Label and No Label filter options. If you apply an Other Label filter, it filters out the photos where the label color and label color text do not match the current color label set. The No Label filter option lets you quickly filter the unlabeled photos only. If you go to the Toolbar (![]() ), just above the Filmstrip, you can use the Sort menu to sort photos by Label Color or Label Text (Figure 10.66). This can also help you locate files where the color label and label text may differ from the current color label setup and address the problem of mismatched Lightroom/Bridge color label descriptions (see page 131).
), just above the Filmstrip, you can use the Sort menu to sort photos by Label Color or Label Text (Figure 10.66). This can also help you locate files where the color label and label text may differ from the current color label setup and address the problem of mismatched Lightroom/Bridge color label descriptions (see page 131).

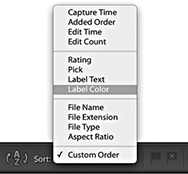

1. In this example, you can see a collection of photos from a location shoot in which I assigned a red color label to the interior and exterior shots, yellow to the black-and-white kitchen shots, green to the staff portraits, blue to the outdoor farm photos, and purple to the final food still-life shots. Because I had not yet applied any filters, all the images were visible in the Library module Grid view.
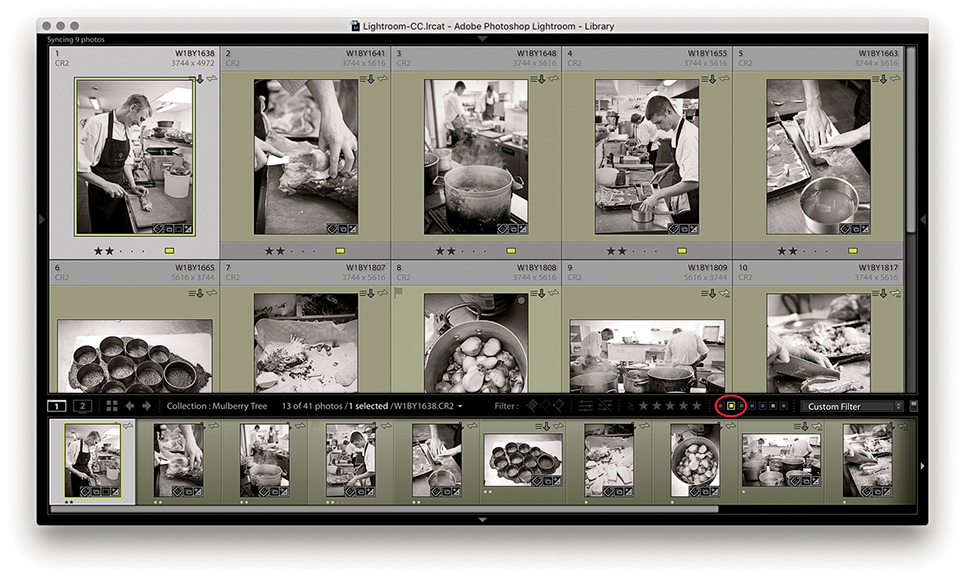
2. I clicked the yellow filter button in the Filmstrip to filter just the yellow-labeled photos.
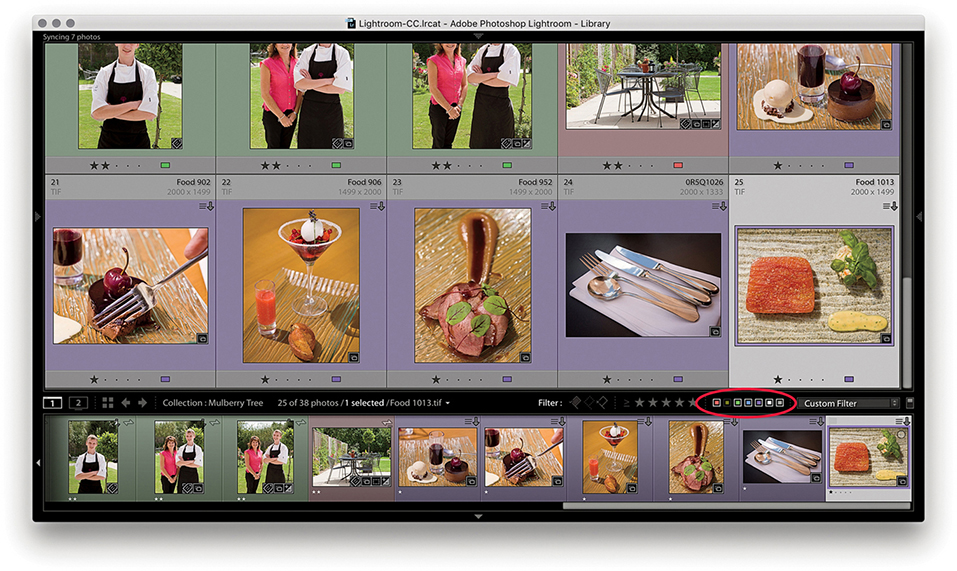
3. Next, I ![]() -clicked the yellow swatch to display all the photos except for the yellow-labeled ones. An inverted swatch selection such as this excludes those photos that do not have a color label.
-clicked the yellow swatch to display all the photos except for the yellow-labeled ones. An inverted swatch selection such as this excludes those photos that do not have a color label.
Virtual copy and master copy filtering
Most of the photos in the catalog will be master copy images. These are the original source files, of which there can be only one version of each in the catalog. However, you can create virtual copy versions of the masters, which then allows you to edit the virtual copy versions as if they were separate originals, but without having to create a physical copy of the master. For more about working with virtual copies, see page 350.
The Master Photos and Virtual Copies filters can therefore be used to filter the display to show or hide the master copy photos only and show or hide the virtual copy photos only. To do this, go to the Library module Library menu, choose Filter by Kind, and choose All, Virtual Copies, Master Photos, or Videos (Figure 10.67). But it is actually far simpler to use the Virtual Copies and Master Photos filter buttons that are located in the Attribute section of the Filter bar (Figure 10.68).


Subfolder Filtering
The Show Photos in Subfolders filter (highlighted in yellow in Figure 10.67) lets you determine whether to include or hide photos contained in subfolders. This menu item is also located in the Folders panel menu (Figure 10.69).

Deselecting Show Photos in Subfolders modifies the photo display in all folders. If there are no photos outside the subfolders, you will see a message that says, “No photos in selected folder, subfolders not shown.” This makes it clear why a folder view may appear empty. Let me give you an example of how this works. In the Folders panel view in Figure 10.70, I selected a folder called London that contained 13,982 photos, of which 10,881 photos were contained in 56 subfolders, which meant there were 3101 photos floating around in the London folder that were not assigned to any of the London subfolders. In this instance, I deselected Show Photos in Subfolders in the Library menu. Therefore, when I clicked the London folder, it showed a photo count of 3101 photos and excluded the images contained in the subfolders.
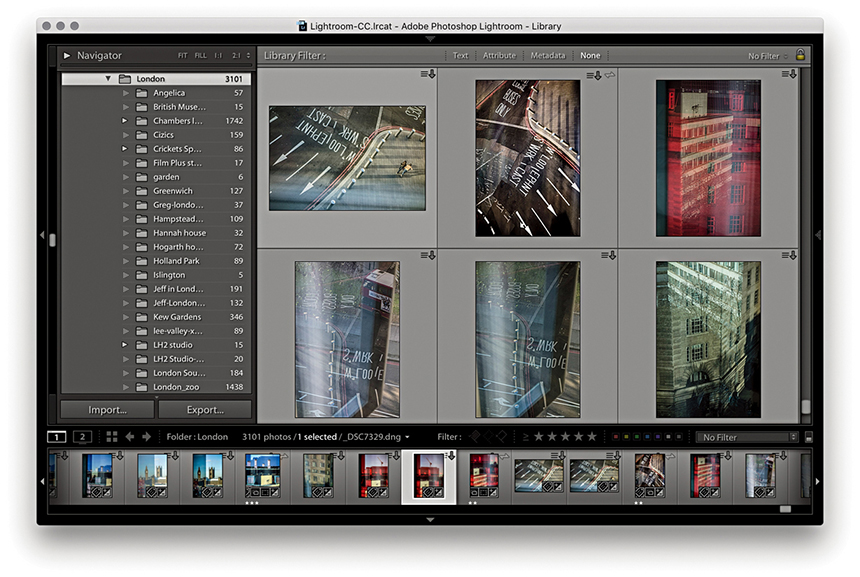
Making Filtered Image Selections
The Edit menu contains a series of “Select by” submenu items. These let you make filtered selections of photos from the current catalog view. For example, in Figure 10.71, I went to the Edit menu “Select by” submenu item and chose Edit ![]() Select by Rating
Select by Rating ![]() two stars. I then opened the Edit menu again and chose Select by Flag
two stars. I then opened the Edit menu again and chose Select by Flag ![]() Intersect with Selection
Intersect with Selection ![]() Flagged. This selected just those photos with two stars or higher that were also marked as being flagged.
Flagged. This selected just those photos with two stars or higher that were also marked as being flagged.
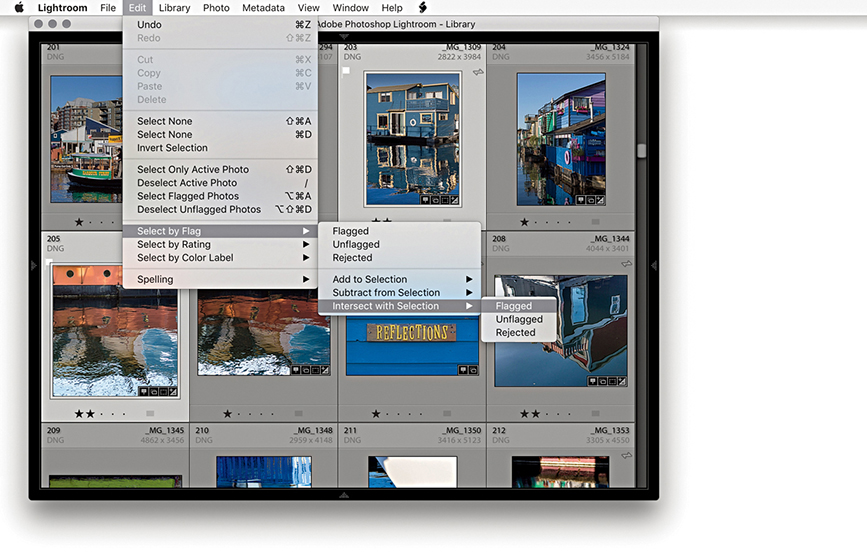

The general idea here is that you can use successive Add to Selection commands to build lots of different kinds of filter selections. For example, you can use the Select by Color Label menu to add yellow label images to a red or yellow photo selection. You can also use the Select by Rating ![]() Intersect with Selection menu to create selections of photos that have matching criteria only. Or, you could use this method to select all the one-star-rated photos that have a red or yellow label. The Edit
Intersect with Selection menu to create selections of photos that have matching criteria only. Or, you could use this method to select all the one-star-rated photos that have a red or yellow label. The Edit ![]() “Select by” menu options can be used in this way to create any number of selection rules, which may be useful when managing large collections of photos.
“Select by” menu options can be used in this way to create any number of selection rules, which may be useful when managing large collections of photos.
Note
Remember, you can also use the Filmstrip buttons to create image selections based on the flag and color label status. If you hold down the ![]() key (Mac) or
key (Mac) or ![]() key (PC) as you click any of the flag or color label buttons, instead of filtering the photos, you can create an image selection based on the buttons clicked. If you hold down the
key (PC) as you click any of the flag or color label buttons, instead of filtering the photos, you can create an image selection based on the buttons clicked. If you hold down the ![]() keys (Mac) or
keys (Mac) or ![]() keys (PC) as you click these Filmstrip buttons, you can add further photos to the selection. To remove photos from a selection, use
keys (PC) as you click these Filmstrip buttons, you can add further photos to the selection. To remove photos from a selection, use ![]() (Mac) or
(Mac) or ![]() (PC) as you click the buttons.
(PC) as you click the buttons.
Filter Bar
The Filter bar (Figure 10.73) can be accessed whenever you are in the Library Grid view mode. To make it visible, go to the View menu and choose Show Filter Bar, or use the ![]() key shortcut. This toggles the visibility on or off.
key shortcut. This toggles the visibility on or off.
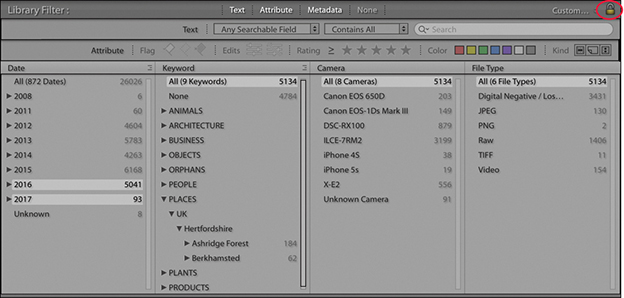
The Filter bar is the main place to go to whenever you need to make refined filter selections of photos in the catalog (although you can also use the Filmstrip controls to filter by ratings and labels). The Filter bar therefore groups together the filter controls in order to make the filtering process more centralized and flexible. It lets you filter the photos shown in the catalog using Text, Attributes (like those in the Filmstrip), Metadata, or a combination of all three. There is a lock button in the top-right section of the Filter bar (circled in Figure 10.74). Clicking this button locks the filter settings and has the same effect as selecting Lock Filters in the File ![]() Library Filters submenu.
Library Filters submenu.
The Filter bar lock behavior is also governed by the Remember Each Source’s Filters Separately option that is highlighted in Figure 10.72. If this item is selected, enabling the lock in the Filter bar allows you to lock filters for specific view sources. If it is not selected, enabling the lock in the Filter bar allows you to lock filters globally. Remember, you can also use the Enable Filters shortcut ( ![]() [Mac] or
[Mac] or ![]() [PC]) to toggle a filter search on or off.
[PC]) to toggle a filter search on or off.
To summarize, locking a filter allows you to lock the filter settings for a specific folder or collection view or to lock the filter settings globally. The Enable Filters command allows you to turn filters on or off (however they might be applied).
The Filter bar layout
There are three components to the Filter bar: Text, Attribute, and Metadata. They can be used to make a filter search of the entire catalog or a subset of catalog images. To combine two or more types of filter searches, you need to hold down the ![]() key as you click the Text, Attribute, or Metadata tab. For speedier, targeted searches, I suggest you make a subselection of photos beforehand, but if you want to conduct a search of the entire catalog, you must remember to first go to the Catalog panel and select All Photographs to carry out a global search. It is so easy forget this important rule; there have been many times when I have gone to the Filter bar intending to carry out a global search, yet forgotten I had a subselection of photos active. So if a Filter bar search does not seem to be working properly, check that you have All Photographs selected.
key as you click the Text, Attribute, or Metadata tab. For speedier, targeted searches, I suggest you make a subselection of photos beforehand, but if you want to conduct a search of the entire catalog, you must remember to first go to the Catalog panel and select All Photographs to carry out a global search. It is so easy forget this important rule; there have been many times when I have gone to the Filter bar intending to carry out a global search, yet forgotten I had a subselection of photos active. So if a Filter bar search does not seem to be working properly, check that you have All Photographs selected.
Text Filter Searches
To carry out a text search, you can choose Library ![]() Find, click the Text tab in the Filter bar, and click the Search field (Figure 10.75), or use the
Find, click the Text tab in the Filter bar, and click the Search field (Figure 10.75), or use the ![]() (Mac) or
(Mac) or ![]() (PC) shortcut. This enables a text search and at the same time highlights the Search field in the Filter bar. From there, you can type in a text term that can be used to filter the photos in the current catalog view, looking for terms that match. For example, a general text filter search of my Lightroom catalog using the term “ann” for any searchable fields yielded 720 results. I could then narrow this down by searching within keywords only. This would result in 110 photos being filtered, including the photograph shown in Figure 10.74 of my mother-in-law, Hannah. The problem with this approach is that a general search for a phrase like “ann” can yield any number of matches—probably too many to be really useful. There are ways, though, that you can limit a search and restrict the number of results you get when filtering the catalog contents. To start with, you can select an appropriate search target. Rather than search using Any Searchable Field, you can narrow down a search target by choosing one of the following options: Filename, Copy Name, Title, Caption, Keywords, Searchable Metadata, Searchable IPTC, Searchable EXIF data, or Any Searchable Plug-in Field.
(PC) shortcut. This enables a text search and at the same time highlights the Search field in the Filter bar. From there, you can type in a text term that can be used to filter the photos in the current catalog view, looking for terms that match. For example, a general text filter search of my Lightroom catalog using the term “ann” for any searchable fields yielded 720 results. I could then narrow this down by searching within keywords only. This would result in 110 photos being filtered, including the photograph shown in Figure 10.74 of my mother-in-law, Hannah. The problem with this approach is that a general search for a phrase like “ann” can yield any number of matches—probably too many to be really useful. There are ways, though, that you can limit a search and restrict the number of results you get when filtering the catalog contents. To start with, you can select an appropriate search target. Rather than search using Any Searchable Field, you can narrow down a search target by choosing one of the following options: Filename, Copy Name, Title, Caption, Keywords, Searchable Metadata, Searchable IPTC, Searchable EXIF data, or Any Searchable Plug-in Field.


Filename searches can be fairly straightforward. For instance, I often search specifically by Filename using a Contains rule and type the filename I am looking for in the Search field. I use this filter method when a client has made their final image selection and sent me a list of filenames of the photos they want me to retouch. All I need to do then is make a general selection of the client’s photos and type in the last four digits of the selected filenames. This is usually enough to quickly locate each of the photos I am looking for. I discussed Copy Name earlier in the Metadata panel section. Basically, you can use this to search the copy names that have been used for all your virtual copy images. All the other types of searches enable you to narrow the range of a text search to concentrate on the selected metadata type only, such as captions or keywords. If you are unsure precisely where to search, the easiest option is to revert to using the more general Any Searchable Field approach, but doing so might mean you end up with too many matches to choose from.
Search rules
You can further limit a filter search via the Rule menu in the Text filter section (Figure 10.76). Here, you can choose rules such as Contains. This carries out a search for text that partially matches anywhere in a text phrase. In the Figure 10.76 example, a search for “ann” could yield results such as Ann, anniversary, or banner. If you enter two or more words when carrying out a Contains search, it will mean photos that match partially or fully are filtered. A Contains All rule is more specific and looks for an exact match, such as Ann. If you enter two or more words when carrying out a Contains All search, it will be like carrying out an “and” search where only photos that match both terms are filtered. For example, if I were to carry out a keyword search using “Cape Town,” Lightroom would show only photos for which both terms (Cape and Town) were found. The Doesn’t Contain rule excludes files that match the text entered. Using a Starts With rule for an “ann” search yields only words like Ann or anniversary, and an Ends With search filters results for anything ending with “ann” like Portmann (or also Ann). These further search refinements ensure you have full control over the filtering process and that you don’t end up with too many text filter matches.

Combined search rules
Clicking the Search field icon circled in Figure 10.77 opens a combined menu containing all the Search Target and Search Rules options. You can navigate this single menu to choose the desired settings. If you click the X icon on the right of the text field box, you can clear a text filter term and undo the current text filter.
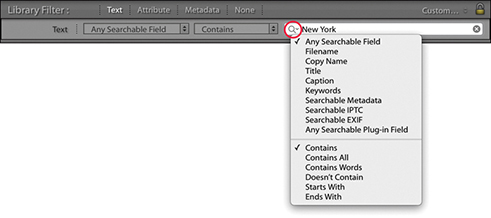
Fine-tuned text searches
You could apply the “Start with” rule when searching, but it is handy to know that you can conduct a search for anything that begins with a specific search term by typing + at the beginning of the term. In my Lightroom catalog, if I were to type +cape in the Search field, this will display photos with any keywords that begin with cape, such as Cape Point or Cape Town, and exclude keywords like Landscape (Figure 10.78). Inverse searches can be made by typing an exclamation point before the search term. For example, in Figure 10.79, I again entered +cape to search for all terms that start with the word cape, but combined this with !USA to exclude any USA locations that start with the word cape. This excluded all the keywords that referred to the USA, such as Cape Canaveral or Cape Fear, but did include non-USA locations such as Cape Town, South Africa (Figure 10.80).


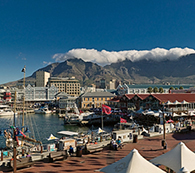
Attribute Filter Searches
The Filter bar Attribute section (Figure 10.81) makes it easier to integrate a refined filter search based on criteria such as the flag status, edit status, the star rating, the color label, or whether you wish to filter the master files, copy files, or video files only. Everything here is the same as the attribute filter controls in the Filmstrip; you can click the buttons to apply a filter and click the star rating options to specify whether to filter for photos with a star rating that is the same and higher, the same and lower, or the same rating only.

Metadata filter searches
The Metadata section (Figure 10.82) integrates some Keyword filter functionality of the Keyword List panel, but goes further by giving you access to a wide range of metadata attributes (not just keywords) that you can combine to accomplish different kinds of metadata information searches. The Metadata filter section provides customizable columns. The example below uses the default four-column view, and you can see how it is possible to combine a metadata search by Date combined with a search that included a Places keyword and Raw file type. There probably are not that many instances where you would want or need to combine quite so many search criteria in a single search, but the functionality is there to allow you to do this (and more).

Metadata filter options
You can adjust the Metadata section in height by dragging the bar at the bottom up or down. When the Filter bar is expanded in height, it can consume a lot of valuable space in the Grid view content area, which is a problem if all you are interested in doing is applying a filter using one panel only. This is another reason why it is important to remember the ![]() keyboard shortcut, which toggles hiding and showing the Filter bar. This gives you the convenience of being able to move the Filter bar out of the way when it is not needed.
keyboard shortcut, which toggles hiding and showing the Filter bar. This gives you the convenience of being able to move the Filter bar out of the way when it is not needed.
The individual panels can be customized by clicking the panel header and selecting one of the many metadata search criteria that are available (Figure 10.83). The default view gives you four panels to work with, but you can customize this layout by clicking the button in the top-right corner of each panel (Figure 10.84) to either add extra columns (up to eight in total) or remove columns. When filtering by Date, Keyword, or Location, there are also options to choose a Hierarchical or Flat list for the Metadata list views. When filtering by Date, there are also Ascending and Descending date options. Because you are able to customize the layout of the panels, this can provide you with lots of ways to filter the catalog photos. Selecting multiple items within a single panel allows you to include more terms in a filter selection, where you can use the ![]() key or the
key or the ![]() key (Mac) or
key (Mac) or ![]() key (PC) to select more than one search term in each panel. Selecting search items from other, separate panels will allow you to “intersect” a photo filter selection and narrow a search.
key (PC) to select more than one search term in each panel. Selecting search items from other, separate panels will allow you to “intersect” a photo filter selection and narrow a search.


Metadata filter categories
The Date categories let you progressively filter by date. For example, you can search first by year, and then expand the year folders to search by month and then by day.
The File Type section can be used to separate images by file format and make it easy to quickly filter out images, such as the TIFF masters or the raw DNG images. The Keyword category is one that you will probably want to use much of the time when searching the catalog, and in Figure 10.85, you can see an example where I used two Keyword filter columns to narrow a keyword search.
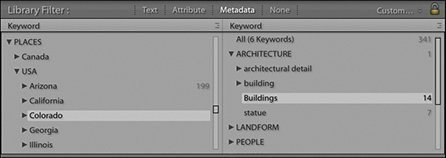
The Label category (Figure 10.86) almost amounts to the same thing as clicking a color label swatch in the Filters section of the Filmstrip. The main difference is that the Label filters used here allow you to distinguish between the color of a label and any text associated with that label. To understand what I mean by this, please refer to the section on sorting color labels on page 637.
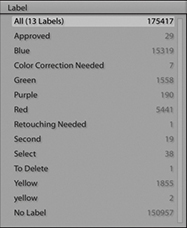
Figure 10.87 shows an example of a Filter bar search that achieves the same filter result as the combined filter search described at the beginning of this chapter. The Filter bar search applied here was based on a three-star filter for photographs taken in 2010, using the keyword elephant.
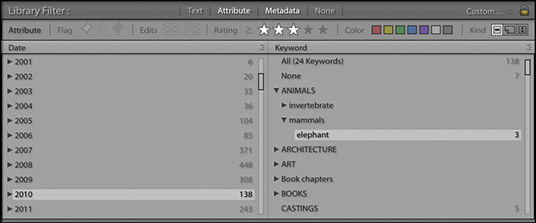
The Camera filter option can be used to filter by camera model, and the Camera Serial Number option by serial number. Imagine, for example, that you suspect a fault has developed on one of your camera bodies. Inspecting the images by camera type can let you filter out the images shot using that specific camera. The Lens filter (Figure 10.88) is useful for filtering the catalog by lens type, which can be handy when you are searching for shots that were taken using a specific lens. Flash State refers to whether the on-camera flash was fired or not. With the Shutter Speed filter, you can filter photos according to the shutter speed the photos were shot at. Likewise, the Aperture filter lists every aperture setting that has been used, which might be useful for shortlisting pictures shot at a particular lens aperture setting. With ISO Speed Rating, you can quickly filter the high-ISO shots from all the rest, and the GPS Data filter lets you filter according to whether GPS data is embedded or not. If you select the Map Location filter, you can filter by the location names saved in the Map module.
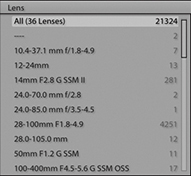
The next few sections require that you have entered custom metadata in the catalog photos. The Location and Creator categories can be useful if you are in the habit of editing the associated IPTC fields via the Metadata panel. If so, you can quickly filter the catalog photos by any of the IPTC metadata items you see here. Location, City, State/Province, and Country all refer to the Location IPTC metadata used to describe where a photo was shot (you may use keywords to do this as well, of course, but only the IPTC data is referenced here). The Creator section filters photos by who was the creator. With some camera systems, you can configure the camera settings so that the creator name is always embedded at the capture stage for each and every shot. The Copyright Status and Job reference are also further examples of IPTC metadata that first has to be entered by the user.
The Aspect Ratio filter lets you filter according to whether the photos are landscape, portrait, or square. The Smart Preview Status filter filters photos that have or do not have Smart Previews. Snapshot Status lets you separate images that do and do not have snapshots. Treatment refers to photos that are in color or have been converted to black and white. The Develop Preset filter filters according to the Develop module presets that may have been applied to the photos in the catalog, including those that have just had the default settings applied. This is a useful filter for tracking down photos that have had a particular type of treatment, such as a favorite black-and-white conversion or split-toning technique (Figure 10.89). Are you looking for inspiration? You could select All Photographs to view the entire catalog and use this filter category to check out certain Develop preset effects as applied to various images. You could then copy the develop setting from one of these filtered photos or make a note to apply this particular Develop preset to other images. And lastly, the Metadata Status lets you filter photos according to whether the metadata is up to date, has been changed, has been changed on disk only, or there is a metadata conflict.
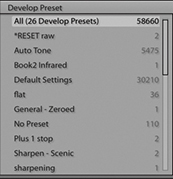
Locating Missing Photos
It is inevitable that photos in the catalog will become misplaced; folders may appear grayed out in the Folders panel, or individual files will show exclamation-point badges. In either case, this indicates that the photos are either offline or missing. It may be a simple matter of checking to reconnect a missing hard-drive volume, or it could be because you have deleted or moved the original photos at the system level. If you need to locate all the currently missing files in the catalog, you can do so by going to the Library menu in the Library module and choosing Find All Missing Photos. This gathers together all the missing files and groups them as a temporary collection in the Catalog panel (Figure 10.90).

Custom Filter Settings
Some filter selections you are likely to apply again and again. It therefore makes sense to save these as custom filter settings, which you can do via the Filter bar Custom Filter menu, shown in Figure 10.91. Here, I have saved a custom filter setting called Client select masters. This filters photos that match the keyword Jobs (to select all client job photos) and where the file type is a TIFF file (which is what I always use when saving retouched master images). I am then able to use this custom filter whenever I need to see a shortlist of all my client retouched master images. Custom filter settings can also be accessed via the Custom Filter menu in the Filmstrip. Also, when saving filter settings, you can also save the number of Filter bar columns that are required. For example, you can save a six-column Metadata filter setting if you wish.
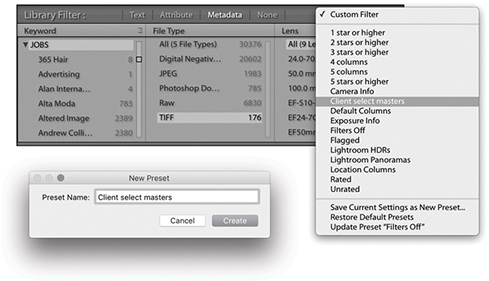
Empty field searches
If you choose to search by caption in the Text filter section of the Filter bar, in the accompanying Rules section, you can apply Is Empty and Isn’t Empty rules. And for keyword searches you can apply Are Empty and Aren’t Empty rules (Figure 10.92). The purpose of these is to let you search for photos with no caption or keywords added, or alternatively, you can select only those photos that do have captions titles or keywords (when either of these rules is selected, the field search is overridden and the search field box dimmed). For example, the Is Empty and Are Empty rules can be used to filter out photos that have yet to have metadata added to them.
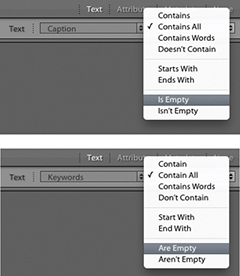
Advanced searches
Let’s finish this section with an example of a complex search in which several different types of search criteria are combined together to create a precise, targeted filter of the catalog. All the tools you need to do this are located in the Filter bar, and the following step-by-step example will hopefully provide guidance and inspiration to help you get the most out of Lightroom’s search abilities. Just to remind you once more: After a filter search has been made, you can use ![]() (Mac) or
(Mac) or ![]() (PC) to toggle the filter on or off.
(PC) to toggle the filter on or off.

1. I first selected All Photographs in the Catalog panel. I then went to the Filter bar, clicked the Text tab, and chose to search by keywords only using the Contain rule. I then typed in the name of one of my clients, Gallagher, to initiate a catalog search for photos that were keyworded with the word Gallagher. As I began typing in the first few letters, the search narrowed the selection of images in the Grid view to show all the photos where the keywords metadata contained this same sequence of letters. The Filter bar search filtered the photos in the grid to show 3,769 photos that had been shot for this client. This included everything—the raw files as well as the TIFF masters. The next task was to whittle this selection down to something more specific.

2. I ![]() -clicked the Attribute tab and applied a three-star filter to show only the three-star or higher images. I also clicked on the Master files button to include master files only, excluding any virtual copy or movie files. Next, I
-clicked the Attribute tab and applied a three-star filter to show only the three-star or higher images. I also clicked on the Master files button to include master files only, excluding any virtual copy or movie files. Next, I ![]() -clicked the Metadata tab to reveal the Metadata filter options and used a Date panel to search for photos that had been shot in 2011. I now had 276 images to choose from. Lastly, I used a File Type panel to search for TIFF Document File Types. This resulted in a filter selection that showed only the TIFF file format photos shot during 2011 for this client that had been rated with three or more stars. This resulted in a filter search of just 4 photos out of the original 3,628.
-clicked the Metadata tab to reveal the Metadata filter options and used a Date panel to search for photos that had been shot in 2011. I now had 276 images to choose from. Lastly, I used a File Type panel to search for TIFF Document File Types. This resulted in a filter selection that showed only the TIFF file format photos shot during 2011 for this client that had been rated with three or more stars. This resulted in a filter search of just 4 photos out of the original 3,628.
Publishing Photos Via Lightroom
The Publish Services panel (Figure 10.93) can be used to publish collections of photos to sites such as Facebook and Flickr. When photos are published in this way, a constant link remains between Lightroom and the hosting website. Any subsequent changes you make to a photo in Lightroom are propagated to the server hosting the images online.
You can also publish photos to a hard drive directory on the computer. If designing a book, you can use the Publish panel to generate resized TIFF files for use in the book and publish these to the folder that is linked to by the page-layout program. If changes need to be made to any of the images, you can edit them in Lightroom, and then simply republish them to generate new TIFF masters that will remain automatically linked in the page-layout program. You can also use this mechanism to maintain off-site backups of important original images. It is also possible to create multiple folders via the Publish Services panel.
The following steps show how I configured the settings for the Photoshelter Archive, a third-party publish services plug-in, I have installed in Lightroom.
Note
There is a PDF on the book’s website showing how you can use Lightroom to set up a Flickr publish service.
Downloadable Content:
![]()
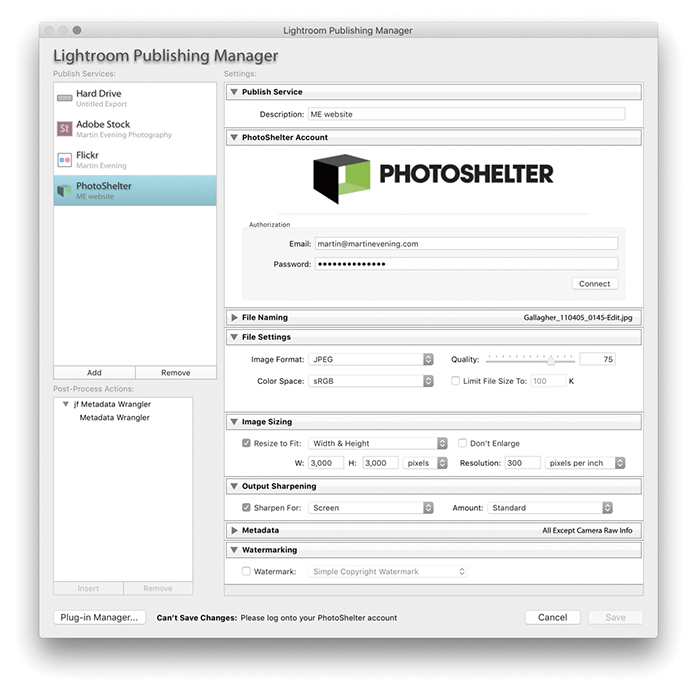
1. To start with, I clicked the Plus button in the top-right corner of the Publish Services panel and selected Go to Publishing Manager. This opened the Lightroom Publishing Manager dialog shown here. I then clicked on the Photoshelter Archive publish service and entered my account details. Here, I configured the remaining Export settings to establish what size I would like the large images to be and chose to add screen sharpening to images uploaded to this service.

2. The plug-in auto-detected the six main categories on my site: Ashridge, Hair, Landscapes, Portraits, Reflections, and Vancouver Island. I was now ready to start adding photographs via the Photoshelter service. To do this, I made a selection of photos via the Library module and dragged these across to the Landscapes category.
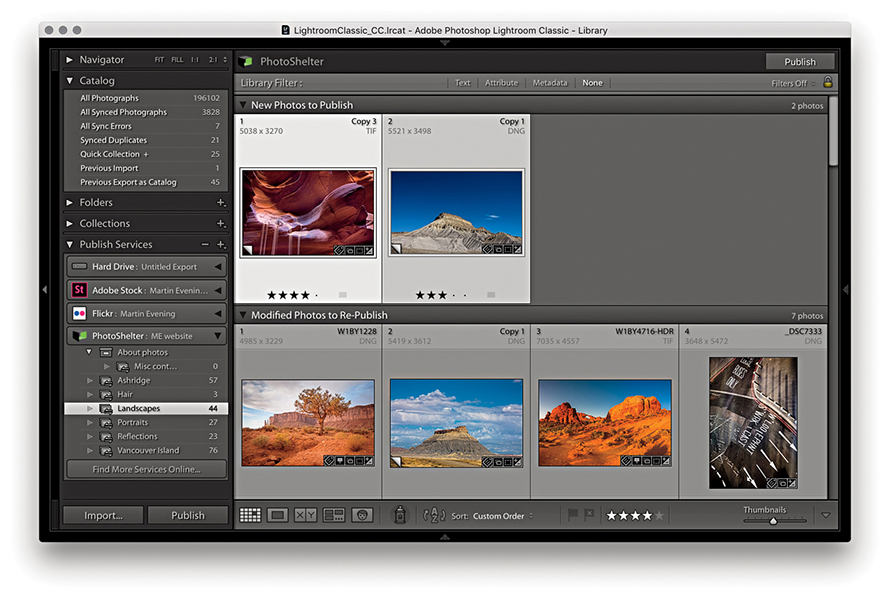
3. I was now ready to publish. The photos I had just added appeared under the New Photos to Publish section, meaning they had yet to be uploaded. To do this, I needed to click the Publish button (there is a Publish button in the bar at the top, as well as in the bottom-left corner) to publish them to my Photoshelter website. This instructed Lightroom to upload all the New Photos to Publish photos. As the photos were added, they emptied from the New Photos to Publish section and joined the Published Photos section. There, they would remain until I decided to do something else to them. For example, if I were to edit the IPTC metadata or the Develop settings for any of these photos, this would move the image out from the Published Photos group and into the Modified Photos to Republish section. This mechanism allows you to keep track of which photos have been published and which ones have been modified in some way or have yet to be published. Lightroom therefore always keeps me informed whenever I needed to update the photos published on my website. Should you need to, you can right-click a photo in the Publish Services panel and select Mark to Republish to move it to the Modified Photos to Republish group.
Saving and Reading Metadata
In your very first computer lesson, you would have learned how important it is to always save your work before you close down a program. Some Lightroom users become confused by the fact that there is no “save” item in the File menu and wonder if they will lose all their work after they quit the program. There is no need to worry because your work is always saved automatically in Lightroom. Even if Lightroom suffers a crash or there is a power failure, you should never lose any data.
It is important to remember that as you carry out any kind of work in Lightroom—whether you are adjusting the Develop settings, applying a color label or star rating, or editing keywords or other metadata—such metadata edits are primarily stored in Lightroom’s catalog file. Whenever you alter a photo in Lightroom, you are not manipulating the actual image data. This is because Lightroom is built around the principle that the imported images are the master negatives and these should never be edited directly. Lightroom therefore records the changes made as metadata information, and these edit changes are always stored at a central location in the Lightroom catalog. This is why Lightroom can be much faster at searching images compared to a browser program such as Bridge. You can add, search, and read metadata information more quickly because the metadata information is all stored in a central catalog file. However, it is also possible for the metadata information to be stored within the individual files themselves, by choosing to explicitly save the metadata to the files directly. In the case of JPEG, PNG, TIFF, PSD, or DNG images, there is a dedicated XMP space within the file header that can be used to store the metadata. However, with proprietary raw files, the metadata has to be stored separately in what is known as an XMP sidecar file. Basically, whenever you edit an image in Lightroom, whether you make adjustments in the Develop module or add keywords, everything you do is recorded directly to the Lightroom catalog file. At the same time, you also have the option to perform an explicit save, which saves the updated metadata to the files’ XMP space. Or, you can configure Lightroom to do this for you automatically in the background when the program is idle.
The fact you can save metadata edits to the file as well as to the catalog may seem like a good thing. Doing so can provide you with an extra level of backup security, but there are a few things to bear in mind here. First, no matter how often you remember to save and update your files, the central catalog file will always contain the most up-to-date version of what has happened to the image files contained in the catalog. The catalog file should, therefore, always be regarded as the primary database—the truth is in the catalog. Second, a major benefit of having everything stored in the catalog file is that all the edit work you do is stored in a single, relatively lightweight database document. This means that backing up can be fast and easy because all you have to do is make a copy of the catalog file rather than make a backup copy of every single image that has been modified since the last time you backed up. Of course, in the case of proprietary raw and HEIC files only the XMP sidecar files need to be backed up, and this can be done very quickly without needing to back up the original raws. However, in the case of raw DNG, TIFF, PSD, PNG, and JPEG images, whenever you update the metadata for these types of files, the entire file has to be copied during the backup process.
A third point is that if you set up Lightroom to “Automatically write changes into XMP,” a lot of disk activity has to take place as Lightroom tries to catch up with all the latest adjustments that have been made to the photos in the catalog. The same is true each time you manually choose to save edits to a large number of files. Following on from this, if you keep modifying files in this way over and over again, there is the added risk that these files may one day become corrupted. Let me stress that it is only a very small risk, but all the same, it’s one worth avoiding.
So, when should you save metadata to the files? If you work with a browser program such as Bridge alongside Lightroom, the only way Bridge can read the metadata is from the file itself (because Bridge cannot read the metadata stored in the Lightroom catalog). So, if you want your Lightroom edits to show up in Bridge, it is necessary to first save the metadata to the file. And, if you are working with other types of cataloging programs in conjunction with Lightroom, it will again be necessary to save any metadata changes to the file so that these can be read. There are also some production workflows that may involve transferring files from one Lightroom catalog to another, where it may be easiest to save the current metadata changes to the files so these can be read when they are imported to another Lightroom catalog. Consequently, we sometimes have to ask ourselves whether the “truth is in the database” (the Lightroom catalog) or the “truth is in the file.” I will return to this question shortly.
For most of the time that you are working in Lightroom, it should not really matter if the metadata information is stored only in the catalog. The main thing is to remember to make regular backups of the catalog, such as once a week, as well as carry out scheduled system backups. It helps too that Lightroom has a built-in catalog backup feature, as well as diagnostics and self-repair functions, to help keep your catalog file protected. If Lightroom detects on launch that the catalog database file has become corrupted, there is a Repair Catalog option (Figure 10.94).

Saving metadata to the file
Let’s first look at how you can automatically save changes to the files. If you go to the Lightroom menu (Mac) or Edit menu (PC) and choose Catalog Settings ( ![]() [Mac] or
[Mac] or ![]() [PC]), you will see the dialog shown in Figure 10.95, which includes an “Automatically write changes into XMP” option. When this is enabled, Lightroom automatically writes changes to the catalog files’ XMP space, but only when it is convenient to do so and without affecting the program’s performance too much. Checking this option ensures that all the files in the Lightroom catalog will eventually get updated. If you want to be sure that a file’s XMP space gets updated right away or you have “Automatically write changes into XMP” switched off, you can choose Metadata
[PC]), you will see the dialog shown in Figure 10.95, which includes an “Automatically write changes into XMP” option. When this is enabled, Lightroom automatically writes changes to the catalog files’ XMP space, but only when it is convenient to do so and without affecting the program’s performance too much. Checking this option ensures that all the files in the Lightroom catalog will eventually get updated. If you want to be sure that a file’s XMP space gets updated right away or you have “Automatically write changes into XMP” switched off, you can choose Metadata ![]() Save Metadata to File command in the Library module (or the Photo
Save Metadata to File command in the Library module (or the Photo ![]() Save Metadata to File command, if working in the Develop module). This forces an immediate export of the metadata information from the Lightroom catalog to the image file’s XMP space. Easier still is to use the
Save Metadata to File command, if working in the Develop module). This forces an immediate export of the metadata information from the Lightroom catalog to the image file’s XMP space. Easier still is to use the ![]() (Mac) or
(Mac) or ![]() (PC) shortcut any time you need to immediately update any metadata changes made to a photo or group of selected photos.
(PC) shortcut any time you need to immediately update any metadata changes made to a photo or group of selected photos.

Note
Although you can save metadata to the file’s XMP space, collections, flags, virtual copies, stacks, and history data are stored only in the central Lightroom catalog database.
Turning on the “Automatically write changes into XMP” option is useful if you wish the metadata updating to always take place in the background. You could regard this as a way to perform an additional metadata backup. For example, if you were to find yourself in the unfortunate position of having a damaged catalog file, you could open the most recently saved backup and choose Metadata ![]() Read Metadata from Files command to read in and restore the most recent missing metadata.
Read Metadata from Files command to read in and restore the most recent missing metadata.
Tracking metadata changes
In order to keep track of which files have been updated and which have not, Lightroom does offer some visual clues. If you choose View ![]() View Options (
View Options ( ![]() [Mac] or
[Mac] or ![]() [PC]), there is a check box in the Cell Icons section of the Library View Options dialog called Unsaved Metadata (circled in Figure 10.96). When this is selected, you may see a “calculating metadata” icon (
[PC]), there is a check box in the Cell Icons section of the Library View Options dialog called Unsaved Metadata (circled in Figure 10.96). When this is selected, you may see a “calculating metadata” icon (![]() ) in the top-right corner of the grid cells as Lightroom scans the photos in the catalog, checking to see if the metadata is in need of an update. You will also see this when Lightroom is in the process of saving or reading metadata from a file. If the metadata in the catalog and the file are in sync, the icon soon disappears. If there is a metadata status conflict, you will see either a down arrow, up arrow, or exclamation mark.
) in the top-right corner of the grid cells as Lightroom scans the photos in the catalog, checking to see if the metadata is in need of an update. You will also see this when Lightroom is in the process of saving or reading metadata from a file. If the metadata in the catalog and the file are in sync, the icon soon disappears. If there is a metadata status conflict, you will see either a down arrow, up arrow, or exclamation mark.

A down arrow in the top-right corner of a grid cell (Figure 10.97) indicates the metadata information embedded in the photo’s XMP space is now out of date compared to the current Lightroom catalog file. This means you need to choose Metadata ![]() Save Metadata to File (
Save Metadata to File ( ![]() [Mac] or
[Mac] or ![]() [PC]) if you want to update the metadata saved to the file. Choosing Save Metadata to File pops open the dialog shown in Figure 10.98, which asks if you wish to continue. If you are uncertain what to do, you can click the down arrow icon, which opens the dialog shown in Figure 10.99. This dialog asks if you want to save the metadata changes to disk (which could also be described as “Do you wish to confirm saving the metadata changes to the photo’s XMP space?”).
[PC]) if you want to update the metadata saved to the file. Choosing Save Metadata to File pops open the dialog shown in Figure 10.98, which asks if you wish to continue. If you are uncertain what to do, you can click the down arrow icon, which opens the dialog shown in Figure 10.99. This dialog asks if you want to save the metadata changes to disk (which could also be described as “Do you wish to confirm saving the metadata changes to the photo’s XMP space?”).
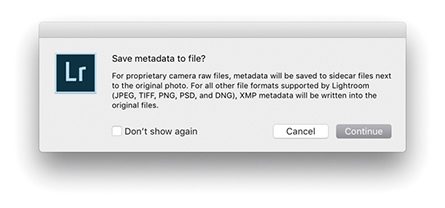
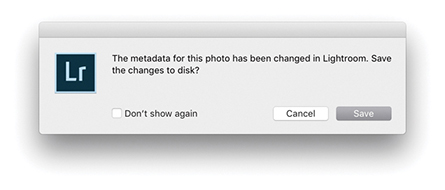
The up arrow in Figure 10.100 indicates the metadata information embedded in the image file’s XMP space is out of sync and more recent than the current Lightroom catalog file. This can occur when you have edited a Lightroom catalog file in Bridge or Camera Raw and the externally edited image has a more recently modified XMP than the Lightroom catalog. If you are confident you do want to read the externally applied edit changes, then choose Metadata ![]() Read Metadata from File.
Read Metadata from File.

If there is a metadata status conflict because the settings have been modified both in Lightroom and another external program, you will see the warning icon shown in Figure 10.101. This situation can occur when the Lightroom catalog photo may have been modified in Lightroom (without saving the metadata to the file) and has also been edited by an external program, resulting in two possible “truths” for the file. Is the truth now in the Lightroom catalog, or is the truth in the externally edited file XMP metadata? Clicking the icon opens the dialog shown in Figure 10.102, where you can choose either to Import Settings from Disk (if you think the external settings are right) or Overwrite Settings (if you think the Lightroom catalog settings are the most truthful and up to date).
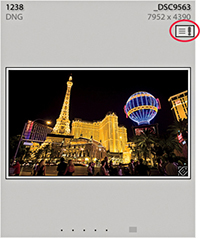
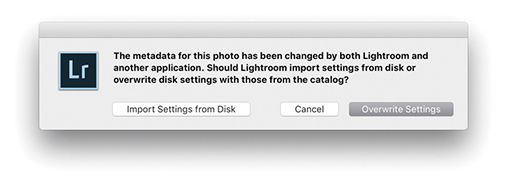
In the Metadata panel (Figure 10.103), there is an item called Metadata Status. If anything has been done to edit the photo metadata settings since the last time the metadata was saved to the file, Metadata Status will list “Has been changed.” This is basically telling you the same thing as the metadata status icon that appears in the Library Grid cells.

XMP read/write options
Let’s now take a closer look at what exactly XMP settings are. The XMP space is the hidden space in an image document (such as a JPEG, PNG, TIFF, PSD, or DNG file) that the metadata settings are written to. In the case of proprietary raw files, it would be unsafe for Lightroom to write to the internal file header (and is not possible with HEIC either), so XMP sidecar files are used instead to store the XMP metadata. This includes everything that is applied in Lightroom, such as the IPTC information, keywords, as well as the Develop settings.
In the Metadata section of the Catalog Settings (Figure 10.104), the “Include Develop settings in metadata inside JPEG, TIFF, PNG, and PSD files” option lets Lightroom distinguish between writing the Develop settings metadata to the XMP space for all files, including JPEG, HEIC, TIFF, PNG, and PSD files, or to raw and DNG files only. This preference predetermines what gets written to the XMP space when you explicitly save the Develop settings metadata to the file. But the ability to save Develop settings into non-raw files can be a mixed blessing. If you are sharing images with another Lightroom catalog, but are not exporting them as a catalog, you will most likely want to save the metadata settings to the XMP space. But for Creative Cloud customers sharing files from Lightroom with Bridge, this can lead to some unexpected file behavior when you open non-raw files via Bridge. Basically, raw and DNG images whose Develop settings have been modified via Lightroom, and the metadata saved, will open in Camera Raw via Bridge exactly as you expect to see them, because Bridge is able to read the settings that were created in Lightroom. However, where you have non-raw files, such as JPEGs, HEICs or TIFFs that have been edited via the Lightroom Develop module, and the Develop settings have been written to the file’s XMP space, Bridge may now consider such files to be like raw files and open them via Camera Raw rather than open them directly in Photoshop. That is what I mean by a “mixed blessing.”

Note
If you are working with the latest version of Lightroom and the latest version of Photoshop, everything will work seamlessly. If you are working with Lightroom Classic CC and an earlier version of Photoshop, such as CS4, CS5, or CS6, there are limitations you need to be aware of. Edits carried out using Version 3/Version 4–specific controls in Lightroom will not be recognized in any version of Camera Raw prior to version 6.7. Edits carried out in Lightroom using Version 1 and Version 2 will be compatible with Photoshop CS4 and Camera Raw 5.7, but you will need to restrict yourself to Version 1/Version 2 adjustments only if sharing with older versions of Photoshop and Bridge.
If you want Lightroom to retain the ability to modify the XMP space of non-raw files for data such as file ratings, keywords, and labels but exclude storing the Develop settings, you should deselect the “Include develop settings in metadata inside JPEG, TIFF, PNG, and PSD files” option. Do this and the Lightroom Develop settings for non-raw files will get written to the Lightroom catalog only and will not be exported to the files when you choose Save Metadata. Meanwhile, raw and DNG files will be handled as expected. On the plus side, you will never face the confusion of seeing your non-raw images such as JPEG, HEIC or TIFF unexpectedly default to open via Camera Raw when you had expected them to open in Photoshop. The downside is that if you modify a non-raw image in Lightroom using the Develop module, these changes will be seen only in Lightroom and not by Bridge.
Let me further explain the settings and how they affect image files after being modified in Lightroom. If a photo in Lightroom is modified using the settings shown in Figure 10.104 with “Automatically write changes into XMP” and “Include develop settings in metadata inside JPEG, TIFF, PNG, and PSD files” enabled, then all the adjustments made to the image will automatically be saved to the Lightroom catalog and also saved to the original image file. In the case of proprietary raw files, the XMP metadata will be written to an XMP sidecar file and when opened via Bridge will, as you would expect, open via the Camera Raw dialog with the same Develop settings that were applied in Lightroom. In the case of DNG files, the XMP metadata will be written internally to the file and these, too, will open in Camera Raw. In the case of JPEG or TIFF files, because you are including the Lightroom Develop settings in the save to the XMP space, they will also default to opening in Bridge via the Adobe Camera Raw dialog. However, just to add to the confusion, this does assume that the Camera Raw preferences are set to “Automatically open JPEGs and HEICs with Settings” and “Automatically open TIFFs with Settings.” This leads me to also mention that in the case of HEIC files, as with raw files, the Develop settings are always saved to an XMP sidecar file. Yet, the file opening behavior of such files via Bridge is the same as for JPEGs that have the XMP data written internally. Whether HEIC files open via Camera Raw or open directly in Photoshop depends on how the aforementioned Camera Raw preferences are configured. And in case you were wondering about PNG and PSD files, these cannot be opened via Camera Raw. The ability to save Develop edits to PNG or PSD files only matters if you intend sharing these files with another Lightroom catalog.
If the “Automatically write changes into XMP” option is disabled, as shown in Figure 10.105, the metadata edits will be saved to the Lightroom catalog only. Raw and DNG files will open via Bridge in Camera Raw, but won’t show the most recent Develop module edits. If you were to open JPEG, HEIC, or TIFF images via Bridge that had just been edited in Lightroom, these will open directly in Photoshop and not open via Camera Raw. PNG and PSD will always open directly in Photoshop anyway. But at the same time, any image ratings, metadata keywords, or other information that may have been entered while working in Lightroom will not be visible to Bridge or any other external editing program either. In this example, the “Include develop settings in metadata inside JPEG, TIFF, PNG, and PSD files” option is still switched on, so if you did want the metadata edits to be saved to the files’ XMP metadata space, you would have to do so manually using the Save Metadata command ( ![]() [Mac] or
[Mac] or ![]() [PC]). But in doing so, you would once again be saving all the Lightroom settings to the files’ metadata space (including the Develop settings), and we are back to the same scenario as in Figure 10.104 where non-raw files may default to opening via Camera Raw, which is perhaps not what was wanted.
[PC]). But in doing so, you would once again be saving all the Lightroom settings to the files’ metadata space (including the Develop settings), and we are back to the same scenario as in Figure 10.104 where non-raw files may default to opening via Camera Raw, which is perhaps not what was wanted.

Now let’s look at what happens when “Include develop settings in metadata inside JPEG, TIFF, PNG, and PSD files” and “Automatically write changes into XMP” are both disabled (Figure 10.106). As before, any edit changes you make in Lightroom will be saved to the Lightroom catalog only. If you do choose to explicitly save the metadata, this saves everything to the raw or DNG files, but in the case of JPEG, HEIC, TIFF, PNG, or PSD files, this saves all the metadata to the file except for any Develop module edits. When such files are opened from Bridge, they will open in Photoshop directly instead of via the Camera Raw dialog. When you save with this configuration, Lightroom saves the informational metadata edits to the file but saves the Develop settings to raw or DNG files only. JPEG, HEIC, TIFF, PNG, and PSD files will not contain Develop edits and always open directly in Photoshop.
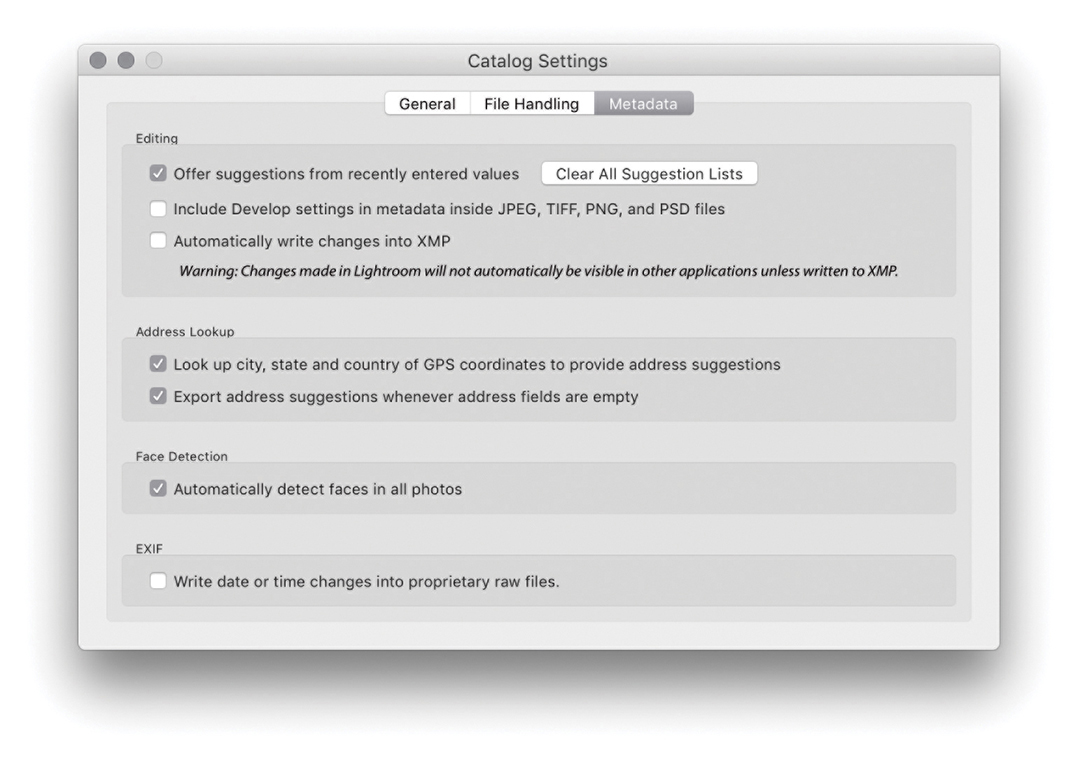
Where is the truth?
The most up-to-date, or “truthful,” settings can reside either in the Lightroom catalog or in the files themselves. If you work only in Lightroom, the truth will always be in the catalog. But if you adopt a more complicated workflow where the files’ Develop settings and other metadata can be edited externally, the truth may sometimes be in the file. For example, Figure 10.107 shows how a photo might appear in Lightroom with Lightroom edits applied, while Figure 10.108 shows what the same image might look like when viewed in Bridge without the edits saved to the file’s metadata. The “Automatically write changes into XMP,” Save Metadata to File, and Read Metadata to File options, therefore, allow you to precisely control how the metadata is updated between the Lightroom catalog and the image files.

Synchronizing metadata settings
You may often want to apply or synchronize metadata settings between photos. To do this, make a selection of images and click the Sync button (circled below). This opens the Synchronize Metadata dialog (Figure 10.109). The check boxes let you select the items you want to synchronize. You can then click the Synchronize button to synchronize the IPTC metadata information (including the keyword metadata) in the most selected image with all the others in the selection. Checked items that have no content will be highlighted in red. You will want to pay careful attention here not to overwrite existing metadata with blank metadata when synchronizing the metadata or using a template. A checked blank item effectively erases metadata fields when you sync the metadata. You can also select an image and press ![]() (Mac) or
(Mac) or ![]() (PC) to apply the Copy Metadata command, and then use
(PC) to apply the Copy Metadata command, and then use ![]() (Mac) or
(Mac) or ![]() (PC) to paste those settings to another selected image or group of images.
(PC) to paste those settings to another selected image or group of images.

Sorting Images
You have the option of sorting images in Lightroom by Capture Time, Added Order, Edit Time, Edit Count (for sorting Edit versions of master images in the order in which they were created), Rating, Pick, Label Text, Label Color, File Name, File Extension, File Type, or Aspect Ratio. You can adjust the sort order by highlighting an item in the View ![]() Sort submenu. An easier method is to use the Sort menu in the Toolbar (Figure 10.111). Capture Time is set by default and is probably the most useful sort-order setting. For example, if you come back from a shoot with several cards full of images, there is a high probability that the order in which you import the photos may not match the order in which they were shot. If the files are renamed at the time of import, you may want to correct this later, making sure the files were sorted by Capture Time in descending order and batch rename them in this order (Library
Sort submenu. An easier method is to use the Sort menu in the Toolbar (Figure 10.111). Capture Time is set by default and is probably the most useful sort-order setting. For example, if you come back from a shoot with several cards full of images, there is a high probability that the order in which you import the photos may not match the order in which they were shot. If the files are renamed at the time of import, you may want to correct this later, making sure the files were sorted by Capture Time in descending order and batch rename them in this order (Library ![]() Rename Photos). Next to the Sort menu is the Sort Direction button. This lets you quickly toggle between ordering the images in an ascending or descending sort order (Figure 10.110). The descending sort order is useful when shooting in tethered mode, when you may want the most recent images to always appear at the top of the filter view in the content area.
Rename Photos). Next to the Sort menu is the Sort Direction button. This lets you quickly toggle between ordering the images in an ascending or descending sort order (Figure 10.110). The descending sort order is useful when shooting in tethered mode, when you may want the most recent images to always appear at the top of the filter view in the content area.

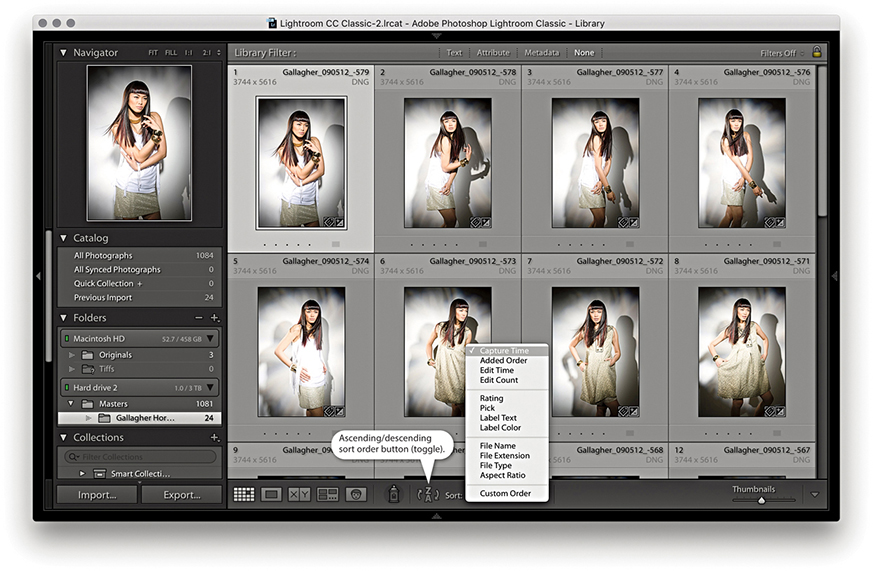
Note
The sort order is numerically sensitive. This means that Lightroom reorders number sequences correctly: 1, 2, 3, 4, 5, 6, 7, 8, 9, 10, 11, 12, 13 as opposed to 1, 10, 11, 12, 13, 2, 3, 4, 5, 6, 7, 8, 9.
Sort functions
If you are viewing a folder or a collection source, you can manually adjust the image sort order by dragging photos either within the Grid view or via the Filmstrip. However, it is possible to drag photos in the Library grid or a Filmstrip view only when a single folder view or a collection is selected. You cannot drag grouped folder views or filter views that span more than one folder source. Sorting the photos manually defaults the sort order menu to the User Order sort setting, and the User Order sort will remain in force after you have exited a particular folder or collection view. As soon as you switch to any other sort order menu option, such as Capture Time, the previous User Order sort will be lost.
Color label sorting
You will notice that instead of having a single sort option for sorting by color labels, there are in fact two options: Sort by Label Color and Sort by Label Text. This can help resolve some of the possible contradictions in the way color labels are identified in Bridge and Lightroom; both use different default label-naming sets (Figure 10.113). The Sort by Label Color option can be used to sort photos (alphabetically) by the color labels applied in Lightroom and Bridge (where the Bridge color label text also matches). The Sort by Label Text option is a “catch-all” option that allows you to sort all color-labeled photos regardless of whether the color-label settings between Lightroom and Bridge match. Also, if you go to the Metadata panel (Figure 10.112), you will notice the Metadata panel displays the color-label text data only. This means that, although Lightroom will not necessarily be able to display the color labels that might have been applied in Bridge as a color tint, you still have a way to filter and sort them based on the color-label text metadata.


Geotagging Images
In this section, we are going to be looking at ways to add GPS location metadata to your photographs, a process known as geotagging. A number of cameras are now able capable of automatically recording and embedding GPS data in capture images. For example, smartphones are capable of embedding GPS coordinates in photos. Alternatively, you can use a GPS receiver to record the GPS data and use separate software to process the tracklog data and “geocode” the captured image files. This data can then specify the exact point where a photograph was taken at a particular time. If an image has been geocoded, you will see the precise GPS coordinates in the GPS field in the Library module Metadata panel (Figure 10.114). The Altitude field displays the known altitude, while the Direction field displays one of eight compass points. To see the precise degree value, roll the pointer over the Direction field. You can click the arrow next to the GPS field to go directly to the Map module.
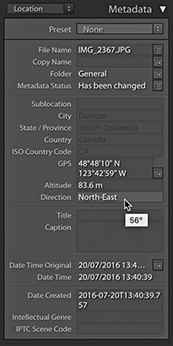
GPS Devices
To geocode images successfully, you need to take several things into account. First is your choice of GPS device. One option is a standalone device, and there are a number of affordable choices for around $100 or less. For example, I regularly use the AMOD AGL3080, which is shown in Figure 10.115. The cheaper devices tend to have a rather low sensitivity, however, and may fail to work when the cloud cover is heavy or you are inside a building. They also tend to consume a lot of battery power. So, it may be a good idea to consider using rechargeable batteries and always carry a spare set with you when you are out on location. As an alternative, many smartphones, such as the iPhone, automatically embed GPS data in the photos you shoot with them, or you can use the Geotag Photos app (geotagphotos.net) to record GPS coordinates via your smartphone every 30 seconds. At the end of a trip, you’ll need to upload the recorded GPS Exchange (GPX) file to your account page on the Geotag Photos website. If you are prepared to spend more money, GPS recording units with higher sensitivity can provide continued recording in overcast weather conditions or when you are down in a deep valley. Such devices offer the benefit of on-screen display controls and can be useful for other activities as well, such as personal navigation (especially in remote areas).

As with raw file formats, there are currently quite a number of different proprietary formats for storing GPS coordinates, not all of which are compatible with the different software solutions that utilize GPS data. Of these, the GPX format has emerged as an industry standard, and only tracklogs written in this format can be loaded into the Lightroom Map module. Therefore, it is desirable to use a GPS device able to export data using GPX. If yours doesn’t, you can still rely on third-party software to read the recorded GPS data, match it with your photos, and geocode the images.
The various hardware options you can buy will most likely already come with supplied software for a Mac or PC, which you can use to geocode your photos. The problem is that many of these programs are designed to write GPS data to JPEG images only. You need to make sure the software you use is able to geocode the GPS data to raw files using XMP sidecar files. This will then allow Lightroom to read in the geocoded metadata. For Mac users, I recommend HoudahGeo 5 (houdah.com/houdahgeo) and GPSPhotoLinker (earlyinnovations.com). For PC users, I recommend GeoSetter (geosetter.de/en).
On a cautionary note, be aware that some geocoding software either does not use the correct EXIF field to store the data or stores the GPS data within its own database only, thereby forcing you to use only that software to make use of the recorded data. Remember also, that if the software you use is able to edit the EXIF data of a proprietary raw file, you should take extra care that this does not affect the integrity of the file. It is generally not a good idea to mess with the XMP data of an undocumented raw file format. You never know if this may cause problems reading other data that’s stored in the file. For example, when reviewing one of the geocoding products shown in an earlier version of this book, I had to point out that the lens data in the lens data EXIF field would appear truncated after modifying the raw files. No real harm was done to the image data, but it was unnerving all the same to see this happen.
Embedding GPS Metadata in a Photo
Now that I have explained how GPS metadata can be useful, let’s look at how you can capture and embed GPS metadata in a series of photos. Firstly, for the geotagging to be accurate, the internal clock in your camera must show the correct time. It does not matter so much whether the camera clock is set to the correct time zone (although it may help if you remember to do this), but it should at least be accurate to a time zone somewhere in the world. GPS time-stamp data is recorded using something very similar to UTC (Coordinated Universal Time), a standard time that is measured irrespective of the different time zones in effect around the world. When it comes to geocoding your images, all you need to do is tell the software which time zone the camera clock was using at the time the photos were taken.
With the right equipment and good timekeeping, you can make an accurate record of where a photograph was taken from at a particular point in time. Such data may prove helpful to say, historians in the future, although given the inaccuracy of many of the photos you currently see placed on Google Earth, I wonder if the data recorded today will be seen as being that valuable? I find that most are wildly inaccurate. But even so, it does amaze me that the photos I have shot using my iPhone mostly have very precise GPS coordinates.
Reverse-geocoding
Reverse-geocoding is the process of reverse-coding a GPS point to an actual address or place name. A number of software programs can match a GPS coordinate to a range of known geographic locations and calculate which one is nearest or most relevant. For example, a typical smartphone can reverse-geocode the GPS data for your photos and show on a map where they have been taken.
To reverse-geocode in Lightroom, you need to open the Catalog Settings and enable “Look up City, state and country of GPS coordinates to provide address suggestions” (When you first create a new catalog in Lightroom, you will be asked if you wish to enable this feature). Once done, geocoded images will display the location name metadata in the Metadata panel (Figure 10.116). To apply location field names, manually click on the location header names circled in Figure 10.117. This reveals a pop-up menu from which you can select and confirm the name for each location name field.
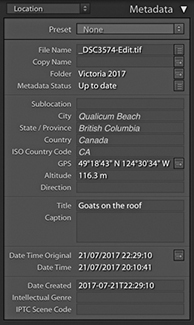
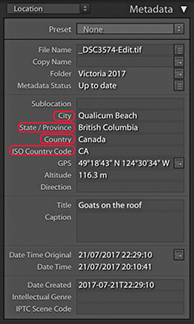
Unsurprisingly, this has brought about some concerns, such as whether it is appropriate to include GPS and other location data when releasing photos into the public domain. For example, there have been panic stories about photos of children taken by their parents at home, which have then been uploaded to a social network site, and the embedded GPS data shows the exact address where the family lives. I can imagine news documentary photographers who might not always want to reveal information about where their photos were taken. Fortunately, the Library module Publish Services panel and Export dialog give you the option to exclude all location metadata. As GPS embedding becomes more widely available, professional photographers have to take extra care to make sure they are not breaking any laws or inadvertently breaking client confidentiality by leaving any GPS data embedded.
The Map Module
The Map module (Figure 10.118), lets you view and manage geotagged images. The main content area displays a map view of the world, and you can change the style of this view via the Map Style menu in the Toolbar Map (Figure 10.119). As with the Web module, the map preview is built using Google’s Chromium Embedded Framework. You can quickly switch map views using keyboard shortcuts: ![]() (Mac) or
(Mac) or ![]() (PC) for Hybrid,
(PC) for Hybrid, ![]() (Mac) or
(Mac) or ![]() (PC) for Road Map, and so on. To view catalog images on the map, you first need to make a photo selection either from the Library module or via the Filmstrip. The Metadata panel on the right can confirm whether GPS data is present, and, when it is, it displays the GPS coordinates (Figure 10.119). For those images that have previously been geocoded with GPS data, clicking the arrow next to the GPS data field (circled) centers the map location on the selected image, as does double-clicking an image in the Filmstrip.
(PC) for Road Map, and so on. To view catalog images on the map, you first need to make a photo selection either from the Library module or via the Filmstrip. The Metadata panel on the right can confirm whether GPS data is present, and, when it is, it displays the GPS coordinates (Figure 10.119). For those images that have previously been geocoded with GPS data, clicking the arrow next to the GPS data field (circled) centers the map location on the selected image, as does double-clicking an image in the Filmstrip.
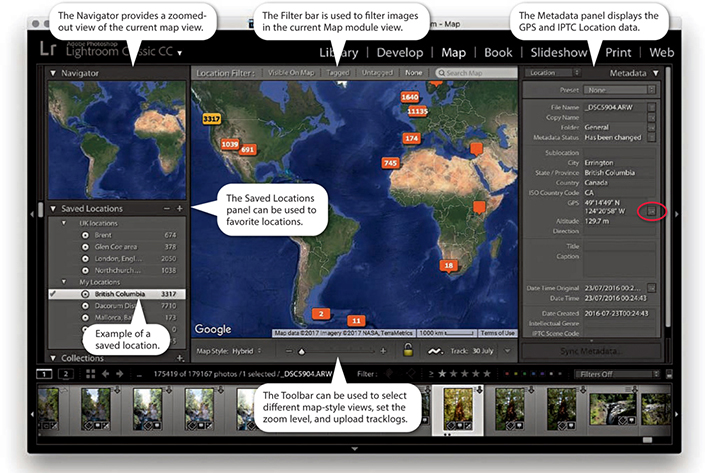

 ) and available map style options.
Navigation
To navigate the Map module, use the Zoom slider in the Toolbar to zoom in or out, and click and drag to scroll the map view. You can also use the ![]() and
and ![]() keys to zoom in and out and can control the level of the zoom with the Toolbar Zoom slider. The Navigator panel (Figure 10.120) provides a slightly more zoomed-out map view, where you can double-click to zoom in and click-drag to scroll the map. Double-click in the Navigator panel to establish a new map view point to scroll to.
keys to zoom in and out and can control the level of the zoom with the Toolbar Zoom slider. The Navigator panel (Figure 10.120) provides a slightly more zoomed-out map view, where you can double-click to zoom in and click-drag to scroll the map. Double-click in the Navigator panel to establish a new map view point to scroll to.
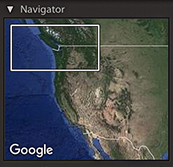
Location filter bar
The Map module Filter bar (![]() ) (Figure 10.121) can be used to filter the Filmstrip contents and create a filtered subselection. The default None option applies no filter to the Filmstrip and lets you see all the Filmstrip images. The Visible on Map option populates the Filmstrip with just those photos that are geocoded and appear within the current map view. As you zoom in, fewer photos will be selected; as you zoom out, more photos will be selected. The Tagged option filters the Filmstrip to select the geotagged photos only, dimming the untagged photos. The Untagged option selects all images that have yet to be geotagged within the current selection and dims all the rest. This is particularly useful if you wish to filter the photos that are yet to be geotagged.
) (Figure 10.121) can be used to filter the Filmstrip contents and create a filtered subselection. The default None option applies no filter to the Filmstrip and lets you see all the Filmstrip images. The Visible on Map option populates the Filmstrip with just those photos that are geocoded and appear within the current map view. As you zoom in, fewer photos will be selected; as you zoom out, more photos will be selected. The Tagged option filters the Filmstrip to select the geotagged photos only, dimming the untagged photos. The Untagged option selects all images that have yet to be geotagged within the current selection and dims all the rest. This is particularly useful if you wish to filter the photos that are yet to be geotagged.

 ) to toggle on or off.
The Search field can be used to search the Google Maps database to find a specific place. Very often, a single place name will suffice when making a search. Otherwise, use a comma when entering a place name hierarchy. So, for example, you might want to specify searching for Las Vegas, New Mexico, if you did not want the search to default to Las Vegas, Nevada. If you are not sure of an exact location, or there might be more than one place associated with a specific search, you will see a pop-up list of suggestions after you press ![]() . This allows you to select whichever is the correct, desired location (Figure 10.122).
. This allows you to select whichever is the correct, desired location (Figure 10.122).
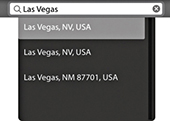
Tip
Lightroom is able to read GPS logs recorded using the GPX format only. If a tracklog has been recorded in some other format, you will first need to convert it to the more universal GPX format. Check out gpsvisualizer.com for help converting tracklog files to GPX.
Loading GPX tracklogs
You can import tracklogs (GPX only) via the tracklog icon in the Toolbar (circled in Figure 10.123) or by choosing Map ![]() Tracklog
Tracklog ![]() Load Tracklog. Once a tracklog has been loaded, Lightroom searches to see if any photos in the current catalog selection have Date Times that match with the times recorded to it. Where matches are found, Lightroom gives you the opportunity to auto-tag the matching photos so they can be geotagged. It is best to make sure you have the correct time set on your camera to match that on your computer and, if necessary, time-shift the GPS data as you load a tracklog. Alternatively, you can drag a photo from the Filmstrip to a point on the tracklog you believe to be the right location for that photo. Do this and all the other photos will auto-tag accordingly (Figure 10.124). This lets you quickly auto-tag photos regardless of any time-zone differences and is most useful for resolving time discrepancies between the camera and the tracklog. This does depend on you being able to recognize a particular location on the map of course.
Load Tracklog. Once a tracklog has been loaded, Lightroom searches to see if any photos in the current catalog selection have Date Times that match with the times recorded to it. Where matches are found, Lightroom gives you the opportunity to auto-tag the matching photos so they can be geotagged. It is best to make sure you have the correct time set on your camera to match that on your computer and, if necessary, time-shift the GPS data as you load a tracklog. Alternatively, you can drag a photo from the Filmstrip to a point on the tracklog you believe to be the right location for that photo. Do this and all the other photos will auto-tag accordingly (Figure 10.124). This lets you quickly auto-tag photos regardless of any time-zone differences and is most useful for resolving time discrepancies between the camera and the tracklog. This does depend on you being able to recognize a particular location on the map of course.

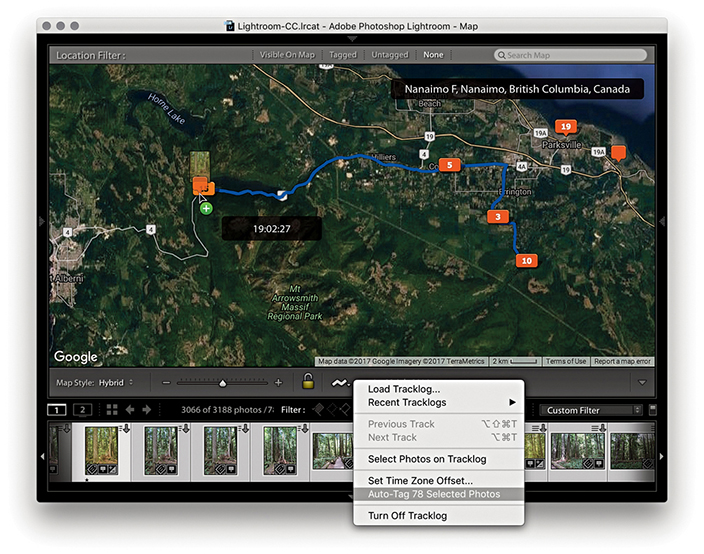
Tip
You can use the Filter bar to search the catalog by Metadata Status. This allows you to filter those files that have up-to-date metadata from those where the XMP metadata has been changed but not saved yet. You can also create a Smart Collection that filters files according to their metadata update status.
Tip
You can use the Recent Tracklogs submenu to select other previously loaded tracklogs. And, at the bottom is an option to turn off tracklogs.
Editing pins
Figure 10.125 shows examples of the types of pins displayed in the Map module. The pin marker for a single, unselected image is an empty orange pin marker. As you roll the pointer over the pin, it changes, adding four arrows, indicating you can drag to alter the pin’s position. Doing this overwrites the original GPS metadata, however, which might be a problem if you end up removing the original recorded GPS position. It is possible to lock solo pins by clicking the lock button in the Toolbar (or use ![]() [Mac] or
[Mac] or ![]() [PC]), but you will not then be able to edit the positions of any of the other solo pins until you remove the lock. If you click a pin to select it, the pin turns yellow, indicating the image is selected in the Filmstrip. If more than one image is geotagged at a specific location, the number of photos are displayed within the pin marker. The number in the pin and number of pins will vary according to the Map module magnification view. To reposition a pin group, you need to click it to select the photos in the Filmstrip. You can then drag those photos from the Filmstrip to reposition them on the map. A yellow rectangle with a number inside and no pointing arrow indicates a cluster of selected nearby photos. An orange rectangle with a number and no pointing arrow indicates a cluster of unselected nearby photos. A pin with a black dot represents the result of a Map search. If you click a pin, you’ll see the thumbnail or thumbnails associated with that pin. When there is more than one photo, click the arrows in the thumbnail preview to scroll through the images associated with that particular pin position (Figure 10.126).
[PC]), but you will not then be able to edit the positions of any of the other solo pins until you remove the lock. If you click a pin to select it, the pin turns yellow, indicating the image is selected in the Filmstrip. If more than one image is geotagged at a specific location, the number of photos are displayed within the pin marker. The number in the pin and number of pins will vary according to the Map module magnification view. To reposition a pin group, you need to click it to select the photos in the Filmstrip. You can then drag those photos from the Filmstrip to reposition them on the map. A yellow rectangle with a number inside and no pointing arrow indicates a cluster of selected nearby photos. An orange rectangle with a number and no pointing arrow indicates a cluster of unselected nearby photos. A pin with a black dot represents the result of a Map search. If you click a pin, you’ll see the thumbnail or thumbnails associated with that pin. When there is more than one photo, click the arrows in the thumbnail preview to scroll through the images associated with that particular pin position (Figure 10.126).


Matching photos to a recorded tracklog
The following steps show an example of how I was able to load a GPX tracklog and ensure that the photos matched correctly when auto-tagging them.

1. To begin, I clicked the tracklog button (circled above) and loaded a GPX tracklog. The GPS tracklog route then showed up in the Map module map view as a blue route. Before I used this to tag the photos in the Filmstrip, I wanted to ensure the selected photos matched the same time zone as had been recorded by the tracklog.

2. Essentially, the tracklog is always correct. What is not always correct is the Date Time set in the camera and, thus, the Date Time that is embedded in the capture image files. The objective here is to work out just what that time difference might be. If you think your camera is set correctly, taking into account daylight-saving time, you can proceed to Step 3. Otherwise, go to the Tracklog menu shown open in Step 1 and select Set Time Zone Offset. If the camera times appear not to match, the tracklog time will appear in red. As you adjust the Offset slider, you will know when you are close to the correct setting when the tracklog time is displayed in black.
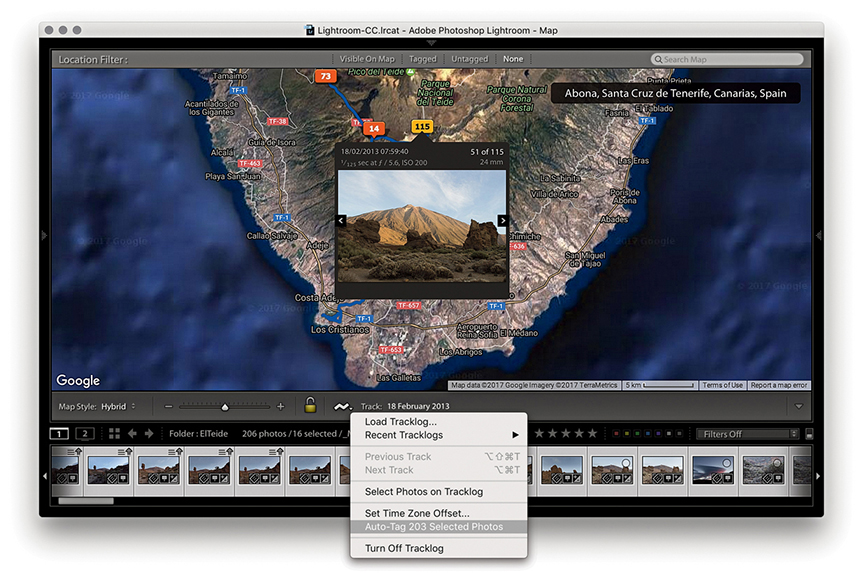
3. Once the time zone was set correctly, all I had to do was to select the photos in the Filmstrip and choose Auto-Tag Selected Photos from the Tracklog menu. This successfully matched the photos to the tracklog.
Manually geotagging photos in the Map module
What about the photos in your catalog that can’t be geocoded using recorded tracklog files? You can manually geocode these by dragging individual photos or selections of photos from the Filmstrip to a location on the map, or hold down the ![]() (Mac) or
(Mac) or ![]() (PC) key and click the map to geotag them. As you do so, you will see that a pin marker is added to the map view (Figure 10.127). This is a quick and easy solution for geotagging photos that do not have any recorded GPS data. However, I would urge you to think carefully when manually tagging photos this way. For the data to be useful and conform with the way GPS data is normally recorded, you need to tag as near as possible to the location the photo was taken from and not the location of the subject in the photo.
(PC) key and click the map to geotag them. As you do so, you will see that a pin marker is added to the map view (Figure 10.127). This is a quick and easy solution for geotagging photos that do not have any recorded GPS data. However, I would urge you to think carefully when manually tagging photos this way. For the data to be useful and conform with the way GPS data is normally recorded, you need to tag as near as possible to the location the photo was taken from and not the location of the subject in the photo.

Tip
If you disabled the “Look up City, state and country of GPS coordinates to provide address suggestions” option in the Metadata section of the Catalog settings and then enabled it again, you will need to restart Lightroom for this to kick in.
When you geocode images manually in this way, the IPTC location fields in the Metadata panel are filled automatically, but only if none of the location fields is empty to begin with and only if you have the “Look up City, state and country of GPS coordinates to provide address suggestions” option enabled in the Metadata section of the Catalog Settings. If any of the fields already has information, Lightroom will not auto-populate them with new location data (even though the new data might be more accurate). If you need to update the location, you will have to do so manually.
If you right-click anywhere in the Map module, you will see an Add GPS Location to Selected Photos menu option. This allows you to manually geotag photos by making a selection in the Filmstrip first and then using the context menu to geotag the selected photos. You can also use this context menu to select a Delete GPS Coordinates option.
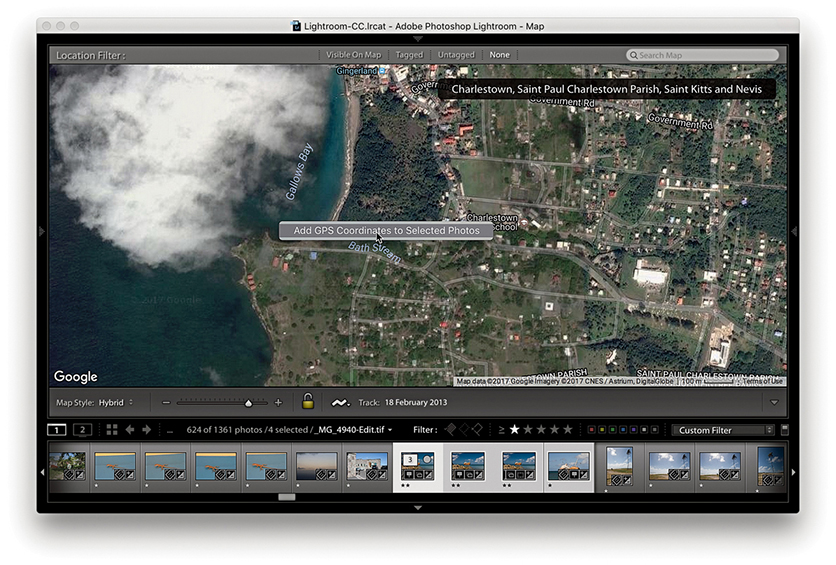
1. In this example, I made a selection of photos via the Filmstrip and right-clicked in the Map view to select Add a GPS Location to Selected Photos.

2. The selected photos were now geotagged to this location.
Saved Locations panel
The Saved Locations panel (Figures 10.128) can be used to store favorite locations and thereby make managing the Map module easier. All you have to do is click the arrow to the right of a saved location, and the Map module will instantly switch to display the location in the map view (Figure 10.129). Use ![]() to toggle the circumference display on or off. To create a new location, make sure the current map view is centered on an area of interest and click the + button at the top of the panel. This opens the New Location dialog shown in Figure 10.130, where you can set a radius for the location and choose a folder to save the new location to. Once a location has been saved, you can edit the radius by dragging the circumference pin. Photos can be dragged directly to Saved Locations, and Saved Locations can be dragged to photos in the Filmstrip.
to toggle the circumference display on or off. To create a new location, make sure the current map view is centered on an area of interest and click the + button at the top of the panel. This opens the New Location dialog shown in Figure 10.130, where you can set a radius for the location and choose a folder to save the new location to. Once a location has been saved, you can edit the radius by dragging the circumference pin. Photos can be dragged directly to Saved Locations, and Saved Locations can be dragged to photos in the Filmstrip.
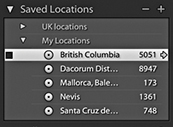


Exporting GPS-encoded files
Whenever you export a photo from Lightroom, the GPS data is normally saved with it, along with all the other XMP data that’s associated with the image. However, there are ways you can specifically strip the GPS and IPTC location metadata. One way you can do this is to select the Private box in the New Location dialog when creating a new location (Figure 10.130). Or, you can right-click the Saved Locations panel to reveal the context menu, and choose Location Options to open the (similar) Edit Location dialog and enable the Private GPS data option. When you do this, the GPS data will from then on be excluded on export from all photos contained within that radius. In the Metadata section of the Export dialog (Figure 10.131), you will see a Remove Location Info check box. This, too, strips the IPTC location and GPS metadata from all photos included in a Lightroom export.
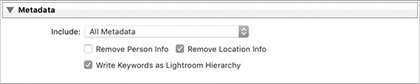
Filtering geocoded images
Figure 10.132 shows the GPS metadata filtering options. This includes a GPS Data filter to filter according to the GPS status. Next to this is the Map Location filter. Both are available as filter options in the Library module Filter bar.