
1 Introducing Adobe Photoshop Lightroom
An introduction to the main features in Lightroom, showing an example of a typical studio shoot workflow

Photograph: Gold Hill, Shaftesbury © 2016 Martin Evening
Sony A7rII | 70mm | 200 ISO | f/8 @ 1/320th
Welcome to the Adobe® Photoshop® Lightroom® system, which is designed to meet the needs of digital photographers everywhere. Lightroom consists of two components: Lightroom Classic CC, which is the desktop version of Lightroom; and Lightroom CC, which refers to all things mobile, but in particular, the Lightroom CC computer application. Because this book is predominantly about working with Lightroom Classic CC, the main focus is on how you can best work with the Lightroom Classic CC desktop program. Some Lightroom Classic CC users may also be subscribed to Lightroom CC, in which case there is a whole chapter at the end of the book dedicated to discussing Lightroom CC mobile workflows and how these integrate with Lightroom Classic CC. With this in mind, and for the sake of simplicity, I mostly refer to Lightroom Classic CC as “Lightroom” throughout the book. However, in the Lightroom Mobile chapter, I make a clearer distinction between Lightroom Classic CC and Lightroom CC/mobile.
Lightroom was designed from the ground up to provide today’s digital photographers with the tools they most need. This is reflected in the way Lightroom separates the various tasks into individual modules, is able to process large numbers of images at once, and lets you archive and retrieve your images quickly. But before I get into too much detail, let me begin by explaining a little about the basic concepts of Lightroom, the essential preference settings, and the Lightroom interface.
What is Lightroom?
Lightroom is a high-quality image processor and image database management system rolled into one. Although, as I mentioned in the introduction, Lightroom now consists of the Lightroom Classic CC desktop application and a Lightroom CC mobile system and streamlined Lightroom application. Lightroom is designed with photographers in mind, giving them powerful image-editing tools to process their photographs and manage large numbers of digital images. Lightroom provides a suite of application modules that provide an ideal workflow for digital photographers.
Note
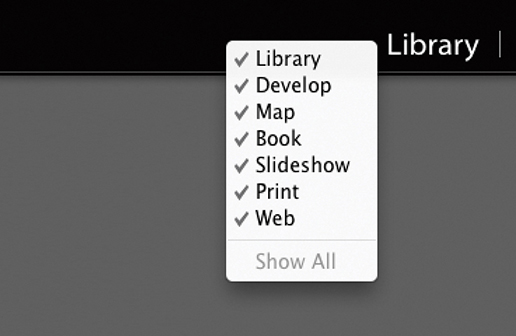
You can use the following Mac shortcuts when switching between individual modules (PC users should use ![]() plus the number):
plus the number):
![]() to select Library
to select Library![]() to select Develop
to select Develop![]() to select Map
to select Map![]() to select Book
to select Book![]() to select Slideshow
to select Slideshow![]() to select Print
to select Print![]() to select Web
to select Web![]() to go back to the previous module
to go back to the previous module
In addition, ![]() selects the Library module in Grid mode,
selects the Library module in Grid mode, ![]() selects the Library module in Loupe mode, and
selects the Library module in Loupe mode, and ![]() selects the Develop module.
selects the Develop module.
Keeping Things Simple
Lightroom’s tools are designed to streamline the image management and editing process and make the user experience as smooth and simple as possible. The program aims to provide photographers with the tools they need most and eliminates the call for complicated workarounds. For the most part, Lightroom has succeeded in doing this. It does not have too many complicated preference dialogs, nor does it demand you do anything special to optimize the program settings before you get started. For example, there are no color management settings dialogs to configure. This is because color management in Lightroom is carried out automatically without needing any user input. The Lightroom print workflow is very logical and, once set up, is easy to work with.
Modular Design
Lightroom is comprised of individual, self-contained modules built around a central core that contains the image processing and image database engines. Each can be thought of as offering a unique set of functions, and in Lightroom there are seven separate modules: Library, Develop, Map, Book, Slideshow, Print, and Web. The modular approach means Lightroom can expand the range of things you can do in the program but without adding unnecessary complexity to the other existing modules. Lightroom is designed so that all individual modules are able to tap into the two core components of the application. This is what gives the program its speed and adaptability.
Figure 1.1 shows a summary of the Lightroom system workflow. You can begin by explicitly importing stills or video files into Lightroom. For example, you can import files from a camera’s flash memory card, directly from a (supported) tethered camera, from files on a hard drive, or via an import from another catalog. The master files are then stored wherever you choose to place them. Once the files are imported, Lightroom is able to process and manage them without you actually editing the files themselves. Everything you do in Lightroom in the various modules is saved automatically to the master catalog file, which is used to store all the Lightroom edit information independently of the master images. As shown in Figure 1.1, you can export data from the Lightroom catalog as a complete catalog with copies of the master images, plus Smart Previews. You can also synchronize photos via Lightroom CC/Lightroom mobile, using the Adobe cloud servers (the Lightroom mobile workflow is explained in more detail in Chapter 11). The Library module is used to manage the catalog, the Develop module to carry out the image processing, and the remaining modules are for creating different types of outputs from Lightroom: i.e., published books, slideshow presentations, prints, or web galleries.

Note
The Figure 1.1 diagram assumes you wish to continue working with Lightroom Classic CC as the main hub in a local storage workflow. As this book is primarily about how to work with Lightroom Classic CC, this is the workflow you should adopt in order to make the most of Lightroom Classic CC working in conjunction with Lightroom CC/mobile. However, you do now have the option to migrate the entire Lightroom Classic CC catalog to Lightroom CC (see Chapter 11). In this scenario, the cloud can become the main hub. It is possible to combine the two, even though this is not the recommended workflow. Personally, I find that as long as you understand how the two systems work, this can be a useful approach to adopt.
You will notice Lightroom has a locked interface, where all you can do is edit the visibility of the modules and module panels—you can’t actually rearrange the panels or make them float. I see this as a positive thing because you always know where you are when you are working with Lightroom. With other programs, like Adobe Photoshop CC, people tend to personalize the program in the way they arrange the panels and their appearance. I find that if I am asked to take control of someone else’s computer, it can take a while to work out where everything is in their version of Photoshop. With Lightroom, the interface is always the same, and it’s never a problem trying to locate a particular panel or tool.
Lightroom Performance
As always, Lightroom aims to provide users with optimum performance. For example, Lightroom applies what is known as predictive caching to speed up the preview loading in the Develop module. It does this by loading the Camera Raw cache for two photos on each side of the current selected image before then loading the final high-quality image into RAM memory. In this respect, the more available RAM memory you have, the better. Consequently, you can expect to see fast image-loading times while navigating images sequentially in the Develop module. Steps have also been taken to speed up the Library module performance. The Camera Raw cache always stores preview-quality negatives, and whenever Lightroom renders thumbnails or smaller standard previews for use in the Library module, these preview-quality negatives are requested and loaded first. As a result, when you’re working in the Library module Grid or Loupe view, the thumbnail/preview rendering is faster. Exporting is also faster, and this should be particularly noticeable when making bulk exports. Lightroom’s thread priority queuing system gives high-priority rendering tasks, such as Develop module editing, priority over such background tasks like exporting images, converting photos to DNG, and building Smart Previews.
Note
Metadata refers to things such as the flags, star ratings, and color labels, as well as keywords that you can apply to photos in Lightroom. This also includes geotagging, where you can add GPS metadata to add location data to a photo.
Just after the release of the last edition of this book, however, it became clear that those improvements did not benefit all customers. Worryingly, customers running high-spec machines with multiple cores and lots of RAM were reporting slowdowns in performance over time that necessitated reboots. Adobe has since cured the slowdown problems and provided performance tweaks to ensure Lightroom runs faster on high-end systems. Therefore, if you are running a system with more than 12GB of RAM or with multiple cores, you should now expect to see some improvement in Lightroom performance. In theory, the more cores you have, the better. You should see an improvement with the speed of images loading while importing in the Grid view. On my four-core machine with 32GB RAM, for example, the import speed is around 15–20% faster. If I had more cores, I could probably expect to see even better import speeds. Customers that have their cameras set to save compressed raw files might notice a speed up in rendering previews from a set of newly imported images. Customers with catalogs that have over 100K of assets should also see improved performance during importing.
The speed gains will be dependent on other factors besides just the number of cores and RAM memory, but generally you should see better performance. But you should also expect to see improved on-screen interactive adjustments when working in the Develop module, as well as faster batch merge operations for HDR/Panorama Photo Merges, faster Export processing, and faster Auto Imports.
Choosing to build Smart Previews as photos are imported enables you to continue working in Lightroom when the master files are off-line. For example, all the masters might be stored on a remote hard drive that is disconnected from the computer. Working with Smart Previews can help you achieve faster Lightroom performance, because Lightroom can work more quickly when using Smart Preview (compact, lower-resolution) versions of the master files. To help you take advantage of this, the Performance preferences includes the option to use Smart Previews in place of the originals when editing in the Develop module. Where Smart Previews are available, you can also manage the photos via the Library module and geotag photos using the Map module. Although you can create on-screen slideshows using Smart Previews, you cannot export slideshows. Similarly, you can use Smart Previews in the Book module to create or edit a book layout (but not to generate a book). Also, you can’t export Smart Previews to Photoshop.
Adobe Camera Raw processing
If you are accustomed to using Camera Raw for Photoshop, you will already be familiar with the Develop module controls in Lightroom. This is because Lightroom shares the same Adobe Camera Raw processing engine as Photoshop, which has evolved to become one of the best raw processing tools on the market and currently supports over 550 proprietary raw file formats.
Color controls
Lightroom is primarily a raw processing program, but Develop module image adjustments also can be applied to TIFF, PSD, PNG, or JPEG images that are in RGB, Grayscale, CMYK, or Lab mode (but note that Lightroom image adjustments are always carried out in RGB). The Basic and Tone Curve panels provide intuitive controls with which you can easily adjust the tone and color in any photograph. Selecting a black-and-white profile plus further modifications via the B&W panel offers an adaptable approach to black-and-white conversions whereby you can adjust the balance of color information that is used to create a monochrome version of a color original. The split-tone controls work nicely on color images as well as black-and-white converted pictures. With a little experimentation you can easily produce quite dramatic cross-processed-type effects. The Develop module provides further tools to optimize your photographs. You can easily manipulate the brightness and color characteristics of global or targeted colors, for instance, and there are the tools for spotting and applying localized adjustments, not to mention tools for optical and geometric corrections.
It is worth pointing out that all Develop adjustments in Lightroom are non-destructive and recorded as edit instructions that are stored in the central catalog (and can also be stored as metadata with the image itself). This means that a single raw master file can be edited in many ways and output or printed at different sizes without your having to create different pixel image versions from the original. Any image edits and ratings you make in Lightroom can be recognized in current versions of Adobe Bridge and Photoshop. The same thing applies to ratings and other metadata. If you edit the metadata in Lightroom and save the changes made to the file, these too can be read in Bridge. The reverse is also true. For example, if you add keywords and assign a colored label to an image in Bridge, these metadata edits can be read by Lightroom and updated to the Lightroom catalog—although this does raise the question of which settings are correct when a single image has been modified in two separate programs. In this situation, Lightroom informs you of any conflicts and lets you decide which settings should override the others.
Managing the image library
Lightroom has been designed to provide a flexible workflow that meets the requirements of all types of photographers. When you work with Lightroom, you begin by explicitly choosing the photos you would like to add to the catalog. From this point on, the way Lightroom manages those images is actually not that much different from working with any other type of browser program. Most browser programs are like glorified versions of the Mac Finder or Windows Explorer, which are mainly useful for inspecting the contents on a computer and allowing you to see everything that is on a drive or in a specific folder. The main difference with Lightroom is that you control which images and videos are imported into the program and then cataloged by the program’s central database. Files can be imported from a camera card, directly from the camera (via the Tethered Capture panel), or by copying them from an existing folder. Or, you can tell Lightroom to “add” photos to the catalog by importing them from the current folder location. After the files have been imported to the catalog, anything you do in Lightroom (such as changing a folder name or filename, deleting a file, or moving a file) is mirrored at the system level. When deleting, you have the option to remove a file from the catalog only or move it to the trash for deletion. Working with the Folders panel in Lightroom (Figure 1.2) is, therefore, not dissimilar from working with a hierarchical folder tree list view in a browser program. But in Lightroom, the tree list in the Folders panel shows only those files that you have requested to be in the catalog and nothing else.
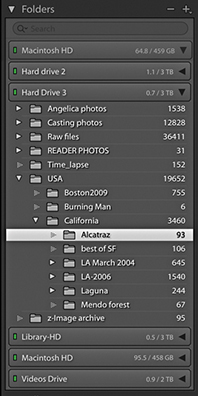
Of course, a hierarchical folder management is fine if you know in which folders your images are stored. But as you start working with many thousands of photographs, you’ll soon find this is no longer such a practical solution. Yes, Lightroom can store all your images in a neat hierarchy of folders, but its real power as an image asset manager comes into play when you use the Filter bar to search for images in the catalog. Once you get into the habit of entering descriptive keyword information each time you import new photos, you will be able to search your archive more easily and more quickly when browsing for specific photographs.
Where does Photoshop fit in?
For many years now, Photoshop has pretty much dominated the pixel image-editing market and has constantly adapted to meet the varying demands of lots of different types of Photoshop customers, from graphic designers to illustrators to special effects artists working in the motion picture industry. Although Photoshop is a powerful image-editing program with a wide range of tools to suit everyone’s requirements, it also has become increasingly complex. When the two Knoll brothers, Thomas and John, first created Photoshop, they could hardly have predicted how their program would develop or what Photoshop users in the future would be doing with it, much less predict the technological demands that digital capture would make. Photoshop started out as a program for editing single images in real time (as opposed to a deferred image-processing route), and the legacy of Photoshop’s architecture led to various compromises being made as more and more features were added.
Lightroom has been built from scratch, which means the engineers were able to design a program that not only addressed current demands but also anticipated future needs. For example, whenever you apply consecutive image adjustments in Photoshop, you are progressively degrading the image. Lightroom, on the other hand, allows you to make as many adjustments and changes as you like; it applies them as a single adjustment only when you choose to edit in Photoshop or export the photo as a fixed-pixel image. You can also revisit the edits you make and create improved versions as the Lightroom editing tools are improved (Figure 1.3).

In Lightroom, the photos in the catalog are like your digital negatives. Whether they are raw files, PSDs, TIFFs, or JPEGs, they are always preserved in their original state throughout the entire Lightroom workflow. You can create slideshows, generate web galleries, or make print outputs without ever physically altering the original files.
Integrating Lightroom with Photoshop
People often ask if Lightroom can ever become a complete replacement for Photoshop. I used to think not, but now when you consider the many kinds of things you can do to your images in Lightroom, the gap is certainly narrowing. The majority of photographs I work on are processed exclusively in Lightroom. Overall, I would say Lightroom is an ideal front-end application for importing new images and building a searchable database of your master photographs. Once your photos are in Lightroom, you have all the controls you need to carry out image-edit selections, group and rename photos, and make basic and advanced Develop adjustments. When you’re ready to take your photos into Photoshop, you can use the Photo ![]() Edit in Adobe Photoshop command or use the File
Edit in Adobe Photoshop command or use the File ![]() Export command to create exported versions of your master images. From there, you can make use of the tools in Photoshop to make photo composites or perform essential production tasks, such as CMYK color conversions.
Export command to create exported versions of your master images. From there, you can make use of the tools in Photoshop to make photo composites or perform essential production tasks, such as CMYK color conversions.
Once you start bringing images into Lightroom, you won’t necessarily find yourself locked into working exclusively in the program the way you are with some other programs. Lightroom is flexible enough to allow you to work simultaneously with Bridge or other image browser programs. Adobe Camera Raw, which is used by both Bridge and Photoshop, does provide the same level of flexibility, but only up until the point when you render a raw file as a pixel image to be edited in Photoshop.
If your Lightroom subscription should come to an end
Lightroom Classic CC is available via the Adobe Creative Cloud only. People are naturally worried about how they will be able to access their catalogs after their subscriptions come to an end. The good news is that when this happens, Lightroom will continue to launch and give you access to your files. However, the Develop and Map modules will be disabled and integration with Lightroom CC/mobile will no longer function.
Tip
To see if the raw files from your camera are supported in Lightroom, go to the Adobe Photoshop website at: helpx.adobe.com/photoshop/camera-raw.html. Cameras capable of capturing raw images using the Digital Negative (DNG) format are also supported in Lightroom. The DNG format offers many benefits: It is a self-contained raw format that can incorporate externally edited XMP metadata (no need for .xmp sidecar files), and, because it is an open standard format, it offers better long-term support.
What you Need
Lightroom can handle JPEGs, TIFFs, raw images, and video files. If your camera is capable of capturing raw images, I strongly advise you to shoot in raw mode whenever possible.
You will require a computer that meets the minimal specifications listed below. Although it is possible to run Lightroom with a minimum of RAM, Lightroom will certainly benefit from having as much memory as possible. Therefore, it is recommended that you install 4 GB or more of RAM. A computer with a fast processor will help, of course. You don’t need much hard disk space to install Lightroom, but you will need to give serious consideration to how you will store all the images in the catalog. Here are the minimum requirements for Mac and Windows systems.
Installing Lightroom
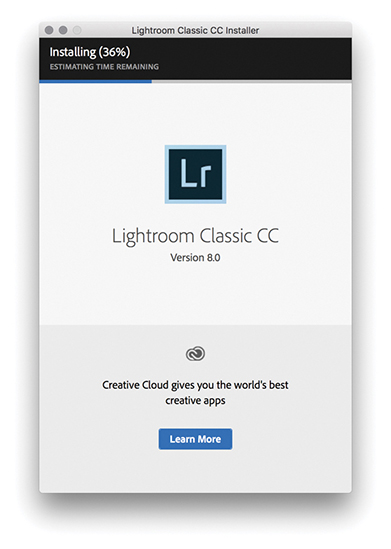
The Lightroom installation process should be fairly easy. All you need to do is download the program and run the installer. Figure 1.4 shows the Lightroom installation dialog. To install Lightroom Classic CC, you will be required to enter your Adobe ID information and accept the Adobe Software License agreement. You must be connected to the Internet when you install Lightroom. Once Lightroom has been installed on your computer, you can continue to use it in offline mode with a valid license. However, after 30 days you’ll receive a reminder to reconnect to the Internet to validate your license. Beyond that, Lightroom will go into expiration mode, where the Develop and Map modules will be unavailable, until you have a chance to connect to the Internet again. If you have an earlier, perpetual license version of Lightroom on your computer, the Lightroom installer will install a separate, new version (see sidebar). However, if you are upgrading an existing Lightroom catalog, you may be asked at this stage if you would like Lightroom to run a verification process to test the integrity of the current catalog (see “Upgrading from an older Lightroom catalog” on page 10). The install process may also need to update the previous catalog file.
Note
The first time you click to update Lightroom, you’ll see a dialog that lets you opt out of or learn more about auto-updating. If you choose to keep this option enabled, Lightroom will automatically install new updates from that point on. Perpetual license customers be reassured: The auto-update process will never uninstall perpetual license products, such as Lightroom 6.
The Adobe Photoshop Lightroom Creative Cloud agreement permits you to install Lightroom Classic CC on a main computer and a secondary computer, such as a laptop, because Adobe recognizes that a lot of its customers regularly work on more than one computer. You can also use a single Lightroom subscription to run a Mac and/or Windows version of the program. All Adobe applications use the same install process, which requires you to have an Adobe ID when installing the software. Your Adobe ID can help Adobe when handling customer support issues or if you move Lightroom to a new computer. The other benefit is that Adobe can improve the product by analyzing workflows in greater detail and can ultimately present tailored content and help based on your unique workflow. However, you do have the ability to opt out of data gathering: Choose Help ![]() Lightroom Classic CC Online, click on your account ID in the top-right corner, choose Manage Account, and go to the Security and Privacy section.
Lightroom Classic CC Online, click on your account ID in the top-right corner, choose Manage Account, and go to the Security and Privacy section.
Although Lightroom will require you to sign in to install, it is still possible to register computers that are normally kept permanently offline (such as those used in secure environments). Follow the regular install procedure until you get a message that says “having trouble connecting to the Internet.” At this point, click the link and follow the instructions on how to generate a response code using a separate Internet-enabled device. This code will be valid for 72 hours.
The first time you launch Lightroom, you will be shown a dialog asking you to select the country/region where you currently live. This is now required due to Google Maps usage in the Map module; the Google Maps usage terms prohibits its use in certain countries.
Sleep Protection
Lightroom Classic CC is designed to prevent your computer from going to sleep while certain processes are taking place, such as building previews, generating slideshows, publishing, importing, or exporting. It also prevents the computer from going to sleep when carrying out a Lightroom Classic CC to Lightroom CC/Lightroom mobile synchronization (provided the “Prevent system sleep during sync” option is checked in the Lightroom mobile preferences [see page 18]). None of the above will prevent the display from going to sleep (depending on how your system preferences are configured).
Upgrading from an Older Catalog
If you are upgrading Lightroom from a previous, perpetual license version of the program, you can let the installer create an upgrade catalog for you, and it will leave the old version and old catalog intact on the computer system. It is possible to get Lightroom to create Smart Collections that sort files according to the bit depth and/or number of color channels in an image. As a consequence of this, you may notice it takes a little longer than expected to update the catalog while Lightroom reads in these additional searchable fields in the existing catalog.
If it is absolutely necessary, you can carry out a super-clean upgrade. First, make an export copy of your current Lightroom catalog, launch Lightroom Classic CC to create a brand-new empty catalog, and then use File ![]() Import from Catalog to import the previous catalog and at the same time carry out a catalog upgrade. Just be aware if you choose to upgrade your Lightroom catalog using this upgrade method, you will lose any Publish Services data, because such data is not stored as part of the Lightroom catalog. So, if you have previously made extensive use of Publish Services in Lightroom, you will want to avoid using this method.
Import from Catalog to import the previous catalog and at the same time carry out a catalog upgrade. Just be aware if you choose to upgrade your Lightroom catalog using this upgrade method, you will lose any Publish Services data, because such data is not stored as part of the Lightroom catalog. So, if you have previously made extensive use of Publish Services in Lightroom, you will want to avoid using this method.
Tip
You can reset the application preferences at launch time by holding down the ![]() keys as the program launches. Resetting preferences at launch clears the user preferences only and not the startup preferences. The Lightroom team has moved a few critical preferences out of the main preference file, so deleting Lightroom’s preferences doesn’t make it forget such essential things as which catalog you were using or which catalogs you’ve already successfully upgraded. Mac users running macOS 10.12 or later will need to take extra steps if they wish to completely delete all cached preferences. Go to username/Library/Preferences, and delete any files with Lightroom or LR in their name. Next, launch Terminal, and enter defaults delete com.adobe.LightroomX, and then relaunch Lightroom. As always, make sure you have data backed up first.
keys as the program launches. Resetting preferences at launch clears the user preferences only and not the startup preferences. The Lightroom team has moved a few critical preferences out of the main preference file, so deleting Lightroom’s preferences doesn’t make it forget such essential things as which catalog you were using or which catalogs you’ve already successfully upgraded. Mac users running macOS 10.12 or later will need to take extra steps if they wish to completely delete all cached preferences. Go to username/Library/Preferences, and delete any files with Lightroom or LR in their name. Next, launch Terminal, and enter defaults delete com.adobe.LightroomX, and then relaunch Lightroom. As always, make sure you have data backed up first.
Current Lightroom Classic CC users will now find that the default option is to upgrade Lightroom Classic CC automatically. This means that as new updates are released—roughly every three months or so—Lightroom automatically downloads the new updates and installs them, overwriting the previous version. But the Lightroom updater system won’t overwrite an older, perpetual license version, such as Lightroom 6. It will be possible to change the default setting to manual version updates as before, or roll back to a previous dot release via the Creative Cloud app should you need to.
Using Lightroom for the First Time
During the initial install, Lightroom will ask you where you wish to store the catalog and what you want to call it. It is important to understand here that the Lightroom catalog is something that is stored separately from the photos themselves. You may want to keep the catalog in your Pictures/My Pictures folder on the main system hard disk, but you can store it anywhere you like. Just bear in mind that a large catalog can easily grow to 100 GB or more. Above all, it is important to be aware that when you import files into Lightroom, it references the photos and videos you import and keeps an updated record of where those files are kept and how they are named. Lightroom doesn’t actually store copies of your files in an internal archive. So, whatever you do, don’t delete the files after you have imported them. Sadly, there have been instances where people have imported photos, thinking they were then “in Lightroom,” deleted the originals, and found out too late that they had just erased the master files.
Lightroom Preferences
On macOS, the Lightroom preferences are located in the Lightroom menu (or you can use the ![]() shortcut). On a PC, they are located in the Edit menu (or you can use the
shortcut). On a PC, they are located in the Edit menu (or you can use the ![]() shortcut). You can access Catalog Settings via the Lightroom menu (Mac) or Edit menu (PC). There is also a Go to Catalog Settings link in the Lightroom Performance preferences. Or, you can use the
shortcut). You can access Catalog Settings via the Lightroom menu (Mac) or Edit menu (PC). There is also a Go to Catalog Settings link in the Lightroom Performance preferences. Or, you can use the ![]() (Mac) or
(Mac) or ![]() (PC) keyboard shortcut to open the Catalog Settings dialog.
(PC) keyboard shortcut to open the Catalog Settings dialog.
Note
Chapter 12 details more about the preference settings, so I’ll just highlight the key settings for now.
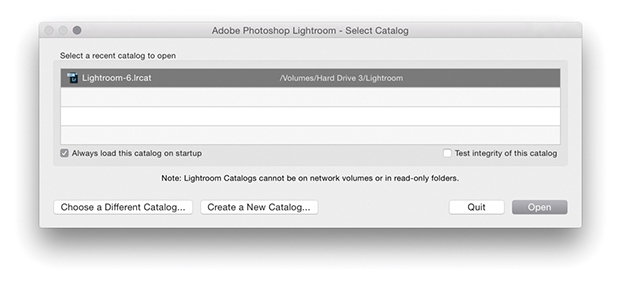
The default Library location for your Lightroom catalog is the username/Pictures folder (Mac), or the username/My Documents/My Pictures folder (PC). If you want to create a new catalog in a different location, you can do so by restarting Lightroom with the ![]() key (Mac) or the
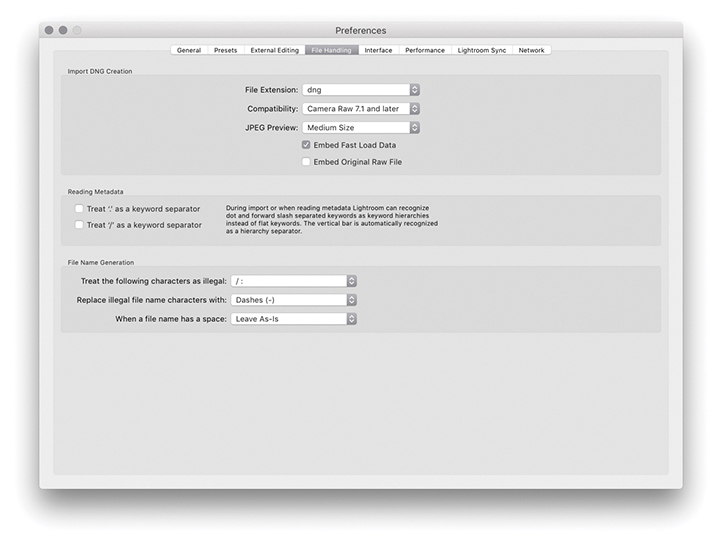
key (Mac) or the ![]() key (PC) held down during startup. This displays the Select Catalog dialog shown in Figure 1.5, where you can click the Create a New Catalog button to select the location to store a new Lightroom catalog. After you have successfully launched the program, go to the Lightroom menu (Mac) or the Edit menu (PC) and choose Preferences. This opens the General Preferences dialog shown in Figure 1.6, followed by the other preference sections shown in Figure 1.7 through 1.12.
key (PC) held down during startup. This displays the Select Catalog dialog shown in Figure 1.5, where you can click the Create a New Catalog button to select the location to store a new Lightroom catalog. After you have successfully launched the program, go to the Lightroom menu (Mac) or the Edit menu (PC) and choose Preferences. This opens the General Preferences dialog shown in Figure 1.6, followed by the other preference sections shown in Figure 1.7 through 1.12.
 key (Mac) or the
  key (PC) during startup allows you to select which catalog to use or lets you create a new catalog.


Performance Preferences
Lightroom performance can be improved by checking the Use Graphics Processor option in the Performance preferences (Figure 1.13). When checked, this allows Lightroom to use the Graphics Processing Unit (GPU) to speed up its interactive image editing when working in the Develop module. How much of a benefit you’ll see depends on the video card and the display. The main impetus for this has been to accommodate Lightroom customers using 4K or 5K displays where the screen pixel density is four times that of a regular display. For example, both the panning and zooming are much faster with GPU support, and the slider response should be virtually instantaneous. If you open a large image and choose a 1:1 zoom view, check out how quickly you can scroll from one corner of the image to another. Without GPU support, the Lightroom Develop module performance tends to be slow and jerky. But when Use Graphics Processor is enabled, the scrolling should be much smoother. If you look at what is happening more closely, you will notice how the on-screen image initially loads a standard-resolution preview image before rendering a full-resolution preview. Also, when you have an image in the Develop module at a 1:1 view, Lightroom preemptively loads and renders parts of the image that are just outside the current visible area. By doing so, Lightroom is able to provide a smoother scrolling experience. When you adjust the Develop sliders, the preview response will appear to be a lot less jerkier when Use Graphics Processor is enabled, although you’ll see more of a performance boost with some types of Lightroom Develop module edits than others.

Note
Currently, the GPU acceleration described here applies only to processing carried out on the main display. Users with multiple displays should be aware that performance on secondary displays will be unchanged regardless of whether Use Graphics Processor is checked. Adobe has created a GPU help document, which is available at: tinyurl.com/hehyn4n.
Graphics card compatibility
When you launch Lightroom, it will test your video card to make sure it is compatible and there are no errors. For example, an error may mean the card driver needs updating. If there is a problem, GPU support will be disabled, and Adobe does also disable some cards by default due to known compatibility issues. If the card you are using is compatible, the video card name will be shown in the Performance section of the Lightroom Preferences dialog. If it is not, Lightroom will show an error message. You will also need to make sure your video drivers are up to date. On the Mac system, video drivers are updated whenever you carry out an operating system update, but on Windows the operating system is not always as accurate and may tell you that the outdated drivers you have installed are just fine. So in these instances, PC users experiencing problems may need to go to the manufacturer’s website to download a dedicated video driver update utility.
Lightroom can currently use only a single GPU, so if your computer has more than one video card, this won’t offer any improvement (although the performance boost from using just one should be significant enough). For best results, the main requirement is that you have a compatible graphics card. You don’t necessarily have to have the fastest card to get optimum performance; a solid, midrange card can be just as effective as a high-end one. Also, if your system has a recent-generation Intel chip, this can make working in the Develop module faster. If you check out the Lightroom system info (Help ![]() System Info), look for an item called “Camera Raw SIMD optimization.” If your computer lists AVX2, then you should see an additional small improvement over AVX in terms of Develop module processing. Basically, the GPU is used for both the display preview management and the rendering (but only when Use Graphics Processor is enabled, of course), where different portions of the rendering can occur on the GPU and Central Processor Unit (CPU) simultaneously. The GPU processing is very fast, but the CPU work may take a little longer, which is why you may sometimes see a slight time lag in the on-screen rendering. But if you have AVX2, you will see a small extra speed boost to the CPU aspect of the processing.
System Info), look for an item called “Camera Raw SIMD optimization.” If your computer lists AVX2, then you should see an additional small improvement over AVX in terms of Develop module processing. Basically, the GPU is used for both the display preview management and the rendering (but only when Use Graphics Processor is enabled, of course), where different portions of the rendering can occur on the GPU and Central Processor Unit (CPU) simultaneously. The GPU processing is very fast, but the CPU work may take a little longer, which is why you may sometimes see a slight time lag in the on-screen rendering. But if you have AVX2, you will see a small extra speed boost to the CPU aspect of the processing.
Tip
It is important to realize that the GPU performance boost will be available for only certain types of video cards (OpenGL 3.3 and higher) and only if you are using a 64-bit operating system—either macOS 10.12 and higher or the latest Windows 10. Enabling the graphics processor can in some cases lead to slower performance on large displays because of the time it takes to load a full-resolution image. So, depending on the size of the images you are working on and the size of your display, you may want to turn the Use Graphics Processor option on or off to compare performance.
Smart Previews Option
You can use the “Use Smart Previews instead of Originals for image editing” option to help speed up the time it takes to edit images in the Develop module. Providing Smart Previews have been built, you can instruct Lightroom to load Smart Preview proxy versions instead of reading in the original file data for a Fill or Fit to Screen view. When you have large-size originals this can speed up the time it takes to load each image, and the workflow is the same as when working in Lightroom mobile where image-edit adjustments are applied to proxy versions, rather than the originals. The downside is the preview quality won’t be as good as working from the original image data. You may see banding occur in blue skies or dark areas. However, this won’t compromise the quality of the final edits (when the adjustments are applied to the master images).
Note
If the original images are available and you zoom into an image, Lightroom automatically displays the original rather that the Smart Preview.
Lightroom Sync (Mobile) Preferences
You can use the Lightroom Sync preferences preferences (Figure 1.14) to sign in to and manage your Adobe Creative Cloud account. Click on More Account Info Online to access your full Adobe account settings and options. Clicking the Delete All Synced Data button will take you first to an Adobe web page. Here, you will be asked to confirm you wish to delete the sync catalog data stored on the Adobe cloud servers. Doing so may cause you to lose any master files that are on the cloud only and have yet to download to Lightroom Classic CC. Because the sync processing can often take a long time, there is a “Prevent system sleep during sync” option to prevent the computer going to sleep and halting a background sync process. This preference will not affect the system display sleep settings though.

The default location to download Lightroom CC/Lightroom mobile synced photos to is the Pictures/My Pictures folder. In the Location section you can specify an alternative location. Because many people prefer to use low-capacity SSD drives for their boot drives, I suggest the download location should ideally be on a large-capacity internal or external hard drive. Below that is an option to organize the imported subfolders by capture date and on the right is a menu of date format options you can select from. The Pending Sync Activity section provides an update of which files are currently being synced and tells you what is being uploaded or downloaded and from which source device the files are being downloaded. You can click on these links to be taken to the source files. If the syncing is only partially complete, you won’t be able to see the files of course, but you can at least check the source images filenames.
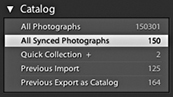
Once you start syncing files to Lightroom mobile, an All Synced Photographs collection item will then appear listed in the Catalog panel (Figure 1.15). This lets you view, at a glance, all photographs that have been synced with Lightroom CC/Lightroom mobile.
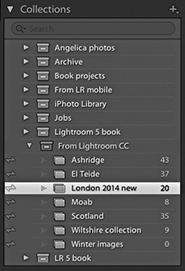
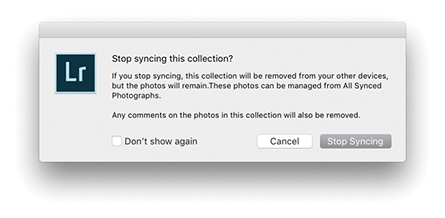
In the Collections panel, you will see a status icon appear next to collections that have been synced with Lightroom CC/Lightroom mobile. In Figure 1.16, the status icons show there are synced Collections. You can click a status icon to pop the dialog shown in Figure 1.17, where you can choose to stop syncing photos in that collection.
History Panel
Lastly, if you check the History panel in the Develop module, you can see recorded the status of any image, which will also indicate if a photo has had its settings changed via Lightroom CC/Lightroom mobile (Figure 1.18).

Customizing the Interface
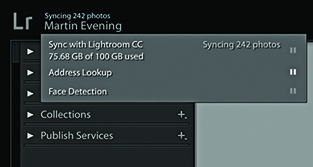
There are several ways to customize the appearance of the Lightroom program. The top panel in the Lightroom interface contains the Lightroom identity plate and module selectors. If you go to the Lightroom menu (Mac) or Edit menu (PC) and select Identity Plate Setup, you will see the Identity Plate Editor dialog, which is shown below. (You can also right-click to reveal the context menu where you can choose Edit Identity Plate.) The “Adobe ID” option displays a small Lightroom logo with your Adobe ID below. With this option you can click the small arrow or anywhere in the identity plate area to reveal the Activity Center (Figure 1.19). The Lightroom Classic CC option displays the Lightroom logo. Or, you can select the Personalized Identity Plate option, which lets you replace the standard Lightroom logos with a custom design of your own. The following steps explain how. Note that identity plates are saved with the catalog and are therefore catalog-specific. Consequently, if you work with multiple catalogs, you’ll have to repeat these steps for each catalog that’s in use.
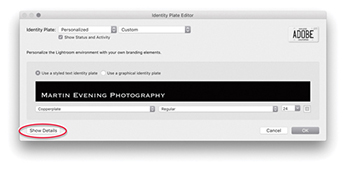
1. This shows the Identity Plate Editor after I selected the Personalized option. I then selected the “Use a styled text identity plate” option, so I could enter custom text, set the font type and font size, and use any font that was available on the computer. In the example shown here, I edited the text to show the full name for my business and set the font to Copperplate.

2. After I had configured a custom identity plate, I went to the Identity Plate Custom pull-down menu and chose Save As to save the settings as a new custom template design.

3. If you select the “Use a graphical identity plate” option instead, you can add an image logo by copying and pasting or dragging a PDF, JPEG, GIF, PNG, TIFF, or PSD image into the identity plate area (PSD files can be added via the Identity Plate Editor using the macOS version of Lightroom). The logo image you place here should not be more than 57 pixels tall and can contain transparent pixels. Graphical identity plates can also be used in Slideshow and Web module templates, but be warned that a 57-pixel-tall logo will be far too small for use in a print layout. For print work, you will probably want to create identity plate graphics that exceed the suggested 57-pixel limit and that are therefore big enough to print with. By clicking the Show Details button (circled in Step 1), you can also customize the appearance of the module selector by choosing an alternative font, which can be in any size you like. Lastly, if you click either of the little color swatch icons (circled), the system color picker opens, enabling you to edit the font colors for the active and nonactive modules that appear in the top panel.


4. These examples show how the top panel looked after I customized the identity plate with the styled text (top) and graphical (bottom) identity plates options.
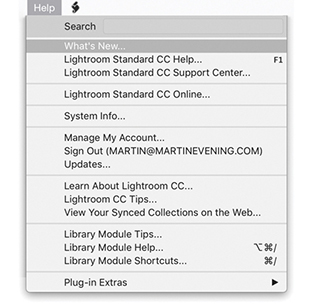
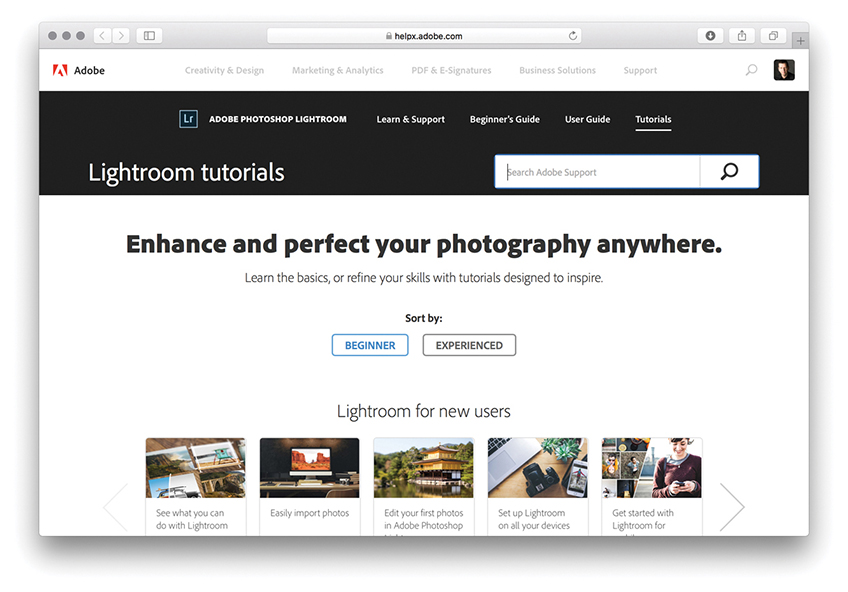
Getting Help
Figure 1.20 shows the Help menu for the Library module. Choose Lightroom Help to access the Lightroom Help page (Figure 1.22). The Lightroom Support Center page is shown in Figure 1.23, where you can find Lightroom tutorials to help you get started.

The Lightroom Interface
The following section provides a quick overview of the Lightroom interface (Figure 1.24), which you’ll find has a consistent layout design from one module to the next.

As with any application, the main menu commands are located in the Lightroom menu bar at the top of the screen (Mac) or at the top of the application window (PC). If you are in absolute full-screen mode, the menu bar will be hidden, but you can reveal it by simply hovering over the top of the screen.
The top panel section contains the identity plate, which normally shows the Lightroom logo. But, as was shown on the previous pages, you can customize this via the Lightroom ![]() Identity Plate Setup menu. For example, you can replace this with your own name or add a company logo graphic. On the right, you have the module picker menu for selecting the Lightroom modules: Library, Develop, Map, Book, Slideshow, Print, or Web. You can use the F5 key to toggle showing and hiding the top panel (Figure 1.25).
Identity Plate Setup menu. For example, you can replace this with your own name or add a company logo graphic. On the right, you have the module picker menu for selecting the Lightroom modules: Library, Develop, Map, Book, Slideshow, Print, or Web. You can use the F5 key to toggle showing and hiding the top panel (Figure 1.25).
The content area is the central section of the interface where you view whatever you are working on. In the Library module Grid view, you see the images displayed as thumbnails in a grid cell layout. In the Library module Loupe view and Develop module, the files are displayed at a Fit view or 1:1 scale size. In the Map module, the content area displays a Map view. In the other modules—Book, Slideshow, Print, and Web—you’ll see previews of how print or screen layouts will look.
Whenever you are in the Library module Grid view, the Filter bar can be expanded from the top of the content area. This allows you to carry out searches using a Text search, or search by rating or flag status using the Attribute section. Or, you can use the customizable panels in the Metadata filter section using various search criteria, such as a specific date, camera type, or lens type. You can use the ![]() key to display more than one Filter bar section at a time and use the
key to display more than one Filter bar section at a time and use the ![]() key to toggle showing and hiding the Filter bar.
key to toggle showing and hiding the Filter bar.
The Toolbar at the bottom is available in all of the Lightroom modules. The Toolbar options will vary according to which module you are in and can be customized when you are in the Library, Develop, or Map modules via the Toolbar options menu (circled). Use the ![]() key to toggle showing and hiding the Toolbar.
key to toggle showing and hiding the Toolbar.
In the Library module, the left panel is mainly used for selecting the source files via the Catalog, Folders, Collections, or Publish Services panels. In the Develop module, it is used to display the Presets, Snapshots, and History panels; and in the remaining modules, it is mainly used for accessing collections and preset settings. For example, if you are working in the Print module, you can save custom print settings as presets, which can then be applied to other images. The individual panels can be expanded or collapsed by clicking the panel bar header. ![]() clicking a panel bar toggles expanding to show the contents of that panel only or expanding to show all panels. You can use the
clicking a panel bar toggles expanding to show the contents of that panel only or expanding to show all panels. You can use the ![]() key to toggle showing and hiding both the left and right panels. You can also right-click the arrows for the left or right panels to access the context menu options. These let you determine the hide/show behavior when clicking to reveal the side panels.
key to toggle showing and hiding both the left and right panels. You can also right-click the arrows for the left or right panels to access the context menu options. These let you determine the hide/show behavior when clicking to reveal the side panels.
The right panel section contains mostly panels that provide information about an image, the controls for adjusting an image, or the layout control settings. In the Library module, you can manage the metadata settings for the currently selected photos, and in the Develop module, you can apply image adjustments. In the Book, Slideshow, Print, and Web modules, the right panel controls govern the layout and output. As with the left panel, individual panels can be expanded or collapsed by clicking the panel bar header. ![]() clicking a panel bar toggles expanding to show the contents of that panel only or expanding to show all panels. You can also use the
clicking a panel bar toggles expanding to show the contents of that panel only or expanding to show all panels. You can also use the ![]() key (Mac) or
key (Mac) or ![]() key (PC) in combination with a keypad number (
key (PC) in combination with a keypad number (![]() , etc.) to toggle opening and closing individual panels in the order they are listed from the top down.
, etc.) to toggle opening and closing individual panels in the order they are listed from the top down.
The Filmstrip is located at the bottom of the Lightroom window. It displays thumbnails of all the images currently viewable in the Library, highlighting those that are currently selected. The Filmstrip thumbnails are accessible in all the other modules and therefore allow you access to individual images or sub-selections of images without your having to switch back to the Library module.
Working Through the Book
I will explain each aspect of the program in greater depth throughout the book, and you will notice that I have structured the book to match a typical workflow, starting with the various ways you can import your photos into Lightroom. If you need further help as you are working in Lightroom, you can always go to the Help menu, where you will also see a Shortcuts item for whichever module you happen to be using (Figure 1.26 shows the shortcuts for the Library module). In keeping with the spirit of Lightroom, I have tried as much as possible to avoid discussing the technical workings of the program and focused on discussing what Lightroom does best: managing, editing, and outputting photographs. If you really want to know more about how Lightroom works, consult Chapter 12, where I elaborate on various technical features. You will also find more detailed technical background information at thelightroombook.com.

 (Mac) or
  (PC)—to find out more about the shortcuts for each module.
Downloadable Content:
![]()