
11 Lightroom CC/mobile
How to synchronize your files with the Lightroom CC/mobile ecosystem

Photograph: Golden Valley, Hertfordshire, UK © 2016 Martin Evening
Sony A7rII | 155mm | 200 ISO | f8 @ 1/60
Smartphones can now be used to do so many things. Your phone can connect to the Internet, take photographs, record audio, recognize a fingerprint, or even be used as an impromptu incendiary device. So it is only natural that Lightroom should now allow you to extend what you can do in Lightroom to a mobile environment. Lightroom mobile (which is now known as Lightroom CC) lets you take Lightroom beyond the confines of a desktop or laptop computer.
It all started off on a small scale with the introduction of Lightroom mobile for iPads and iPhones, and later for Android devices. Since then Lightroom CC has extended to include Lightroom web for sharing collections/albums with friends and clients, Lightroom web view for remote editing via a web browser, Lightroom for Apple TV, and now the Lightroom CC application, a self-contained Lightroom-lite program with full synchronization to Lightroom CC/mobile apps and a master Lightroom Classic CC catalog.
This chapter gives you an overview of the Lightroom CC/mobile family and explains how the different elements integrate with each other. If you already understand how Lightroom Classic CC works, you will find most of the controls self-explanatory. This chapter provides a useful guide to working with Lightroom CC/mobile and explores the various components.
Lightroom CC/Mobile Workflow
Lightroom mobile for the iPad and then the iPhone first came about in response to user requests for a mobile app version of the Lightroom desktop program. Since then the Lightroom mobile (now Lightroom CC) features have expanded to offer more ways to edit and share photos synced to the cloud and linked to a master Lightroom Classic CC catalog. You can view synced images via an iPhone, iPad, Android device, or any web browser. You can capture photos directly using a smartphone camera. Plus, the latest Zeiss ZX1 camera even has Lightoom CC for mobile built-in. When using the Lightroom CC program or Lightroom CC for mobile on one of the latest iPad Pro devices, you can import raw files directly and have these sync directly to the cloud from wherever you are in the world. This has the potential to let you travel light, with the security of knowing that backups will automatically be uploaded to the cloud. Meanwhile, you can edit photos on your devices while you are on the road and the edits you make will be synced back to the synced Lightroom Classic CC catalog and Lightroom CC application, as well as to collections/albums on other devices that are running Lightroom CC/mobile.
Note
Lightroom Classic CC customers who are subscribed to the Photography plan will have access to Lightroom CC included along with 20 GB of storage. This allows you to dip your toes in the water and try out Lightroom CC. Should you wish to extend the storage space limit to 1 TB, a further plan is available. Or, you can choose to subscribe to Lightroom CC only with 1 TB of storage.
That, in theory, is how things should work, but this will be very much dependent on the speed and availability of your Internet access. Although you may have a nice fast connection at home or at work, what matters more is the Internet access that’s available to you when you are out and about, which can often be patchy and slow. Furthermore, many hotels place a cap on the amount of data you can download or upload each day. In reality, a high bandwidth workflow is something currently only a few photographers have access to on a regular basis. It may one day become a reality as high bandwidth speeds and high-volume data access become more widely available. Certainly, a lot may change over the coming years, and it is no bad thing for Lightroom CC/mobile to be ahead of the game at this stage with a mobile ecosystem that’s ready for a globally connected world. To help overcome such problems, I recommend you sync photos to the cloud during those times when you do have good Internet access. That way you can work more efficiently in places where the Internet connection is not so great. In these situations, the Lightroom CC application and Lightroom CC/mobile components only need to download proxy versions for you to work with and the edits you make are uploaded as metadata only.
Tip
From Lightroom CC for desktop, you can text yourself a link to install the Lightroom CC for mobile app on your phone. Go to Help ![]() Get Lightroom CC on Mobile. Choose your country, then enter your phone number.
Get Lightroom CC on Mobile. Choose your country, then enter your phone number.
Essentially, you can use the Lightroom CC program and Lightroom CC/mobile system to quickly share photos with others via social media, share photos using weblinks, or simply to access Lightroom Classic CC catalog photos on a personal device. I particularly like the ability to share Lightroom CC albums via a Lightroom web view link. As you update individual images, these are updated automatically on the album’s Lightroom web view page. Therefore, when you share a selection of images with someone, you can continue to edit the photos in Lightroom Classic CC, or any of the Lightroom CC components, and the edits are continuously updated on the web page. Also, using Lightroom web view, friends or clients can leave feedback by liking or adding comments.
While Lightroom CC for mobile gives you the freedom to work with your photos on personal devices, you can use Lightroom CC for web to access Lightroom mobile–shared albums from any computer or device that’s connected to the Internet and upload files to the Adobe cloud via the web browser interface.
Note
To sum up, Lightroom Classic CC is a disk-storage-based computer application, whereas Lightroom CC/ mobile is an integrated, cloud-storage-based, mobile system. Lightroom CC consists of Lightroom for mobile, Lightroom web view, Lightroom for web, Lightroom for Apple TV, and a Lightroom CC desktop application. When you work with Lightroom CC, the cloud is central to everything you do in Lightroom. And, although not promoted as such, the above Lightroom CC/Lightroom mobile components can all link to a single, master Lightroom Classic CC catalog.
Ultimately, the Lightroom CC/mobile workflow is all about making the catalog syncing process as robust as possible, so whether you capture photos on your phone, import them from a personal device or laptop or desktop computer, your photos can be shared everywhere. It’s also about helping photographers to manage their photos better. Lightroom CC/mobile users will find the Adobe cloud-based servers provide a powerful search engine that can help you find the photos you are looking for by using descriptive terms, just as you would when carrying out a regular Internet search.
Note
Should your Lightroom subscription come to an end, you will be able to continue running Lightroom CC in a residual mode with continued access to all your images. Meanwhile, an independent “punch out” utility can be used to download all of your images, which will be possible for a year after your subscription ends.
Figure 11.1 shows a summary of the Lightroom CC/mobile family workflow illustrating the data upload/download paths. The high-bandwidth data transfer for the master files is represented by the wide green arrows. The medium-bandwidth Smart Preview data transfer is represented by the medium brown arrows, and the low-bandwidth metadata data transfer is represented by the thin purple arrows.

What Lightroom CC/Mobile Can and Cannot Do
Essentially, all the Lightroom CC/mobile elements let you interact with your synced Lightroom Classic CC catalog via compatible mobile devices and work remotely. To interact with the synced catalog data, you will need to be online and have the bare minimum free space to download the required proxy files/JPEG previews to your device (proxy/Smart Preview files are essentially low-resolution compressed raw files). This can be described as a “leaning back” workflow that integrates seamlessly with your synced Lightroom catalog. Lightroom CC/mobile for iPad, iPhone, or Android is useful for those who want to work on their catalog images without having to carry around a laptop computer, turning a commuter journey into productive reviewing or editing time, for instance. With Lightroom CC for mobile, you can also add files directly from the Camera Roll, shoot photos using the Lightroom CC for mobile camera mode, or copy files from a camera card to the device. This can be described as a “road warrior” workflow, where Lightroom CC for mobile on a mobile device can replace the use of a laptop.
Note
The preview files use the P3 display space, which is designed to match the gamut of wide-gamut displays such as the 5K iMac and iPad Pro, where incidentally, iOS 11 includes system-level color management. This provides the necessary hooks for app-based color management, such as X-Rite’s ColorTRUE app. For images that are viewed on a web page, Lightroom CC/mobile relies on the browser to carry out the color conversion to the monitor profile (which will usually be sRGB) except for certain browsers running on older iOS devices and Android devices. You also need to take into account that you can adjust the hardware display controls on Android devices, which makes this even more of a guessing game.
You have the means to share images via text message, email, or social media. You can present images in a slideshow form, although it helps if you have previously selected the images to work offline and allowed time to download the proxy data.
When it comes to making tone and color edits, you are limited, of course, to the color gamut of the display on your mobile device. A mobile device won’t be able to match the gamut of modern desktop displays. So, although it is cool that you can work on images outside the office and stream the edit changes via the cloud, the edits you apply may well look quite different when viewed back at the office on your regular display. Such color management limitations are likely to prove a stumbling block for some time. The Apple iOS or tablet hardware in general may become more sophisticated and provide a more reliable viewing environment, but these are still primarily consumer devices. However, you can calibrate an iPad screen though using the X-Rite ColorTRUE app (see Note).
If you view using Lightroom CC for web, the JPEG proxy files (which use the Display P3 color space) will match the color space used by the latest wide-gamut Retina iMacs. Display P3 is roughly the same size as Adobe RGB. It isn’t an exact match, but it can contain most of the same colors. Therefore, the color management should be effective if you are working in Lightroom CC for web on a remote computer that has a similar wide-gamut, calibrated display.
Lightroom CC for Apple TV
To access Lightroom CC for Apple TV, you need an Apple TV (4th generation) running tvOS 9.0 or later. Download Lightroom CC for Apple TV from the App store and open it. When you sign in, note down the code that appears, then visit lightroom.adobe.com/tv in your computer’s web browser and enter the authorization code. If successful, Lightroom CC for Apple TV can display your Lightroom CC albums on the TV screen as slideshows.
Setting Up Lightroom CC/Mobile
When you install Lightroom Classic CC, your Adobe account will automatically be activated. If for some reason you are signed out, you can sign in again via the Lightroom Help menu and enter your account details using the dialog shown in Figure 11.2. The Lightroom Sync preferences (Figure 11.3) show your current Adobe account status and can be used to manage the Lightroom CC settings. The Sync Activity section tells you how many photos are in the process of uploading and downloading. Clicking the expansion triangle will give you specific information about which files are uploading, as well as information about any sync errors. You can pause Lightroom CC synchronization via the Identity Plate menu by clicking the pause button (circled in Figure 11.4).


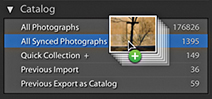
Photos can be synced from Lightroom Classic CC to Lightroom CC/mobile by creating collections and enabling these to be synced with Lightroom CC/mobile. If you click the plus button at the top of the Collections panel to create a new collection, you can select the Sync with Lightroom CC option (Figure 11.5). This ensures the selected photos in the collection are saved as a new collection and synced to Lightroom CC/mobile. After you click the Create button, Lightroom Classic CC starts the synchronization process, whereby Lightroom creates Smart Preview proxy versions of the master images and uploads these to the Adobe cloud servers (note, the Smart Previews don’t count toward Lightroom CC cloud data allowance). Meanwhile, in the Collections panel, you will see a sync badge appear in the left column next to the synced collection (Figure 11.5). This indicates a collection is currently set to sync with Lightroom CC/mobile (as an album). Clicking on this opens a dialog that allows you to turn off syncing for that collection. However, doing so will remove all the mobile sync data for that collection/ album, including photos stored on the cloud and any comments. Alternatively, you can sync photos with Lightroom CC/mobile without having to add them to a specific Lightroom CC/mobile collection/album first. Just simply drag photos to All Synced Photographs in the Catalog panel (Figure 11.6).

The overall sync status can be seen in the Identity plate area (Figure 11.4), where you can click the pause button to pause the sync process. Sync activity is also shown in the Lightroom Sync preferences (Figure 11.3). Synchronizing a large number of files can take time, which is why you’ll often see a long list of pending activities in the Sync Activity section. Even if your Internet access is good this can all take time, which is why there is a “Prevent system sleep during sync” option, to allow syncing to complete fully before letting the computer to go to sleep mode. The synchronization process works in both directions, syncing not just the selected photos in the Lightroom Classic CC catalog to Lightroom CC/mobile, but also syncing back to Lightroom Classic CC, plus downloading photos that have been added via Lightroom CC/mobile. So, if you add photos to a mobile device via the Camera Roll, capture via Lightroom CC for mobile directly, or import files from a camera to a device, these are synchronized to the cloud and synced back to Lightroom Classic CC. This works with only a single Lightroom catalog at a time. If you attempt to sign in to a different Lightroom catalog, Lightroom Classic CC will display an alert if the catalog you’re signing in from is not the one it is already synced to. Also, be warned that if you click the Delete All Data button, this removes everything you have currently synced to Lightroom CC/mobile and will return you to a “stopped” state where sync is switched off.
Note
When an image is imported into Lightroom CC for desktop, it uploads the original to the cloud; the cloud then generates a Smart Preview. Once you’ve uploaded the original file, the original may eventually be purged from your system. This will depend on how your local storage settings are configured plus a number of other factors. For example, a photo or video that has been imported within the last 15 days will be kept around if possible. If you have recently viewed a photo in Loupe view, this indicates you are still interested in editing the image, so Lightroom CC aims to keep the original stored locally to give the best editing experience. If the “Store a copy of all Smart Previews locally” option is enabled in the Lightroom CC for desktop preferences, Lightroom CC for desktop will download all the Smart Previews from the cloud and store them locally on your machine. If you do this, it means you can work with your entire catalog while offline and have editing access to all of your images. If the “Store a copy of all Smart Previews locally” option is not enabled, Lightroom CC for desktop will download the Smart Previews as they are required, based on a complex set of rules that take into account a number of factors.
Essentially, photos that are synced from Lightroom Classic CC to Lightroom CC/mobile are synced to the cloud as Smart Preview proxies. Synced devices, such as an iPhone or an Android device, can access first of all the JPEG previews and then download proxies on demand for editing on a device. In the case of Lightroom CC for web view and Lightroom CC for web, the proxy images are higher resolution JPEGs. Images that are uploaded via a device running Lightroom CC for mobile, or a computer running Lightroom CC for web, or Lightroom CC are uploaded as original files to the Adobe cloud servers whether these are JPEGs or raw files. The synchronization process ensures copies of master files captured or imported to a device are safely stored in the cloud and can also eventually all sync back to Lightroom Classic CC (providing sync is enabled). Originals can also be synced back to Lightroom CC for mobile and Lightroom CC for desktop, or Lightroom CC for web (on demand), but only if the settings are configured to allow this. Otherwise, imported or captured files are only synced as proxies in order to economize on storage space.
How Lightroom CC Edits are Synchronized
With everything synced via the cloud, edits made to an image on a computer running Lightroom Classic CC, Lightroom CC, or Lightroom CC for web, or on a device running Lightroom CC for mobile are synced automatically to all the other Lightroom CC–synced components. This can happen very quickly because only the file metadata is being synced. However, if there is a conflict, such as an edit change made in Lightroom Classic CC clashing with an edit change previously made on a Lightroom CC for mobile device, the mobile device changes are preserved as a Develop Snapshot in Lightroom Classic CC.
Where Lightroom CC/Mobile Photos are Kept
Photos synced from Lightroom Classic CC to Lightroom CC/mobile are copied to the Adobe cloud servers as Smart Preview proxy images. Once these have been uploaded to the cloud, the Adobe cloud servers create JPEG previews that are downloaded first to the Lightroom CC for mobile devices or Lightroom CC for web view/web pages (with Lightroom CC for web view and Lightroom CC for web, the JPEG previews are used to view only and not downloaded to the computer used to view them). This is followed by downloading the Smart Preview proxies “on demand” to Lightroom CC for mobile devices or to computers running Lightroom CC (and the originals as well, depending on the settings). The Smart Preview proxy files are limited in size to 2560 pixels across the widest dimension. This makes the proxies suitably big enough to make edits to and enlarge to see in more close-up detail, while not being so big they take ages to download. The Smart Preview proxy files are temporarily stored on each device and automatically cleared after a time in order to keep space clear on the device.
NOTE
Lightroom CC uses a number of different criteria to determine whether the original files should be kept available locally, or whether they should be “purged” and downloaded from the cloud on an as-needed basis.
Original files that are imported via Lightroom CC for mobile devices, Lightroom CC for web, or the Lightroom CC program are immediately uploaded to the Adobe cloud servers as original masters, stored there permanently, and may eventually be deleted from the source devices. Once the files are uploaded to the cloud, the Adobe cloud servers convert the files to Smart Preview and JPEG proxies that can be accessed via other Lightroom CC for mobile devices or Lightroom web pages. However, the uploaded originals are always automatically downloaded to the synced Lightroom Classic CC catalog and copied to the designated Lightroom Classic CC images folder. The default location is the Pictures/My Pictures folder. If you intend to sync a large number of files, this may use up a lot of precious space on the main computer hard drive. You can physically move the files from this folder location and place them on other drives and the link with the Lightroom mobile versions will be maintained. I would still be concerned about the linking becoming broken, though. A better solution is to go to “Specify Location for Lightroom CC ecosystem’s images” in the Lightroom Sync preferences (Figure 11.3) and select a master folder location on a drive that has ample clear space.
To make the synchronized files easier to manage, there is a “Use subfolders formatted by capture date” option in the Lightroom Sync preferences. So photos synced this way are automatically imported to Lightroom desktop and imported to the desired download folder using a dated folder configuration of your choice.
To summarize, master images that are synced via Lightroom Classic CC stay on the host computer and Smart Preview proxies are uploaded to the Adobe cloud servers. Originals imported via any Lightroom CC for mobile device are synced to the cloud, copied to the Lightroom Classic CC computer, and will eventually be removed from the device they were imported from. The cloud converts all imported originals to JPEG and Smart Preview proxies, which can be shared with Lightroom CC for mobile enabled devices, or Lightroom CC for desktop.
Creating a Synchronized Collection from Lightroom Classic CC
1. To set up a collection to synchronize with Lightroom CC/mobile, I made a selection of images in Lightroom Classic CC and clicked the + button in the Collections panel to open the Create Collection dialog. Here, I created a new collection inside a collection set named Lr Mobile and made sure the Sync with Lightroom CC box at the bottom was selected.

2. This initiated a synchronization between the Lightroom Classic CC desktop computer and the cloud, which, in turn synchronized with any synced devices using Lightroom CC/mobile.

3. Over in Lightroom CC for mobile, the synced collection I created in Lightroom Classic CC appeared as a new album. When I tapped on the album, it opened in a Grid view. I could tap the arrow (circled) to return to the album list view.
Note
Lightroom CC for mobile can display the File Type badges shown here in the grid view to denote raw, DNG, or HDR photos. To change this, use a two-finger tap in Grid view to cycle through all the Info display options, including flags, ratings, and EXIF Info.
Tip
When creating a selection, tap to select a photo; lift your finger and tap, or tap and swipe to add more photos.
Working with Lightroom CC for Mobile
Lightroom CC for mobile is available for iPhone, iPad running iOS 10.x or later, and Android devices (the iPad and Android screens will look slightly different from the iPhone-based examples shown here). It provides a limited range of controls to apply global and localized image edits and add flag or star ratings. You can use Lightroom CC for mobile from your phone or tablet while you are away from the computer running Lightroom Classic CC or Lightroom CC. You can edit your pictures and see the edits you apply updated when you get back to the main computer.
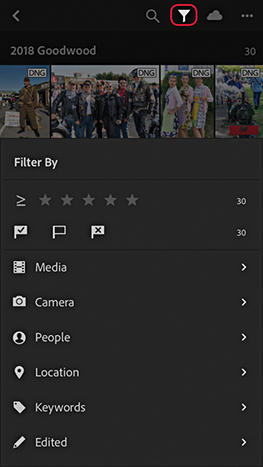
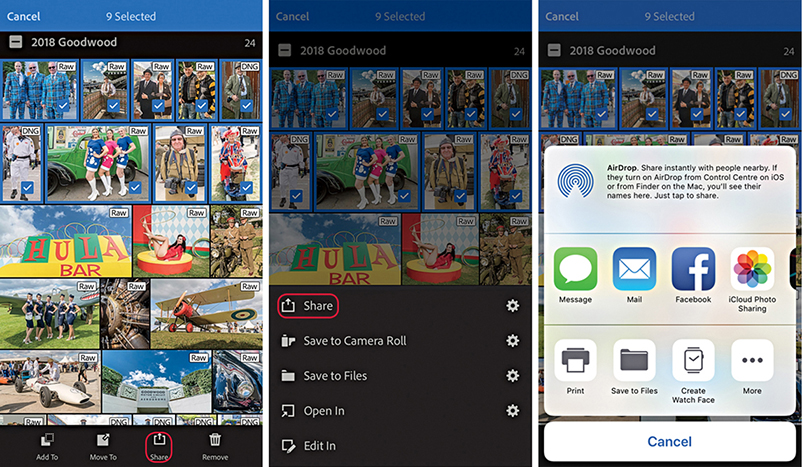
Once you have created a synced collection via Lightroom, you can view it as an album with any compatible device running Lightroom CC for mobile. Use a single-tap to open an album in Grid view (see Step 3 above). You can tap the Refine button at the top (circled in Figure 11.7) to reveal the filtering and sort order options. The Share options can be accessed via the button circled in Figure 11.8. For example, you can choose Save to Camera Roll, or open the files in a social media app. Or, you can choose the “Edit in” option to edit in Adobe Photoshop Fix. In Figure 11.8, I created a selection of photos and tapped Share. I confirmed I wanted to share the photos via an interim screen where I could choose to resize before sharing as a message, in an email, send via social media, or send direct to a printer.
Tap the three dots (circled in Figure 11.9) to access the Manage options. Here, you can choose a segmented view, such as by years or by star ratings. You can sort by Capture Date, Import Date, Modified Date, or File Name. Choose View Options to add overlays to the thumbnails, such as the file type shown in Step 3. And choose Add Photos to add new photos from your device to Lightroom CC. Tap Slideshow at the bottom to prepare the photos to be viewed as a slideshow presentation. This reveals an arrow Play button (![]() ). Tap the three dots at the top of the screen while a slideshow is playing to access the slideshow playback options. You can also use an extra long press on a photo in Grid view and then swipe upward to access the Share options.
). Tap the three dots at the top of the screen while a slideshow is playing to access the slideshow playback options. You can also use an extra long press on a photo in Grid view and then swipe upward to access the Share options.

Single image view
Use a single tap to go from the Grid view to a Single image view. Figure 11.10 shows the five view modes that are available. In Review mode, the rating options can be used to apply flag ratings or star ratings. Swipe up or down on the left side to add or decrease the star rating. Swipe up or down on the right side to add or decrease the flag rating. Also included here is a Filmstrip mode, like you would have in the Lightroom Develop and Create modules, so you can easily select other photos without having to exit the Single image view mode. The Activity mode lets you review likes and comments made by people you have invited to view shared albums.

The Keywords mode can be used to view and enter keywords. Files migrated from Lightroom Classic CC to Lightroom CC that already had keywords applied will preserve the entered keywords. Keywords subsequently added via Lightroom CC are added as a flat list, but will not be synced back to Lightroom Classic CC. In all these modes, you can swipe left or right to navigate through the images. A single tap can be used to toggle the data information display on and off, and a two-finger tap can be used to cycle through the information display options (displaying the file information or histogram, or none).
The Info mode displays Title, Caption, Copyright, rating, and basic EXIF metadata. When adding titles and captions to your photo, you can type them or use iOS voice recognition (tap the microphone key next to the Spacebar to record). Auto text correction can help with spelling. In Single image view mode, the Cloud icon indicates the download status: whether a preview or Smart Preview is available. Tapping the Cloud icon reveals more information telling you the status of the local and cloud storage, as well as the download status.
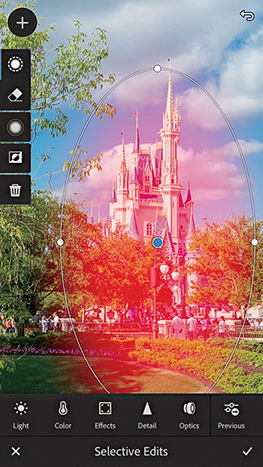
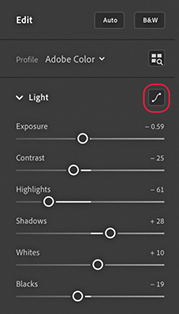
The Edit mode image-edit controls more or less match those in the Lightroom Develop module. For example, you can tap the Light option to access the Curve and Tone slider controls (see Figure 11.10). Use a two-finger slide on the Exposure, Highlights, Shadows, Whites, or Blacks sliders to see the clipping mask. As you make a slider adjustment, you can increase the granularity of your finger adjustments by moving your finger farther away from the slider. Tap to add points and double-tap to remove points from the parametric curve. Use a tap-and-hold gesture to toggle between the before and after views, and double-tap sliders to reset. Tap the Undo button (![]() ) to toggle between the last state and the current.
) to toggle between the last state and the current.
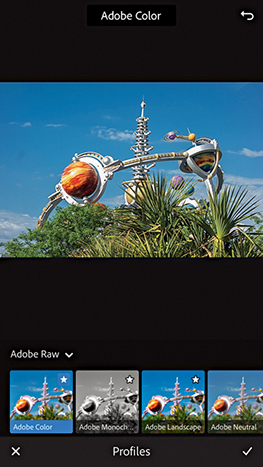
All the Lightroom CC apps now let you apply profiles. Therefore, you can select a profile via the Edit mode before or after applying other edits (see Figure 11.11). To apply a selective edit, tap the Selective button (to the left of Crop). Next, tap the Plus button (![]() ) to reveal the Selective tool options (
) to reveal the Selective tool options (![]() ). Here, you can tap to select either the Brush, Radial Gradient, or Linear Gradient tools. Selecting the Brush tool opens the Brush tool controls on the left, where you can tap and swipe up or down to change the Size (
). Here, you can tap to select either the Brush, Radial Gradient, or Linear Gradient tools. Selecting the Brush tool opens the Brush tool controls on the left, where you can tap and swipe up or down to change the Size (![]() ), Feather (
), Feather (![]() ), or Flow (
), or Flow (![]() ) attributes. If the device you are using has a pressure-sensitive screen, the brush also reacts to how hard or soft you press with your finger. Having done that, you adjust the Develop settings, tap the photo, and drag to add a new brush adjustment. After adding an adjustment, you can remain in the Add brush mode (
) attributes. If the device you are using has a pressure-sensitive screen, the brush also reacts to how hard or soft you press with your finger. Having done that, you adjust the Develop settings, tap the photo, and drag to add a new brush adjustment. After adding an adjustment, you can remain in the Add brush mode (![]() ) to add to adjustments or tap the Erase tool (
) to add to adjustments or tap the Erase tool (![]() ) to erase adjustments. With the Radial Gradient, you first tap the screen to add a Filter adjustment (Figure 11.12), and then adjust the Develop settings. Next, you can edit the Filter overlay handles to adjust the extent of the Radial Gradient adjustment. Tap the Feather button (
) to erase adjustments. With the Radial Gradient, you first tap the screen to add a Filter adjustment (Figure 11.12), and then adjust the Develop settings. Next, you can edit the Filter overlay handles to adjust the extent of the Radial Gradient adjustment. Tap the Feather button (![]() ) and swipe up or down to change the Feather setting. Tap the Invert button (
) and swipe up or down to change the Feather setting. Tap the Invert button (![]() ) to switch between an inside and an outside adjustment. In the Add and Erase modes, you also have Size, Feather, and Flow attribute sliders to adjust the brush edit settings. With the Linear Gradient tool, you tap and drag to add an adjustment and edit the Develop settings. You can then tap and drag the overlay controls to set the extent and angle of the Linear Gradient adjustment. As with the Radial Gradient, you can switch between the Add and Erase modes to adjust the brush edit settings.
) to switch between an inside and an outside adjustment. In the Add and Erase modes, you also have Size, Feather, and Flow attribute sliders to adjust the brush edit settings. With the Linear Gradient tool, you tap and drag to add an adjustment and edit the Develop settings. You can then tap and drag the overlay controls to set the extent and angle of the Linear Gradient adjustment. As with the Radial Gradient, you can switch between the Add and Erase modes to adjust the brush edit settings.
The Edit mode also has controls for Healing, Crop, Auto Settings, Color, Effects, Detail, and Geometry and Optics, as well as Presets options offering various color, tone, and black-and-white effects. Figure 11.13 shows the Healing Brush in action. Select the Healing Brush tool and simply tap, or tap and drag over the area you wish to repair. Lightroom CC for mobile then automatically selects a source area to clone from. To scroll the image, remember to use a two-finger gesture to navigate. Otherwise, a single tap adds a new target healing spot.

The Optics menu now includes a Remove Chromatic Aberration option. This automatically removes lateral chromatic aberration, which is the green/purple fringing that may sometimes be seen toward the edges of a photo, particularly along high-contrast edges. Figure 11.14 shows a typical example of lateral chromatic aberration in the top image, which can easily be removed by enabling the Remove Chromatic Aberration option.

In the Detail view, double-tap to open the sharpening loupe at 100%. To see the sharpening mask, first start sliding the Mask slider, then, while keeping your first finger on the slider thumb, add a second finger on top of the slider track.
Edit menu settings
Tap the Settings tridot button (![]() ) to choose to add to an album, delete, show/hide info, or show/hide the histogram as well as copy and paste the Develop edit settings.
) to choose to add to an album, delete, show/hide info, or show/hide the histogram as well as copy and paste the Develop edit settings.
Manage and create presets
The first time you set up Lightroom CC, profiles and presets will be automatically ingested from Lightroom Classic CC. From there, these profiles and presets are automatically synced across the Lightroom CC ecosystem and will update as new profiles are created. But further updates will not take place between Lightroom CC and Lightroom Classic CC.
While in the Presets panel view, you can create and manage presets. To create a new preset, tap the tridot menu (circled in Figure 11.15). Next, tap Create Preset at the bottom to open the New Preset panel (Figure 11.16, left). Here, you can name the new preset, choose which group to save it to, and check the items you wish to include in the preset.
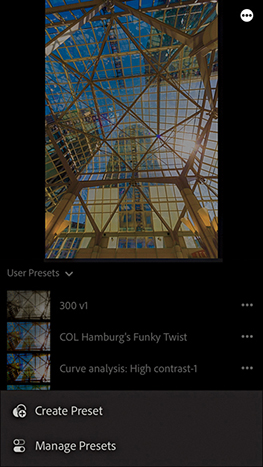

If you tap the Manage Presets option (at the bottom in Figure 11.15), this opens the Manage Preset panel (Figure 11.16, right). Here, you can tap to enable or disable particular groups of presets. Doing so allows you to make the User Presets easier to navigate. In Figure 11.17, selected the User Presets group, which listed the presets contained within that group.

Lightroom CC for mobile preferences
Tap the gear wheel in the top-right corner to access the Lightroom CC for mobile preferences shown in Figure 11.18 (the main menu is outlined in red). In the About Lightroom preferences, the Send Usage Info option is on by default. This collates non-personal data about how you use Lightroom mobile on your device and sends this back to Adobe to help improve product features. You can deselect it if you are uncomfortable with this.
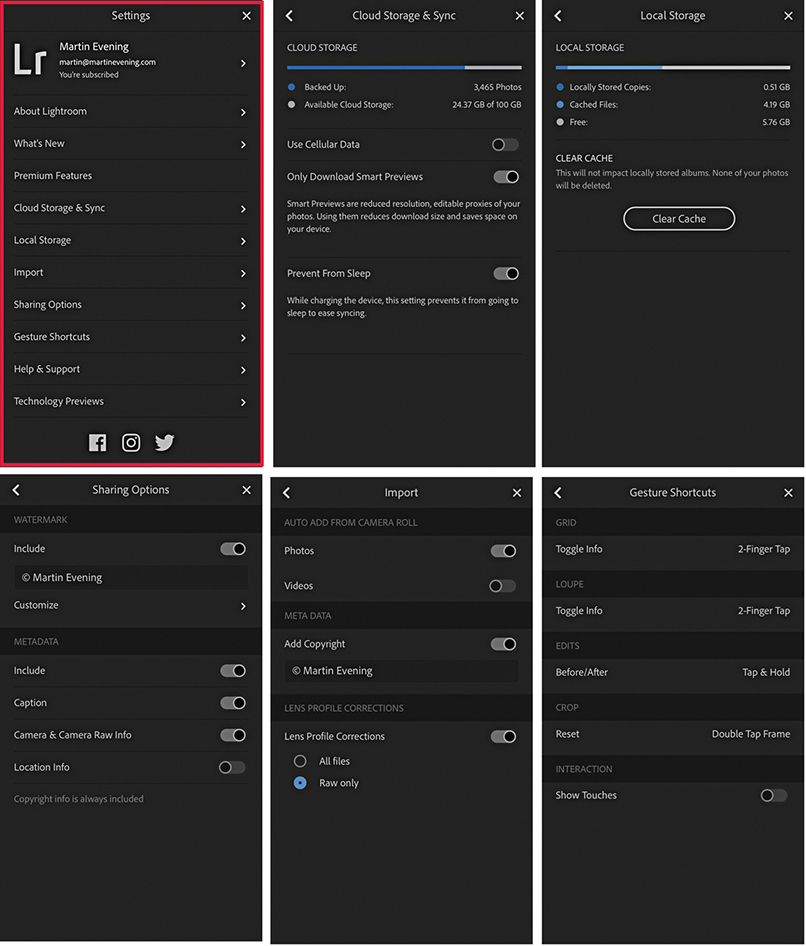
The Cloud Storage & Sync section indicates how many photos and how much cloud storage you have left available. Disabling the Use Cellular Data option restricts uploads to Wi-Fi only. This lets you avoid cellular network usage for data transfers and thereby avoid hitting cap limits on your cellphone plan. Selecting Only Download Smart Previews is best for customers who have limited bandwidth and restricts downloads to Smart Previews only. Note you can also pause sync when tapping the cloud button. This, too, can be helpful when you have limited Internet access. The Prevent From Sleep mode stops Lightroom CC for mobile from going to sleep when a power cable is connected. The Local Storage section monitors the overall storage space taken up by locally stored copies plus the cached files. The Clear Cache button clears the cache data stored on the device without deleting the master photos. In the Sharing Options section, you can choose to include adding a watermark when sharing photos. In the Metadata section, choose which metadata will be saved when you share images via Lightroom CC for mobile. Mobile devices, such as the iPhone, store GPS metadata automatically, so you will need to think carefully whether the Location data should be included when you share files.
In the Import section, you can select to auto-add Photos and/or Videos from the device’s Camera Roll. Select the Add Copyright option to automatically add your copyright notice. If Lens Profile Corrections is enabled, you can choose to have these applied to All Files or Raw only. The Gesture Shortcuts section shows information about gesture shortcuts you can use in Lightroom CC for mobile. The Show Touches option is one instructors might want to select if recording a demo movie that incorporates the finger gestures used when working with Lightroom CC for mobile.
Album/folder options
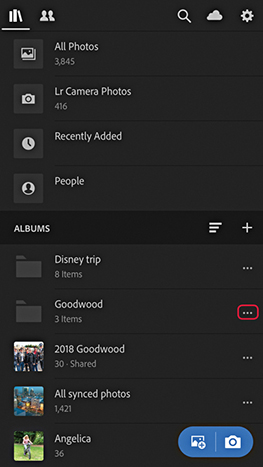
Tap the plus sign in the Albums header section (Figure 11.19) to add a new album or folder. Albums can be nested within folders (think collection sets). Tapping on the three dots next to an album opens the Album options shown in Figure 11.20. Here, you can share an album on the web, rename, clear the cache, or delete. Use the Move To option to move the selected album to a destination folder, as you would moving files between albums. If you are about to board a plane, or travel to a region with poor Internet access, you can tap the Store Locally option. This ensures Smart Previews are downloaded locally for that album. An interim dialog informs you how much storage space will be required. Having done this, you can continue to edit these photos while your device is offline.

Adding Photos Directly Via a Device
Photographs can be added via the device you are using. You can do this using the blue floating action button (![]() ) and clicking the Camera Roll button. This will take you to the Camera Roll on the device where you can single-tap or swipe to select the photos you wish to add. Once done, these will appear as Recently Added photos in Lightroom CC for mobile and in All Synced Photographs in the Catalog panel in Lightroom Classic CC.
) and clicking the Camera Roll button. This will take you to the Camera Roll on the device where you can single-tap or swipe to select the photos you wish to add. Once done, these will appear as Recently Added photos in Lightroom CC for mobile and in All Synced Photographs in the Catalog panel in Lightroom Classic CC.
Tip
When using an iOS device, Lightroom CC for mobile can be added as a Widget, which can be seen when you swipe right after launch to reveal the Widget screen.
Lightroom CC for mobile camera
When you click the Camera button, this opens the Lightroom CC for mobile camera, which you can use to capture photos and add them automatically to Lightroom CC for mobile. In Auto mode, the options are limited, while the Professional capture mode (Figure 11.21) offers manual camera controls that you can tap to manually control the individual settings. Tap the three dots (top left) to reveal the additional options shown below in Figure 11.21. If you tap the Focus button (just below Reset), you can adjust the opacity of a focus peaking overlay.
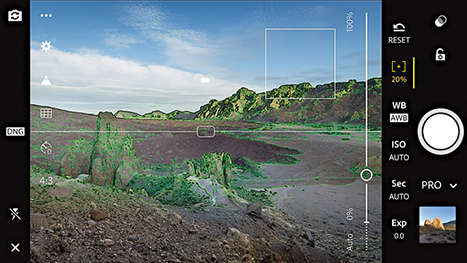
In Pro mode, Exposure compensation is selected by default. Drag up or down in landscape mode, or left to right in portrait mode to vary the setting. Likewise, you can select other parameters, such as WB or ISO, and tap and slide to adjust.
You can also capture using the Volume buttons. Tap one of the buttons to capture a photo, or tap and hold to capture photos in burst mode. Mobile devices running iOS 11 with a 12-megapixel sensor (and higher) can capture in DNG mode direct, but is supported only on the iPhone 6S and later and iPad Pro models. When using such devices, the Settings menu gives you the option of shooting in JPEG or DNG mode.
HDR and Long Exposure
HDR and Long Exposure capture modes are available for iPhone 7 devices and later, but you will have to first enable the Long Exposure mode via the Technology Previews Settings (Figure 11.22). This adds a Long Exposure shooting mode to the Lightroom CC for mobile camera settings shown in Figure 11.23 below.


After selecting the mode, you can set the exposure time by adjusting the Long Exposure timer settings. The Lightroom CC camera captures a sequence of photos and combines them to produce a composite, long-exposure image. You don’t necessarily need to use a tripod, as the Lightroom CC processing is able to align the still sections of a scene and keep these sharp. On the other hand, you can get creative with intentional camera movement to create blurry, abstract images (Figure 11.24). However, if you move the camera about too much, Lightroom CC for mobile may be unable to process and won’t create an image. Also, do bear in mind that shooting in this mode uses up more battery power because of the added number of exposures and additional processing, which can take quite a while to compute at the longer exposure settings.

Guided Tutorials
Guided Tutorials can be accessed via the Lightroom CC for mobile Help & Support settings (Figure 11.25). Select a tutorial, and this will then guide you to select one of your own photos and follow the programmed steps to discover how to use particular Edit tools, or create specific effects.

Shared Views
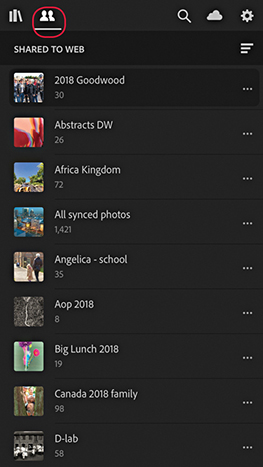
Tap the Shares tab in the top left corner (Figure 11.26) to switch from an all photos view to a Shared to Web view that shows just albums and images you shared via lightroom.adobe.com. You’ll now find a Shares view mode is also available in Lightroom CC for web and Lightroom CC for desktop.
Watermarking in Lightroom CC for iOS
You can create and customize a text-based watermark for use when exporting images from Lightroom CC for iOS. To do this, go to the Sharing Options in Lightroom Settings (Figure 11.27) and tap the Include switch to enable watermarking. In the text field, you can customize the text that appears as a watermark. Tap Customize to go to the Customize Watermark Editor (Figure 11.27). Here, you can edit the position of the anchor point for the watermark text and adjust the Font attribute, Color, Size, Offset, and Opacity settings.

Lightroom CC for Mobile Searches
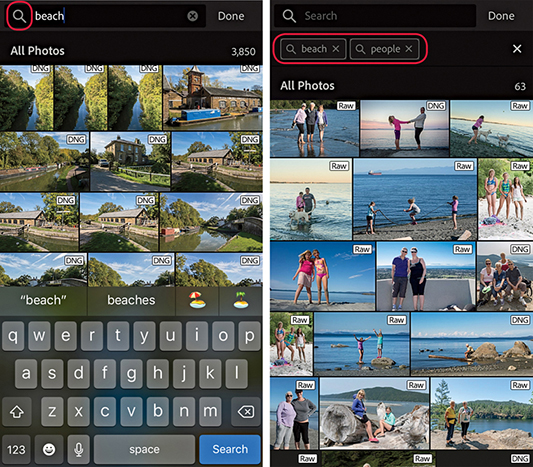
To carry out an image search, your device must have Internet access. Tap the Search button (circled in Figure 11.28). This reveals the keypad where you can type in a search term to search the current selected photos. You can search a specific Album or all Lightroom CC photos (as was selected in this example). When entering a search, it works best if you use a singular term, such as “house” or “car,” rather than plural. You can do a combined search by entering more than one search term. In Figure 11.28, I did a search for “beach” + “people”. Predictive texting can help you select correct terms, and the microphone button can be used to carry out a verbally recorded search. But remember, Lightroom CC for mobile searches are localized to whatever language you have the program set to. When you carry out such searches, the Adobe server uses a powerful search engine that can match images based on textual criteria. This is the same thing as carrying out a web search, in which a search for a specific term will show relevant image matches. When searching your images, the server utilizes knowledge it has lots of other images to optimally filter your photos. At the same time, the search engines also make use of any available embedded metadata, such as album names, GPS coordinates, IPTC metadata, and keywords.
Lightroom CC for Web View
Albums synced with Lightroom CC/mobile can be made available to view on a web page. To do this, you need to enable web sharing, which can be done via Lightroom CC for mobile, Lightroom CC for desktop, or in Lightroom Classic CC, where you can select a Lightroom CC–synced collection/album and click the Make Public button in the Toolbar at the top of the screen (Figure 11.29). This reveals a URL link you can use to share with friends or clients. This will let them view the photos in a Lightroom CC for web view page using a regular web browser (Figure 11.30) much in the same way as they would view a Lightroom-generated web gallery. When viewing a Lightroom CC for web view page, visitors have the opportunity to add likes and comments, which you can then view via the Lightroom Classic CC Library module Comments panel, or Lightroom CC for mobile Activity view. As you update individual photos, the contents of Lightroom CC for web pages will update automatically. In this respect, Lightroom CC for web is more dynamic than regular Lightroom web galleries created via the Web module.


Note
To share via Lightroom CC for mobile, tap the three dots next to an album and tap Share to Web. In the Share to Web screen that follows, switch on Enable sharing. Lightroom CC for mobile also offers a number of sharing and display options. In Lightroom CC for desktop, select an album. In the top bar, click on the three dots and choose Share to Web.
If you wish, you can click the Make Private button to make an album private again. Essentially, this allows you to share Lightroom CC/mobile–synced albums via a web page on any computer that has Internet access. Anyone you share the link with can view the page, but visitors must have an Adobe ID, or use a Facebook or Google account, to log in before they will be able to interact with a Lightroom web album. They can then mark photographs with likes or add comments. You can also use the following shortcuts to navigate the Lightroom CC for web view interface: Use ![]() to return to the Grid track view. Use
to return to the Grid track view. Use ![]() to toggle the Activity Info panel in Loupe view, and use
to toggle the Activity Info panel in Loupe view, and use ![]() to toggle the Photo Info panel in Loupe view.
to toggle the Photo Info panel in Loupe view.
Lightroom CC for web view can be really useful for working photographers. They can share collections/albums of photos, and allow clients to monitor the latest changes or additions as they happen. Let’s say you are working on a series of photographs that are being retouched in Photoshop and cataloged in Lightroom. By managing these images in Lightroom and syncing them to Lightroom CC/mobile, the collection/album data will be continuously updated to show the latest updated versions. This all happens in the background and means you don’t have to manually create a new website as the image-edit changes are updated automatically.
When someone adds a like or a comment, you can see who has added it via the Lightroom CC for web view page, via the Activity view in Lightroom CC or mobile, or via the Comments panel in Lightroom Classic CC (Figure 11.31). Notifications will also appear in the Lightroom Classic CC Grid view and Collections panel (Figure 11.32). A yellow comment badge in the Grid view indicates that one or more people have made a comment. Similarly, in the Collections panel, new comments are flagged with a yellow badge. To locate photos in Lightroom that have recently been commented upon, you can select a collection and choose Library ![]() Review comments. Or, you can choose Sort Order
Review comments. Or, you can choose Sort Order ![]() Last Comment Time.
Last Comment Time.

Lightroom CC for Web
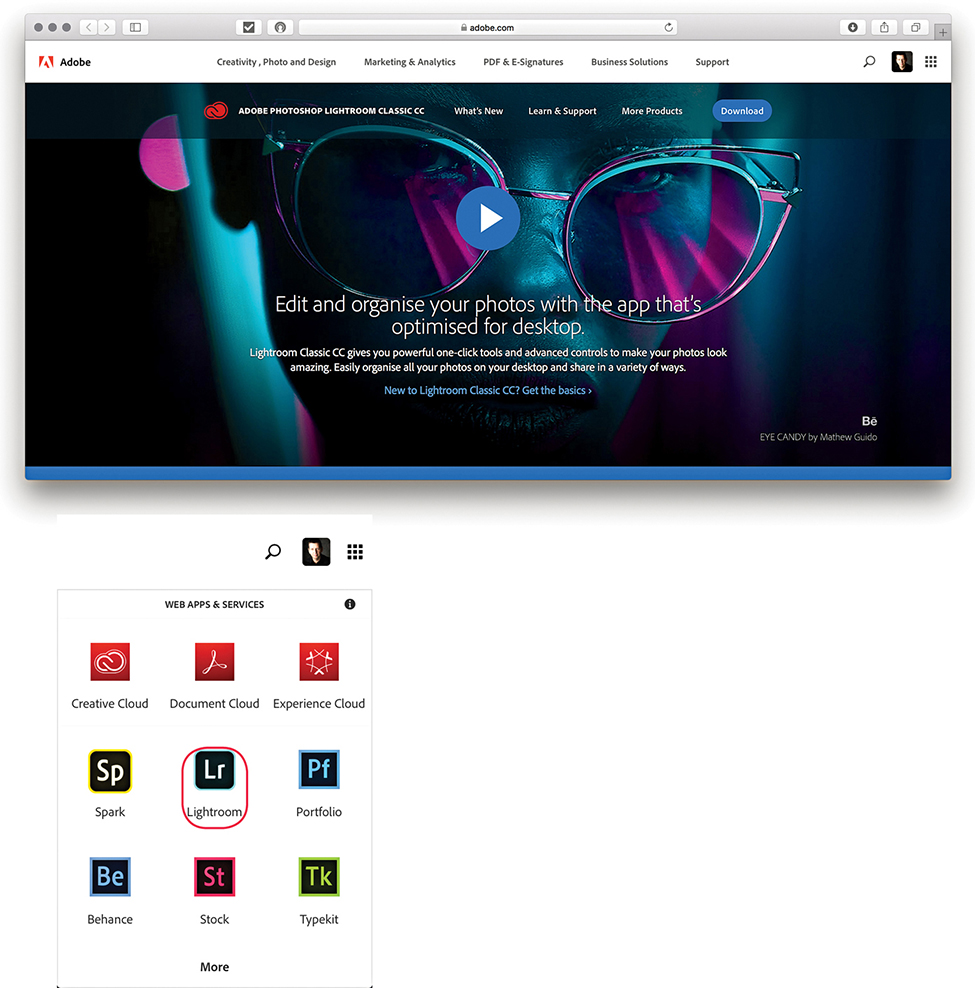
Lightroom CC/mobile–synced images can also be accessed using the Lightroom CC for web interface. Lightroom CC for web is kind of hidden, though. Start by going to the Help menu in Lightroom Classic CC and selecting “Lightroom Classic CC online.” This opens the Adobe Photoshop Lightroom CC page (Figure 11.33). Click the grid button circled at the top of Figure 11.33 to open the page below. Then click the Lightroom icon to launch the Lightroom CC for web page. At this point, I suggest you bookmark the page for future use. Lightroom CC for web shares some of the same Lightroom shortcuts, such as pressing ![]() for Grid view and using
for Grid view and using ![]() to go to Develop. Use
to go to Develop. Use ![]() to access the Crop overlay, and
to access the Crop overlay, and ![]() to convert to black and white (toggled). Although the initial version of Lightroom CC for web was rather slow, the Grid display is now notably faster when you have a large number of photos loaded.
to convert to black and white (toggled). Although the initial version of Lightroom CC for web was rather slow, the Grid display is now notably faster when you have a large number of photos loaded.
Note
Lightroom CC for web is a good example of how machine learning and artificial intelligence (AI) opens up new opportunities in the cloud-native, Lightroom CC workflow. If you click the Lr icon and go to the Technology Previews section, you can enable the Best Photos feature. This feature is particularly interesting, as it can analyze photos in a selected album and filter photos based on “aesthetic” criteria, such as depth of field, symmetry, rule of thirds, sharpness, and lighting. It also places emphasis on people and faces to come up with an overall score for each image. This is followed by a de-duplication process to remove photos that are close together in capture time and similar in content to help you narrow down the best results when dragging the slider to select Fewer or More photos.
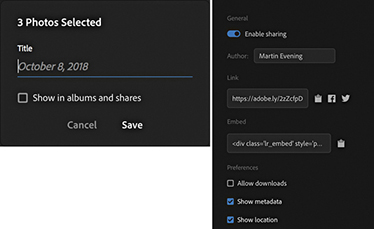
The Lightroom CC for web page offers an alternative way to manage files synced with Lightroom CC/mobile, whether these have been synced as albums or simply added as synced photographs. In Figure 11.34, the left track panel is currently in My Photos mode and the selected album photos can be seen in the main content area. The other option is the Shares mode (circled in blue). This displays shared albums only. More actions are available from the top-right tridot menu, where you can play a slideshow, select Best Photos (if enabled), send to Adobe Portfolio, or delete an album. Click the Sort icon in the Footer to access the sort order options. These let you sort photos based on capture date or a custom order. Click the Sharing tab (circled red in Figure 11.34) to open the share options and access the Share Settings (Figure 11.35). The options here include allowing file downloads, showing metadata, and showing location info.

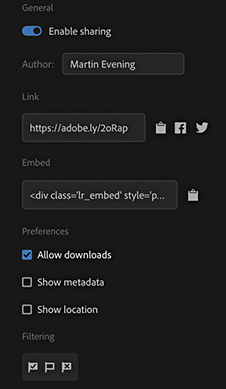
Image searches
To carry out an image search, click in the Search field (see Figure 11.34) and enter a search term. As with Lightroom CC for mobile, Lightroom CC for web interrogates the master images stored on the Adobe cloud server and displays the results in the main content area. The search results are displayed with the most relevant images placed at the top. Therefore, as you scroll down the list, you’ll most likely start to see results that don’t match the search criteria so closely.
Single image view
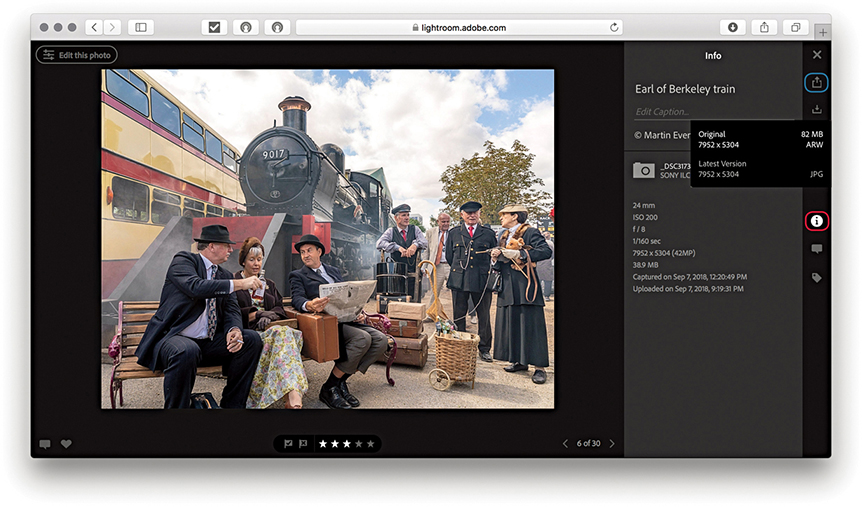
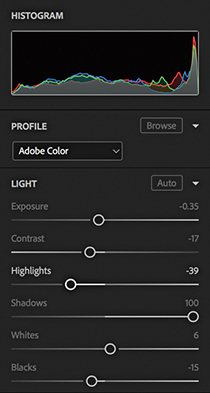
The Lightroom CC for web interface lets you edit your photos in the same way as you can in Lightroom CC for mobile. Click the Edit This Photo button (top left) to access the Develop edit controls, which are more or less the same as in the other Lightroom apps. Figure 11.37 shows the Histogram, Profile, and Light panel controls. When you’re viewing a single image (Figure 11.36), the rating options are displayed just below the photo. Click the Info button (circled in red) to reveal the Info tab shown in Figure 11.36. Here, you can title and caption images and view the EXIF metadata. Click the Download button (circled in blue) to download files. This can be the original file, or the Latest Version, which will be a JPEG with a maximum dimension of 2048 pixels. Click on the Activity button ( ) to view and add comments. And click the Keyword button (
![]() ), or press
), or press ![]() , to enter new keywords.
, to enter new keywords.
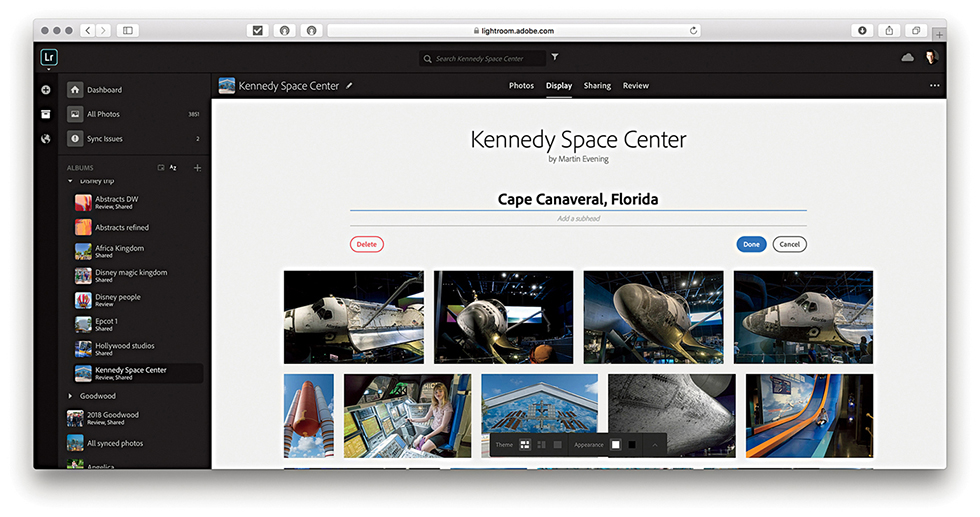
Display options
Clicking the Display tab reveals the display edit controls. Here, you can click to add a heading and subheading to the selected album (Figure 11.38). Also, you can use the floating panel to change the background color from black to white and select different grid views (Figure 11.39). Once applied, the Display settings become sticky on an album-by-album basis. Therefore, you can use this feature to customize specific albums.

Note
The Display mode lets you view your albums, shared or not, with the same visual styling they would have in a shared album.
Review mode
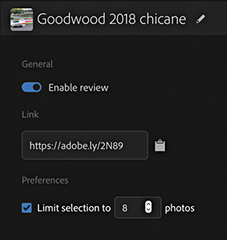
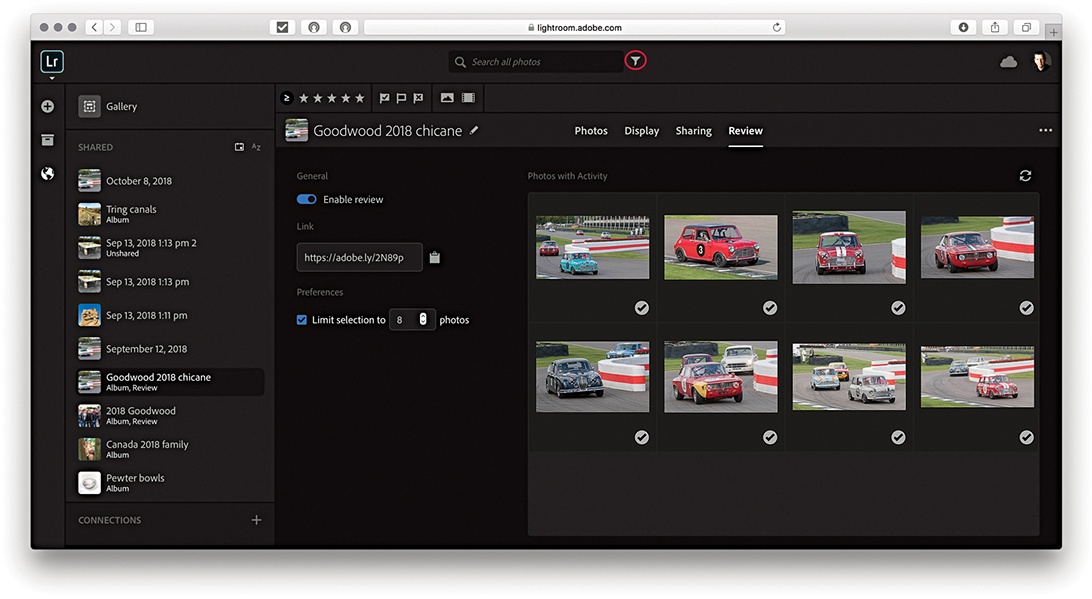
The Review mode allows you to share links for clients to review. To start, select an album to set up for review. Click the Review tab, and click Enable review (see the close-up view in Figure 11.40). As when normally sharing an album, this gives you a link to send to a client. Below, there is an option to limit how many photos a client can select. If disabled, the client can select as many photos as desired. On the right is the review area. This shows you the photos that have been selected and/or commented on by a client.
When you send a link to a client, that person’s experience will be similar to when viewing a normal shared web album. However, the user experience will be different to yourself as the account owner, and you won’t be able to select or like photos when viewing your own album. To make things clearer, the client visiting the web page will be able to watch a tutorial explaining how the review workflow works. When clients select photos, which replaces liking in the Loupe view, they will see information regarding how many photos they have selected in the header. In Figure 11.41, you can see how a client selection of photos might look to you when accessing the Review display mode to check up on client activity.
Refine Search tools
Figure 11.41 also shows the Refine Search header options, such as filter by star rating, which can be accessed by clicking on the Refine Search button circled in red.
Uploading files via Lightroom CC for web
Lightroom CC for web can be used to upload files remotely. This means you can, in effect, add photos to the Lightroom CC catalog via the Lightroom CC for web interface from any computer. The supported file formats include: proprietary raw, DNG, TIFF, JPEG, PSD, and PNG. As you do this, photos are added to the Adobe cloud server, where they are synchronized to the Lightroom Classic CC catalog on the desktop computer. Photos synced in this way will be copied to the Lightroom CC ecosystem folder defined in the Location section of Lightroom Classic CC’s Lightroom Sync preferences. If you select an image in Lightroom Classic CC that’s been imported this way, you can use the Metadata panel used to locate the specific, dated subfolder into which the file has been segregated. Or, you can use the context menu, or choose Photo ![]() Show in Finder (
Show in Finder (![]() [Mac] or
[Mac] or ![]() [PC]). If the file you have synchronized already exists in the catalog, it will still be added, but it will be synced to the original file in the master catalog as a virtual copy rather than be added to the Lightroom CC/mobile folder. The following steps show how to upload files via Lightroom CC for web.
[PC]). If the file you have synchronized already exists in the catalog, it will still be added, but it will be synced to the original file in the master catalog as a virtual copy rather than be added to the Lightroom CC/mobile folder. The following steps show how to upload files via Lightroom CC for web.
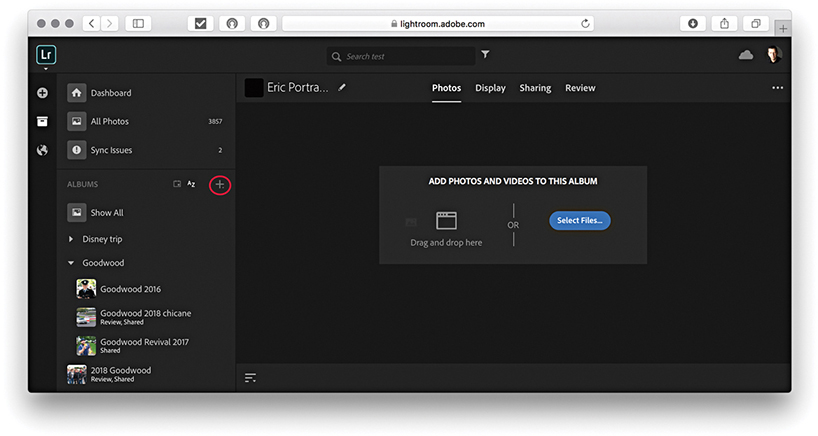
1. To begin with, I clicked the Album plus button in Lightroom CC for web (circled) to create a new collection/album and named it Eric Portraits. With the new empty collection selected, I clicked Select Files to choose the files to upload. You can also drag photos directly to a collection to initiate an upload.

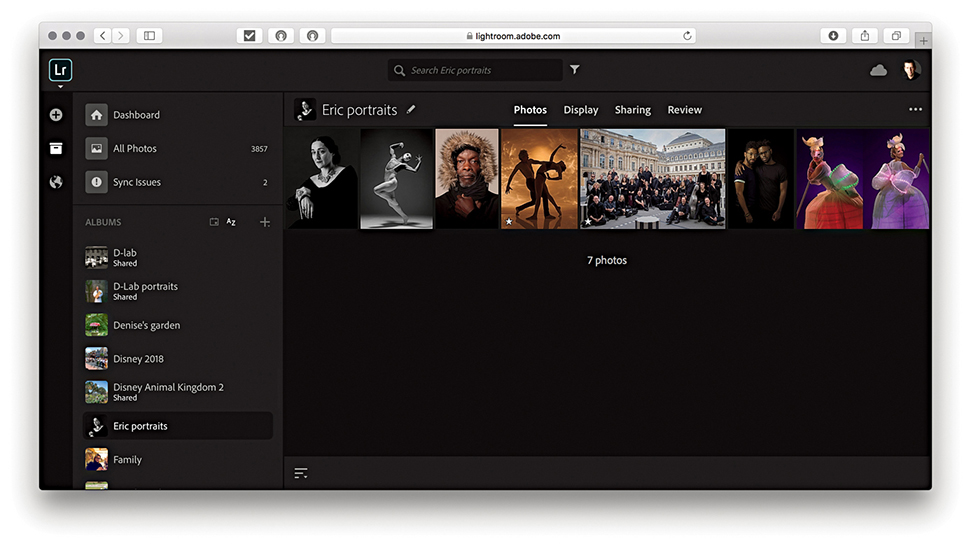
2. The photos were now added to the new album in Lightroom CC for web.

3. Meanwhile, in Lightroom Classic CC, the photos that had recently been added via Lightroom CC for web view showed up in the Collections panel and were also accessible via All Synced Photographs in the Catalog panel.
Managing photos via Lightroom CC for web
The Lightroom CC for web manage options are shown below in Figure 11.42.

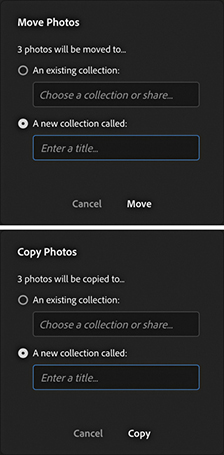
When viewing photos in the Grid view, you can select the photos you wish to manage by clicking the top-right corner of each thumbnail. As you roll over this area, you will see a tick icon. Click this to select or add to a selection (as shown in Figure 11.42). Once a selection has been made, you will see the manage options. You can use the Set as Cover button to replace the cover image of an album using a single selected photo. The Remove button can be used to remove photos from Lightroom CC. To delete master files from the synced Lightroom Classic CC catalog, you’ll need to click on the Delete button next to this. Click the Copy To or Move To buttons to copy or move to an existing album or to a new album. The Move Photos and Copy Photos options are shown in Figure 11.43. You can also drag a selection to copy these photos to another album, or drag to the + icon to create a new album. Click the Share button to open the Share options shown in Figure 11.44. Start by giving the photo or photos you wish to share a title, and click Save. In the next dialog, you can enable sharing and see the URL link to copy and paste, or click on one of the social media buttons on the right. Select Allow Downloads if you wish to allow the photos to be downloaded.
Click the X at the end of the manage options in Figure 11.42 to cancel and deselect a selection.
Lightroom CC for Desktop
The Lightroom CC for desktop program (which I refer to from here on as Lightroom CC) provides the security of cloud-based storage, a simplified user interface (Figure 11.45), and the ability to sync photos across multiple devices, other computers running Lightroom CC or Lightroom Classic CC. It might suit photographers who find Lightroom Classic CC too intimidating and overcomes two of the major hurdles of image management: knowing how and where to import your images and how to keep them secure.

Note
Lightroom CC requires macOS 10.13 or later, or Windows 10.
Lightroom CC has a new code base that enables it to sync to the cloud with an ease that is not available in Lightroom Classic CC. This makes it more adaptable to the future of cloud-based management. Lightroom CC assumes no prior knowledge of Lightroom and simplifies the process by making sure everything is synced to the cloud and, therefore, synced to your other copies of Lightroom CC for mobile devices (as well as to the synced Lightroom Classic CC catalog). Ultimately, once an import/upload process is completed, your files are safe on the Adobe server even if they are yet to be downloaded elsewhere. If a laptop computer running Lightroom CC, your tablet, or your phone were to be stolen, all you would need to do is get the computer or device replaced, log in to the Adobe Creative Cloud, and access all your master files again.
Note
Lightroom Classic CC uploads only Smart Previews to the cloud, not originals. So don’t get fooled into thinking this is a viable backup. Lightroom CC, on the other hand, always uploads originals to the cloud.
Migrating from Lightroom Classic CC
Migrating a catalog is a one-time process for adding photos, videos, and related metadata from Lightroom Classic to the Lightroom CC/mobile ecosystem. Go to the File menu in Lightroom CC and choose Migrate Lightroom Catalog (![]() [Mac] or
[Mac] or ![]() [PC]). Here, you can select as many Lightroom catalogs as you want to migrate (Figure 11.46).
[PC]). Here, you can select as many Lightroom catalogs as you want to migrate (Figure 11.46).
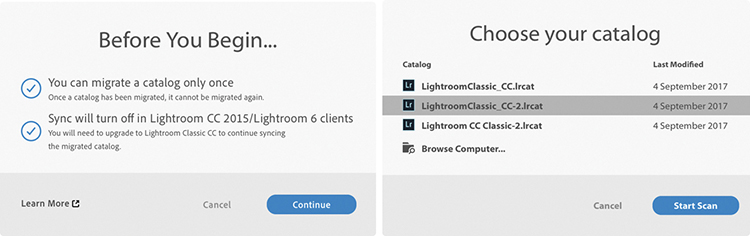
How long the migration process takes depends on the size of your catalog, size of the files, and specs of your computer. You are strongly advised to plug in your computer while migrating rather than rely on battery power. If you see warnings about missing files during migration, you will be prompted to go back and find them. For example, this can happen if you’ve moved the catalog, you left an external drive disconnected, or a Windows drive took on a different drive letter when plugged back in. To fix this, open Lightroom Classic CC, look in the Folders panel for folders marked with question marks. Right-click and choose Find Missing Folder to help locate the folders on your drive. Then, quit Lightroom Classic CC and try the migration again. For more information on how to locate missing files, see tinyurl.com/nlbvg9f.
Note
If migrating from Lightroom 6.x/2015.5, you can migrate any single catalog, after which syncing will be disabled. Once you have upgraded to Lightroom Classic CC, you can continue to sync files to the cloud and can migrate further Lightroom Classic CC catalogs. If these include duplicates, however, duplicate files will be added to Lightroom CC.
Note
You can now also migrate from an Apple Photos catalog. Choose File ![]() Migrate Apple Photos Library. Or, use the
Migrate Apple Photos Library. Or, use the ![]() (Mac) or
(Mac) or ![]() (PC).
(PC).
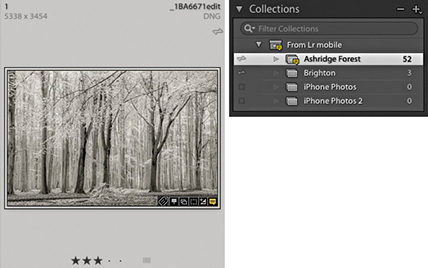
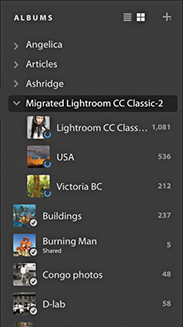
After migration, the contents of each catalog will be added to a folder (similar to a collection set in Lightroom Classic CC) identified by the catalog’s name (Figure 11.47). Collection hierarchies will be maintained but limited to five levels, with the top level going to the catalog name. It is also possible some images may get imported twice, in which case they will be added multiple times.
By default, the migrated catalog files are all copied to a temporary location within the Lightroom Library.lrlibrary file inside the Pictures/My Pictures folder on your computer. Over time, as they are backed up to the cloud, Lightroom CC may remove these large, original files and replace them with smaller Smart Previews in order to save disk space, but this initial copy can require a lot of space. If there is not enough storage space available on your local system drive, you’ll see an error message that gives you the option to direct Lightroom CC to store original files on a separate drive. In Lightroom CC, go to Edit ![]() Preferences (Win) or Lightroom CC
Preferences (Win) or Lightroom CC ![]() Preferences (Mac) (see Figure 11.83 on page 703), and select the Local Storage panel. Click the Change Location button to select a drive with at least the amount of space recommended in the error message.
Preferences (Mac) (see Figure 11.83 on page 703), and select the Local Storage panel. Click the Change Location button to select a drive with at least the amount of space recommended in the error message.
The migration process will copy keyword metadata to Lightroom CC. However, what gets migrated along with the images is limited. Folders and folder hierarchies will not be preserved. Nor will Smart Collections or snapshots. Keyword hierarchies will be flattened and face, name data, etc., converted to keywords (Figure 11.48). After you complete migrating a catalog to Lightroom CC, you can still access and use the catalog in Lightroom Classic CC, and it is possible to continue syncing to and from Lightroom Classic CC. You can import new photos, create a synced collection, and these will sync to Lightroom CC as new albums outside the migrated catalog folder. Or, you can drag new photos to All Synced Photographs, and these will sync to Lightroom CC. You can continue to edit all photos in Lightroom Classic CC and Develop settings updates will propagate to Lightroom CC. Likewise, photos edited in Lightroom CC will be updated to Lightroom Classic CC. If you add new photos to the original Lightroom Classic CC catalog, you can always export these as a separate catalog, which can then be migrated into Lightroom CC.

Lightroom CC Program Layout
The initial animated slides can help you learn about Lightroom CC; the content will vary depending on whether you have Lightroom Classic CC installed. The Lightroom CC interface displays recently added files plus a dated list of files on the left with a list of albums (Lightroom mobile–synced collections) below. Use ![]() to toggle hiding/showing the left track. Use
to toggle hiding/showing the left track. Use ![]() (Mac) or F11 (PC) to enter the full-screen application window mode. To keep your albums neatly organized, you can arranged them into folders and subfolders. Select Create Folder from the Albums fly-out menu shown in Figure 11.49. The Edit, Keyword, and Info options are on the right. Use
(Mac) or F11 (PC) to enter the full-screen application window mode. To keep your albums neatly organized, you can arranged them into folders and subfolders. Select Create Folder from the Albums fly-out menu shown in Figure 11.49. The Edit, Keyword, and Info options are on the right. Use ![]() to toggle between Grid and Working Grid view modes.
to toggle between Grid and Working Grid view modes.

To filter images, use the controls in the left panel to filter by date, people, folder, or album. Or, click the Search field that’s highlighted in Figure 11.50. As with Lightroom CC for mobile and web, when you enter a search term, Lightroom CC queries the cloud-based files and displays the search results (which means you need an Internet connection). Using the left panel, you can cross-reference a text search with a specific date, people, or album search. Then use the Refine bar to also refine by keywords, camera model, location, or sync status information.
Tip
As you add different words to your search or apply filters, the parameters of your search will appear in the Search bar. You can click to dismiss them individually to change a search.
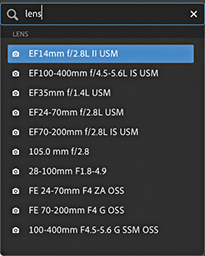
You can extend the range of the Filter bar by carrying out what is known as a faceted search. Using the Search field you can type specific terms, such as lens or ISO, to see a list of matching criteria for the current selection. For example, in Figure 11.51, I typed lens, which revealed a list of all the lenses related to the current image selection. Other terms can be entered, such as Flash (to select photos with or without flash), Edited, f/, Flag, Orientation, or Type. In fact, you will find that as you start typing in the Search field, Lightroom CC will attempt to auto-complete, which can make the above terms, as well as others more discoverable. You can also include AND, OR, and NOT terms into a search. You need not capitalize in English, but in other languages, you may need to do so to prevent clashing with other terms. To avoid confusion, you can use the following symbols instead: +, |, or −. In Figure 11.52 below, I carried out a search for cats | dogs. Or, I could have typed cats OR dogs. Either way, the search included both types of pets in the resulting search return.

Lightroom Help and Tips
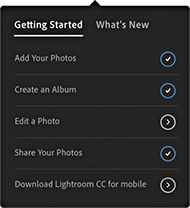
Click the Question mark button in the top-right corner (circled in Figure 11.52) to access the Getting Started and What’s New help resources (Figure 11.53). The Getting Started topics initiate guided tutorials, while the What’s New section lists the most recent additions to Lightroom CC.

Importing Files Via Lightroom CC
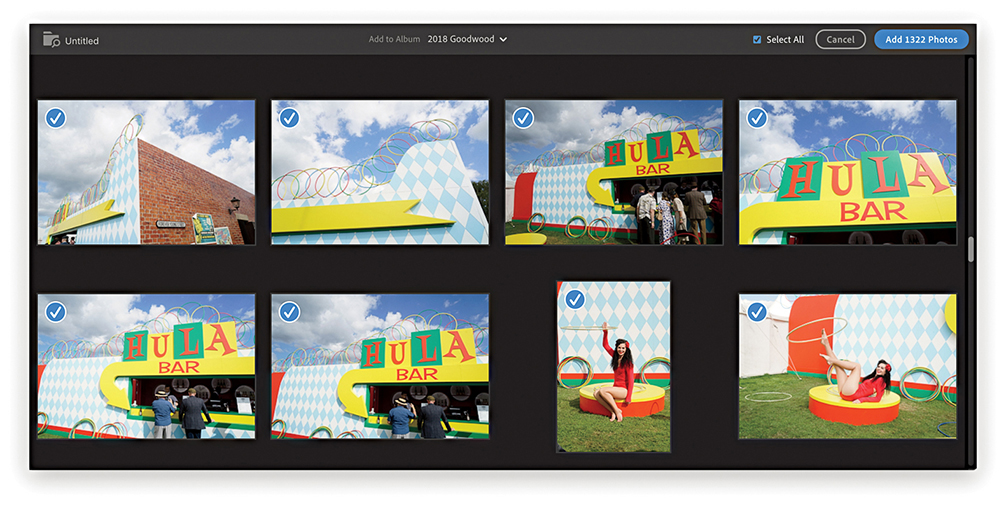
Clicking the Add Photos button (![]() ) opens the Import interface shown in Figure 11.54. If a camera card or more than one card is inserted, you’ll first see a list of cards to import from. You will then be prompted to browse the computer to select a folder to import from and add to the Catalog. If a camera card is connected, you can choose to copy from the card. In Figure 11.54, I checked the Select All option. But you can also manually select the files to import. The imported files will initially be stored in the Pictures/My Pictures/Lightroom Library.lrlibrary file. The import process is carried out in the background, freeing you to get on with other tasks. The thumbnail images will show up fairly quickly in the content area, but it will take longer for a full upload to take place, as Lightroom CC also needs to copy the original files to the Adobe cloud server. From there, the files are processed as JPEG and Smart Preview proxies ready to be accessed by other Lightroom CC/mobile clients, Lightroom CC for web, and so on. Incidentally, Mac computers with Retina displays will need to pull down higher-res previews, which can add to the time it takes to load Smart Previews.
) opens the Import interface shown in Figure 11.54. If a camera card or more than one card is inserted, you’ll first see a list of cards to import from. You will then be prompted to browse the computer to select a folder to import from and add to the Catalog. If a camera card is connected, you can choose to copy from the card. In Figure 11.54, I checked the Select All option. But you can also manually select the files to import. The imported files will initially be stored in the Pictures/My Pictures/Lightroom Library.lrlibrary file. The import process is carried out in the background, freeing you to get on with other tasks. The thumbnail images will show up fairly quickly in the content area, but it will take longer for a full upload to take place, as Lightroom CC also needs to copy the original files to the Adobe cloud server. From there, the files are processed as JPEG and Smart Preview proxies ready to be accessed by other Lightroom CC/mobile clients, Lightroom CC for web, and so on. Incidentally, Mac computers with Retina displays will need to pull down higher-res previews, which can add to the time it takes to load Smart Previews.
You can have two or more computers running Lightroom CC accessing the images stored on the Adobe cloud servers and have these synchronized with the synced Lightroom Classic CC catalog. Figure 11.55 shows how this might work with a laptop running Lightroom CC and a desktop computer running Lightroom Classic CC plus a second Lightroom CC program. In this example, original files imported to a laptop computer running Lightroom CC are copied to the Adobe cloud server and stored on the cloud, where JPEG previews and Smart Preview proxies are created. Meanwhile, the originals are copied to the computer that’s running Lightroom Classic CC and added to the (synced) catalog. Here, the original files are copied to the designated Lightroom CC/mobile images folder.
When you click to edit an image in Lightroom CC, preview proxies and originals are downloaded on demand from the Adobe cloud server. So, in this example, when you’re editing an image in Lightroom CC on the original laptop computer, JPEG previews and proxies are downloaded to the Lightroom CC program. And similarly, when you edit a photo in the Lightroom CC program on the desktop computer, previews and proxies are downloaded there, too. Lightroom Classic CC and Lightroom CC don’t have to be on the same computer. You could have a scenario in which Lightroom CC is on a laptop, Lightroom Classic CC is on a desktop computer, and a second version of Lightroom CC is on another, separate computer.
Note
After your trial or subscription expires, Lightroom CC can work in a residual mode. This means you can browse your photos, but you won’t be able to edit them any longer or upload new photos to the cloud. This is similar to the policy for Lightroom Classic CC, with which you can continue to access your photos after your subscription expires.
As original files are uploaded from Lightroom CC to the cloud, these will over time be deleted from the host computer to clear disk space. How this happens depends on the Target Available Disk Space Usage setting in the Lightroom CC preferences. If you have a large catalog of images, the chances are you won’t need to access most of the original images again or only very rarely. But you will need to access favorite photos or those shot in the last year more frequently. One terabyte of storage is made available on the Adobe Cloud servers. This should be enough space to store around 40,000 raw originals or more, depending on the size of the raw files, although other storage plans are available. At the same time, Lightroom CC routinely downloads proxies so these are accessible on the local machine if and when it needs them. This mechanism allows Lightroom CC to remove the originals more aggressively, freeing up space, and lets you continue working should the originals be offline. The Target Available Disk Space Usage setting currently does not allow for additional storage demands of Smart Previews, so you may, therefore, see the disk usage increase beyond this set threshold.
Tip
To view the Lightroom CC sync status, click the cloud icon circled blue in Figure 11.56. This also allows you to pause syncing.

If you choose Lightroom CC to manage your imports, how and where these are stored is less relevant. The target market is for those who prefer things be made simple. But it is also important for more advanced users to be aware of Lightroom CC’s features and how it fits in to the current Lightroom CC/mobile workflow.
Editing Photos in Lightroom CC
To switch from the Grid view to the Detail view, double-click or use ![]() . The Edit controls (
. The Edit controls (![]() ) are accessed from the right panel track (Figure 11.56) and the Edit panels are summarized in Figure 11.57. These are all mostly similar to those found in Lightroom desktop, except some of the groupings and names are slightly different. For example, the basic tone controls (
) are accessed from the right panel track (Figure 11.56) and the Edit panels are summarized in Figure 11.57. These are all mostly similar to those found in Lightroom desktop, except some of the groupings and names are slightly different. For example, the basic tone controls (![]() [Mac],
[Mac], ![]() [PC]) are grouped under Light, where the Auto button (
[PC]) are grouped under Light, where the Auto button (![]() ) can apply an instant auto-adjustment. Or,
) can apply an instant auto-adjustment. Or, ![]() -click on any of the Light panel slider names to auto-set the values. The advanced controls are accessed by clicking on the disclosure triangle to reveal more options. For example, the Detail panel (
-click on any of the Light panel slider names to auto-set the values. The advanced controls are accessed by clicking on the disclosure triangle to reveal more options. For example, the Detail panel (![]() [Mac],
[Mac], ![]() [PC]) contains a single Sharpness slider. Click the disclosure triangle next to it to reveal all four sharpening sliders. Despite these user-interface differences, the slider settings all correspond with those in Lightroom Classic CC. Lightroom CC does require all images to be converted to Version 5. Therefore, when you select a photo to edit, you may see a warning if a photo needs updating to the current process version.
[PC]) contains a single Sharpness slider. Click the disclosure triangle next to it to reveal all four sharpening sliders. Despite these user-interface differences, the slider settings all correspond with those in Lightroom Classic CC. Lightroom CC does require all images to be converted to Version 5. Therefore, when you select a photo to edit, you may see a warning if a photo needs updating to the current process version.


Note
To open and edit a photo in Photoshop, choose File ![]() Edit in Photoshop (
Edit in Photoshop (![]() [Mac] or
[Mac] or ![]() [PC]). This opens a rendered version as a 16-bit image in ProPhoto RGB. Save and close the photo in Photoshop to see the saved photo added to Lightroom CC.
[PC]). This opens a rendered version as a 16-bit image in ProPhoto RGB. Save and close the photo in Photoshop to see the saved photo added to Lightroom CC.
Tip
Whenever you are in a Detail view, you can now view your photos in full-screen mode by using either the ![]() key or choosing View
key or choosing View ![]() Detail Full Screen.
Detail Full Screen.
The Color panel (![]() [Mac],
[Mac], ![]() [PC]) can be used to edit the White Balance, Vibrance, and Saturation settings. Click the color wheel (circled in 11.57) to disclose the Color Mix options. Clicking the B&W button in the Edit header reveals instead the black-and-white mix options. The Clarity slider is moved to the Effects panel (
[PC]) can be used to edit the White Balance, Vibrance, and Saturation settings. Click the color wheel (circled in 11.57) to disclose the Color Mix options. Clicking the B&W button in the Edit header reveals instead the black-and-white mix options. The Clarity slider is moved to the Effects panel (![]() [Mac],
[Mac], ![]() [PC]), where it joins the Dehaze, Vignette, and Grain effect sliders. The Detail panel contains Sharpening and Noise Reduction sliders. Lens Corrections options are grouped under the Optics panel (
[PC]), where it joins the Dehaze, Vignette, and Grain effect sliders. The Detail panel contains Sharpening and Noise Reduction sliders. Lens Corrections options are grouped under the Optics panel (![]() [Mac],
[Mac], ![]() [PC]), and the Transform panel Upright adjustment options are grouped in the Geometry panel (
[PC]), and the Transform panel Upright adjustment options are grouped in the Geometry panel (![]() [Mac],
[Mac], ![]() [PC]).
[PC]).
The Crop tool options (![]() ) are the same as Lightroom Classic CC, except you also have Horizontal and Vertical flip buttons, which are just below the Straighten slider. Use
) are the same as Lightroom Classic CC, except you also have Horizontal and Vertical flip buttons, which are just below the Straighten slider. Use ![]() (Mac),
(Mac), ![]() (PC) to rotate left and
(PC) to rotate left and ![]() (Mac),
(Mac), ![]() (PC) to rotate right. The Healing Brush tool (
(PC) to rotate right. The Healing Brush tool (![]() ) lets you choose either Clone or Heal modes.
) lets you choose either Clone or Heal modes.
Tone Curve adjustments
The Tone Curve button (circled in Figure 11.58) is located at the top of the Light panel. To edit the Tone Curve in Parametric mode, click the (![]() ) button. Then click in the desired quadrant region and drag up to lighten and drag down to darken. For example, in the left example in Figure 11.59, I clicked in the Shadows quadrant and dragged upward to lighten the shadow tones. In Point Editor mode (
) button. Then click in the desired quadrant region and drag up to lighten and drag down to darken. For example, in the left example in Figure 11.59, I clicked in the Shadows quadrant and dragged upward to lighten the shadow tones. In Point Editor mode (![]() ), you can click anywhere on the curve to add a control point, and then click and drag to adjust the curve shape.
), you can click anywhere on the curve to add a control point, and then click and drag to adjust the curve shape.

To remove a control point, you can either double-click on the control point or use a right-click to access the context menu shown in Figure 11.60. Double-click in the panel header to remove all points. To disable a Tone Curve adjustment, click the switch highlighted in Figure 11.60.

You can also click to select the Red, Green, and Blue Point Curve editing modes (Figure 11.61) to adjust the color balance and stylize your image.

Split Toning
The Split Toning controls can be used to simulate traditional black-and-white tints and toners, such as sepia toning, or simulate cross-processing effects on color images. The Split Toning controls can be accessed via the Effects panel by clicking the button circled in Figure 11.62. Doing so opens the Split Toning panel shown in Figure 11.63. Here, you can click to select the Shadows or Highlight buttons and click anywhere inside the color ramp to apply a hue color of a desired saturation strength. If you hold down the ![]() key (Mac) or
key (Mac) or ![]() key (PC) and drag left or right, Lightroom restricts you to adjusting the Hue only. And, if you hold down the
key (PC) and drag left or right, Lightroom restricts you to adjusting the Hue only. And, if you hold down the ![]() key and drag up or down, you’re restricted to adjusting the Saturation only. As with the Tone Curve panel, you can use the context menu or double-click on a point to reset the Shadows or Highlights colors. Double-click in the header to delete all the settings, and click the switch to disable an adjustment.
key and drag up or down, you’re restricted to adjusting the Saturation only. As with the Tone Curve panel, you can use the context menu or double-click on a point to reset the Shadows or Highlights colors. Double-click in the header to delete all the settings, and click the switch to disable an adjustment.
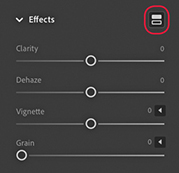

Healing Brush
When the Healing Brush tool is selected from the right-hand track, the Healing Brush panel becomes active (Figure 11.64), allowing you to choose between Clone and Heal modes, adjust the cursor Size, Feather, and Opacity. At the bottom is a Visualize Spots preview mode, which you can toggle on and off by pressing ![]() . When it’s on, you can adjust the Threshold slider to adjust the threshold point for the black-and-white preview at which the sensor spots are made most visible.
. When it’s on, you can adjust the Threshold slider to adjust the threshold point for the black-and-white preview at which the sensor spots are made most visible.

Localized adjustments
Localized adjustments include the Brush, Linear Gradient, and Radial Gradient tools. Figure 11.65 shows a Radial Gradient (![]() ) adjustment being applied to an image (Press
) adjustment being applied to an image (Press ![]() to cycle the Overlay visibility and
to cycle the Overlay visibility and ![]() to toggle the overlay color between a red and green display. Here, I also had the Eraser tool selected (
to toggle the overlay color between a red and green display. Here, I also had the Eraser tool selected (![]() ), which can be used to brush edit an adjustment effect, erasing the mask. Hold down the
), which can be used to brush edit an adjustment effect, erasing the mask. Hold down the ![]() key to toggle to the “add to mask” mode. When any localized adjustment is active, a right-click on any slider reveals a Reset All Sliders option.
key to toggle to the “add to mask” mode. When any localized adjustment is active, a right-click on any slider reveals a Reset All Sliders option.

To see a Before/After preview, click the Show Original button on the bottom right of the Toolbar (circled in Figure 11.65), or use the (![]() ) key shortcut (in the Before view mode the controls are grayed out).
) key shortcut (in the Before view mode the controls are grayed out).
Syncing Profiles and Presets
Lightroom CC can synchronize both presets and profiles, including those custom-created by third-party suppliers. You can also create presets on your mobile devices and have these synced across Lightroom CC via the Creative Cloud, just as you can sync your photos. If you are installing Lightroom CC for the first time, the existing Lightroom Classic CC profiles and presets on your computer should automatically migrate to Lightroom CC. Otherwise, you’ll need to manually import your presets and profiles from Lightroom Classic CC to Lightroom CC. To do this, launch Lightroom CC, and choose File ![]() Import Profiles & Presets (or use the tridot menu in the Presets panel). In the Import dialog, browse to find the presets you wish to import. Once the presets and profiles have been imported and allowed to sync, you should see these synced across all other devices in the Lightroom CC ecosystem. Be warned that depending on your Internet connection, it may take up to a few hours for these to all appear synced.
Import Profiles & Presets (or use the tridot menu in the Presets panel). In the Import dialog, browse to find the presets you wish to import. Once the presets and profiles have been imported and allowed to sync, you should see these synced across all other devices in the Lightroom CC ecosystem. Be warned that depending on your Internet connection, it may take up to a few hours for these to all appear synced.
Once they’re installed, you can access the presets by clicking the Presets button, highlighted in Figure 11.66, or use ![]() . The presets will then appear in a column next to the Edit controls. As you roll over the preset previews, the Edit sliders adjust to show the settings used. Profiles can be accessed by clicking the Profile menu or Profile Browser (circled in blue), just as you would in Lightroom Classic CC.
. The presets will then appear in a column next to the Edit controls. As you roll over the preset previews, the Edit sliders adjust to show the settings used. Profiles can be accessed by clicking the Profile menu or Profile Browser (circled in blue), just as you would in Lightroom Classic CC.
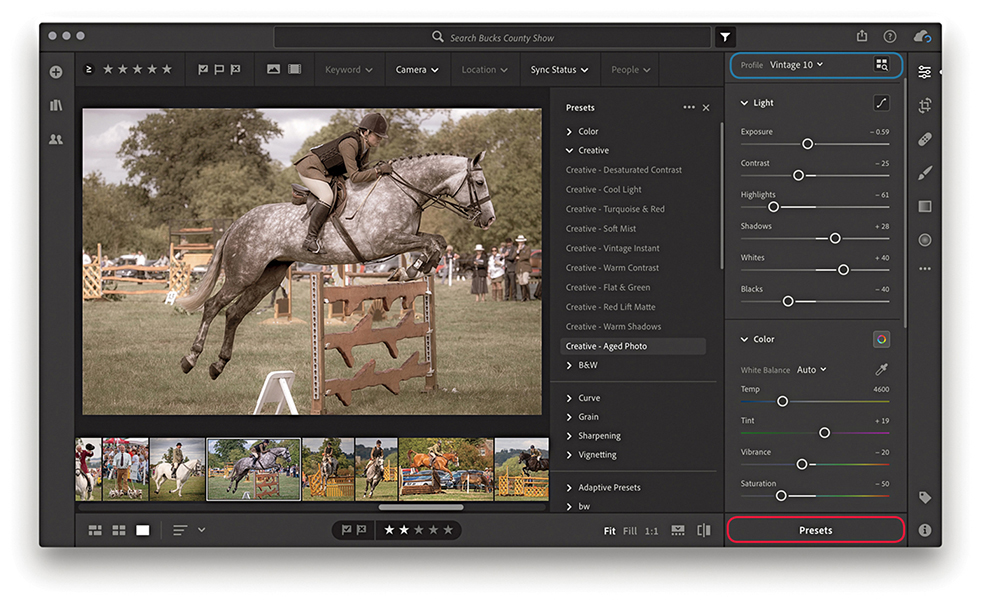
Note
Sync presets to the following directory: Win: C:ProgramDataAdobeCameraRawSettings Mac: Username/Library/Application Support/ Adobe/CameraRaw/Settings
Sync profiles to the following directory: Win: C:ProgramDataAdobeCameraRawCameraProfiles Mac: username/Library/ Application Support/ Adobe/Camera Raw /Camera Profiles
Batch copy and paste settings
You can copy Develop settings from one image and paste them to multiple images at once. Go to the Lightroom CC Photo menu, and choose Copy Edit Settings (![]() [Mac]
[Mac] ![]() [PC]). This copies the Develop edit settings from the current selected image based on the options selected in the Copy Settings dialog (Figure 11.67). To paste, select the image or images you wish to apply the settings to and choose Photo
[PC]). This copies the Develop edit settings from the current selected image based on the options selected in the Copy Settings dialog (Figure 11.67). To paste, select the image or images you wish to apply the settings to and choose Photo ![]() Paste Settings (
Paste Settings (![]() [Mac]
[Mac] ![]() [PC]).
[PC]).
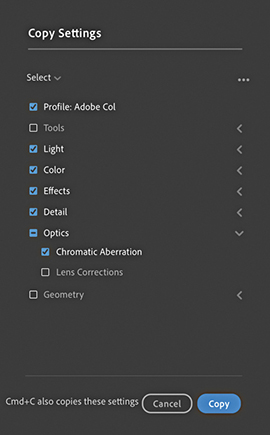
By default, the Copy Settings exclude copying tools, lens corrections, and geometry settings. To precisely select which settings you wish to copy (and set as the new default), go to Photo ![]() Choose Edit Settings to Copy (
Choose Edit Settings to Copy (![]() [Mac]
[Mac] ![]() [PC]). This opens the dialog shown in Figure 11.67, where you can check the settings as desired. If more than one photo is selected while in Detail view, use
[PC]). This opens the dialog shown in Figure 11.67, where you can check the settings as desired. If more than one photo is selected while in Detail view, use ![]() (Mac)
(Mac) ![]() (PC) to paste to all photos.
(PC) to paste to all photos.
You can click on the three dots circled in blue Figure 11.65 to open a pop-up menu that contains copy and paste plus other options. The Show Original option can be toggled to show a before or after view. Revert to Original undoes all Develop adjustments. Select Single-Panel Mode if you want the panel header to collapse when you click to select another panel. Click Edit in Photoshop to open in Photoshop.
Editing the Capture Time
You can adjust the capture time, for a single photo or a series of photos. This is useful for those times when the capture time settings are wrong, such as when you need to compensate for a time-zone shift. Start by making a selection of the photos that you wish to edit. Go to the Info panel shown in Figure 11.68 and click the pencil icon (circled). This opens the Edit Capture Time dialog shown in Figure 11.69, where you can shift the calendar date and time settings as desired. Click Change to apply the time shift adjustment. This then updates the EXIF metadata fields accordingly.

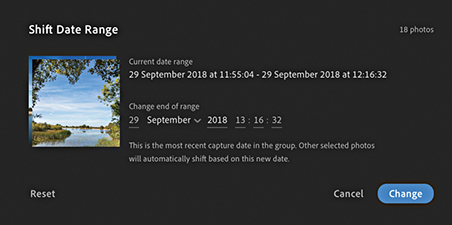
People View Mode
Lightroom CC now has a People view mode, which is circled in Figure 11.70 below. This feature is fairly similar to the face tagging in Lightroom Classic CC. Essentially, Lightroom CC carries out an initial server-side face-detection process of all the files you have imported to Lightroom CC. Having done that, Lightroom CC then carries out a face-recognition step in which it starts to group similar faces together in clusters. Again, this is done on the server side.
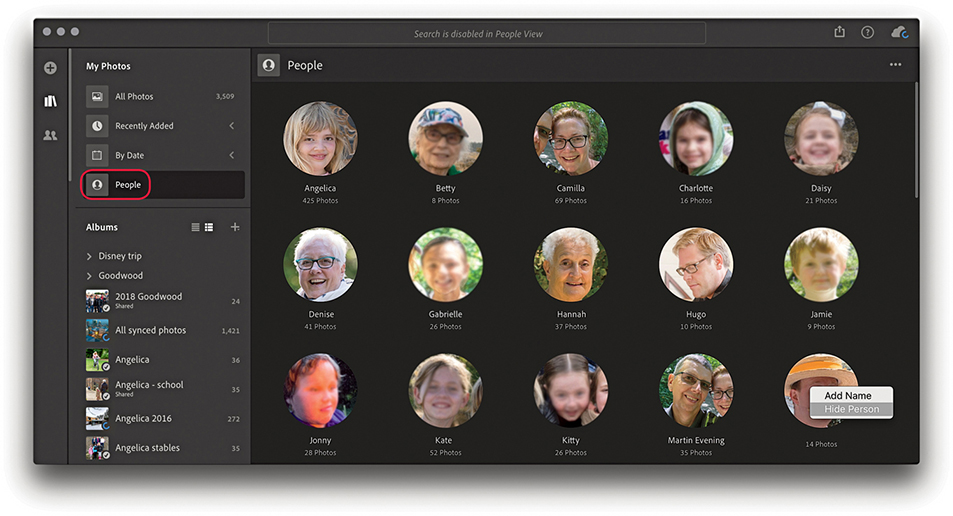
Assuming you have photos of people in your catalog, when you select the People view mode, you’ll see a bunch of cluster circles, each with an identifying face. There should be one cluster for each individual person who appears in the catalog, and each cluster will contain all the known photos of that person. There must be a minimum of five identified faces to create a single cluster, which can help filter out random faces in a crowd, but there may also be false positives where other people have been incorrectly identified as that person. When the identified clusters are not relevant, you can right-click and choose Hide Person. If you double-click a cluster, you enter a filtered Grid display (Figure 11.71), where you can check to see if the identified faces are correct. If the cluster is unnamed, you can enter a new name and click the arrow to the left (circled) to return to the People view mode. If you find you need to merge clusters, you can drag one of the circles on top of the other. This will pop the Merge dialog shown in Figure 11.72. Sometimes Lightroom CC may identify a cluster as being similar to another cluster and ask if you wish to merge the two together.

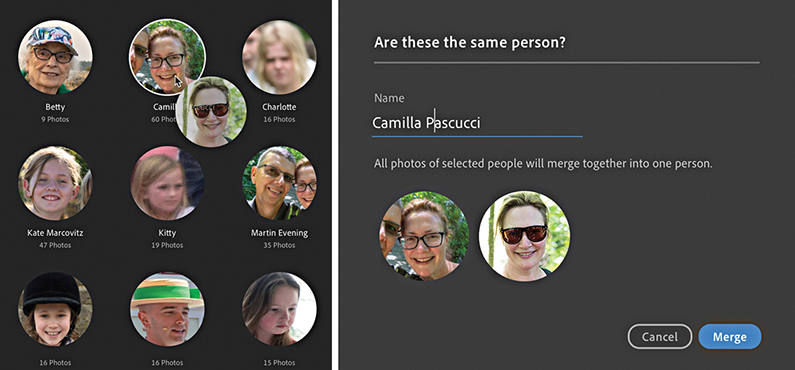
Note
A People view mode is also available in Lightroom CC for iPhone and iPad.
Export and Sharing Options
Click the Share button to access the Share options shown in Figure 11.73. The Save To options are so far limited to exporting photos from Lightroom CC as JPEGs either as small (maximum 1024 pixels), full-sized, or at a custom size of your choosing (Figure 11.74). Or, you can save as Original files with settings.

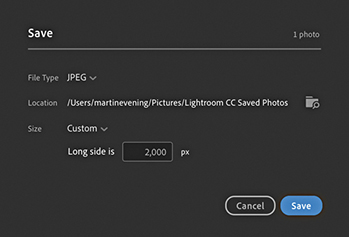
The Share To Web option can be used to share selected photos via a web link. Create a selection of photos, and choose Share To Web. This pops the Share Settings dialog shown in Figure 11.75, where you have some control over the options available when viewing this link. Here, you can copy the link to share the album link with others. You can decide whether to allow people to download images and whether to include metadata and show location information.
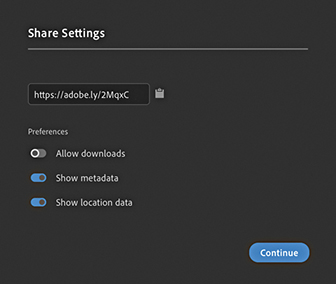
Tip
After setting up a web share, you can choose Share To Web to return to the Share Settings dialog and choose Stop Sharing.
To share a specific album, go to the Album list on the left track, right-click the album you wish to share, and select Share To Web (Figure 11.76). This again opens the Share Settings dialog shown in Figure 11.75, You can modify the options at any time. This includes shared albums/collections previously created via Lightroom Classic CC. The Share To option in the Figure 11.76 menu currently has just one option, which is to share to Adobe Portfolio.

Stacking Photos
To stack photos in Lightroom CC, create a photo selection and choose Edit ![]() Stacks
Stacks ![]() Group Into Stack. Or, you can right-click to reveal the context menu shown in Figure 11.77 and select Group Into Stack.
Group Into Stack. Or, you can right-click to reveal the context menu shown in Figure 11.77 and select Group Into Stack.
On the face of it, stacks in Lightroom CC are similar to stacks in Lightroom Classic CC. However, Lightroom CC stacks don’t actually correspond with Lightroom Classic CC, or vice versa. They are only similar in that you can group photos into a stack to compact a series of photos and have them represented as a single Grid thumbnail. You can click on a thumbnail Stack badge to see the stacked photo contents (Figure 11.78). The square thumbnail on the left of the group (circled below) shows the cover image. You can drag any image from the stack to replace this.
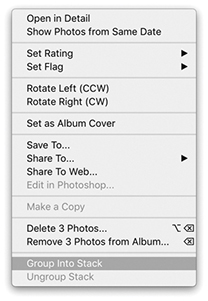

Essentially, the main difference is that stacks in Lightroom CC are global and more like “assets.” For example, you can click and drag a stack to copy it to another album. A stack is therefore like an entity that can exist in more than one album. This means ungrouping the stack in one location ungroups the stack elsewhere.
Managing Photos in Lightroom CC
The Info panel view is shown in Figure 11.79. This displays a basic subset of IPTC metadata information plus EXIF data in the camera placard section. If the file contains GPS or IPTC location metadata, you’ll also see an accompanying map view.

Selecting and rating images
You can multi-select albums using the ![]() , or the
, or the ![]() (Mac) or
(Mac) or ![]() (PC) keys. If an album is currently empty, a help message will appear reminding you to click the Add Photos button to add new photos to the album. Use Edit
(PC) keys. If an album is currently empty, a help message will appear reminding you to click the Add Photos button to add new photos to the album. Use Edit ![]() Select None to deselect (
Select None to deselect (![]() [Mac],
[Mac], ![]() [PC]). To rate images, use the number keys
[PC]). To rate images, use the number keys ![]() to
to ![]() . You can also use the
. You can also use the ![]() key to flag images,
key to flag images, ![]() key to mark as a reject, and
key to mark as a reject, and ![]() to unflag. Incidentally, as you flag photos or add star ratings, these photos are prioritized when uploading files to the cloud.
to unflag. Incidentally, as you flag photos or add star ratings, these photos are prioritized when uploading files to the cloud.
Creating copies
To create a copy image in Lightroom CC, choose Edit ![]() Make a Copy. Or, right-click on a photo and choose Make a Copy from the context menu. When you create a copy in Lightroom CC, there is no master copy or virtual copy. All copies have equal status. Therefore, you can create a copy, apply separate edits to the copy image, and delete the first version should you wish to. One thing to be aware of, though, is that Lightroom CC copies are indistinguishable from duplicate photos, i.e., a photo that has been imported twice. As I mentioned earlier, although this isn’t allowed in Lightroom CC, it is possible when migrating files from Lightroom Classic CC.
Make a Copy. Or, right-click on a photo and choose Make a Copy from the context menu. When you create a copy in Lightroom CC, there is no master copy or virtual copy. All copies have equal status. Therefore, you can create a copy, apply separate edits to the copy image, and delete the first version should you wish to. One thing to be aware of, though, is that Lightroom CC copies are indistinguishable from duplicate photos, i.e., a photo that has been imported twice. As I mentioned earlier, although this isn’t allowed in Lightroom CC, it is possible when migrating files from Lightroom Classic CC.
Accessing related albums
Albums that a photo belongs to are also listed via the Info panel (Figure 11.79). When you select a photo, you can go to the Info panel and scroll to the bottom to see all the albums a particular photo is shared with. This is, therefore, a handy way of being able to quickly navigate to any other associated album in Lightroom CC.
Keywording
In the Keyword panel view (Figure 11.80), you can use the Add Keyword field to add keywords. As you enter keywords, they appear listed below. When you have a selection of images active, you can see those keywords that are applied to just some and those that are applied to all the selected images. As you roll the pointer over keywords in the Applied to Some section, these will change to blue and, if you click, be applied to all selected images. As you roll over keywords in the Applied to All section, the keywords will change color to red and be removed from all selected images.
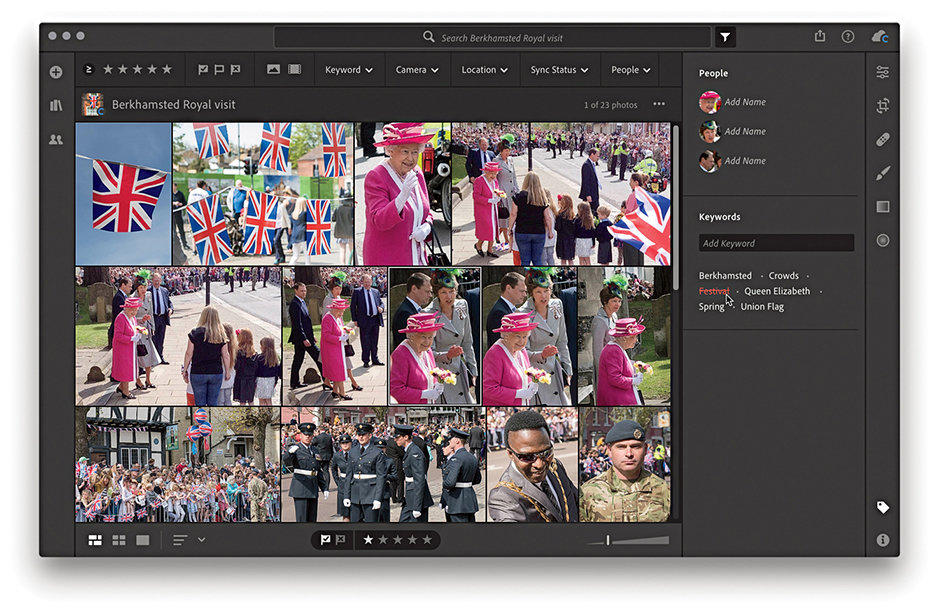
There is no requirement that you comply to a particular controlled vocabulary. Just type the keywords you wish to assign, and these are added as a flat list. Keywords entered in Lightroom CC on one computer will be synced to the cloud and appear in Lightroom CC on another computer. But crucially, keywords added in Lightroom CC to synced photos will not appear listed in Lightroom Classic CC. However, while keywords that have been added via Lightroom Classic CC won’t appear in Lightroom CC, they’ll be there all the same, but are simply hidden from view.
The overall intention has been to make keyword entry simple for Lightroom CC users, as there is no keyword list hierarchy to manage. At the same time, this has resulted in a necessary disconnect with Lightroom Classic CC. The only way to get keywords entered via Lightroom Classic CC to copy over and appear listed in Lightroom CC is to use the migration process described on page 683.
Removing/Deleting Photos
To remove a photo, or a selection of photos from Lightroom CC, choose Edit ![]() Delete Photo, or press
Delete Photo, or press ![]() . This opens the Permanently Delete dialog shown in Figure 11.81, warning that the photo or photos you are about to delete will be deleted permanently. It is important to bear in mind that with Lightroom CC, there is no fail-safe backup to recover photos from the trash. Be absolutely sure before you delete anything.
. This opens the Permanently Delete dialog shown in Figure 11.81, warning that the photo or photos you are about to delete will be deleted permanently. It is important to bear in mind that with Lightroom CC, there is no fail-safe backup to recover photos from the trash. Be absolutely sure before you delete anything.
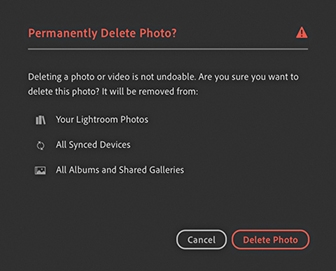
Tip
Remember, any photos you delete from Lightroom CC will also be deleted from the cloud. And, once deleted, these photos will be unrecoverable.
Lightroom CC Preferences
Click the cloud button to view the cloud status and settings (Figure 11.82). This tells you how much data space you’ve used so far and confirms if your data has been synced and backed up successfully. To open the Preferences, click the gear wheel button (circled) or use the use ![]() (Mac) or
(Mac) or ![]() (PC) shortcut.
(PC) shortcut.

The Account Preferences (Figure 11.83) show the status of your current cloud account usage. The Local Storage preferences (Figure 11.84) show the available free disk space on your computer to cache the original files along with copies of the Smart Previews, as space allows. If you select a low setting, you can save on disk space. However, Lightroom CC will store less permanent cache data and, therefore, rely more heavily on your Internet connection to access the cache data. Without a fast Internet connection, this can result in a slower user experience. Originals are then only downloaded for editing and exporting. You can select which drive to store local files. This can be an internal, external, or NAS drive. If the drive gets disconnected, files are stored temporarily and copied across the next time the drive is connected. Or, if anything gets deleted from the local drive, copies are downloaded from the cloud to restore. The General preferences (Figure 11.85) can be used to prevent system sleeps while a laptop is connected to power. You can check Use Graphics Processor to speed up Develop edits and other actions. When “Add copyright to imported images” is enabled, Lightroom automatically adds the copyright information (as entered in the field below) to all newly imported photos. The Interface preferences (Figure 11.86) can be used to manage the interface appearance. In Manual Panel Tracks mode, you can open the left and right track panels simultaneously. You can also choose to swipe between images using a mouse/trackpad. And lastly, reset all warning dialogs and tips. Should you need to reset all preference settings, use ![]() to reset the preferences at launch.
to reset the preferences at launch.

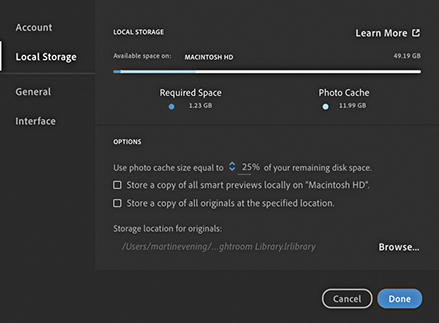


Note
When Add copyright to Imported images is enabled in the preferences, imported images with pre-existing copyright data won’t get overwritten.
Tip
If “Store a copy of all smart previews locally on name of drive” is selected, these files will be stored in the Required Space. If the option is not selected, they will be stored within the Photo Cache. Likewise, if “Store a copy of all originals at the specified location” is enabled, these are stored within the Required Space, unless they happen to be stored on an external drive. Lightroom CC uses a number of different criteria to determine whether the original files should be kept available locally, or whether they should be “purged” and downloaded from the cloud on an as-needed basis. Note that If you have “Store a copy of all originals at the specified location” enabled in Lightroom CC and are also storing files locally in Lightroom Classic CC, you will end up duplicating all these photos unnecessarily.