
7 Exporting from Lightroom
How to export files from Lightroom and work in harmony with Photoshop

Model: Jagna @ Profile Models. Makeup: Camilla Pascucci. Hair: Brian Gallagher. Clothes styling: Harriet Cotterill. © 2009 Martin Evening
Canon EOS-1Ds Mark III | 50mm | 100 ISO | f11 @ 1/125th
The best way to understand the Lightroom/Photoshop relationship is to think of Lightroom as a program for managing and processing lots of images, which are filed in the catalog, and regard Photoshop as a program for retouching individual photographs.
Although there is a fair amount of overlap between Photoshop Camera Raw and Lightroom, it is clear that Photoshop will continue to remain the program of choice for serious retouching and layered image editing. The question then is, what is the most efficient way to work between these two programs? In this chapter, I will show you some of the various ways you can take photographs from Lightroom and edit them in Photoshop, as well as how to use the Export module to process single images or batches of photographs. I also show how to use the post-processing section of the Export module to integrate complex Photoshop routines as part of an export.
Opening Images in Photoshop
I have so far covered the image processing that can be done directly in Lightroom using the Develop module controls. Remember, all Lightroom edits are nondestructive. The master photos are managed by the Lightroom catalog, and the master images are always preserved in their original state. If you want to edit an already rendered pixel image outside of Lightroom in an image-editing program such as Photoshop, you can choose to edit the original or edit a new copy version. If you want to edit a raw or HEIF image in Photoshop, Lightroom must first generate a rendered pixel-image version for you to work with.
Note
One of the reasons why I prefer managing photos in Lightroom compared to Bridge is because the Lightroom policies are much clearer and the user always remains in full control as to how such photos are opened from Lightroom. For example, if the Photoshop/Bridge Camera Raw preferences are configured with the TIFF or JPEG handling set to “Automatically open all supported TIFFs and JPEGs,” then such images will open via Camera Raw rather than directly into Photoshop, which is potentially rather confusing.
The External Editing Options
Before you do anything else, you will first need to go to the Lightroom preferences via the Lightroom menu (Mac), or Edit menu (PC) and configure the External Editing preferences (Figure 7.1). The External Editing settings allow you to establish the file format, color space, bit depth, resolution, and, where applicable, the compression settings that are used when you ask Lightroom to open a catalog image in an external pixel-editing program. There are essentially two ways you can externally edit a Lightroom catalog image: either in Photoshop or in a nominated external photo editor (which can also be Photoshop).

Edit in Adobe Photoshop
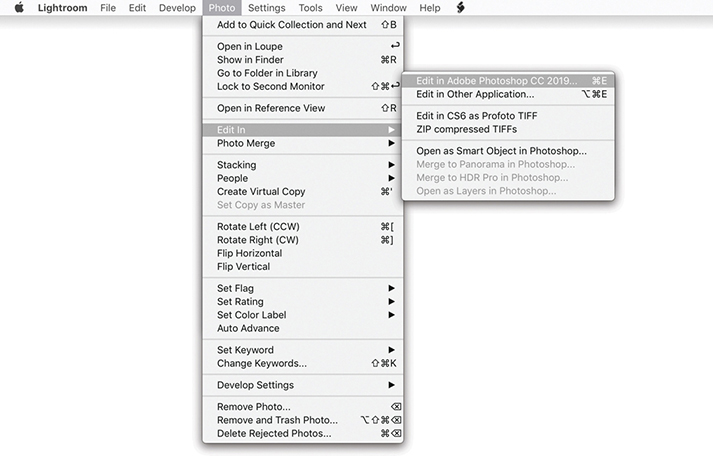
The main Edit in Adobe Photoshop command can be found in the Photo ![]() Edit in menu (
Edit in menu (![]() [Mac] or
[Mac] or ![]() [PC]). This lets you open raw or HEIF photos from the Lightroom catalog directly into whatever is the most current version of Photoshop, without adding an edit copy version of the master to the catalog (the same also applies when you choose one of the extended editing options such as Merge to HDR). You can use the Edit in Adobe Photoshop command to open and edit single as well as multiple photo selections. If you use this method to open a raw or HEIF image, Lightroom will render a pixel version of the master image with Develop settings applied, without showing the Edit Photo options dialog. The Edit in Adobe Photoshop section at the top of the External Editing preferences determines the file format settings for images opened this way and what the default file-editing settings will be when opening a raw or HEIF image.
[PC]). This lets you open raw or HEIF photos from the Lightroom catalog directly into whatever is the most current version of Photoshop, without adding an edit copy version of the master to the catalog (the same also applies when you choose one of the extended editing options such as Merge to HDR). You can use the Edit in Adobe Photoshop command to open and edit single as well as multiple photo selections. If you use this method to open a raw or HEIF image, Lightroom will render a pixel version of the master image with Develop settings applied, without showing the Edit Photo options dialog. The Edit in Adobe Photoshop section at the top of the External Editing preferences determines the file format settings for images opened this way and what the default file-editing settings will be when opening a raw or HEIF image.
Note
The Photoshop file-opening behavior has been updated so that HEIF files opened using Edit in Adobe Photoshop are treated the same as raw files. The HEIF file format specification allows a file to contain multiple images, supports 16-bit, yet is capable of more efficient file compression compared to JPEG. Apple names the HEIF format for iPhone captures as HEIC. Such files are similar to raws in that it’s a read-only format you can’t overwrite (other than to update the file’s XMP metadata).
In Figure 7.1, ProPhoto RGB was selected as the color space, with a bit depth of 16 bits per channel, saving to the TIFF file format using no compression. An opened image will display the same raw file extension as the master (e.g., .nef, .cr2, .dng, or .heic), and it is only when you choose File ![]() Save in Photoshop that the file format and other settings configured in the External Editing preferences come into play. The edited image is then saved to the same folder as the original master and added to the catalog. Basically, the Edit in Adobe Photoshop command provides you with a means to open raw or HEIF catalog images in Photoshop without generating new edit copy versions of the master each time you do so. You can open a raw or HEIF file in Photoshop to make some edits and then decide whether to save it or not. If you prefer, you can choose File
Save in Photoshop that the file format and other settings configured in the External Editing preferences come into play. The edited image is then saved to the same folder as the original master and added to the catalog. Basically, the Edit in Adobe Photoshop command provides you with a means to open raw or HEIF catalog images in Photoshop without generating new edit copy versions of the master each time you do so. You can open a raw or HEIF file in Photoshop to make some edits and then decide whether to save it or not. If you prefer, you can choose File ![]() Save As to save the image to an alternative folder location without adding it to the catalog and, if you wish, save using a different file format or different save settings.
Save As to save the image to an alternative folder location without adding it to the catalog and, if you wish, save using a different file format or different save settings.
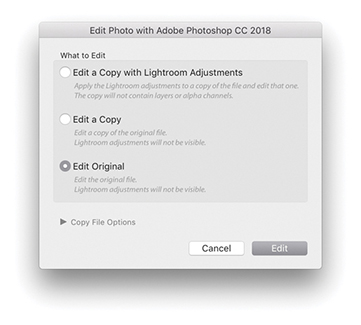
If you open a non-raw image such as a TIFF, PSD, JPEG, or PNG from Lightroom using the ![]() (Mac) or
(Mac) or ![]() (PC) command, you will see the dialog shown in Figure 7.2, where the Edit a Copy with Lightroom Adjustments option is usually selected by default. If you choose a non-raw image that has Lightroom adjustments applied to it, these are read and applied to the image before opening in Photoshop; but in making a copy, this will flatten any layers in the original pixel image. You can choose Edit a Copy if you want to create an edit copy of the file in its original state (ignoring any Lightroom adjustments that might have been applied). Or, you can choose Edit Original. Both these options are useful for editing layered masters or derivative versions of a master where you wish to carry on editing the source photo, but do not wish to generate a new copy version. This preserves the original file without applying Lightroom adjustments. But the adjustments will be applied when saved back to the Lightroom catalog.
(PC) command, you will see the dialog shown in Figure 7.2, where the Edit a Copy with Lightroom Adjustments option is usually selected by default. If you choose a non-raw image that has Lightroom adjustments applied to it, these are read and applied to the image before opening in Photoshop; but in making a copy, this will flatten any layers in the original pixel image. You can choose Edit a Copy if you want to create an edit copy of the file in its original state (ignoring any Lightroom adjustments that might have been applied). Or, you can choose Edit Original. Both these options are useful for editing layered masters or derivative versions of a master where you wish to carry on editing the source photo, but do not wish to generate a new copy version. This preserves the original file without applying Lightroom adjustments. But the adjustments will be applied when saved back to the Lightroom catalog.

Edit in Additional External Editing Program
The other alternative is to open images using the additional external editor option, choosing the Photo ![]() Edit in menu or the
Edit in menu or the ![]() (Mac) or
(Mac) or ![]() (PC) shortcut. In the Additional External Editor section of the External Editing preferences (Figure 7.1), you can again specify which external editing program to open the images in and the default file settings to use. The external program could be, for example Affinity Photo, or you can choose to open in the same version of Photoshop but with different default file format options. The difference between this and the Edit in Adobe Photoshop command is an edit copy of the master is always added to the Lightroom catalog. The Lightroom External Editing preferences let you customize the pixel image-editing settings for any pixel-editing program. For example, you might want to use the settings shown in Figure 7.1 to create new edit versions that are saved using the TIFF file format but with different compression settings. Whichever program you select here then becomes available as a menu option when you go to the Photo
(PC) shortcut. In the Additional External Editor section of the External Editing preferences (Figure 7.1), you can again specify which external editing program to open the images in and the default file settings to use. The external program could be, for example Affinity Photo, or you can choose to open in the same version of Photoshop but with different default file format options. The difference between this and the Edit in Adobe Photoshop command is an edit copy of the master is always added to the Lightroom catalog. The Lightroom External Editing preferences let you customize the pixel image-editing settings for any pixel-editing program. For example, you might want to use the settings shown in Figure 7.1 to create new edit versions that are saved using the TIFF file format but with different compression settings. Whichever program you select here then becomes available as a menu option when you go to the Photo ![]() Edit in Adobe Photoshop menu, just below the main Edit in Adobe Photoshop command (Figure 7.3).
Edit in Adobe Photoshop menu, just below the main Edit in Adobe Photoshop command (Figure 7.3).
The main difference when opening a raw image via the “Edit in Other Application” option is that it uses the Lightroom raw processing engine to render a pixel image copy of the catalog image. With HEIF files, these don’t need to be rendered. The new copy image is added to the catalog before opening it up in the selected program; you also have the opportunity to override the file format and other settings before the image is opened. So, when you use ![]() (Mac) or
(Mac) or ![]() (PC) to open a raw image, instead of the photo opening directly, you will see the dialog shown in Figure 7.4. On the face of it, the only available option here is to Edit a Copy with Lightroom Adjustments. If you click the disclosure triangle at the bottom of the dialog, however, you can expand the Copy File Options and use these to override the file format, RGB space, and bit-depth options set in the External Editing preferences (but if you have selected a program other than Photoshop or Photoshop Elements as the external editor, the PSD file format option will not be available). Photos opened this way are automatically stacked with the original catalog image (see Step 3 on page 441), although you can turn this option on or off via the External Editing preferences (Figure 7.1).
(PC) to open a raw image, instead of the photo opening directly, you will see the dialog shown in Figure 7.4. On the face of it, the only available option here is to Edit a Copy with Lightroom Adjustments. If you click the disclosure triangle at the bottom of the dialog, however, you can expand the Copy File Options and use these to override the file format, RGB space, and bit-depth options set in the External Editing preferences (but if you have selected a program other than Photoshop or Photoshop Elements as the external editor, the PSD file format option will not be available). Photos opened this way are automatically stacked with the original catalog image (see Step 3 on page 441), although you can turn this option on or off via the External Editing preferences (Figure 7.1).

Opening Non-Raw Images in an External Editing Program
When you open a pixel image such as a TIFF, PSD, JPEG, or PNG, the default option will also be Edit a Copy with Lightroom Adjustments. This opens a pixel image from the catalog and applies any associated Lightroom adjustments; but when making a copy, this will flatten any layers in the original pixel image. When you open a non-raw file, the Edit a Copy and Edit Original options become available (Figure 7.5). The Edit a Copy option lets you edit a copy version of the original master file in an alternative external editing program. If the image you wish to open contains layers and you want to preserve them, then choose either the Edit a Copy or the Edit Original option.
To summarize, the main difference here is that the External Editing options allow you to open your catalog photos using a program other than the latest version of Photoshop (as set in the External Editing preferences) and edit the Copy File Options. Plus, you have options to edit the original or a copy of the original master.
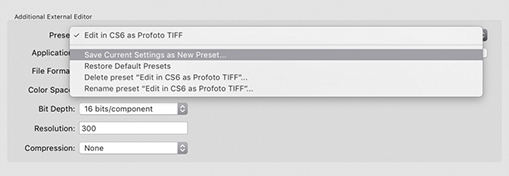
Creating Additional External Editor Presets
In the External Editor preferences, you can save the Additional External Editor settings as presets (Figure 7.6). Once saved, these appear as Photo ![]() Edit In submenu options (Figure 7.3).
Edit In submenu options (Figure 7.3).
External Editing File-Naming Options
At the bottom of the External Editing preferences dialog (Figure 7.1) is the Edit Externally File Naming section. Lightroom normally appends –Edit to each externally edited image filename, and as you create further edit copies, Lightroom increments the numbering: –Edit1, –Edit2, and so on. It is possible, though, to customize the file naming. For example, you could create a custom template that always adds a date stamp after the original filename (Figure 7.7) and apply this renaming scheme whenever you create an edit copy version from a master file.

The File Format and Other File Settings Options
Let’s now recap a bit and look at the file format and file settings options in more detail. The file format options in the External Editing preferences let you establish the default file format, RGB space, and bit depth to use when opening an image. There are two edit copy file format options: TIFF and PSD. The TIFF file format is the most versatile of the two, because the TIFF format always stores a flattened composite image and is able to save all Photoshop features, such as layers, paths, and layer effects. The PSD file format is sometimes quicker to save and open. But if you want Lightroom to recognize imported, layered PSD files, you must make sure the “Maximize PSD compatibility” option is switched on first in the Photoshop File Handling Preferences.
The Color Space options are limited to ProPhoto RGB, Adobe RGB, Display P3, and sRGB. ProPhoto RGB is capable of preserving all the color information that was captured in the original raw file after it has been processed in Lightroom. This can prove useful when making high-end print outputs where you need to preserve rich color detail. Adobe RGB is a more commonly used RGB space among photographers and perhaps a safer choice if you are sending RGB images for others to work with. The Display P3 color space matches the display gamut of the latest wide color gamut Retina iMacs and recent MacBook Pros. It is roughly the same size as Adobe RGB, although the color gamut range is different. It is not identical, but can certainly contain more colors than sRGB. The sRGB space is a standardized RGB space that is suitable for web work and sending photos via email. It is also a suitable “best-guess” choice if you are unsure whether the recipient is using a properly color managed system or not.
The Bit Depth can be set to “16 bits/component,” which preserves the most tonal information (as much as Lightroom is able to). The “8 bits/component” option reduces the number of levels to 256 per color channel and allows you to save smaller-sized files. These settings are crucial for opening raw images, but with non-raw files, it is important to realize that the file settings options will be limited by the file properties of the master images. For example, if the source image is, say, an 8-bit, sRGB JPEG and you choose Edit a Copy with Lightroom Adjustments, you will not gain anything by saving it as a 16-bit ProPhoto RGB TIFF.
Camera Raw Compatibility
When opening raw images, there is a further issue to take into account when choosing between the main Edit in Adobe Photoshop and “Edit in Other Application” commands. The main Edit in Adobe Photoshop command opens raw images directly and relies on Camera Raw in Photoshop to read the Lightroom settings and carry out the raw conversion. What happens next, therefore, depends on which Develop adjustments have been used to edit the photo, whether these are specific to Lightroom or not, and which version of Photoshop and Camera Raw you are using. For example, if you are using Photoshop CS6 with the most recent compatible version (Camera Raw 9.1.1), most Lightroom Develop settings will be readable. But in this instance, Camera Raw 9.1.1 will not provide full Lightroom functionality (for that, you will need Camera Raw 11 or later for Photoshop CC). Therefore, if you are using Photoshop CS6 with Camera Raw 9.1.1, you will see the warning dialog shown in Figure 7.8. Here, you can choose Open Anyway (maybe all the applied Develop settings can be read by the 9.1.1 version of Camera Raw). Or, you can choose “Render using Lightroom,” where Lightroom will render an edit copy of the original and automatically add this to the Lightroom catalog. Essentially, you gain the ability to open a Lightroom image in Photoshop CS6, or older versions of Photoshop, but lose the option to open a raw image in Photoshop and choose whether to save or not. Where a raw image has “unknown” Develop settings, you will also see the warning dialog shown in Figure 7.8.

The main thing to understand when editing a raw image in Photoshop is that Lightroom always wants to open the image using the Camera Raw plug-in contained in Photoshop itself. This allows an opened image to remain in an unsaved state until you decide to save it. When there may be compatibility problems (because the version of Camera Raw or the version of Photoshop you are using is unable to interpret the Lightroom settings), you can always choose the “Render using Lightroom” option to override the default Lightroom behavior. The downsides are that this must always create a rendered copy first and you lose the option to close without saving. To be honest, this situation is less likely these days because CC subscribers will always have access to the most recent and compatible version of Camera Raw.
How to Use the External Edit Feature

1. Here, I selected a master raw image from the Filmstrip and used the “Edit in Other Application” command (![]() [Mac] or
[Mac] or ![]() [PC]) to create an edit copy that opened in the most current version of Photoshop, but without (yet) automatically adding a saved version to the catalog.
[PC]) to create an edit copy that opened in the most current version of Photoshop, but without (yet) automatically adding a saved version to the catalog.

2. With the image opened in Photoshop, I was able to retouch the photo. When I finished, I chose File ![]() Save and closed the image.
Save and closed the image.
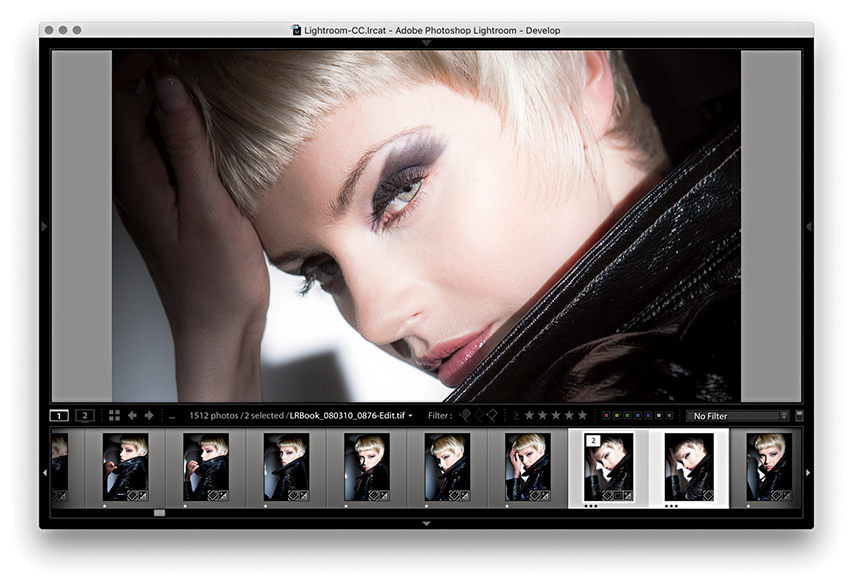
3. Back in Lightroom, you can see how the edited version was added to the same folder as the original and appeared highlighted in the Filmstrip. You can see the selected image identified as number 2 of 2 images in the stack. The modifications made in Photoshop were also reflected in the Filmstrip and main preview.

4. If I needed to re-edit the image in Photoshop, I could use either ![]() (Mac)/
(Mac)/ ![]() (PC) or
(PC) or ![]() (Mac)/
(Mac)/ ![]() (PC) to open the Edit Photo dialog, where I would want to choose the Edit Original option.
(PC) to open the Edit Photo dialog, where I would want to choose the Edit Original option.
From Lightroom to Photoshop to Lightroom
There are a number of ways you can use the Develop module controls to produce interesting black-and-white conversions or different types of color-processed looks. The question this raises is, when is the best time to apply such adjustments? Let’s say you want to convert a photo to black and white, but you also want to carry out a significant amount of retouching work in Photoshop. Should you convert the photo to black-and-white mode in Lightroom first and then choose to edit it in Photoshop? That could work, but once you have converted a photo to black and white in Lightroom and edited it in Photoshop, there is no opportunity to go back to the color original. Suppose later on, a client decides that he does not like the black-and-white look and wants the color version instead? In my view, it is best to prepare your photos in Lightroom to what can be considered an initial optimized image state, create an edit copy version to work on in Photoshop, and then apply the black-and-white conversion or special coloring effects to the Photoshop-edited image in Lightroom. Of course, the major problem with this approach is that you do not get to see what the final treatment image looks like while you are working in Photoshop. However, the following steps suggest one way you can overcome this drawback and make this transition between Lightroom and Photoshop more fluid.

1. I started here with a raw image. Highlighted alongside it is the TIFF edit copy that I had created previously and edited in Photoshop.

2. I selected the edited TIFF version and created a virtual copy using ![]() (Mac) or
(Mac) or ![]() (PC). The virtual copy was selected here.
(PC). The virtual copy was selected here.
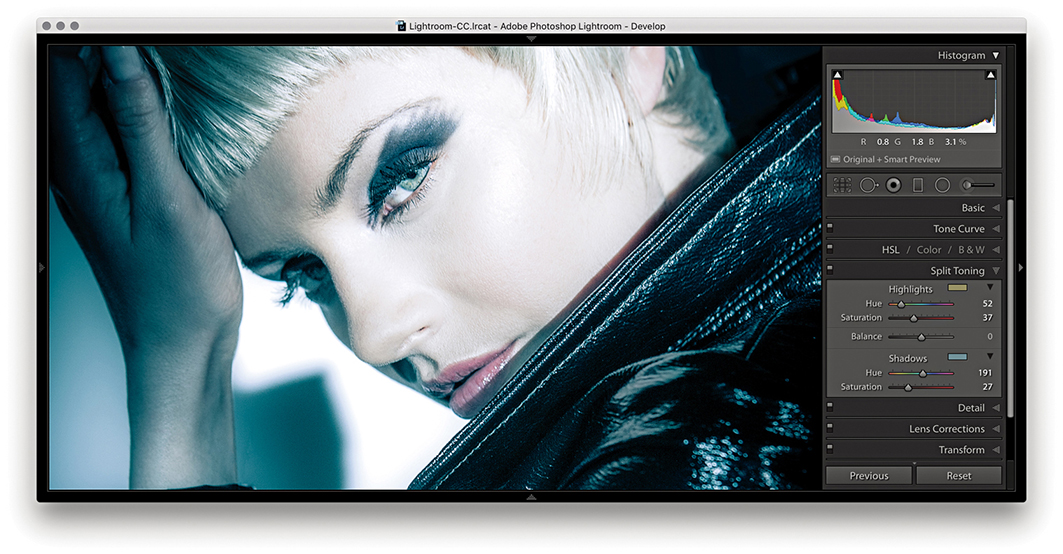
3. I then went to the Develop module and carried out a number of color and tone adjustments. I mainly adjusted the red and blue channels in the Tone Curve point curve editor and combined this with a Split Toning adjustment.
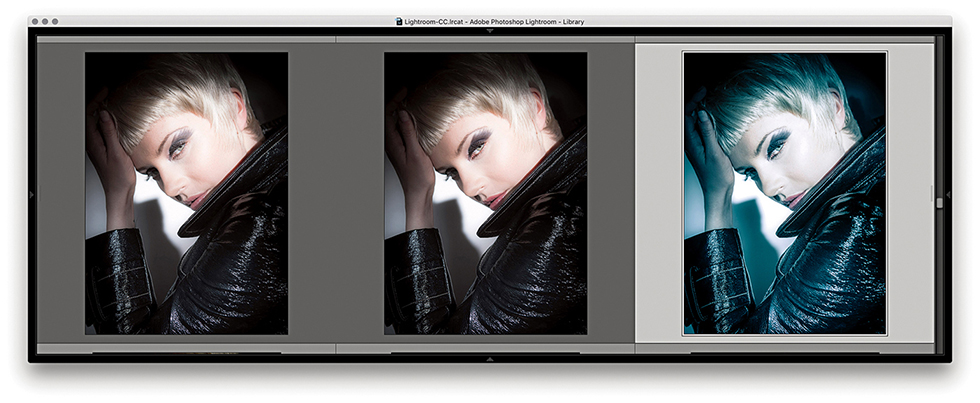
4. Returning to the Library module Grid view, you can see the Develop adjusted virtual copy version next to the unadjusted TIFF original.

5. I chose Photo ![]() Edit in Adobe Photoshop and continued editing the original image selected in Step 4. As you can see, here I was carrying out the retouching work on the full-color version of the photo without the coloring effect.
Edit in Adobe Photoshop and continued editing the original image selected in Step 4. As you can see, here I was carrying out the retouching work on the full-color version of the photo without the coloring effect.
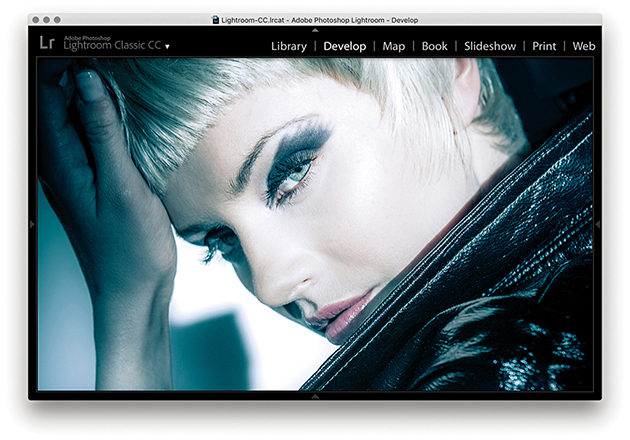
6. Meanwhile, back in Lightroom, I could preview a combination of the Photoshop-edited image and the Lightroom-applied adjustments. But I had to remember to keep saving the image in Photoshop in order for the most currently updated version of the photo to appear in the Lightroom window.

7. At this stage, I could simply toggle between the Photoshop and Lightroom windows to compare the two image previews. Because I had the luxury of a dual-display setup, however, I was able to view the Photoshop image on one display and the Lightroom window on the other.
Extended Editing in Photoshop
In addition to being able to edit photos directly in Photoshop, you can make use of Lightroom’s extended Photoshop editing features: such as Merge to Panorama, Merge to HDR, and Open as Layers. These commands use the same settings as the Edit in Adobe Photoshop command and allow you to process images that have been selected in Lightroom, but without adding new photos to the catalog. For example, if you open raw photos from Lightroom as Smart Objects in Photoshop, you can preserve the raw editing capabilities of the original and still be able to use Photoshop to do things like transform the images and add layer masks.
Note
Photoshop Smart Objects are like containers that fully preserve the image contents. As you transform a Smart Object or add filter adjustments, the original image data remains intact. There are in fact two types of Smart Objects: embedded and linked. Both are discussed here.

1. Here are two photographs I wanted to merge together in Photoshop while retaining control over the Lightroom/Camera Raw adjustments.
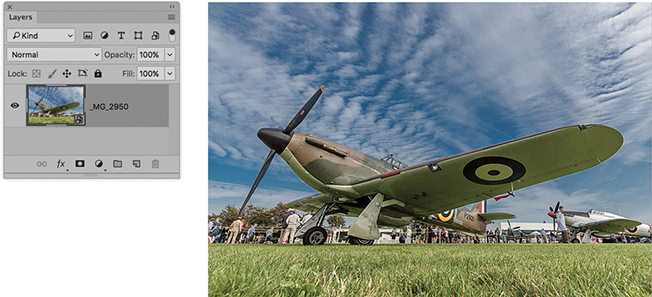
2. I began by selecting the Spitfire photograph and chose Photo ![]() Edit in Adobe Photoshop
Edit in Adobe Photoshop ![]() Open as Smart Object in Photoshop. This opened the selected photo as a Smart Object (see the (
Open as Smart Object in Photoshop. This opened the selected photo as a Smart Object (see the (![]() ) icon bottom-right in the layer thumbnail).
) icon bottom-right in the layer thumbnail).

3. I double-clicked the Smart Object layer, which opened it via Camera Raw. This allowed me to edit the Develop settings. Here, I decided to apply a warmer white balance.

4. I then opened the second image (see Step 1) as a Smart Object in Photoshop and used the Move tool to drag it over to the first document window. This added it as a new layer above the Smart Object layer of the Spitfire.

5. In Photoshop, I created a mask of the Spitfire and added this to the sky layer to reveal just the Spitfire and the grass.

6. I then double-clicked the sky Smart Object layer and revised the Develop settings via Camera Raw. Here, I also applied a warmer white balance to match that of the Spitfire image layer.

7. Here is the finished composite, where the two Smart Object layers preserved the source files in their raw state and remained fully editable via Camera Raw. With this technique, it remained possible to open the Smart Object layers and continue editing the Camera Raw settings. For example, in this step I added a localized adjustment to remove some of the green tint on the underside of the aircraft wings.
Linking Lightroom Photos as Smart Objects
It is possible to synchronize Lightroom Develop edits with files that are being edited in Photoshop. For example, you can create a linked Smart Object in Photoshop that is linked to a photo that happens also to be in the Lightroom catalog. Once the linked Smart Object has been set up, as you make edit changes in Lightroom, these will be reflected in the linked Smart Object when it is opened in Photoshop.
Also, if you ![]() -drag a raw file from the Lightroom Grid view to a Photoshop document, it will be placed as a linked Smart Object layer. As you update the source raw image in Lightroom and choose Photo
-drag a raw file from the Lightroom Grid view to a Photoshop document, it will be placed as a linked Smart Object layer. As you update the source raw image in Lightroom and choose Photo ![]() Save Metadata to File, the edit changes will be updated in the Photoshop Smart Object layer.
Save Metadata to File, the edit changes will be updated in the Photoshop Smart Object layer.
Exporting from Lightroom
The Export function can be used to export single or multiple photos. Master image files can be exported as original files, DNGs, flattened TIFFs, flattened PSDs, or JPEGs, and you have full control over the exported file settings, such as where the files get saved to. You can also specify whether to incorporate a post-processing action and save export settings as custom presets, making it easy to create and use different export configurations. To export, make a selection and choose File ![]() Export or use
Export or use ![]() (Mac) or
(Mac) or ![]() (PC) to open the Export dialog shown in Figure 7.9. Or, you can use
(PC) to open the Export dialog shown in Figure 7.9. Or, you can use ![]() (Mac) or
(Mac) or ![]() (PC) to bypass the Export dialog and carry out an export based on the last used settings.
(PC) to bypass the Export dialog and carry out an export based on the last used settings.

Export Presets
The Preset section already contains a few preset export options to get you started. For instance, the For Email setting can be used to export JPEG versions of the master catalog images within an email. Plus, you can configure your own custom settings and click the Add button (circled in Figure 7.9) to add these to the User Presets list. The settings listed here can be managed using the context menu, which will let you update user preset settings (Figure 7.10).

Export Location
In the Export Location section, you can choose to export to the same source folder or to a specific folder. When the latter is selected, the folder location is remembered between exports, so you can regularly send your exports to locations such as the My Pictures folder. In the Figure 7.9 example, I had the For Email (Hard Drive) preset selected; with this preset you are required to choose a folder later, once Lightroom has finished rendering the JPEG exports. You can also check the Add to This Catalog option if you want to automatically reimport the exported photos back into the Lightroom catalog. In the Existing Files menu, you can leave this set to “Ask what to do” when an existing file is encountered as an exported image and is reimported back to the catalog, or choose from one of the following policies. If you select “Choose a new name for the exported file,” you get the opportunity to rename the reimported image and create a new master image. You can also choose Overwrite WITHOUT WARNING. As the loud lettering hints, that this is a potentially risky policy to choose, because the images that are likely to be affected are JPEG, TIFF, or PSD masters. Let’s say you chose to export as JPEG and resave the exported photos to the same folder location. You could end up overwriting original JPEG capture masters with low-resolution, heavily compressed versions. Or, you might risk overwriting a layered TIFF or PSD with a flattened version of the original. Finally, you can choose Skip, where Lightroom still exports the existing files but skips reimporting them.
Note
Export speed was recently improved for bulk exports. However, this speed gain can be at the expense of performance when carrying out other tasks in Lightroom. In addition, export speed can in some instances be limited by constraints imposed by the operating system. For example, Mac users using the new 6-core MacBook Pro and the most recent version of the 27-inch iMac have experienced slow export speeds due to thermal throttling of the CPU.
Exporting to the Same Folder
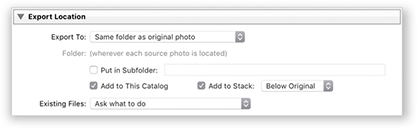
If you select “Same folder as original photo” from the Export To menu (Figure 7.11), you can export a derivative version of a catalog photo, such as a full-sized TIFF version from a raw original, and export the new photo to the same source folder as the original. The option Add to This Catalog also becomes available, and you have the option to stack the exported image either before or after the original. If the Add to Stack option is not available, it is probably because you are trying to export from a Quick Collection. The Export dialog therefore provides you with a simple one-step solution for creating derivative versions of the raw masters and simultaneously adding them to the catalog.
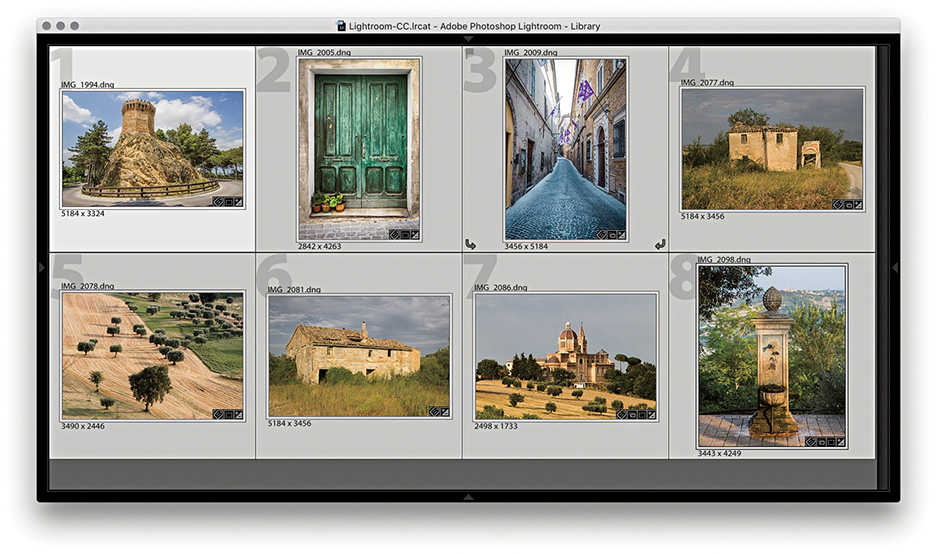
1. Here, you can see that I filtered the photos in the catalog to select just the favorite photos from a series shot in Treia, Italy.
2. I used the Export command (![]() [Mac] or
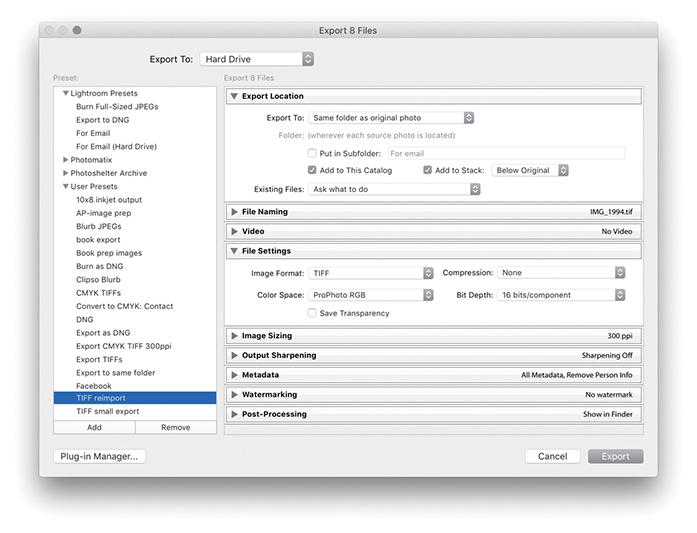
[Mac] or ![]() [PC]) to export these eight photos with a custom TIFF reimport preset that used the same Export Location settings as those shown in Figure 7.11.
[PC]) to export these eight photos with a custom TIFF reimport preset that used the same Export Location settings as those shown in Figure 7.11.

3. Once the Export process was complete, the exported photos were added to the catalog and stacked after the raw masters.
Note
When the panels in the Export dialog are collapsed, the settings are summarized in the panel bars for quick and easy viewing.
File Naming
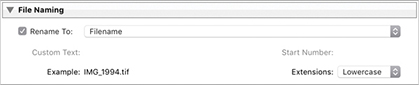
If you want to retain the current naming, you can leave the File Naming section (Figure 7.12) set to Filename. If you want to differentiate the export processed images from the original masters, you can choose a file-naming preset from the Rename To menu.
File Settings
In the File Settings section, images can be exported using the JPEG, PSD, TIFF, DNG, or Original format, and the file format options will alter according to the file format you have selected. For example, in Figure 7.9, you can see the File Settings that are available for JPEG exports. If you select the TIFF format, you will see the TIFF options shown in Figure 7.13.

When selecting the TIFF format, you can select a compression option. I normally prefer to save uncompressed TIFFs, but you can use ZIP or JPEG compression to make TIFFs smaller to economize on data transfer times. However, it will take longer to save TIFF files that have compression and including compression may, in some instances, cause compatibility problems with third-party applications.
All your catalog files will have been edited using the Lightroom internal RGB space, but when you choose to export as a JPEG, TIFF, or PSD, you can select an output color space, which can be sRGB, Display P3, Adobe RGB, or ProPhoto RGB. If you are exporting the photos for photo editing, your choice will boil down to Display P3, Adobe RGB, or ProPhoto RGB. Adobe RGB is a safe general choice, as it is a widely adopted space for general photo-editing work in programs such as Photoshop. Display P3 is a new addition. It is roughly the same size as Adobe RGB and closely matches the gamut of the latest iMac displays (you could select this if exporting images to be viewed in a slideshow on an iMac). ProPhoto RGB is, in many ways, better than Adobe RGB, because the ProPhoto RGB color gamut is a lot bigger than Adobe RGB and is more or less identical to the gamut of the native Lightroom RGB space. With ProPhoto RGB, you can guarantee inclusion of all the colors that were captured in the original raw file, whether your display is able to show them or not. For this reason, ProPhoto RGB is a favorite photo-editing space for high-end print work for which you want to preserve the maximum color gamut to achieve the best print results. The downside of using ProPhoto RGB is that you must view the files in a color-managed application in order to see the colors displayed correctly. If you view a ProPhoto RGB image in a program that does not recognize profiles (such as most web browsers) or where the color management is switched off, the colors will look terrible. If you are familiar with the basic concepts of color management and are using Photoshop with the color management switched on, it will be safe for you to export using Display P3, Adobe RGB, or ProPhoto RGB. If any of the preceding information confuses you, then perhaps you should stick to using sRGB. In fact, I would definitely advise choosing sRGB if you are exporting images as JPEGs for web use, for client approval (especially if you are unsure how well the client’s systems are color-managed), or when preparing pictures to email friends. For the time being at least, sRGB remains the most suitable lowest common denominator space for web work and general use. The Other menu option lets you choose a custom RGB profile to export to. This option might be useful when you wish to export using a custom print RGB profile. For example, some commercial print labs provide profiles for the printers they use, which you can download. So, if you are able to access these profiles, you might want to export your photos using their profile color space.
Note
You can never tell what the future may hold. There was a time when nobody could foresee a real need for deep-bit images. These days, film and video editors regularly rely on 16-bit or higher bit depths for special effects work. And new display technologies are emerging that can show deep-bit images on wide dynamic-range displays. This is why I recommend you export your Lightroom photos as 16-bit files in ProPhoto RGB.
You can set Bit Depth to 16 bit or 8 bit. One of the reasons so many professionals advocate working in 16 bit is because you can make full use of all the capture levels in an image when applying your basic tonal edits. If you start out with an 8-bit image and carry out major edits, you will end up needlessly throwing away a lot of data along the way. Keeping your images in 16 bit throughout helps preserve all the levels. In Lightroom (and this is true for any raw processor), you are making all your basic edits in 16 bit regardless of how you export them. So, at this stage, you will already have taken full advantage of all the deep-bit levels data in the original capture. Therefore, choosing 8 bit at this stage is not necessarily such a damaging option, especially if you have carried out all the major edit adjustments to the raw file in Lightroom. If you think 16 bits will help you preserve more levels as you perform subsequent editing work in Photoshop and you feel the extra levels are worth preserving, then the safest option is to choose 16 bit.
You can export images from Lightroom in their original format. For example, when burning a DVD, it will be quicker to export and burn photos to a disc when files are kept in their original format. After all, if your files have already been converted to DNG in Lightroom, there is no point in converting them to DNG all over again. When exporting TIFF or PSD files, you will need to select the original format option if you wish to preserve any layers. Also, because Lightroom supports the managing of CMYK images and video files, you can only really use the Original format option when exporting these types of files from Lightroom.
DNG Export Options
The File Settings DNG options shown in Figure 7.14 let you choose the desired compatibility and JPEG preview options, as well as whether to embed Fast Load Data (these options are covered in more detail on pages 710–715).

If you check the Use Lossy Compression option, you can also check the Resize to Fit option in the Image Sizing section. This gives you the option to choose either Megapixels or Long Edge from the menu. When you limit by the number of megapixels, the pixel dimensions of the final image will adapt to fit the number of megapixels entered (the compression amount remains the same). When Long Edge is selected, you can specify the exact number of pixels you want along the longest edge. Whenever you resize a DNG in this way, the image data has to be demosaiced but is still kept in a linear RGB space. This means that while the demosaic processing becomes baked into the image, most of the other Develop controls, such as those for tone and color, remain active and function in the same way as for a normal raw/DNG image. Things like Lens Correction adjustments for vignetting and geometric distortion will be scaled down to the DNG output size. As a safety measure, the Image Sizing for lossy DNG output always resets to “off” each time after you carry out an export.
Just as you can convert any supported proprietary raw file to DNG, you can also save non-raw files as DNGs. One advantage of doing this is that the DNG file format can combine the XMP data alongside the pixel image information in a single file document. You can also store the Lightroom-edited preview in the DNG file, which can help when viewing DNG-converted JPEGs in other non–Camera Raw aware programs. Having said all this, it is also important to point out that saving a JPEG as a DNG does not convert a JPEG image into a true raw format image. It must be stressed that once you have converted a raw image to a TIFF or JPEG, there is no way of returning it to its raw state again.
Exporting files and converting them to DNG is also quicker than converting to DNG internally. This is because the export process can make use of multiple threads. When you select Library ![]() Convert Photos to DNG, the process is single-threaded. The expectation is that users will want to keep working in Lightroom and, therefore, need the program to remain responsive.
Convert Photos to DNG, the process is single-threaded. The expectation is that users will want to keep working in Lightroom and, therefore, need the program to remain responsive.
Note
Some people still get confused by the Resolution setting. Basically, whatever resolution you set here has no bearing on the actual pixel file size. The Resolution box simply lets you “specify” the resolution for the image in terms of pixels per inch or pixels per centimeter.
Image Sizing
In the Image Sizing section (Figure 7.15), you have the opportunity (where the image format options allow) to resize the exported photos. There are various options here. If you select Resize to Fit, you can choose Width & Height to make the photos resize to fit within the values entered in the two boxes. If you select Dimensions, you can force the exported images to fit precisely within specific dimensions, or you can resize the photos along the long edge, the short edge, by megapixels, or by percentage. If you have a selection of photos in which some are landscape and others are portrait, you can specify a long-edge or short-edge dimension limit and all photos will resize to the same long-edge or short-edge dimension constraints.

If you deselect the Don’t Enlarge check box in the Image Sizing section, you can use the Resize to Fit settings to create output images with bigger pixel dimensions than the original. If the Don’t Enlarge check box is selected, this resizes the photos to the desired output dimensions, but if the source photo is smaller than this size, it will output the photo at its native pixel size rather than try to make it bigger. The Resolution box lets you set the number of pixels per inch or pixels per centimeter for the resolution.
If you choose to export photos as JPEGs, the File Settings section allows you to specify a file size limit for the exported JPEGs, where you can let Lightroom auto-calculate the appropriate amount of JPEG compression that is required.
When to Interpolate
There are no interpolation options in Lightroom. Instead, an adaptive method of interpolation is applied behind the scenes. In Photoshop terms, Lightroom uses an adaptive sampling approach that combines Bicubic and Bicubic Sharper algorithms when downsampling an image and combines the Bicubic and Bicubic Smoother algorithms when upsampling.
Output Sharpening
The Output Sharpening section (Figure 7.16) provides the same sharpening controls that are found in the Print module Print Job panel options. These sharpening options are intended for applying sharpening for inkjet print output. This means that, instead of using the sharpening controls in the Print module to sharpen for print, you can use the Export dialog settings to sharpen a file ready for print output. For example, let’s say you wanted to prepare Lightroom photos for printing in Photoshop or via a dedicated raster image processor (RIP). If you apply output sharpening at the Export stage in Lightroom, all of your files will be nicely sharpened and ready to print.

Note
Photoshop author and digital imaging guru Bruce Fraser worked on the PixelGenius PhotoKit SHARPENER plug-in for Photoshop alongside Mike Skurski and Jeff Schewe. Adobe worked with PixelGenius to bring the PhotoKit SHARPENER technology into Lightroom. This included the inkjet and screen image sharpening that is available in the Print module and in the Export dialog.
In the Sharpen For menu, you can select Screen (for outputting to a web page or external slideshow presentation) or choose between Matte Paper or Glossy Paper for output to inkjet and other types of continuous tone printers. However, there are no sharpening options available specifically for halftone CMYK output. The Amount settings are Low, Standard, and High. The Lightroom output sharpening here is based on routines that were originally devised by Bruce Fraser and were all coded with the Standard setting. The Low and High settings, therefore, allow you to make the sharpening effect weaker or stronger. Whether you need to adjust these or not depends on a number of things. For example, if you are inclined to apply heavy amounts of capture sharpening, you may find the Low setting works better for print output. If you are interpolating an image at the export stage to increase the output size, then you may find a High setting works best. For most situations, I recommend leaving Amount set to Standard.
Metadata
The Metadata section (Figure 7.17) lets you decide how much metadata should be included during an export and lets you selectively strip the metadata. Choose Copyright Only or Copyright & Contact Info Only to keep the metadata minimal and exclude keywords. If you want to keep the Camera Raw data hidden, choose All Except Camera Raw Info. Choose the All Except Camera and Camera Raw Info option if you wish to keep the EXIF info hidden as well. To include everything, choose All Metadata. If the Remove Person Info option is checked, this removes Face tagging and People keywords. This might be useful if you need to keep the identity of someone featured in a photograph private. If the Remove Location Info option is checked, this removes all IPTC location info as well as any GPS data. This can be important if the location data is sensitive.

The Write Keywords as Lightroom Hierarchy option is checked by default. This ensures keywords are always written to a file’s XMP space so the keyword hierarchy is preserved when the keyword metadata is previewed on another computer running Lightroom, where perhaps the keywords used are unknown or do not share the same hierarchy. It also exports a flat list of keywords at the same time to ensure compatibility with applications that don’t support hierarchical keywords.
Note
There is no industry standard way of writing a keyword hierarchy, nor is there likely to be one. Picture libraries may need to strictly enforce a standard hierarchy for all images that are submitted, but most people will choose to categorize keywords in different ways. Some people may choose to organize geographic locations using a hierarchy such as PLACES > Continent > Asia > India. Other users might use a hierarchy such as LOCATIONS > Asia > India. Both would be valid ways of categorizing images using keywords, but both might trip up when importing a photo supplied by the other person. Both users would tag their India photos using the keyword “India,” but the hierarchies used would be different.
For example, let’s say you have two computers that share the same controlled vocabulary (that is, they both share the same keyword hierarchy structure). If you were to export a photo from one computer and import it into the other, the Write Keywords as Lightroom Hierarchy option would not make any difference because the keyword hierarchy for the individual keywords is recognized anyway. If this option is unselected and the second computer does not share the same information, the keywords will otherwise be output as a flat list without a Lightroom-recognized hierarchy. So, if you happen to adopt a keyword hierarchy that uses Places > USA > California, that hierarchy will be preserved as long as either the computer you are importing the photo to already knows this hierarchy relationship or the Write Keywords as Lightroom Hierarchy option has been selected. If it is not, the keywords will only be exported as a flat list: California, Places, USA.
Watermarking
The Watermarking section (Figure 7.18) can be used to control how watermarks are applied to your exported images. On the next two pages, you will see two examples of how to add a watermark: one using text and the other using a graphic. In addition to placing a watermark at the time of export, you can do this via the Print module Page panel and Web module Output Settings panel. Watermarks can also be edited by going to the Lightroom menu (Mac) or Edit menu (PC) and choosing Edit Watermarks.

Creating Watermark Settings
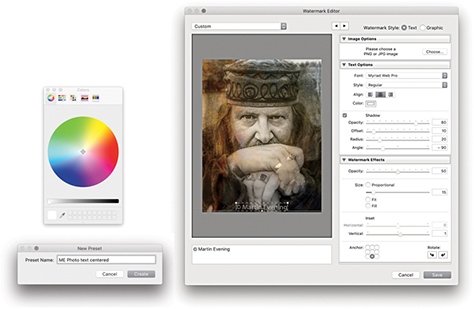
To create or edit a watermark, go to the Lightroom menu (Mac) or Edit menu (PC) and choose Edit Watermarks. Or, if you are already in the Export dialog, go to the Watermarking section and select Edit Watermarks from the Watermark menu. This opens the Watermark Editor (Figure 7.19), which shows the Text options. Here, you can type the text to use for the watermark and use the bounding-box handles to adjust the text scale. Over on the right are the text and watermark options for setting the alignment, orientation, opacity, and color; plus, you can also add a drop shadow and adjust the Radius and Angle settings to create a bevel and emboss type of effect. Once you are happy with the watermark settings, click the Save button to save the current settings as a new preset. The saved watermark preset will now be available as a custom option in the Watermarking section of the Export panel (Figure 7.18). Alternatively, you can click the Graphic button, select a PNG or JPEG image, and place this as your logo. The Watermark Editor Graphic options are shown in Figure 7.20. There are no active settings here for adjusting a watermark graphic other than to adjust the Opacity and Size.

Note
Watermarks cannot be applied when exporting as a raw original or raw DNG format, because it is not possible to add watermarks to raw images.
Note
The logo shown here was designed using type layers in Photoshop with a rounded bevel edge effect added with the type on a separate layer against a transparent background. The edited logo was then saved as a PNG file ready to be utilized in the Watermark Editor.
Post-Processing
The Post-Processing section (Figure 7.21) is a powerful feature. This lets you perform such tasks as showing the images in the Finder at the end of an export and instructing Lightroom to open the photos in Photoshop after exporting. Over the next few pages, you can find out how to create Photoshop droplets (which are self-contained Photoshop action routines) and have these run at the post-processing stage of a Lightroom export.

Adding Export Actions in Lightroom
Using the Post-Processing section in the Export dialog you can integrate Photoshop processing routines saved as droplet actions into the export process. All you have to do is run through a sequence of Photoshop processing steps that you would like to see applied at the end of an export, record these as an action, and save as a droplet. The following few steps illustrate how to create a Photoshop action for converting RGB images to CMYK that includes the necessary presharpening and profile conversion steps. This is just one example of a Photoshop routine that you might like to apply on a regular basis to photos that you export from Lightroom. By following the steps shown here, you can adapt the technique to record almost any type of Photoshop processing sequence.
It is also possible to drag photos from Lightroom to a Photoshop droplet. Be warned, though, that Develop adjustments and other settings will not necessarily be transferred with the file if you drag and drop a file from Lightroom in this way.

1. I started by opening an image in Photoshop and recorded a series of steps as an action. In this example, I flattened the image, applied an automated sharpening routine, merged the image, and converted it to a specific CMYK profile, before converting it to 8-bits-per-channel mode.
2. Having recorded the action, I was now ready to save it as a droplet. In Photoshop, I chose File ![]() Automate
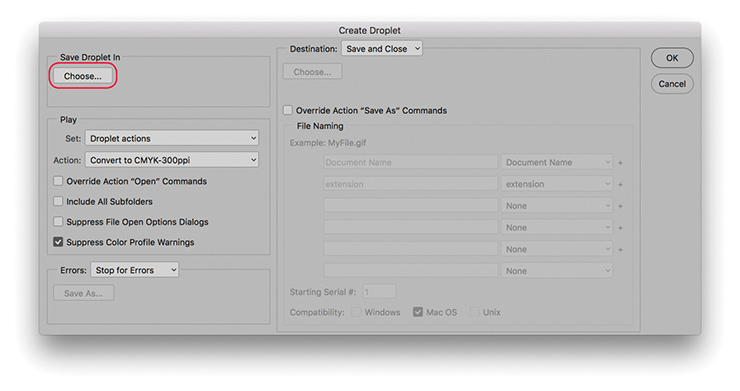
Automate ![]() Create Droplet and applied the settings shown here. There was no need to establish an output folder in the Destination section, because I would be using the Lightroom Export dialog to determine where the exported files would be saved. I chose Save and Close, then clicked the Choose button (circled).
Create Droplet and applied the settings shown here. There was no need to establish an output folder in the Destination section, because I would be using the Lightroom Export dialog to determine where the exported files would be saved. I chose Save and Close, then clicked the Choose button (circled).

3. The Photoshop droplet had to be saved to the Lightroom/Export Actions folder. On a Mac, go to the Users/Library/Application Support/Adobe/Lightroom/Export Actions folder. On a PC, go to the Users/Username/AppData/Roaming/Adobe/Lightroom/Export Actions folder.
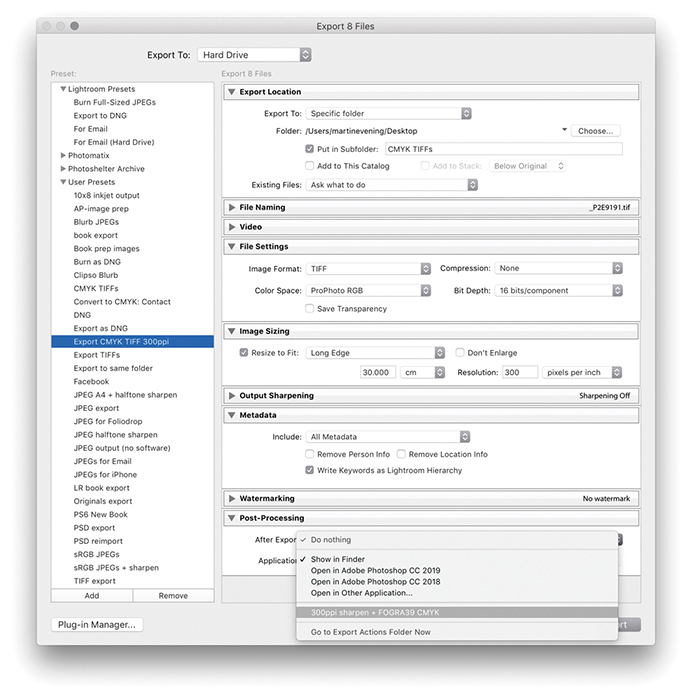
4. In the Export dialog, I configured the settings to save exported files to a CMYK TIFFs folder. In the File Settings section, I selected the TIFF image format with Compression set to None. It did not matter too much which RGB space was selected here because the output files would eventually be converted to CMYK, but I chose ProPhoto RGB as the output color space because this was similar to the native Lightroom RGB space. In the Image Sizing section, I limited the output size to 30 cm along the longest edge at a resolution of 300 ppi. Lastly, in the Post-Processing section, I selected the droplet I had saved previously to the Export Actions folder. It was time to save these customized settings as a new preset. For this example, I saved the Export settings as Export CMYK TIFF 300 ppi. You can adapt the CMYK conversion action routine shown here for any publication. My recommendation would be to create separate droplet actions for different publications using the correct profile or CMYK setting for each. You can then build up different sets of user presets for each client.
Exporting Catalog Images to a CD or DVD
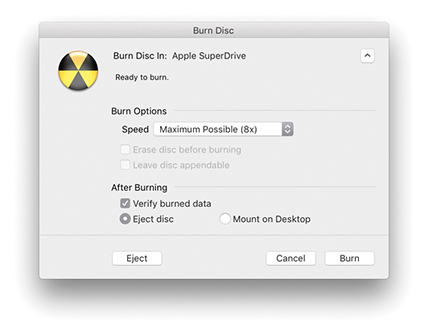
You can export images to a CD or DVD via the Export dialog. In Figure 7.22, I selected the Burn Full-Sized JPEGs export setting, which uses the CD/DVD Export mode. This setting converts selected photos to JPEG and burns them to a CD or DVD. The photos are first converted to JPEG and automatically placed in a temporary folder. Lightroom then launches the operating system disc-burning utility (such as the one shown in Figure 7.23) and alerts you when Lightroom is ready to start copying the files to a blank recordable CD or DVD. If you have more than one CD/DVD burning device available, you can select which unit you want to use to burn the disc. Once you have done this, click Burn, and you will then see the Burn Summary dialog (Figure 7.24) where you can enter a name for the archive disc you are about to create. If there is not enough room to burn all the data on a single disc, Lightroom informs you of this and enables a multi-disc burn session. For example, a single recordable DVD disc can hold a maximum of 4.3 GB of data. If your photos consume more space than that, Lightroom automatically divides the library export into batches of equal size (based on the space available on the first disc you inserted to record to) and proceeds to burn the data (and verify) to successive discs, appending each disc burn session with successive numbers. After all the discs have been burned, Lightroom automatically deletes the temporary disc folder.


Note
Burn to CD/DVD is available only if the computer you are using has an enabled CD/DVD drive.
Exporting Photos as Email Attachments
The Export To Email option lets you export images directly as email attachments using your preferred email client program. There are several ways to do this. You can choose the For Email Export To option from the Lightroom Presets list in the Export dialog; this selects the appropriate settings for creating email attachments. You can also choose File ![]() Email Photo (
Email Photo (![]() [Mac] or
[Mac] or ![]() [PC]), or use the context menu in the Library module and select Email Photo. But bear in mind that the Export dialog gives you significant control over how the images are exported. You have the means to adjust the JPEG compression settings, apply screen display sharpening, and choose whether to add a watermark.
[PC]), or use the context menu in the Library module and select Email Photo. But bear in mind that the Export dialog gives you significant control over how the images are exported. You have the means to adjust the JPEG compression settings, apply screen display sharpening, and choose whether to add a watermark.
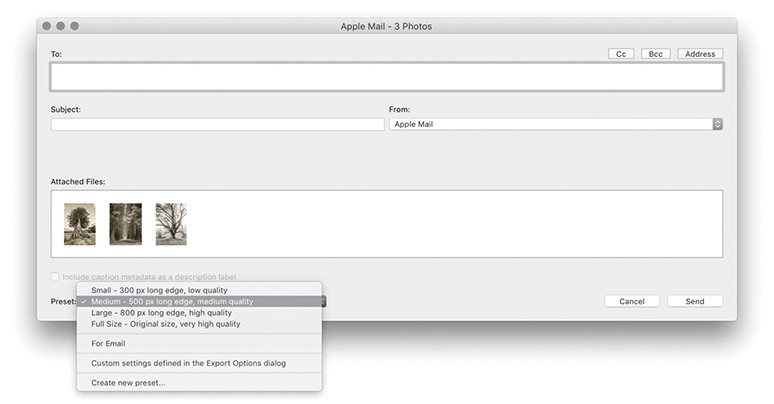
Next, Lightroom creates an email-ready sRGB JPEG of the original file and opens in its own email client dialog (Figure 7.25). Here, you can enter the email address of who to send to, and so on. In the From section, you can select the Lightroom Email Account Manager, enter your regular Internet hosting settings, and use this to send photos directly from Lightroom. There is an Address button in the top-right corner that can be used to save frequent sender emails, and in the bottom-left section, you can choose from different preset sizes (or select the “Create new preset” option to make your own). All of this is kind of fiddly to configure. A simpler solution is to select your existing email client program in the From menu. In Figure 7.25, you can see I selected Apple Mail. With this configuration, there is no need to enter an email address in the To section or enter a Subject. All you have to do then when you choose the For Email export option and you see this dialog, is ignore everything and just click Send. This then opens a blank new email window (Figure 7.26) with the image or images you selected copied to the body of the email.

The Export dialog also offers a For Email (Hard Drive) preset for exporting email photos to the hard drive. This creates permanent saved copies to a specified location that you can then use to copy photos to an email. Overall, the standard For Email preset is the best to use to send photos in an email and have Lightroom integrate with your regular email program.
Third-Party Export Plug-Ins
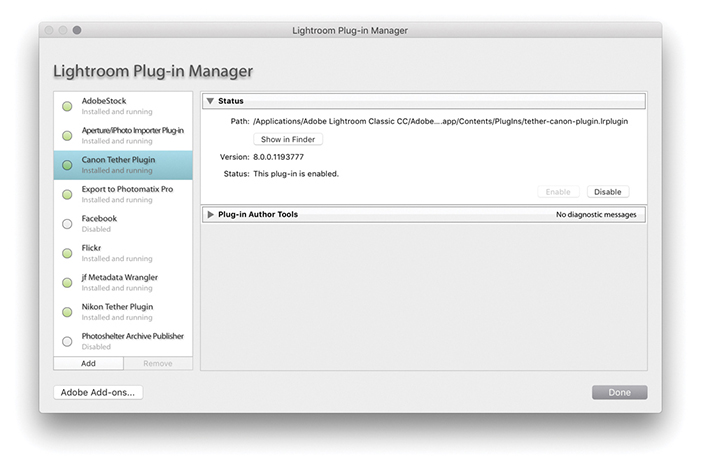
The Lightroom Export dialog can work with Export plug-ins from various third-party providers. To install a plug-in, click the Plug-in Manager button (circled) at the bottom of the Export dialog (Figure 7.27), which opens the Plug-in Manager shown in Figure 7.28. Clicking the Adobe Add-ons button takes you to an Adobe site where you can search for more Lightroom plug-ins.

Note
There are several sites offering plug-ins for Lightroom, such as Jeffrey Friedl’s site: regex.info/blog/lightroom-goodies. Also check out the Photographer’s Toolbox at photographers-toolbox.com. There you will find links to plug-ins such as Lr/Mogrify and Lr/Enfuse.
Exporting Video Files
You can use the Export dialog to export video files. To do so, you must first have the Include Video Files box selected in the Video section (Figure 7.29). You then have three options. If you want to include video files in an export and export them in their unedited state, you should choose Original from the Video Format menu. If, on the other hand, you have edited them in Lightroom using the Quick Develop controls, or have edited the trackline, you can choose to export edited videos using either the H.264 or DPX video formats. Clearly, if you have spent time making use of Lightroom’s video-editing features, you will want to make sure your editing work is applied to the video files on export. Of the two available formats, it is more likely that you will want to choose H.264, as this is best known as the codec standard for Blu-ray discs and is also widely used for streaming Internet content. It is also the format you would need to use for videos to go on YouTube, Vimeo, or iTunes. The four quality options allow you to export anything from a high-quality video to a low-quality, small video suitable for fast streaming on mobile devices. Maximum matches as close to the source as possible (1920x1080, 25.000 fps, 22 Mbps). High produces high quality, but with a possible reduction in video bit rate (1920x1080, 25.000 fps, 22 Mbps). Medium is suitable for web sharing and higher-end tablets (1280x720, 25.000 fps, 8 Mbps). Low is suitable for mobile devices (480x270, 25.000 fps, 1 Mbps).
Note
Here are the DPX options:
DPX 24p Full Range: 1920x1080 24p Full Range (max bit depth).
DPX 25p Full Range: 1920x1080 25p Full Range (max bit depth).
DPX 30p Full Range: 1920x1080 30p Full Range (max bit depth).

The Digital Picture Exchange (DPX) format is a more specialist, folder-based video format. It is lossless, which means that it produces export folders that are many times bigger in file size than the original video clips. It is really intended as an intermediate format for working interoperatively with professional video applications, such as Adobe After Effects and Adobe Premiere Pro.