
Chapter Summary
In this chapter we discuss what runtime environments are and how to configure them; we’ll then discuss what user secrets are and how to use them.
When Done, You Will
Understand what runtime environments are.
How to set them via the ASPNETCORE_ENVIRONMENT variable.
Understand the role of launchSettings.json and appsettings.json files.
What user secrets are.
How to use user secrets to solve the problem we had at the end of the last chapter.
Environments
Stressful for you as a developer
Showing great irresponsibility as an application owner
Potentially impactful to the end user
Therefore, to avoid such a scenario, most, if not all organizations, will have some kind of “Development” environment where developers can roam free and go for it, without fear of screwing up.
If you’ve ever worked as part of a development team, you’ll know the preceding statement is not quite true. Yes, you can break things in the development environment without fear of impacting customers, but if you break the build, you will have the wrath of the other members of your team to deal with!
I know this from bitter experience.
Anyway, you’ll almost always have a Development environment, but what other environments can you have? Well, jumping to the other end of the spectrum, you’ll always have a Production environment . This is where the live production code sits and runs as the actual application, be it a customer-facing web site or in our case an API available for use by other applications.
You will typically never make code changes directly in production; indeed deployments and changes to production should be done, where possible, in as automated (and trackable) a way as possible, where the “human hand” doesn’t intervene to any large extent.
So, are they the only two environments you can have? Of course not, and this is where you’ll find the most differences in the real world. Most usually you will have some kind of “intermediate” environment (or environments) that sits in between Development and Production; it’s primary use is to “stage” the build in as close to a Production environment as possible to allow for integration and even user testing. Names for this this environment vary, but you’ll hear Microsoft refer to it as the “Staging” environment; I’ve also heard it called PR or “Production Replica.”
Replicating a Production environment accurately can be tricky (and expensive), especially if you work in a large corporate environment with lots of “legacy” systems that are maintained by different third-party vendors – coordinating this can be a nightmare.
There are of course ways to simulate these legacy systems, but again, there is really no substitute for the real thing. If you’re not simulating the legacy systems your app is interacting with precisely, that’s when you find those lovely bugs in production.
I remember being caught out with SQL case sensitivity on an Oracle DB while on site at a customer deployment. An easy fix when I realized the issue, but something as simple as that can be stressful and also damaging to your own reputation!
Our Environment Setup

Development and Production Environments
As you can see, the “components” that are there are effectively the same; it’s really only the underlying platform that is different (a local Windows PC vs. Microsoft Azure).
We’ll park further discussion on the Production Environment for now and come back to that in later chapters; for now, we’ll focus on our Development environment.
The Development Environment
How does our app know which environment it’s in? Quite simply – we tell it!
This is where “Environment Variables” come into play, specifically the ASPNETCORE_ENVIRONMENT variable. Environment variables can be specified, or set, in a number of different ways depending on the physical environment (Windows, OSX, Linux, Azure, etc.). So, while they can be set at the OS level, our discussion will focus setting them in the launchSettings.json file (this can be found in the Properties folder of your project) for now.
![]() Environment variables set in the launchSettings.json file will override environment variables set at the OS layer; that is why for the purposes of our discussion, we’ll just focus on setting out values in the launchSettings.json file.
Environment variables set in the launchSettings.json file will override environment variables set at the OS layer; that is why for the purposes of our discussion, we’ll just focus on setting out values in the launchSettings.json file.
A fuller discussion on multiple environments in ASP.NET Core can be found here.1

LaunchSettings.json File
IISExpress
IIS
Project (which launches the Kestrel web server)
In the preceding highlighted profile section, there are also additional details that are specified including the “applicationUrl” for both http and https and well as our environmentVariables; in this instance we only have one: ASPNETCORE_ENVIRONMENT , set to: Development.
launchSettings.json is read (if available).
environmentVariables settings override system/OS-defined environment variables.
The hosting environment is displayed.
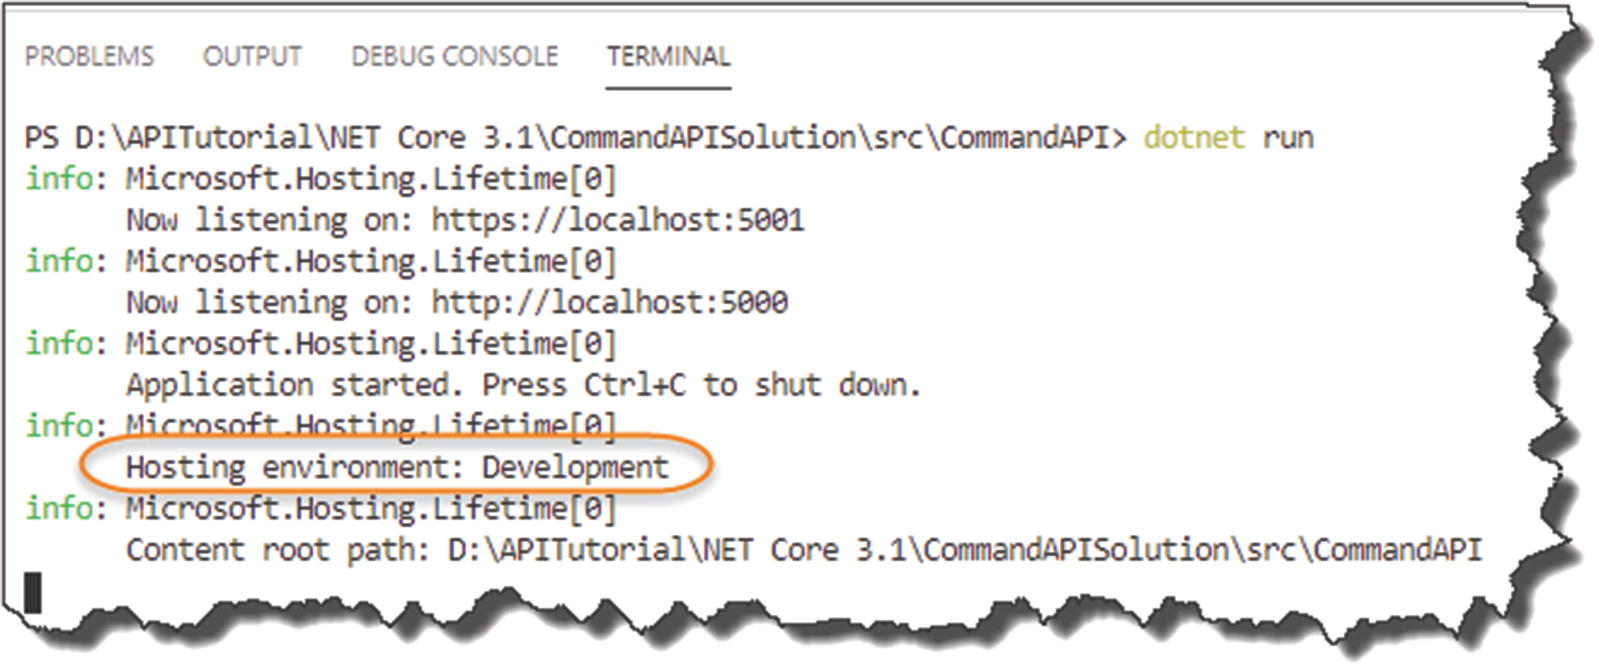
Our environment is set to Development
So What?
At this stage I hear you all saying, “Yeah that’s great and everything, but so what?”
Good question; I’m glad you asked that question!2
Endpoints (e.g., Server Name/IP address, etc.)
Different log-in credentials, etc.
Therefore, depending on our environment, we’ll want to change our configuration.
I’m using the database connection string as an example here, but there are many other configurations that will change depending on the environment. That is why it is so important we are aware of our environment.
Make the Distinction
- 1.
“Manually” determine the environment in your code, and take the necessary action.
- 2.
Leverage the power and behavior of the .NET Core Configuration API.

Code-based determination of environment
The preceding snippet is taken from our very own Startup class, where the default project template uses the IsDevelopment parameter to determine which exception page to use.
Order of Precedence
OK, so we’re going to leverage from the behavior of the .NET Core Configuration API to change the config as required for our two different environments (we’ve already made use of this when we configured the connection string for the DB Context).

Configuration sources and order of preference
The launchSettings.json file is loaded when we issue the dotnet run command and set the value for ASPNETCORE_ENVIRONMENT.
A number of configuration sources that are used by the CreateDefaultBuilder method.
By default these sources are loaded in the precedence order specified previously, so appsettings.json is loaded first, followed by appsettings.Development.json, and so on.
![]() It is really important to note here that The Last Key Loaded Wins.
It is really important to note here that The Last Key Loaded Wins.
What this means (and we’ll demonstrate this below) is that if we have two configuration items with the same name, for example, our connection string, PostgreSqlConnection, that appears in different configuration sources, for example, appsettings.json and appsettings.Development.json, the value contained in appsettings.Development.json will be used.
So, you’ll notice here that Environment Variables will take precedence over the values in appsettings.json. This is the opposite of how this works when we talk about launchSettings.json. As previously mentioned, the contents of launchSettings.json take precedence over our system-defined environment variables.
So be careful!
I’ve referenced a great Blog Post on the Order of Precedence with Configuring ASP.NET Core here,3 for a further overview.
It’s Time to Move

Appsettings.Development.json
Again, if you’re unsure that your JSON is well-formed, use something like http://jsoneditoronline.org/ to check.
Save the files you’ve made any changes to, run your API, and make the same call – it all still works as usual.
Let’s Break It
Stop your API from running (Ctrl + c).
Go back into appsettings.Development.json file, and edit the Password parameter in the connection string so that authentication to the PostgreSQL Server will fail – see Figure 8-7.
- Save your file.
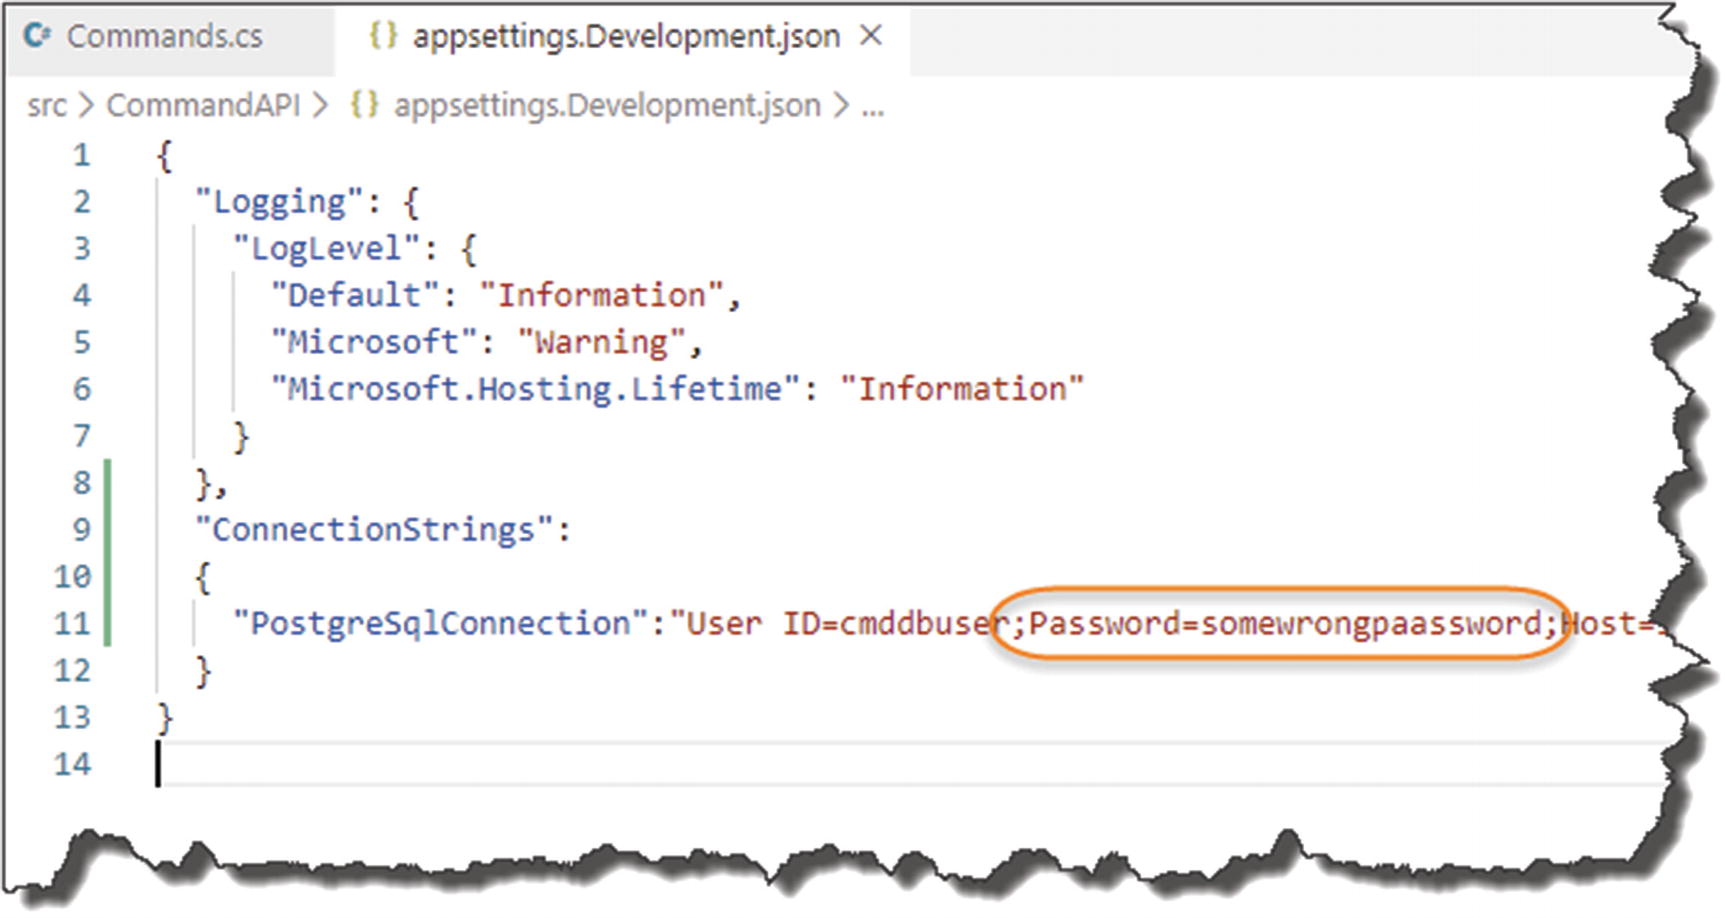 Figure 8-7
The wrong credentials
OK, now run the app again, and try to make the API Call.
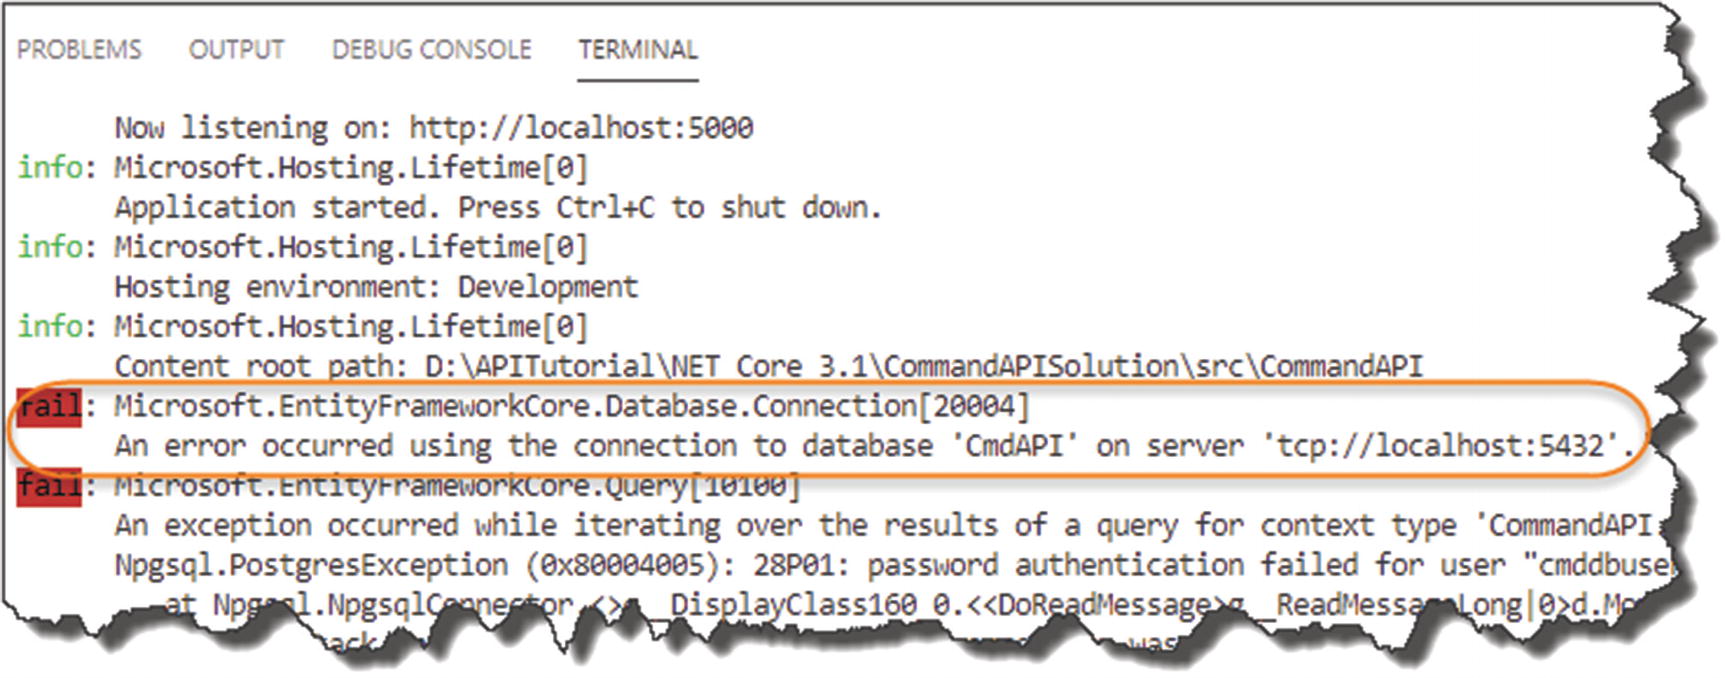
As expected, we can't connect
Fix It Up
Edit your appsettings.Development.json file, and correct the value for the Password parameter
Delete the ConnectionStrings json from the appsettings.json file.

Cleaned up Appsettings.json
This means that currently, we only have a valid source for our connection string when running in a Development environment.
What will happen if you edit the launchSettings.json file and change the value of ASPNETCORE_ENVIRONMENT to “Production”?
Do this, run your app, and explain why you get this result.
We will cover our Production connection string in the Chapter 13.
User Secrets
We’ve covered the different environments you can have and why you have them and have even reconfigured our app to have a development environment-only connection string. But we still have not solved the issue we were left with at the end of the previous chapter – that being that, our User ID and Password are still in plaintext and are therefore available to anyone who has access to our source code – for example, someone looking at our repo in GitHub.

Secrets.json in the scheme of things
What Are User Secrets?
Well I gave you a bit of a clue in this chapter already.
User Secrets are “tied” to the individual developer – that is, you!
They are abstracted away from our source code and are not checked into any code repository.
They are stored in the “secrets.json” file.
The secrets.json file is unencrypted but is stored in a file system-protected user profile folder on the local dev machine.
This means that individual users can store (among other things) the credentials that they use to connect to a database. As the file is secured by the local file system, they remain secure (assuming no one has log-in access to your PC).
In terms of what you can store, this can be anything; it’s just string data. We’re now going to set up User Secrets for our development connection string.
Setting Up User Secrets
We need to make use of something called The Secret Manager Tool in order to make use of user secrets; this tool works on a project-by-project basis and therefore needs a way to uniquely identify each project. For this we need to make use of GUIDs.
Find out what GUID stands for, and do a little bit of reading on what they are and where they can be used (assuming you don’t know this already!)
Cast your mind back to Chapter 2 where we set up our development lab, and one of the extensions we suggested for VS Code was Insert GUID – well now we get to use it!
Place your cursor in between the opening <UserSecretsId> and the closing </UserSecretsId> elements.
- Open the VS Code “Command Palette”:
Press F1
Or Ctrl + Shift + P
Or View ➤ Command Palette
Type “Insert.”
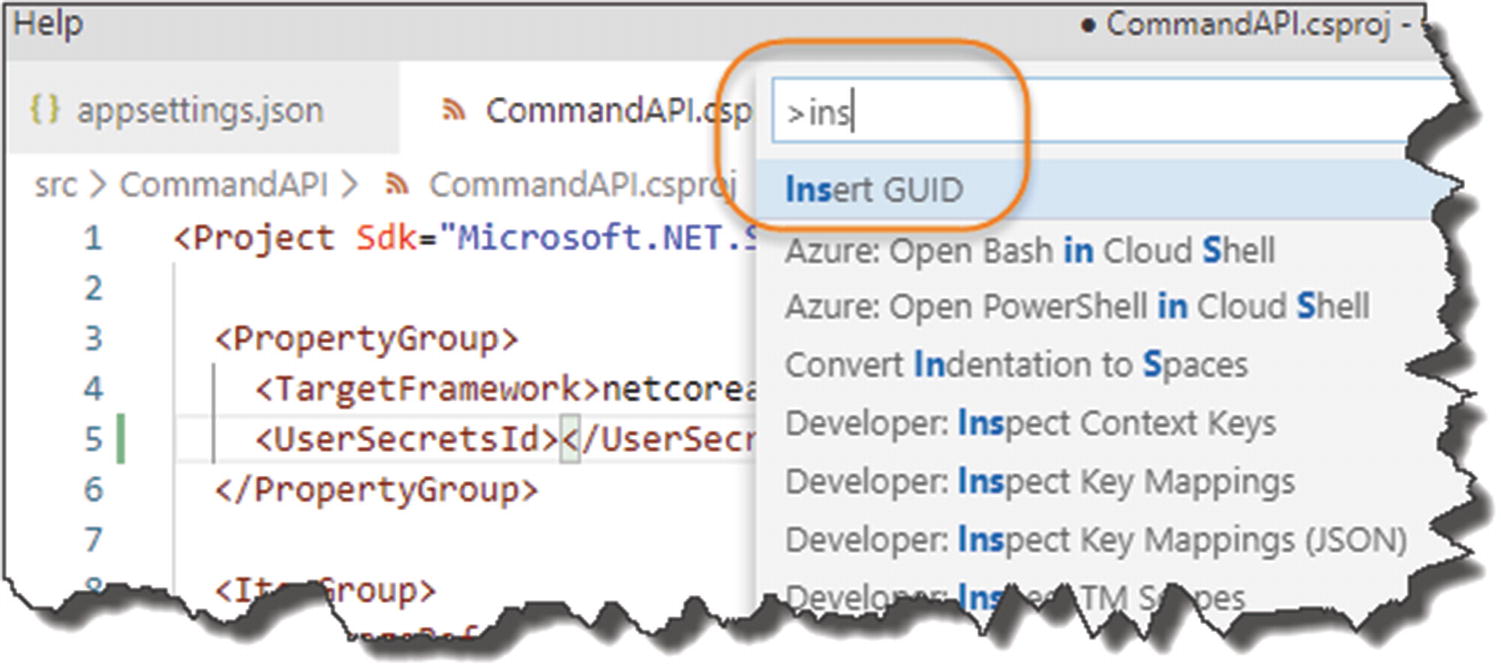
Insert GUID
- Insert GUID should appear; select it and select the first GUID Option.
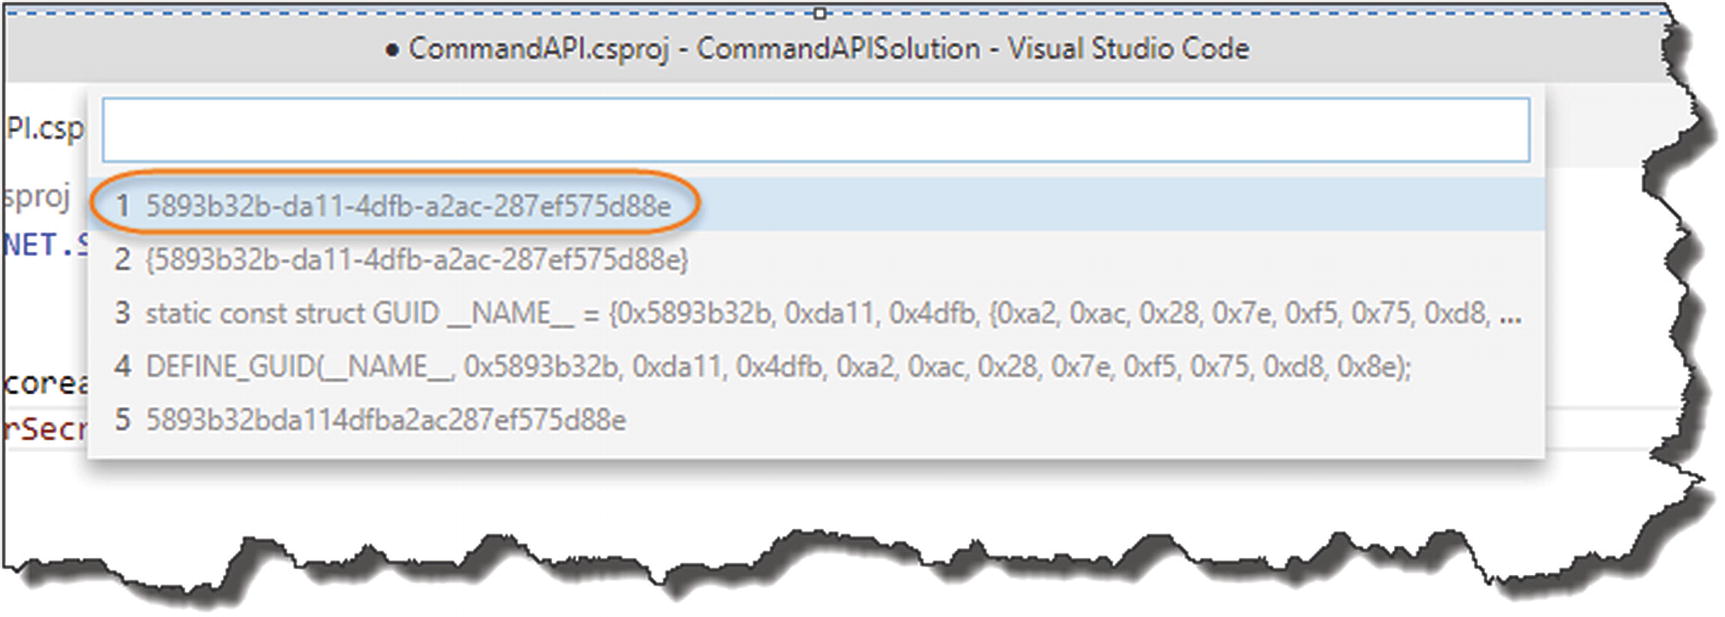 Figure 8-12
Select this GUID Format
- This should place the auto-generated GUID into the xml elements specified; see the following example.
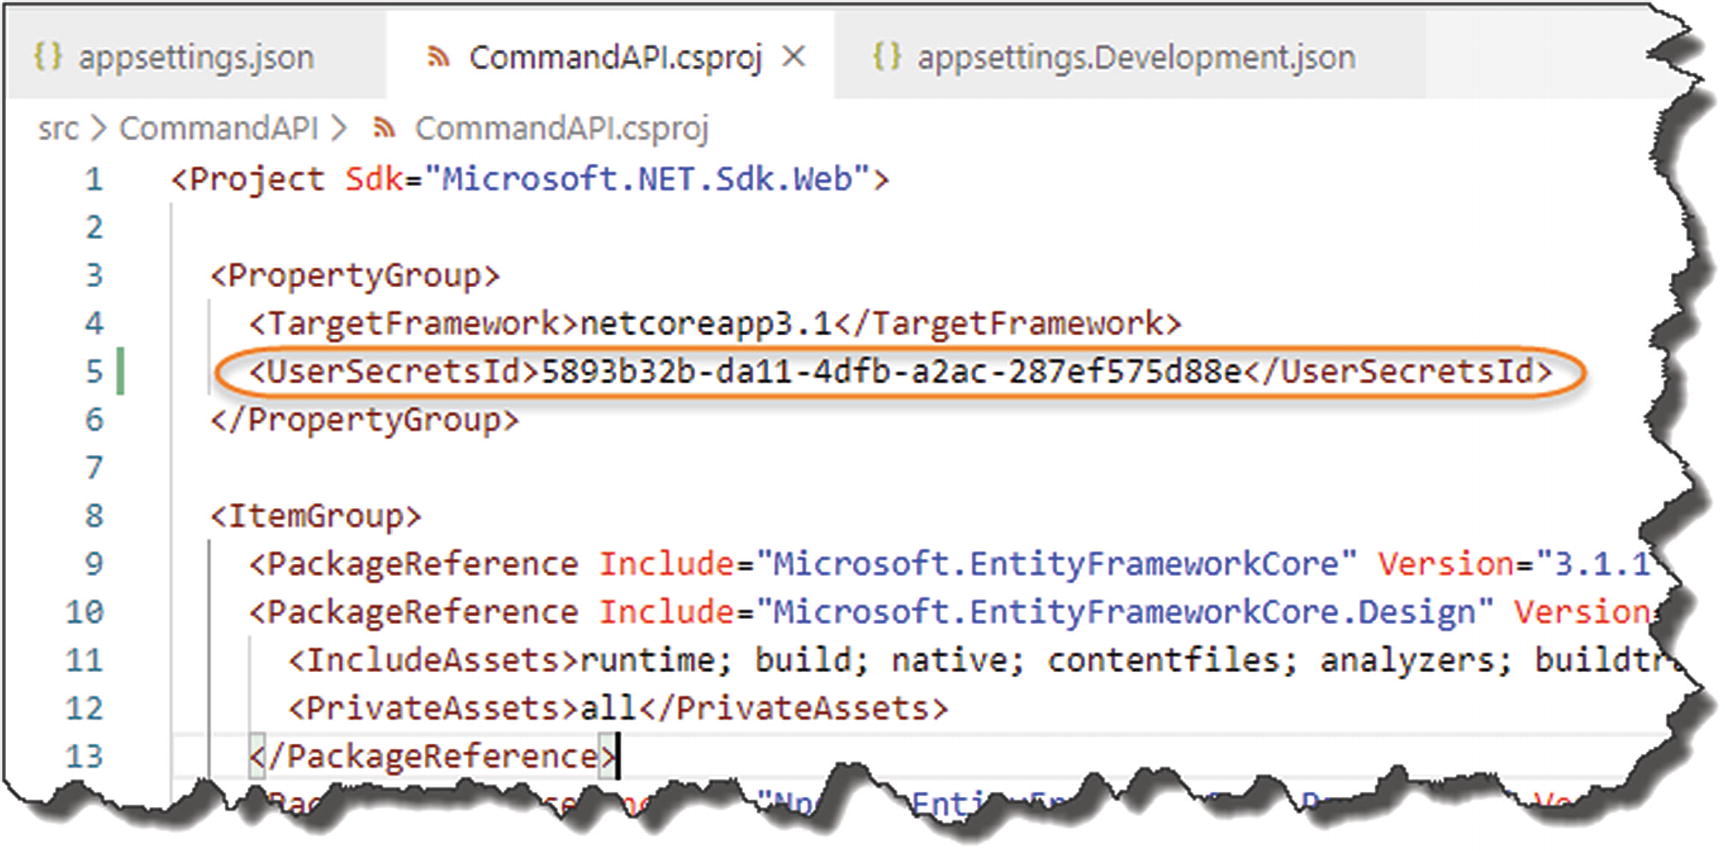 Figure 8-13
GUID Inserted into the .CSPROJ File
Now save your file.
Deciding Your Secrets
Now we come to actually adding our secrets via The Secret Manager Tool, which will generate a secrets.json file.
- 1.
Want to store our entire connection string as a single secret.
- 2.
Store our User Id and Password as individual secrets and retain the remainder of the connection string in the appsettings.Developent.json file.
Either will work, but I’m going to go with option 2 where we will store the individual components as “secrets.”
Ensure you have generated the GUID as described earlier, and save the .csproj file.
At a terminal command (and make sure you’re “inside” the CommandAPI project folder), type

Adding our first user secret
Again, you should get a similar success message.
Where Are They?
Windows: %APPDATA%MicrosoftUserSecrets<user_secrets_id>secrets.json
Linux/OSX: ~/.microsoft/usersecrets/<user_secrets_id>/secrets.json

Location of Secrets.Json on Windows
It’s just a simple, non-encrypted JSON file.
Code It Up
OK, so now to the really exciting bit where we’ll actually use these secrets to build out our full connection string.
Step 1: Remove User ID and Password

Removal of sensitive connection string attributes
Make sure you save your file.
Step 2: Build Our Connection String
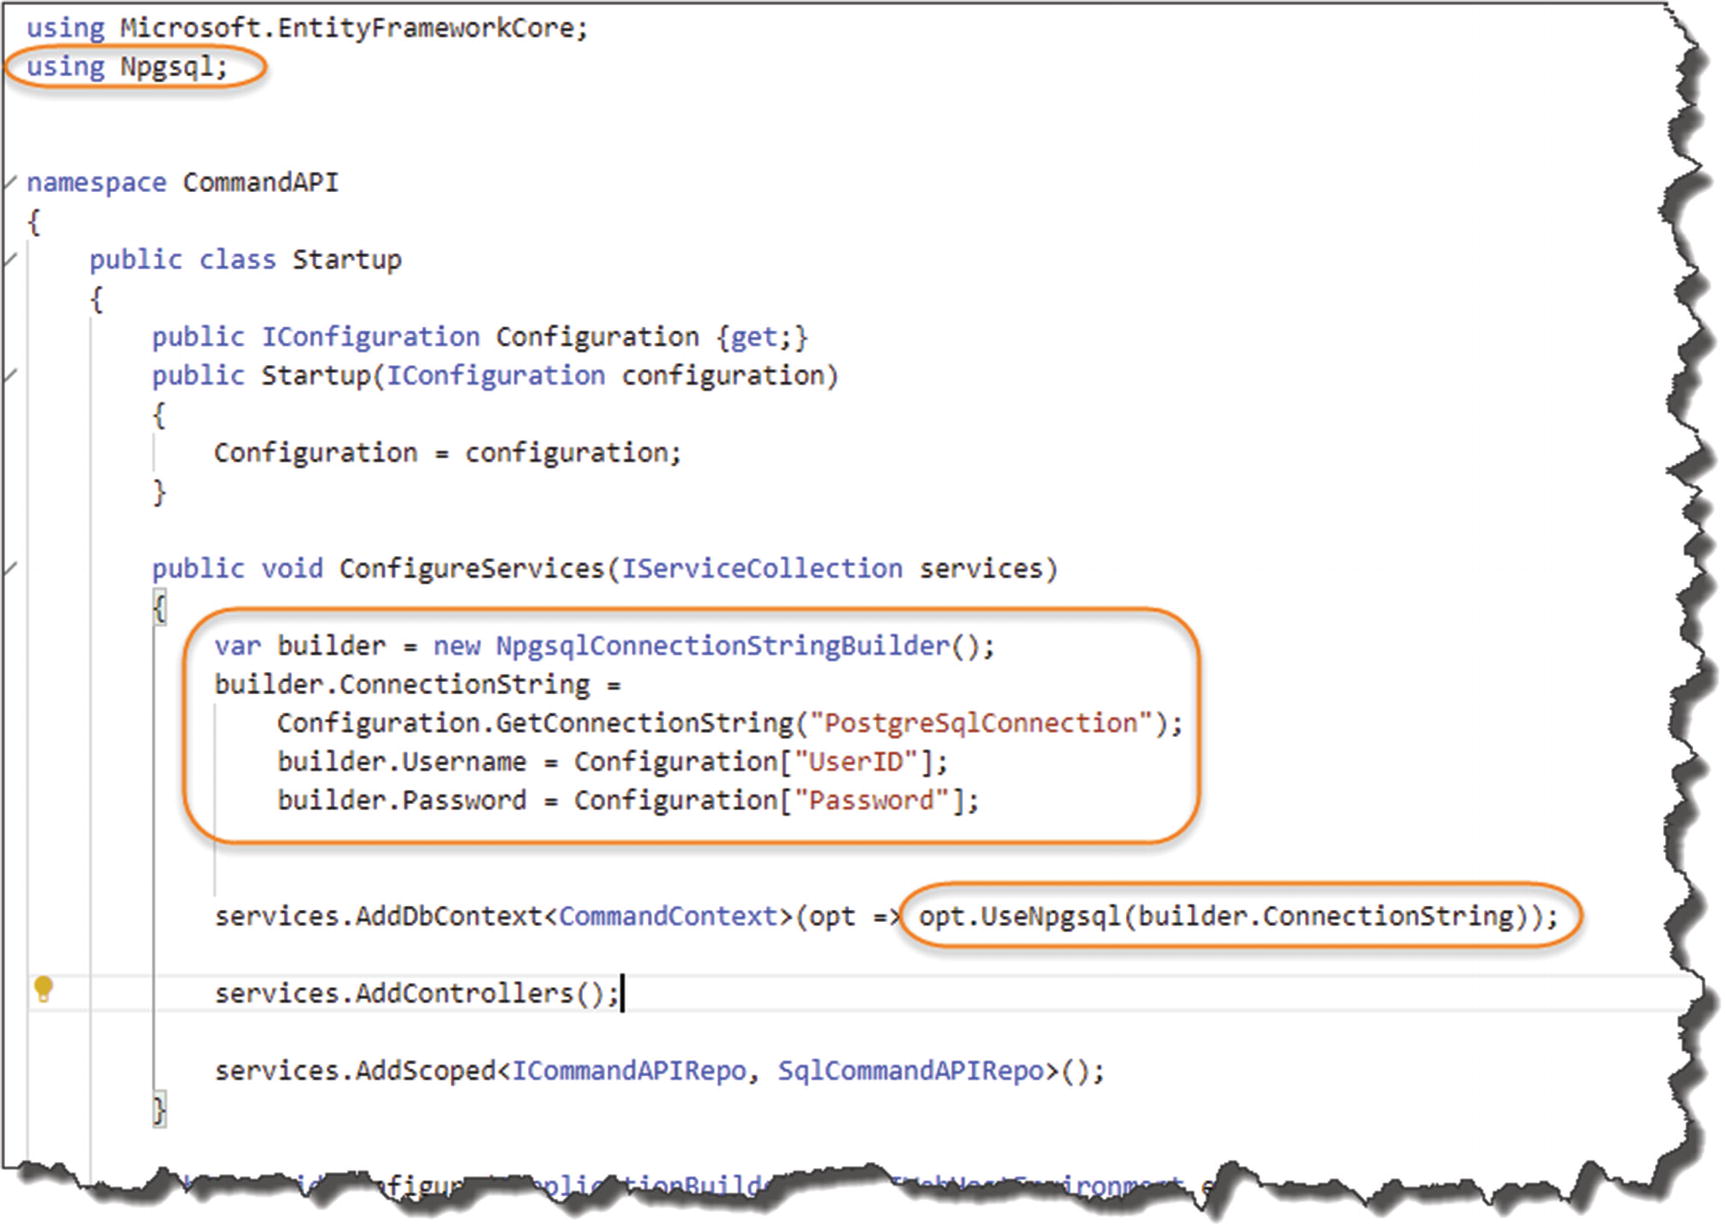
Updated Startup class
- 1.
We need to add a reference to Npqsql in order to use NpgsqlConnectionStringBuilder.
- 2.This is where we
- a.
Create a NpgsqlConnectionStringBuilder object, and pass in our “base” connection string PostgreSqlConnection from our appsettings.Development.json file.
- b.
Continue to “build” the string by passing in both our UserID and Password secret from our secrets.json file.
- a.
- 3.
Replace the original connection string with the newly constructed string using our builder object.
Save your work, build it, then run it. Fire up Postman, and issue our GET request to our API. You should get a success!
You have now dynamically created a connection string using a combination of configuration sources, one of which is User Secrets from our secrets.json file!

Revisit of precedence
The .NET Configuration layer by default provides us access to the configuration sources as shown in Figure 8-18; in this case we used a combination of 2 + 3.
Wrap It Up
We moved our connection string to a development-only config file: appsetting.Development.json.
We removed the sensitive items from our connection string.
We moved the sensitive items (User ID and Password) to secrets.json via The Secret Manager Tool.
We constructed a fully working connection string using a combination of configuration sources.
All that’s left to do is commit all our changes to Git then push up to GitHub!

Clean Appsettings.json on GitHub