
Chapter Summary
In this chapter we discuss how we can secure our API; specifically, we’ll add the “Bearer” authentication scheme into the mix that will allow only authorized clients to access our API resource through the use of Tokens.
When Done, You Will
Understand the Bearer authentication scheme.
Use Azure Active Directory to secure our API.
Create a simple client that is authorized to use the API.
Deploy to Azure.
We have a lot to cover – so let’s get going!
What We’re Building
Our Authentication Use Case

Authentication use case
Overview of Bearer Authentication
Scheme | Description |
|---|---|
Basic | A common, relatively simple authentication scheme. Requires the supply of a user name and password that’s then encoded as a Base64 string; this is then added to the authorization header of a http request. Natively, this is not encrypted, so it’s not that secure, unless you opt so make requests over https, in which case the transport is encrypted |
Digest | Follows on from Basic Authentication but is more secure as it applies a hash function to any sensitive data (e.g. username and password) before sending |
Bearer | Token-based authentication scheme where anyone in possession of a valid “token” can gain access to the associated secured resources, in this case our API. Considered secure, it is widely adopted in industry and is the scheme (specified in RFC 6750); we’ll use to secure our API |
NTLM | Microsoft-specific authentication scheme, using Windows credentials to authenticate. Perfectly decent, secure scheme but as it’s somewhat “proprietary” (and I’m trying to avoid that), we’ll leave our discussion there for now |
Bearer Token vs. JWT
The use of “tokens” in Bearer authentication is a central concept. A token is issued to a requestor (in this case a daemon client) and the client (or “bearer of the token”) then presents it to a secure resource in order to gain access.
So, what’s JWT?
JWT (or JSON Web Tokens) is an encoding standard (specified in RFC 7519) for tokens that contain a JSON payload. JWTs can be used across a number of applications; however, in this instance, we’re going to use JWT as our encoded token through our use of Bearer authentication.
Bearer authentication is the authentication scheme that makes use of (bearer) “tokens.”
JWT is a specific implementation of bearer tokens, in particular those with a JSON payload.
Again, rather than dwelling on copious amounts of theory, the concepts will make more sense as we build them below.
Build Steps
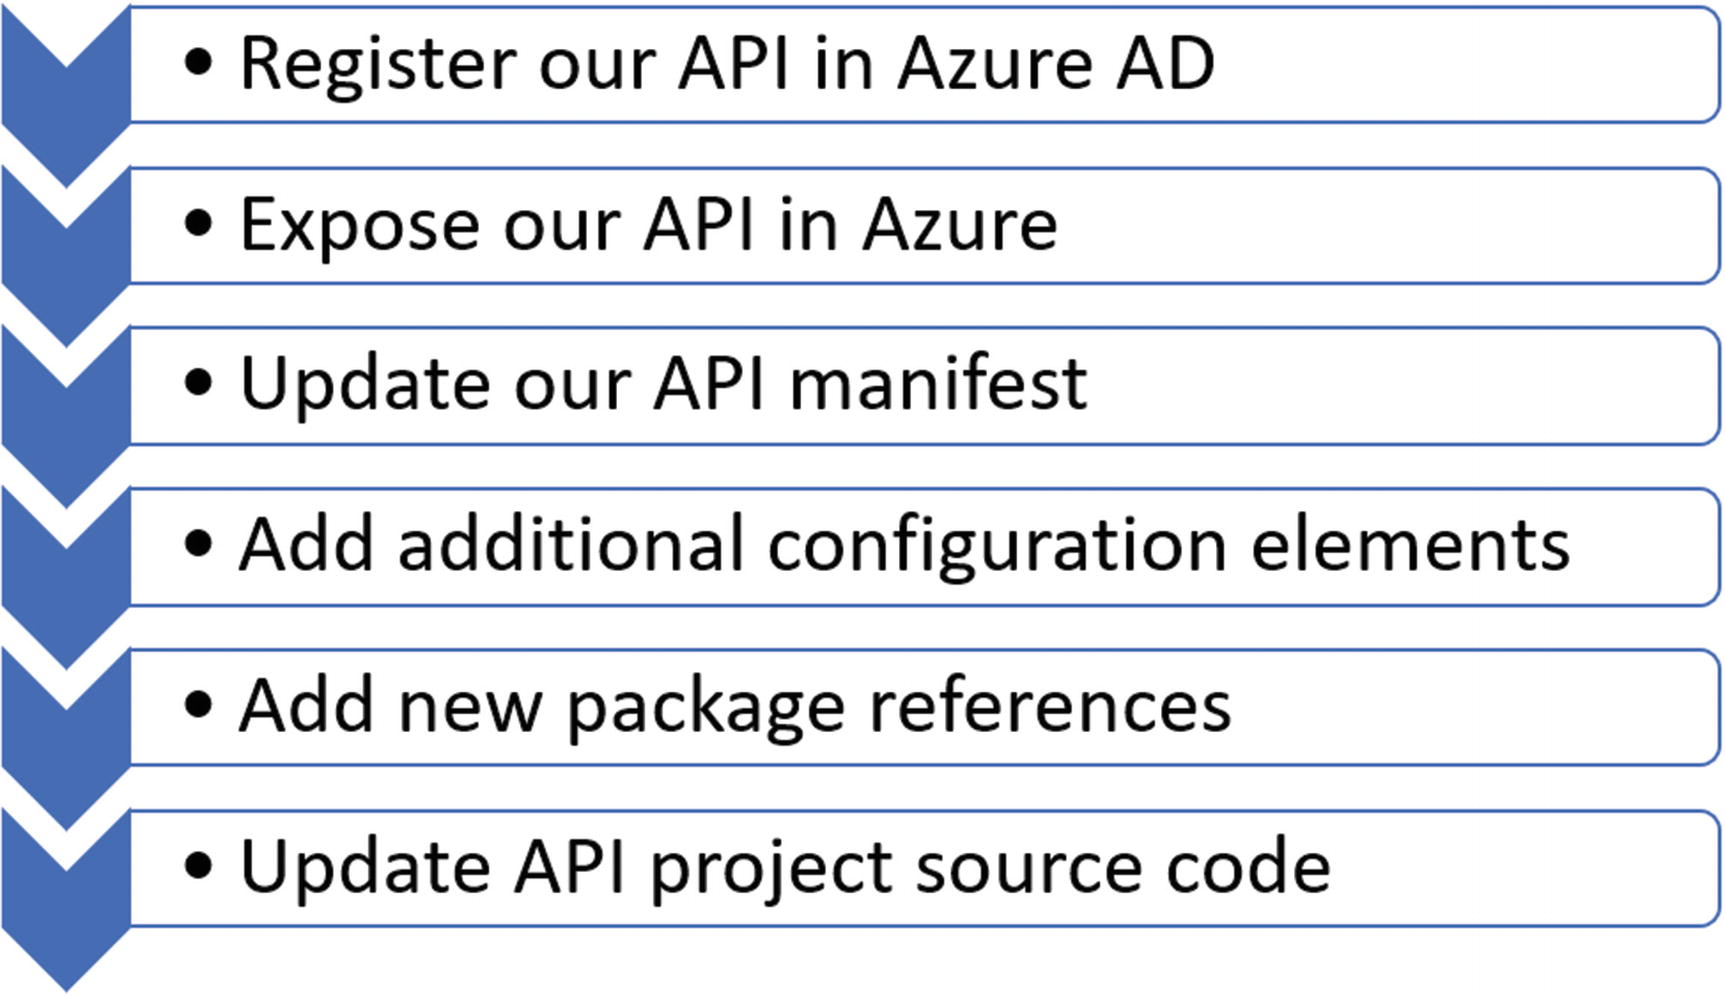
API build steps

Client build steps
Steps for Our API Project
Steps for Our Daemon Client
You can see there is actually a lot to do – so let’s get on it!
Registering Our API in Azure AD
The first thing we need to do is register our API with Azure Active Directory (AAD), as we’re using AAD as our Identity and Access Management directory service.
![]() One of my first jobs out of university was as part of a team supporting a large (I believe at the time the second largest in the world) deployment of Novell NetWare Directory Services (NDS), which was weird as I had neither the background nor inclination to learn NDS.
One of my first jobs out of university was as part of a team supporting a large (I believe at the time the second largest in the world) deployment of Novell NetWare Directory Services (NDS), which was weird as I had neither the background nor inclination to learn NDS.
Anyhow, this product was considered relatively leading-edge at the time as it took the approach of storing user accounts (as well as other “organizational objects”) in a hierarchical directory tree structure that was both distributed and replicated (in this case) nationwide. In short it was hugely scalable and could cater for 10,000s (we had well over 100,000) of user accounts.
At the time Microsoft only used Windows NT Domains which were arguably more basic (they were “flat”), less scalable, distributable, and reliable than their NetWare counterparts. Blue screen of death anyone?
Microsoft was obviously, cough, “inspired,” cough again, by NDS (and Banyan Vines – see next section) to such an extent that they brought out a rival product, Active Directory, which bore a remarkable resemblance to, drum roll, NDS. You could argue this was poetic justice as Novell had been “inspired” by an earlier product called Banyan VINES.1 Interestingly, Jim Allchin, engineering supremo at Banyan, joined Microsoft due to creative and strategic differences with the Banyan leadership.
The rest is history.
Banyan and Novell’s products withered and died due to a number of different strategic missteps, as well as the fact that Microsoft had a compelling value proposition.
So, if you use a Windows PC at work and have to “log-in,” then you’re most likely logging into an Active Directory. Now with the emergence of Azure, you don’t even need to host your AD on premise and can opt to use Azure Active Directory, which is what we’ll be using for this chapter.
Create a New AD?
Now this step is optional, but I have created a “test” AAD in addition to the AAD that gets created when you sign up for Azure. This is really just to ring-fence what is in essence my “production AAD” (the one that holds my login for Azure) from any development activities I undertake.
You can create a new AAD in exactly the same way as you create any other resources in Azure, so I won’t detail the steps here. If you do opt for this approach though (remember it is optional), the only thing you need to be aware of is that when you want to create objects in your “Development AAD,” you’ll need to switch to it in the Azure Portal.
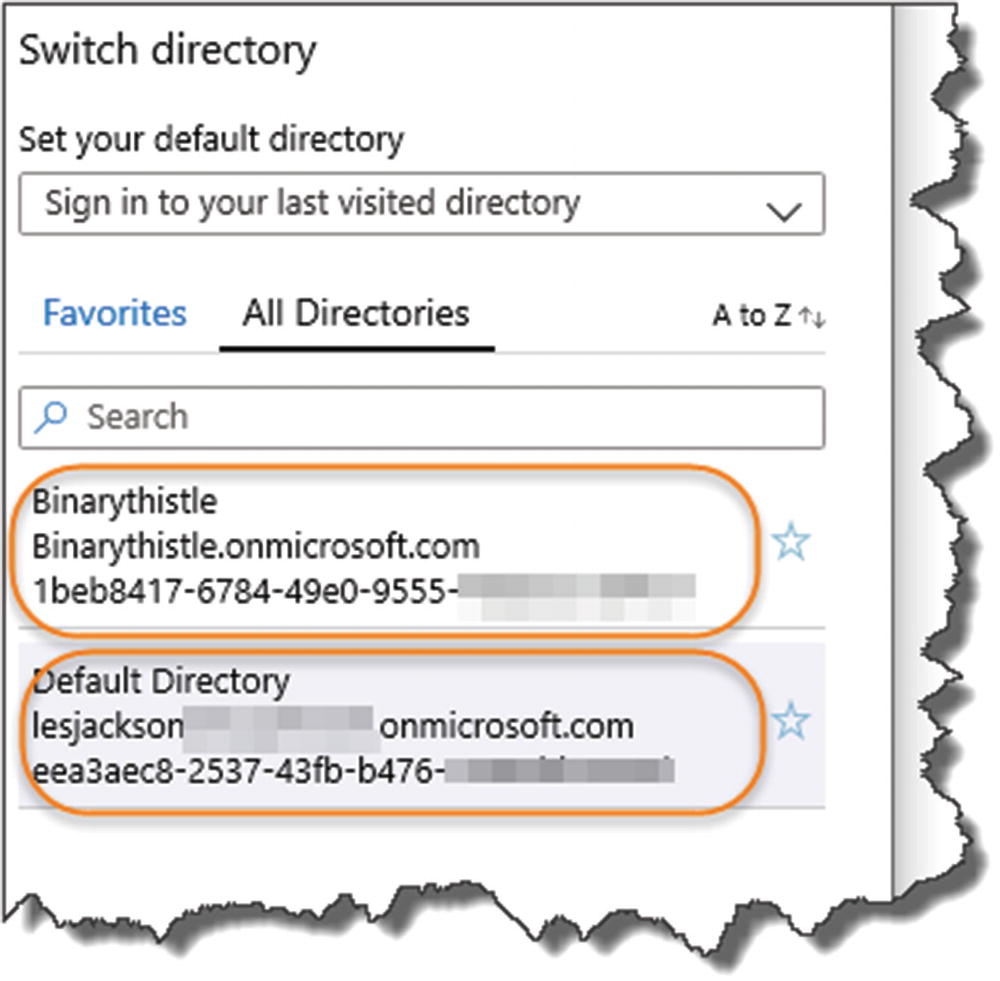
Switching Between AADs

Switching Active Directory
Register Our API

Select the AD you want to work with
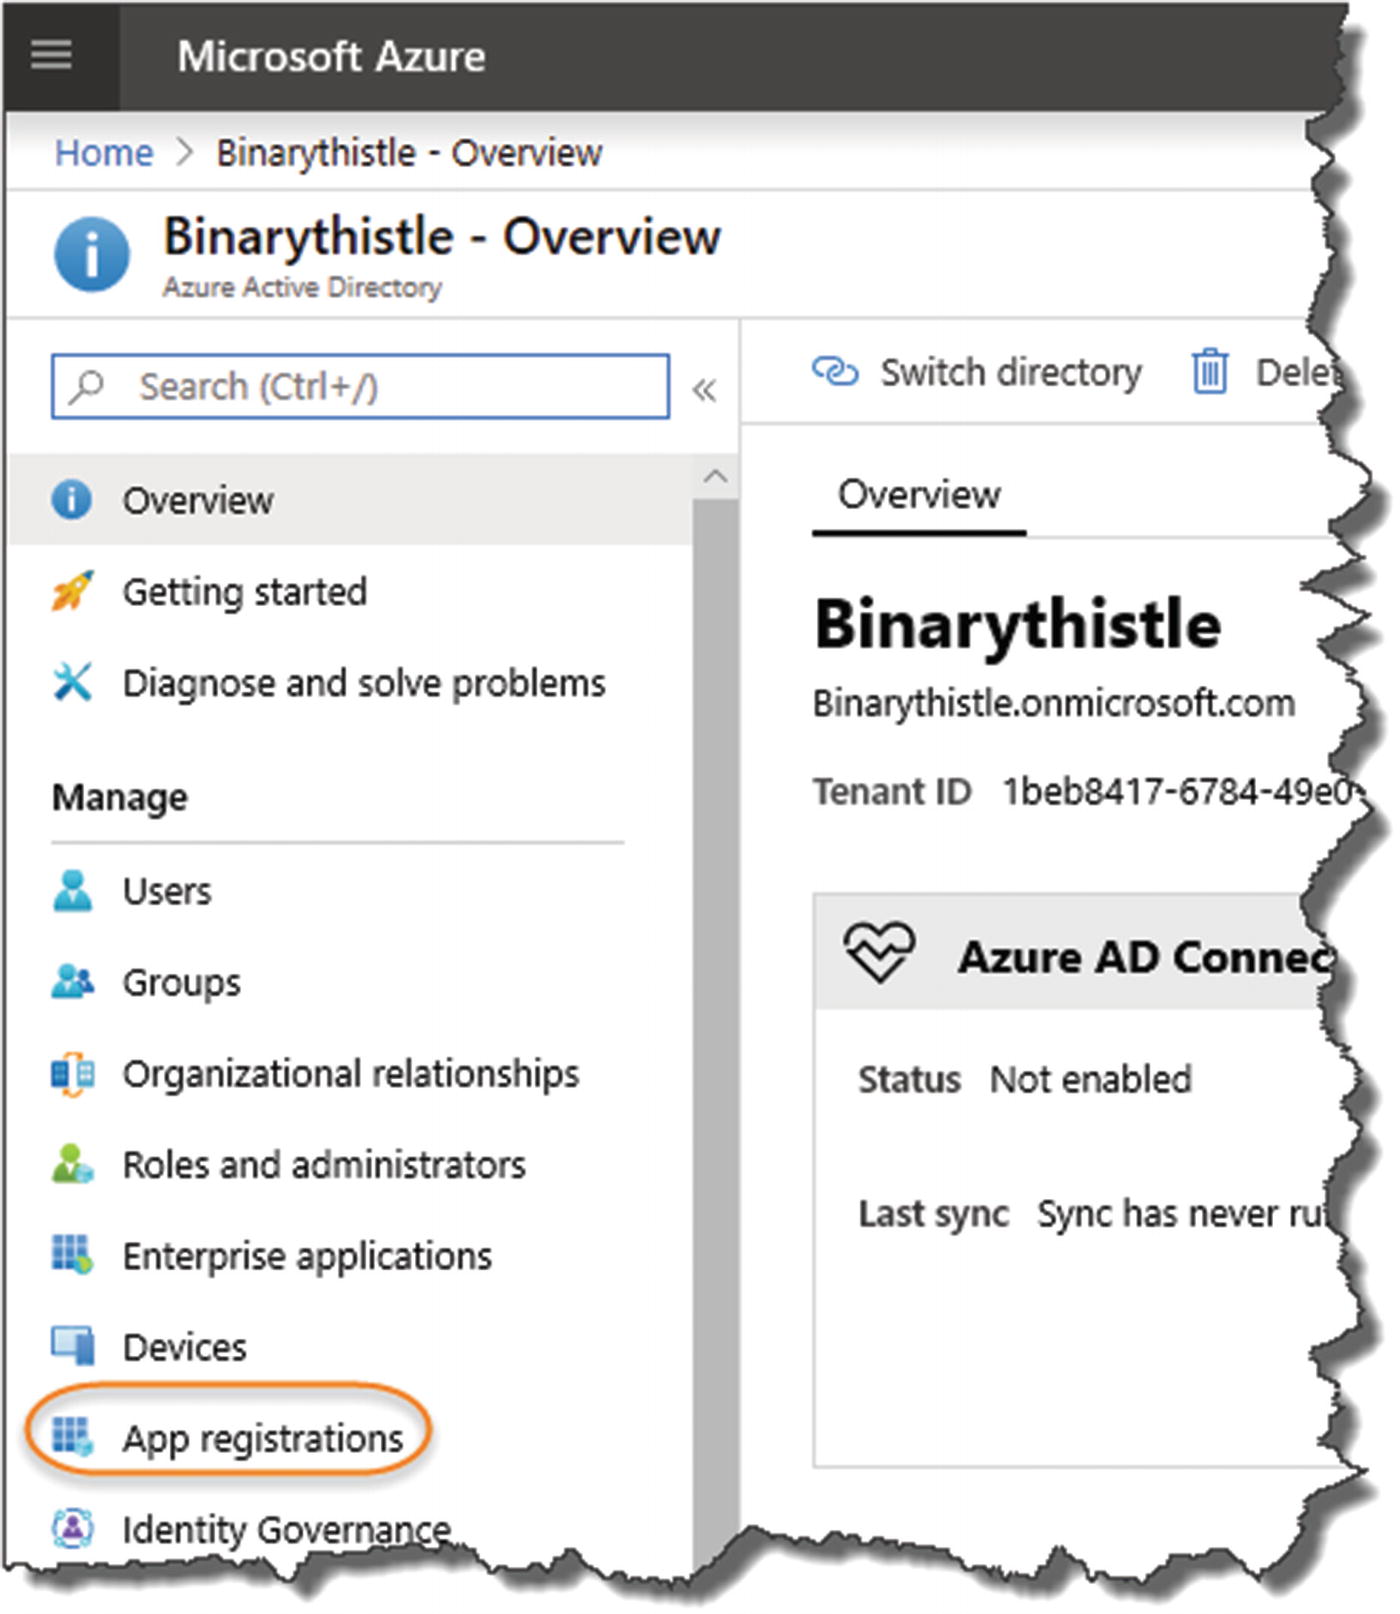
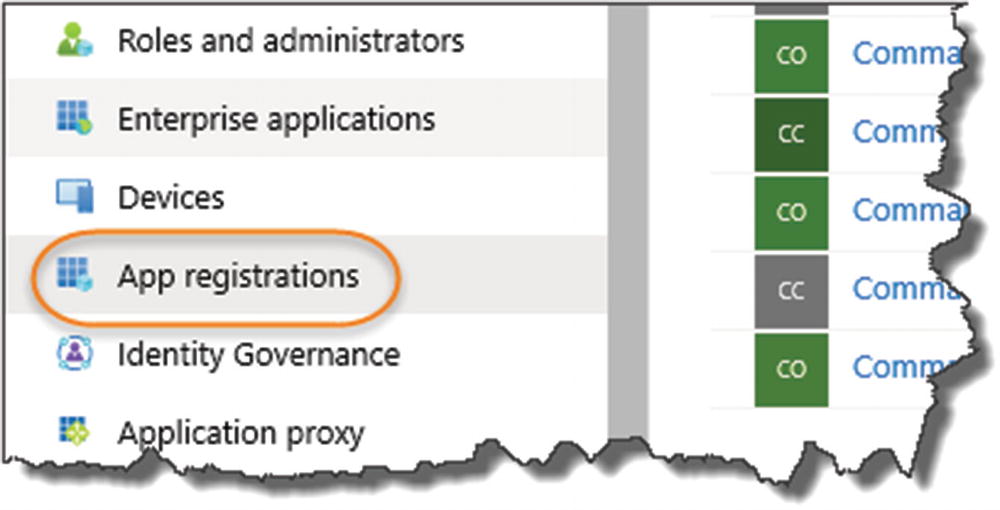
Select App registrations
Select “App registrations” as shown in Figure 14-7. You can see from the next example that I already have an existing app registered on my AAD, but we’re going to create a new one for our CommandAPI running on our “development” environment (i.e., the one running locally on our PC). We’ll come on to our Azure-deployed API later.
![]() Even though we are running our development API on our local machine, we can still make use of AAD as our Identity management service (assuming our development PC has connectivity to the Internet!).
Even though we are running our development API on our local machine, we can still make use of AAD as our Identity management service (assuming our development PC has connectivity to the Internet!).
The point I’m making here is that we can use AAD no matter where our APIs (and client for that matter) are located.
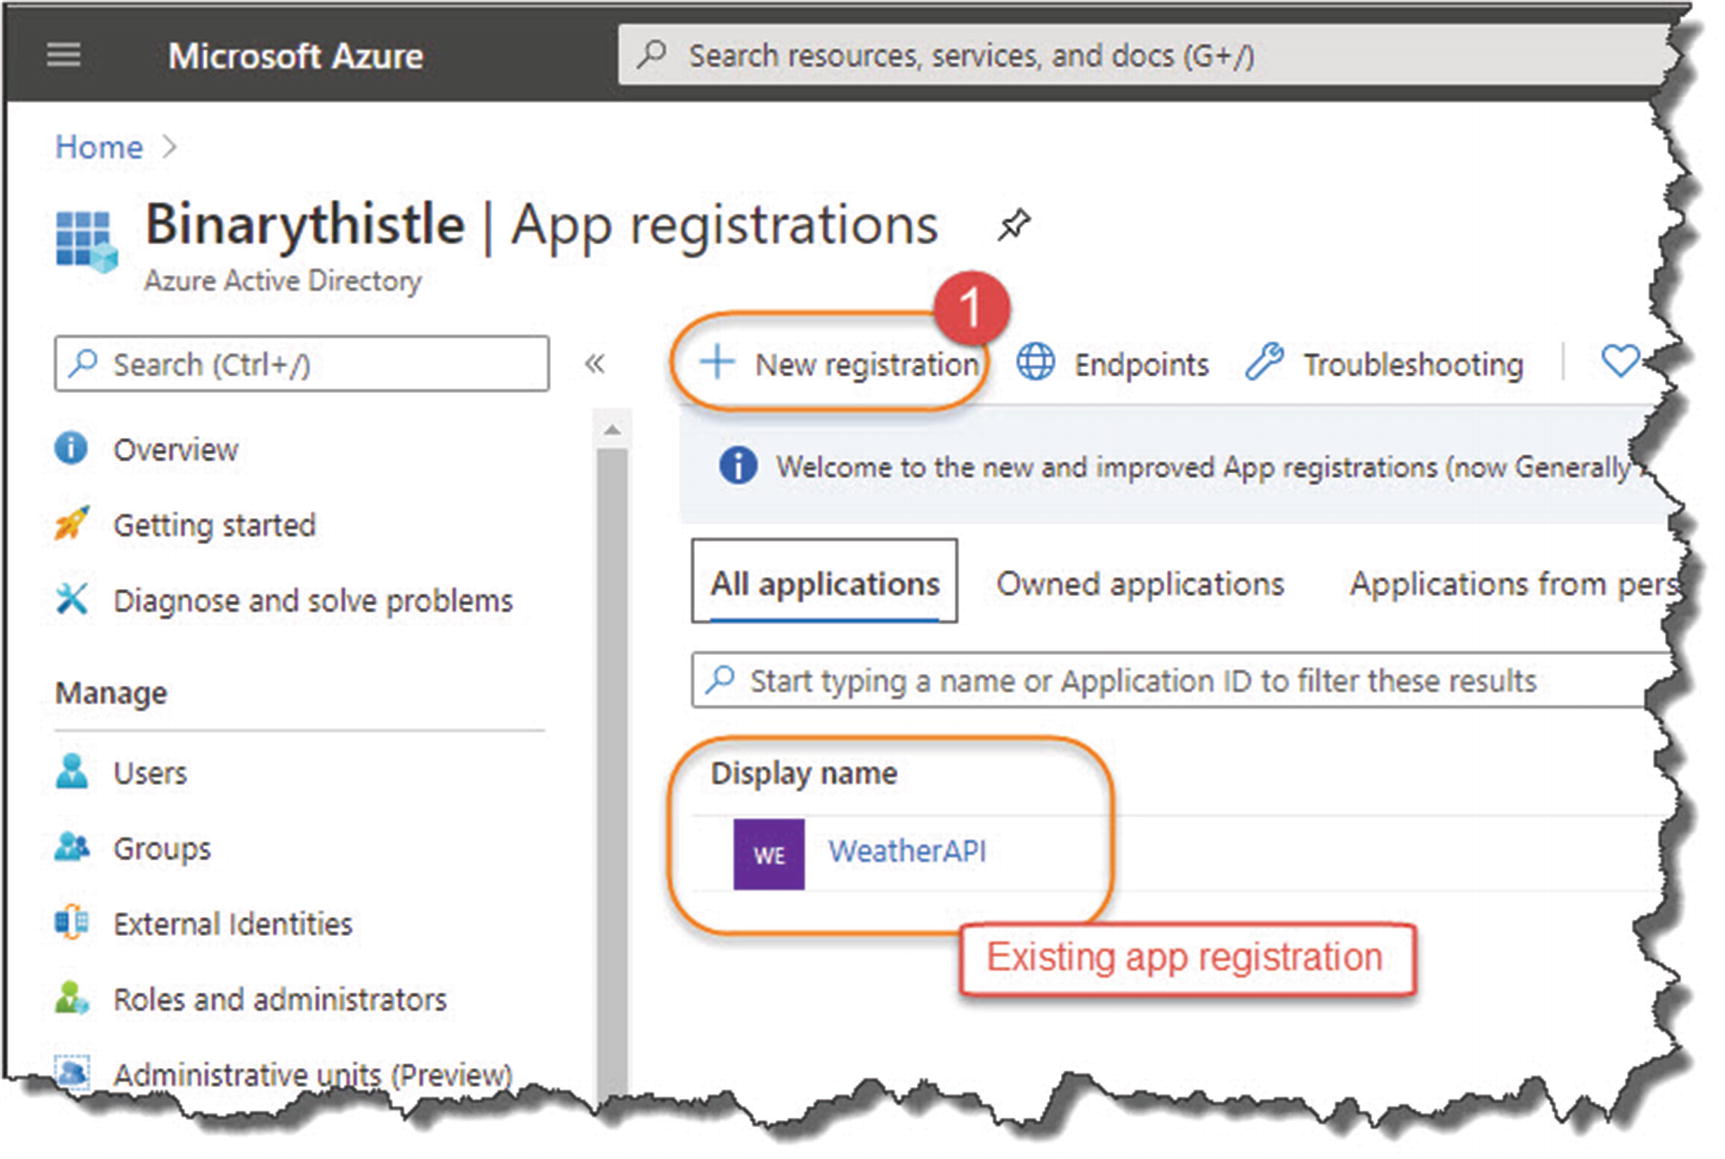
Create a new registration

Configure the registration
Enter a name for the app registration; it can be anything, but make it meaningful, (I’ve appended “_DEV” to this registration to differentiate it from any Production Registrations we subsequently create). Also, ensure that “Accounts in this organization directory only” ([Your AAD Name] only – Single tenant) is selected.

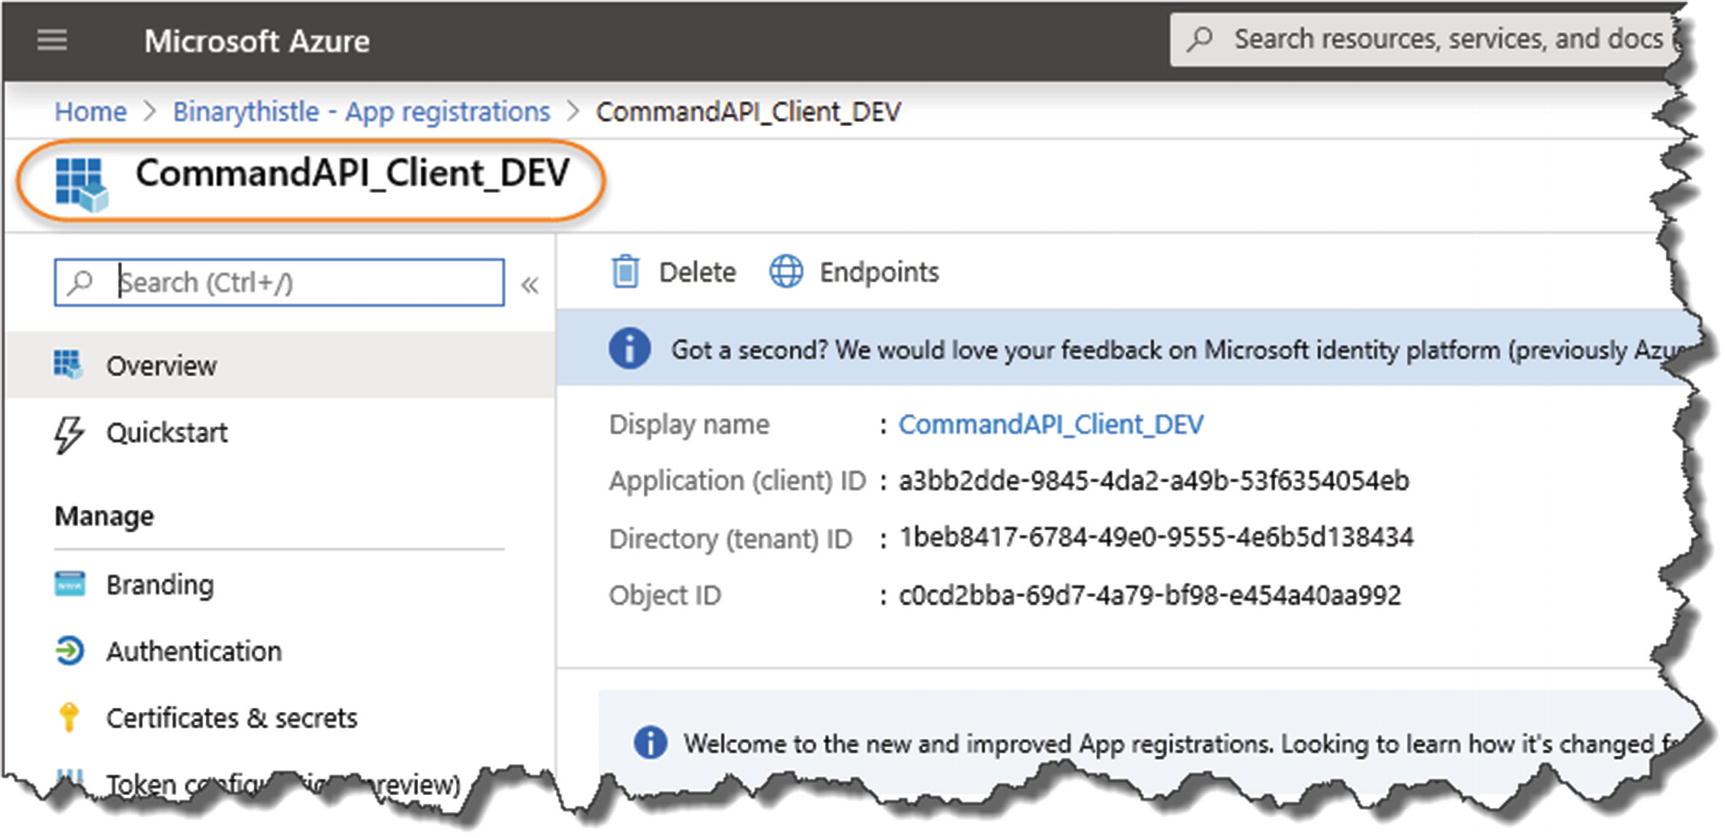
We'll use client Id and tenant id
- 1.
Application (client) ID
- 2.
Directory (tenant) ID
Going forward I’m going to use the terms Client ID and Tenant ID, but what are they?
Client ID
The client ID is essentially just a unique identifier that we can refer to the Command API in reference to our AAD.
Tenant ID
A unique id relating to the AAD we’re using, remembering that we can have multiple (i.e. multi-tenant) AADs at our disposal.
We’ll come back to these items later when we come to configuring things at the application end; for now we need to move on as we’re not quite finished.
Expose Our API
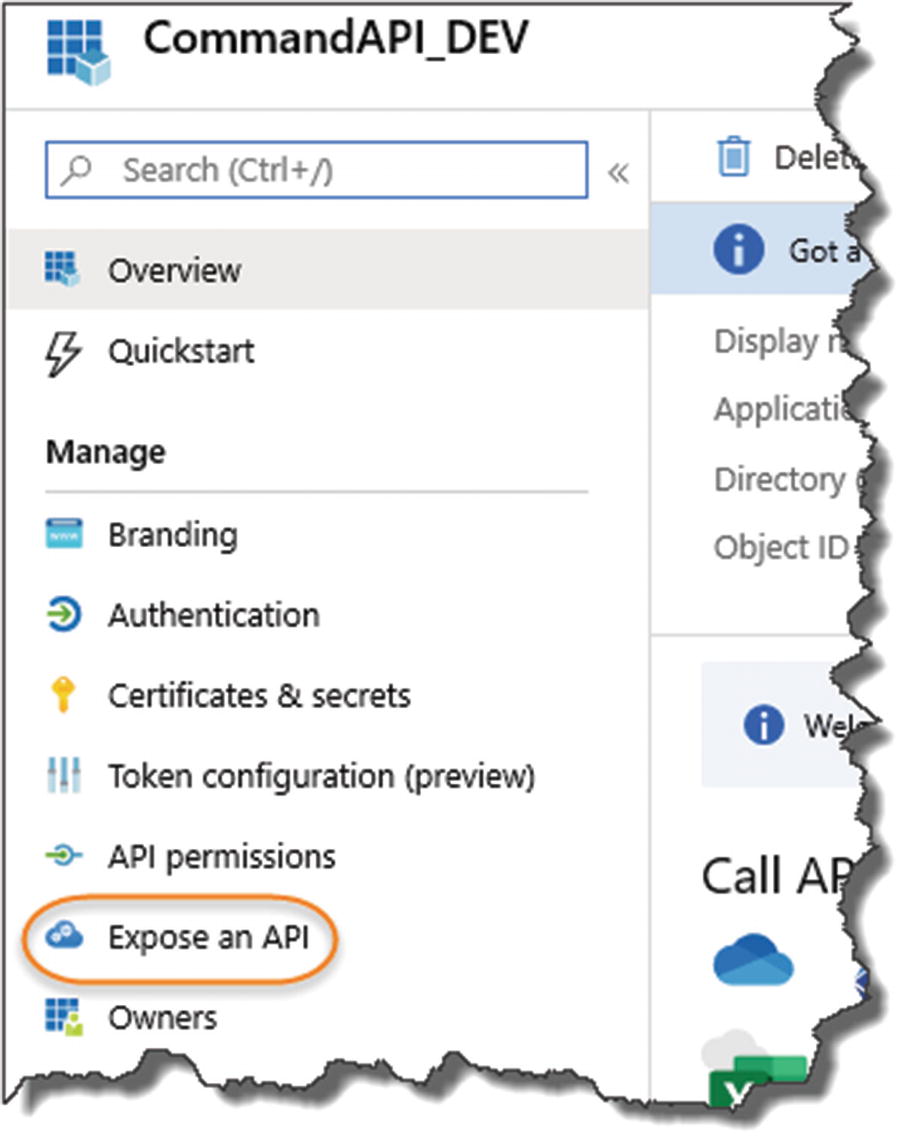
Exposing our API
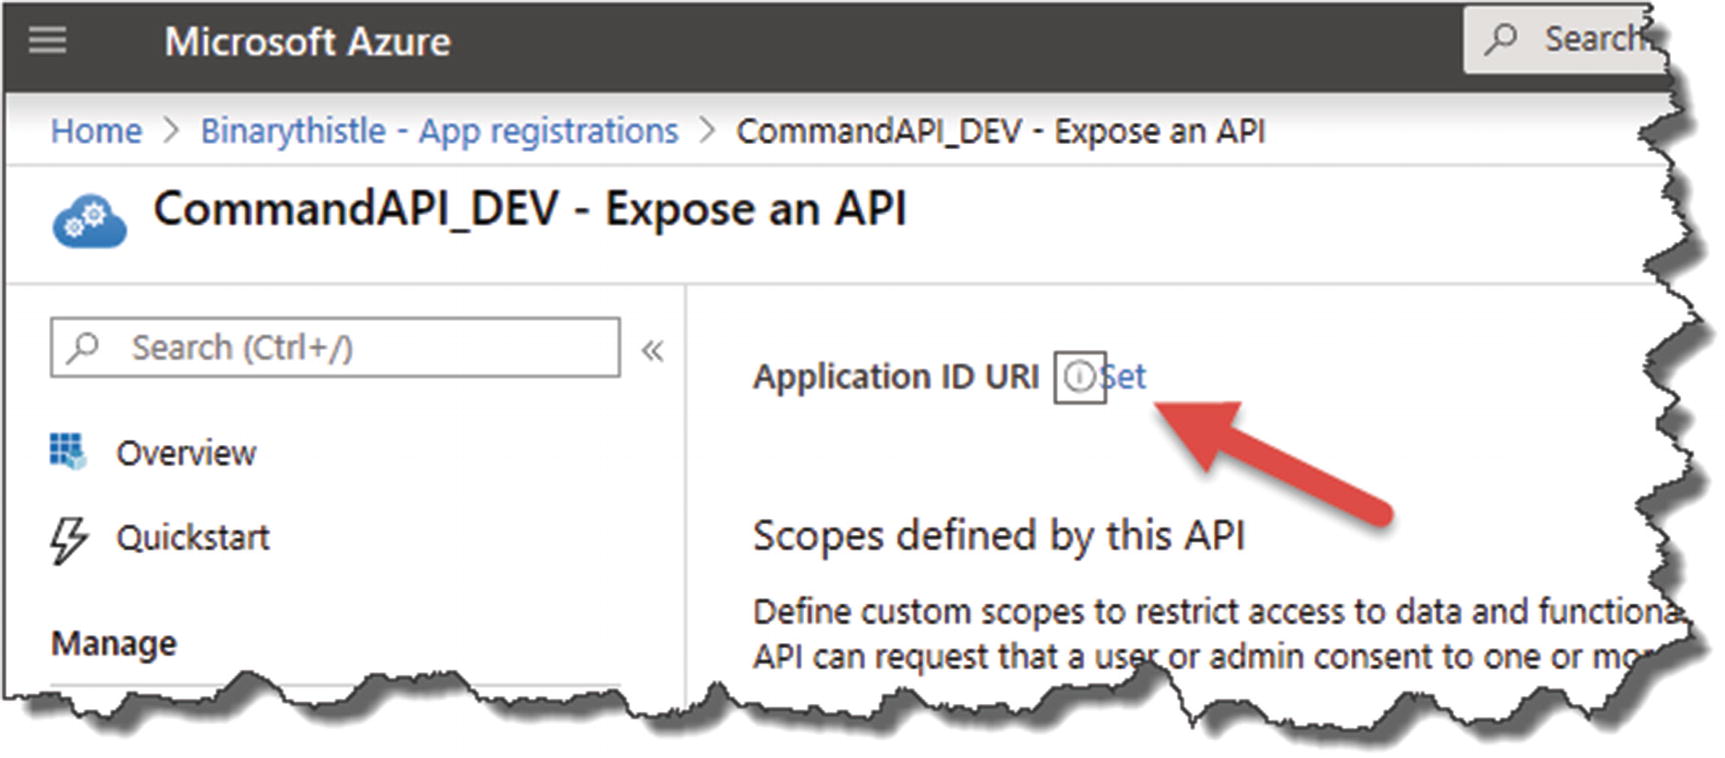
Set the Resource ID

Auto-generated Resource ID (Application ID URI)

Resource ID is created
We’re almost finished with our API configuration in AAD but have one more bit of configuration to complete.
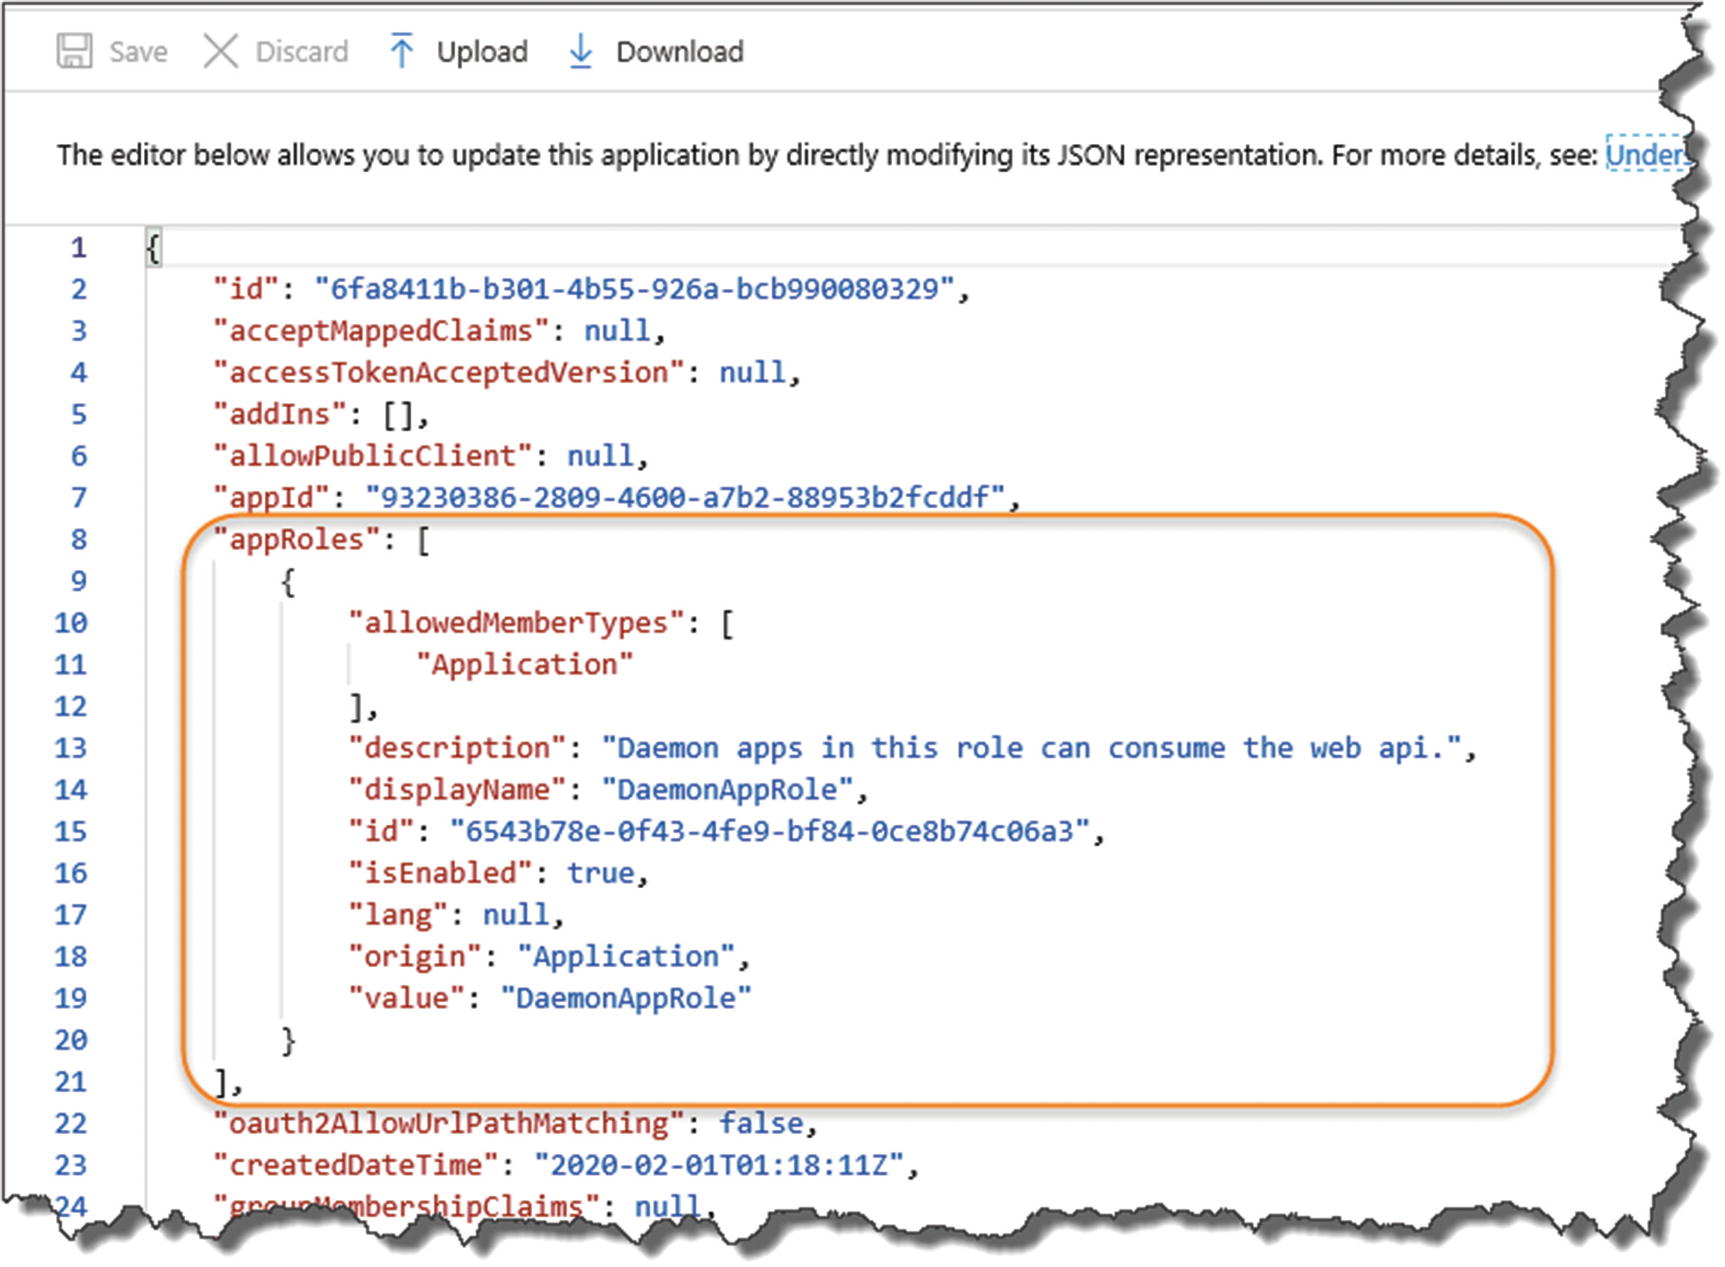
Update Our Manifest
Here, we update the appRoles section of our application manifest which specifies the type of application role(s) that can access the API. In our case, we need to specify a noninteractive “daemon” app that will act as our API client. More information on the Application Manifest can be found in Microsoft Docs.2

Update the manifest
Ensure you update the manifest correctly
Make sure you keep the integrity of the json, and don’t omit or introduce any additional commas. You can always use something like https://jsoneditoronline.org/ to check.
You can add multiple appRoles to this section; we need only one, although if you do decide to add some additional roles, you’ll need to ensure that the “id” attribute is a unique GUID. You can use the example GUID I’ve supplied with the JSON here, or you can create your own (you can use the same GUID’s across different AADs – you just can’t duplicate them in the same AAD).
When completed, don’t forget to save the file.
That’s it for our API registration in Azure; we need to move over to our API now and make some config and code changes so it can make use of AAD for authorization.
Add Configuration Elements
The log-in “Instance”
Our AAD Domain
The Tenant ID
The Client ID
The Application ID URL (or Resource ID)
![]() Remember we’re currently working with our API in our Development Environment, before we move on to configuring our API on Azure.
Remember we’re currently working with our API in our Development Environment, before we move on to configuring our API on Azure.
As we’ve already discussed, you can store your application config in a number of places (e.g., appsettings.json, appsettings.Development.json, etc.); in this section, I’m going to make use of User Secrets once again (refer to Chapter 8 for a refresher).
The primary reason I’m taking this approach is that I’ll be pushing my code up to a public GitHub repository and I don’t want those items visible in something like appsettings.json.
Config element | User secret variable |
|---|---|
The log-in “instance” | Instance |
Our AAD Domain | Domain |
The Tenant ID | TenantId |
The Client ID | ClientId |
The Application UD URL (Or Resource ID) | ResourceId |
This will add a value for our Login Instance (you should use the same value I’ve used here). The other User Secrets I’ll leave for you to add yourself, as the values you need to supply will be unique to your own App Registration (refer to these values on the App Registration overview screen for your API).
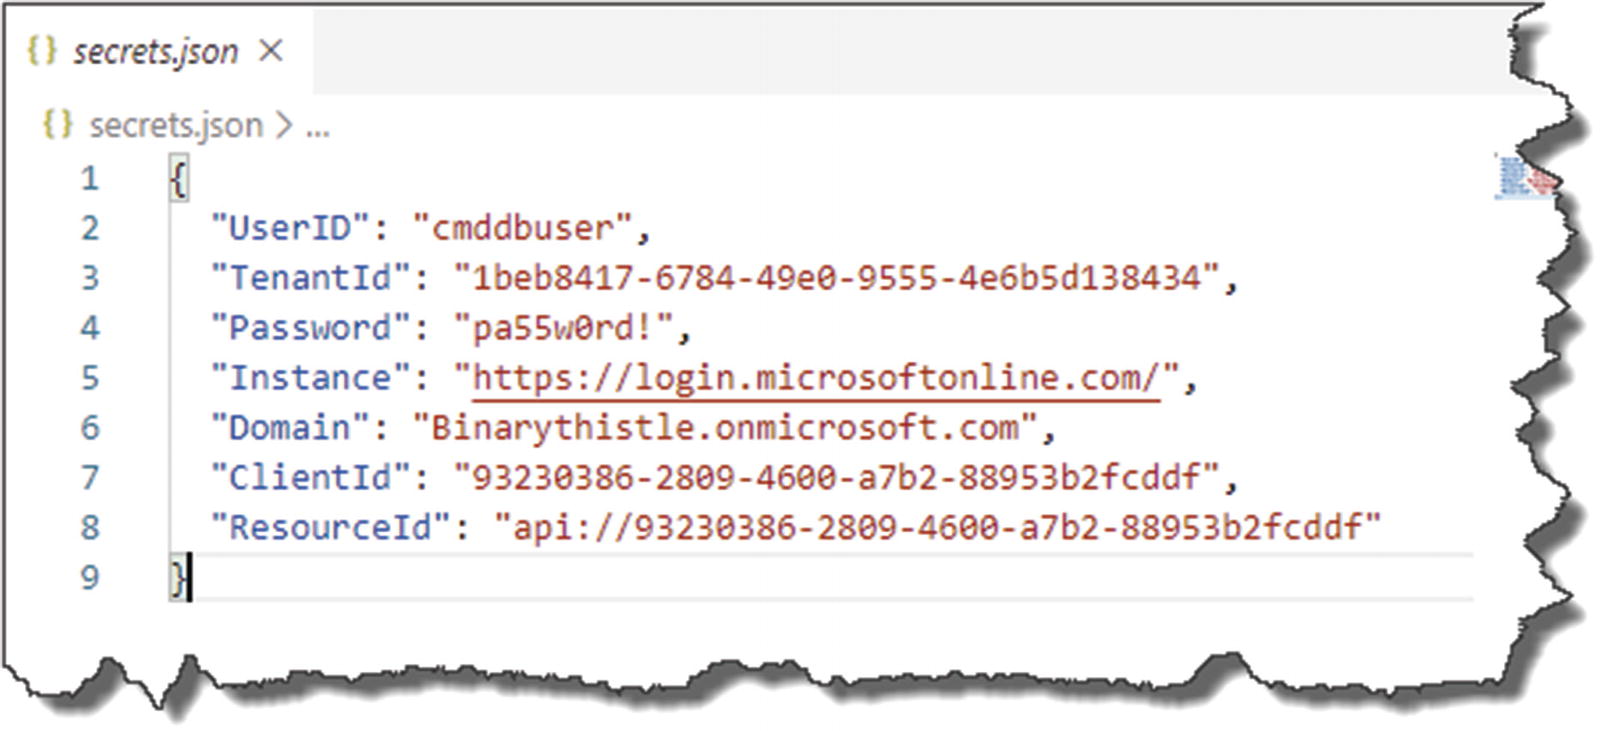
Example contents of my secrets.json file
Some points to note
The value you have for Instance should be exactly the same as I’ve used earlier.
The values you have for UserID and Password may be the same as what I’ve just shown if you’ve been following the tutorial exactly as I’ve described (they may of course be different if you’ve chosen your own values!).
The values you have for TenantId, Domain, ClientId, and ResourceId will be different to mine.3
Update Our Project Packages

Add Reference to allow JWT Bearer Authentication
Updating our Startup Class
Update Configure Services

register Authentication service in Startup
Audience: We set this to the ResourceID of our App Registration in Azure.
Authority: Our AAD Instance that is the token issuing authority (a combination of Instance and TenantId).
Update Configure

Update the configure method in Startup
Authentication vs. Authorization
Authentication (The “Who”): Verifies who you are, essentially it checks your identity is valid.
Authorization (The “What”): Grants the permissions/level of access that you have.
So in our example, our client app will be authenticated via AAD; once it has, we can then determine what endpoints it can call on our API (authorization).
![]() As authentication happens first (we need to identify you before we can authorize you to do anything), the order in which you add these components to the Request Pipeline (via the Configure method) is critically important. So please make sure you add them in the order specified earlier.
As authentication happens first (we need to identify you before we can authorize you to do anything), the order in which you add these components to the Request Pipeline (via the Configure method) is critically important. So please make sure you add them in the order specified earlier.
Refer back to Chapter 4 on our brief discussion on the Request Pipeline if you’ve forgotten (it was a while ago!); for a more in-depth conversation, refer to the Microsoft Docs.4
Update Our Controller
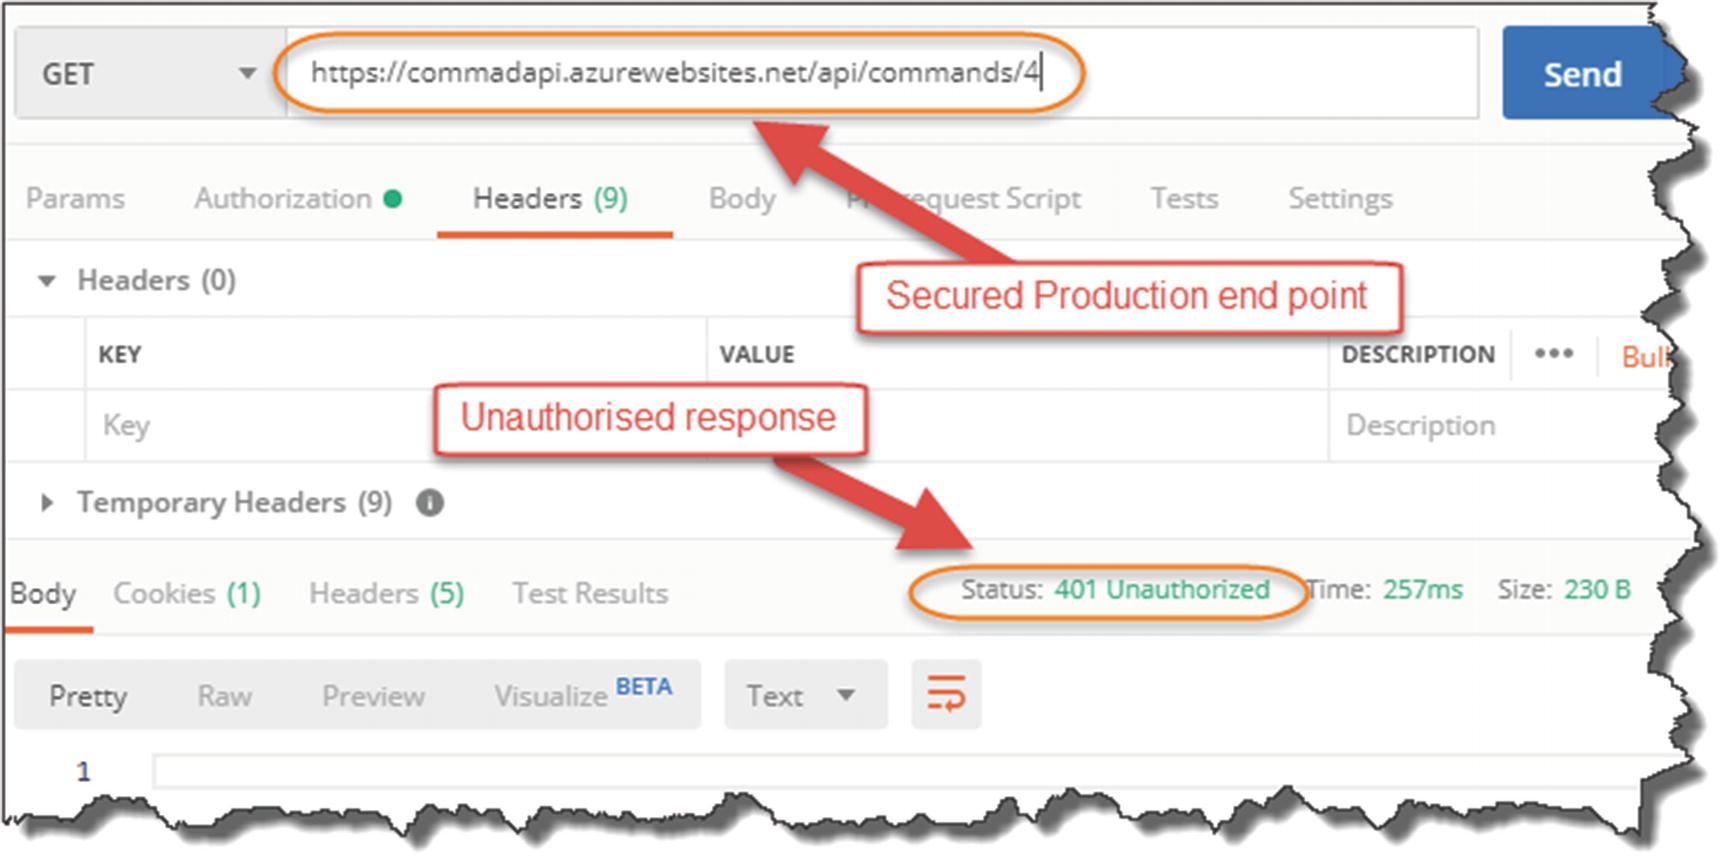
We have added the foundations of Bearer authentication using JWT tokens to our Startup class to enable it to be used throughout our API, but now we want to use it to protect one of our endpoints. We can of course protect the entire API, but let’s just start small for now. We can pick any of our API endpoints, but let’s just go with one of our simple GET methods, specifically our ability to retrieve a single Command.

Our endpoint is secured
- 1.
We get a 401 Unauthorized response
- 2.
Selecting the return headers, we see
- 3.
That the authentication type is “Bearer” (and we have a token error back from AAD)

This endpoint is not secured and can still be accessed
![]() What happens if we run our Unit Test suite? Will some of our tests break because we require authorization on one of our API endpoint methods? If not, why not?
What happens if we run our Unit Test suite? Will some of our tests break because we require authorization on one of our API endpoint methods? If not, why not?
Register Our Client App
In the next section, we’re going to write a simple .NET Core Console application that will act as an authorized “client” of the API. As this is a “daemon app,” it needs to run without user authentication interaction, so we need to configure it as such.
![]() There are a number of different authentication use cases we could explore when it comes to consuming an API, for example, a user authenticating against AAD (username/password combo), to grant access to the API.
There are a number of different authentication use cases we could explore when it comes to consuming an API, for example, a user authenticating against AAD (username/password combo), to grant access to the API.
The use case I’ve decided to go with in this example (a “daemon app”) resonated with me more in terms of a real-world use case.
Create an App Registration for our client app

Name the registration
Client registration overview
As before it will prepopulate some of the config elements for you, for example, Client ID, Tenant ID, etc.
![]() What do you notice about the Tenant ID for our client registration when compared to the Tenant ID of API registration?
What do you notice about the Tenant ID for our client registration when compared to the Tenant ID of API registration?
Create a Client Secret

Create a client secret

Select New client Secret
A description (can be anything but make it meaningful)
An expiry (you have a choice of 3 options)
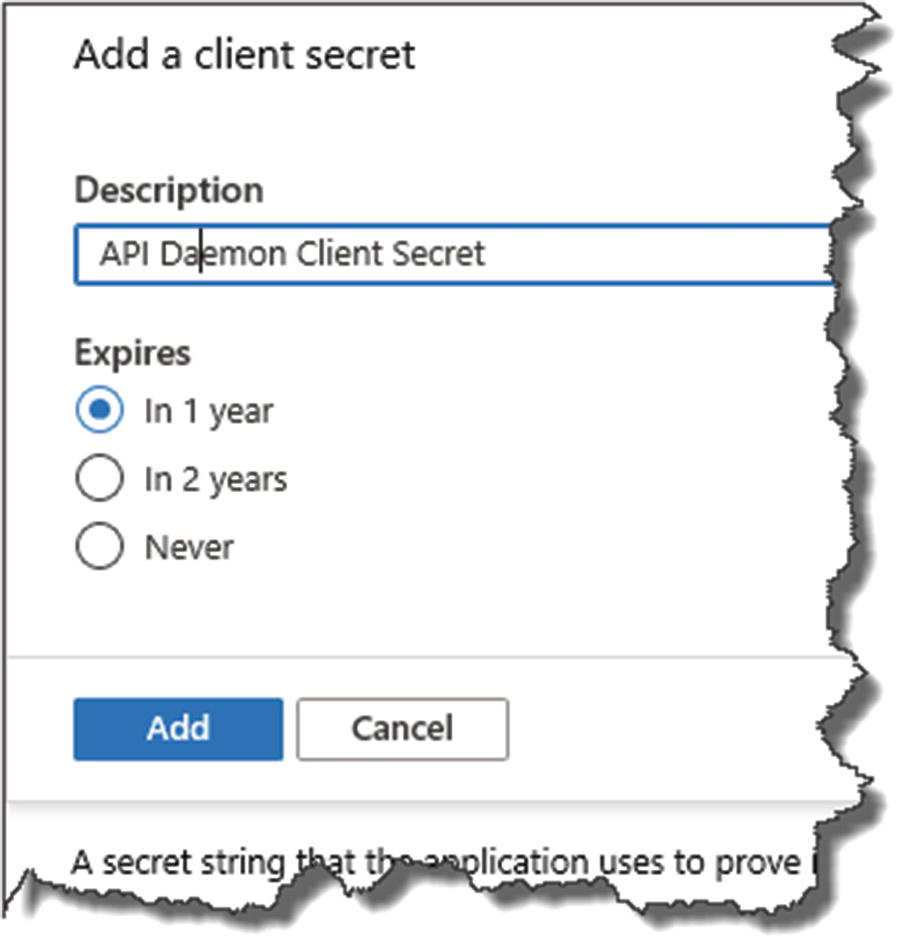
Name the secret and set expiry
When you’re happy, click “Add.”
![]() Make sure you take a copy of the client secret now; shortly after creation it will not be displayed in full again – you’ll only see a redacted version, and you won’t be able to retrieve it unlike our other registration attributes.
Make sure you take a copy of the client secret now; shortly after creation it will not be displayed in full again – you’ll only see a redacted version, and you won’t be able to retrieve it unlike our other registration attributes.
This is a by design security feature to help stop the unauthorized propagation of the client secret (which is effectively a password).
Configure API Permissions

Setup Permissions to our API
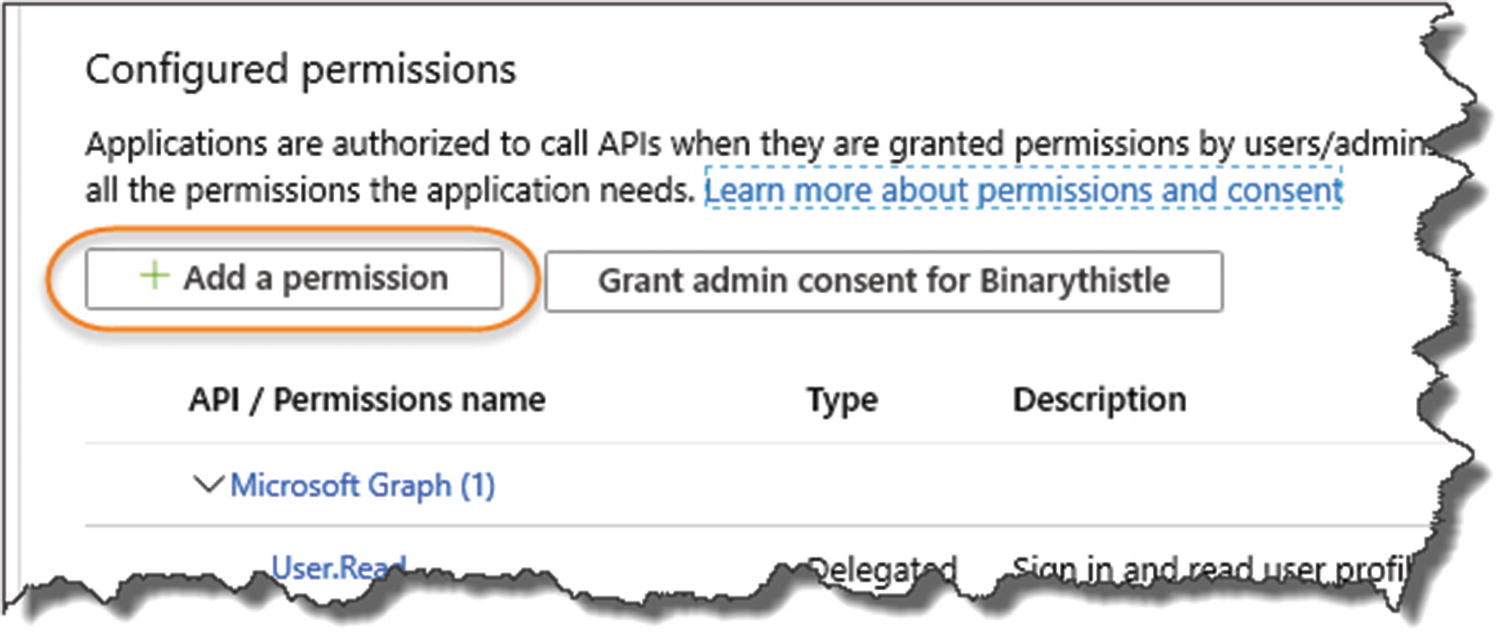
Add a permission

select "My APIs"
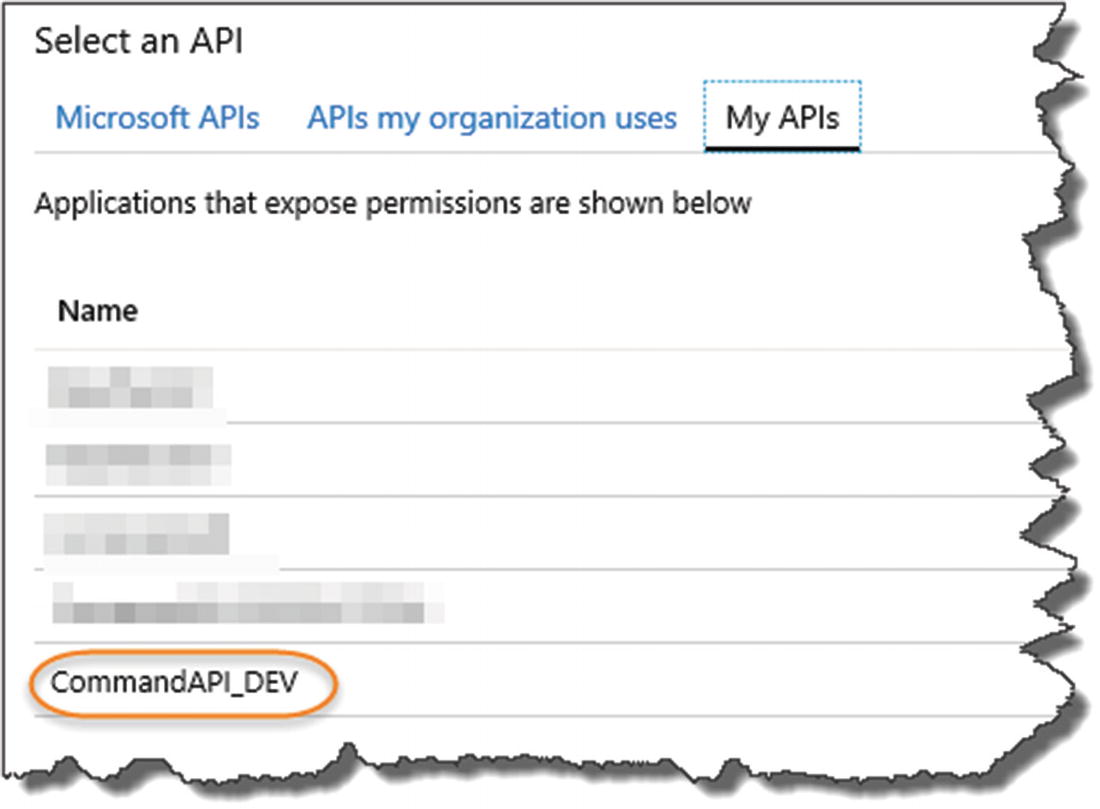
Select the CommandAPI_DEV instance
- 1.
Application permissions is selected.
- 2.
You “check” the DaemonAppRole Permission.
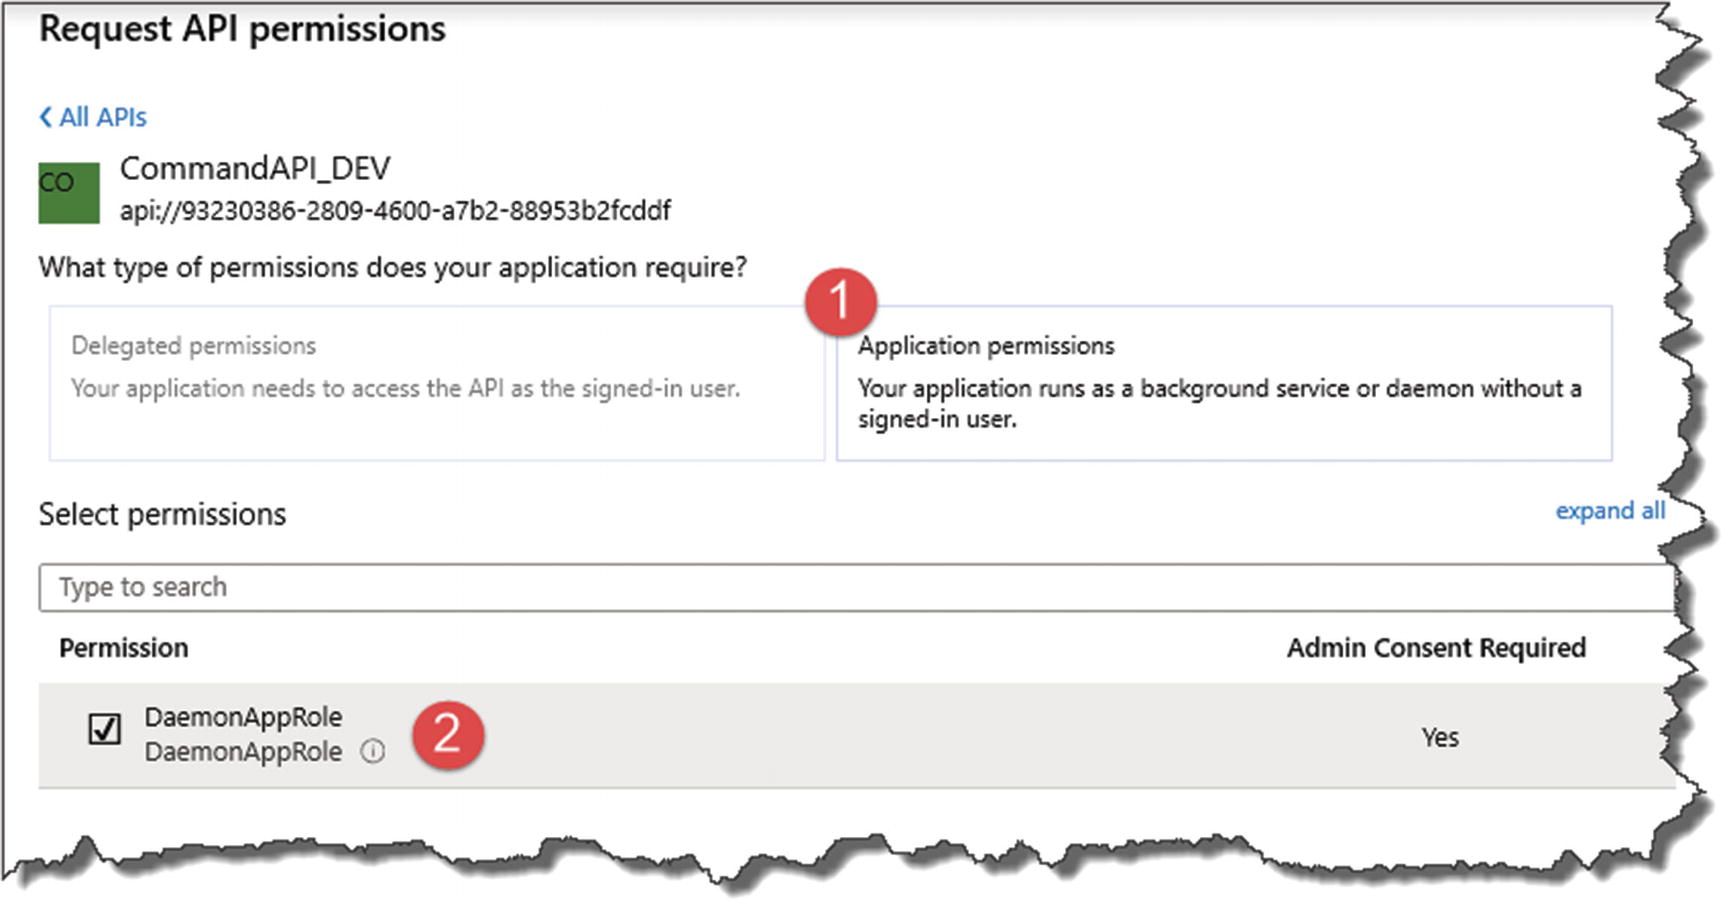
Configure permissions accordingly

Grant consent
- 1.
The permission has been “created” but not yet “granted.”
- 2.
You’ll need to click the “Grant admin consent for <Name of Your AAD Here5>” button – do so now.
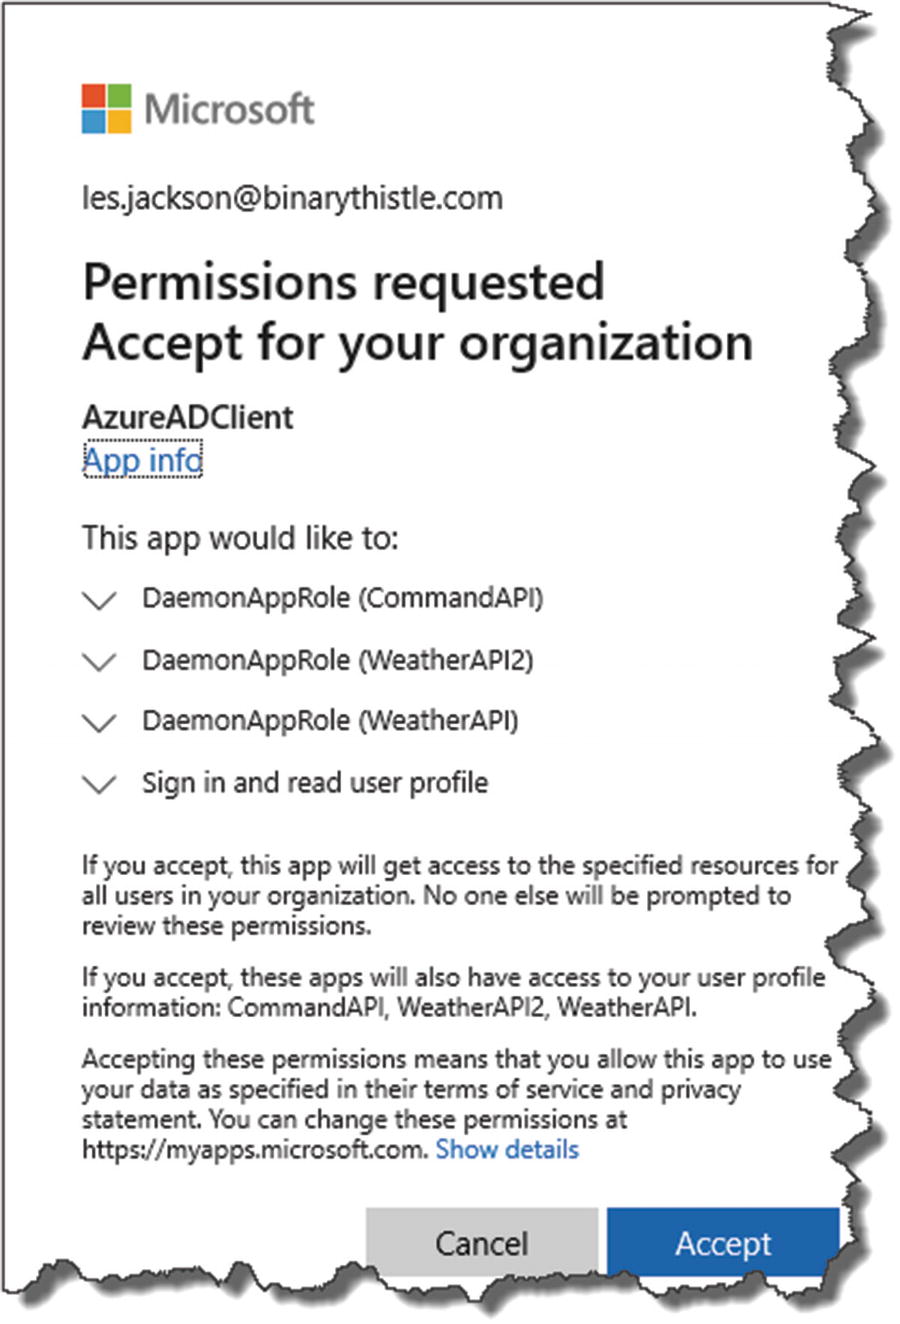
You may be asked to accept permission request

Permissions fully granted
And with that, the registration of our (yet to be created) client app is complete.
Create Our Client App
The final part of this chapter is to create a simple client that we can use to call our protected API, so we’re going to create new console project to do just that.
![]() I don’t consider this app part of our “solution” (containing our API and Test Projects), so I’m going to create it in a totally separate working project directory outside of CommandAPISolution folder.
I don’t consider this app part of our “solution” (containing our API and Test Projects), so I’m going to create it in a totally separate working project directory outside of CommandAPISolution folder.
As we’ll only be creating 1 project, I’m not going to make use of a “solution” structure.
You can find the code to this project here on GitHub:
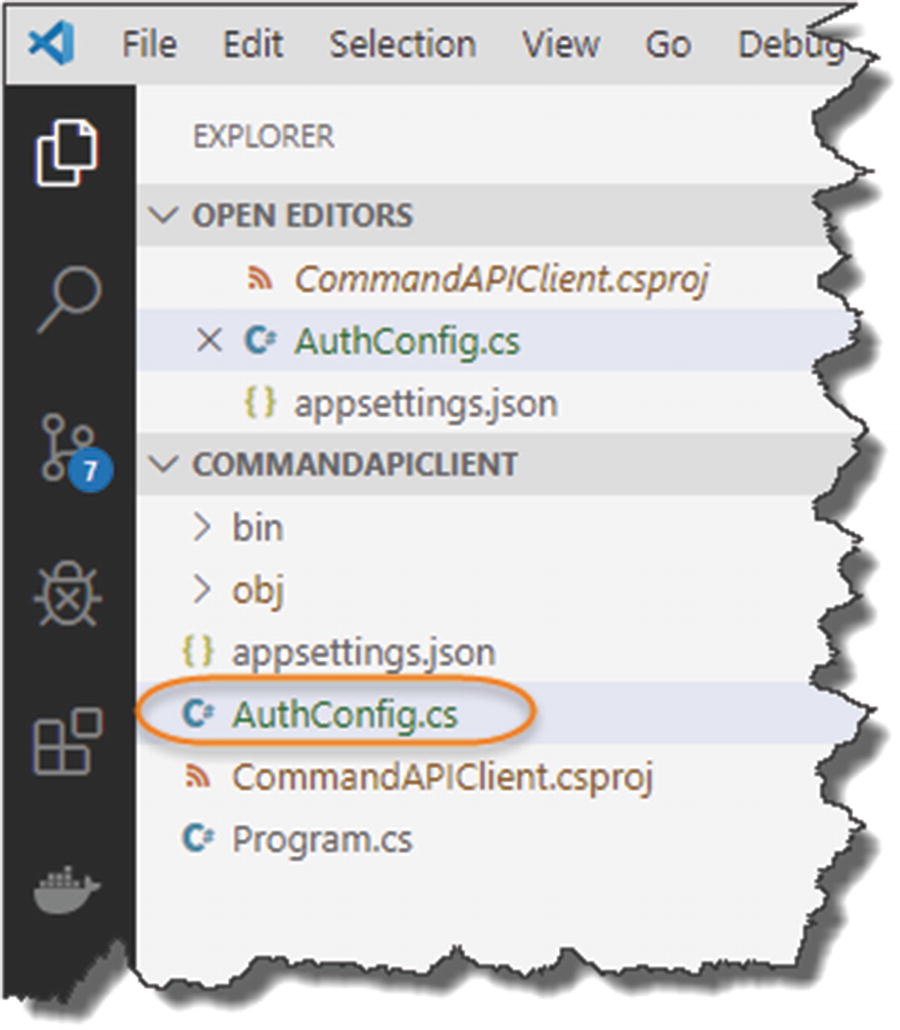
This will open the project folder CommandAPIClient in VS Code.
Our Client Configuration
As I’m making this code available on GitHub for you to pull down and use, I’m deliberately going to store the config in an appsettings.json file as opposed to using User Secrets, as it will be easier for you to get going with it quickly if you choose to work with the code from the repo.6 We will, therefore, be storing sensitive config elements in here; therefore, for production systems you would not do this!
![]() Following the approach we took for our API; “convert” the Client App example here to use user secrets.
Following the approach we took for our API; “convert” the Client App example here to use user secrets.
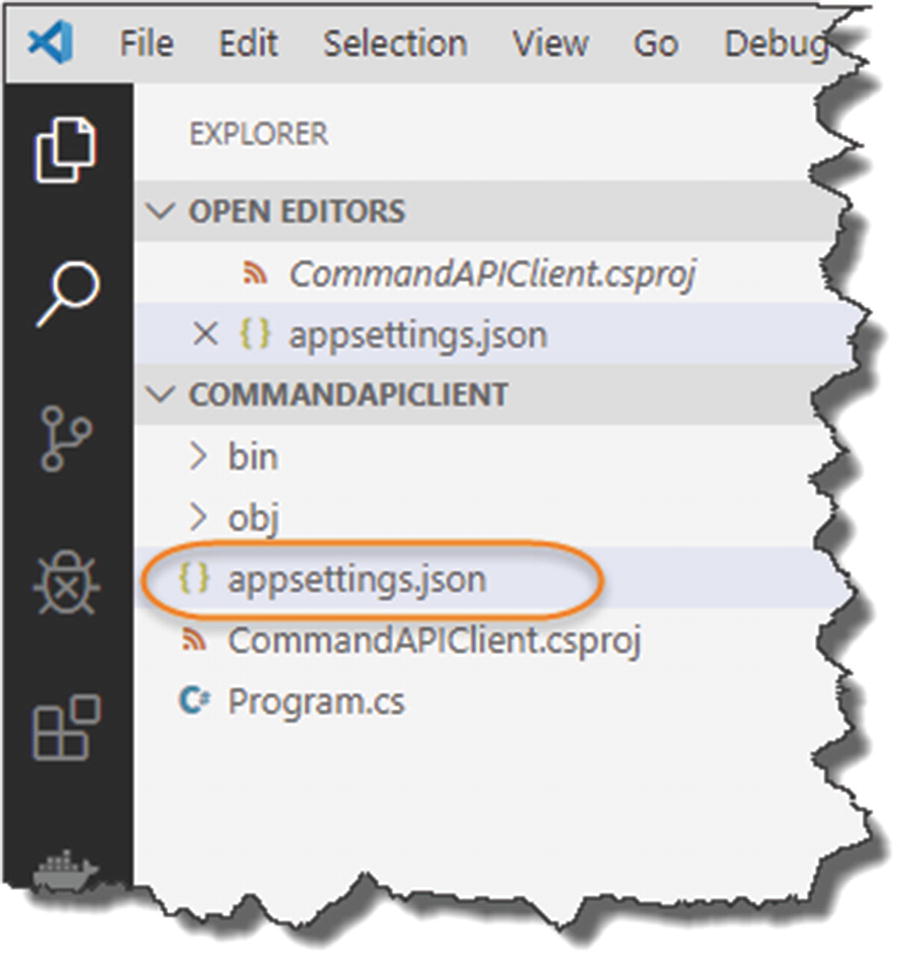
Create an Appsettings.json file
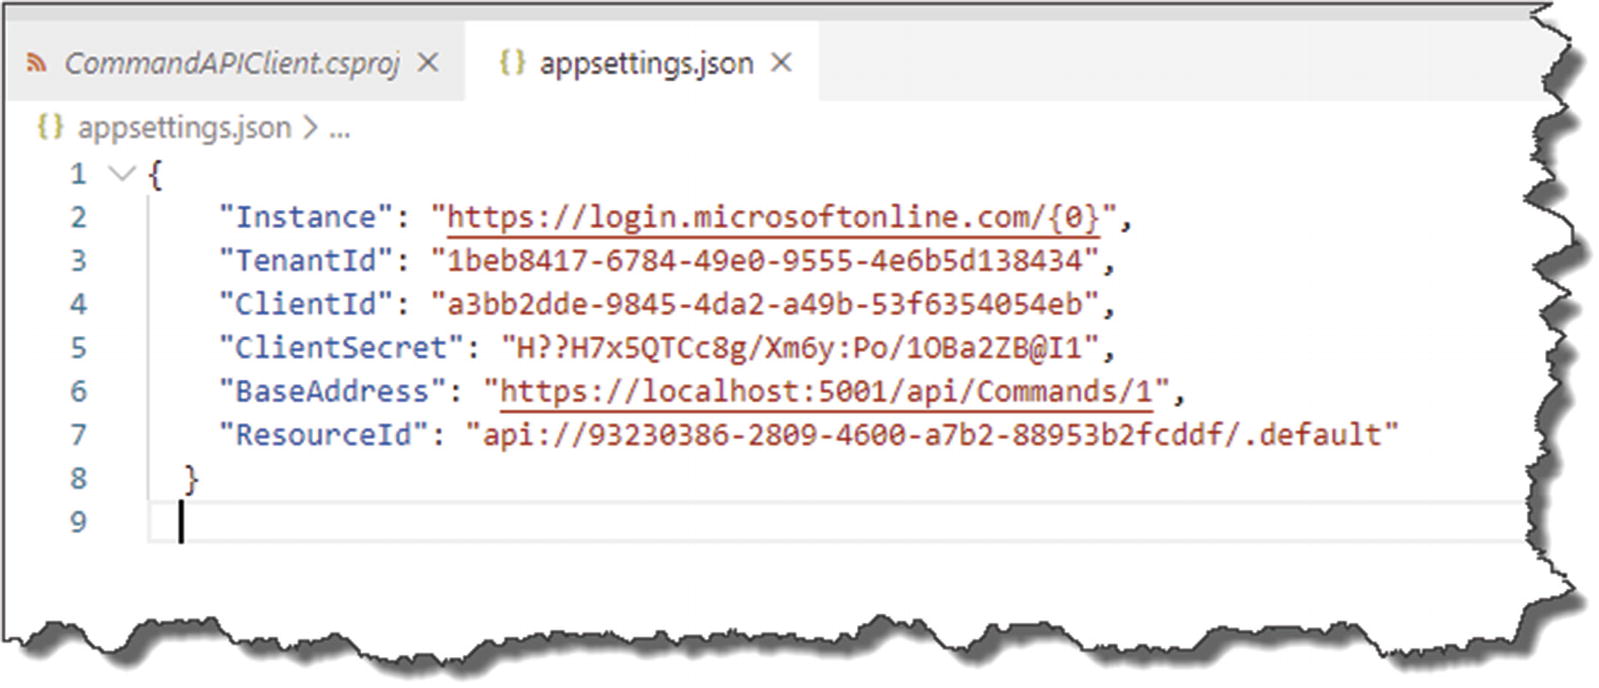
Client configuration
BaseAddress: This is just the local address of the command API (we’ll update to our production URL later). Note that I’m deliberately specifying the API Controller Action that requires authorization.
ResourceId: This is the ResourceId of our API App Registration.
The other attributes are straightforward and can be retrieved from Azure, except the ClientSecret which you should have made a copy of when you created it.
![]() All the attributes given are enough to get access to our restricted API without the need for any additional passwords, etc. So, you should not store it like this in production; you should make use of user secrets or something similar.
All the attributes given are enough to get access to our restricted API without the need for any additional passwords, etc. So, you should not store it like this in production; you should make use of user secrets or something similar.
Again, I’ve chose to provide it in an appsettings.json file to allow you to get up and running quickly with the code and have left it as a learning exercise for you to implement the user secrets approach.
Add Our Package References
Microsoft.Extensions.Configuration
Microsoft.Extensions.Configuration.Binder
Microsoft.Extensions.Configuration.Json
Microsoft.Identity.Client
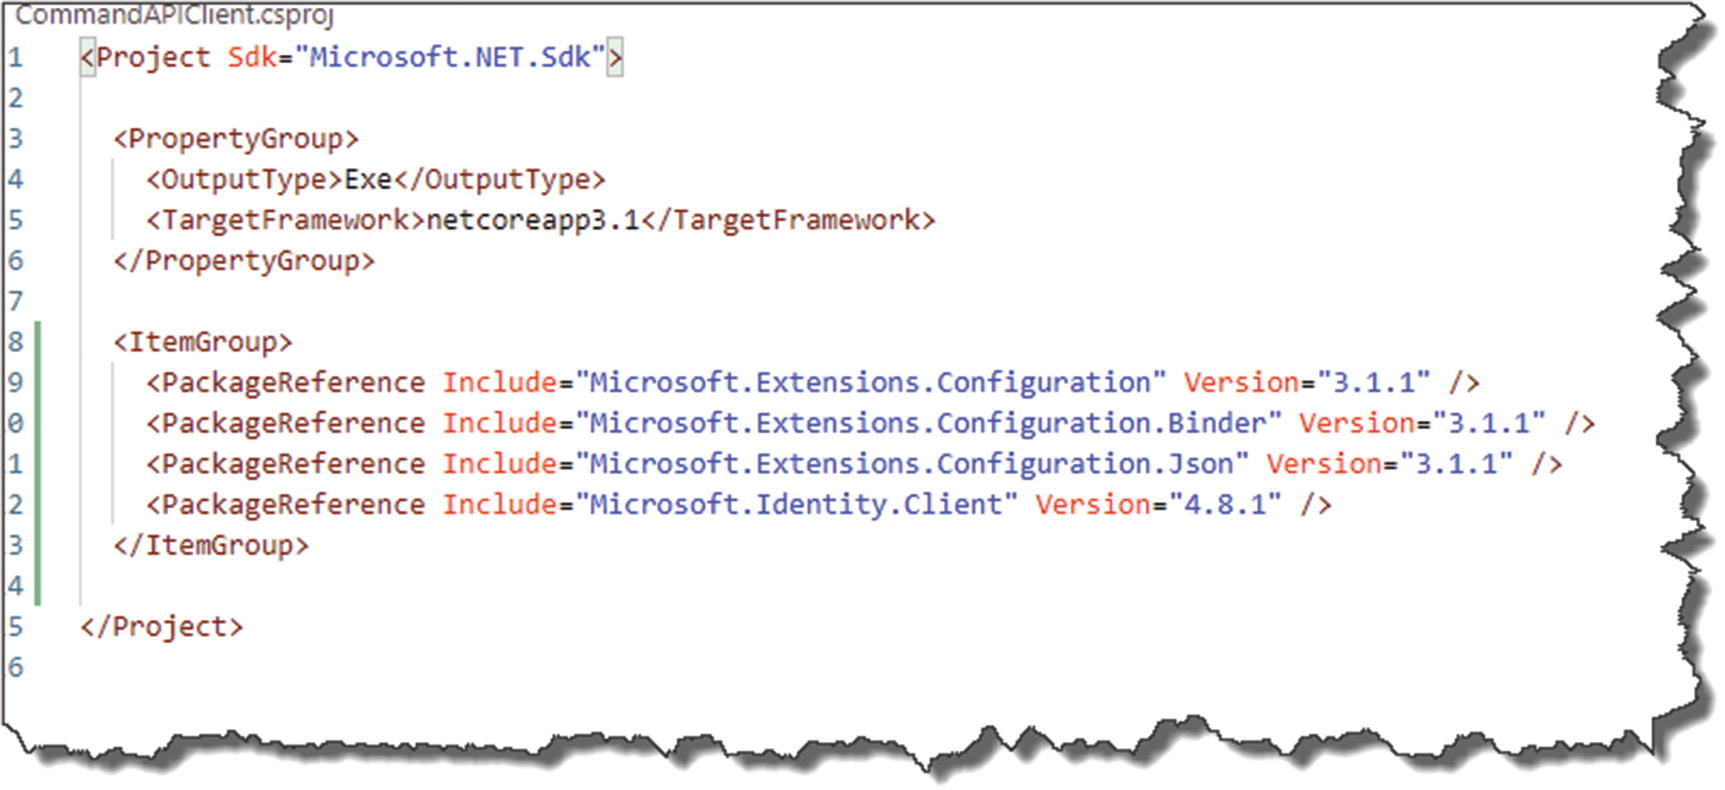
Package References for our client
Client Configuration Class
AuthConfig class to read in and manage client configuration
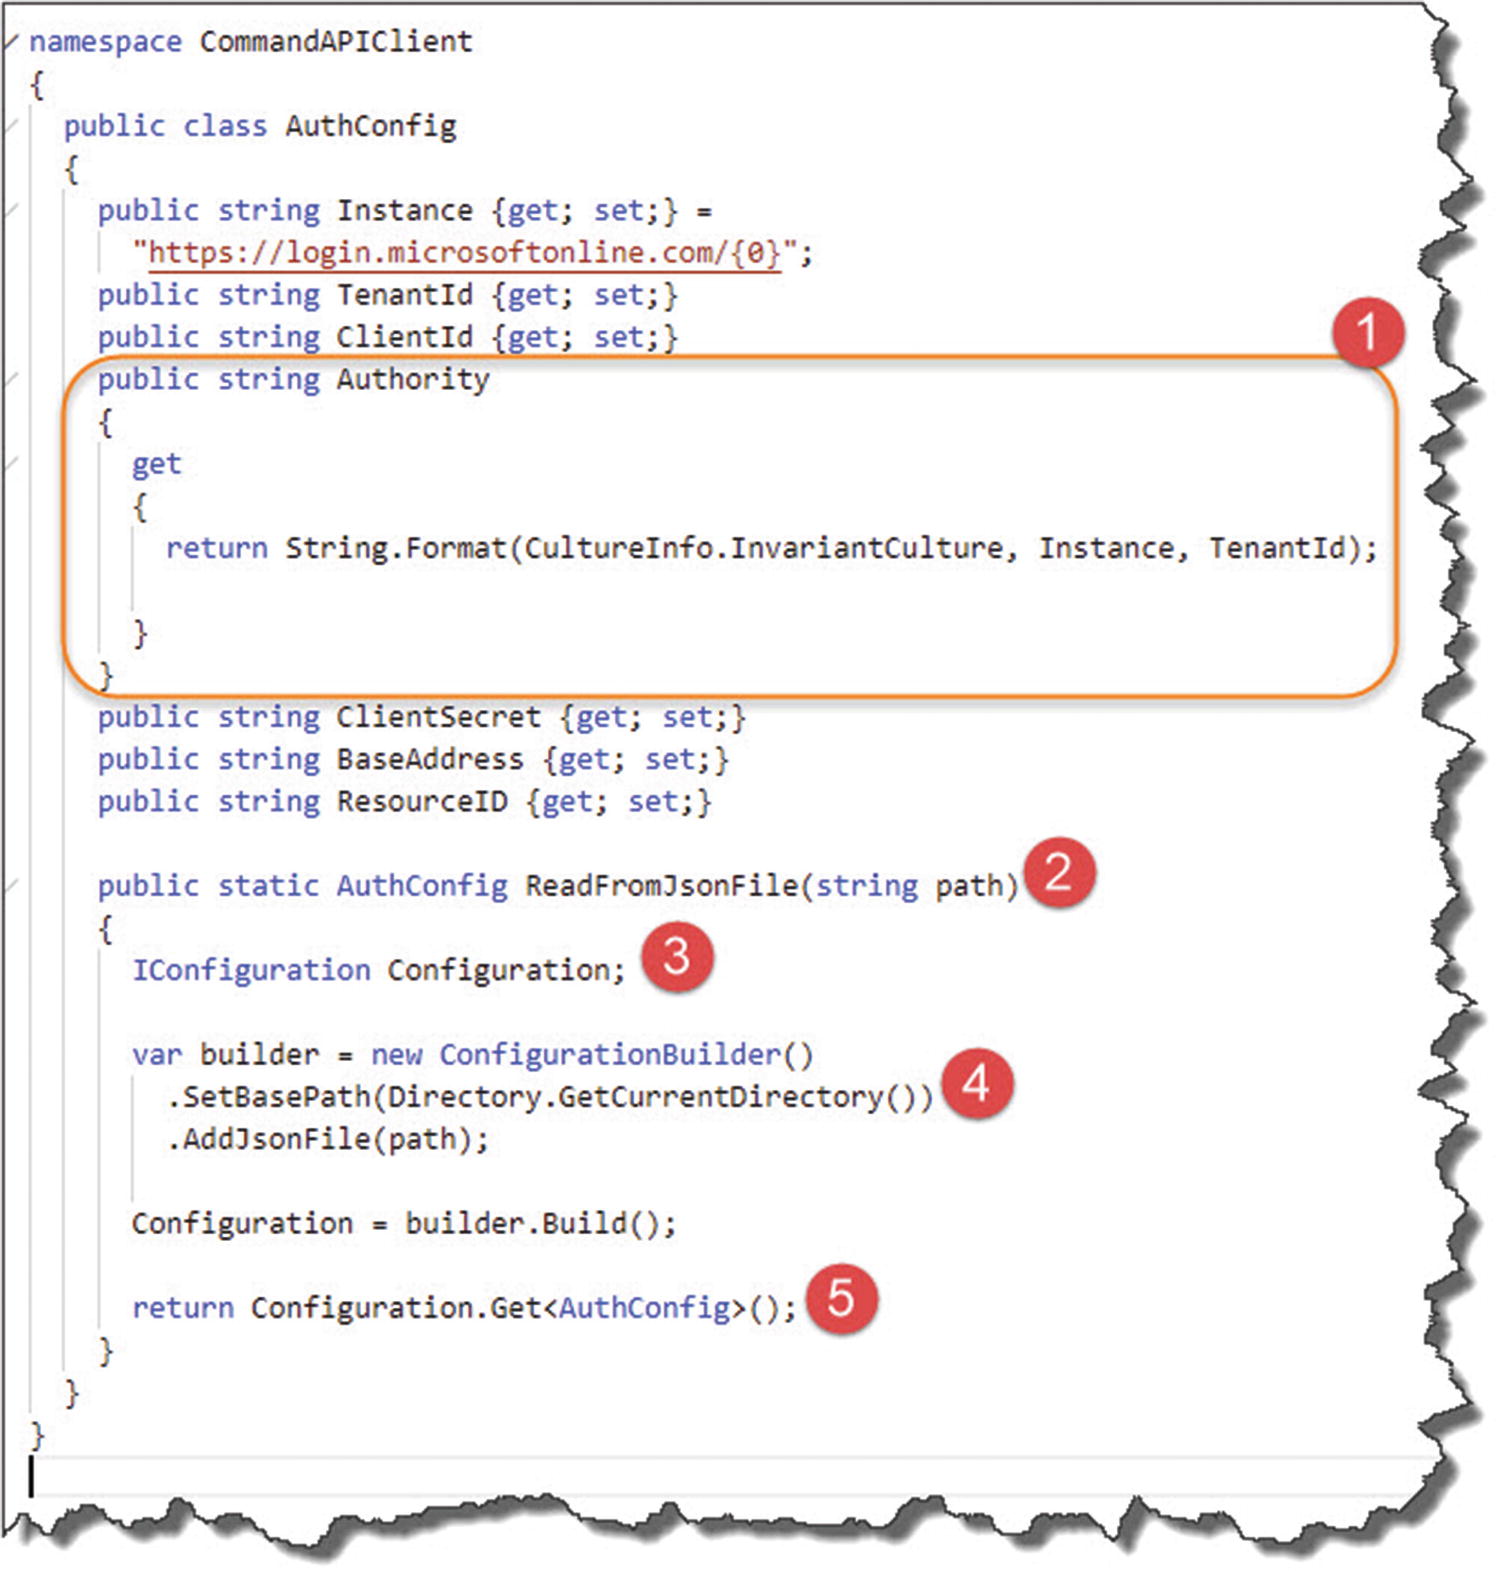
Walk-through of Authconfig class
- 1.
We combine the Instance and our AAD Tenant to create something called the “Authority”; this is required when we come to attempting to connect our client later.
- 2.
Our class has one static method that allows us to specify the name of our JSON config file.
- 3.
We create an instance of the .NET Core Configuration subsystem.
- 4.
Using ConfigurationBuilder, we read the contents of our json config file.
- 5.
We pass back our read-in config bound to our AuthConfig class.
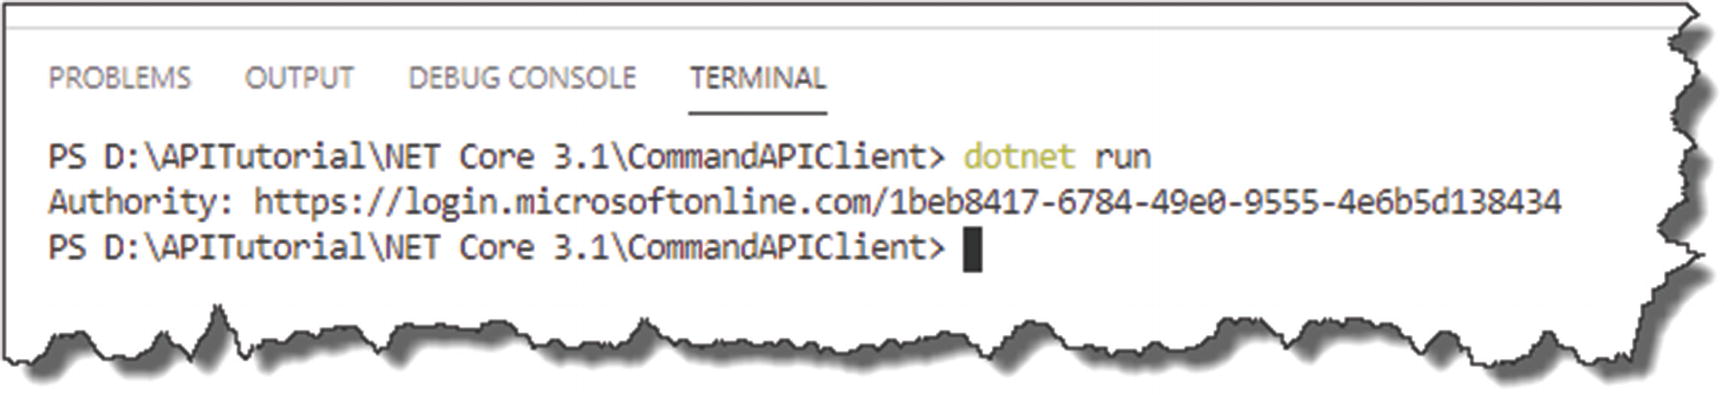
Run the client
Finalize Our Program Class
As mentioned previously, the first thing our client will have to do is obtain a JWT token that it will then attach to all subsequent requests in order to get access to the resources it needs, so let’s focus in on that.

Progressing the client
- 1.
Our RunAsync method is asynchronous and returns a result we’re interested in, so we chain the GetAwaiter and GetResult methods to ensure the console app does not quit before a result is processed and returned.
- 2.
ConfidentialClientApplication is a specific class type for our use case; we use this in conjunction with the ConfidentialClientApplicationBuilder to construct a “client” with our config attributes.
- 3.
We set up our app with the values derived from our AuthConfig class.
- 4.
We can have more than one ResourceId (or scope) that we want to call; hence, we create a string array to cater for this.
- 5.
The AuthenticationResult contains (drum roll) the result of a token acquisition.
- 6.
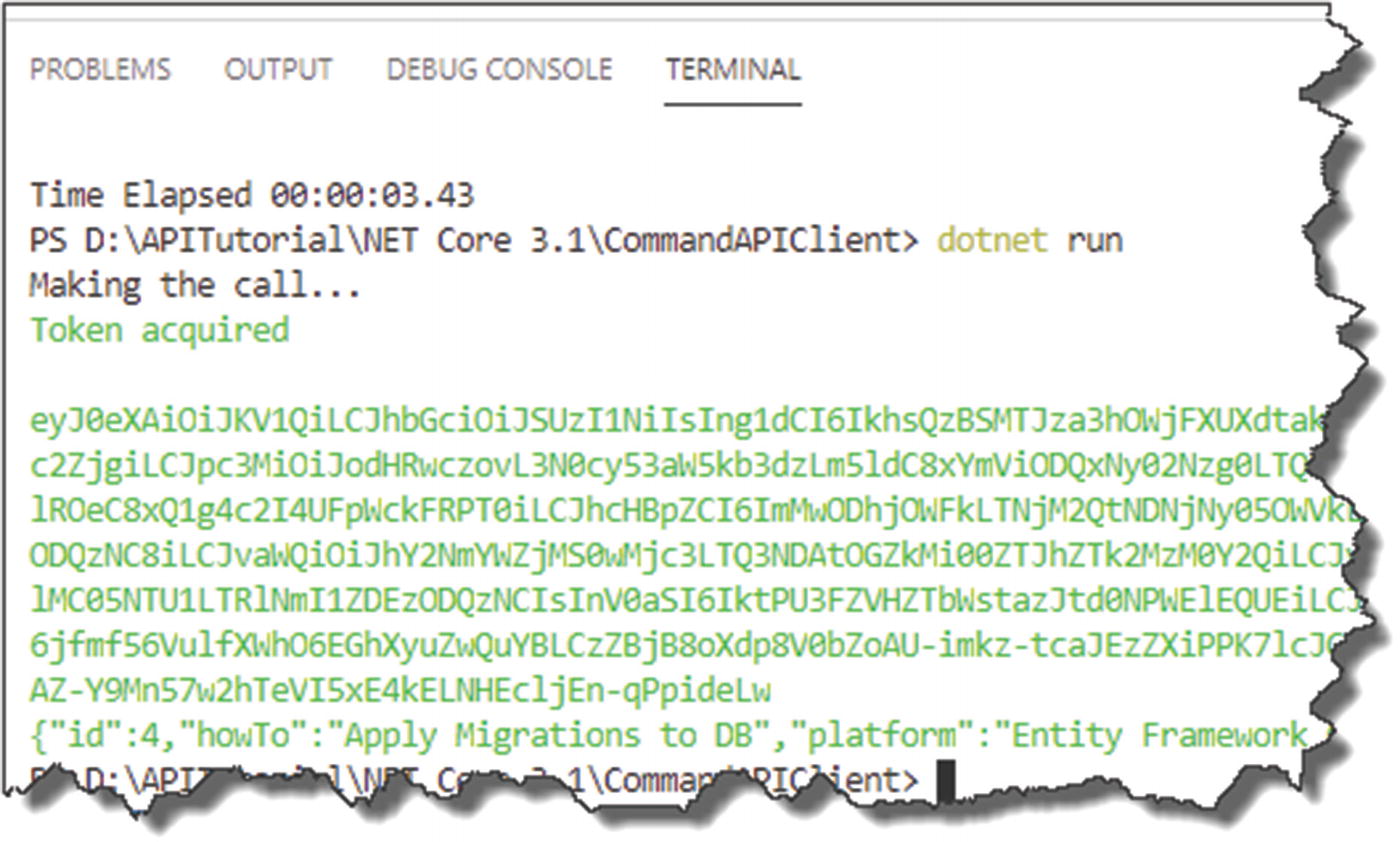
Finally, we make an asynchronous AcquireTokenForClient call to (hopefully!) return a JWT Bearer token from AAD using our authentication config.
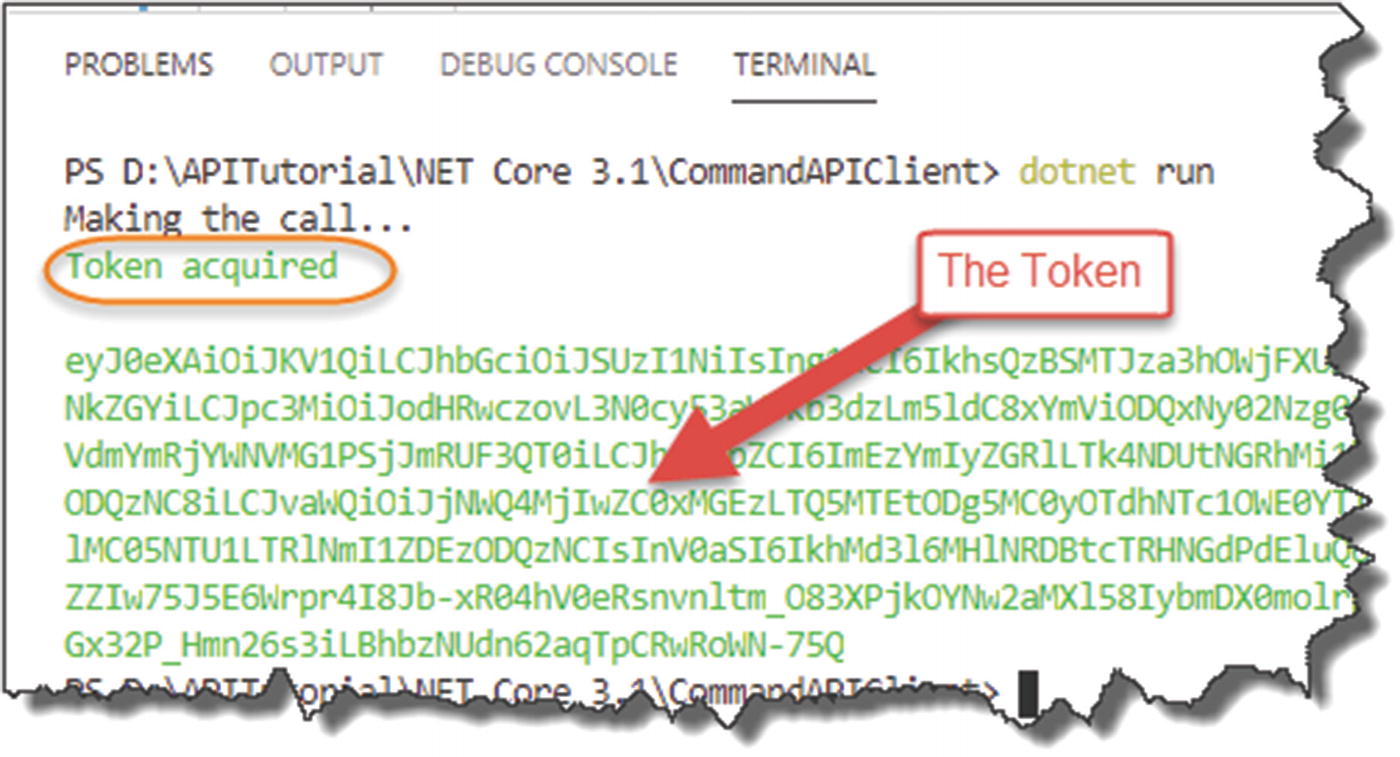
Successful token acquisition
![]() Good job! There was a lot of config and coding to get us to this point, obtaining a JWT token, so the rest of this chapter is all too easy!
Good job! There was a lot of config and coding to get us to this point, obtaining a JWT token, so the rest of this chapter is all too easy!
So well done!

Calling the API
- 1.
We use a HttpClient object as the primary vehicle to make the request.
- 2.
We ensure that we set the media type in our request headers appropriately.
- 3.
We set out authorization header to “bearer” as well as attaching our token received in the last step.
- 4.
Make an asynchronous request to our protected API address.
- 5.
Check for success and display.
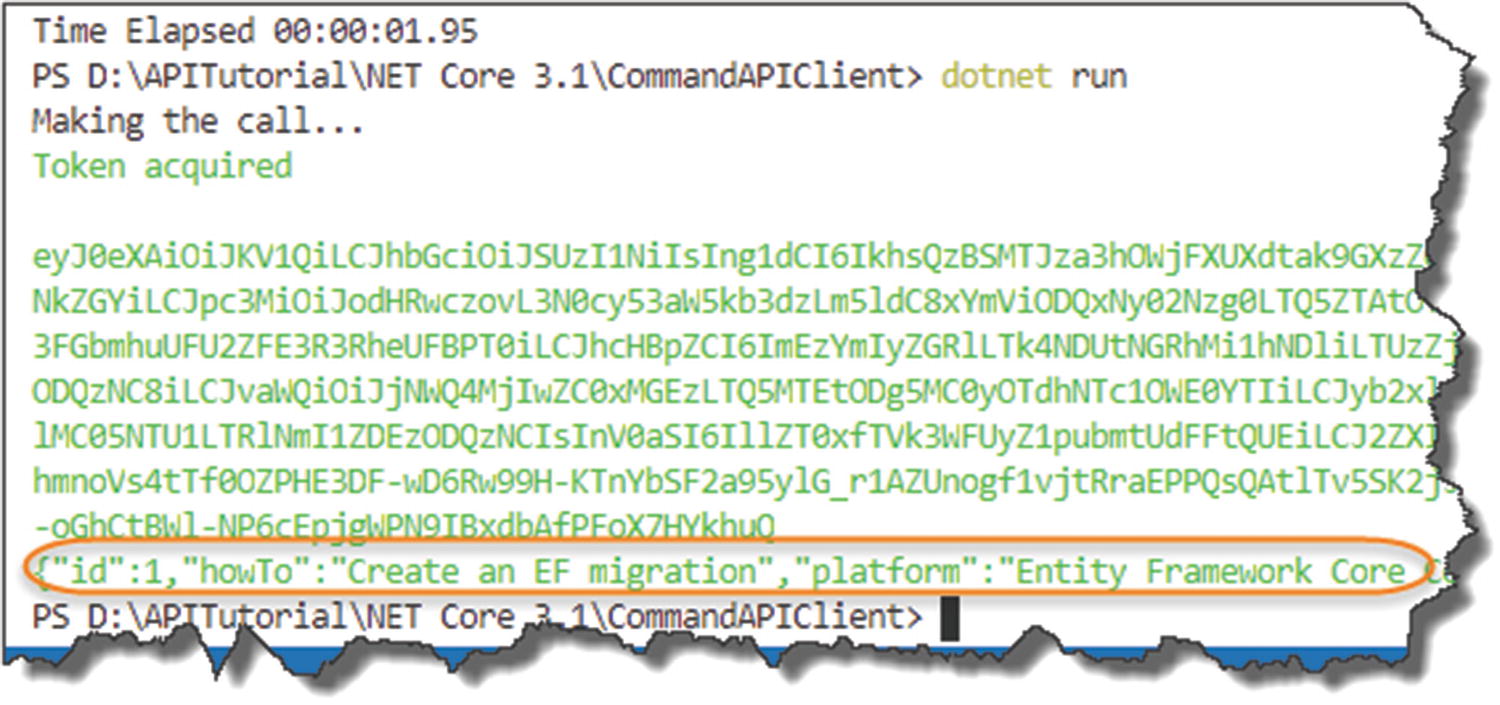
Secure API Called
where we have the JSON for our protected API endpoint returned.
Updating for Azure
Config element | Application setting name |
|---|---|
The log-in “instance” | Instance |
Our AAD Domain | Domain |
The Tenant ID | TenantId |
The Client ID | ClientId |
The Application UD URL (Or Resource ID) | ResourceId |
Before we do that though, while we could reuse the existing API App Registration (CommandAPI_DEV) that we created for our “local” Command API, I think its good practice to set up a new “production” registration for our Command API.
![]() Rather than step through the exact same instructions to create a new “production” Command API registration, I’m going to leave you to do that now. As a suggestion, call this new app registration: CommandAPI_PROD.
Rather than step through the exact same instructions to create a new “production” Command API registration, I’m going to leave you to do that now. As a suggestion, call this new app registration: CommandAPI_PROD.
Come back here when you’re done!

Production App Registrations
If like me you created your App Registrations in a different Azure Directory to your main one (i.e., where all your resources are), I’d take a note of all of the values for things like TenantId, ClientId, and ResourceId in the Production App Registration you just created before you switch back to your main AAD to add the new Application Settings for our API.

Switching active directories

API app settings
Again, we’ve already added application settings before, so I’m going to leave it to you to add all the necessary application settings to allow our API to be correctly configured from an authentication perspective.
![]() Make sure you give your application settings the exact same name as the User Secrets you set up before, with the relevant values from the Production API App registration (CommandAPI_PROD).
Make sure you give your application settings the exact same name as the User Secrets you set up before, with the relevant values from the Production API App registration (CommandAPI_PROD).

Additional app settings to support authentication
Remember to Save the new Application Settings you’ve just added.
Client Configurations
- 1.
Create a Production Client App Registration on Azure.
- 2.
Update the necessary local settings in our Client App’s applicationsettings.json file.
![]() You have learned everything you need to know in order to complete this work, so again I’m going to leave it to you complete the two steps mentioned.
You have learned everything you need to know in order to complete this work, so again I’m going to leave it to you complete the two steps mentioned.
Take your time, and remember to copy down the new values that are generated as part of the new production client app registration.
When done, come back here.
Deploy Our API to Azure
Back in our Command API Solution, we just want to kick off a deploy to Azure, so if you don’t have any pending commits, make an arbitrary change to your code (insert a comment somewhere), and add/commit and push.
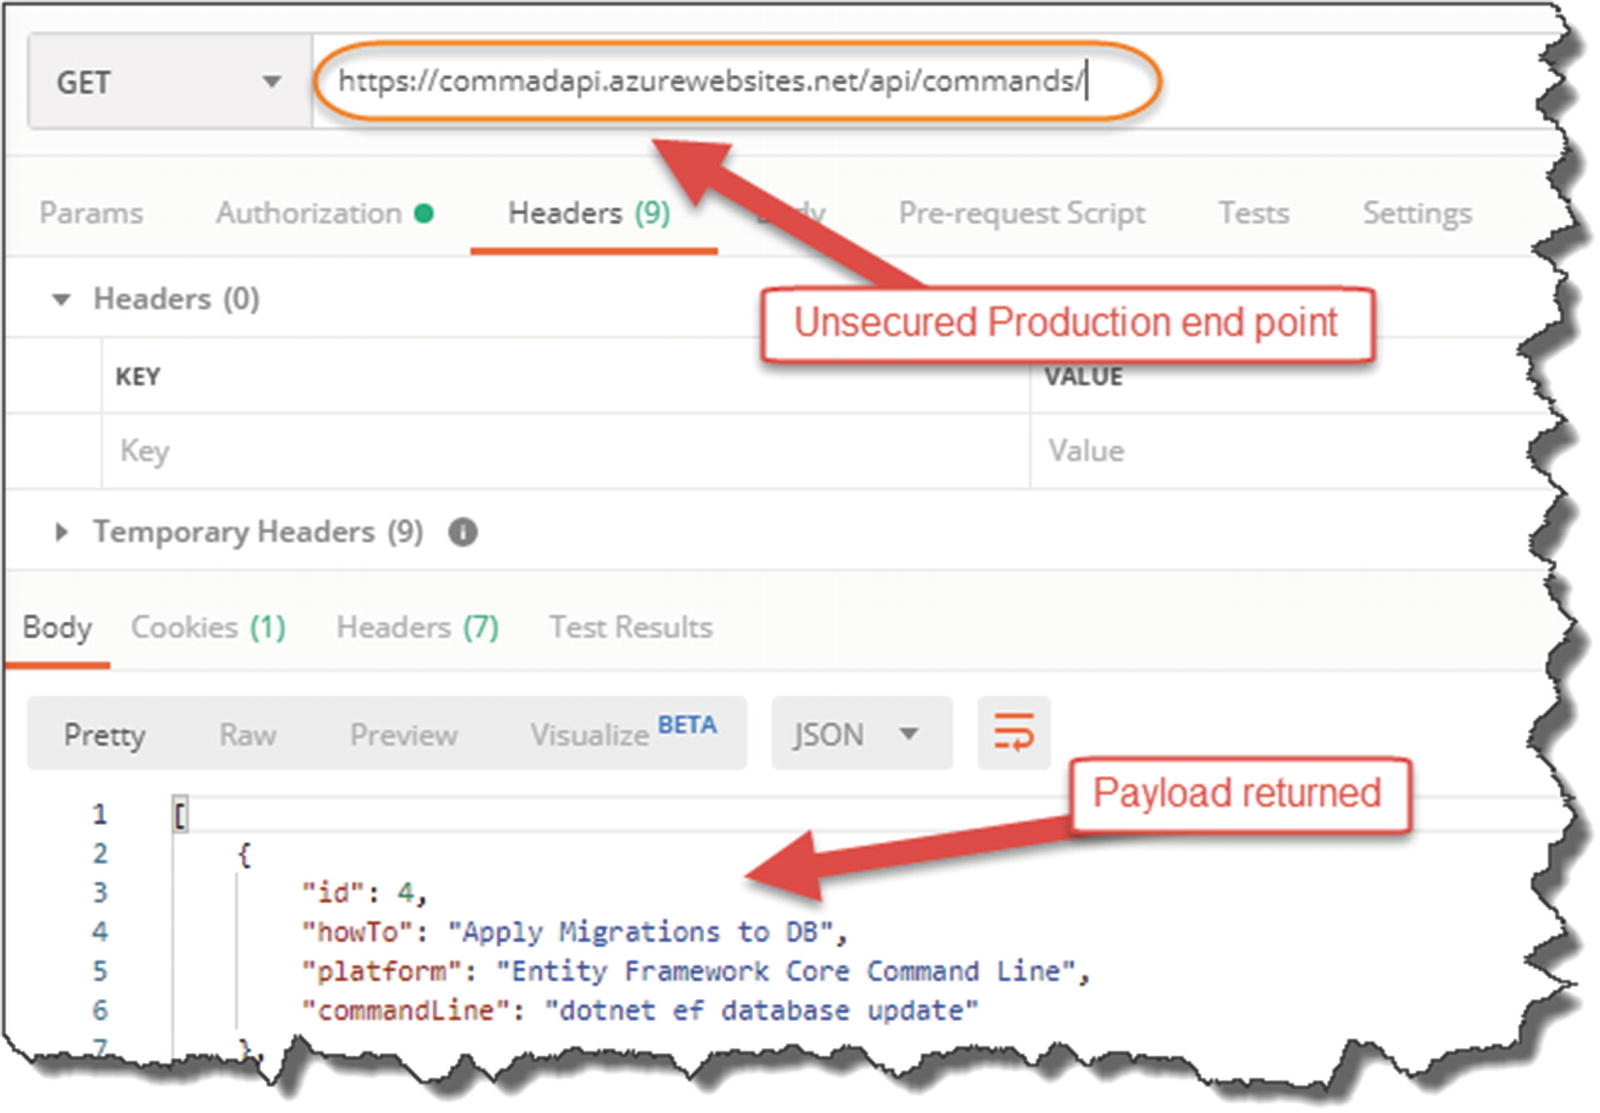
Unsecured endpoint continues to work
Secured endpoint declines the request
Successful call of our secure endpoint on Azure