
Chapter Summary
In this chapter we’ll introduce you to Unit Testing, what it is, and why you’d use it. We’ll then create unit tests to test the core functionality of our API Controller, providing us with an automated regression suite (don’t worry if you don’t know what that means!).
When Done, You Will
Understand what Unit Testing is and why you should use it.
Understand the power of the Repository Interface once again!
Understand how to use a mocking or isolation framework in unit testing.
Write Unit Tests using xUnit to test our API functionality.
What Is Unit Testing
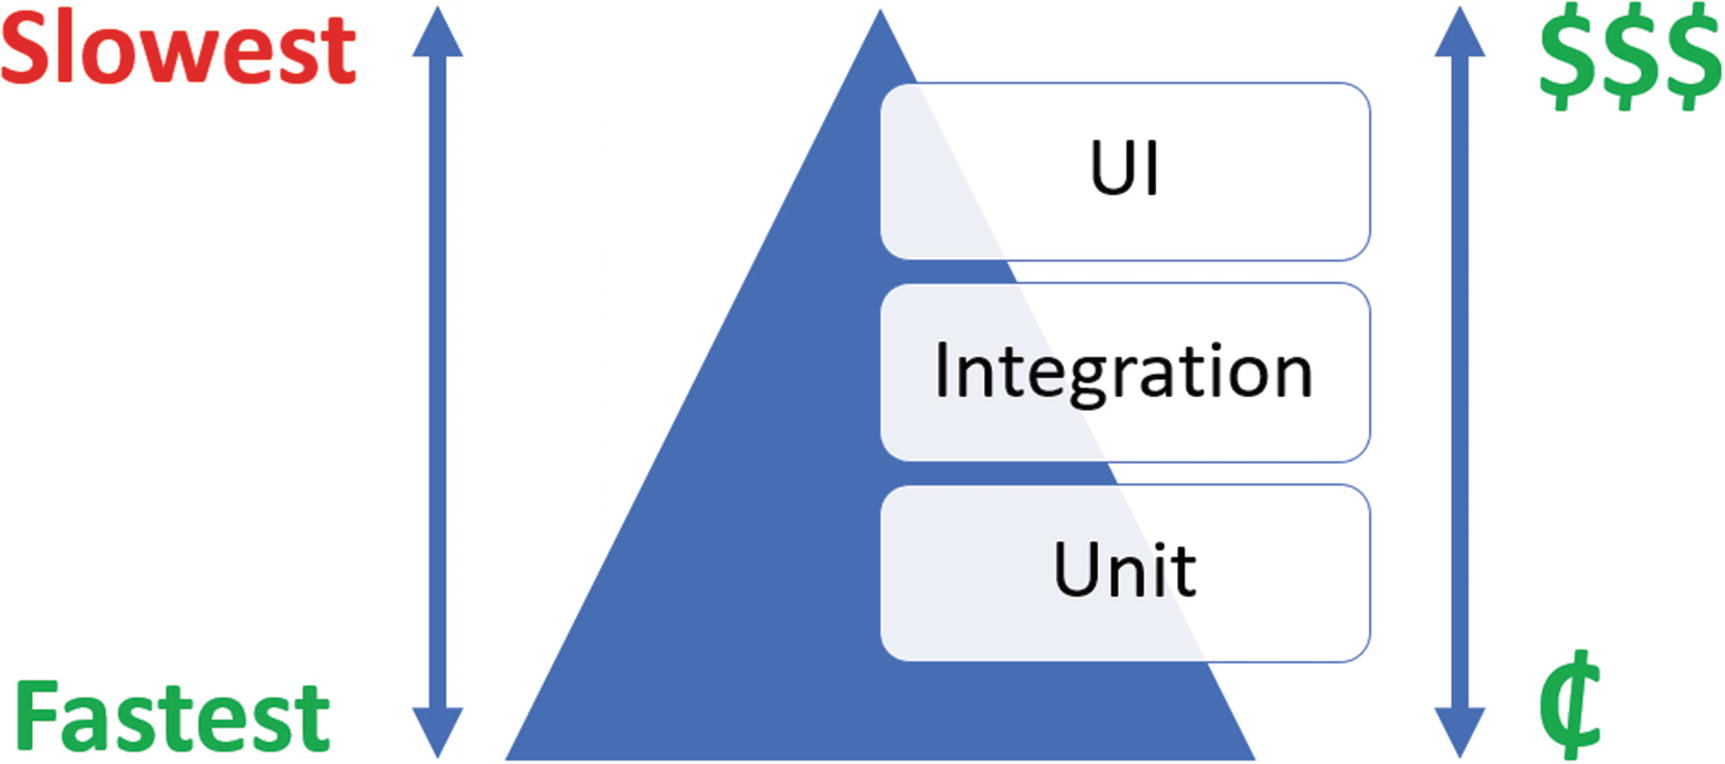
Testing Pyramid
Abundant: There should be more of them than other types of test.
Small: They should test one thing only, that is, a “unit” (as opposed to full end-to-end “scenarios” or use cases).
Cheap: They are both written and executed first. This means any errors they catch should be easier to rectify when compared to those you catch much later in the development life cycle.
Quick to both write and execute
Unit tests are written by the developer (as opposed to a tester or business analyst), so that is why we’ll be using them here to test our own code.
OK, so aside from the fact that they are quick and cheap, what other advantages do you have in using them?
Protection Against Regression
Because you’ll have a suite of unit tests that are built up over time, you can run them again every time you introduce new functionality (which you should also build tests for). This means that you can check to see if your new code had introduced errors to the existing code base (these are called regression defects ). Unit testing therefore gives you confidence that you’ve not introduced errors or, if you have, give you an early heads up so you can rectify.
Executable Documentation
When we come to write some unit tests, you’ll see that the way we name them is descriptive and speaks to what is being tested and the expected outcome. Therefore, assuming you take this approach, your unit test suite essentially becomes documentation for your code.
![]() When naming your unit test methods, they should follow a construct similar to
When naming your unit test methods, they should follow a construct similar to
<method name>_<expected result>_<condition>
For example:
GetCommandItem_Returns200OK_WhenSuppliedIDIsValid
Note: There are variants on the convention, so find the one the one that works best for you.
Characteristics of a Good Unit Test
Fast: Individual tests should execute quickly (required as we can have 1000’s of them), and when we say quick, we’re talking in the region of milliseconds.
Isolated: Unit tests should not be dependent on external factors, for example, databases, network connections, etc.
Repeatable: The same test should yield the same result between runs (assuming you don’t change anything between runs).
Self-checking: Should not require human intervention to determine whether it has passed or failed.
Timely: The unit test should not take a disproportionately long time to run compared with the code being tested.
Focused: A unit test (as the name suggests and as mentioned earlier) should test only one thing.
We’ll use these factors as a touchstone when we come to writing our own tests.
What to Test?
OK, so we know what they are, why we have them, and even the characteristics of a “good” test, but the $1,00,000 question is what should we actually test? The characteristics detailed earlier should help drive this choice, but ultimately it comes down to the individual developer and what they are happy with.
Some developers may only write a small number of unit tests that only test really novel code; others may write many more that test more standard, trivial functionality. As our API is simple, we’ll be writing tests that are pretty basic, and test quite obvious functionality. I’ve taken this approach to get you used to unit testing more than anything else.
You would generally not test functionality that is inherent in the programming language: for example, you would not write unit tests to check basic arithmetic operations– that would be overkill and not terribly useful. Taking this further, unit testing code you cannot change (i.e., code you did not write) may be somewhat pointless: discuss.
Unit Testing Frameworks
I asked a question at the start of the book about what xUnit is. Well xUnit is simply a unit testing framework; it’s open source and was used heavily in the creation of .NET Core, so it seems like a pretty good choice for us.

Unit Testing .NET Core Project templates
MSTest
NUnit
We’ll be sticking with xUnit though, so if you want to find out about the others, you’ll need to do your own reading.
Arrange, Act, and Assert
Irrespective of your choice of framework, all unit tests follow the same pattern (xUnit is no exception).
Arrange
This is where you perform the “setup” of your test. For example, you may set up some objects and configure data used to drive the test.
Act
This is where you execute the test to generate the result.
Assert
This is where you “check” the actual result against the expected result. How that assertion goes will depend on whether your test passes or fails.
Going back to the characteristics of a good unit test, the “focused” characteristic comes in to play here, meaning that we should really have only one assertion per test. If you assert multiple conditions, the unit tests become diluted and confusing – what are you testing again?
So, enough theory – let’s practice!
Write Our First Tests
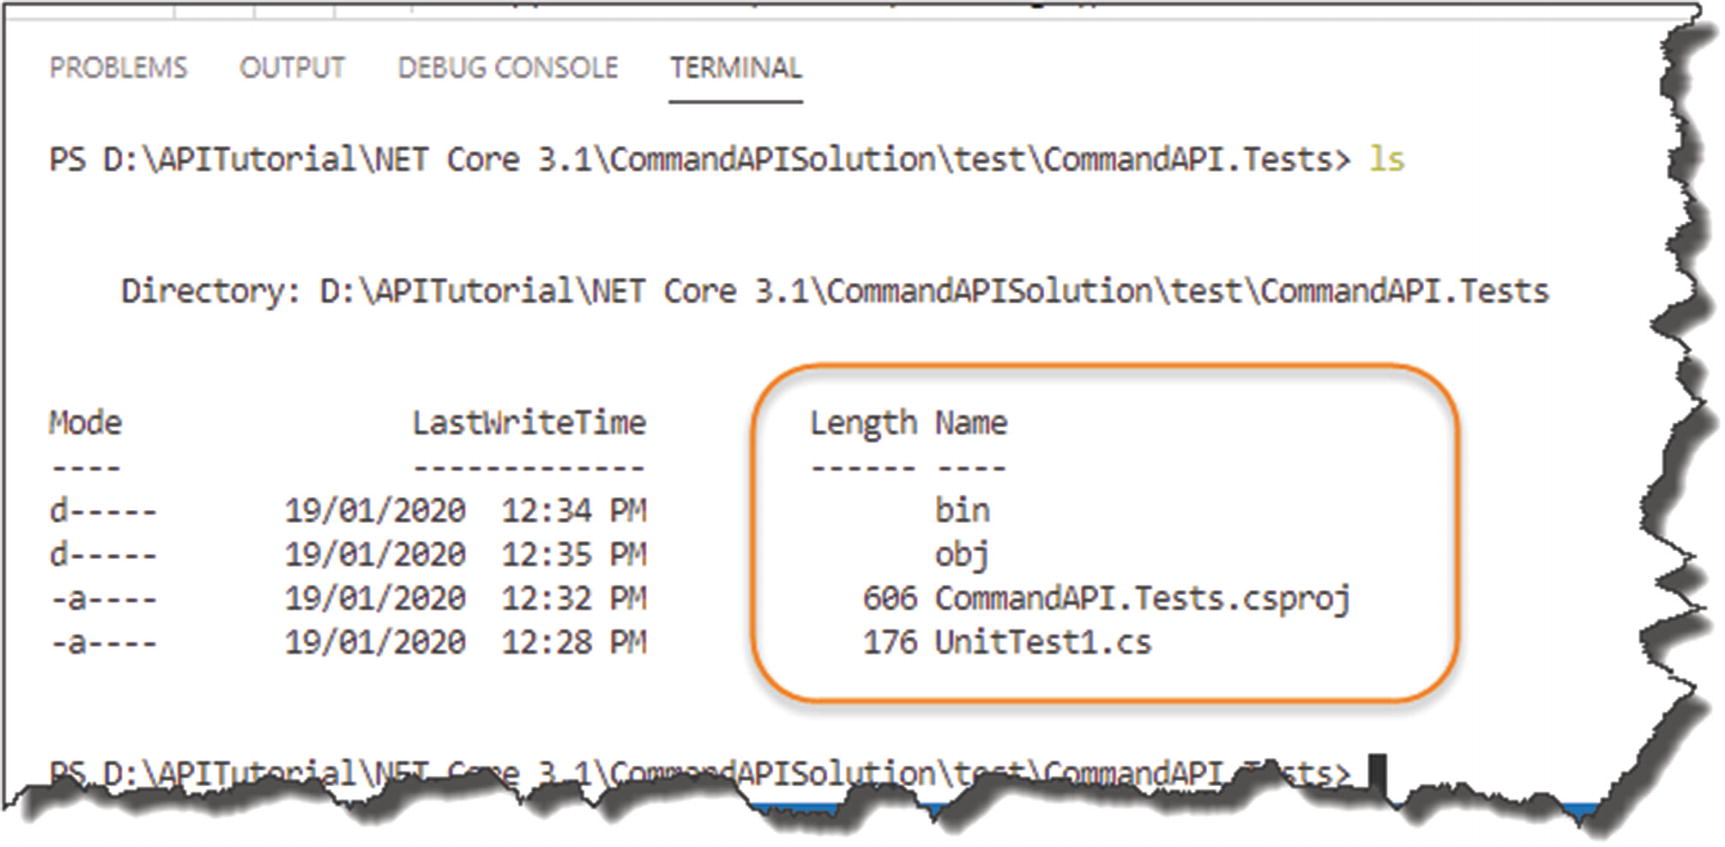
Anatomy of a xUnit Project
bin folder
obj folder
CommandAPI.Tests.csproj project file
UnitTest1.cs default class
You should be familiar with the first three of these, as they are the same artifacts we had in our API project. With regard to the project file, CommandAPI.Tests.csproj, you’ll recall we added a reference to our API project in here so we can “test” it.

Simple xUnit Test Case
- 1.
A reference to xUnit
- 2.
Our class method Test1 is decorated with the [Fact] attribute. This tells the xUnit test runner that this method is a test.

Running Tests in xUnit
OK, we know our testing setup is good to go, so let’s start writing some tests.
![]() When running through the code again myself (yes I actually followed the book all the way through to make sure it made sense!), I got a warning at this stage complaining that Microsoft.EntityFrameworkCore.Relational was at a different version in the xUnit project compared to the main API project.
When running through the code again myself (yes I actually followed the book all the way through to make sure it made sense!), I got a warning at this stage complaining that Microsoft.EntityFrameworkCore.Relational was at a different version in the xUnit project compared to the main API project.
Note that this package was not explicitly listed in the package references in our xUnit projects .csproj file.
To rectify this I installed the Microsoft.EntityFrameworkCore.Relational package in my xUnit project:
dotnet add package Microsoft.EntityFrameworkCore.Relational --version 3.1.4
noting that I did specify a version this time to ensure both packages across both projects were in alignment. If you encounter this same behavior, take note of the version that gets complained about, and act accordingly.
Even though I believe this warning was benign, I don’t like warnings lingering in the background.
Testing Our Model
Our first test is really at the trivial end of the spectrum to such an extent you probably wouldn’t unit test this outside the scope of a learning exercise. However, this is a learning exercise, and even though it is a simple test, it covers all the necessary mechanics to get a unit test up and running.
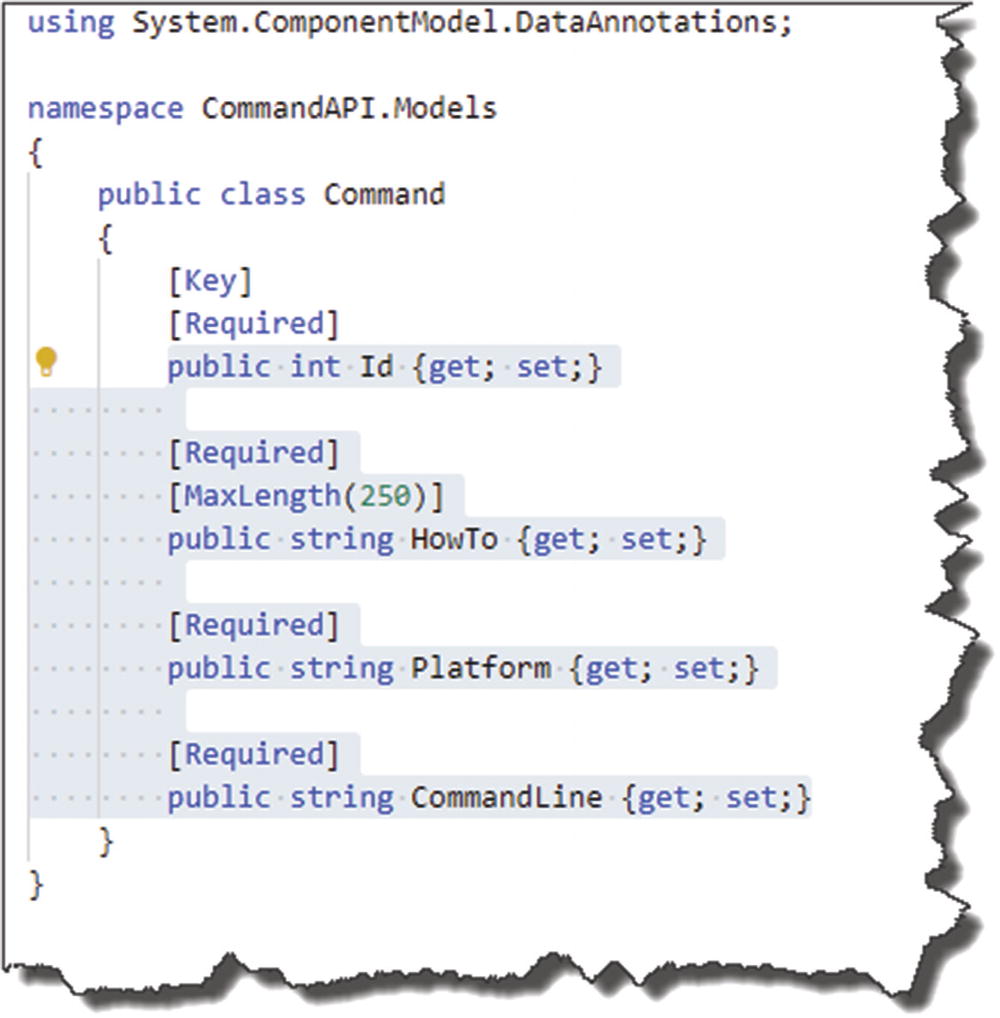
Revisiting the model
We can change the value of each of the class attributes.
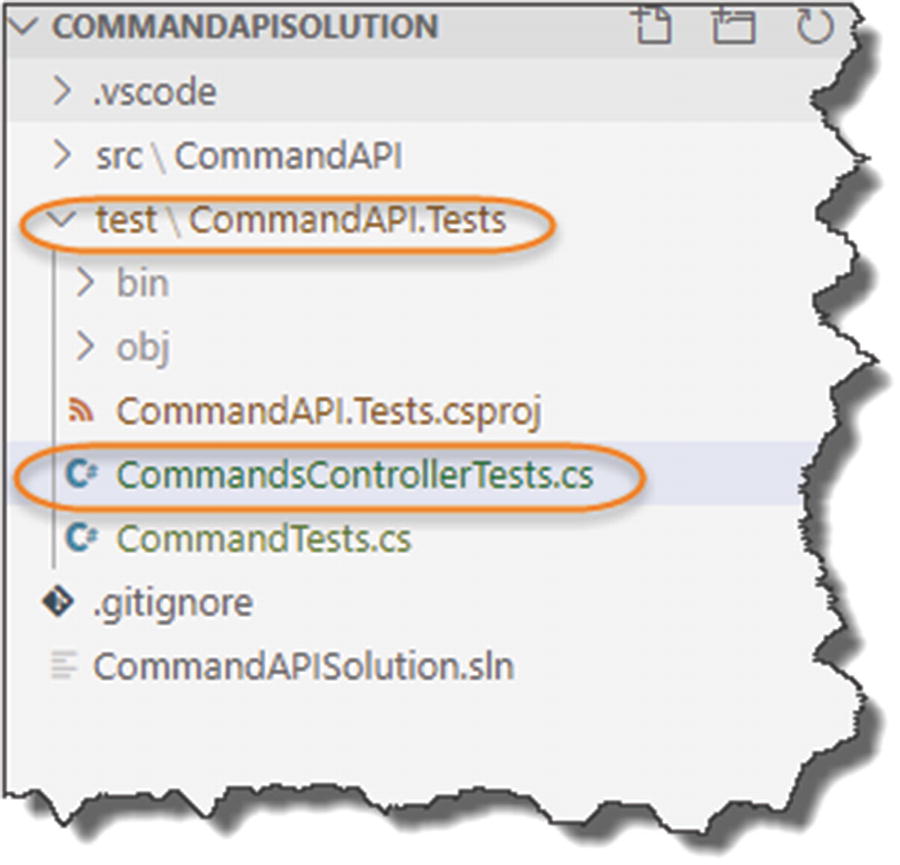
- Create a new file called CommandTests.cs in the root of our CommandAPI.Tests Project.
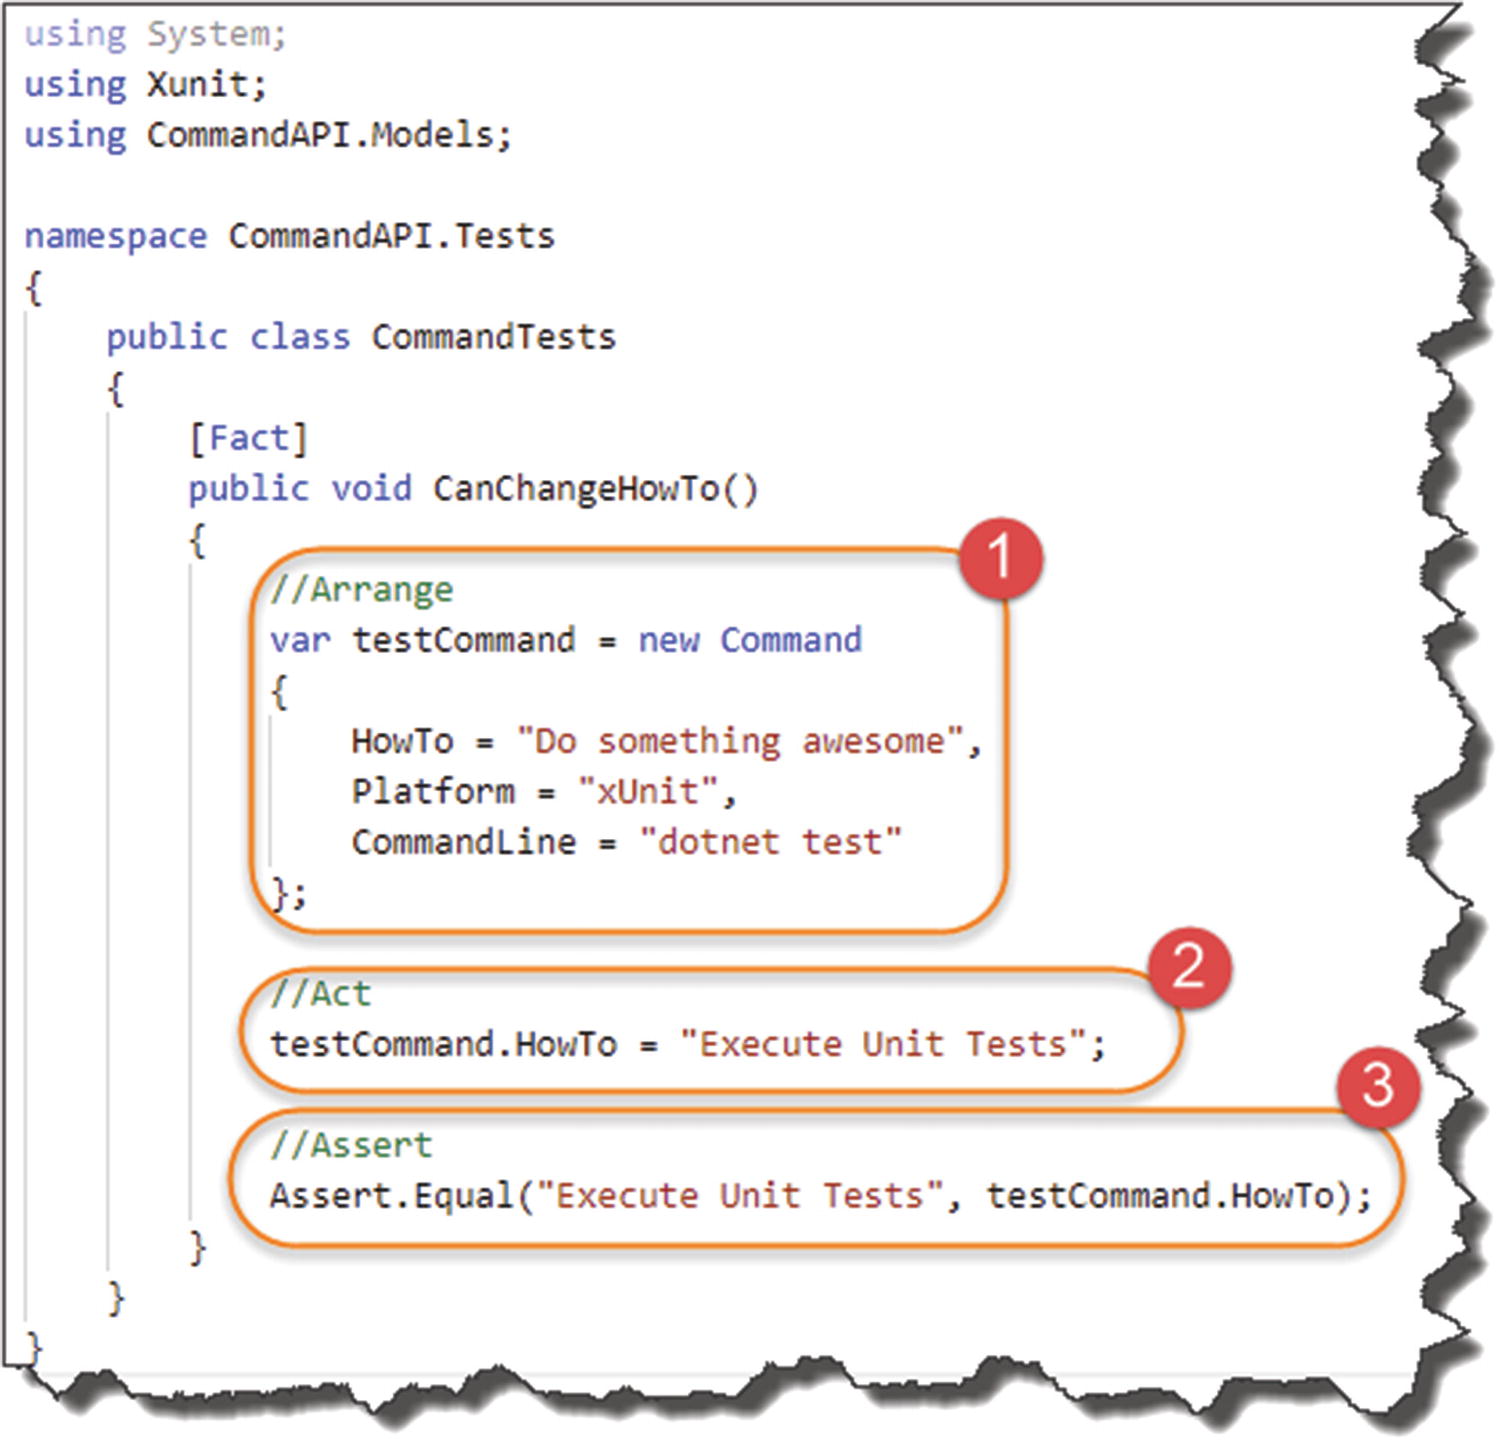
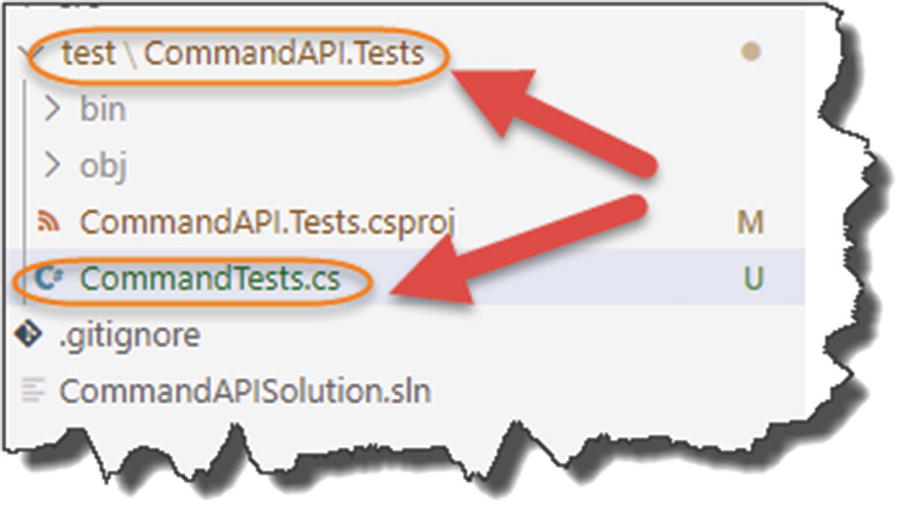 Figure 11-7
Tests for our Model
![]() This is such a trivial test (we’re not even testing a method); we can’t really use the unit test naming convention mentioned earlier:
This is such a trivial test (we’re not even testing a method); we can’t really use the unit test naming convention mentioned earlier:
<method name>_<expected result>_<condition>
So, in this instance, we’re going with something more basic.

Our First Model test
- 1.
We have a reference to our Models in the CommandAPI project.
- 2.
Our Class is named after what we are testing (i.e., our Command model).
- 3.
The naming convention of our test method is such that it tells us what the test is testing for.
Arrange, Act, and Assert
- 1.
Arrange: Create a testCommand and populate with initial values.
- 2.
Act: Perform the action we want to test, that is, change the value of HowTo.
- 3.
Assert: Check that the value of HowTo matches what we expect.
Steps 1 and 2 are straightforward, so it’s really step 3 and the use of the xUnit Assert class to perform the “Equal” operation that are possibly new to you. Whether this step is true or false determines whether the test passes or fails.
Ensure you save your CommandTests.cs file.
dotnet build: This will just check your tests are syntactically correct.
dotnet test: Will run our test suite.
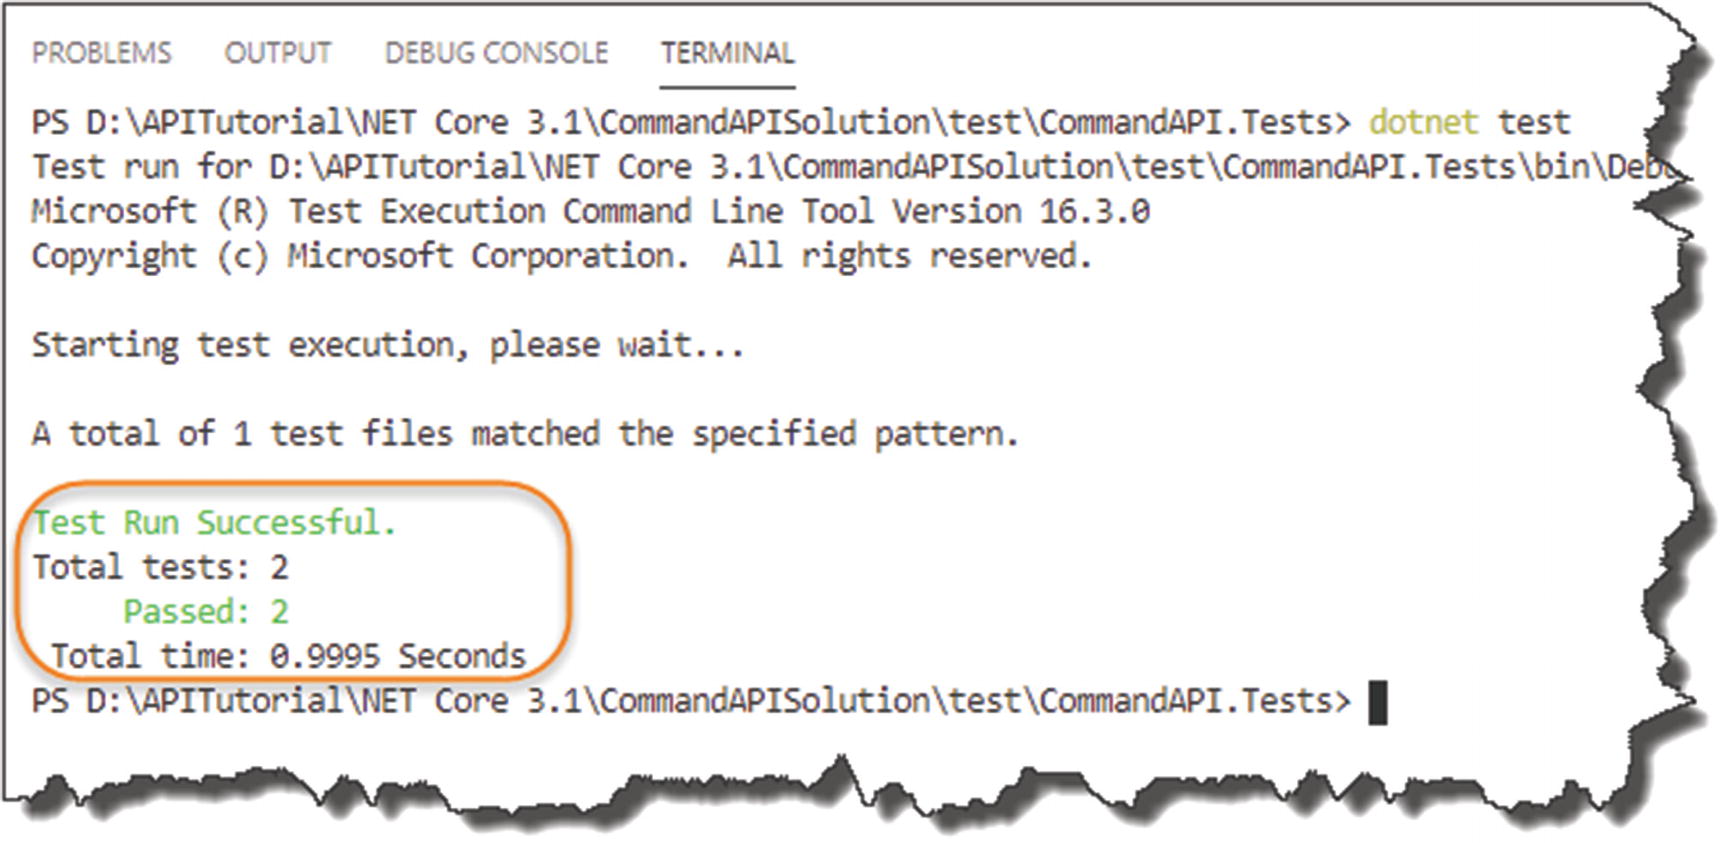
We have two passing tests?
It says two tests have passed? Where is the other test? That’s right we still have our original UnitTest1 class with an empty test method, so that’s where the second test is being picked up. Before we continue, lets’ delete that class.

Forcing test Failure

As expected, failed test
Here, you can see the test has failed and we even get the reasoning for the failure. Revert the expected string back to a passing value before we continue.
![]() We have two other attributes in our Command class that we should be testing for: Platform and CommandLine (the Id attribute is auto-managed so we shouldn’t bother with this for now).
We have two other attributes in our Command class that we should be testing for: Platform and CommandLine (the Id attribute is auto-managed so we shouldn’t bother with this for now).
Write two additional tests to test that we can change these values too.
Don’t Repeat Yourself
OK, so assuming that you completed the last Learning Opportunity, you should now have three test methods in your CommandTests class, with three passing tests. If you didn’t complete that, I’d suggest you do it, or if you really don’t want to – refer to the code on GitHub.2
One thing you’ll notice is that the Arrange component for each of the three tests is identical and therefore a bit wasteful. When you have a scenario like this, that is, you need to perform some standard setup that multiple tests use; xUnit allows for that.
Constructor and Dispose (shared setup/clean-up code without sharing object instances)
Class Fixtures (shared object instance across tests in a single class)
Collection Fixtures (shared object instances across multiple test classes)
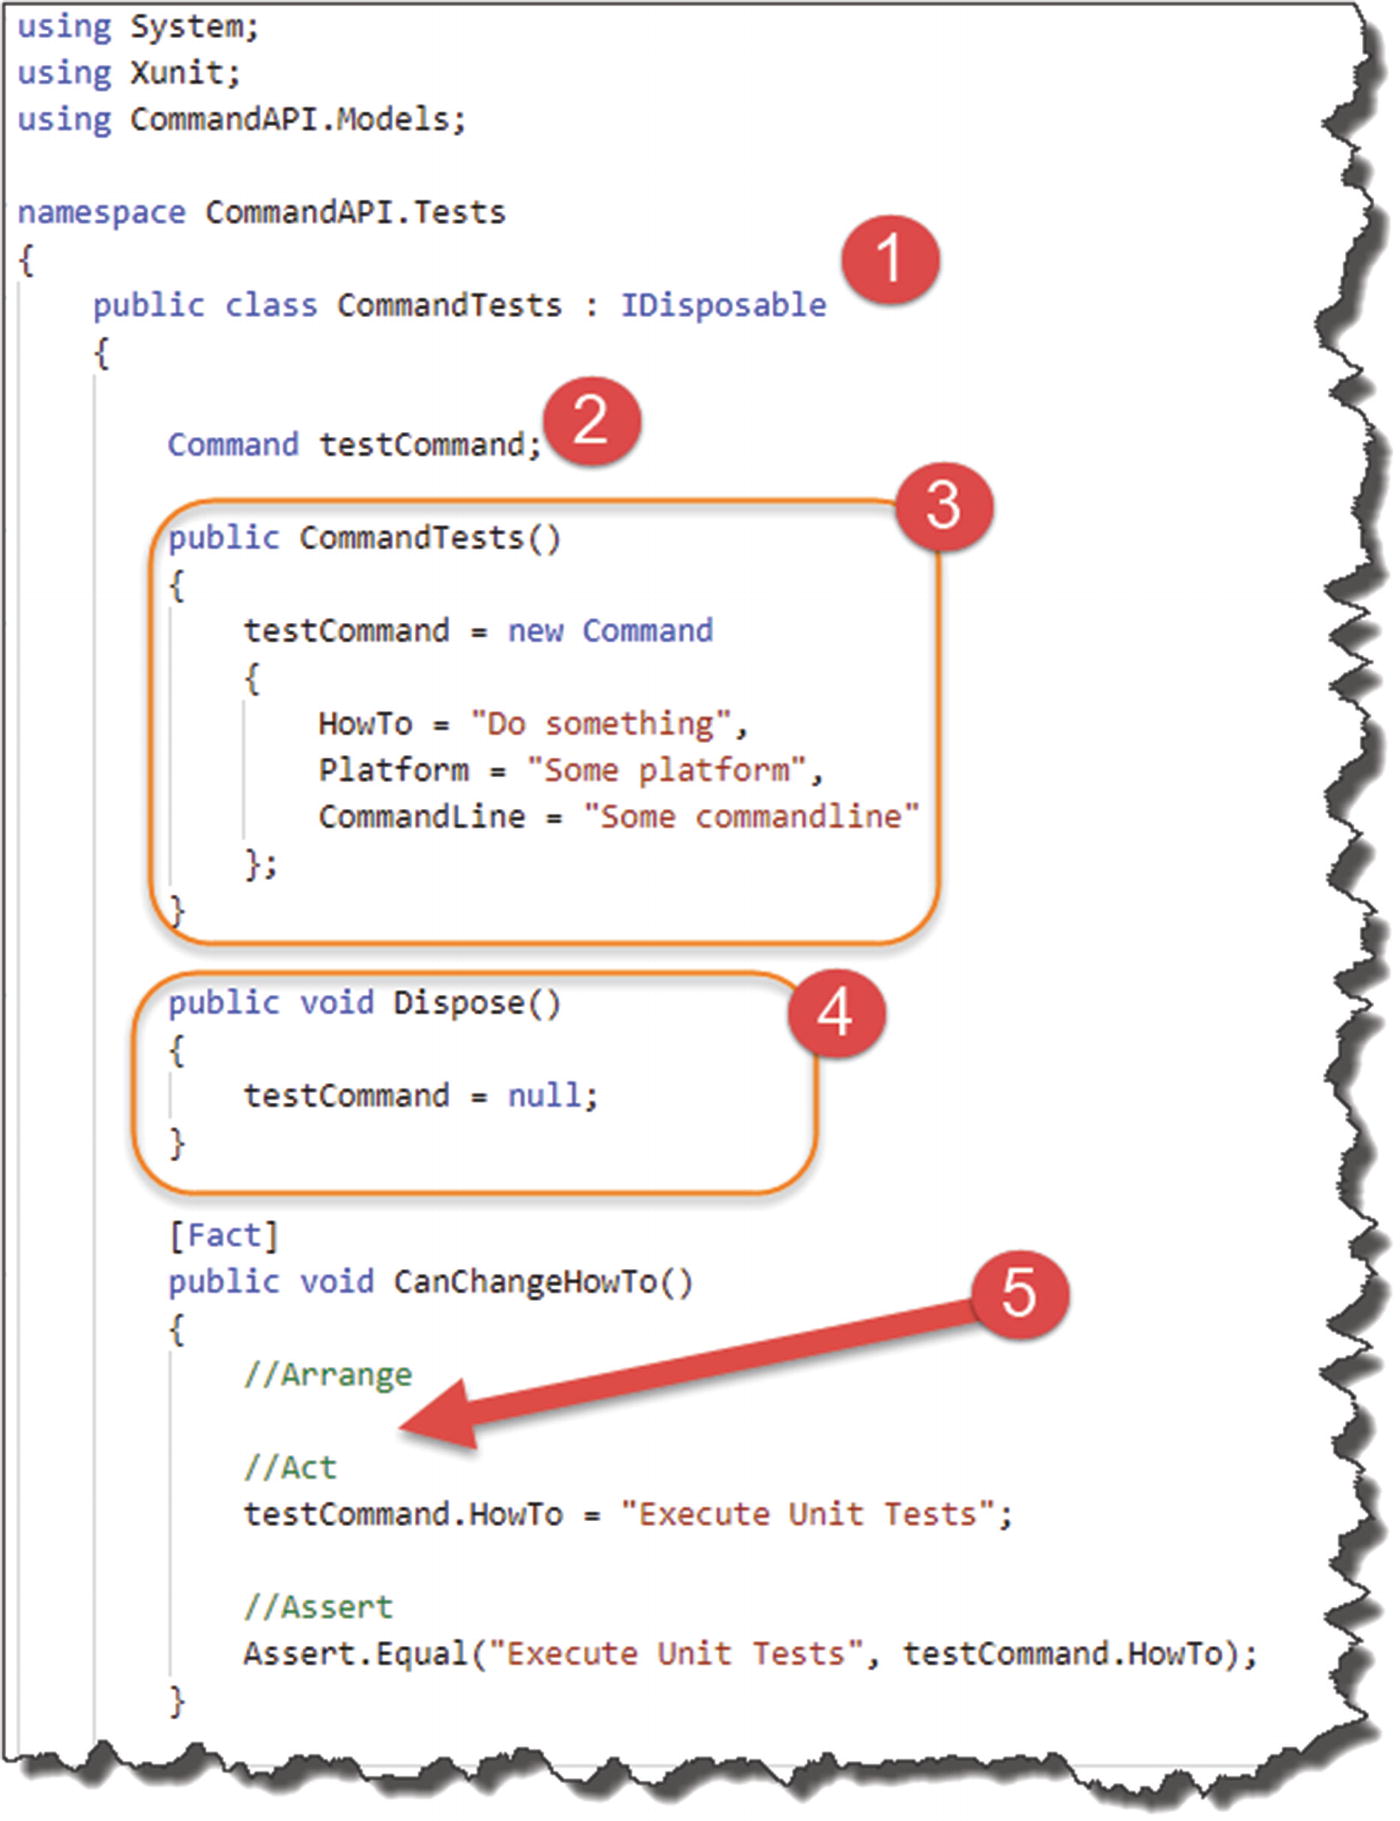
Don't Repeat Yourself – refactored Model tests
- 1.
We inherit the IDisposable interface (used for code cleanup).
- 2.
Create a “global” instance of our Command class.
- 3.
Create a Class Constructor where we perform the setup of our testCommand object instance.
- 4.
Implement a Dispose method, to clean up our code.
- 5.
You’ll notice that the Arrange section for each test is now empty; the class constructor will be called for every test (I’ve only shown one test here for brevity).
For more information, refer to the xUnit documentation.3
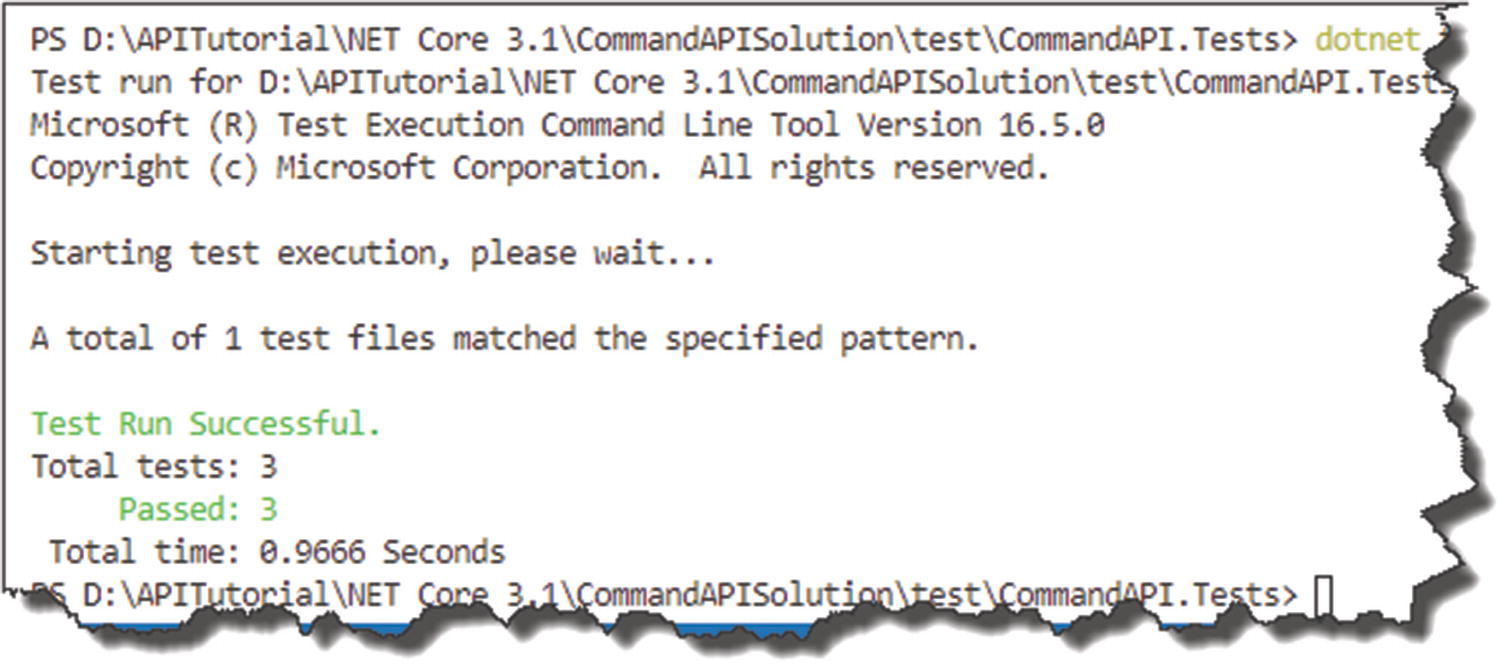
3 Passing Tests
Test Our Controller
OK, so testing our model was just an amuse-bouche4 for what’s about to come next: testing our Controller. We up the ante here as it’s a decidedly more complex affair; although the concepts you learned in the last section still hold true, we just expand upon that here.
Revisit Unit Testing Characteristics
Fast: Individual tests should execute quickly (required as we can have 1000s of them), and when we say quick, we’re talking in the region of milliseconds.
Isolated: Unit tests should not be dependent on external factors, for example, databases, network connections, etc.
Repeatable: The same test should yield the same result between runs (assuming you don’t change anything between runs).
Self-checking: Should not require human intervention to determine whether it has passed or failed.
Timely: The unit test should not take a disproportionately long time to run compared with the code being tested.
Focused: A unit test (as the name suggests and as mentioned earlier) should test only one thing.
I often struggle with the Focused characteristic and frequently have to pull myself back to testing just one thing, rather than wandering into integration test territory (and attempting to test an end-to-end flow). But that’s not the characteristic I’m most worried about in this instance.
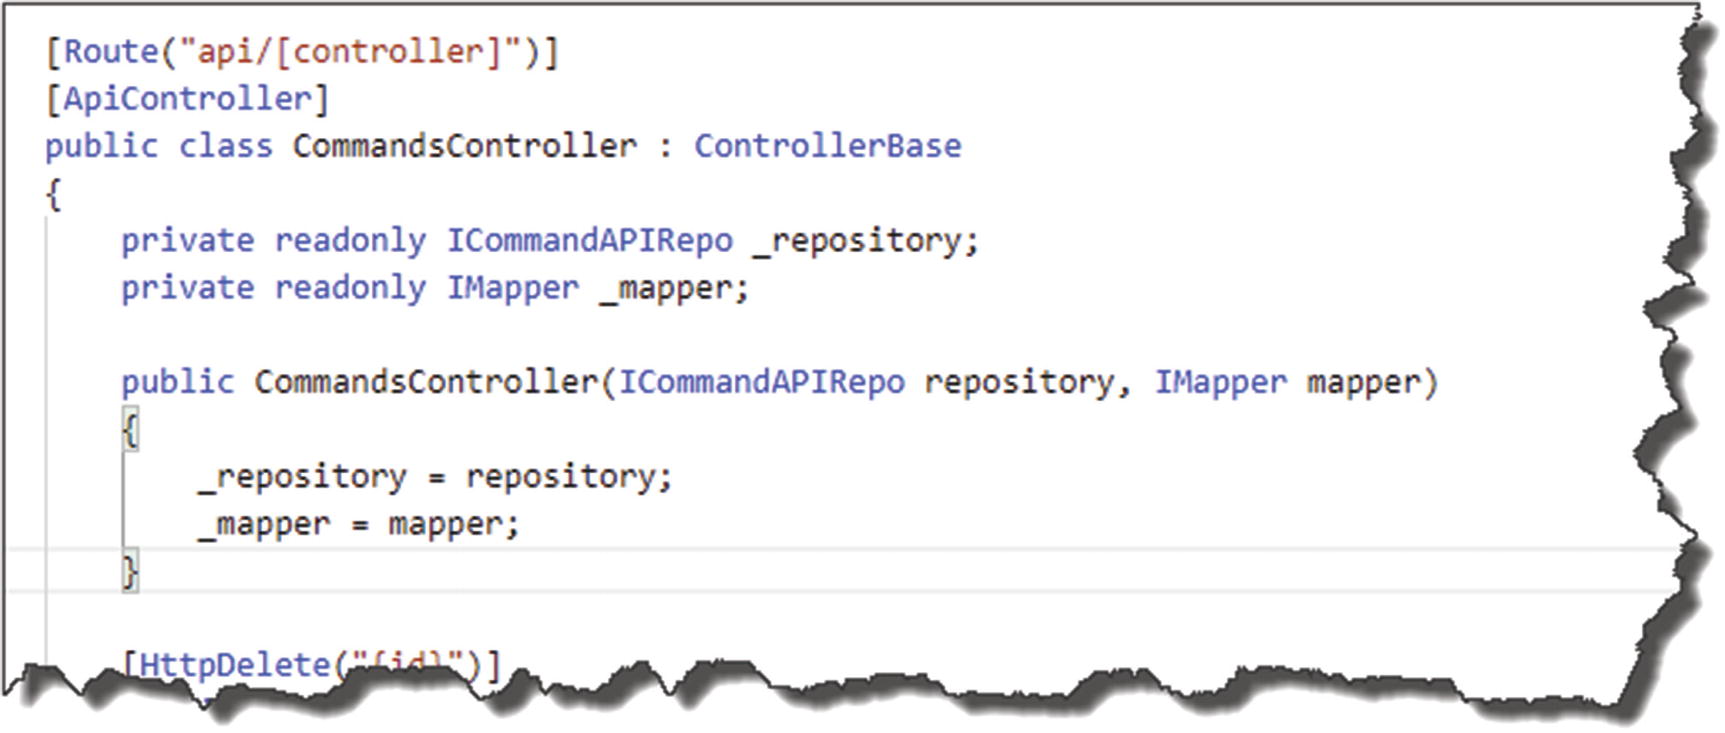
Reminder of the dependencies injected into the constructor
Even though we are using Dependency Injection (which is awesome), they are still dependencies as far as our controller is concerned, so when we come to unit testing the controller – how do we deal with this? Dependency Injection again? Stick a pin in that for now – I just want to plant the seed.
As before, I think the best way to learn about this is to get coding, so let’s turn our attention back to our very first controller action: GetAllCommands.
GetAllCommands Unit Tests and Groundwork
GetAllCommands Overview
Verb | URI | Operation | Description |
|---|---|---|---|
GET | /api/commands | Read | Read all command resources |
Attribute | Description |
|---|---|
Inputs | None; we simply make a GET request to the URI in the preceding table |
Process | Attempt to retrieve a collection of command resources |
Success Outputs | • HTTP 200 OK Status |
Failure Outputs | N/A: If this endpoint exists, it can’t really be called “incorrectly” |
Safe | Yes – Endpoint cannot alter our resources |
Idempotent | Yes – Repeating the same operation will provide the same result |
GetAllCommands Unit Tests
Test ID | Arrange and action | Assert |
|---|---|---|
Test 1.1 | Request Resources when 0 exist | Return 200 OK HTTP Response |
Test 1.2 | Request Resources when 1 exists | Return a Single Command Object |
Test 1.3 | Request Resources when 1 exists | Return 200 OK HTTP Response |
Test 1.4 | Request Resources when 1 exists | Return the correct “type” |
Request a Resource when one exists.
So why not roll these into one test and perform the three assertions there? Well again that would break our Focused characteristic – we should be testing for one thing only per test.
Groundwork for Controller Tests
Tests for the Controller
So straight away we want to start arranging our tests so that we have access to a CommandsController class to work with, but how do we create one when it has two dependencies (the repository and AutoMapper)? Dependency Injection – I hear you say! But if you look back at the anatomy of our Unit Test project, there’s no equivalent of the Startup class in which to Register our services for injection. We could start to add one I guess, but that would then lead to the problem of testing against our repository.
Even if we were to use Dependency Injection here, we’d still need to provide a concrete implementation instance; which one would we use? SqlCommanAPIRepo? That requires a DB Context, which in turn requires our Database. Argh! Not only is that horrifically complicated, we’re breaking the Isolation characteristic in a big way by dragging all that stuff into our unit testing.
We could move back to MockCommandAPIRepo and implement test code in there that wasn’t dependent on external factors, a possibility, but still a hassle – don’t worry there is a better way!
Mocking Frameworks
Thankfully we can turn to something called “mocking,” which means we can quickly create “fake” (or mock) copies of any required objects to use within our unit tests. It allows us to self-contain everything we need in our unit test project and adhere to the Isolation principle. We can certainly use mocking for our repository and possibly AutoMapper.
In order to use mocking, we need to turn to an external framework for this; the one I’ve chosen for us is called Moq. It’s fairly well understood and used within the C# .NET Community, so I thought it was a good choice for us.
Install Moq and AutoMapper

Package References for Moq
You’ll notice we’ve added AutoMapper in addition to Moq; we’ll require this later.
Using Moq (Mock the Repository)
Or code is still not runnable, but I wanted to pause here and go through what we have added as there is quite a lot going on!

Mocking our repository
- 1.
We set up a new “mock” instance of our repository; note that we only need to pass the interface definition.
- 2.
Using our new mock repository, we use the Setup method to establish how it will “behave.” Here, we specify the interface method we want to mock followed by what we want it to return (as described next).
- 3.
Still in our Setup, we specify that the repository GetAllCommands method returns GetCommands(0) – see step 5.
- 4.
We use the Object extension on our mock to pass in a mock object instance of ICommandAPIRepo.
- 5.
We’ve mocked a private method: GetCommands that will return either an empty List or a List with one Command object depending on the value of the input parameter.
You can see how easy it is to set up mock objects using this type of framework, saving us a lot of the hassle of writing up our own mock classes. It also highlights the usefulness of our repository interface definition once again.
OK, so we’ve created a mock of our repository that we can use to create a CommandsController instance, but what about AutoMapper?
Mock AutoMapper?
While you can use Moq to mock-up AutoMapper, we’re not going to do that here. Why? Well because in this particular instance, general consensus is that it is more effective (and useful) to use an actual instance of AutoMapper. Additionally, using this approach we get to test the AutoMapper Profiles we’ve set up in our API Project too.
Now I want to sense check here.
This may seem completely contrary to the Isolation and Focused principles, and to some extent it is. My response to that is one of pragmatism (you may call it a cop out!), but the Unit Test Characteristics are just that: Characteristics. They are not unbreakable rules.
As developers we’re often faced with choices and challenges. I may take one path, and you may choose another – personally I think that’s fine. Coding can be as much art as science.
What me must strive to do is solve a problem the best way we can, and sometimes that involves compromise or, as I prefer to call it, pragmatism. In this case (in my view), using an instance of AutoMapper (as opposed to a mocked instance of it) provides more benefits than downsides, so that is the approach I’m going to take.
But please feel free to disagree!

Using AutoMapper in our tests
- 1.
We set up a CommandsProfile instance and assign it to a MapperConfiguration.
- 2.
We create a concrete instance of IMapper and give it our MapperConfiguration.
- 3.
We pass our IMapper instance to our CommandController constructor.
There is a lot of new content and groundwork there, but now we’re set up; the rest of this chapter should be quite quick! Make sure you save your work, build to check for errors, commit to GitHub, and we’ll move onto completing our first test!
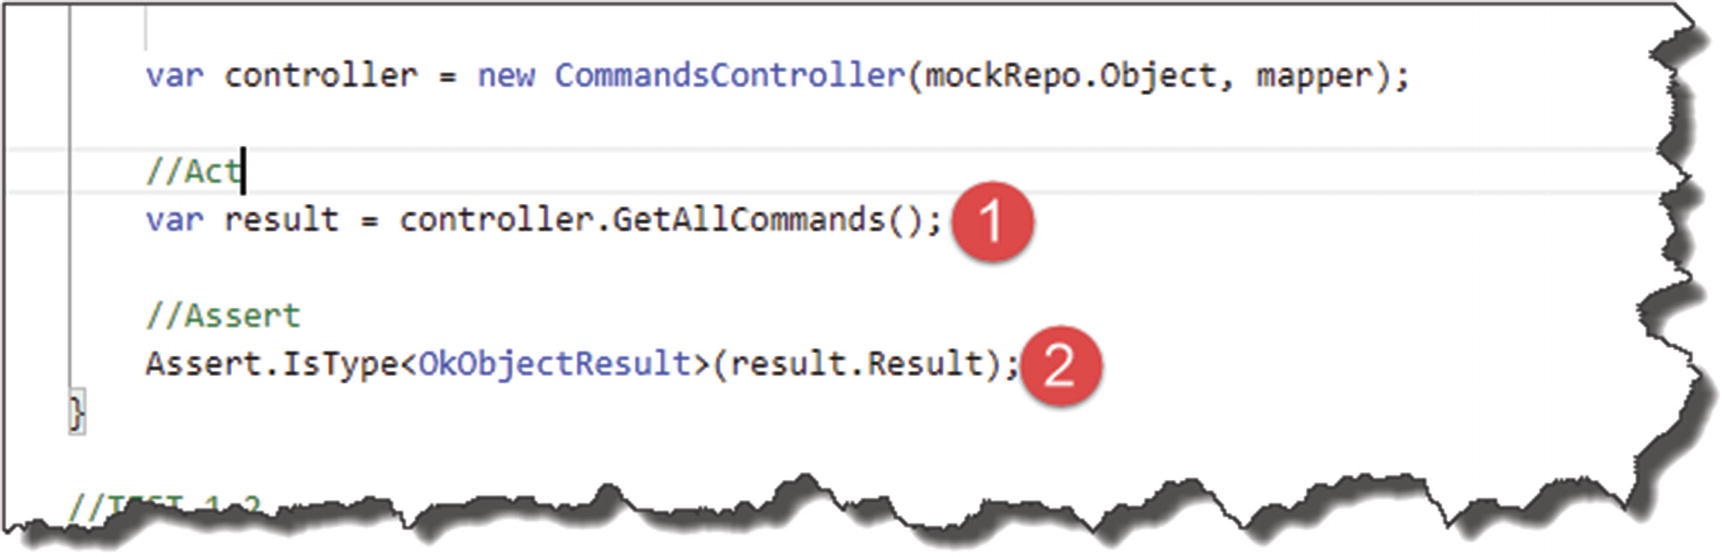
Finish Test 1.1 – Check 200 OK HTTP Response (Empty DB)
Test ID | Arrange and action | Assert |
|---|---|---|
Test 1.1 | Request Resources when 0 exist | Return 200 OK HTTP Response |
Finalizing our Test
- 1.
We make a call to the GetAllCommands action on our Controller.
- 2.
We Assert that the Result is an OkObjectResult (essentially equating to 200 OK).
The only specific arrangement for this test case is the fact that we want the mock repository to return “0” resources.
If you want to “test your test,” save your work, and build the project, and then perform a dotnet test (of course inside the xUnit Project) to make sure it passes.
Test 1.2 – Check Single Resource Returned
Test ID | Arrange and action | Assert |
|---|---|---|
Test 1.2 | Request Resource when 1 exists | Return Single Resource |
![]() I debated on whether to include this test at all. Depending on how you look at it, you may claim that this is not really testing our Controller but testing our Repository.
I debated on whether to include this test at all. Depending on how you look at it, you may claim that this is not really testing our Controller but testing our Repository.
Nonetheless, I thought I’d include it to show you how to obtain this type of information.

Getting to the Value
- 1.
We arrange our mockRepo to return a single command resource.
- 2.
In order to obtain the Value (see step 4), we need to convert our original result to an OkObjectResult object so we can then navigate the object hierarchy.
- 3.
We obtain a list of CommandReadDtos (again we use the “as” keyword to assist here).
- 4.
We assert that we have a Single result set on our commands List.
![]() Personally, I hate this code and think it’s way too complex. The reason for this complexity stems from the fact that in our GetAllCommands controller action, we return our result set as follows:
Personally, I hate this code and think it’s way too complex. The reason for this complexity stems from the fact that in our GetAllCommands controller action, we return our result set as follows:
return Ok(_mapper.Map<IEnumerable<CommandReadDto>>(commandItems));
Had we just used this
return _mapper.Map<IEnumerable<CommandReadDto>>(commandItems);
that is, returning our result set not enclosed in the Ok() method, navigation to our result set would be much simpler. So why did I write the controller action in the way I did? Simply because I wanted to! I wanted to be explicit in the way our successful results were returned.
There is an interesting discussion thread (isn’t there always!) on this exact topic on Stack Overflow.6 For now, my rant is over and we move on.
Save the code and perform a dotnet test to make sure it passes.
Test 1.3 – Check 200 OK HTTP Response
Test ID | Arrange and action | Assert |
|---|---|---|
Test 1.3 | Request Resource when 1 exists | Return HTTP 200 OK |
Test 1.4 – Check the Correct Object Type Returned
Test ID | Arrange and action | Assert |
|---|---|---|
Test 1.4 | Request Resource when 1 exists | Return the correct “type” |
Out of the four tests we’ve constructed for our first controller action, this is my favorite. Why? It’s essentially testing our external contract. If we subsequently change how our controller behaves (and what it passes back to our consumers), this test will fail in regression. This is the mark of a valuable test for me!
![]() Now, I had an internal debate with myself whether to include the rest of the unit test code in the book or whether just to reference you off to GitHub, and we’d close this chapter off here.
Now, I had an internal debate with myself whether to include the rest of the unit test code in the book or whether just to reference you off to GitHub, and we’d close this chapter off here.
The reason I had that debate was
- 1.
I said no fluff/filler content - and you could argue that given the repeated nature of unit tests that we are going into that territory.
- 2.
Most of the code that follows doesn’t require much more explanation as we have covered the concepts already. So, it’s just ends up as code on a page.
However, I did decide to keep the code here in the book, which means that chapter continues on. Why? In one word: Completeness. I wanted to produce the best product that I could, and I felt if I didn’t keep all the code here in the book, it wouldn’t be a complete product.
I hope you agree.
GetCommandByID Unit Tests
GetCommandByID Overview
Verb | URI | Operation | Description |
|---|---|---|---|
GET | /api/commands/{id} | Read | Read a single resource (by Id) |
Attribute | Description |
|---|---|
Inputs | The Id of the resource to be retrieved. This will be present in the URI of our GET request |
Process | Attempt to retrieve the resource with the specified identifier |
Success Outputs | • 200 OK HTTP Response • Returned resource <CommandReadDto> |
Failure Outputs | • 404 Not Found Response |
Safe | Yes – Endpoint cannot alter our resources |
Idempotent | Yes – Repeating the same operation will provide the same result |
GetCommandByID Unit Tests
Test ID | Condition | Expected Result |
|---|---|---|
Test 2.1 | Resource ID is invalid (does not exist in DB) | 404 Not Found HTTP Response |
Test 2.2 | Resource ID is valid (exists in the DB) | 200 Ok HTTP Response |
Test 2.3 | Resource ID is valid (exists in the DB) | Correct Resource Type Returned |
Test 2.1 – Check 404 Not Found HTTP Response
Here we setup the GetCommandsById method on our mock repository to return null when an Id of “0” is passed in. This is a great demonstration of the real power of Moq. How simple was that to set up the behavior of our repository? The answer is very simple!
We then just check for the NotFoundResult type (equating to a 404 Not Found HTTP Response).
Test 2.2 – Check 200 OK HTTP Response
The only novel code here is the way we set up the GetCommandByID method on our repository to return a valid object, again very simple and quick. The rest of the code doesn’t require further discussion.
Test 2.3 – Check the Correct Object Type Returned
This test checks to see if we returned a CommandReadDto. In terms of checking for the validity of our externally facing contract, I like this test very much. If we changed our Controller code to return a different type, this test would fail, highlighting a potential problem with our contract – very useful.
CreateCommand Unit Tests
CreateCommand Overview
Verb | URI | Operation | Description |
|---|---|---|---|
POST | /api/commands | Create | Create a new resource |
Attribute | Description |
|---|---|
Inputs | The “command” object to be created This will be added to the request body of our POST request; an example is shown here: { "howTo": "Example how to", "platform": "Example platform", "commandLine": "Example command line" } |
Process | Will attempt to add a new command object to our DB |
Success Outputs | • HTTP 201 Created Status • Newly Created Resource (response body) • URI to newly created resource (response header) |
Failure Outputs | • HTTP 400 Bad Request • HTTP 405 Not Allowed |
Safe | No – Endpoint can alter our resources |
Idempotent | No – Repeating the same operation will incur a different result |
CreateCommand Unit Tests
Test ID | Condition | Expected Result |
|---|---|---|
Test 3.1 | Valid Object Submitted for Creation | Correct Object Type Returned |
Test 3.2 | Valid Object Submitted for Creation | 201 Created HTTP Response |
- 1.
Test before and after object count of our repository (increment by 1).
- 2.
Test if the content of the object passed back was correct.
- 3.
Test for the 400 Bad Request.
- 4.
Test for the 405 Not Allowed.
That’s not the focus of our testing here.
Our Repository is mocked.
I chose not to write unit tests for those. These cases could be considered valid integration tests that included our controller, but again that’s not what we are doing here. (This is the trap I said I could fall into around the Focused unit test principle.)
For tests 3 and 4, the behavior demonstrated here derived from the default behaviors we get from decorating our controller with the [ApiController] attribute. This is not code I (or you) wrote – so I’m not going to write a unit test for code that I have no control over.
If I subsequently decided to add my own code to handle these conditions, then I’d probably introduce testing for them.
Test 3.1 Check If the Correct Object Type Is Returned
Test 3.2 Check 201 HTTP Response
UpdateCommand Unit Tests
UpdateCommand Overview
Verb | URI | Operation | Description |
|---|---|---|---|
PUT | /api/commands/{Id} | Update (full) | Update all of a single resource (by Id) |
Attribute | Description |
|---|---|
Inputs (2) | The Id of the resource to be updated. This will be present in the URI of our PUT request The full “command” object to be updated This will be added to the request body of our PUT request; an example is shown here: { "howTo": "Example how to", "platform": "Example platform", "commandLine": "Example command line" } |
Process | Will attempt to fully update an existing command object in our DB |
Success Outputs | • HTTP 204 No Content response code |
Failure Outputs | • HTTP 400 Bad Request • HTTP 404 Not Found • HTTP 405 Not Allowed |
Safe | No – Endpoint can alter our resources |
Idempotent | Yes – Repeating the same operation will not incur a different result |
UpdateCommand Unit Tests
Test ID | Condition | Expected result |
|---|---|---|
Test 4.1 | Valid object submitted for update | 204 No Content HTTP Response |
Test 4.2 | Nonexistent resource ID submitted for update | 404 Not Found HTTP Response |
As we are not returning any resources back as part of our update, there are no tests checking for resource type this time.
I have opted to test for the 404 Not Found result as this is behavior we actually wrote – so I want to test it.
Test 4.1 Check 204 HTTP Response
Here we ensure that the GetCommandById method will return a valid resource when we attempt to “update.” We then check to see that we get the success 204 No Content Response.
Test 4.2 Check 404 HTTP Response
We setup our mock repository to return back null, which should trigger the 404 Not Found behavior.
PartialCommandUpdate Unit Tests
PartialCommandUpdate Overview
Verb | URI | Operation | Description |
|---|---|---|---|
PATCH | /api/commands/{Id} | Update (partial) | Update part of a single resource (by Id) |
Attribute | Description |
|---|---|
Inputs (2) | The Id of the resource to be updated. This will be present in the URI of our PATCH request The change-set or “patch document” to be applied to the resource This will be added to the request body of our PATCH request; an example is shown here: [ { "op": "replace", "path": "/howto", "value": "Some new value" }, { "op": "test", "path" : "commandline", "value" : "dotnet new" } ] |
Process | Will attempt to perform the updates as specified in the patch document Note: If there is more than one update, all those updates need to be successful. If one fails, then they all fail |
Success Outputs | • HTTP 204 Not Content HTTP Status |
Failure Outputs | • HTTP 400 Bad Request • HTTP 404 Not Found • HTTP 405 Not Allowed |
Safe | No – Endpoint can alter our resources |
Idempotent | No – Repeating the same operation may incur a different result |
PartialCommandUpdate Unit Tests
Test ID | Condition | Expected Result |
|---|---|---|
Test 5.1 | Nonexistent resource ID submitted for update | 404 Not Found HTTP Response |
Even fewer tests here! As mentioned, when we implemented this endpoint, there are addition external dependencies required to get PATCH endpoints up and running. This cascades into unit testing too. The cost vs. benefit proposition of including the necessary inclusions to perform one unit test (testing for a 204 No Content) did not stack up for me and I assumed for you too as the reader! I have therefore included only one test below – the 404 Not Found Response.
Test 5.1 Check 404 HTTP Response
DeleteCommand Unit Tests
DeleteCommand Overview
Verb | URI | Operation | Description |
|---|---|---|---|
DELETE | /api/commands/{Id} | Delete | Delete a single resource (by Id) |
Attribute | Description |
|---|---|
Inputs | The Id of the resource to be deleted. This will be present in the URI of our DELETE request |
Process | Will attempt to delete an existing command object to our DB |
Success Outputs | • HTTP 204 No Content HTTP result |
Failure Outputs | • HTTP 404 Not Found HTTP result |
Safe | No – End point can alter our resources |
Idempotent | Yes – Repeating the same operation will incur the same result |
DeleteCommand Unit Tests
Test ID | Condition | Expected result |
|---|---|---|
Test 6.1 | Valid resource Id submitted for deletion | 204 No Content HTTP Response |
Test 6.2 | Nonexistent resource Id submitted for deletion | 404 Not Found HTTP Response |
Test 6.1 Check for 204 No Content HTTP Response
Test 6.2 Check for 404 Not Found HTTP Response
Wrap It Up
We covered a lot in this chapter, and to be honest we really only scraped the surface. Hopefully though you learned enough to start to get you up to speed on unit testing.
The power of Moq to help Isolate ourselves when unit testing
The somewhat arbitrary nature of what to test (use the characteristics as pragmatic guidelines)
With that we move into looking at how we’ll deploy to production using a CI/CD pipeline on Azure DevOps!