
Chapter Summary
In this chapter we deploy our API onto Azure for use in the real world. On the way, we create the Azure resources we need and revisit the discussion on runtime environments and configuration.
When Done, You Will
Know a bit more about Azure.
Have created the Azure resources we need to deploy our API.
Update our CI/CD pipeline to deploy our release to Azure.
Provide the necessary configuration to get the API working in a Production Environment.
We have a lot to cover – so let’s get going!
Creating Azure Resources
Azure is a huge subject area and could fill many books, many times over, so I’ll be focusing only on the aspects we need to get our API and database up and running in a “production-like” environment – which should be more than enough.
- 1.
Create resources manually via the Azure Portal.
- 2.
Create resources automatically via Azure Resource Manager Templates.
- 3.
Create resources automatically using third-party tools, for example, Terraform.
It’s simpler (in our case anyway, see next point).
We only have a small number of resources.
I think it’s the right approach to learning (our focus is still our API).
Create Our API App

Create an Azure Resource
![]() Again, I’ll mention the point that the following screenshots were correct at the time of writing, but given the fast pace of change in Azure, they may be subject to change.
Again, I’ll mention the point that the following screenshots were correct at the time of writing, but given the fast pace of change in Azure, they may be subject to change.
Fundamentally though, resource creation in Azure is not that difficult, so small UI changes should not stump someone as smart as yourself!

Search for API App
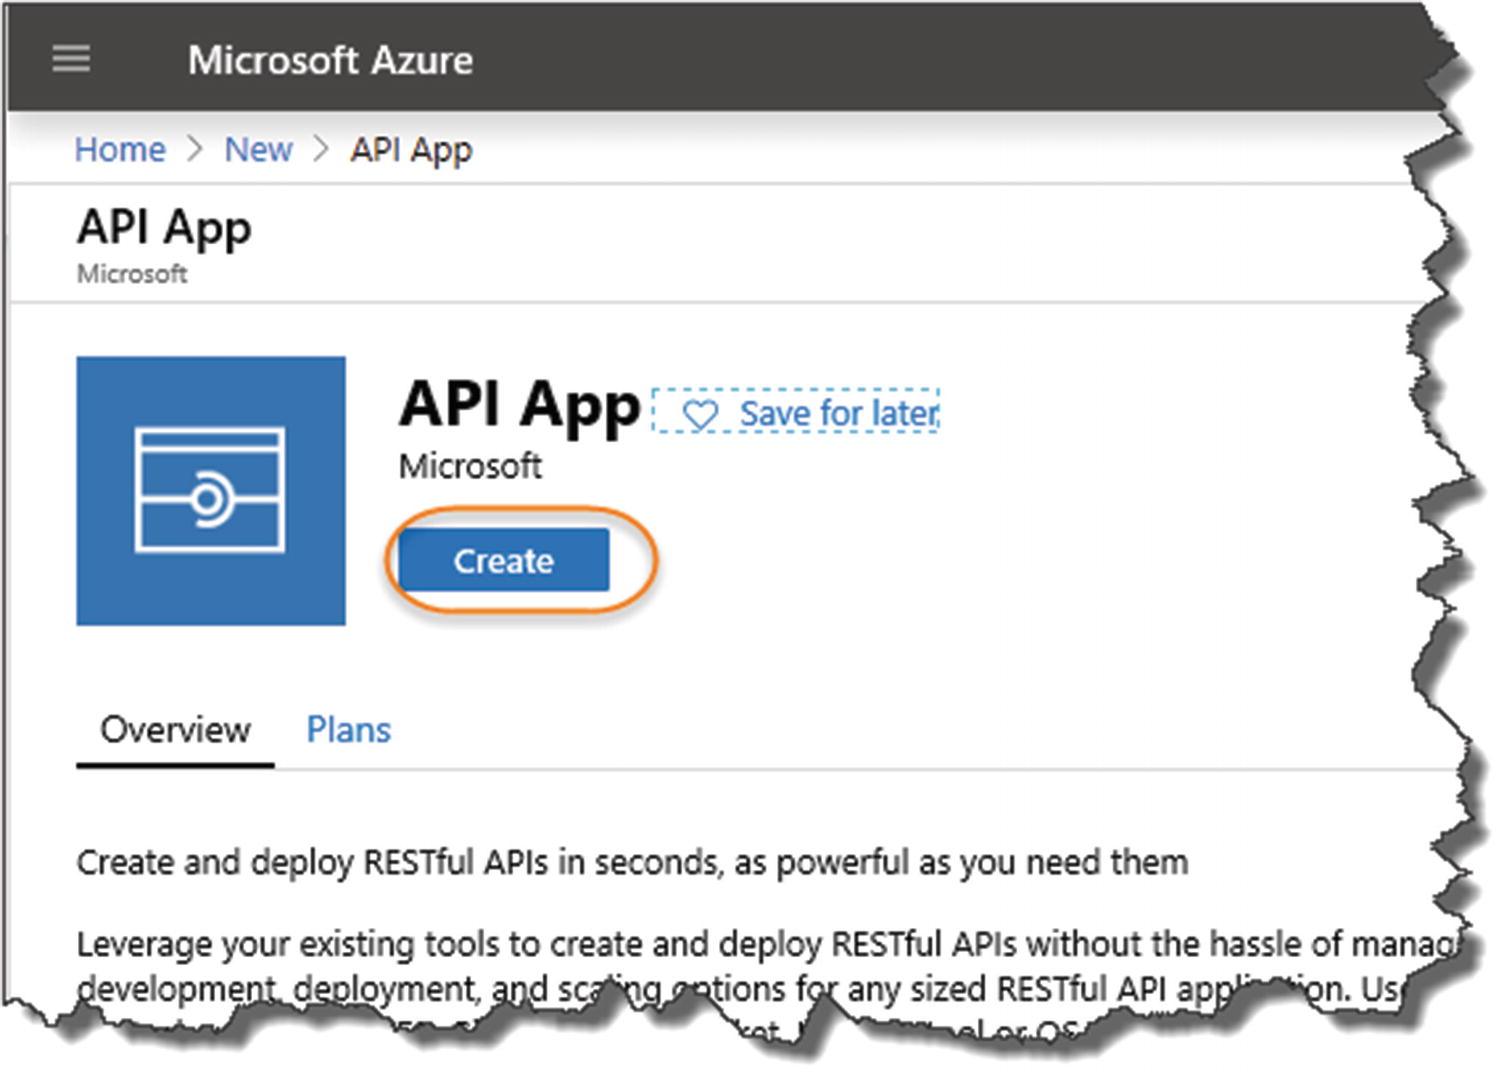
Create the API App
- 1.
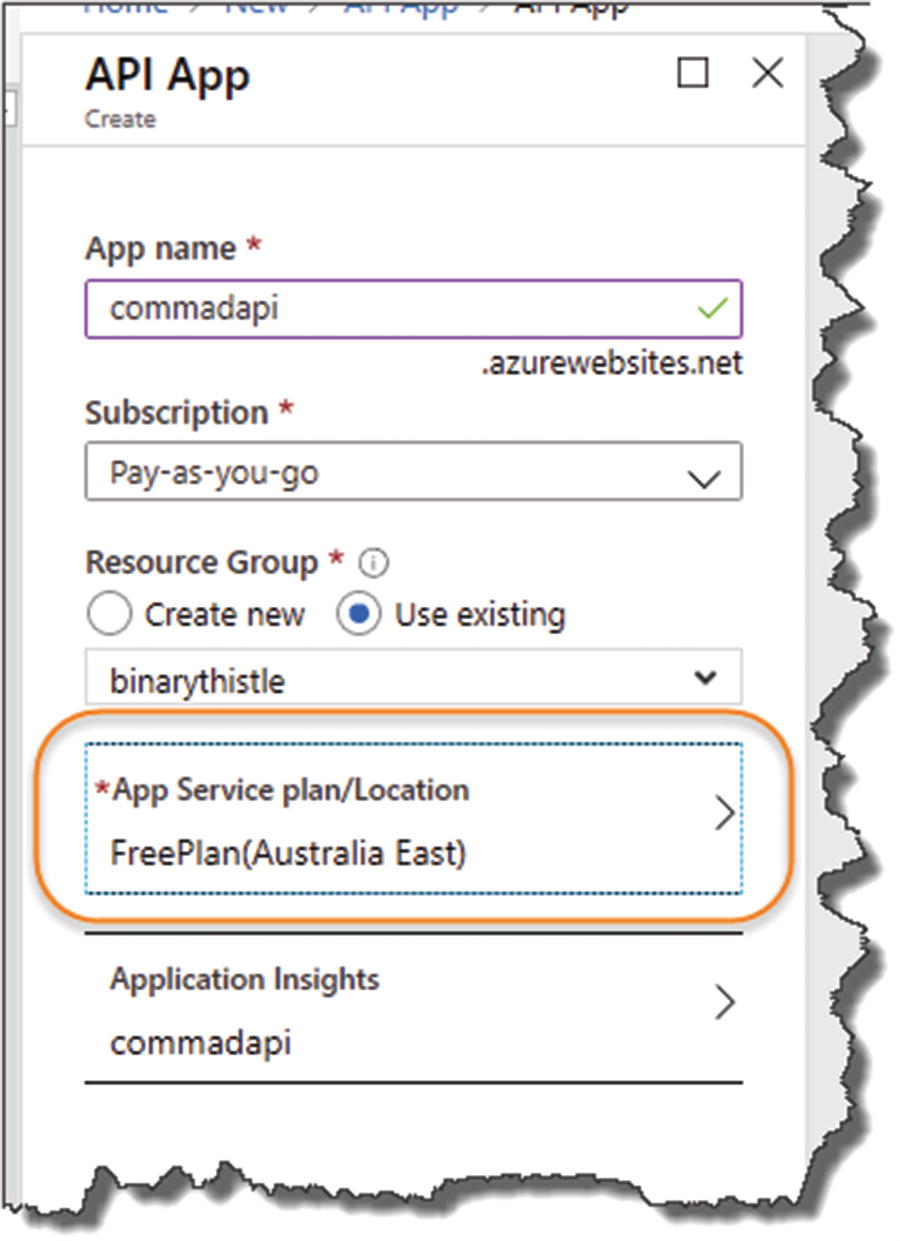
A name for your API App.1
- 2.
Select your subscription (I just have a “pay as you go”).
- 3.A name for your new “Resource Group” – these are just groupings of “resources”; if you don’t have an existing resource group, you’ll need to create one.
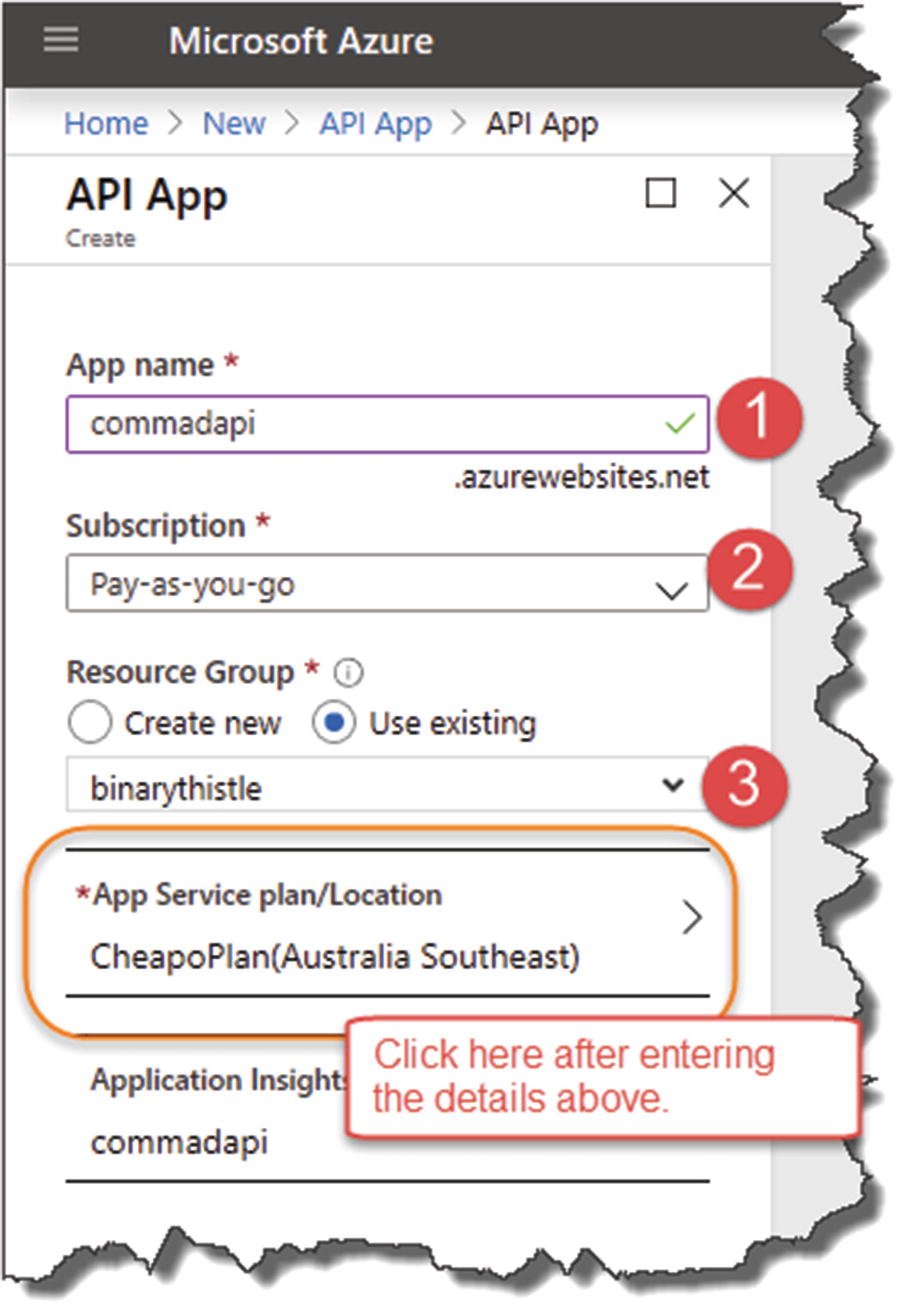 Figure 13-4
Configure your API App – make sure you configure a free plan!
WAIT! Before you click Create, click the App Service plan/location.
![]() The API App resource describes what you are getting; the App Service Plan and Location tells you how that API App will be delivered to you.
The API App resource describes what you are getting; the App Service Plan and Location tells you how that API App will be delivered to you.
For example, do you want your API App
Hosted in the United States, Western Europe, Asia, etc.
On shared or dedicated hardware
Running on certain processor speed, etc.
By default, if you’ve not used Azure before, you’ll be placed on a Standard plan which can incur costs! (This is a personal anecdote because I did that and was shocked when my test API started costing me money!)
So be careful of the Service Plan you set up; I detail the free plan next.
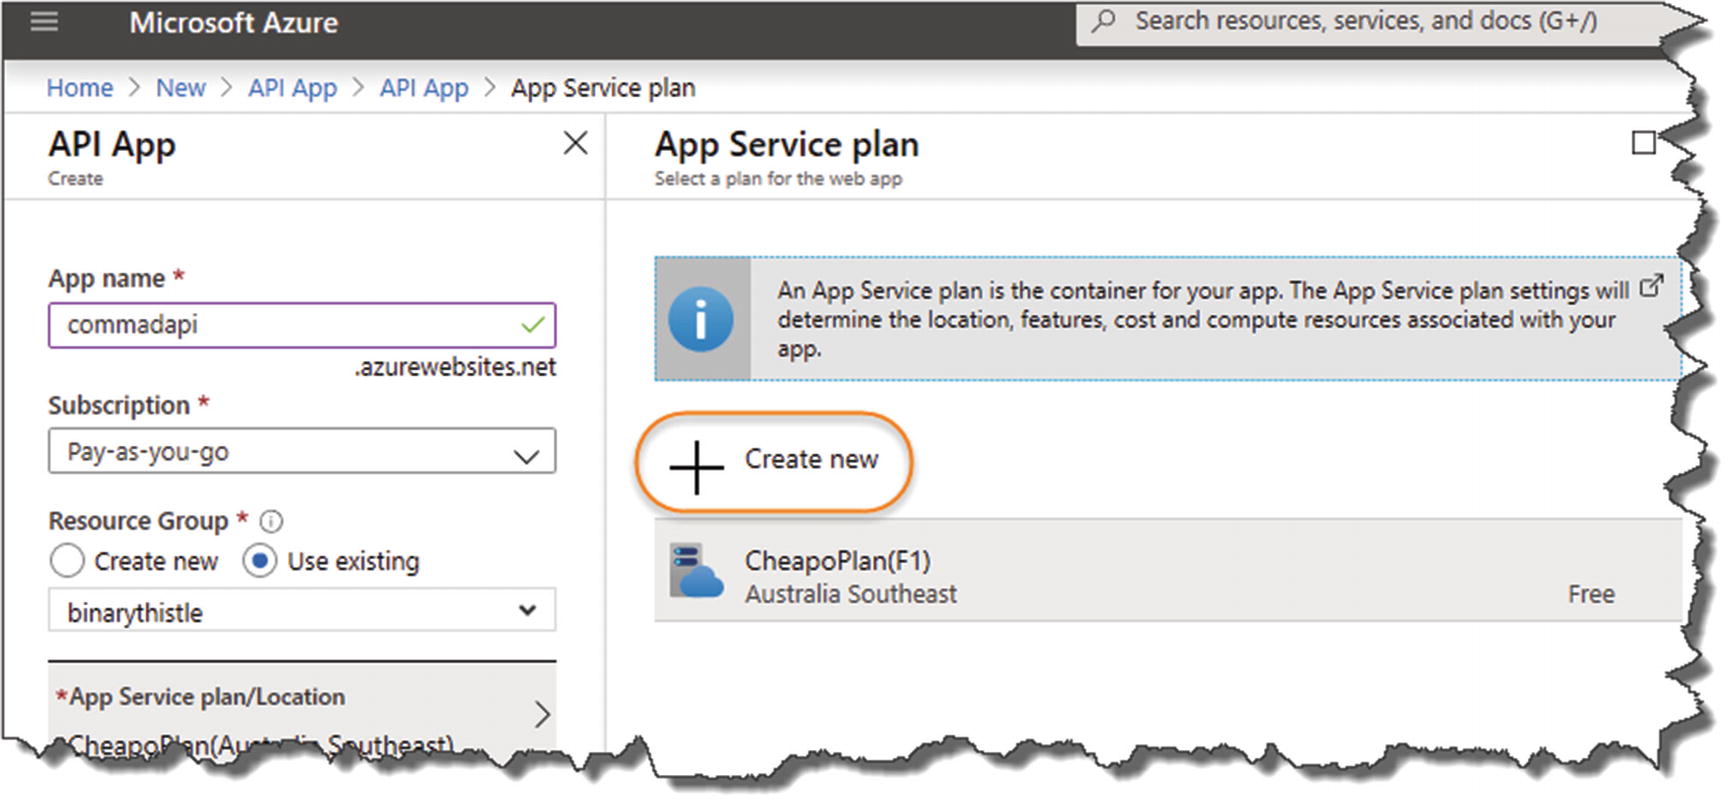
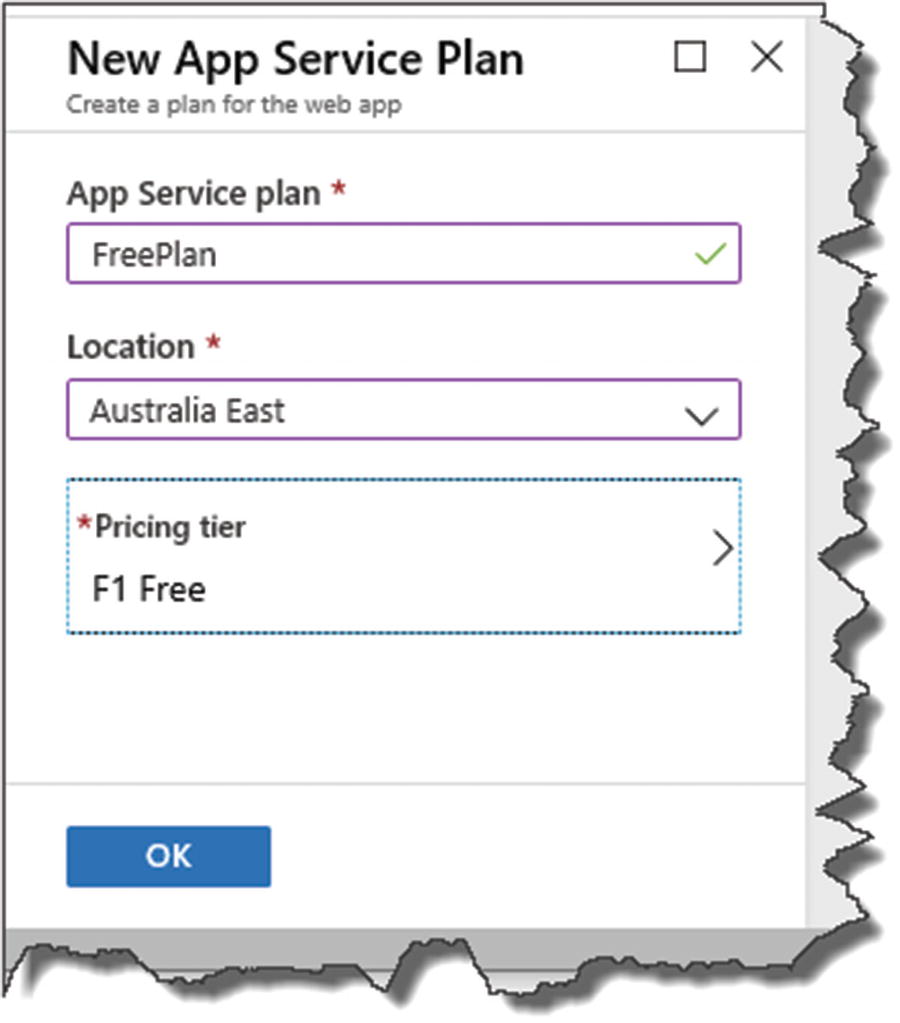
Creating an App Service Plan

The Pricing Tier

Select the Free option
- 1.
Select the Dev/Test tab.
- 2.
Select the “F1” Option (Shared infrastructure/60 minutes compute).
- 3.
Click Apply.
We have selected the cheapest tier with “Free Compute Minutes,” although please be aware that I cannot be held responsible for any charges on your Azure Account! (After I create and test a resource if I don’t need it – I “stop it” or delete it).
You're ready to go
Free plan has been applied to the API APP
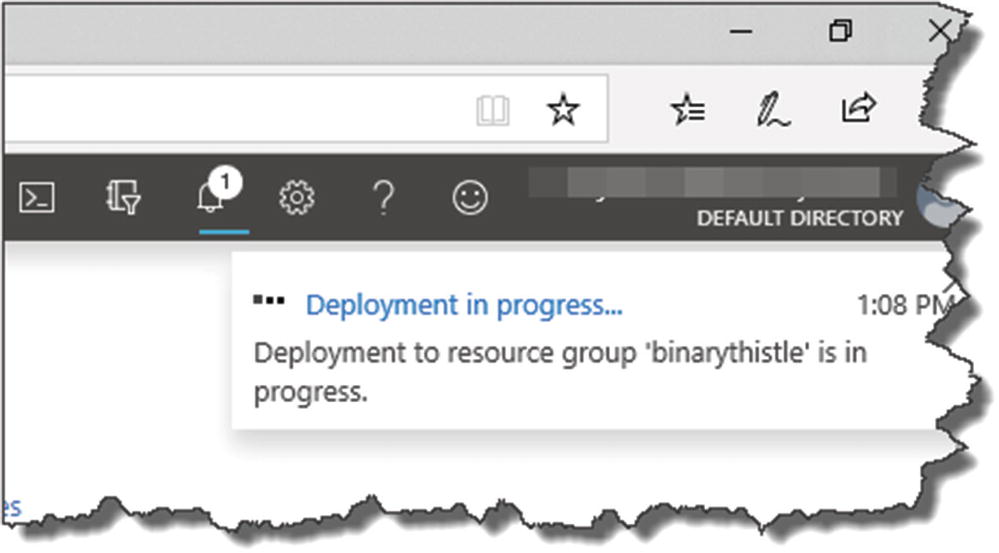
Deployment will take a few minutes…

Notification of Resource Creation
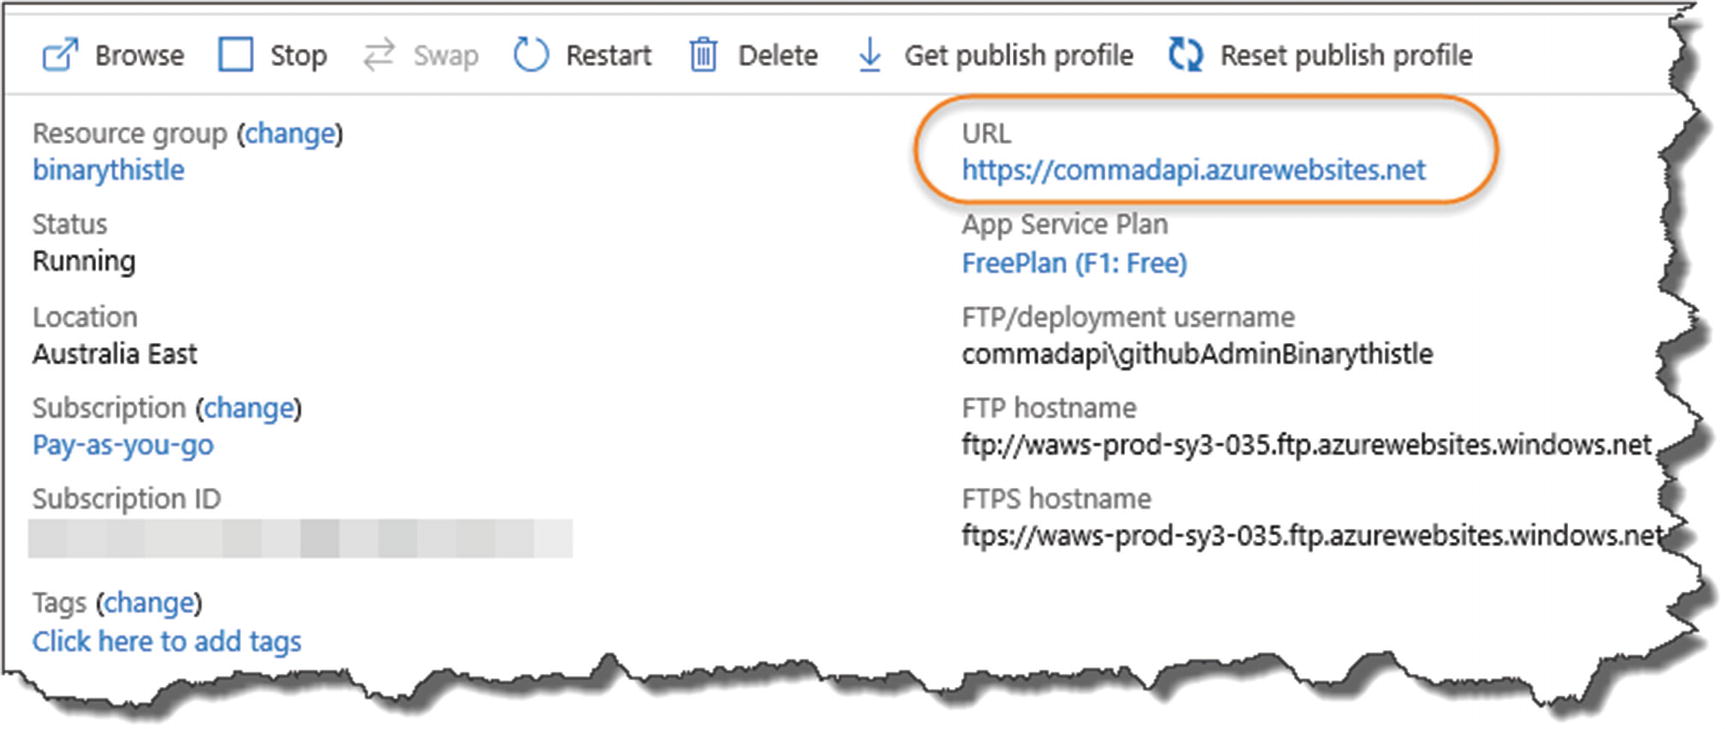
API App Overview including URI

Default public landing page
As we have not deployed anything, you’ll get a similar landing page as shown in Figure 13-13 (of course for reasons already mentioned, it may look a bit different, but that is of no consequence to us at this point).
![]() You’ve just created your first Azure resource, one of the primary components of our production solution architecture!
You’ve just created your first Azure resource, one of the primary components of our production solution architecture!
Create Our PostgreSQL Server
Now, there are a number of different ways that you can create a PostgreSQL database on Azure, but I’m going to take a slightly unorthodox route and spin up a PostgreSQL Server in a Container Instance in Azure (think Docker containers).
Azure Database for PostgreSQL Servers
Container Instance running a PostgreSQL Image
Azure Database for PostgreSQL Servers

Cost estimate for Postgres Server
Container Instance Pricing
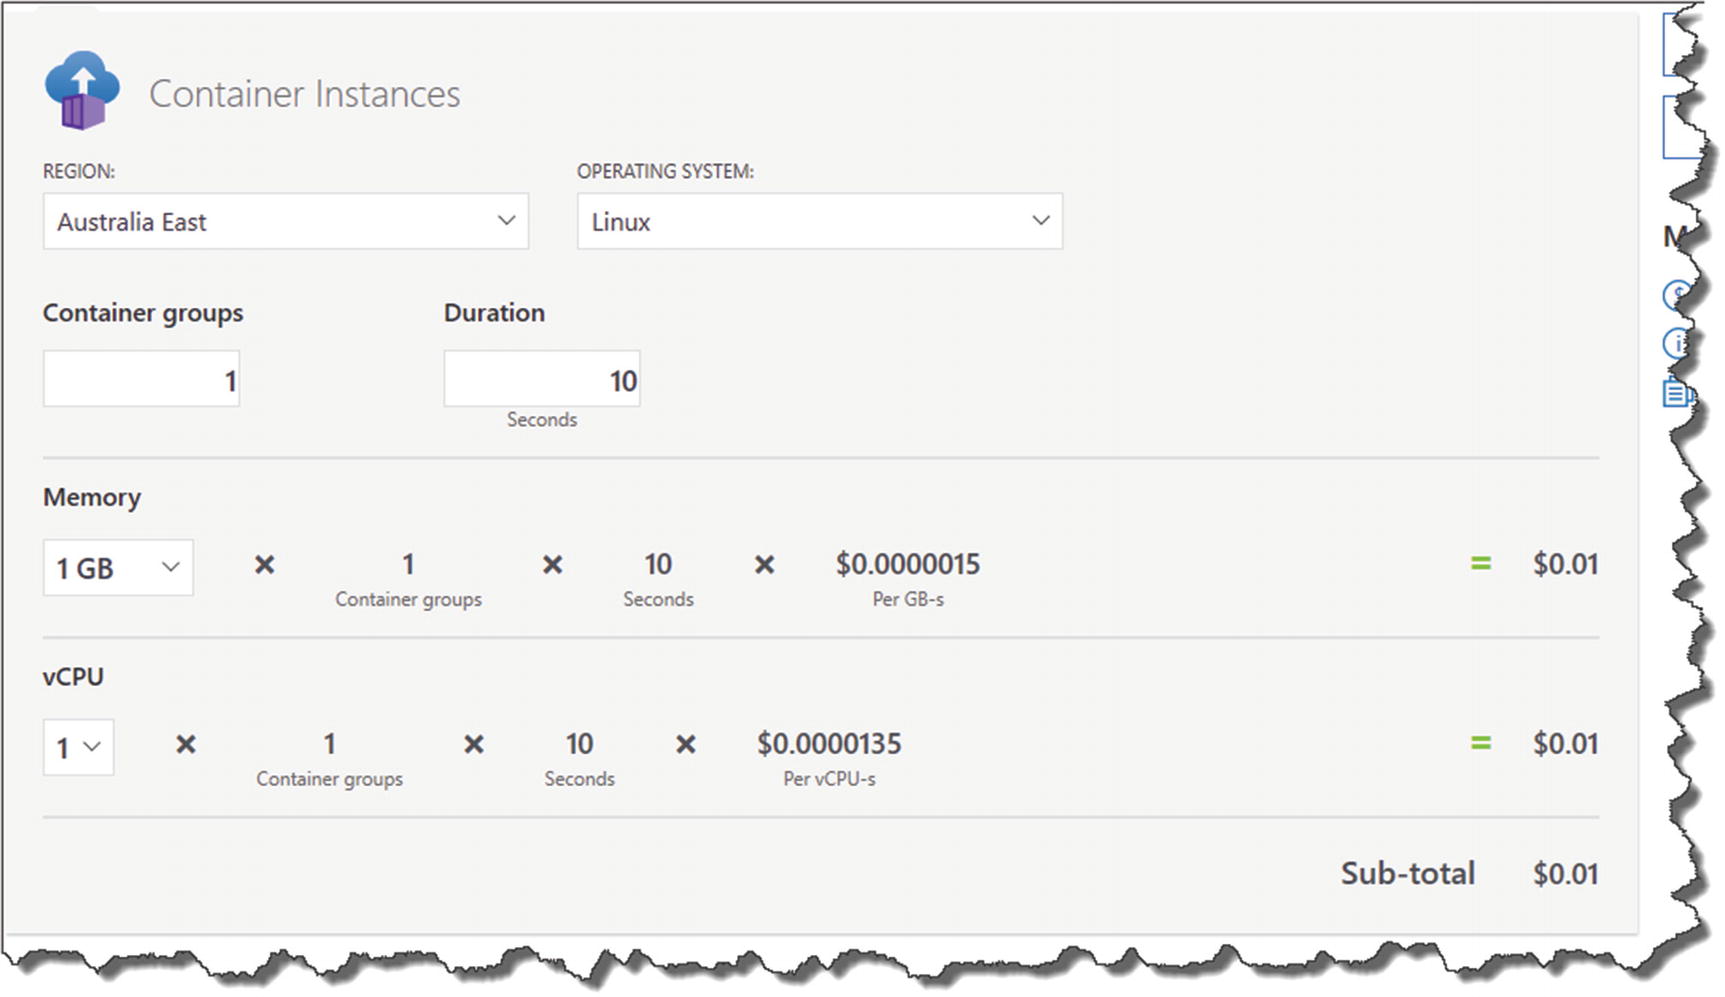
Container instance pricing
Now, I don’t need to tell you that “you get what you pay for” in this life, so clearly the Azure Database for PostgreSQL option is a purpose-built resource that’s designed to work as a database, whereas the container option I’m taking is in no way optimized for Production performance!
![]() If you restart the PostgreSQL container instance that we create in the next section, it essentially resets, and you will lose your configuration and data relating to it – just something to bear in mind.
If you restart the PostgreSQL container instance that we create in the next section, it essentially resets, and you will lose your configuration and data relating to it – just something to bear in mind.
From a learning (and cost!) perspective, I still think this option is acceptable. If, however, you are moving to a “real” Production environment, then you’ll really need to look at something a little more fit for purpose.

Search for Container Instances
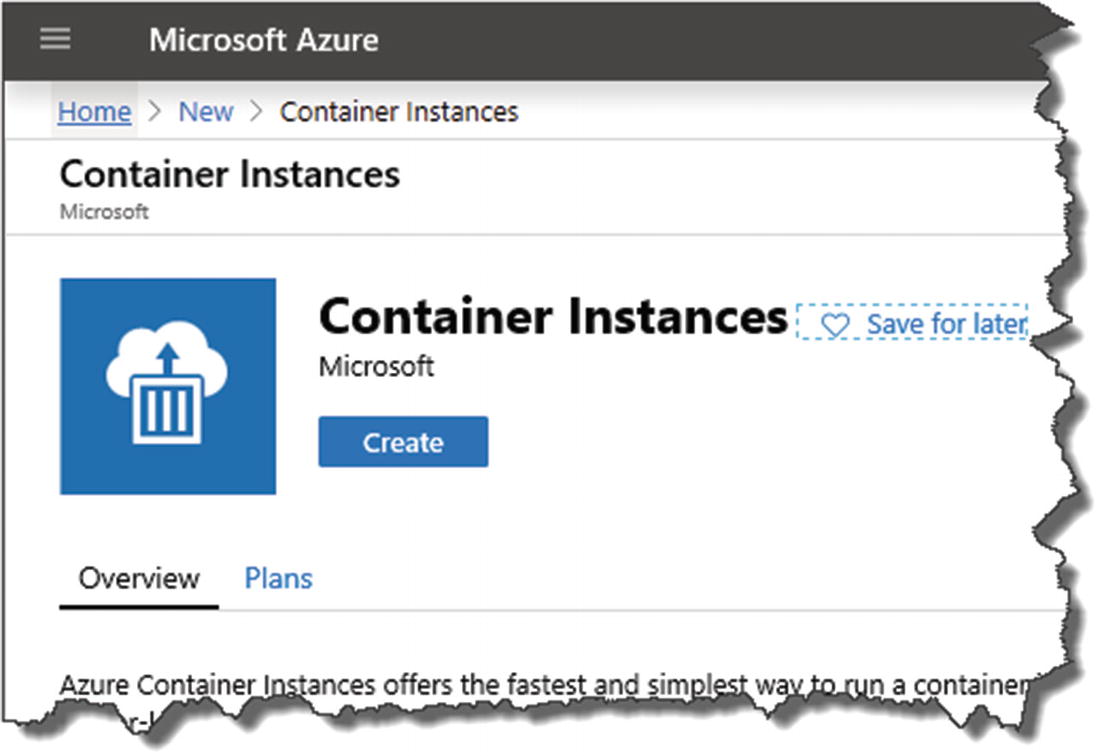
Overview of Container Instances

Configure your Container Instance
- 1.
Your subscription.
- 2.
Resource group (I’d make this the same as the one you placed the API app into).
- 3.
Container name can be anything, but I’d name it something that identified it as a PostgreSQL server.
- 4.
Region (I’d make this the same as the one you placed the API app into).
- 5.
Image Source: Select Docker Hub (this is where we’ll get our postgres image).
- 6.
Image Type: Select Public (the postgres image we use in the next step is publicly available on Docker Hub).
- 7.
Image Name: As mentioned earlier, this needs to be the exact name of the image on Docker Hub, so in this case postgres.
- 8.
OS Type: Select Linux.
- 9.
Size: Leave these as the defaults.

Networking

Networking configuration
- 1.
Select “Public” for a public IP Address (note this can change if the container restarts).
- 2.
Add a DNS name label as the IP Address can change if the container restarts.
- 3.
Add the standard 5432 TCP port for PostgreSQL.

Onto Advanced Settings

Setup Environment variables
- 1.
Set the Restart Policy to “On Failure.”
- 2.
Create an “environment variable” for the Postgres password for the default database; the Key you should use for this is
![]() As you can see our PostgreSQL password is in plain text; again this is not a production-suitable solution. We are using it for (cheap!) testing purposes only.
As you can see our PostgreSQL password is in plain text; again this is not a production-suitable solution. We are using it for (cheap!) testing purposes only.
If you pop back to Chapter 7 where we set up an instance of PostgreSQL locally using Docker Desktop, there is a bit more of a discussion on these settings – so we don’t need to go over old ground here. Just a point of note, however, the environment variable for the PostgreSQL DB password (POSTGRES_PASSWORD) is exactly the same as the one we used when setting up our local Docker instance.
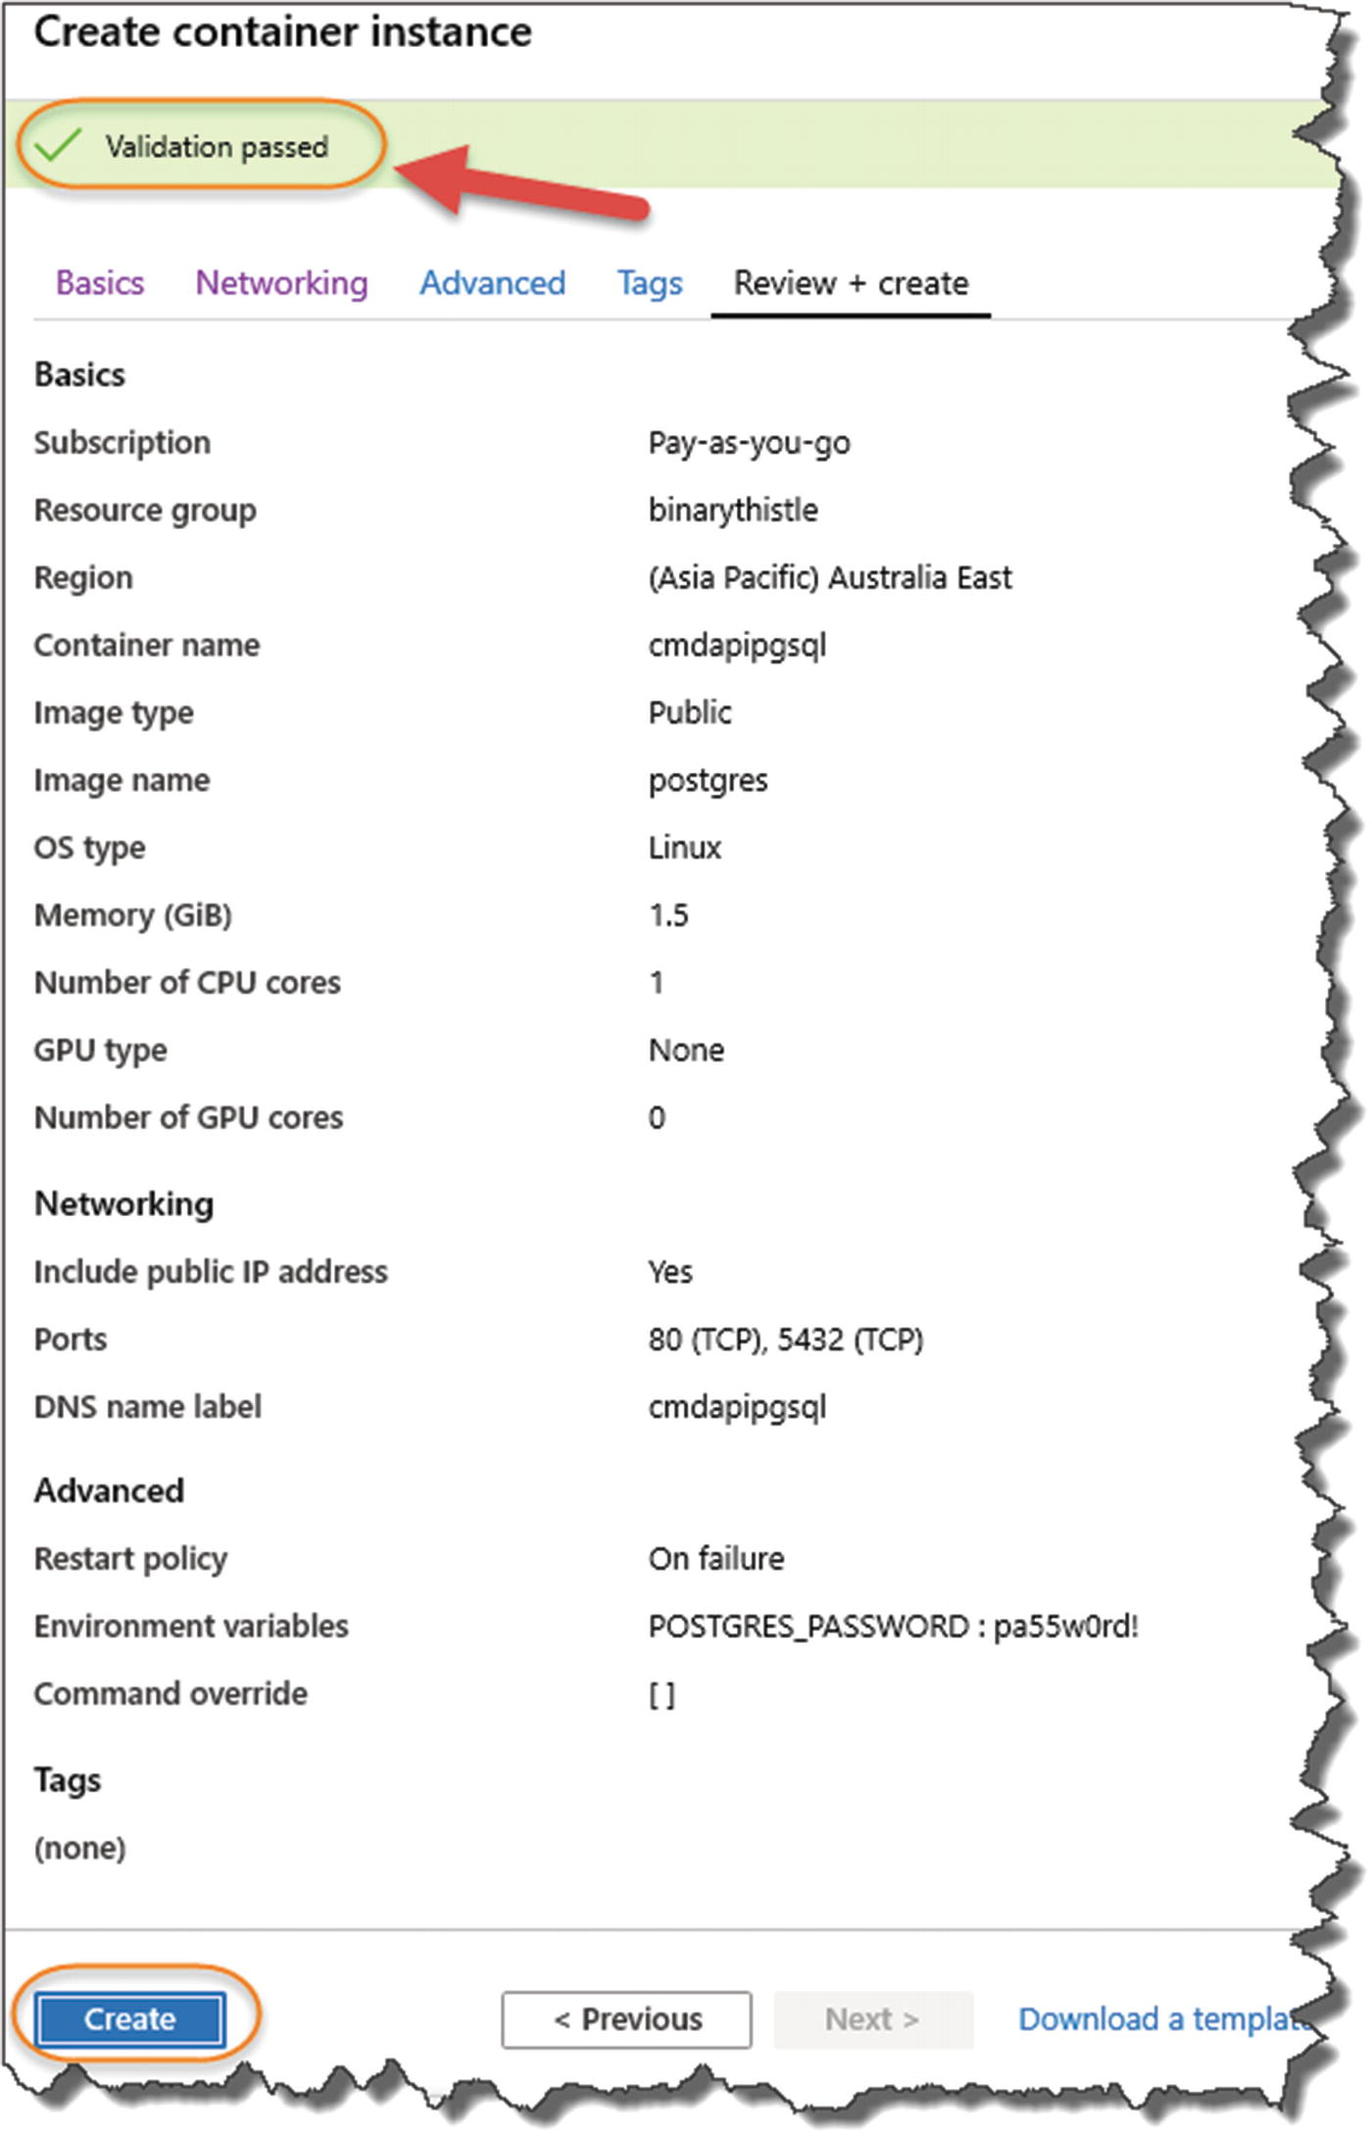
Validation Passed
You should see “Validation Passed” at the top of the screen; when you’re happy, click Create, and in a similar way to the API App, Azure will go off and create your resource.

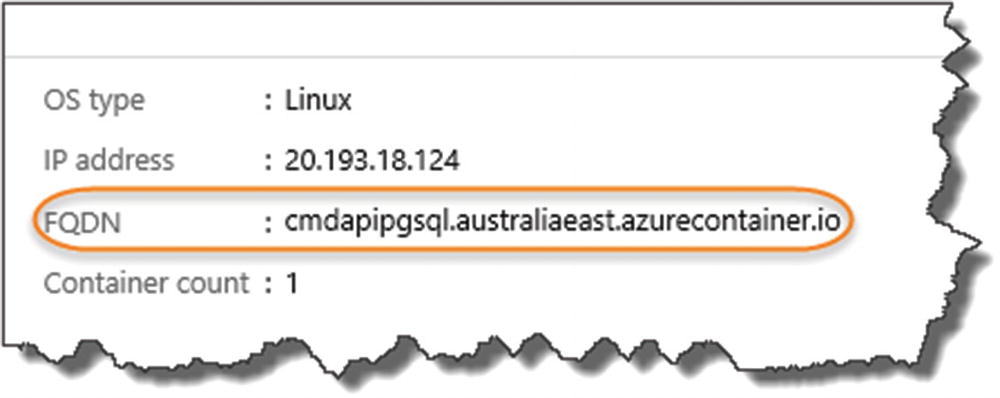
Resources up and running
Connect and Create Our DB User
As before we want to create a dedicated user to connect in and use our database, the exercise is also a great opportunity to test that our PostgreSQL container instance is up and running.
Location of the API
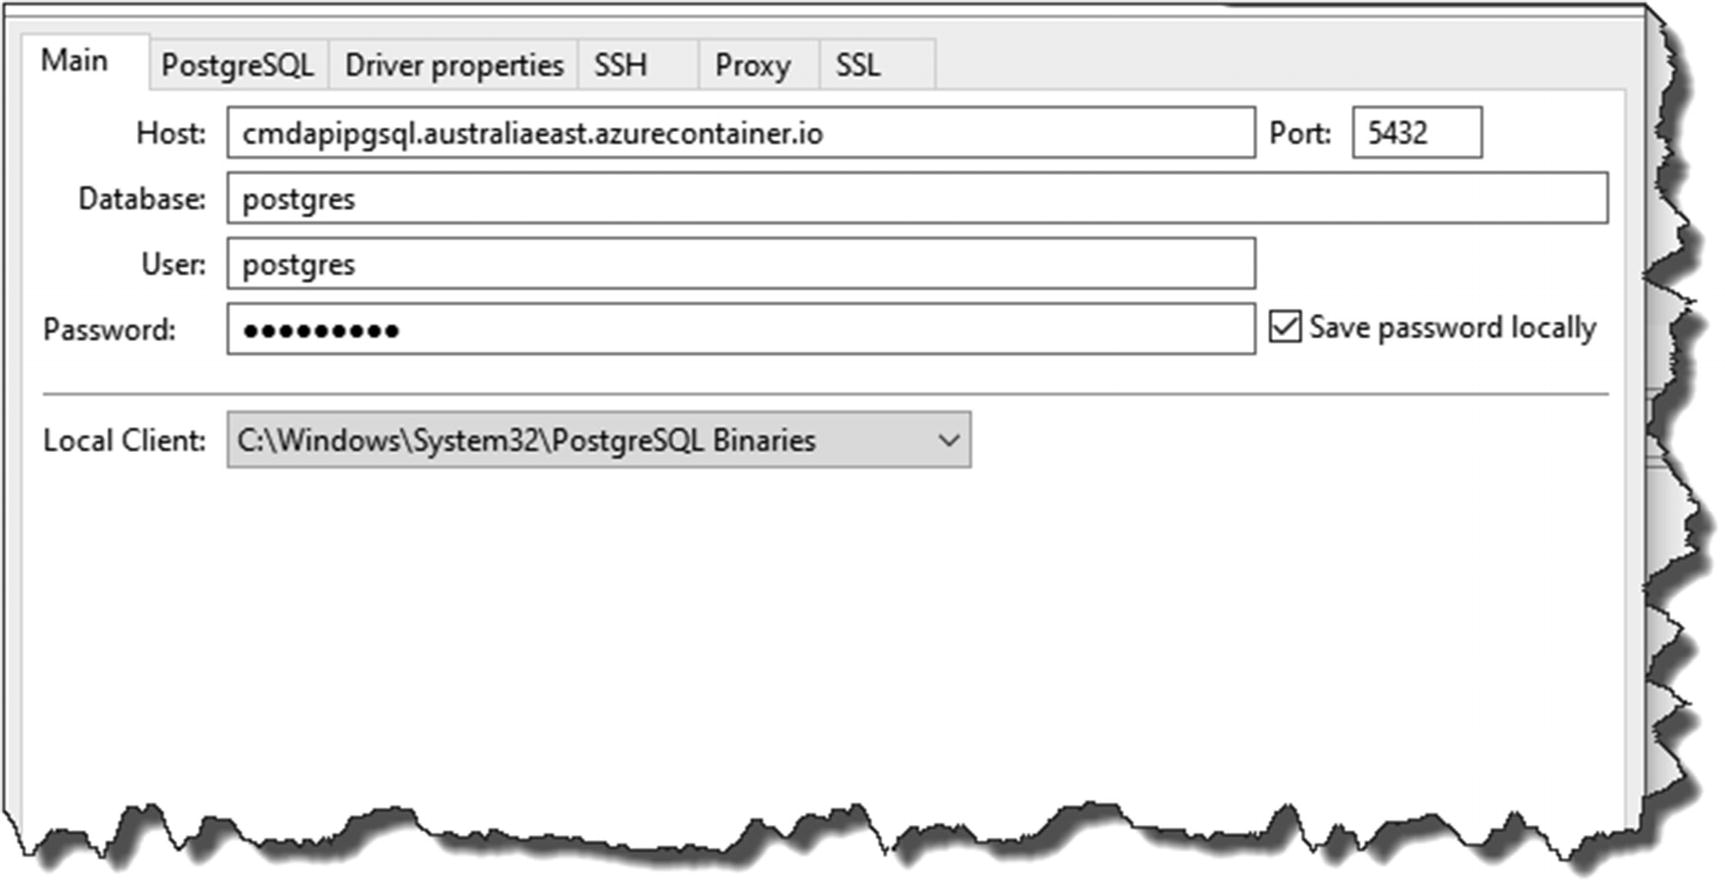
Connect to the Azure instance

Ensure Show all Databases is ticked
You can test the connection or press Finish to setup our connection to our Azure-based instance.
Open a New SQL Editor Window.
Enter and run the following SQL (you can change the password obviously!):
And again, check that the role was created and that it has create database rights.
Along with the FDQN, set aside the user ID and password for later.
Revisit Our Dev Environment
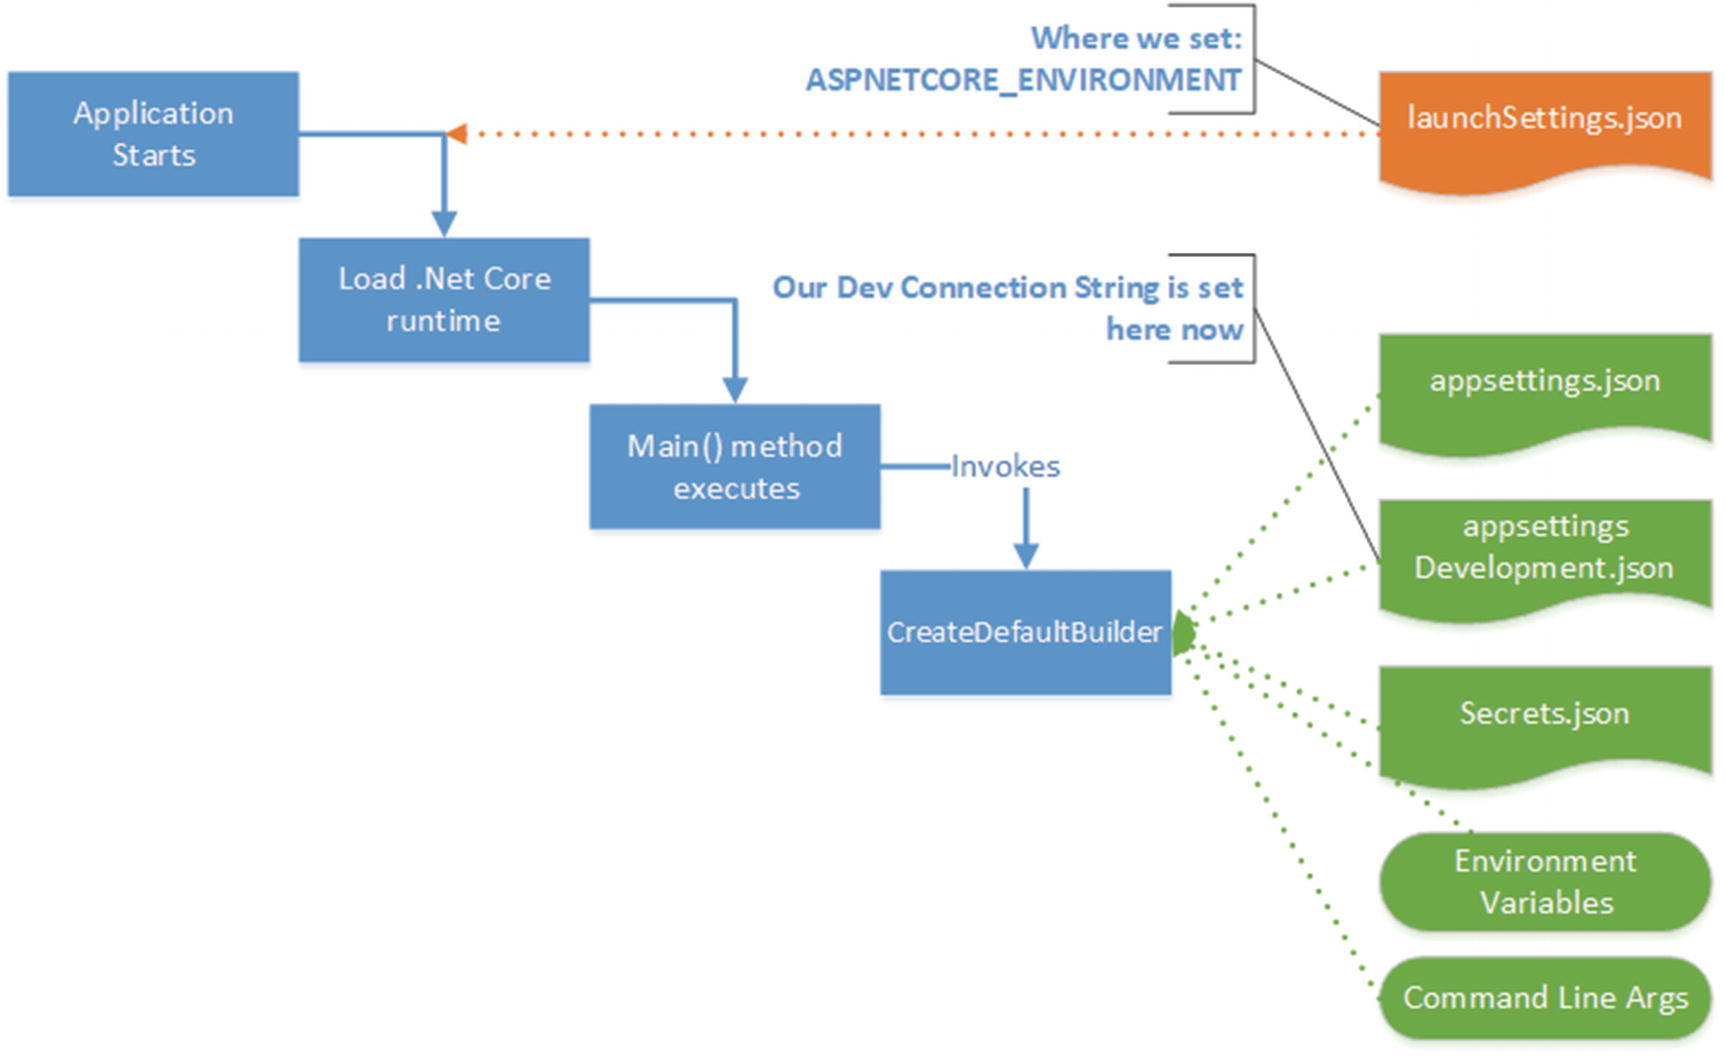
Revisit configuration
We set our environment in launchSettings.json (in the ASPNETCORE_ENVIRONEMENT variable).
Our Connection Strings can sit in appsettings.json or the environment specific variants of that file, for example, appsettings.Development.json. This is where our Development connection string sits.
“Secret” information, such as Database log-in credentials, can be broken out into Secrets.json via The Secret Manager tool. Meaning, we don’t check in sensitive data to our code repository.
Non-sensitive Connection String stored in appSettings.Development.json).
Our User ID, stored in a User Secret called UserID.
Our Password, stored in a User Secret called Password.
Setting Up Config in Azure
Require some simple config settings in our API App.
Require no code changes in our app; there would be something very wrong if we needed to change our code to move into production – that should all be handled by configuration.
Configure Our Connection String
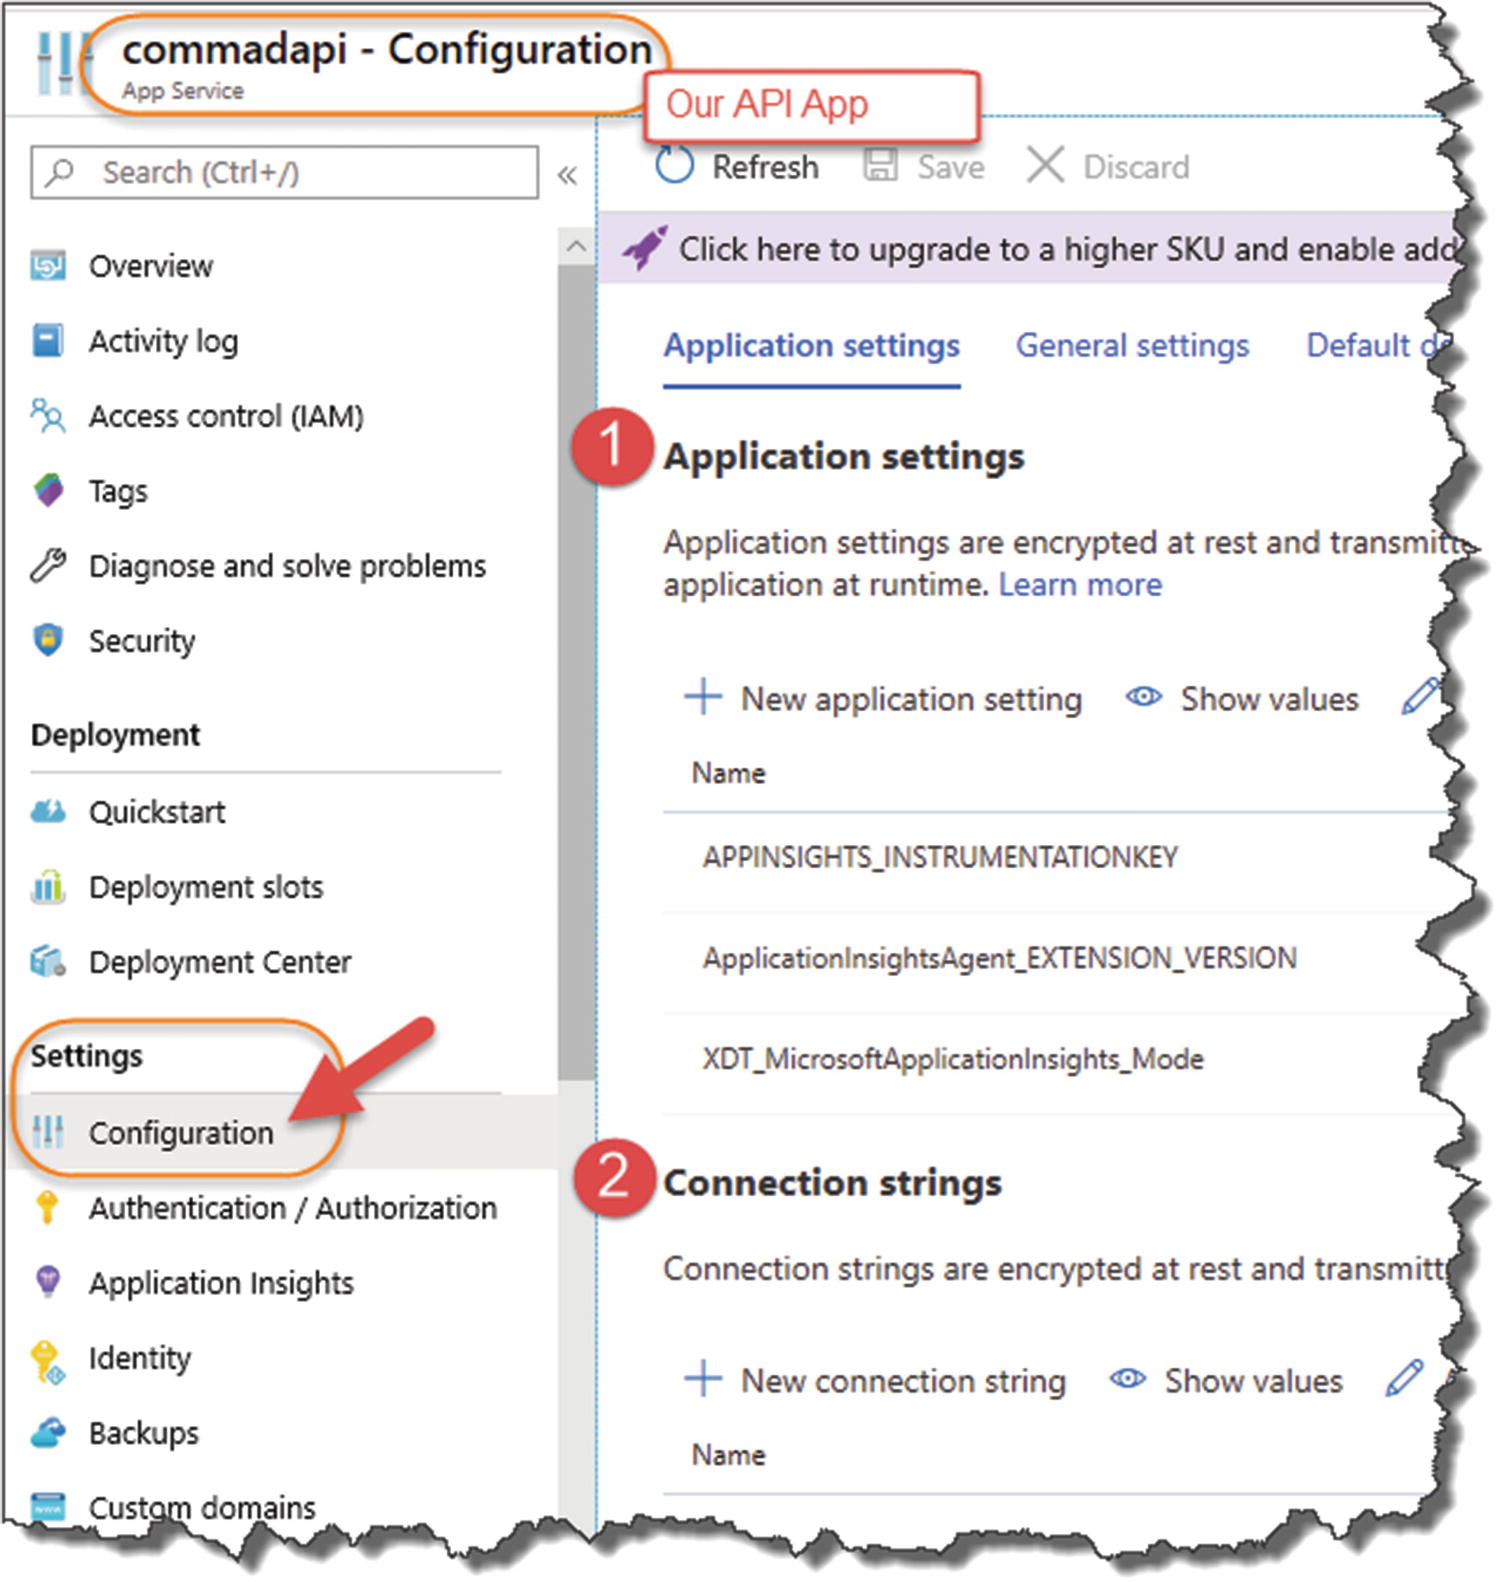
Application settings and connection strings in the API app
- 1.
Application Settings
- 2.
Connection Strings
- 1.
Connection String Name (this should be the same name as our development connection string – I cannot stress that enough!).
- 2.
The connection string we generated earlier (note we’ll be configuring our User ID and Password separately below).
- 3.Set the type to Custom.
 Figure 13-30
Add the connection string; be careful to name it correctly
Warning!
 You do have the option of “PostgreSQL” for the connection string type – however, I’ve had significant issues trying to use this – so use it at your peril!

Again, ensure it's named correctly
Configure Our DB User Credentials
- 1.
Name: This should be the same as our User Secret name for User ID.
- 2.
Value: This is the user account you set up on the PostgreSQL Container Instance earlier.
Name: UserID
Value: cmddbuser

Create User ID Application Setting

Make sure you name it correctly

UserID added to Application Settings
![]() Add a second Application setting for our Password. This should follow the same process as UserID.
Add a second Application setting for our Password. This should follow the same process as UserID.
![]() Storing passwords in Application Settings possibly isn’t the best location for them, one reason being that you can see what they are in plain text. Even though Azure is “secured,” that is, only authorized users will have access to it – plain text passwords are just generally not a great idea.
Storing passwords in Application Settings possibly isn’t the best location for them, one reason being that you can see what they are in plain text. Even though Azure is “secured,” that is, only authorized users will have access to it – plain text passwords are just generally not a great idea.
In a real production environment, you’d want to opt for something like Azure Key Vault or a third-party product such a Vault.2 I feel that detailing that here would just be taking us too far out the way of what we want to achieve today.
Configure Our Environment
Name: ASPNETCORE_ENVIRONMENT
Value: Production
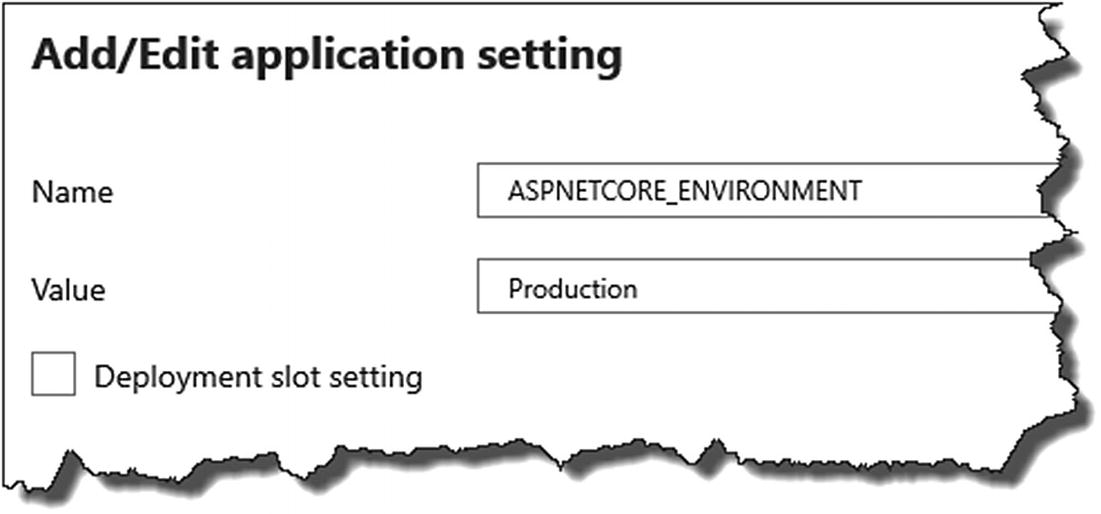
Specifying our environment
- 1.
Application settings: ASPNETCORE_ENVIRONMENT
- 2.
Application settings: Password
- 3.
Application settings: UserID
- 4.
Connection string: PostgreSQLConnection

Newly created Application Settings
Again, I know I keep repeating myself, but you need to make sure the Names of these configuration items are the same as their Development counterparts, as that is what our application is expecting – please double-check these! The values of these items I have to leave up to you to get correct!

Make sure you save!
Make sure you click Save to apply your changes (when starting out with this stuff, I didn’t and spent a lot time trying to understand what was wrong!).
![]() You have just set up all your Azure Resources and have configured them ready for our deployment!
You have just set up all your Azure Resources and have configured them ready for our deployment!
Completing Our Pipeline

The pipeline
- We created what Azure DevOps calls a Build Pipeline that does the following:
Builds our projects
Runs our unit tests
Packages our release
What we now need to do in Azure DevOps is create a Release Pipeline that takes our package and releases and deploys it to Azure. So basically, our full CI/CD Pipeline = Azure DevOps Build Pipeline + Azure DevOps Release Pipeline.
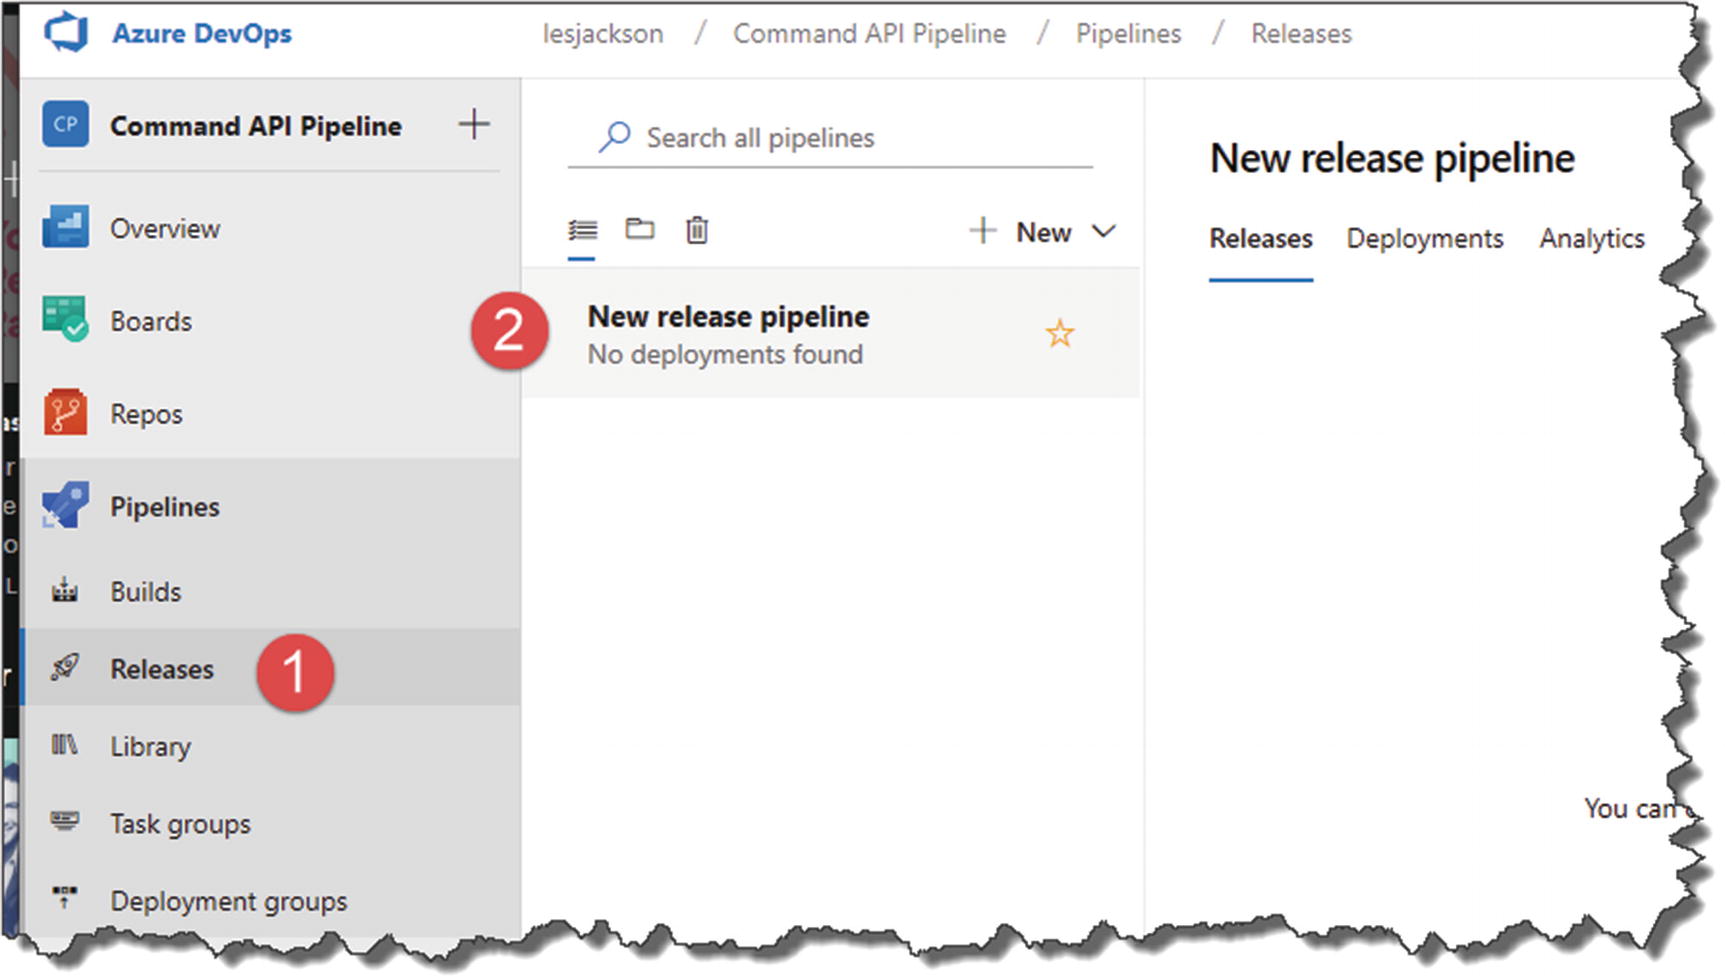
Creating Our Azure DevOps Release Pipeline
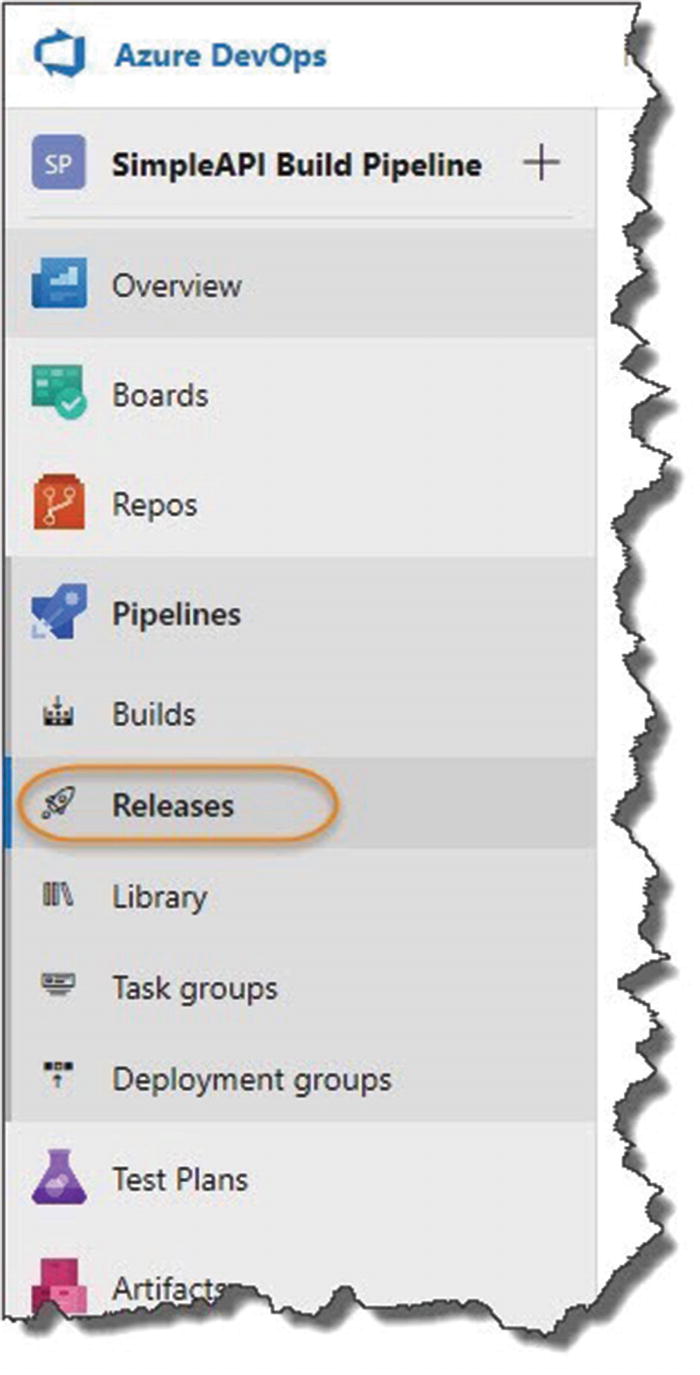
Release Pipeline

Create a new Release Pipeline
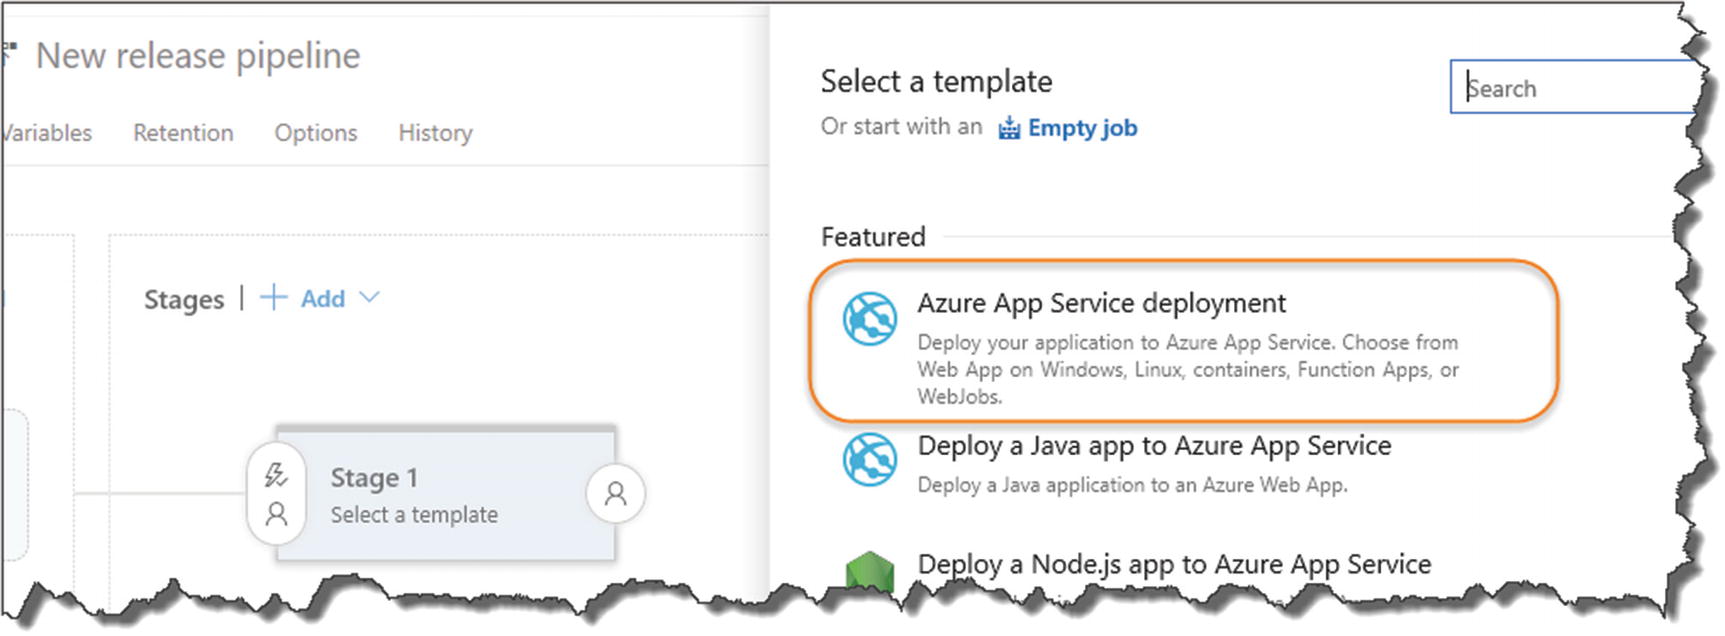
Select Azure App Service deployment
- 1.
Change the stage name to “Deploy API to Prod Azure” (or whatever you like so long as it’s meaningful).
- 2.Click the Job/Task link in the designer.
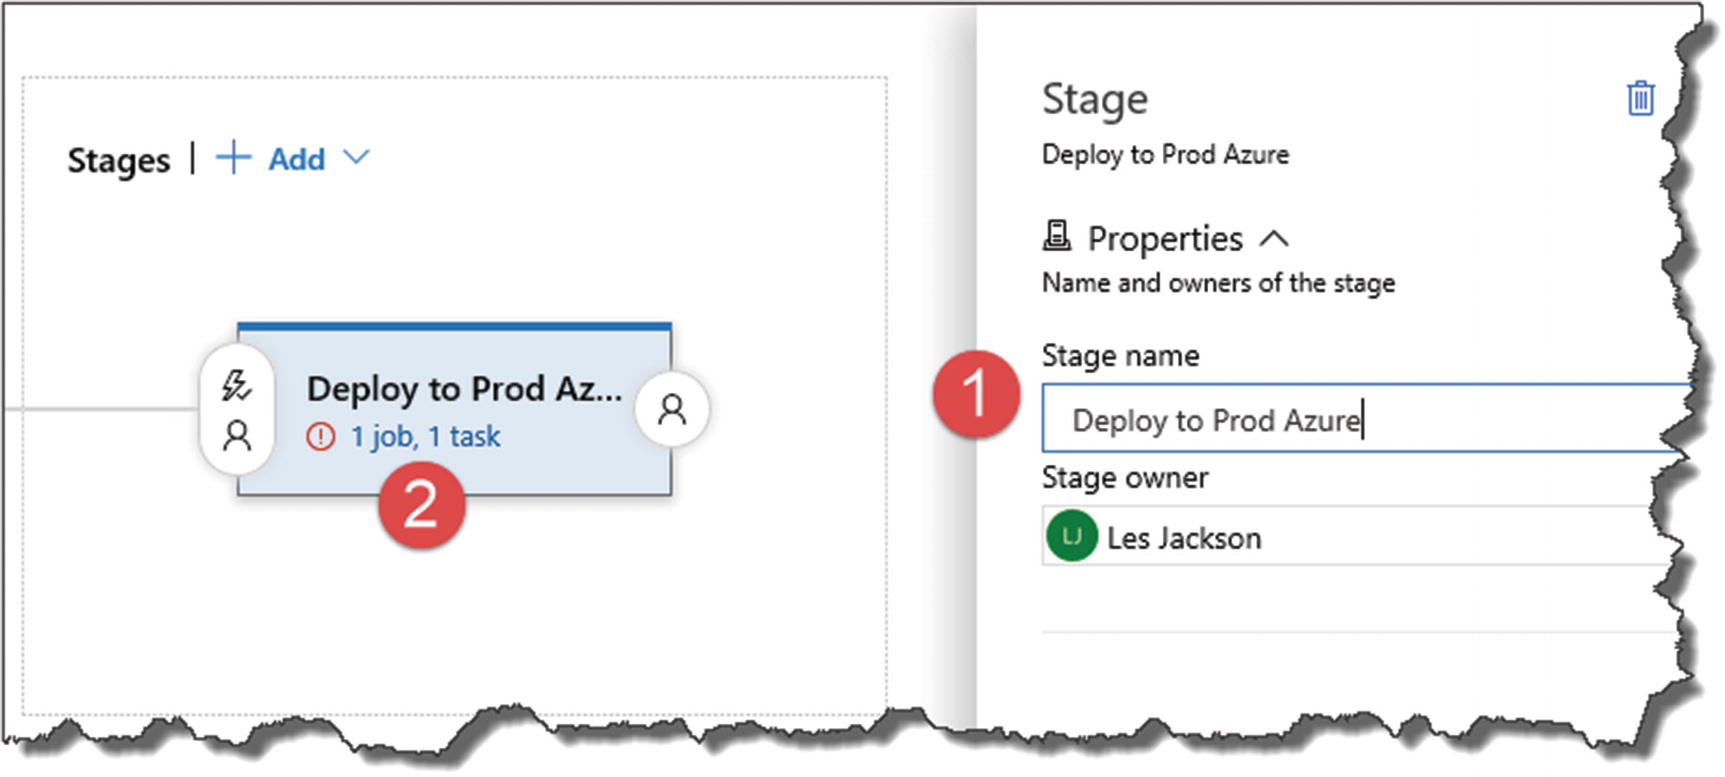 Figure 13-42
Name the stage and fix up the task errors
- 1.
Select our Azure subscription (you will need to “authorize” Azure DevOps to use Azure).
 Warning! If you’ve got an active pop-up blocker, this can cause you some issues here as the authentication window needs to “pop up.” Depending on your setup, you’ll need to allow pop-ups for this site in order to cleanly authenticate Azure DevOps to use Azure.
 - 2.
App Type (remember this is an API App)
- 3.App Service Name (all of your API Apps will be retrieved from Azure – select the one you created earlier)
 Figure 13-43
Fix up the errors and remember to save!

Add a comment if you need to
Just click OK.

Adding an artifact for deployment
- 1.
The Project (this should be preselected)
- 2.
The Source Pipeline (this is our Build pipeline we created previously)
- 3.Default version (select “Latest” from the drop-down)
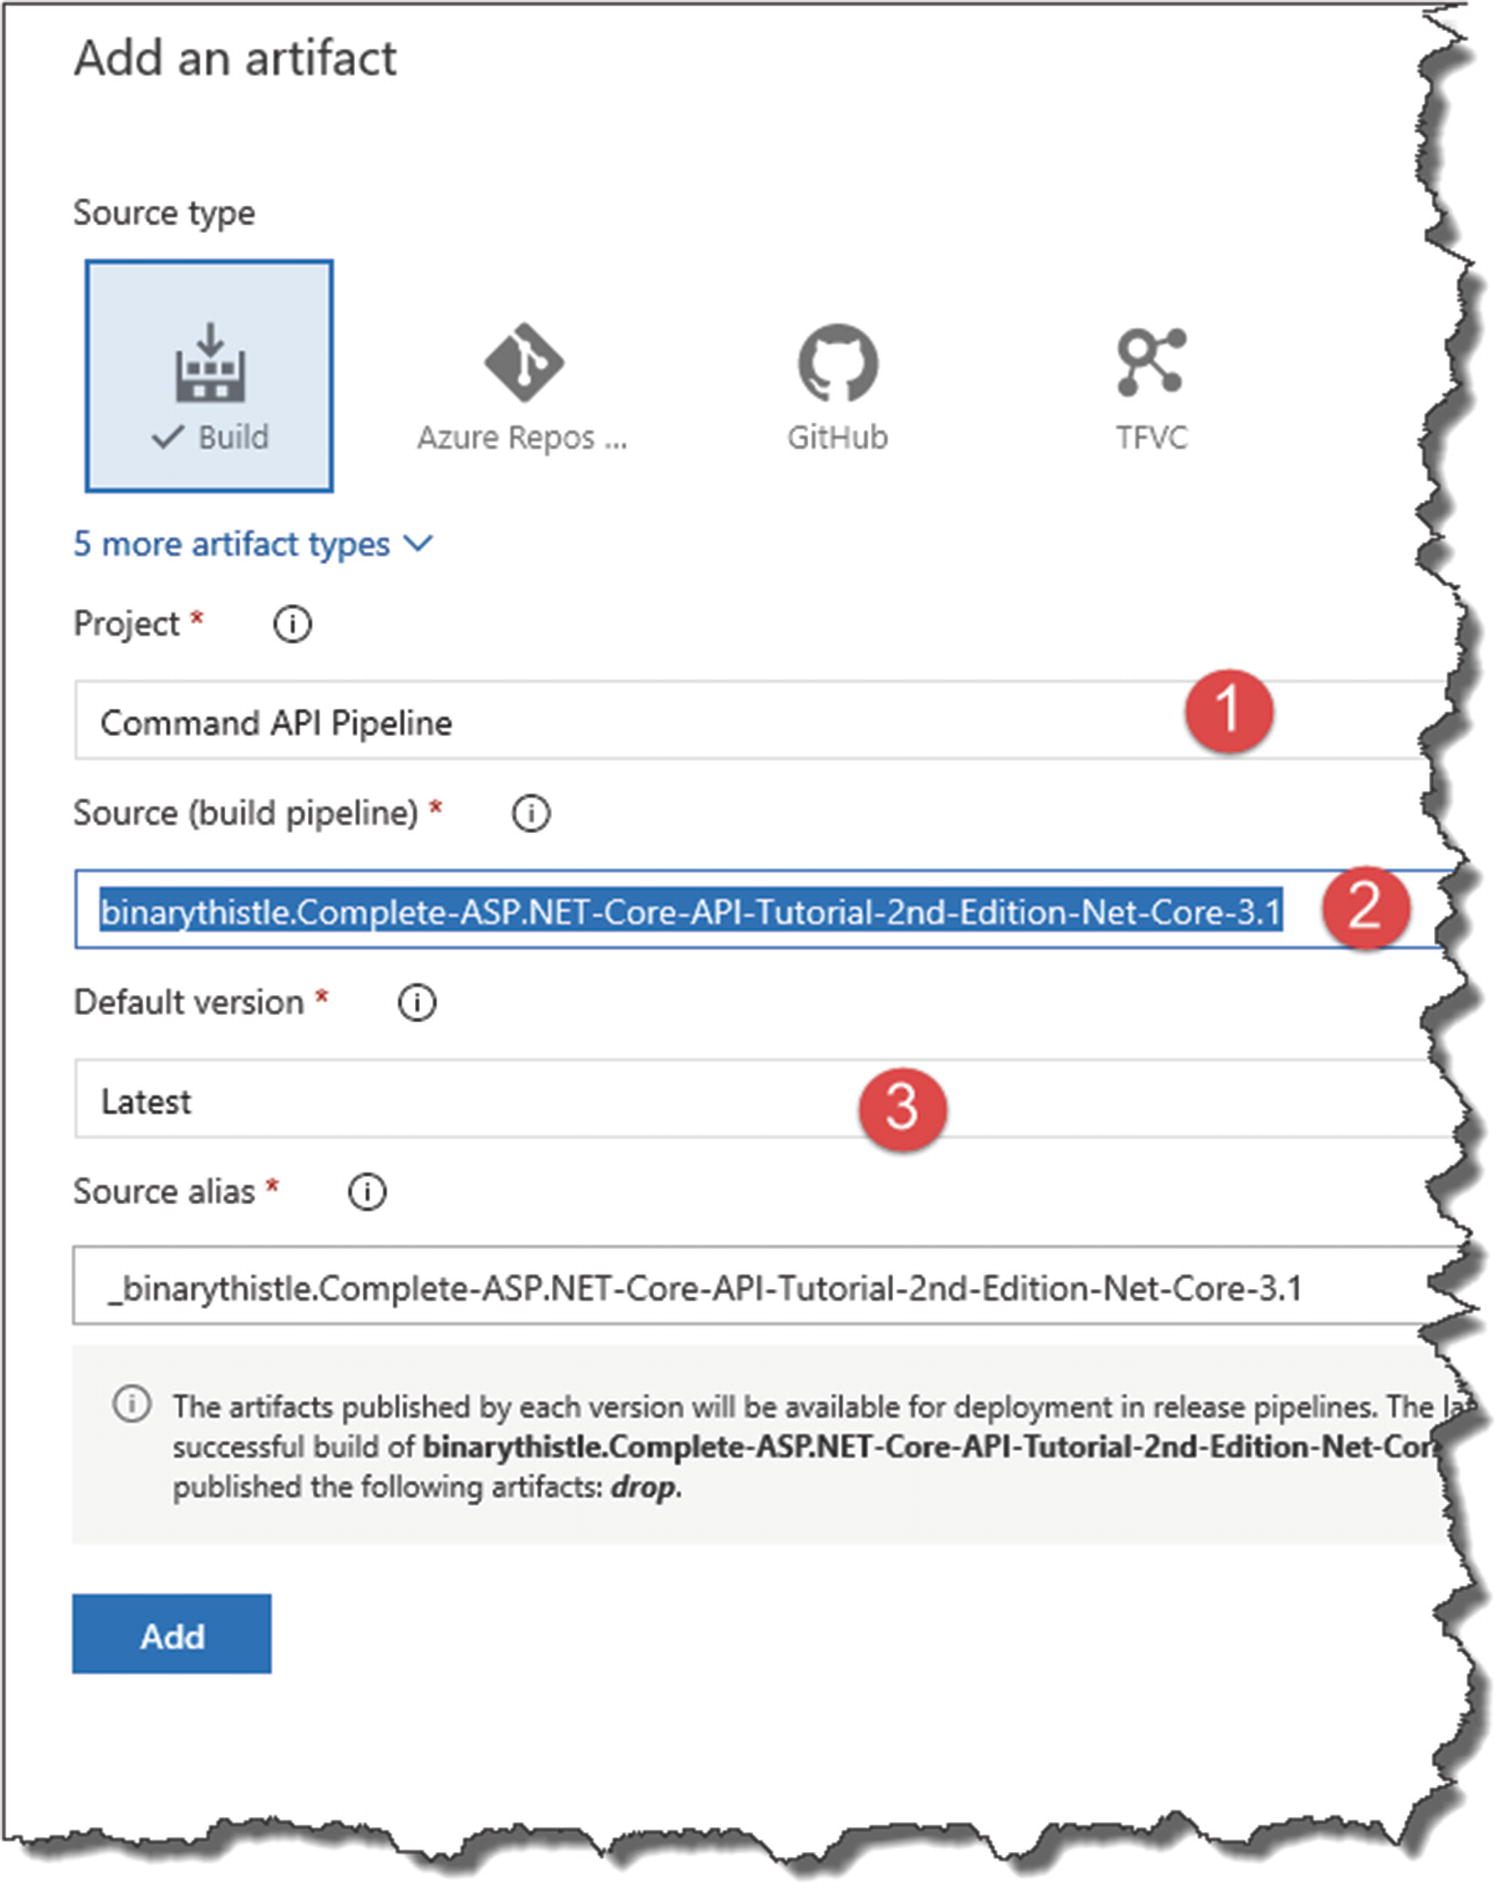 Figure 13-46
Configure the artifact
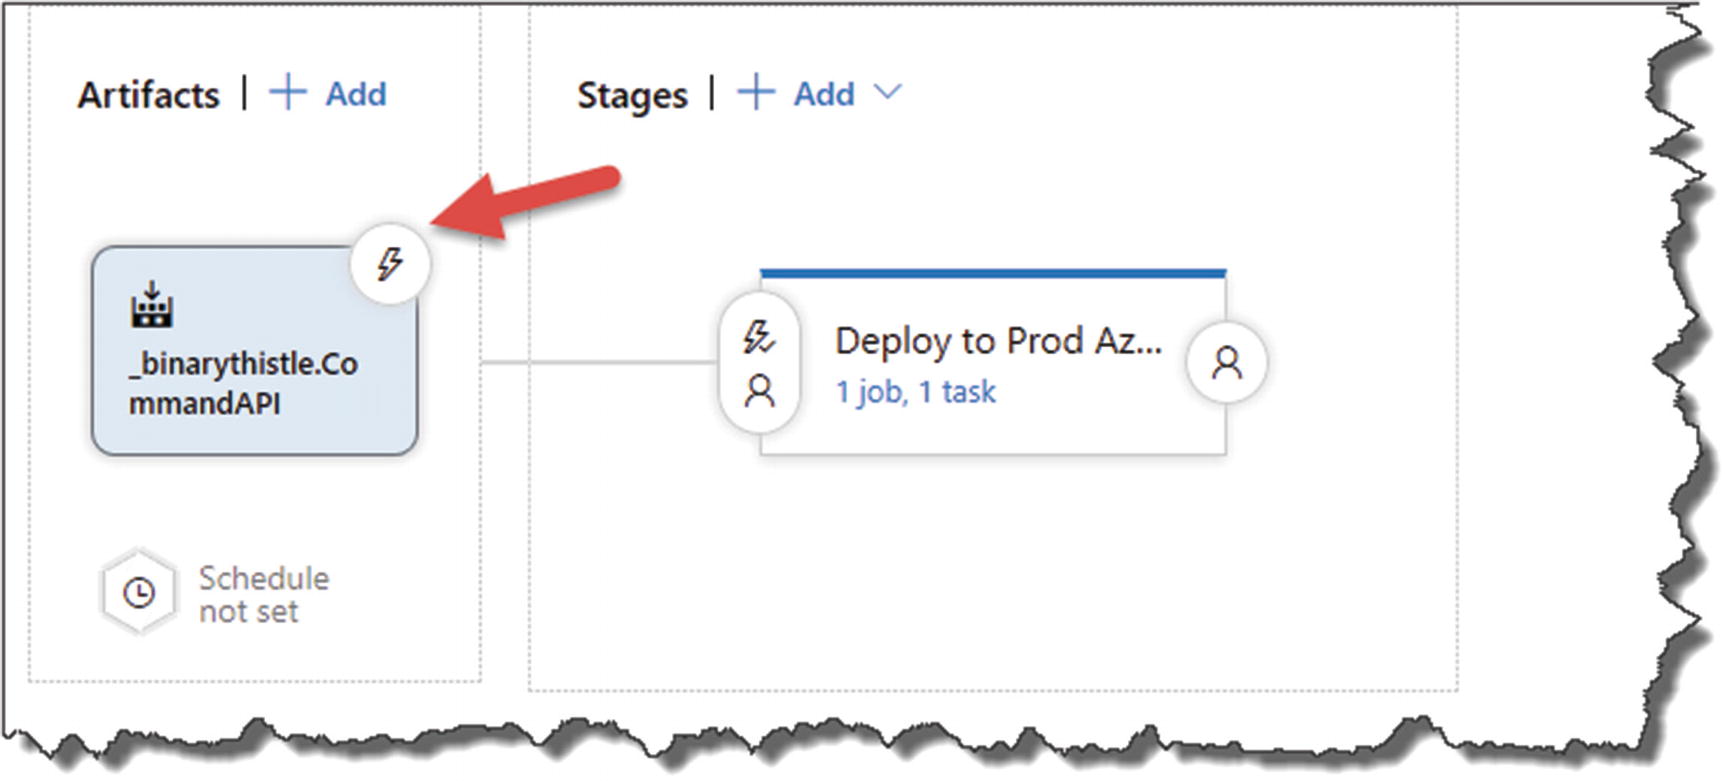
Select triggers
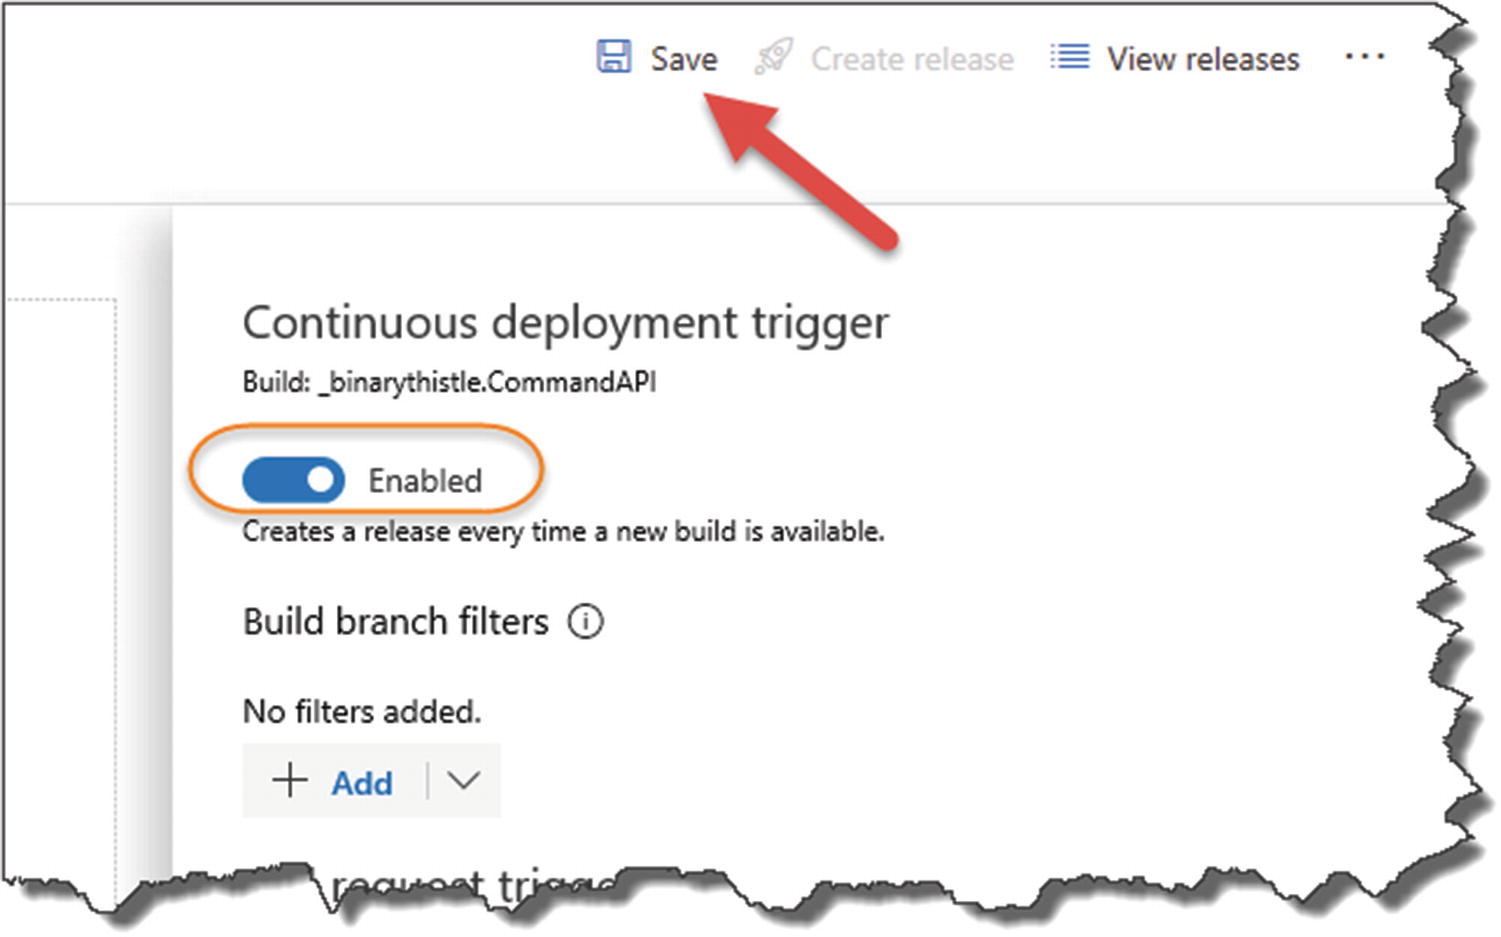
Enable the Continuous deployment trigger
It is this setting that switches us from Continuous Delivery to Continuous Deployment.
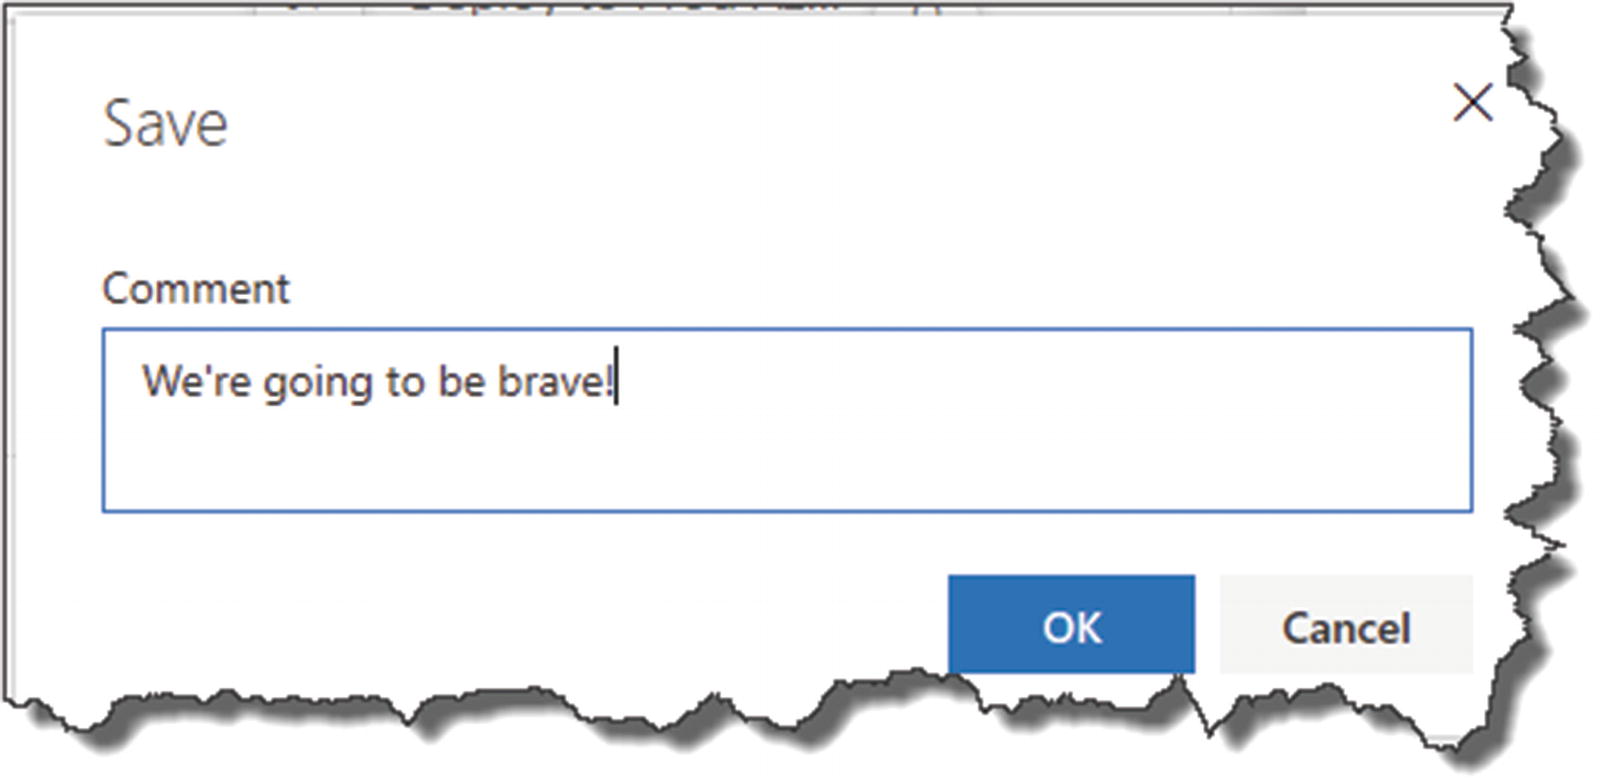
Again, add a comment if you want to
Release Pipeline created
Pull the Trigger – Continuously Deploy
OK, the moment of truth. If we have set everything up correctly, all we need to do now to test our entire CI/CD pipeline end to end is to perform another code commit to GitHub, which will trigger the Build Pipeline. Then, as we’ve just configured, the Release Pipeline will be triggered by the Build Pipeline, which will deploy our API App to Azure.
Wait! What About EF Migrations?
Nowhere in our CI/CD pipeline have we accounted for this step, where we tell Azure it has to create the necessary schema in our PostgreSQL DB. There are a few ways we can do this, but the simplest is to update the Configure method in the Startup class.
This approach means that migrations will be applied when the app is started for the first time.

Migrate Database

Pipeline triggered again

Release pipeline attempting to deploy

Deployed!
Click All resources.
- Select you API App (App Service type).
 Figure 13-55
Get the URI for your API App
Note: Yours will be named differently.

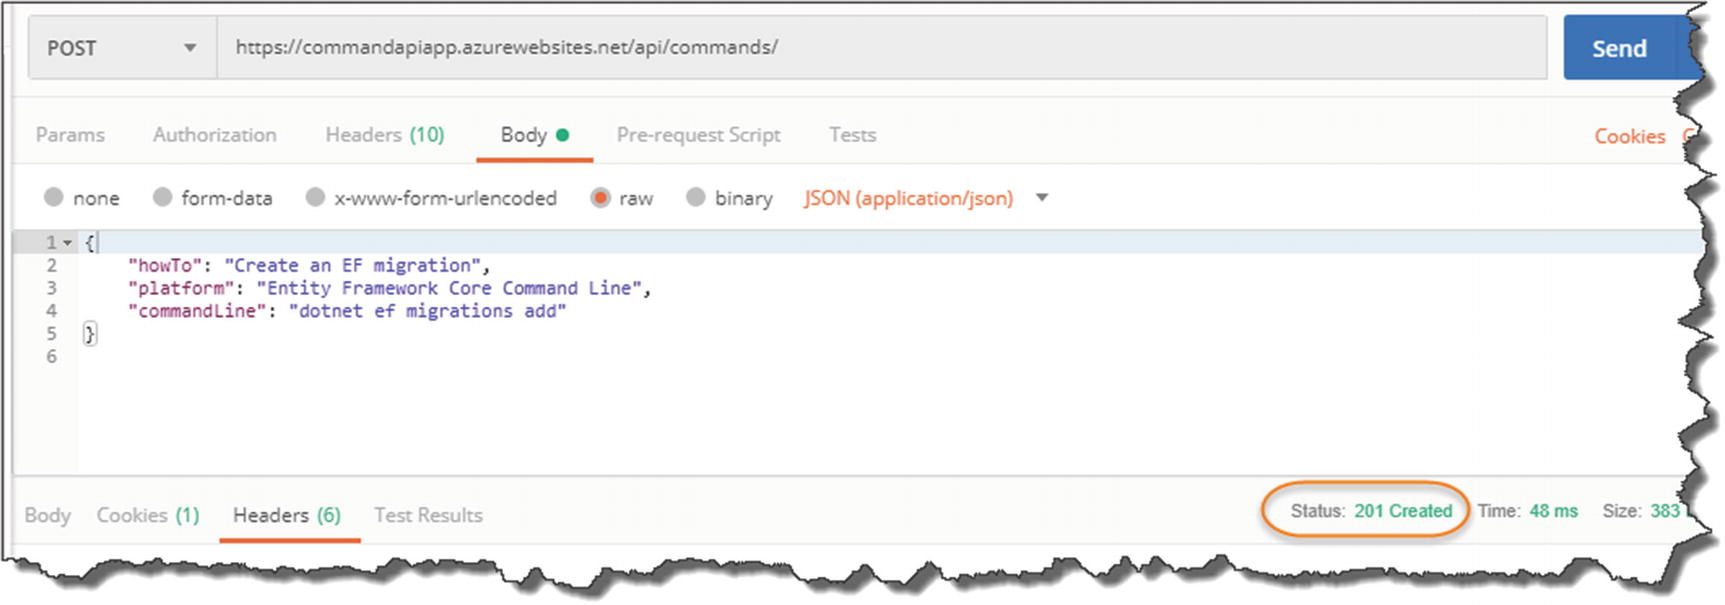
Call the API on Azure from Postman
Remember to append: /api/commands to the base URL
Then click Send.

Success – but we have no data
![]() Rad!3 Our API is deployed and working in our Production Azure environment; moreover, it’s there via process of Continuous Integration/Continuous Deployment!
Rad!3 Our API is deployed and working in our Production Azure environment; moreover, it’s there via process of Continuous Integration/Continuous Deployment!
Double-Check
Just to double-check everything, let’s make a POST request to create some data.
- 1.
Request Verb to POST.
- 2.
The request URL is correct (e.g., https://commadapi.azurewebsites.net/api/commands).
- 3.
Click Body.
- 4.
Select Raw and JSON for the request body format.
- 5.Paste the JSON into the body payload window.
 Figure 13-58
POSTing Data to out Azure hosted API
201 Success!
And again, we have success!
![]() Revel in the enormity of what you have just done! Not many people can say that have deployed an API on to the cloud via a CI/CD pipeline.
Revel in the enormity of what you have just done! Not many people can say that have deployed an API on to the cloud via a CI/CD pipeline.