
Chapter Summary
In this chapter we’re going to introduce “data” to our API, so we’ll begin our journey with our Model and Repository classes.
When Done, You Will
Understand what a “Model” class is and code one up.
Define our Repository Interface, and implement a “mock” instance of it.
Understand how we use Dependency Injection to decouple interfaces from implementation.
Our Model
OK so we’ve done the “Controller” part of the MVC pattern (well a bit of it; it’s still not fully complete – but the groundwork is in), so let’s turn our attention to the Model part of the equation.
Just like our Controller, the first thing we want to do is create a Models folder in our main project directory.

Model Folder and Command Class
The rest of the class is a simplistic model that we’ll use to “model” our command-line snippets. Possibly the only thing really of note is the Id attribute.
This will form the Primary Key when we eventually create a table in our PostgreSQL DB (noting this is required by Entity Framework Core.)
Additionally, it conforms to the concept of “Convention over Configuration.” That is, we could have named this attribute differently, but it would potentially require further configuration so that Entity Framework could work with it as a primary key attribute. Naming it this way, however, means that we don’t need to do this.
Data Annotations
We could leave our model class like that, but when we come to working with it, especially for creation and update actions, we want to ensure that we specify the properties of our Model that are mandatory and those that are not. For example, would there be any value in adding a command-line snippet to our solution without specifying some data for our CommandLine property? Probably not. We solve this by adding some Data Annotations to our class.
Is it required or not?
Maximum length of our strings
Whether the property should be defined as Primary Key
And so on.
All Properties are required (they cannot be null).
Our Id property is a primary key.
In addition, the HowTo property can only have a maximum of 250 characters.
With our annotations in place, when we come to creating an instance of our Model later, a validation error (or errors) will be thrown if any of them are not adhered to. They also provide a means by which to generate our database schema, which we’ll come onto in Chapter 7.
First command adds all files to our local Git repo (this means our new Command.cs file).
Second command commits the code with a message.
Third command pushes the commit up to GitHub.

Our Committed Model Class
![]() Looking at the GitHub page presented earlier, how can you tell which parts of our solution we included in the last commit and which were only included in the initial commit?
Looking at the GitHub page presented earlier, how can you tell which parts of our solution we included in the last commit and which were only included in the initial commit?
Our Repository
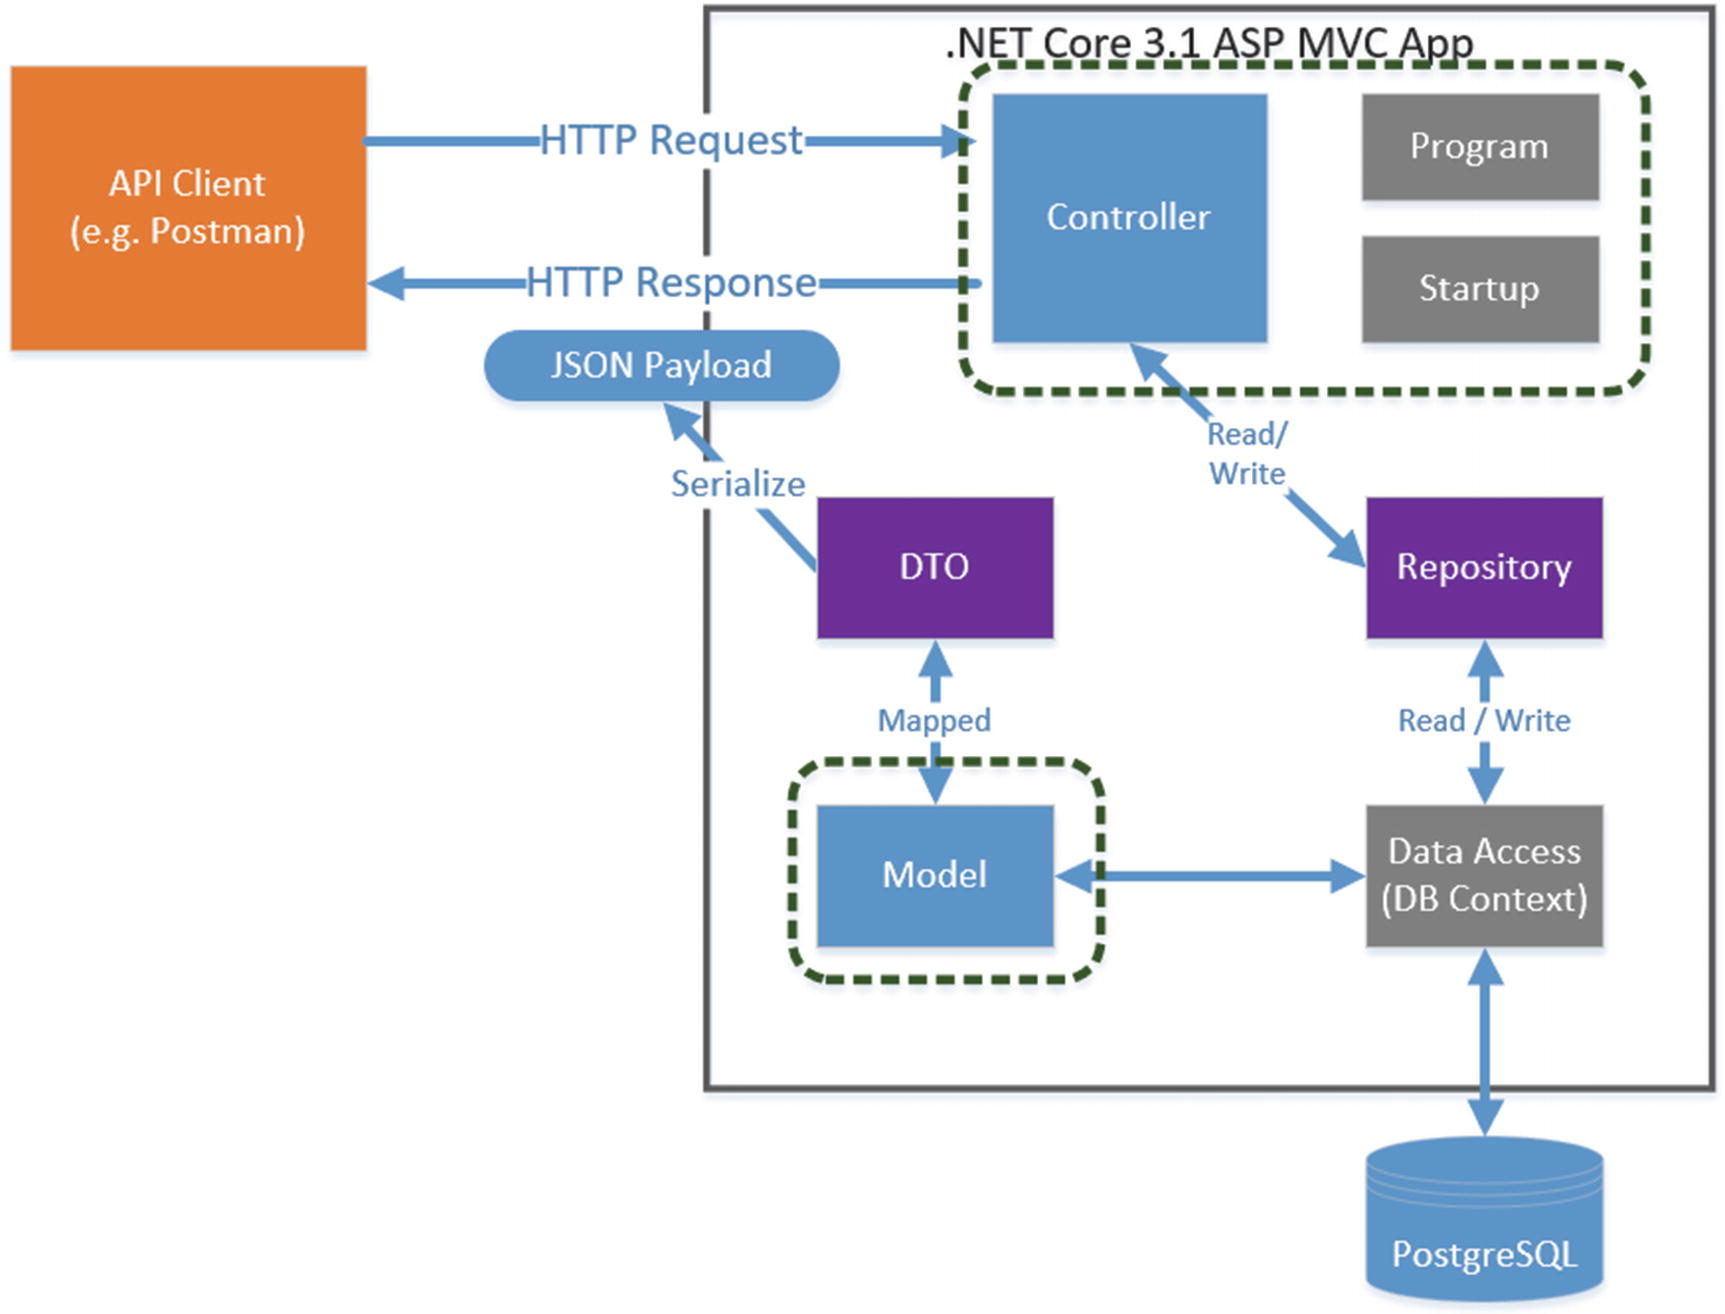
Progress through our architecture
Started our Controller that currently returns hard coded data
Created our Model
The next step in our journey is to define our Repository Interface, which will provide our controller with a technology-agnostic way to obtain data.
What Is an Interface?
An interface is just as it sounds; it’s a specification for what functionality we want it to provide (in this case to our Controller), but we don’t detail how it will be provided – that comes later. It’s essentially an agreement, or contract, with the consumer of that Interface.
Verb | URI | Operation | Description |
|---|---|---|---|
GET | /api/commands | Read | Read all command resources |
GET | /api/commands/{Id} | Read | Read a single resource (by Id) |
POST | /api/commands | Create | Create a new resource |
PUT | /api/commands/{Id} | Update (full) | Update all of a single resource (by Id) |
PATCH | /api/commands/{Id} | Update (partial) | Update part of a single resource (by Id) |
DELETE | /api/commands/{Id} | Delete | Delete a single resource (by Id) |
Return a collection of all Commands.
Return a single Command (based on its Id).
Create a new Command Resource.
Update an existing Command Resource (this covers PUT and PATCH).
Delete an existing Command Resource.

Data Folder will hold our Repository Interface

Our ICommanderRepo.cs File
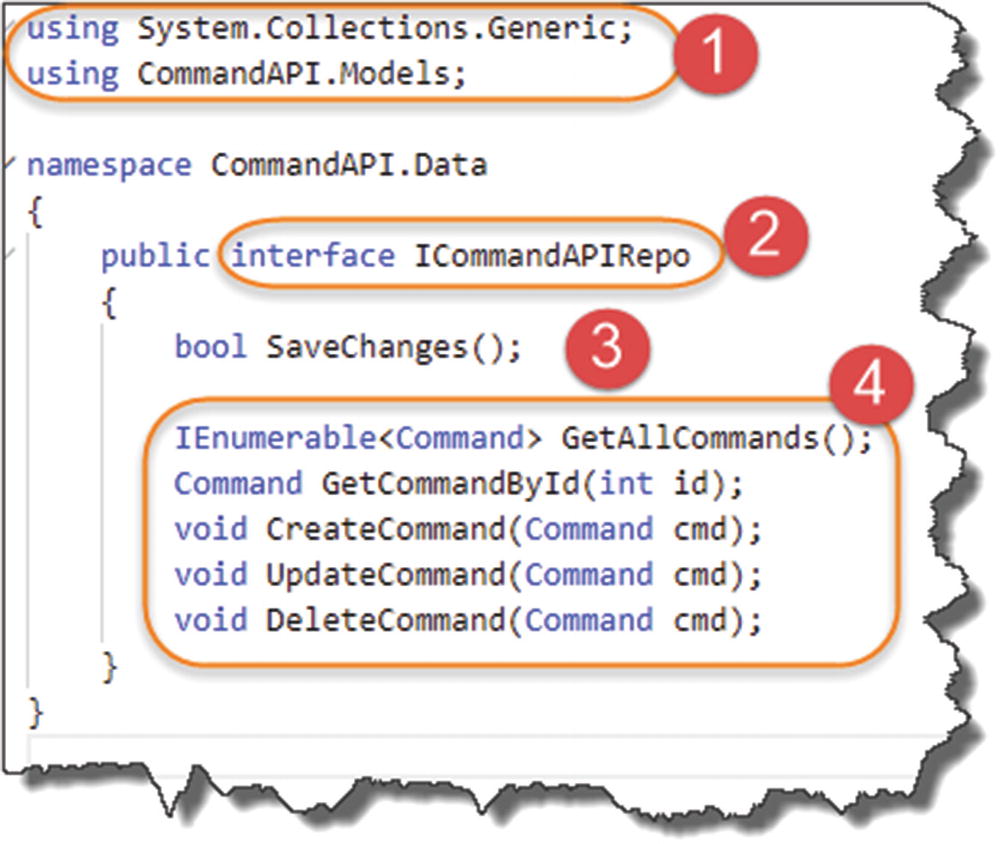
ICommandAPIRepo Interface
- 1.
Using directives, noting that we have brought in the namespace for our Models.
- 2.
We specify a public interface and give it a name starting with capital “I” to denote it’s an interface.
- 3.
We specify that our Repository should provide a “Save Changes” method; stick a pin in that for now, we’ll revisit when we come to talking about Entity Framework Core in Chapter 7.
- 4.
Section 4 defines all the other method signatures that consumers of this interface can use to obtain and manipulate data. They also serve another purpose, which I detail in the section below.
What About Implementation?
That’s our Repository Interface complete. Yes, that’s right; it’s done, fully complete. So, your next question (well it was my next question when I was learning about interfaces), will be: OK, but where does stuff “get done”?
Great question!
Again, to labor the point, our interface is just a specification (or a contract) for our consumers. We still need to implement that contract with a concrete class. And this is the power and the beauty of using interfaces: we can create multiple implementations (concrete classes) to provide the same interface, but the consumer doesn’t know, or care, about the implementation being used. All they care about is the interface and what it ultimately provides to them.
Still confused? Let’s move to an example.
Our Mock Repository Implementation
We are going to create a concrete class that implements our interface using our model; however, we’ll just be using “mock” data at this stage (we’ll create another implementation of our interface to use “real” data in the next chapter).

Our Concrete Class Definition is complaining
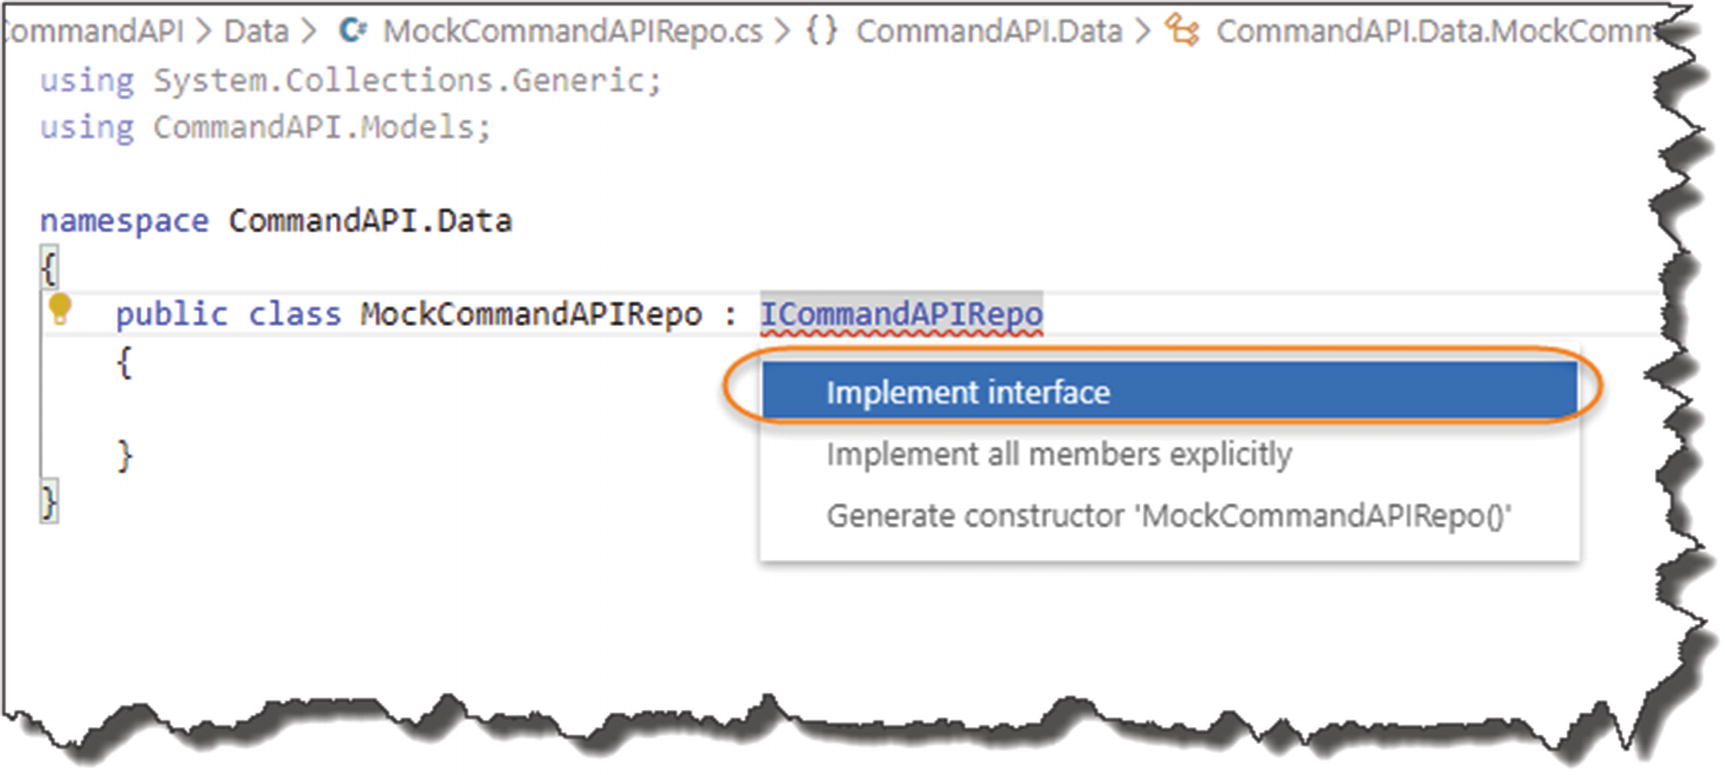
Help is always appreciated!
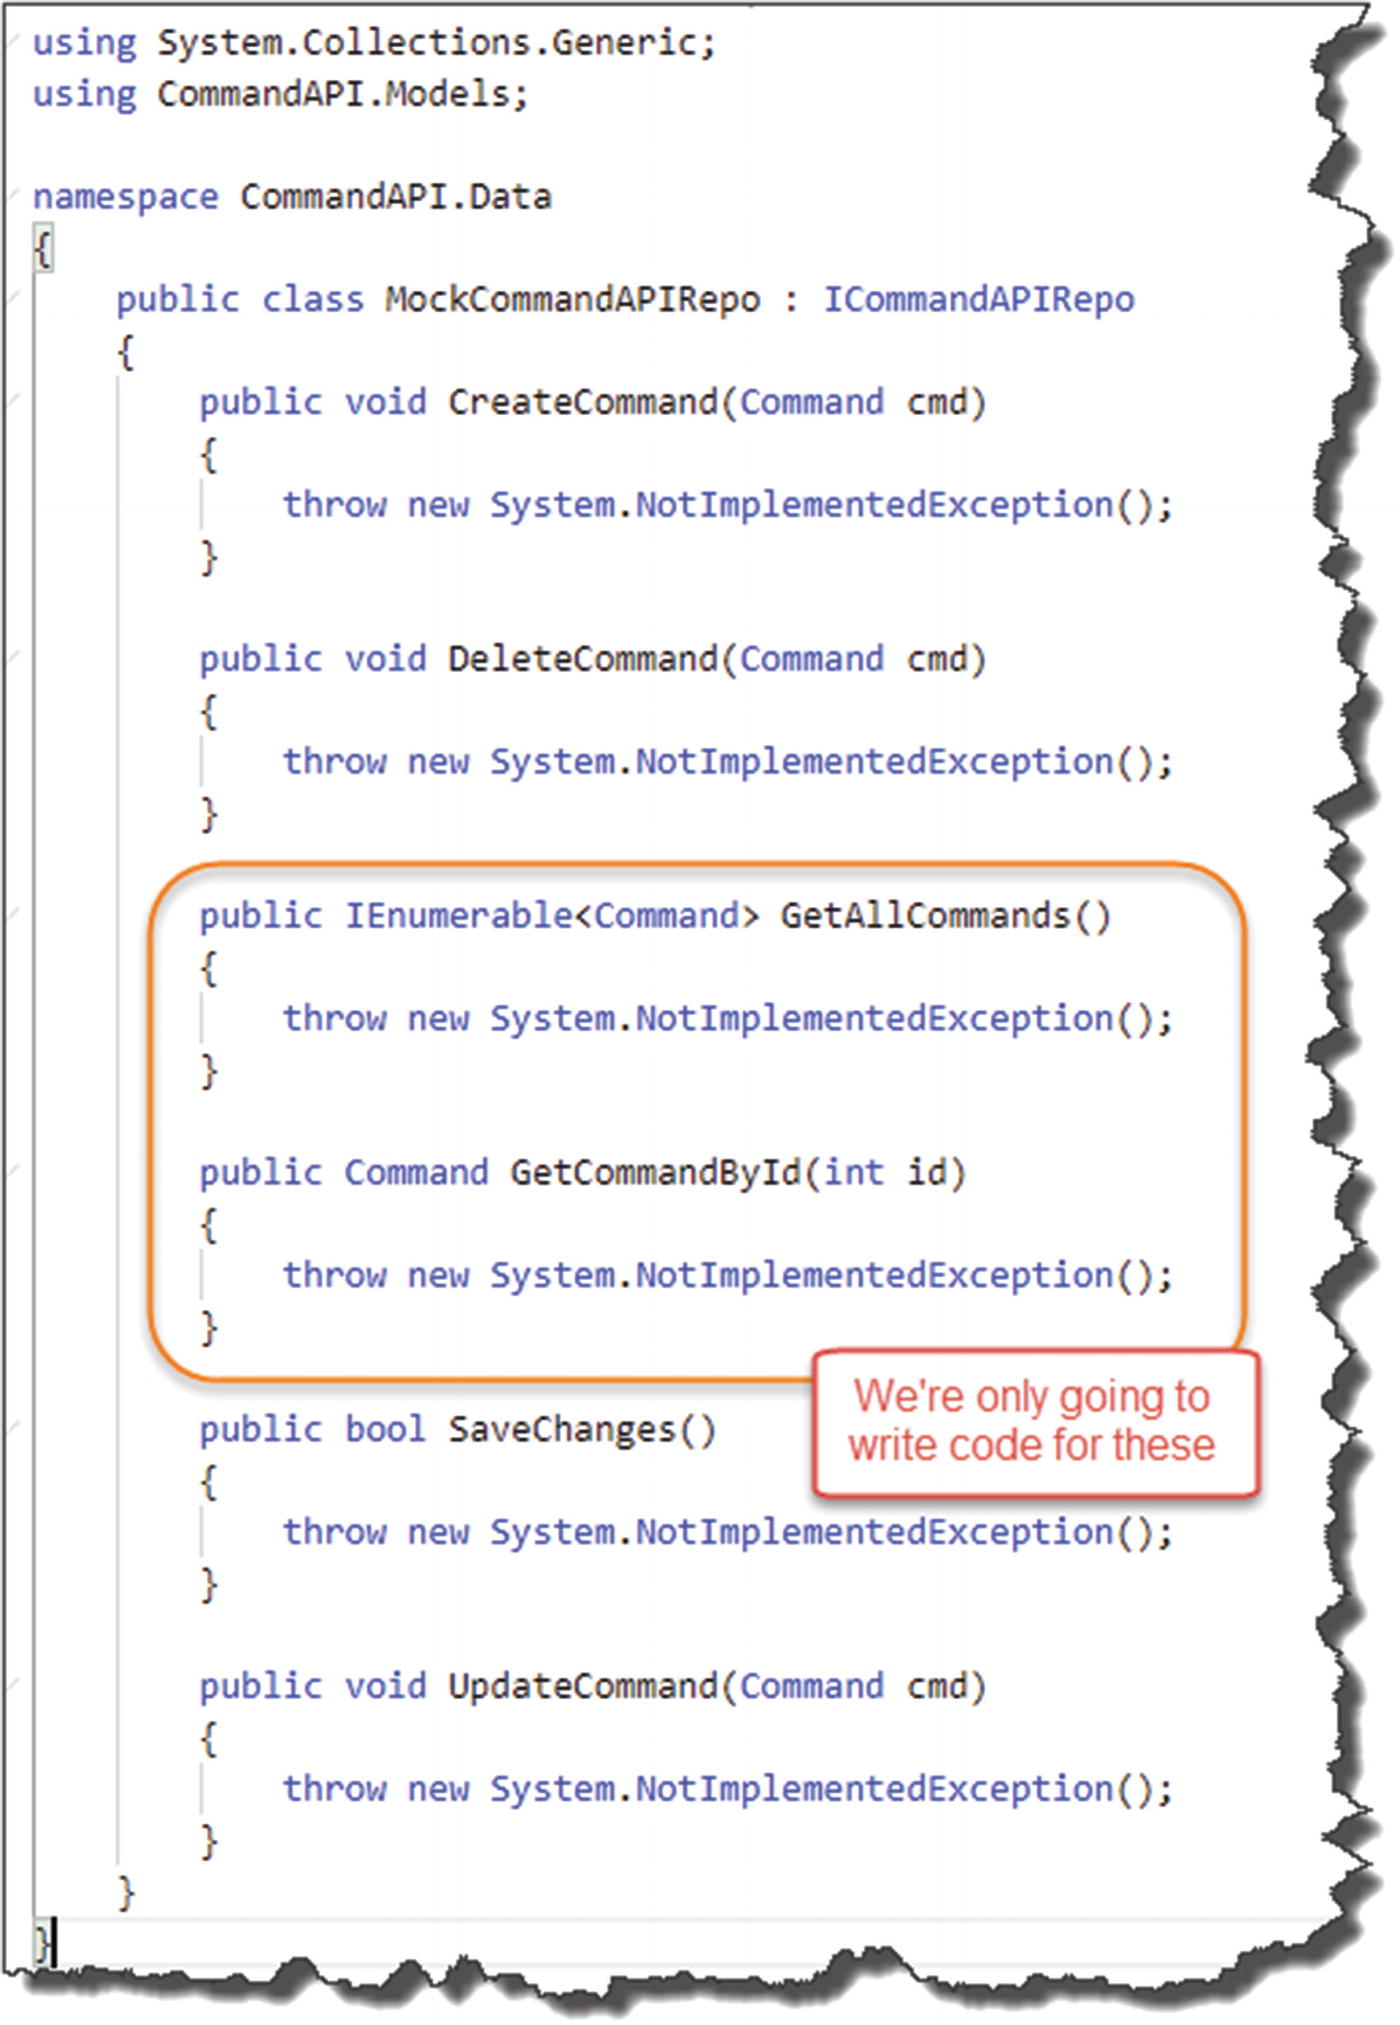
Auto-generated Implementation code
As you can see, it has provided all the method signatures for the members of our interface and populated them with a throw new System.NotImpementedException();
GetAllCommands
GetCommandById
What this does is take our Model class and use it to create some simple mock data (again just hard-coded) and return it when these two methods are called. Not earth-shattering, but it is an implementation (of sorts) of our repository interface.
We now need to move on to making use of the ICommandAPIRepo interface (and by extension the MockCommandAPIRepo concrete class) from within our controller.
To do this we use Dependency Injection.
Dependency Injection
Dependency Injection (DI) has struck fear into many a developer getting to grips with it (myself included), but once you grasp the concept, not only is it pretty straightforward, it’s also really powerful and you’ll want to use it.
What makes it even easier in this instance is that DI is baked right into the heart of ASP.NET Core, so we can get up and running with it quickly without much fuss at all. Next, I’ll take you through a quick theoretical overview; then we’ll employ DI practically in our project (indeed, we’ll continue to use it throughout the tutorial).
Again, as with many of the concepts and technologies in this tutorial, you could fill an entire book on DI, which I’m not going to attempt to do here. If you want a deep dive on this subject beyond what I outline below, the MSDN docs are decent1.
Back to the Start (Up)

Startup Class Sequence
Casting your mind back, it is in the ConfigureServices method where our “services” are registered (in this case think of a service as both an interface and an implementation of it). But what exactly do we mean by register?

Service Container with our Repository Service Registered
Once we have registered our service in the Service Container, whenever we request to make use of a given interface from somewhere else in our app, the DI system will serve up, or “inject,” the concrete class we’ve associated with the interface (aka the “dependency”) in its place.
This means that if we ever need to swap out our concrete class for some other implementation, we only need to make the change in one place (the ConfigureServices method); the rest of our code does not need to change.
We will follow this practice in this tutorial by first registering our mock repository implementation against the ICommandAPIRepo interface; then we’ll swap it out for something more useful in the next chapter without the need to change any other code (except the registration).
This decoupling of interface (contract) from implementation means that our code is infinitely more maintainable as it grows larger.
Enough theory; let’s code.
Applying Dependency Injection
The code is quite straightforward; it uses the service collection: services, to register our ICommandAPIRepo with MockCommandAPIRepo. The only other novelty is the use of the AddScoped method.
AddTransient: A service is created each time it is requested from the Service Container.
AddScoped: A service is created once per client request (connection).
AddSingleton: A service is created once and reused.
Beyond what I’ve just outlined, I feel we may get ourselves off track from our core subject matter: building an API! So, we’ll leave it there for now; again refer to Microsoft Docs as mentioned earlier if you want more info.
OK, so now that we have registered our service, the next step is to make use of it from within our Controller – how do we do that?
Constructor Dependency Injection
If I’m being honest, it was this next bit that tripped me up when I was learning DI, so I’ll try and be a as clear as I can when describing how it works.

You can't write this code!
You will get an error along the lines of “Can’t create an instance of an abstract class or interface.” You could revert to “newing-up” a concrete instance of our MockCommandAPIRepo class, but that would defeat the entire purpose of what we have just been talking about. So how do we do it?
The answer is that we have to give the DI system an entry point where it can perform the “injection of the dependency,” which in this case, it means creating a class constructor for our Controller and providing ICommandAPIRepo as a required input parameter. We call this Constructor Dependency Injection.
![]() Pay very careful attention to the Constructor Dependency Injection code pattern that follows; as you’ll see, this pattern is used time and time again throughout our code as well as in other projects.
Pay very careful attention to the Constructor Dependency Injection code pattern that follows; as you’ll see, this pattern is used time and time again throughout our code as well as in other projects.

Constructor Dependency Injection Pattern
- 1.
Add the new using statement to reference ICommandAPIRepo.
- 2.
We create a private read-only field _repository that will be assigned the injected MockCommandAPIRepo object in our constructor and used throughout the rest of our code.
- 3.
The Class constructor will be called when we want to make use of our Controller.
- 4.
At the point when the constructor is called, the DI system will spring into action and inject the required dependency when we ask for an instance of ICommandAPIRepo. This is Constructor Dependency Injection.
- 5.
We assign the injected dependency (in this case MockCommandAPIRepo) to our private field (see point 1).
And that’s pretty much it! We can then use _repository to make use of our concrete implementation class, in this case MockCommandAPIRepo.
As I’ve stated earlier, we’ll reuse this pattern multiple times through the rest of the tutorial; you’ll also see it everywhere in code in other projects – take note.
Update Our Controller
Verb | URI | Operation | Description |
|---|---|---|---|
GET | /api/commands | Read | Read all command resources |
GET | /api/commands/{Id} | Read | Read a single resource (by Id) |

Removal of our old Controller Action
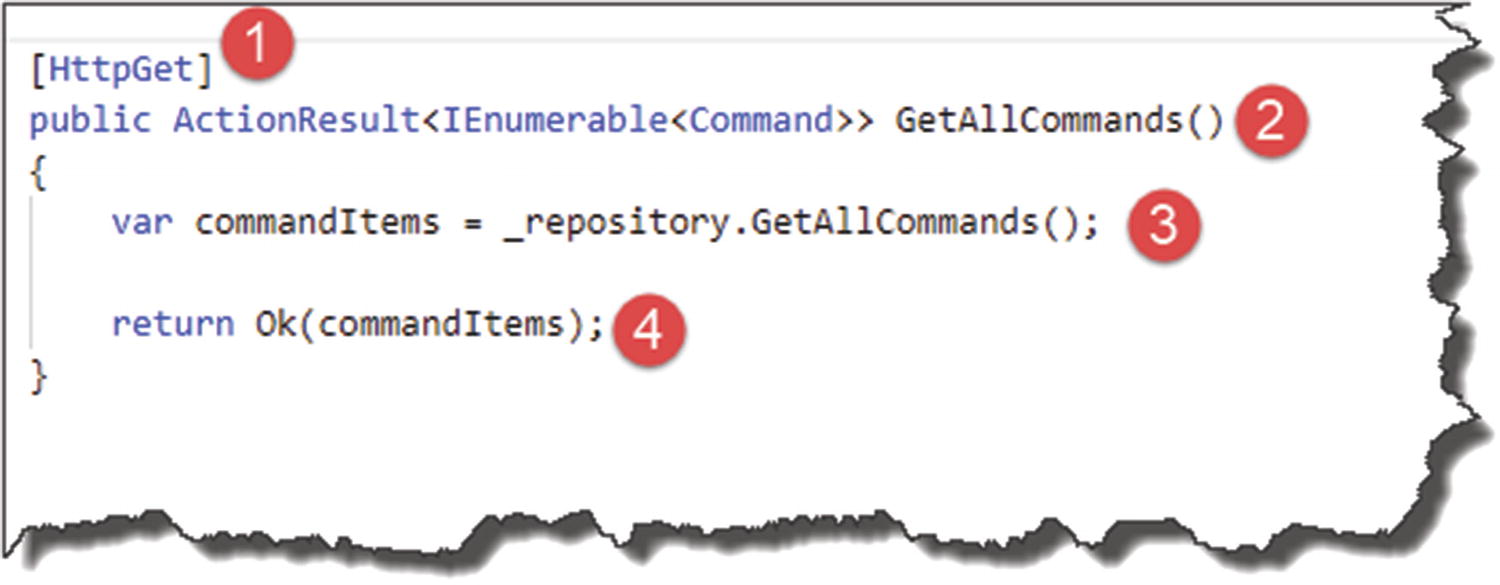
New Controller Action using our Repository
- 1.
The controller action responds to the GET verb.
- 2.
The controller action should return an enumeration (IEnumerable) of Command objects.
- 3.
We call GetAllCommands on our repository and populate a local variable with the result.
- 4.
We return a HTTP 200 Result (OK) and pass back our result set.

Successful API Endpoint Result
- 1.
Verb set to GET.
- 2.
Our URI is exactly the same as the one we have used before.
- 3.
We get a 200 OK status result.
- 4.
We have the hardcoded data returned from our mock repository!
This is actually a really important checkpoint! We have implemented our repository interface, created and used a concrete (mock) implementation of it, and used it in our Controller via Dependency Injection!
Give yourself five gold stars and a pat on the back.

GetCommandByID endpoint
- 1.
The route to this controller action includes an additional route parameter, in this case the Id of the resource we want to retrieve; we can specify this in the HttpGet attribute as shown.
- 2.
The controller action requires an id to be passed in as a parameter (this comes from our route; see point 1) and returns an ActionResult of type Command.
- 3.
We call GetCommandByID on our repository passing in the Id from our route, storing the result in a local variable.
- 4.
We check to see if our result is null and, if so, return a 404 Not Found result.
- 5.
Otherwise if we have a Command object, we return a 200 OK and the result.
Our mock repository will always return a result irrespective of what Id we pass in, so the null check will never return false in this case. That will change when we come to our “real” repository implementation in Chapter 7.

Single Command Resource Returned
- 1.
We’re still using a GET request.
- 2.
Our URI has changed to reflect the route we need to use to hit our endpoint.
- 3.
200 OK Status Retrieved.
- 4.
Single Resource returned.
We’ll wrap this chapter up here for now as we’ve covered a lot of ground, but we will revisit these two controller actions later when we come on to discussing Entity Framework Core, Data Transfer Objects, and Unit Testing.
git add .
git commit -m “Added Model and Mock Repository”
git push origin master
to update our Git repository (local and remote) with our changes.
In the next chapter, we move on to using “real” data that’s persisted in a database backend rather than relying on hard-coded mock data.