Unit Testing
As a developer (or software engineer), you must have skills in the testing field as well. For example, developers are responsible for writing the unit tests of their code (for example, using JUnit or TestNG). Most probably, a pull request that doesn't contain unit tests as well won't be accepted.
In this chapter, we will cover unit testing interview problems that you may encounter if you apply for a position such as developer or software engineer. Of course, if you are looking for a tester (manual/automation) position, then this chapter may represent just another perspective of testing, so do not expect to see questions specific to manual/automation tester positions here. In this chapter, we'll cover the following topics:
- Unit testing in a nutshell
- Questions and coding problems
Let's begin!
Technical Requirements
The codes used in this chapter can be found on GitHub on: https://github.com/PacktPublishing/The-Complete-Coding-Interview-Guide-in-Java/tree/master/Chapter18
Unit testing in a nutshell
The process of testing an application contains several layers of testing. One of these layers is the unit testing layer.
Mainly, an application is built by small functional parts called units (for example, a regular Java method can be considered a unit). Testing the functionality and correctness of these units under specific inputs/conditions/constraints is called unit testing.
These unit tests are written by developers using the source code and the test plan. Ideally, every developer should be capable of writing unit tests that test/validate their code. Unit tests should be meaningful and provide accepted code coverage.
If the unit tests fails, then the developer is responsible for fixing the issues and executing the unit tests again. The following diagram depicts this statement:
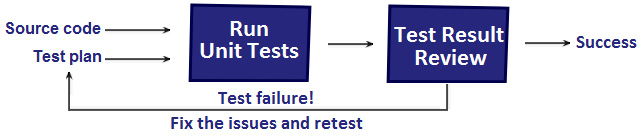
Figure 18.1 – Unit testing flow
Unit testing uses unit test cases. A unit test case is a pair of input data and expected output meant to shape a test for a certain functionality.
If you are in an interview where you are expected to know unit testing, don't be surprised if you are asked questions on functional testing and/or integration testing. Hence, it is advisable to be prepared with answers to these questions as well.
Functional testing is about testing functional requirements based on the given input and a produced output (behavior) that needs to be compared with the expected output (behavior). Each functional test uses the functional specification to verify the correctness of the component (or a group of components) that represents the implementation of that functional requirement. This is explained in the following diagram:

Figure 18.2 – Functional testing
The goal of integration testing is to find out the defects in the software components while they are being integrated in an iteratively incremental manner. In other words, the modules that have been unit tested are integrated (grouped together or aggregated) and tested by following the integration plan. This has been depicted in the following diagram:
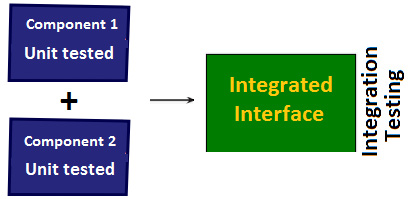
Figure 18.3 – Integration testing
A question regarding unit and integration testing that is frequently put to interview candidates is about highlighting the main differences between these two. The following table will help you prepare an answer to this question:
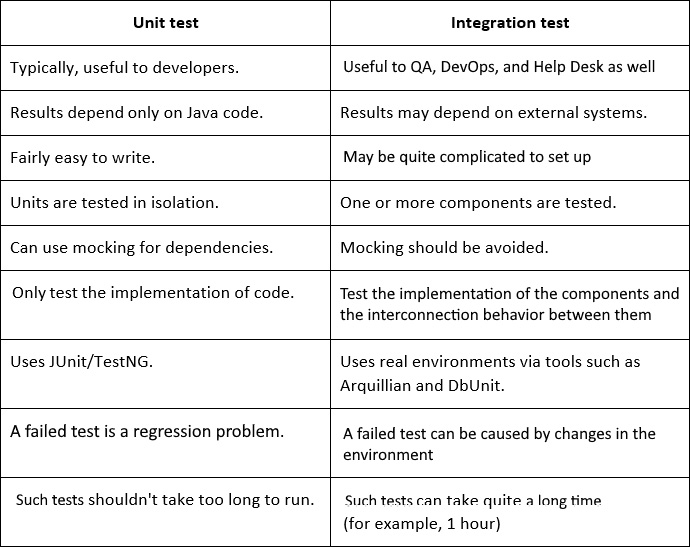
Figure 18.4 – Comparison between unit tests and integration tests
A good tester is capable of stressing and abusing the subject of testing without making any kinds of assumptions or constraints regarding the input. This applies to unit tests as well. Now that we have touched on unit testing, let's have a look at some coding challenges and questions on unit testing.
Questions and coding challenges
In this section, we'll cover 15 questions and coding challenges related to unit testing that are very popular in interviews. Let's begin!
Coding challenge 1 – AAA
Problem: What is AAA in unit testing?
Solution: The AAA acronym stands for [A]rrange, [A]ct, [A]ssert, and it represents an approach to structuring tests to sustain clean code and readability. Today, AAA is a testing pattern that's almost a standard across the industry. The following snippet of code speaks for itself:
@Test
public void givenStreamWhenSumThenEquals6() {
// Arrange
Stream<Integer> theStream = Stream.of(1, 2, 3);
// Act
int sum = theStream.mapToInt(i -> i).sum();
// Assert
assertEquals(6, sum);
}
Arrange section: In this section, we prepare or set up the test. For example, in the preceding code, we prepared a stream of integers where the elements are 1, 2, and 3.
Act section: In this section, we perform the necessary actions to obtain the result of the test. For example, in the preceding code, we sum the elements of the stream and store the result in an integer variable.
Assert section: In this section, we check whether the unit test's result matches the expected results. This is done via assertions. For example, in the preceding code, we checked that the sum of the elements is equal to 6.
You can find this code in the application called junit5/ArrangeActAssert.
Coding challenge 2 – FIRST
Problem: What is FIRST in unit testing?
Solution: Good testers use FIRST to avoid many of the pitfalls encountered in unit tests. The FIRST acronym stands for [F]ast, [I]solated, [R]epeatable, [S]elf-validating, [T]imely. Let's see what each of them mean:
Fast: It is advisable to write unit tests that run fast. Fast is an arbitrary notion that depends on how many unit tests you have, how often you run them, and how long you are willing to wait for them to run. For example, if each unit test has an average completion time of 200 ms and you run 5,000 unit tests, then you'll wait ~17 minutes. Commonly, unit tests are slow because they access external resources (for example, databases and files).
Isolated: Ideally, you should be able to run any test at any time, in any order. This is possible if your unit tests are isolated and they focus on small snippets of code. Good unit tests don't depend on other unit tests, but this is not always achievable. Nevertheless, strive to avoid chains of dependencies since they are evil when things go wrong, and you'll have to debug.
Repeatable: A unit test should be repeatable. This means that the unit test's assertions should produce the same result every time you run it. In other words, the unit tests should not depend on anything that may introduce variable results to assertions.
Self-validating: Unit tests should be self-validating. This means that you shouldn't manually verify the results of the tests. This is time-consuming and reveals that the assertions are not doing their job. Strive to write assertions so that they work as expected.
Timely: It is important to not postpone writing unit tests. The more you postpone, the more defects you'll face. You'll find out that you cannot find time to come back and write unit tests. Think of what's happening if we constantly postpone taking out the trash. The more we postpone, the harder it will be to take it on, and we risk our health. Did I say anything about the smell? So, write the unit tests in a timely fashion. This is a good habit!
Coding challenge 3 – Test fixtures
Problem: What are test fixtures?
Solution: By test fixtures, we mean any test data that lives outside that test and is used to set up the application so that it's in a fixed state. Having a fixed state for the application allows the tests to be run against a constant and known environment.
Coding challenge 4 – Exception testing
Problem: What are the common approaches for testing exceptions in JUnit?
Solution: In JUnit 4, we commonly test exceptions via the try/catch idiom, the expected element of @Test, and via the ExpectedException rule.
The try/catch idiom prevailed in JUnit 3.x and can be used as follows:
@Test
public void givenStreamWhenGetThenException() {
Stream<Integer> theStream = Stream.of();
try {
theStream.findAny().get();
fail("Expected a NoSuchElementException to be thrown");
} catch (NoSuchElementException ex) {
assertThat(ex.getMessage(), is("No value present"));
}
}
Since fail()throws an AssertionError, it cannot be used to test this error type.
Starting with JUnit 4, we can use the expected element of the @Test annotation. The value of this element is the type of the expected exception (subclasses of Throwable). Check out the following example, which was written using expected:
@Test(expected = NoSuchElementException.class)
public void givenStreamWhenGetThenException() {
Stream<Integer> theStream = Stream.of();
theStream.findAny().get();
}
This approach is alright as long as you don't want to test the value of the exception message. Moreover, pay attention that the test passes if a NoSuchElementException is thrown by any line of code. You may expect this exception to be caused by a particular line of code, while it can, in fact, be caused by other code.
Another approach relies on the ExpectedException rule. This approach was deprecated starting with JUnit 4.13. Let's take a look at the code:
@Rule
public ExpectedException thrown = ExpectedException.none();
@Test
public void givenStreamWhenGetThenException()
throws NoSuchElementException {
Stream<Integer> theStream = Stream.of();
thrown.expect(NoSuchElementException.class);
thrown.expectMessage("No value present");
theStream.findAny().get();
}
Via this approach, you can test the value of the exception message. These examples have been grouped into an application called junit4/TestingExceptions.
Starting with JUnit5, there are two approaches we can use to test exceptions. Both of them rely on the assertThrows() method. This method allows us to assert that a given function call (passed in as a lambda expression or even as a method reference) results in the expected type of exception being thrown. The following example speaks for itself:
@Test
public void givenStreamWhenGetThenException() {
assertThrows(NoSuchElementException.class, () -> {
Stream<Integer> theStream = Stream.of();
theStream.findAny().get();
});
}
This example just validates the type of exception. However, since the exception has been thrown, we can assert more details of the thrown exception. For example, we can assert the value of the exception message as follows:
@Test
public void givenStreamWhenGetThenException() {
Throwable ex = assertThrows(
NoSuchElementException.class, () -> {
Stream<Integer> theStream = Stream.of();
theStream.findAny().get();
});
assertEquals(ex.getMessage(), "No value present");
}
Simply use the ex object to assert anything you consider useful from Throwable. Whenever you don't need to assert details about the exception, rely on assertThrows(), without capturing the return. These two examples have been grouped into an application called junit5/TestingExceptions.
Coding challenge 5 – Developer or tester
Problem: Who should use JUnit – the developer or the tester?
Solution: Commonly, JUnit is used by developers for writing unit tests in Java. Writing unit tests is a coding process that tests the application code. JUnit is not a testing process. However, many testers are open to learn and use JUnit for unit testing.
Coding challenge 6 – JUnit extensions
Problem: What useful JUnit extensions do you know/use?
Solution: The most widely used JUnit extensions are JWebUnit (a Java-based testing framework for web applications), XMLUnit (a single JUnit extension class for testing XML), Cactus (a simple testing framework for testing server-side Java code), and MockObject (a mocking framework). You will need to say a few words about each of these.
Coding challenge 7 – @Before* and @After* annotations
Problem: What @Before*/@After* annotation do you know about/use?
Solution: In JUnit 4, we have @Before, @BeforeClass, @After, and @AfterClass.
When executing a method before each test, we annotate it with the @Before annotation. This is useful for executing a common snippet of code before running a test (for example, we may need to perform some reinitializations before each test). To clean up the stage after each test, we annotate a method with the @After annotation.
When executing a method only once before all tests, we annotate it with the @BeforeClass annotation. The method must be static. This is useful for global and expensive settings, such as opening a connection to a database. To clean up the stage after all the tests are done, we annotate a static method with the @AfterClass annotation; for example, closing a database connection.
You can find a simple example under the name junit4/BeforeAfterAnnotations.
Starting with JUnit5, we have @BeforeEach as the equivalent of @Before and @BeforeAll as the equivalent of @BeforeClass. Practically, @Before and @BeforeClass were renamed with more suggestive names to avoid confusion.
You can find a simple example of this under the name junit5/BeforeAfterAnnotations.
Coding challenge 8 – Mocking and stubbing
Problem: What is mocking and stubbing?
Solution: Mocking is a technique that's used to create objects that emulate/mimic real objects. These objects can be pre-programmed (or preset or pre-configured) with expectations and we can check whether they have been called. Among the most widely used mocking frameworks available, we have Mockito and EasyMock.
Stubbing is like mocking, except that we cannot check whether they have been called. Stubs are pre-configured to respond to particular inputs with particular outputs.
Coding challenge 9 – Test suite
Problem: What is a test suite?
Solution: A test suite is the concept of aggregating multiple tests divided among multiple test classes and packages so that they run together.
In JUnit4, we can define a test suite via the org.junit.runners.Suite runner and the @SuiteClasses(...) annotation. For example, the following snippet of code is a test suite that aggregates three tests (TestConnect.class, TestHeartbeat.class, and TestDisconnect.class):
@RunWith(Suite.class)
@Suite.SuiteClasses({
TestConnect.class,
TestHeartbeat.class,
TestDisconnect.class
})
public class TestSuite {
// this class was intentionally left empty
}
The complete code is called junit4/TestSuite.
In JUnit5, we can define a test suite via the @SelectPackages and @SelectClasses annotations.
The @SelectPackages annotation is useful for aggregating tests from different packages. All we have to do is specify the names of the packages, as shown in the following example:
@RunWith(JUnitPlatform.class)
@SuiteDisplayName("TEST LOGIN AND CONNECTION")
@SelectPackages({
"coding.challenge.connection.test",
"coding.challenge.login.test"
})
public class TestLoginSuite {
// this class was intentionally left empty
}
The @SelectClasses annotation is useful for aggregating tests via the names of their classes:
@RunWith(JUnitPlatform.class)
@SuiteDisplayName("TEST CONNECTION")
@SelectClasses({
TestConnect.class,
TestHeartbeat.class,
TestDisconnect.class
})
public class TestConnectionSuite {
// this class was intentionally left empty
}
The complete code is called junit5/TestSuite.
Additionally, filtering test packages, test classes, and test methods can be done via the following annotations:
- Filter packages: @IncludePackages and @ExcludePackages
- Filter test classes: @IncludeClassNamePatterns and @ExcludeClassNamePatterns
- Filter test methods: @IncludeTags and @ExcludeTags
Coding challenge 10 – Ignoring test methods
Problem: How can we ignore a test?
Solution: In JUnit4, we can ignore a test method by annotating it with the @Ignore annotation. In JUnit5, we can do the same thing via the @Disable annotation.
Ignoring test methods can be useful when we have written some tests in advance and we want to run the current tests without running these particular tests.
Coding challenge 11 – Assumptions
Problem: What are assumptions?
Solution: Assumptions are used to execute tests if the specified conditions have been met. They are commonly used to handle external conditions that are required for the test to execute properly, but that are not under our control and/or are not directly related to what is being tested.
In JUnit4, assumptions are static methods that can be found in the org.junit.Assume package. Among these assumptions, we have assumeThat(), assumeTrue(), and assumeFalse(). The following snippet of code exemplifies the usage of assumeThat():
@Test
public void givenFolderWhenGetAbsolutePathThenSuccess() {
assumeThat(File.separatorChar, is('/'));
assertThat(new File(".").getAbsolutePath(),
is("C:/SBPBP/GitHub/Chapter18/junit4"));
}
If assumeThat() doesn't meet the given condition, then the test is skipped. The complete application is called junit4/Assumptions.
In JUnit5, assumptions are static methods that can be found in the org.junit.jupiter.api.Assumptions package. Among these assumptions, we have assumeThat(), assumeTrue(), and assumeFalse(). All three come in different flavors. The following snippet of code exemplifies the usage of assumeThat():
@Test
public void givenFolderWhenGetAbsolutePathThenSuccess() {
assumingThat(File.separatorChar == '/',
() -> {
assertThat(new File(".").getAbsolutePath(),
is("C:/SBPBP/GitHub/Chapter18/junit5"));
});
// run these assertions always, just like normal test
assertTrue(true);
}
Notice that the test method (assertThat()) will only execute if the assumption is met. Everything after the lambda will be executed, irrespective of the assumption's validity. The complete application is called junit5/Assumptions.
Coding challenge 12 – @Rule
Problem: What is @Rule?
Solution: JUnit provides a high degree of flexibility via so-called rules. Rules allows us to create and isolate objects (code) and reuse this code in multiple test classes. Mainly, we enhance tests with reusable rules. JUnit comes with built-in rules and with an API that can be used to write custom rules.
Coding challenge 13 – Method test return type
Problem: Can we return something other than void from a JUnit test method?
Solution: Yes, we can change the return of a test method from void to something else, but JUnit will not recognize it as a test method, so it will be ignored during the test's execution.
Coding challenge 14 – Dynamic tests
Problem: Can we write dynamic tests (tests generated at runtime) in JUnit?
Solution: Up until JUnit5, all tests were static. In other words, all the tests annotated with @Test were static tests that were fully defined at compile time. JUnit5 introduced dynamic tests – a dynamic test is generated at runtime.
Dynamic tests are generated via a factory method, which is a method annotated with the @TestFactory annotation. Such a method can return Iterator, Iterable, Collection, or Stream of DynamicTest instances. A factory method is not annotated with @Test, and is not private or static. Moreover, dynamic tests cannot take advantage of life cycle callbacks (for example, @BeforeEach and @AfterEach are ignored).
Let's look at a simple example:
1: @TestFactory
2: Stream<DynamicTest> dynamicTestsExample() {
3:
4: List<Integer> items = Arrays.asList(1, 2, 3, 4, 5);
5:
6: List<DynamicTest> dynamicTests = new ArrayList<>();
7:
8: for (int item : items) {
9: DynamicTest dynamicTest = dynamicTest(
10: "pow(" + item + ", 2):", () -> {
11: assertEquals(item * item, Math.pow(item, 2));
12: });
13: dynamicTests.add(dynamicTest);
14: }
15:
16: return dynamicTests.stream();
17: }
Now, let's point out the main lines of code:
1: At line 1, we use the @TestFactory annotation to instruct JUnit5 that this is a factory method for dynamic tests.
2: The factory method returns a Stream<DynamicTest>.
4: The input for our tests is a list of integers. For each integer, we generate a dynamic test.
6: We define a List<DynamicTest>. In this list, we add each generated test.
8-12: We generate a test for each integer. Each test has a name and a lambda expression containing the requisite assertion(s).
13: We store the generated test in the proper list.
16: We return the Stream of tests.
Running this test factory will produce five tests. The complete example is called junit5/TestFactory.
Coding challenge 15 – Nested tests
Problem: Can we write nested tests in JUnit5?
Solution: Yes, we can! JUnit 5 supports nested tests via the @Nested annotation. Practically, we create a nested test class hierarchy. This hierarchy may contain the setup, teardown, and test methods. Nevertheless, there are some rules that we must respect, as follows:
- Nested test classes are annotated with the @Nested annotation.
- Nested test classes are non-static inner classes.
- A nested test class can contain one @BeforeEach method, one @AfterEach method, and test methods.
- The static members are not allowed in inner classes, which means that the @BeforeAll and @AfterAll methods cannot be used in nested tests.
- The depth of the class hierarchy is unlimited.
Some sample code for a nested test can be seen here:
@RunWith(JUnitPlatform.class)
public class NestedTest {
private static final Logger log
= Logger.getLogger(NestedTest.class.getName());
@DisplayName("Test 1 - not nested")
@Test
void test1() {
log.info("Execute test1() ...");
}
@Nested
@DisplayName("Running tests nested in class A")
class A {
@BeforeEach
void beforeEach() {
System.out.println("Before each test
method of the A class");
}
@AfterEach
void afterEach() {
System.out.println("After each test
method of the A class");
}
@Test
@DisplayName("Test2 - nested in class A")
void test2() {
log.info("Execute test2() ...");
}
}
}
The complete example is called junit5/NestedTests.
Summary
In this chapter, we covered several hot questions and coding challenges about unit testing via JUnit4 and JUnit5. It is important to not neglect this topic. Most likely, in the last part of an interview for a Java developer or software engineer position, you'll get several questions related to testing. Moreover, those questions will be related to unit testing and JUnit.
In the next chapter, we will discuss scaling and scaling-related interview questions.