
Chapter 5
Walls: From Trash Talk to Smooth Talk
In This Chapter
• Making minor repairs to drywall surfaces, and patching a larger hole
• Repairing small cracks in plaster
• Replacing grout, and removing and replacing a cracked or broken ceramic tile
• Making minor repairs to wallpaper
Unfortunately, your walls do talk. Every bump with a furniture leg, hit with a hockey stick, and bounce of a ball where it shouldn’t be can make a mess of your nice, smooth walls. Sometimes, a scuff will wash away with soap and water, but sooner or later, deeper evidence of close encounters of the worst kind will need treatment.
In this chapter, you’ll learn to work with joint compound and other soft stuff: grout, tile cement, glue, and other materials to make beat-up walls look clean and new. And working with all this goop may bring back nice memories of your sandbox days!
Minor Drywall Repairs
Drywall is the most common type of base wall material, and what you’ll usually find in houses less than fifty years old. It is made by sandwiching a gypsum core, which is fire resistant, between layers of paper. Sometimes known as Sheetrock, wallboard, or gypsum board, this material is also made in a water-resistant variety for use in damp areas such as basements and bathrooms.
You may not want to fix dings, dents, or popped fasteners every time they happen; if you’ve got an active family or an enthusiastic pet, little nicks and dents are bound to occur frequently. But sooner or later, your walls will get that tired, worn-out look. If possible, wait until your room is ready for its next paint job.
These little repairs are easy to do but take time because there are several steps. Between each step, you must wait for the patching medium to dry. Normally this means waiting 8-12 hours (or overnight) to go to the next step. Unless you’re that rare bird with time on her hands, make all the wall repairs in one room on the same weekend, or successive days, so that all the fill-ins dry in one waiting period, are primed at one time, then painted at one time.
With little repairs, work gently. A bold, heavy hand will make a small flaw larger.

Ounce of Prevention
Be sure to wear safety goggles and a dust mask whenever you sand to protect your eyes and lungs. Maybe you think it’s wimpy to protect your eyes, nose, and mouth for simple, small repairs. But I think my vital parts are worth protecting, no matter how few small particles are flying. Over time, little particles add up to bigger problems, and tiny crumbs of plaster in the eye can create a big problem. So be safe when you sand! I also hate sweeping and dusting, so the newspapers or drop cloth are my constant home repair sidekicks; they’re much cheaper than a cleaning service.
Repairing Dings and Dents
You’ll need the following:
□ Sanding block or sandpaper (80-100 grit and 120-150 grit)
□ Utility knife
□ Clean sponge or cloth
□ Putty knife
□ Joint compound
1. Lay newspaper or a drop cloth below the repair site to catch debris. Put on safety goggles and a dust mask when you sand to protect your eyes and lungs.
2. Using the 80-100 grit sanding block or paper, lightly sand the dent to remove little flecks of the drywall or paint that hang on the surface.

Sand the dent.
3. Gently cut away any torn pieces of the drywall that remain at the repair site with a utility knife.
4. Wipe the dent with a damp cloth or sponge to remove any bits that remain in the dent area.
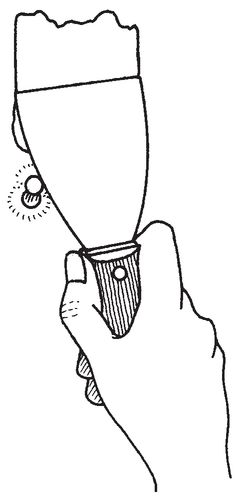
5. With the putty knife, fill the dent with joint compound, and smooth the surface of the repair. Wipe off and clean the putty knife. Allow the repair to dry (usually overnight; see joint compound package directions).
Fill the dent.
6. When the repaired surface is dry, sand with the fine (150-grit) sandpaper.
If the surface looks rough or bumpy, or if any of the dents can still be seen, you’ll need another cycle of compound application/drying time/sanding. If you’re satisfied with the repair, wipe it off with a damp cloth or sponge, or vacuum the repaired area using the brush tool. You are ready to prime and repaint.

What Pros Know
When applying joint compound, your result should blend into the surrounding wall. While the recesses caused by denting and nicking should be filled, you don’t want the surrounding walls to look like a relief map of the Rockies. Aim for a finished repair that is as flush to the intact drywall surface as you can make it. Think of the compound as a thin glaze, not fluffy frosting!
Popped Nails
While most pros now opt for screws and power drivers to install drywall, nails used to be the fastener of choice for attaching wallboard to the wall studs (lumber that creates the frame for the walls). A drywall/wallboard nail (they may be called by either name) has little rings on its shank and a flat, round head. Even though they’re designed to stay put, these sturdy fasteners do pop out from time to time. Here’s how to keep them in their place.
You’ll need the following:
□ Claw hammer
□ Drywall nails
□ Putty knife
□ Joint compound
□ Sanding block or sandpaper (150-grit)
□ Clean sponge or cloth
1. Lay newspaper or a drop cloth below the repair site to catch debris. Put on safety goggles and a dust mask when you sand to protect your eyes and lungs.
2. Hammer the nail back into the drywall so it’s flush with the wall. With a second hit, create a small dimple in the wall around the nail. Don’t pound hard; you want a dimple, not a tear. Then drive a second nail next to the first, to hold the popped one in its place, and create a second, overlapping dimple.
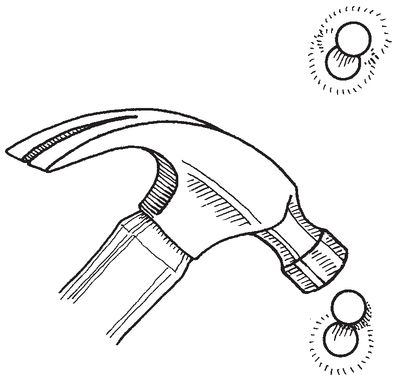
Create dimple.
3. Using the putty knife, apply joint compound over the nail heads and dimples. Clean the putty knife and allow the compound to dry. When the repair is dry, sand the area and wipe off any remaining dust. You are ready to prime and repaint.
Apply compound to dimples.
Patching Holes
Oops! I know you didn’t mean to put your hammer (or the shower rod, or some other object) through the wall, but there it is: a nasty-looking void in the drywall. It used to be that fixing this kind of damage meant ripping out a section of drywall between studs and doing a (very) labor-intensive repair. Hardware stores now stock a great invention for holes of relatively small diameter: a mesh patch you can place over the hole. It’s got a sticky back that adheres to the intact wall surface around the cavity. These patches are available in sizes up to about 8 inches square.
You’ll need the following:
□ Utility knife
□ Sanding block or sandpaper (80-100 and 120-150 grit)
□ Mesh wall patch (about 2× the area of the hole)
□ Tray to hold compound
□ Joint compound
□ Putty knife (4” or wider, depending on the hole)
□ Clean sponge or cloth
1. Cover the floor with newspaper and place a drop cloth on the surrounding area to protect furnishings. (This job may raise more dust than the others!) Put on safety goggles and a dust mask when you sand to protect your eyes and lungs.
2. Prepare the surface for the patch. Use the utility knife to cut away any protruding or hanging pieces of drywall. You might also want to sand the edge of the hole gently with the coarser grit (80-100) sandpaper. The idea is to make the surface of the hole flush with the wall, not to make the hole bigger!
3. Peel away the backing paper from the mesh patch and center the patch over the hole; then stick it down, smoothing the edges.
Apply the mesh patch.
4. Load your tray with joint compound. Use the putty knife to apply the compound over the patch. Cover the mesh area completely, applying compound beyond the borders of the mesh. Smooth on the compound from side to side, top to bottom, corner to corner. When you’re finished, clean and dry the knife and tray.
Apply compound to patch.
5. Let the repair dry—like other drywall repairs, this one will take 8 or more hours. Then sand the dried area with the coarse (80-100) sandpaper. Wipe away any dust with a damp sponge or cloth.
6. Apply a second coat of compound as in Step 4. Let the compound dry. This time, use the fine sandpaper (120-150), and clean up as before. You’re ready to prime and paint.

What Pros Know
Small flaws—dents, popped nails, and the like—can usually be covered with a 2” or 3” putty knife, and joint compound applied right from its small container. If you’ve got holes or a lot of imperfections to cover, you’ll probably want a larger bucket of compound and a broader knife, 4” or wider, to cover the hole(s). To keep the compound from drying out, transfer the quantity you think you’ll need into a tray (you’ll find trays near the joint compound in the hardware store or home center). Then reclose the lid on the compound bucket to preserve the rest. Professional drywall installers work quickly, and waste neither time nor words. They call joint compound “mud,” an apt description that saves two syllables!
Loose Drywall Tape
Drywall seams are joined and sealed by means of drywall tape, now a nice, self-stick product that usually stays put. But the drywall seams in your house may be put together with the old, paper product. This sometimes lifts off, and you can smooth it down with a new strip of 2-inch drywall repair tape, then go over it with joint compound and your putty knife, just the way you repaired everything else in this section.
If the old drywall tape is lifting all over the place in a section of a room, or rooms, this may be an indication of a moisture problem behind the sheetrock, and that’s not funny.
Moisture in the walls not only damages drywall. It could degrade insulation, cause mold, and on and on. If you repair lifted tape and the problem keeps popping up, call in a pro.
Repairing Cracks in Plaster
Plaster is a beautiful wall surface; intact plaster has a smooth, hard finish that is beautiful to the eye and the touch. If you’ve got an old house, your walls may be covered with this material, which is traditionally applied in three coats over a layer of lath that is attached to the wall studs. But houses settle, and that’s when the fun begins. Sooner or later, cracks and other defects may appear.
For all of us in DIY 101, the cracks are what we’ll deal with. Bigger jobs are for the pros.
Spackling compound is a bit thicker than joint compound, and is good for repairing hairline cracks in plaster.
You’ll need the following:
□ Lever-type can opener
□ Clean sponge or cloth
□ Spackling compound
□ Sanding block (150-grit)
def•i•ni•tion
Lath is the foundation for plaster, or sometimes for tile. It is traditionally a framework of thin wood strips, or, more recently, wire mesh.
1. Lay newspaper or a drop cloth below the work area to catch debris. Put on safety goggles and a dust mask when you sand to protect your eyes and lungs.
2. In order for the compound to make a good bond with the wall and the underlying layer of plaster beneath the crack, a hairline crack should be opened to about ⅛" wide. Do this by running the tip of a lever-type can opener (or the tip of the blade of a table knife) down the length of the crack. Brush away any crumbs of plaster that remain with a damp sponge or cloth.

Open plaster crack uniformly.
3. With your forefinger, push the spackling compound into the crack using smooth strokes until the crack is filled, end to end. The repair should overlap the wall slightly, creating a bond with the plaster.
Apply spackling compound.
4. Wash your hands, and let the repair dry (up to 24 hours; check the spackling compound package directions). When it’s dry, if the patch seems to have shrunk into the crack, repeat Step 3, filling the indentation until the patch is flush with the wall, then let the area dry completely.
5. Sand the dry surface of the repair, and wipe away remaining dust. You’re ready to prime and paint.
Because plaster is usually composed of three layers—a base coat, a second thicker coat, and a top coat (the beauty part), damage below the surface layer and beyond small cracks can be a tough DIY project. If you’re patient, don’t mind a lot of dust, and have plenty of spare time, see Appendix B for some sources of help for larger repairs.
You may prefer to call in a professional. Plasterers are artisans, but since drywall has so overwhelmingly replaced plaster in modern construction, masters of this craft are disappearing. It may take some time and sleuthing to find a good one.
Grout and Tile Crackups
Attractive, quite sturdy, and easy to clean, tile is a great wall covering in bathrooms, on kitchen backsplashes, and anywhere moisture can settle. A sponge or damp cloth wipes away dust and grime. It’s wonderful stuff!
Over time, though, the grout (cement filling) between the tiles can become dirty and start to degrade; little bits of grout can chip or crack, and then it’s time to renew the offending seams. If grout is falling like rain, you may want to call a pro. Doing a whole wall or a whole room could be more work than you bargained for.
Sometimes, bad stuff happens to good walls. A single tile will develop an obvious crack, or fracture from too many hits with a pot, or the vacuum cleaner. Replacement is fairly straightforward if you’ve got some leftover tile stashed away.
You’ll need to remove the grout around the broken piece before you remove the tile.

Ounce of Prevention
If the grout in the tiled areas of your home still looks good, a great little weekend project would be to seal it. Your local tile dealer stocks sealers that are easy to apply, and will protect the surface of the grout; just follow the package directions. If you seal the grout every couple of years, you may be able to skip this section for a while!
Replacing Grout
Finding grout to match what’s already there may be the hardest part of this small job. Before you start, chip out a little sample of grout from the crumbling area with a utility knife, and bring it to the tile store. If you can’t find a perfect match, ask the tile dealer about grout dye, which is applied like paint, with a brush, to the replacement grout. You may find just the right shade to make your repair invisible.
Oh, and if you’ve got a match, after you take what you need, be sure to close the package containing the remaining grout. Store it in an airtight container, labeled with the color and where it is used in your house. Love those leftovers!
You’ll need the following:
□ Masking or painter’s tape
□ Utility knife or grout saw
□ Grout to match what’s already there
□ Clean sponge or cloth
□ Grout sealer
1. Removing grout will create some debris in the area below the damage; spread newspaper or a drop cloth in the work area. Put on safety goggles to protect your eyes from flying debris.
2. The surface of ceramic tile is vulnerable to scratching and chipping. If you’re removing grout, or a cracked or broken tile, you’ll want to mask the edges of the surrounding tiles with masking or painter’s tape so the repair you’re doing won’t create more work!
Mask around the repair.

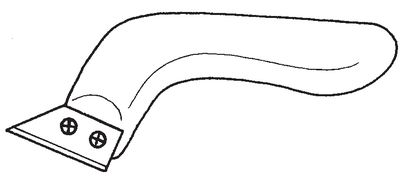
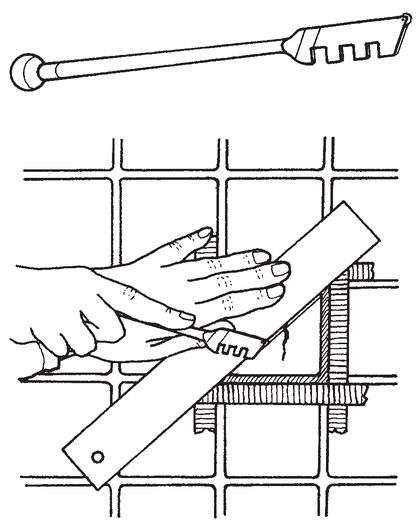
3. Remove the old grout with a utility knife or a grout saw. Ceramic tile is usually ¼" thick (or less) so work carefully and don’t cut into the surface of the wall.
A grout saw looks like a large utility knife with an offset handle. It is useful for cutting grout, especially if grout seams are wider than ¼". A utility knife is fine for cutting narrower seams.
4. Make sure the seams are free of the old grout, then mix the new grout according to package directions.
5. You won’t be needing the masking at this point, so remove it from around the open seam(s). Apply the grout to the open seam(s); smooth it with your finger.
6. When the seams are completely filled and look smooth, you can wipe away any grout remaining on the surrounding tiles with a damp sponge or cloth. Let the grout dry, then seal it with a grout sealer according to package directions.
Replacing a Ceramic Tile
If you’re only replacing one or two tiles, you will only need a small quantity of tile adhesive, also called mastic. Bring the replacement tile with you, or ask the tile dealer when you buy a replacement which adhesive is suited to the job. Purchase that variety.
You’ll need the following:
□ Masking or painter’s tape
□ Utility knife or grout saw
□ Metal straight edge
□ Glass-cutting tool
□ Nail set
□ Hammer
□ Cold chisel
□ Putty knife
□ Tile adhesive/mastic
Ounce of Prevention
If your broken tile is over the bathtub, you’ll want to protect the surface of the tub from flying shards of tile. Cover the whole tub with a drop cloth. Bits of tile can be very sharp and downright dangerous when they become airborne. In addition to your goggles, protect your arms with long sleeves—button sleeves if they have buttons so loose cuffs won’t be in your way.
□ Replacement tile
□ Wood block
□ Grout to match what’s already there
□ Clean sponge or cloth
1. Protect surrounding tiles with masking or painter’s tape, and cover the floor around the work area with newspapers or a drop cloth. Put on safety goggles to protect your eyes from flying debris.
2. Remove the old grout; follow the instructions in the repair just described.
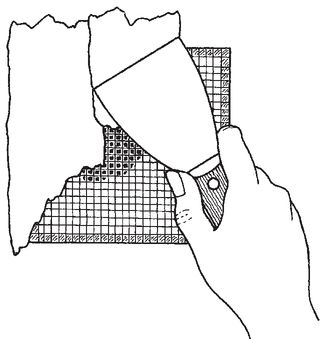
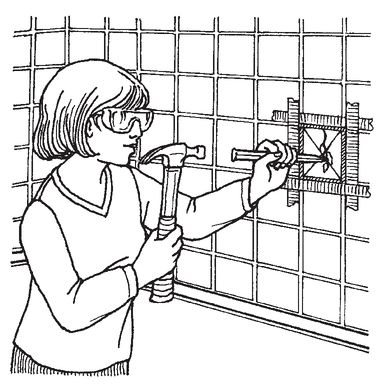
3. Using the straight edge as a cutting guide, and the glass-cutting tool, score the damaged/broken tile with an X mark, corner to corner on the diagonal.
The glass-cutting tool is not only good for cutting glass; you can use it to score many hard, brittle materials.
Score the crack.
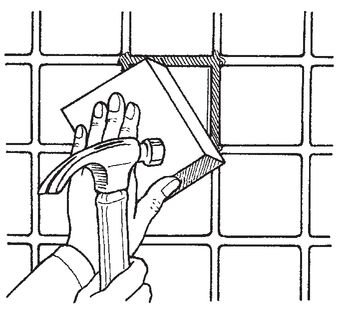
4. Position the nail set at the center of the X, and tap with the hammer to loosen the cracked tile.
5. Using the hammer and the cold chisel, carefully chip out the tile. Once you have gotten enough small pieces out, you can hammer the end of the putty knife (if it’s got a metal end on the handle) to carefully work out the tile. Take care not to gouge the underlying wallboard. Hold the chisel or knife at an angle so that you’re lifting tile but not denting or tearing drywall.
Chisel out broken tile.
6. When all the tile bits are removed, scrape out the remaining dried tile adhesive with the putty knife, also taking care to leave the underlying wall intact.
7. If you do make a gouge in the wall, go back to the drywall repair section of this chapter and make the repair. You’ll have to wait for the compound to dry, then sand it and wipe away any remaining dust before you set the tile. (Remember to wear a dust mask when you sand.)
8. Using the putty knife (be sure it’s clean and dry), “butter” the back of the tile with adhesive, and position it where the old tile was set. Wipe away any mastic that squishes up from beneath the tile.
9. Using a wood block to protect the surface of the new tile, hammer the block gently so that the tile is level with the surrounding work.
10. Hold the tile in place with masking or painter’s tape while it dries (tape it up and down, side to side, to the adjoining intact tile work).
Secure the new tile in place.
11. Once the tile is set (adhesive should usually set for 24 hours; check the directions on the adhesive packaging), grout the seams around the tile, and wipe any excess grout away with a damp sponge.
Replace grout.

12. When the grout dries, apply a sealer according to package directions.

What Pros Know
Uh oh! You have no leftover tile and there’s nothing resembling it at the six or seven tile stores you’ve visited. (Did you check their discard piles of extras from old jobs? Don’t forget to try.) If you’re willing to sacrifice a few intact tiles, and the field (your tile wall) isn’t too large, you can make lemonade out of this lemon of a dilemma. Buy a few contrasting tiles that fit the color scheme in your room, or a few pretty art tiles that will complement the décor, and install them randomly. This replacement method will look like a design, not a repair, if done well. If this sounds like too much work, it won’t take a pro long to replace a few tiles with substitutes, and the price will beat a complete retiling.
Minor Wallpaper Repairs
After he graduated from the crib to a big-boy bed, my son lulled himself to sleep by picking at the wallpaper where his bed aligned with the wall. Cleverly, he did this below the level of the mattress, so I didn’t notice until he had removed a fairly large patch of paper. To give him an alternative sleep aid to peeling wallpaper, we went shopping for a new fuzzy stuffed friend, and then I learned to patch. Fortunately for me, the paper was a simple grid pattern; it was easy to line up the pattern and cut a patch along the grid lines. And my son loved Jerry, his new bear!
Even though you can return unused rolls of wallpaper and get a little money back, save at least one roll of leftover paper from any wallpaper project for unexpected mishaps, and store it with your other leftover supplies. Most wallpaper patterns go out of production after a couple of seasons, and if you’ve got a tear or hole in a prominent position that you can’t cover with a hanging picture, you will regret being penny-wise!
Bursting Those Bubbles
Unlike popping balloons, getting rid of air bubbles beneath wallpaper is a delicate maneuver.
You’ll need the following:
□ Utility knife
□ All-purpose glue
□ Toothpick
□ Clean sponge or cloth
Carefully make a slit in the bubble and press it flat with your fingertip. If it won’t stay down, put a little all-purpose glue on a toothpick, and carefully spread the glue underneath the lifted area. Press down, and wipe away any excess glue with a damp sponge.
Flatten a wallpaper bubble.
Flattening Flappy Seams
A good paperhanger takes care to match and flatten each strip of wallpaper so that the pattern—not the strips—are what you see when you walk into the room. Over time, the adhesive that once kept the edges down may dry out sufficiently that the seams begin to lift off the wall in places. And these little “lift-offs” can tear if someone brushes against them. A little first aid will keep your seams straight!
You’ll need the following:
□ All-purpose glue
□ Toothpick
□ Clean sponge or cloth
□ Wallpaper seam roller
As with the burst bubble, put a little glue behind the tear or the lift. Use a toothpick for gluing very small lifts. Press down, making sure the repair lines up properly with the adjoining pattern. Wipe away any excess glue that blobs out from under the repair with a damp sponge. Roll the seam with the seam roller for a neat, flat finish.
Glue a wallpaper seam.

A wallpaper seam roller will glide over your repair without hitting a snag. It’s also great for smoothing anything else you have to glue and flatten.
Patching a Torn Section of Wallpaper
That leftover roll of wallpaper is key to this repair. You’ll need to make your patch line up with the existing paper, to make it less visible. It’s best if the corners of the patch wind up inside the pattern, rather than on the plain background of the paper, so the repair is less visible. If the paper is a very busy pattern with little or no plain background, the corners should disappear nicely.
You’ll need the following:
□ Utility knife
□ Blue painter’s tape
□ Straight edge
□ Putty knife
□ Wall sealer (for repair area)
□ Bucket of lukewarm water
□ Sponge
□ Leftover matching wallpaper
□ Wallpaper adhesive, or a shallow pan of water
□ Brush for applying wallpaper adhesive, if necessary
□ Wallpaper seam roller

What Pros Know
Dipping it for about ten seconds in a pan of water activates the adhesive on prepasted wallpaper. Unpasted wallpaper is applied with wallpaper paste. Which kind is yours? Sometimes the manufacturer will tell you by printing the information on the backside of the paper. If you can’t figure it out, dip a scrap of paper in water and see if it will stick to a wall surface. (Unless you want to keep it there, remove immediately after checking and wipe away the residue with a sponge!) Expensive designer papers, meant to be installed by pros, are often unpasted. If you’re still in doubt, bring a scrap to the wallpaper store and ask.
1. Spread newspaper or a drop cloth below the work area to catch debris.
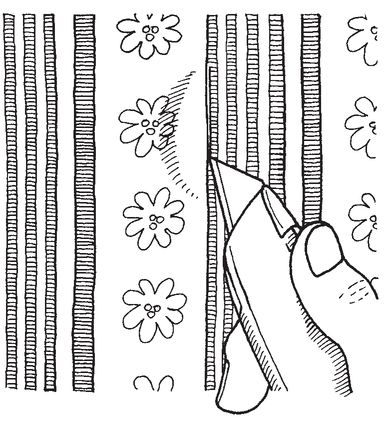
2. With the utility knife, remove any bits of wallpaper that are hanging loose. Cut a piece of wallpaper from your leftover roll that covers the torn or damaged area with a generous border around it.
Cut the patch.
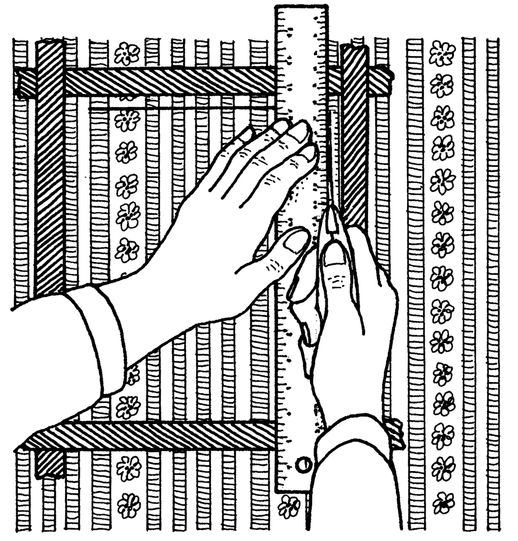
3. Carefully match the edges of the patch to the existing wallpaper, and tape it flush to the wall with blue painter’s tape.
4. Using the utility knife and your straight edge, cut out a square or rectangular patch inside the taped edges that also encloses the torn area. You will be cutting the patch and scoring the existing paper at the same time. Take care not to gouge the wall. (If you should slip, you can always repair the underlying drywall with the skill you learned earlier in this chapter!)
5. Set aside your newly cut patch for the moment. Dampen the scored area around the torn area and use the putty knife to scrape away the wallpaper. You may have to apply warm water to the paper and let it soak for a few minutes to make removal easier.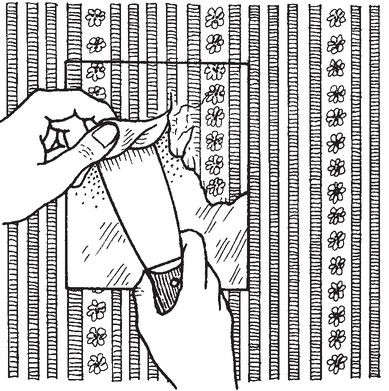
If your old paper is strippable (it may say so on the back of the paper), you can just lift the corner of the paper with your putty knife and pull it back, holding the paper at a sharp 10˚ angle. Peel carefully.
Remove old paper.
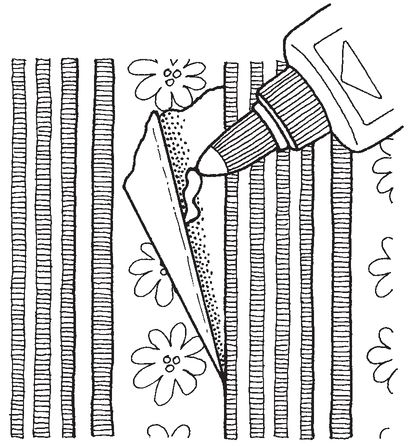
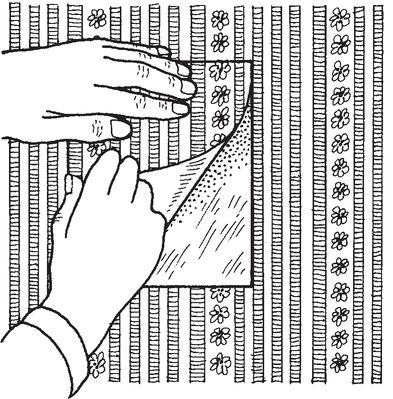
6. When all the paper is removed from the area you will patch (with your “custom fit” replacement), apply wall sealer (from the wallpaper store; ask the dealer) according to package directions, and let it dry.
7. If you’re using a prepasted wallpaper, dip it in water and then install it over the opening you’ve prepared, taking care to line up the pattern and the seams. Use the sponge to wipe away excess moisture. (If using unpasted paper, apply adhesive to the back of the patch according to directions. Wipe away any excess adhesive from the edges of the repair.) Smooth the paper from the center to the edges, taking care to keep the pattern in line.
Install the patch.
8. When you’re satisfied with the fit, run the seam roller along the edges for a nice, flat edge. Let the patch dry.
The Least You Need to Know
• Wall repairs take time because many patch products dry slowly. The good news: you don’t have to watch! Do something else while you wait.
• Save and label leftovers from renovation projects. You never know when you’ll need an extra tile or piece of wallpaper.
• A heavy hand in wall repairs makes more work. Light and easy does it!
• Always protect your eyes, mouth, and nose when sanding.
..................Content has been hidden....................
You can't read the all page of ebook, please click here login for view all page.