
Chapter 8
Getting Clear About Windows
In This Chapter
• Parts of a window
• How double-hung windows work
• Smoothing the passage of sticky windows, and tightening up loose ones
• Dealing with the pain of broken panes
• Common screen repairs
Your home’s windows are its (and your) eyes on the bigger world. In addition to lighting your interiors, keeping fresh air flowing in good weather, and shutting out the elements when it’s foul outside, windows that work and look good make a statement about you. So subdue that stubborn sash, banish those broken windows and torn screens, and give your home a clean, bright face.
What a Pane! Parts of a Window
There are many kinds of windows, but nothing’s better for your fenestration vocabulary than learning the names of the parts of the most common window style—the double-hung. Now you can talk the talk!
def•i•ni•tion
Fenestration is the term architects use for the design and placement of windows in a building.
Let’s start from the top. The header is the top horizontal piece of the frame. The jamb refers to the vertical side pieces of the frame. The sill is the horizontal part at the bottom of the frame. (Looking at the window from outside, you’d see the stool where the sill is, often supported by a small board called an apron.)
Now let’s get to the real business of this window. Double-hungs have two moving pieces, called the sash. The piece on top is the upper sash, which can be lowered from its closed position, and on the bottom is the lower sash, which can be raised. The rails are the horizontal part of the sash frame and the stiles are the vertical parts.
The sash, upper and lower, hold the glass portion of the window. A single piece of glass is called a pane. A sash can have one or more panes; the dividers between the panes are called muntins. On both vertical sides of the sash are channels, which guide the sash up or down in a straight line. The small molding piece that runs up the front, at the sides of the lower sash is called the inside stop, which keeps the sash running smoothly in its channel. The sashes lock together by means of a two-piece latch, positioned atop the upper rail of the lower sash, and the bottom rail of the upper sash.
If your windows look like double-hungs, but the upper sash doesn’t move, these are called single-hung windows.
Are you getting clear about windows yet? Don’t worry; review the illustration if you forget some of the names referred to in the repairs.
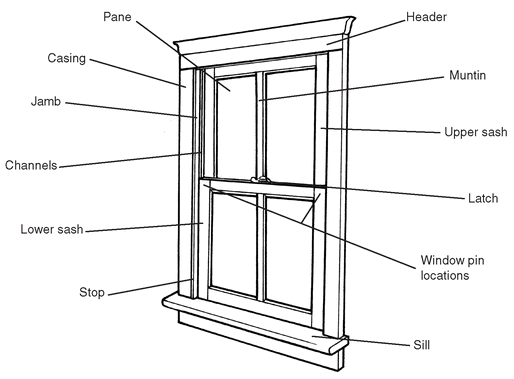
Parts of a double-hung window, as it looks when viewed from inside.
How Double-Hung Windows Work
Modern double-hung windows are truly things of beauty. Double glazed, weather-stripped, and vinyl-clad at the factory, they need very little maintenance. In the spring and fall, you just clean the channels, and spray and wipe the moving parts with a little lubricant.
When it’s time to wash the glass parts, the real benefits of modern double-hung windows are even more apparent. The sash of most good-quality double hung windows can be removed from their channels and washed. No more ladders, no more freezing fingers as you try to clean them from the outside. Technology can be a blessing.
However, this part of the chapter is not for owners of fabulous, new, easy-care windows. It’s for the rest of us who have sticky, drafty, balky, and unrepentant old wood windows that need more than their fair share of attention. So let’s get busy!
Stubborn Stuck Sash
This section proceeds from a no-load solution to some nitty-gritty ideas.
Wait and See
This is not often the case (it’s too easy), but sometimes the only problems with your windows is that it’s been hot and humid for days. If the windows worked well before the heat wave, you may want to leave them alone temporarily.
Once a dry spell arrives, your windows may go up and down as before.
Don’t take drastic action to sand or plane windows during humid seasons. While they may be sticky in the spring and summer, the cooler, drier months could set your newly sanded windows rattling in the jambs because you removed too much wood. If you are trying to make balky windows glide to your tune in summer—when you need to open and close them frequently—try the less invasive fixes.
Gentle Tap, Tap, Tapping
Before you disturb the paint on the windows with any type of prying tool, you can try this little wake-up call. This technique works best if you can work both sides of the window; you may need a helper if the windows are on the second floor and require a ladder to reach their exterior side.
You’ll need the following:
□ Small wood block
□ Piece of heavy cloth
□ Duct tape
□ Claw hammer
□ Sponge
□ Lubricant or silicon spray
1. Make sure the sash is unlatched. Wrap the wood block in a piece of heavy cloth or felt to protect the finish on the windows. Keep the cloth in place on the block with some duct tape, if you like.
2. Place the block against the frame along the bottom rail of the lower sash and gently tap it with the hammer along the width of the sash. If your windows are on the first floor, go outside and do this to the same rail on its exterior side. Gradually work along the stiles of the sash, inside and out, working upward until you reach the top of the window.
3. If this frees the sash, move it up and down, and examine the channels. Clean out any debris and dirt with a damp sponge. Let dry, and spray some lubricant or silicon spray in the channels.

What Pros Know
If your windows are stuck because they’ve been painted shut, use a utility knife to carefully score the paint that has bonded any window parts together: between stop and sash, between upper and lower sash, between sill and sash. You’ll only do more damage to the paint if you skip this step before trying to move or pry the windows.
Don’t Want to Pry, But …
If gentle tapping doesn’t work, you’ll need a stronger approach. You’ll need the following:
□ Putty knife
□ Rubber mallet
□ Pry bar
□ Shim or thin block of wood
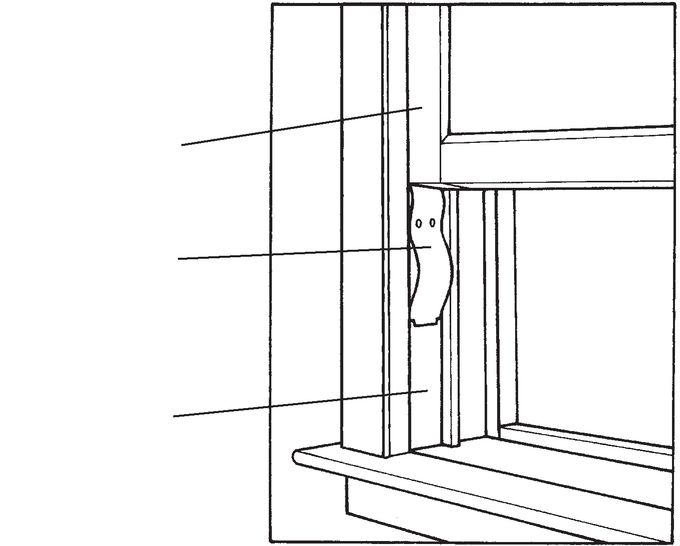
To pry the window from inside:
1. Make sure the sash is unlatched. Insert the blade of a putty knife into the crack between the stile of the lower sash and the stop, tapping it lightly with the rubber mallet to free the window. Do this along both stiles.

Pry open a tight sash from the inside.
2. If this frees the sash, move it up and down. Work the putty knife into any spots that are still resistant.
Once the window is moving freely, examine the channels. Clean out any debris and dirt with a damp sponge. Let dry, and spray some lubricant or silicon spray in the channels.
To pry the window from outside:
1. Make sure the sash is unlatched. Using a thin wood block or shim to protect the stool from the pry bar, insert the pry bar into the crack between the stool and the sash. Work first at one end of the sash, then the other, so that the sash will move up evenly.
Pry open a tight sash from the outside.

2. If this moves the window, go back inside and open it. Examine the channels, then clean and lubricate them.
Windows That Won’t Stay Open
You can prop up a window that won’t stay open with a stick or a ruler, set in the channel below one side of the sash. Or you can install some hardware, as described next. But neither of these “make do” fixes really corrects the underlying problem.
A sash that’s loose in the jamb, and won’t stay put when it’s opened, usually means that its raising/lowering mechanism has failed. In old, single-paned wood windows, this is often a rope-and-weight pulley system; your window won’t stay open because the weights have come loose from the rope, or the rope has simply broken from age and wear. If you look at the top of the jamb, you’ll probably see the little pulley.
Some rope-and-pulley controlled windows have access panels in the jambs that allow you to get to the weights without removing the window casings. Even when you can get to them, though, this is a delicate, often frustrating (the weights fall down inside the walls!), and time-consuming job. Remember, these old, single-paned windows are probably leaky, and they’re costing you for the extra money you have to spend on heating and air-conditioning your drafty house. The best fix is to start saving for new, energy-efficient sashes that can be fitted in the old jambs, or spring for completely new windows.
In the meantime, you can apply weather stripping at the joints of your windows: between sash and sill, between the sash and the stops, anywhere air is leaking in (put your hand at one of the joints on a cold, windy day and you’ll feel the cold air passing through).
And to keep the windows up when you do want fresh air, you can install little stainless steel controls in the channels of the lower sash that provide some resistance to your weight-less window. They work like the stick or the ruler, but they’re a bit more sturdy, and only cost a couple of dollars.
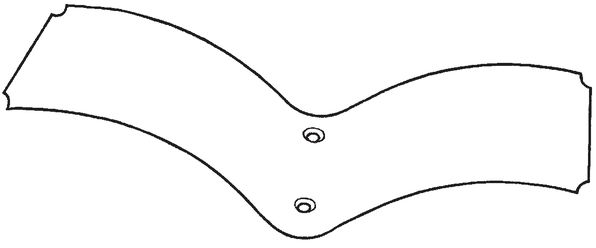
Window control.
To install them, you’ll need the following:
□ Ruler or dowel (to hold up the window while you work)
□ One pair of window controls per loose window
□ Claw hammer
□ Box nails
□ Measuring tape
□ Pencil or awl
1. Raise the lower sash as far as it will go, and secure with the dowel or ruler; you may want to prop it on both sides for safety.
2. Position the control in the lower sash channel so that the nail holes (which have little burrs on the backside where they meet the channel) are about an inch below the highest opening you want for your window. Nail in one control.
Window control in place.
3. Nail in the control on the opposite side of the window. Measure and mark the location of the nail holes for the second control with the pencil or awl, so both controls are nailed at the same height in the channel.
4. Remove the supporting dowel or ruler and carefully lower the window so that the top sections of the controls are between the sash and channel as you lower the sash (see the previous illustration). The controls are flexible, so they act like springs to tighten the movement of the sash.
When Windows Break
Modern windows—the double-glazed, gas-filled, or tempered variety—are pretty sturdy. But when they break, you’ll need a professional glass installer to fix them. Current building codes require that door glass (for sidelights and other door panes) be tempered. If it breaks, it does so harmlessly into about a million little chips per pane. I know this because my lawn guys got too close to our French doors with a weed-whacker, and it was doomsday for the bottom right pane. Specialized glass products have a little seal imprinted in a lower corner of the glass, which is your indicator that all such panes need professional replacement.
When tempered or other specialty glass breaks, you’ll have to do a temporary repair until the glass man arrives. Even when you’re just picking up glass chips, take precautions when you clean up the glass.
def•i•ni•tion
A sidelight is a window positioned next to a door. Usually doors with sidelights have one on either side of the door. Tempered glass has been heated and cooled repeatedly in a controlled environment to give it more strength than conventional, single-layer window glass.
You’ll need the following:
□ Newspaper
□ Painter’s, masking, or duct tape
□ Putty knife
□ Measuring tape
□ Utility knife (to cut cardboard make-do)
□ Sheet of corrugated (box) cardboard, or sheet of transparent acrylic plastic, cut to fit opening
To clean up a broken specialty glass window:
1. Sweep up and discard any chips of glass on either side of the window (interior and exterior). Tape a piece of newspaper on the inside of the opening so more glass does not fall inside. Wearing heavy gloves and safety goggles, and working from outside, use the putty knife to carefully knock off any remaining pieces of glass; put the debris in a supermarket paper bag (it’s thick), and discard.
2. Measure the dimensions of the now-empty opening, and cut a cardboard template that you can put in place with duct tape or masking tape from the inside. (You can also take your measurements to a hardware store and get a piece of Plexiglas cut to fit, for a more aesthetic make-do.)
For small window panes that are single-glazed (one layer of conventional glass, no little imprint in the lower corner), you can replace them yourself. I don’t recommend cutting your own glass unless you’ve had a lot of experience with a glass cutter (it’s best to test your skill with a small pane first). Do the cardboard make-do fix, and take your window frame measurements to the hardware store so they can cut your glass.

Ounce of Prevention
Large panes of glass are too heavy to handle. If your panes are larger than a foot-and-a-half square, leave replacement to the pros. You must handle glass carefully, by its edges, or it will easily crack. Start small if you want to learn to work with glass!
You’ll need all the tools and materials mentioned earlier for removing tempered glass and installing a temporary make-do (cardboard will do until you get your replacement glass).
In addition, if you’re doing the replacement, you’ll need the following:
□ Pliers
□ Sandpaper (100-150 grit)
□ Sheet of glass (see Step 6)
□ Glazing putty (sold in ropes so you don’t have to roll your own)
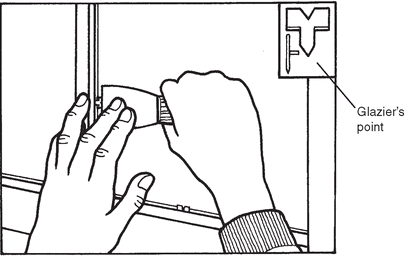
□ Glazier’s points
□ Touch-up paint (for repaired window frame)
1. Unlike tempered glass, shards of single sheets of glass are very sharp. Work from outside and, as with tempered glass, tape newspaper on the inside of the window.
2. Wearing heavy gloves and safety goggles, remove the large pieces of glass first. Use the putty knife to knock out remaining small bits of glass.
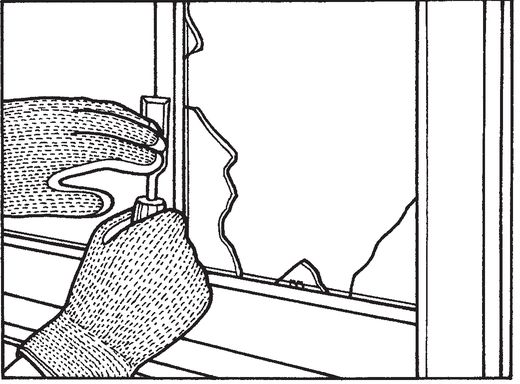
Remove a broken single-glazed pane.
3. Remove the old glazier’s points with pliers.
4. Lightly sand the edges of the opening to get rid of any remaining putty.
5. Measure the window opening; measure and install the cardboard make-do.
6. Take your opening measurements (remember, measure twice, cut once) to the hardware store and get a piece of glass cut. Tell them that your measurements are the actual size of the opening; they’ll cut the glass ⅛ of an inch less than the total width and length.
Once you have your replacement glass, you can proceed with the next part of the repair:
1. Remove the cardboard make-do. Working from outside, press a rope of glazing putty, about ¼ inch thick, around all the edges of the window opening. This is your setup for installing the glass.
2. Carefully press the pane into place, then insert the glazier’s points into the frame, pushing them in with the putty knife. Use two points on each side if it’s a small pane. If the glass is longer than a foot in length or width, insert the glazier’s point’s every four to six inches.
Insert glazier’s points into frame.
3. Apply another ¼-inch rope of putty around the edges of the opening. Use the putty knife to smooth the putty and form a good seal with the window frame.
4. When the putty is dry, you can paint it to match the surrounding wood.
Screen Test
The screen and storm windows at our ancient house are heavy and cranky. They’re in wood frames—no nice little slide-out or pop-out aluminum framed stuff. Our least favorite weekends in spring and fall are those when we have to change from storms to screens, and from screens to storms. But before we do any of the really tiresome leg work and ladder climbing, the stored windows must be cleaned. You clean storms the way you clean any window: with glass cleaner and clean rags or paper towels. And the spring changeover is the time to replace any storm window glass. If it’s the single-glazed variety of storm window, you can follow the previous directions.
This is also a good time to clean the frames, if your storm/screens are of the slide-out variety. Clean the runners and the channels where they fit, and lubricate them with a lubricating oil or silicon spray—they’ll go in and out more easily.
To clean dirty screens, simply spray the screens with your garden hose and clean them with the sponge (or a wire brush) and soapy water. Rinse, let dry, and hang ’em!
Screen Repairs
Once the screens are out, you may notice some defects: a loose screen here, a little hole there. Last spring while cleaning her window screens, my sister noticed that her big red Persian cat, Gizmo, had been slipping out of the house the previous summer because one of the screens for the living room windows had come loose from its frame. She had to replace it, or Gizmo would be doing his warm-weather wandering once again!
Here’s how to handle common screen defects.
Small Holes
Holes in the screens let in all kinds of unappealing critters when your windows are open: mosquitoes, moths, flies, and other little creatures will take advantage.
To some of us, little repairs in a screen door might look a bit tacky, so if it bothers you to have a patch at your door, you might want to go all the way and replace the whole screen (see how in the next section; door screens work just like the window screens). But for window screens that don’t get as much scrutiny as a front or back door, you can patch; it’s a less time-consuming fix.
You’ll need the following:
□ Scissors
□ Screen patch (these come in various sizes, available at most hardware stores; make sure the color/material is a close match to your screen—some are metal, some are fiberglass—or it really will show)
□ Glue for fiberglass screen (ask the store salesperson for a good, waterproof variety)
You’ll notice that screens are composed of lengths of fine, interwoven metal wire or fiberglass filament.
def•i•ni•tion
A filament is a slender strand of fiber or other material. The thin wire that is the light-producing element of a bulb when electric current passes through it and the element that emits electrons in a vacuum tube when current is passed through it are also known as filaments.
1. Cut a patch to fit over the hole in the screen; the patch should extend at least 1”-2” around the circumference of the hole.
2. You’ll want to remove a wire or filament (or two) from each side of your screen patch to give you a little bit of extra length to make the fix.
3. Position the patch over the hole on the interior side of the screen. Insert the wire ends of each side of the patch into the intact screen holes around the tear or hole you are covering. Bend the wire ends so they grip the intact screen. You may want to use needlenose pliers or even a nail file to help you bend the wires—they’re tiny, and tough to work with if you have big hands. If the screen is the soft, fiberglass filament type, you won’t bend the ends—they’ll lie on top of the edges of the repair. You can glue the ends to the existing screen with the waterproof glue.
Replacing Screens
If a screen has big holes or tears or has become loose and taken on a “wavy” look, you’ll want to replace it. Even if the old screen isn’t torn, if it’s bulging in places it may be weakened by the stretching. You may as well get new material to work with. Use the old screen for patches (store it in one of your “leftovers” bins).
The most common window and door screens are attached to the screen’s frame with a flexible, vinyl rope known as spline. The spline fits into a groove where mesh meets frame. If you look carefully at the corners of the screen, you may also see little plastic pieces that help fit the spline snugly in each corner.
def•i•ni•tion
Spline is a piece of wood, metal, or plastic that is used as a connecting or framing piece between two sections of material. Spline can be used to hold a screen in its surrounding frame; the material that frames caning in a chair seat where it meets the wood or metal part of the seat is also known as spline.
If the screen is mounted in the window (or door), you’ll need to detach it from the surrounding frame. In the case of window screens, you’ll probably just need to pop or slide them out. A door screen may be mounted to the frame with screws; if so, unscrew the screen from the frame, take out the screen, and put the screws in the screw holes in the window or door with a couple of turns so they don’t fall out. Loose screws are always rolling away and getting lost!
You’ll need the following:
□ Needlenose pliers
□ Narrow putty knife or flat-tipped (standard) screwdriver
□ Mesh screening
□ Measuring tape
□ Scissors
□ Spline tool
□ Utility knife
□ Replacement spline
□ Plastic corner pieces, if you have these in the corners
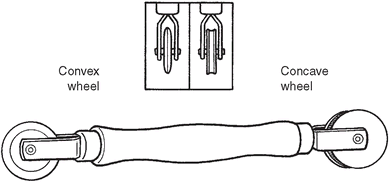
A spline tool is a hand tool with a wheel at each end. One wheel has a convex (∪) rim, for pushing the screen into the spline channel; the other wheel has a concave (∩) rim, for pushing the spline down over the mesh and into the channel.
While setting in the mesh and inserting the spline, an extra set of hands is helpful for holding the mesh in place. Or you can hold the mesh down at the corners you’re not working on with a wood block or two.
You will need to bring samples of your mesh screening, old spline, and plastic corners (if they’re used for your screens) to the hardware store so that you can buy the exact match of each material. There are different types of all three.
You will also need to measure the screen so that you buy replacement screening of sufficient size to cover the screen opening. Also, measure the perimeter of the window opening(s) so that you buy a sufficient length of spline.

What Pros Know
Remember geometry? If you do, skip this tip. If math gave you a rash, read on. It’s not necessary to measure all four sides of a rectangular opening to find the distance around it. Perimeter = length + width times 2. Aha, applied mathematics! Your geometry teacher told you it would be useful, and the time has come!
1. Lay the screen flat on a sturdy work surface. Starting in one corner, remove the little plastic corners (if they’re there) with the needlenose pliers, or pop them out with the screwdriver tip. Pry out the spline with the putty knife or screwdriver, going corner to corner. The spline may be dirty or gunky, so the edge of the knife or tip of the screwdriver can assist you in getting it out cleanly.
Remove old spline.

2. If you’re saving the old screen, roll it up and set it aside. Otherwise discard it. Check the channels from which the old spline and screen have been removed. If they’re clean, go to Step 3. If they’re dirty, get a bucket of warm water, a sponge, and some paper towels, clean them and let them dry.
3. Lay the new mesh screen over the window (door) frame. Make sure the mesh is lying square to the frame; check at the edges to see that the gridwork of the mesh lines up with the frame so it doesn’t look crooked.
4. Measure the frame’s outer dimensions, and with the scissors, cut the mesh to this size. Cut a little square out of each corner of the cut piece, no wider than the frame. This will keep the mesh from bunching in the corners when you install it.
5. Starting in a corner, push the mesh into the spline channel with the convex (∪) wheel of the spline tool. Go all the way up and down one side. You’re trying to create a light indentation, not scrunch down the mesh. The spline will do the holding.
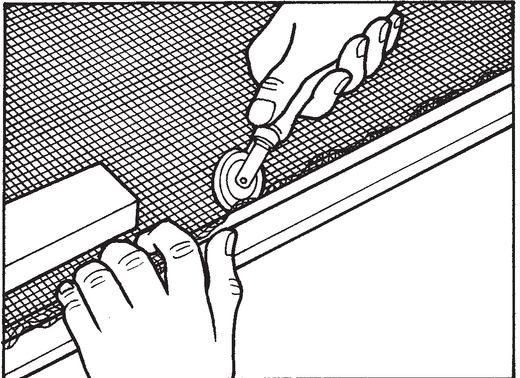
Use spline tool (convex wheel) to insert mesh in channels.
6. Starting in the same corner where you began Step 5, using the concave (∩) wheel of the tool, push the spline into the channel over the mesh. Put your other hand on the screen, or have your helper hold it, so that the tension on the screen is even and it doesn’t bunch up. When you’ve fully inserted the spline on one side, follow Steps 5 and 6 to install the spline on the other three sides.
7. Once the spline is set around the perimeter, use the screwdriver to push the spline into all four corners; trim the end of the spline with the scissors. Trim any mesh that still overlaps the frame with the utility knife. If your original screening had plastic corners, install the new ones.
You’re done! Put the screen back in the window or door opening.
Installing Security Pins in Windows
In areas of your home that are hidden from view on the ground floor, it’s easy for someone with bad intentions to break a window, undo the latch, and make mayhem. If you have a perimeter security system installed, that’s one way to safeguard unwanted entry. Security gates (not window guards, which protect children from falling out) for windows will do the job, but will also make you feel like you’re living in a prison. I had these in one apartment in Manhattan where my bedroom windows opened on a fire escape. I hated the feeling of being locked in, and moved out within months.
If you don’t have the budget for a security service, you can add a layer of protection from forced window entry using the simple method of drilling holes through the lower sash of your double hung windows and installing window security pins, common nails, or eye bolts that prevent the window from easily being raised, even if a pane is broken out.
You’ll need the following:
□ Measuring tape
□ Awl or pencil
□ Electric drill
□ Window pins, eyebolts, or common nails; one pair for each window
□ Drill bit slightly larger than pins, bolts, or nail you are using
□ Masking or painter’s tape, or bit stop to fit your bit
□ Lubricant or silicon spray

Ounce of Prevention
If you can only find window pins that operate with a key, don’t buy them; use bolts or nails instead. In case of fire or other emergency, you don’t want to be looking for a misplaced key!
1. Fully close and lock the window you’ll be drilling; you want the upper rail of the lower (inside) sash, and the lower rail of the upper (outside) sash to be parallel. (The double-hung window shown at the beginning of this chapter shows it in locked position.)
2. You don’t want to drill through both sashes completely, because this will enable someone to foil your security plan from outside! So measure the depth of the two sashes in locked position, and mark your drill bit to ¾ of that measure with a piece of masking tape or a bit stop. You will stop drilling when the bit gets to this mark.
3. Find the center of the top left and top right corners of the lower sash; mark it with the awl or pencil; the awl is good for this mark, because it “grounds” the drill as you begin drilling. (Security pin hole locations are marked on the window illustration earlier in this chapter.)
4. Wearing safety goggles, hold the drill straight, drill into the window at the marks. Keep your grip firm, because you’re drilling through two wood rails and possibly some weather stripping between them. Stop drilling when your bit is inserted to the stop or masking tape mark.
5. When both holes are drilled, lubricate your fasteners before you insert them in the holes. The fasteners should be a little loose so you can remove them easily.
The Least You Need to Know
• Some sticky window problems are merely the result of sticky weather; don’t apply invasive measures unless you must.
• Old wood windows that have lost their weights can still be controlled by installing devices in the channels.
• To fix screens mounted with splines, an exact duplicate material is needed.
• Window pins are a simple addition to your home’s security.
..................Content has been hidden....................
You can't read the all page of ebook, please click here login for view all page.