Chapter 7
Stairs: A Few Steps to a Happy Landing
In This Chapter
• The anatomy of a staircase
• Silencing annoying, squeaky stairs
• Fixing a loose tread
• Securing handrails and balusters
• Making your stairways safe for elders and children
Fixing a staircase is usually a matter of tightening up its parts. Most stairs are constructed of wood, and wood is a responsive material: it expands when the surrounding humidity increases and shrinks when its environment is dry. Even though we can’t see it happening, these tiny movements in the wood, coupled with human contact—you, your family, and your pets, walking, stomping, and bounding up and down, every day—loosen the parts of a staircase. Eventually, the stairs begin to talk, as only stairs can: they squeak.
If the joints of your staircase are not as snug as they once were, you can help them settle down.
Stairs can also be a hazard for the elderly and for small children. I’ll talk about a couple of fixes to improve safety, too.
Parts of a Staircase
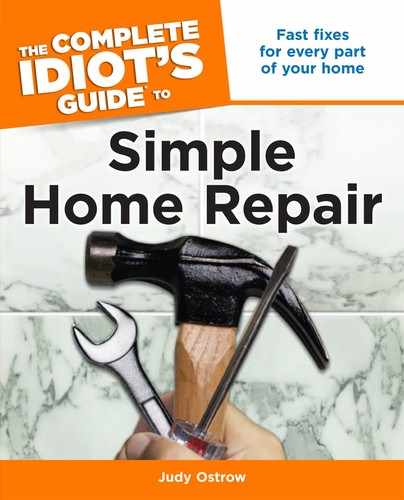
It has more parts, but for our purposes, this is what you should know about staircases. Let’s start with what we step on: the horizontal part of a step is called the tread; the vertical part is the riser. The banister—what we hold onto going up and down—has three main parts: the handrail that we grasp, the vertical posts spaced evenly along its length, which support the handrail, called balusters, and a larger, supporting vertical piece at the bottom of the handrail, called a newel post.
Anatomy of a staircase.
Silencing Squeaks
Squeaky stairs signal loose joints, and they’re fairly easy to fix. We’ll start with the simplest procedure, and go from there.
A Lube Job
This doesn’t make it easier, but if you must, remove carpet and padding from the steps to get to the stair. (Find out how in Chapter 6.) Follow the directions and watch out for furring strips, which may be located not only at the top and bottom of the stair run, but also at an interval or intervals where seams of the carpet start and end.
To mark the offending steps, you’ll need your roll of painter’s or masking tape.
Ask the heaviest member of your family (no offense intended) to walk up and down the stairs so you can locate the protesting tread or treads. Mark them with a piece of tape.
You’ll also need some powdered graphite, which comes in a little squeeze bottle. You can squeeze the graphite out of the container and into the offending, noisy joints. In the case where the joint is between the top of the riser and the tread, you might want to hold a piece of cardboard underneath the graphite bottle to catch the falling powder, then blow it off the cardboard into the joint.
This will lubricate the joints, and may be all you need. If not, try the next procedure.
def•i•ni•tion
In carpentry, a joint is the intersection of two pieces of wood. There are many different kinds of wood joints.
Repairing Squeaks from Below the Stairs
Like the wood floor fixes in Chapter 6, taming squeaks is much easier if you can get to them from under the stairs.
You’ll need the following:
□ Hammer
□ Wood shims
□ Carpenter’s glue (yellow)
□ A small block of wood for driving the shims
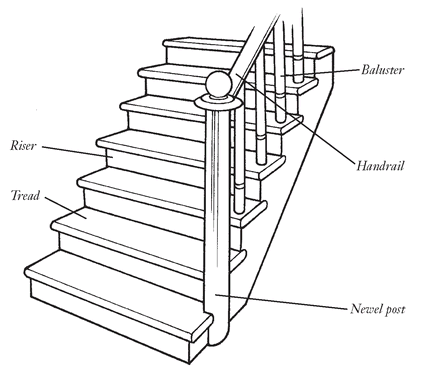
1. Put on safety goggles to protect your eyes from falling debris. Since you’ve already marked the offending stair(s), have your friend stomp on the squeaky treads, so you can see what moves.
2. Coat the wood shims with glue, and tap them, thin end forward, into the joint between the offending tread and its riser. Drive the shims in by placing the wood block between the butt end of the shim and the hammer head.

What Pros Know
Basements can be dark, and sometimes it’s hard to position a flashlight and work simultaneously. If your work area is poorly illuminated, buy yourself a work light. It’s essentially a light bulb in a socket, surrounded by a little plastic cage, with a long cord, that you can hook or hang where you’re working. Just always be aware of the cord so you don’t trip yourself.
Silence a squeaky stair with wood shims.
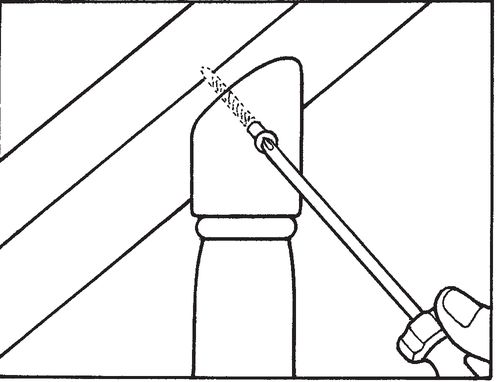
Fixing the Squeak or Loose Tread from Above
You can tighten the joint between tread and riser by drilling straight down through the tread into the riser, and inserting and tightening the screw.
Be sure to mark the location for your drill bit carefully, and keep your drill bit straight—that is, perpendicular to the surface you are drilling. You don’t want the screw to go through the tread and miss the riser!
You’ll need the following:
□ Measuring tape
□ Pencil or awl
□ Electric drill
□ Combination bit sized for the screw you’re using
□ Screwdriver
□ Flathead wood screws (2½")
□ Wood putty
□ Sandpaper (220-grit)
□ Finish or paint to match stair surface (not important if the stairs are covered)
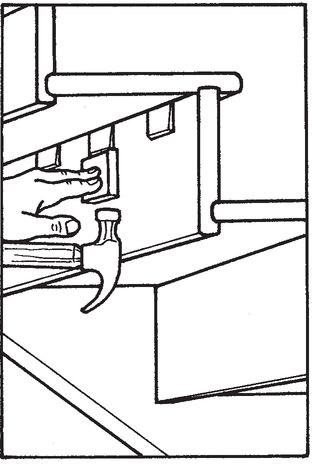
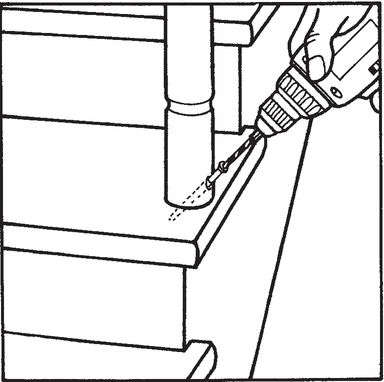
1. Measure carefully if your stair tread is not flush with the riser; most treads extend at least 1½” from their supporting risers. The edge of a standard riser where it meets the tread is ¾" thick, and ideally you want to drill into the center of the riser. Mark the spot with a pencil or awl.
2. Wearing safety goggles, drill two or three pilot holes; insert and tighten screws below the tread surface.
Insert screws from above.
3. Fill the holes with wood putty; wear gloves to protect your hands if you don’t like to handle the putty. Let the putty dry, sand, and finish as desired.
Another way to fill the gap left by a countersunk fastener is to buy a package of small, round wooden plugs, the same size as the screw head. These are called dowel plugs, because these small wood wafers are cut from a wooden dowel. Coat one side of the plug with glue and insert the glued side in the hole; then finish as desired. Some people like to use these plugs; others prefer the putty fix.
Getting a Grip on Handrails
With use, time, and fluctuations in humidity, the vertical balusters sometimes loosen in the mortises where they join the handrail, causing a shaky situation that’s not good when you’re negotiating stairs—the handrail should support you, not the reverse.
def•i•ni•tion
A mortise is a hole or slot cut into wood or other material so that a projecting piece (called a tenon) can be precisely inserted. In woodworking, a mortise and tenon joint creates a good bond between two pieces of wood.
Here are two ways to tighten the relationship between handrail and baluster.
For the “shimy” solution, you’ll need the following:
□ Wood shim
□ Carpenter’s glue (yellow)
□ Small wood block (to drive the shim)
□ Hammer
□ Utility knife
1. Coat the wood shim with glue.
2. Using the small block as a driver, hammer the shim into the joint between the baluster and the handrail. Don’t try to drive the two pieces apart, just drive the shim until it closes the gap between handrail and baluster.
3. Using the utility knife, trim the shim flush with the banister. Shims are pretty easy to cut; they’re softwood.
For the “screwy” solution, you’ll need the following:
□ Electric drill
□ Combination bit sized for the screw you’re using
□ Screwdriver to match screw head
□ Flathead wood screws
□ Wood putty
□ Sandpaper (220-grit)
□ Finish to cover repair (wood finish or paint)
1. Wearing safety goggles, using the combination bit, drill a pilot hole up through the baluster into the handrail at a 45˚ angle.
Angle a screw through the baluster and handrail.
2. Drive in, countersink, and tighten the screw.
3. Fill the hole with wood putty; let it dry. Sand the repair and finish as desired.
Off-Base Balusters
Sometimes the baluster gets loose in its bottom mortise—its joint with the stair tread. You’ll need another pilot hole and countersunk screw for this one.
You’ll also need the following:
□ Electric drill
□ Combination bit sized for the screw you’re using
□ Screwdriver to match screw head
□ Flathead wood screws
□ Wood putty
□ Sandpaper (220-grit)
□ Finish to cover repair (wood finish or paint)
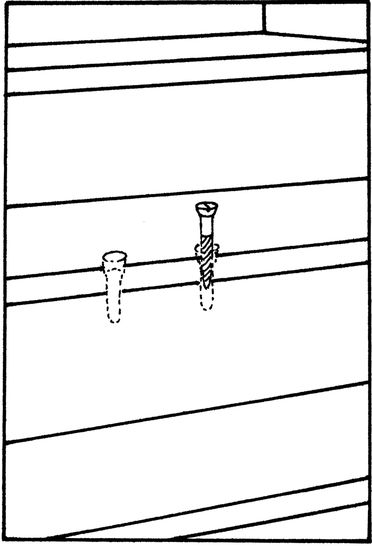
1. Wearing safety goggles, drill the pilot hole at an angle through the baluster and into the tread.
Tighten a baluster with a screw support.
2. Drive in, countersink, and tighten the screw in the predrilled hole.
3. Fill the hole with wood putty; let it dry, then sand and finish.
Safe Stairs
For elders and children, a staircase can be a hazard. A secure handrail and stair treads tight to the risers are great first steps, but the young and the frail may need extra help.

Ounce of Prevention
Equip the electrical receptacles (outlets) in your stair halls with night lights. They use a miniscule amount of energy but make the way safe for anyone who’s moving around when the house is dark. Keep a supply of the little bulbs with your other light bulbs, so you always have a spare when this little “night watchman” suffers a burnout.
Elder Safety
Falls are the leading cause of life-threatening, debilitating injury for the elderly, and falls on stairs are a common culprit. If you have an older person living with you, you want to make sure that they can see the steps.
You’ll need the following:
□ Scissors
□ A roll of reflective tape (it glows in the dark, a plus at night and during power outages and other emergencies)
1. Make sure the stairs are clean and dry so the tape will adhere.
2. Cut each strip of tape so that it will extend the entire length of the tread.
3. Secure the reflective tape to the top, front edge of the tread. Make sure it is lying flat. Place the tape on the top front edge of the stair landing, and every stair in the staircase.
If there are any step-ups or places where the floor is uneven—sills in doorways, for example, where an elderly person might trip—mark these step-ups and sills with reflective tape as well. Even a half-inch rise in the floor surface could create a problem for someone with poor mobility or vision.
Kidproofing the Stairs
Child safety gates have been around for years. They’re an inexpensive way to keep active and curious youngsters from an accident on the stairs, or any other place where they might find themselves in harm’s way.
When my son was just 10 months old, he was quite the little bruiser, built solid and full of energy. We had put safety gates on our stairs, but at that time, what was available was a fairly simple design that clamped to the sides of the stairway by means of pressure. There were no fasteners on the thing that I could screw into the wall.
One day, my boy was cruising around on the upper floor in his little walker, careening against the walls (why I learned to repair drywall). He worked up such a head of steam that, in a split second, he crashed against the pressure-installed gate and was on his way down the steps when I grabbed him, and the walker, preventing a disaster. Within an hour I was at the hardware store, looking for the right straps and screws to secure the gate to the walls. We rigged our own safety setup. And the walker went, as my son would say when he couldn’t locate something, “bye-bye someplace.”
Pressure mounted gates are still around, but the Consumer Product Safety Commission does not recommend their installation at the top of stairs, because children (like someone I know) can push them over and fall down the stairs. Select gates with hardware mounts, screw them into the wall securely, and periodically check the screws to see that they are still tightly fastened.
The Least You Need to Know
• A staircase is made up of the tread, riser, handrail, balusters, and newel post.
• You can make invisible repairs to the stairs if you can get at them from underneath.
• Wood shims and countersunk screws tame squeaks and tighten wobbly parts.
• Add safety insurance to your stairs: night lights in the hall, reflective tape on the treads for your elders, and hardware-mounted safety gates for your tots.
..................Content has been hidden....................
You can't read the all page of ebook, please click here login for view all page.