Chapter 9
Doors: An Open-and-Shut Case
In This Chapter
• Parts of a door
• Silencing the talkative door, and making the stubborn one respond
• Getting a grip on doorknobs with a couple of easy repairs
• Keeping balky sliders on track
• Installing a peephole in a windowless outer door
Do you have door slammers at your house? I do. They announce themselves with a bang, not a whimper, which is okay, except that our back door gets a workout. Screws loosen, the strike plate wobbles, and pretty soon it’s time to get out the screwdriver for a couple of minor repairs.
Throughout her teenage years, our daughter would voice her displeasure with a resounding bang of her bedroom door. The last slam came when she broke one of the ancient hinges clear through its cast iron body—I believe the term is metal fatigue, and I’m sure it was very tired. Replacement hinges set Rachel back several weeks of allowance money, so she’s become much gentler with doors ever since.
Even without a resident slammer, doors get a workout over the years, and some at your house may be showing signs of age or hard wear. This chapter will teach you all the important parts of doors, and how to make them swing to your rhythm—and eliminate wobbles, squeaks, drags, or rattles.
Of course, you can avoid many of these little repairs by insisting that all members of your household close doors with their hand on the knob: no slamming! It’s the best preventive maintenance I can think of.
Anatomy of a Door
You may notice some of the same words that are also used to describe a window. The jamb is the vertical part of the door frame—the opening in which the door is installed. The frame’s top piece is called the header; the bottom piece is the sill. On exterior doors, the sill may have another piece over it that spans the sill; this is known as a saddle (not shown).
The door itself has horizontal parts, called the rails; and vertical parts, called stiles. The hinge stile is the vertical piece where hinges are attached; the latch stile is the vertical piece that holds the latch, doorknob, and/or lock, if there is one.
Parts of a door.

What Pros Know
The previous illustration shows the door from the outside; because the hinges are on the left side of the door, it is known as a left-handed door. Looking at the door from the outside, doors that are hinged on the right are known as right-handed doors. Knowing whether a door is right- or left-handed is important if you are buying or replacing a doorknob that can be locked, also known as a lockset, that works with one or the other, but not both. Since you want the key to be on the outside of the door and the push- or turn-button lock on the inside, you need to buy a right- or left-handed lockset, depending upon the door in which it will be installed.
Many older doors are composed of rails, stiles, and panels, like the one shown in the illustration. Other, newer doors may not be solid wood; they may be made of thin layers of wood or metal applied over a core of rigid foam or other material.
Silencing the Talking Door
A door that squeaks usually needs attention to its hinges—the metal hardware that attaches the door to its frame. There are lots of different kinds of hinges, but the principle is the same. The two sides of the hinge, called leaves, connect to each other by means of a pin threaded through interlocking knuckles.

Common door hinge.
Squeaks are usually eliminated by applying a little lubricant—a penetrating oil is good, though some people have told me that vegetable oil is also effective!
You’ll need the following:
□ Newspaper to put under the hinges (oil can spot the carpet!)
□ Small-tipped nail set or thin-shanked standard screwdriver
□ Claw hammer
□ Can of penetrating oil or similar lubricant, equipped with a straw for applying a narrow stream
□ Clean rag or sponge
1. Lay newspaper under the door to protect the carpet. Open the door and look at the hinge. You’ll want to lubricate the area where the pin meets the knuckles of the two hinge leaves.
2. If you know which hinge is squeaking, start there. But lubricate all the hinges and you’ll have silence longer!
3. In most cases, you can loosen the pin by driving the nail set or screwdriver tip into the hole at the bottom of the hinge joint. Wearing safety goggles, use the hammer to drive the pin up from between the leaves an inch or so.
4. Spray a little lubricant into the pin hole at the top, where the head of the pin has been raised. Give the oil a minute to seep down inside, around the pin and the knuckles. Wipe off any excess or drips of lubricant with your rag. Reset the pin and try the door.
5. If the door is no longer squeaking, repeat this exercise with the other hinge or hinges. If it’s still squeaking, drive up the first pin again and repeat Steps 2-4 until you achieve silence.
Tightening Loose Hinges
Time, use, and wear can make two things that belong together—the hinge and its screws—come apart. Tighten screws as soon as you notice they are loose. The longer loose screws are left untightened, the greater the likelihood that they’ll widen the screw holes or wear (strip) the screw threads and need replacement. Because of the law of gravity—the weight of the door that the hinges support—the top hinge will most likely exhibit loose screws first.
If you’ve got loose screws, here are a couple of suggestions.
Fix #1: Gum Up the Holes
This quick fix will work for repairing loose screw holes for hinges of lighter-weight doors. For heavy doors, skip to Fix #2.
You’ll need the following:
□ Screwdriver (standard or Phillips, whichever fits)
□ Book of cardboard matches
□ Wood glue
□ Utility knife
1. Open the door wide and wedge something under it so the door’s weight won’t stress the hinge.
2. Remove the loose screw or screws from the hinge leaf. Dip one or two cardboard matches in the wood glue and put them in the loose screw hole. Cut away any bits of matchstick that stick out of the hole with the utility knife. Reinsert the screws and tighten.
Fix #2: Longer Screws
If you already have the right-size fasteners, this is even easier than Fix #1.
You’ll need the following:
□ Screwdriver
□ 2½" wood screws, same diameter as the old ones (you may want to use Phillips head screws rather than standard head screws; most people think they’re easier to tighten and loosen)
1. Prop up the open door as in Fix #1.
2. Replace the loose screws one by one.
What Pros Know
When you go to the hardware store and look at door hinges, you’ll notice that the hinges are sold with fairly short screws. By using a longer screw, you’ll fasten the hinge more deeply into the door jamb.
Sticking Doors
Sometimes a door binds because the door itself is swollen from humidity; if binding doors are a problem in this kind of weather, you may want to lightly sand and refinish the latch edge of the door, particularly if the door is peeling paint—bare wood swells more than finished material. Or you can take the lazy strategy, and wait for cool weather. Several of the interior doors in my old New York house bind in summer when it’s very warm and sticky; I just don’t close them. They work perfectly in winter, when I want to keep them closed, anyway.
And sometimes, there’s a bit of a hardware problem. If the hinges are loose, the door may bind along the latch jamb (the doorknob side). Tightening the hinge screws may cure the problem. Or the problem may be located on the opposite side of the door.
Open and close the door slowly, and look at the strike plate; that’s the little square or rectangular gizmo that has a hole in its center (the strike) which holds the latch or bolt that’s released when you let go of the doorknob and the door is shut. If the strike plate is loose (continual slamming can loosen it!), get out your screwdriver and try Fix #1 or #2 described previously to tighten the screws into the latch jamb.
Strike plate.
Doors That Won’t Stay Closed
First, test the doorknob; the latch or bolt that fits into the strike plate may be sticking, and thus not releasing and engaging with the strike. You can probably fix this by lubricating the latch with a little graphite or penetrating oil.
The tale of the mysterious shrinking door is actually not very mysterious. If the weather is cold and dry, or if the humidity level in your house is very low, a wooden door will shrink in response. In turn, the latch or bolt may no longer engage with the strike, and the door won’t close.
This is a job for shims! It’s a good idea to use a fix that can be reversed, in case the door swells up again.
You’ll need the following:
□ Screwdriver (to match the strike plate screws)
□ Cardboard (file folder stock makes good shims for this purpose)
□ Pencil
□ Scissors
On an interior door, shimming the strike plate works fine, and you don’t have to mess with the hinges. Here’s what you do.
1. Unscrew the strike plate and put the screws in a safe place so you don’t lose track of them.
2. Trace the strike plate on cardboard; make a few copies. Cut out the cardboard templates.
3. Position one cardboard shim behind the strike plate, and screw the shim and plate back into its mortise. Then try the door. If the latch holds, you’ve solved the problem. If not, insert additional shims until the door closes properly.
On an exterior door, shimming out the strike plate can create a problem with door security. In this case, you can shim out the hinges. If you follow the direction suggested by the following illustration, you’ll be able to shim the hinges without removing the door.
In addition to the tools and supplies listed for the strike plate shim fix, get a thin piece of paper so you can trace the outline of the hinge. You will also need something to support the door—wood blocks, shims, books—while you are tinkering with the hinges.
1. Open the door and, using pencil and paper, trace the outline of the hinge on the door jamb, including the screw positioning. Close the door when you’re done and continue to Steps 2 and 3.
2. Using the tracing as a template, make a couple of cardboard shims for each door hinge (many modern doors have two hinges; others three, some four).
3. Cut the hinge shim like the illustration, with slots cut to the edge of the template so you can slide the shim under loosened screws.
Placing a cardboard shim behind a hinge may fix a door that won’t stay closed.
4. Open the door wide, exposing the jamb side of the hinge. Loosen one hinge at a time, slide in a shim, and tighten; shim all the hinges. Add shims until the door latches properly.
Getting a Grip on Doorknobs
There are four basic types of doorknobs:
1. Dummy doorknobs don’t turn and are often used just for appearance.
2. Passage doorknobs turn, but have no keys or locks; these are often used in children’s bedrooms or playrooms where a locking door could be a problem.
3. Privacy doorknobs lock and can be unlocked only from the inside; these are good for adult bedrooms and bathrooms. If someone should accidentally lock themselves in, you can quickly free them (see how later in this chapter).
4. Keyed entry doorknobs mean what they say; to gain entrance, you must unlock them with a key.
Tighten a Loose Knob
Modern doorknobs—the ones you’ll find in a house that’s less than fifty or sixty years old—are fairly simple to tighten. On these models, the whole works may be jiggling—from trim to knob. Usually you’ll find two surface-mounted screws on the face of the inside doorknob trim piece that is mounted flush with the door—it’s traditionally called a rose. Sometimes the screws are concealed under the trim piece. In this case, you’ll have to pry off the trim piece to get to the screws. The screws actually pass all the way through the door to the trim piece on the other side.

Modern doorknob.
You’ll need the following:
□ Screwdriver (Phillips or standard, to match the screws)
□ Utility knife (if you need to score the paint around the trim piece to remove it)
□ Small pry bar or standard screwdriver to remove trim piece, if the screws are underneath

Ounce of Prevention
Careless painters may have painted the edge of the trim piece where it meets the door. If your door trim is paint-bound, use a utility knife to carefully score the paint around the rose so you won’t mess up the surface of the door by hacking away at it with the screwdriver.
Only one step here—tighten the screws. Hold both trim pieces tight to the door with one hand as you tighten the screws with the other. Tighten the screw closest to the edge of the door first.
The house I grew up in (circa 1940), and the one I live in now (“renovated” in the 1870s), have old-style doorknobs. You may have them, too. Instead of two screws passing through the lock cylinder to the other side of the door, there is a square metal spindle with threads on both ends that passes through the rose. The spindles are covered on both sides of the door with little metal shanks; the knobs screw (usually) onto the spindle at each threaded end. All of this is held in place by means of a single set screw in each of the two shanks. The screw threads through the shank and tightens against the spindle on one of its four flat surfaces.
Old-style doorknob.
Wobbles happen when the set screw gets loose, or disappears. You may have to hunt for a replacement screw (see Appendix B for a dealer in old hardware), but these antique knobs are often beautiful, made of glass, bronze, chrome (1930s), or nicely aged and worn wood. They’re worth saving—or selling to someone who likes them!
You’ll need the following:
□ Standard screwdriver—make sure it’s the right size or you may deform the set screw head; some late-model (1940s and after) set screws may unscrew with a hex head (Allen wrench)
□ Lubricating oil (penetrating oil, such as WD-40)
1. Loosen the set screw in the shank of the loose knob. If the screw is tight, don’t force it! Lubricate the screw with a drop of lubricating oil, and then try to unscrew it.
2. Examine the screw. If the base (the opposite end from the head) looks deformed, it should be replaced. You can finish the repair once you have a new set screw.
3. If the screw is intact, check the set screw that holds the knob in place on the other side of the door. If it’s tight, proceed.
4. Press the knob that still has its set screw in place tightly against the rose on the other side of the door. Turn the knob until one of the flat sides of the spindle is facing up through the set screw hole. Replace the set screw, tightening it firmly against the flat side of the spindle.
5. Operate the knob; you should be able to turn it freely.
Replacing a Passage, Privacy, or Keyed Entry Lockset
It’s fairly easy to replace a set of doorknobs and latch with a modern doorknob—the kind that attaches both knobs and engages the latch with two long screws. Remove the screws, and then the knobs and trim will pull out easily. Then take the old set to the store and purchase a new one by the same maker. The new set will install in the reverse order that you removed the old set. All it takes is the right screwdriver; on modern doorknob sets, usually a Phillips head. If the trim piece conceals the long screws, you’ll need a standard (flat head) screwdriver or small pry bar to pry off the trim piece.
If you’ve got the old-style doorknobs in your house, replacement is more problematic, as these are not so standard. Refer to Appendix B for an old house parts supplier; they may have the parts or replacements to do the job, and they work by fax or e-mail to assist customers.
Screen and Storm Doors
Having an extra door can be helpful. In winter, a glass-windowed storm door adds an extra layer of insulation to the door. Usually these doors have interchangeable storm and screen panels. In summer, when you change to screens, you can get a nice breeze going through your house when the entry doors are open and the screen doors are closed. One problem with these extra doors is that the screens can get torn or loose and need replacement. See Chapter 8 for instructions on repairing and replacing screens.
Adjusting the Door Closer
The other problem with storm/screen doors is that they usually operate with a mechanical closer that may be too fast or too slow—either slapping into your ankles or letting in flies along with the person who’s coming or going. The good news is that this problem is incredibly easy to fix.
Let’s take a look at the most common mechanical closer, the pneumatic variety. It looks a lot like a bicycle pump.
def•i•ni•tion
Pneumatic refers to a tool or machine that is operated by compressed air.
This device is attached to the hinge jamb and (usually) the top rail of the door. When you need to hold the door open, you can adjust the little washer shown in the illustration to keep the door in place; move the washer next to the tube when you want the door to close as usual.
Pneumatic door closer.
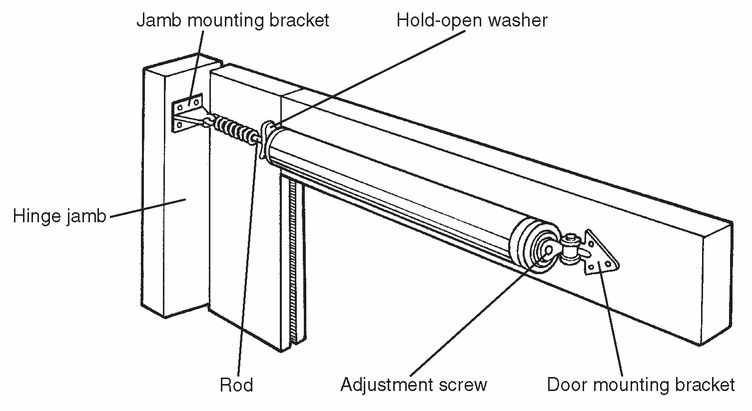
To slow down or speed up the closing action, you’ll need to use a Phillips or standard head screwdriver to turn the adjustment screw, usually located in the same position on the closer as the one shown in the illustration. To slow the closing action, turn the screw clockwise (righty, tighty). To speed up the door, turn the screw counterclockwise (lefty, loosey).
If You Need a New Closer
These door closers have a long life span. But they eventually wear out, and installing a new one is very easy. If you can find a duplicate model, you can even use the same screw holes for the brackets. If you have to drill new holes, follow the closer package instructions, use a torpedo level to make sure the installation is level, and wear safety goggles when you drill the bracket holes.
Just be sure to put a stop or bit of masking tape on your drill bit at a length less than the door’s thickness, so that you don’t drill through the door!

What Pros Know
When you install a door closer, you can position it anywhere on the screen door, as long as the jamb bracket is unobstructed by other hardware; however, it’s generally attached along the top rail of the door, so it doesn’t interfere or get tangled with people and things passing by.
Lock and Key Dilemmas
Usually, your key fits in its corresponding lock, the door opens, no problem. But when glitches happen, here’s what to do.
Key Sticks in the Lock
If the key does not go smoothly into and out of the keyhole, you can put a little graphite on the key, and work it into the lock, or squeeze a little graphite into the keyhole, and do the same.
Key Breaks Off in the Lock
This happens, but don’t panic. Before you call the locksmith, try to grab whatever is still sticking out of the lock with locking or needlenose pliers. Pull straight out. If the key fragment won’t budge, try squirting a little lubricant into the lock, and try again with the pliers. If this doesn’t do it, or if you can’t grip the key fragment that remains in the lock, you’ll have to call the pro.
Lock Is Frozen
This occasionally happens when there’s been a lot of wet weather followed by bitter cold; the moisture freezes and can find its way into keyholes, too. Keep a small container of spray de-icer in your purse or other easily accessible place in the wintertime. Spray a little on the keyhole, and it should break the ice in seconds. I’ve also heard of people warming up the key with a hair dryer, but this isn’t going to work if you’re locked outside the house!
Locked in (Privacy Lock)
If you have small children or live with elderly family members, the kids or seniors may occasionally lock themselves into a room that is accessed with a privacy doorknob set; that is, there’s a locking mechanism on the inside of the door. They lock themselves in, and can’t get themselves out. And there’s no key on the exterior doorknob for you to unlock.
You can first try to coax your elderly relative or child to turn the little locking mechanism on the inside of the door to the “unlock” position. If that doesn’t work, try the following fix. Assuming you have modern doorknobs, you can release them if you can locate a slot or hole on the exterior doorknob, or on the rose (trim piece) of the exterior doorknob. Use the tip of a metal nail file, or the point of a straightened paper clip to push straight into the hole or slot. This will probably open the door. If it doesn’t, you’ll have to call a locksmith.
While children are small, or seniors are living with you, consider changing from privacy to passage locks. My daughter locked herself in the bathroom when she was little, and the experience scared her enough that she didn’t repeat it. However, kids and elders alone in the bathroom are always at risk for an accident while they’re stuck.
Installing a Peephole
If there is no way to see who’s on the other side of your exterior door, it’s a good idea to install a peephole. You should never open the door if you don’t know the person who’s there, or if the person will not identify himself/herself. You can buy peepholes in the section of the hardware or home center where locks, keys, and other door security equipment is sold. Look for one that has a vision field of 190˚, which will permit the widest view of who’s standing outside your door.
To install a peephole, you’ll need a good-sized bit to drill a hole of sufficient diameter to accommodate this device. (This fix presumes your door is wood, not metal or metal-clad. If you have the latter type, ask your hardware salesperson to recommend the right drill bit for the job.)
Door peephole.
You’ll need the following:
□ Pencil or awl
□ Measuring tape
□ Electric drill
□ spade bit (for peephole shown; check package)
□ Old toothbrush

The spade bit is designed for drilling large holes at slow speed.
1. Mark a point on the inside of the door with the pencil that is at eye level with the shortest adult in your house (children shouldn’t answer the door to unknown people!).
2. Measure the center point of the door from left to right at eye level and mark it with a pencil or tip of an awl.
3. Close and lock the door. You may want to position someone on the other side of the door for Step 4.
4. Attach the spade bit to your drill, and put on the safety goggles. Using the awl or pencil center mark as a guide, position the tip of the drill on the mark, and drill straight through the door. It is important that you hold the drill steady and straight. When you feel the center point of the spade bit touch the surface on the other side of the door (or your friend sees it), stop drilling forward and remove the bit straight out from the hole you’ve drilled. (Don’t stop the movement of the bit as you remove it.)
5. Go around to the other side of the door; close and lock it, and, using the bit mark as your center point, drill through the door from the outside. Brush any wood splinters or sawdust out of the hole with the old toothbrush.
6. Insert the receiver tube through the hole from the inside of the door; then thread the lens end into the receiver tube from the outside of the door.
Sliding Door Fixes
Sliding doors make for an easy transition from indoors to outside; their big glass panes provide a nice view. But the problem with sliders is that they are heavy, and when they don’t slide smoothly, they’re annoying to use.
There are two ways that sliding doors may not measure up:
• They don’t slide smoothly.
• They are a security risk.
Let’s address the first problem.
Wobbly Tracks
You’ll need a screwdriver to tighten the screws in the sliding door tracks (usually Phillips). If the screws seem not to want to stay put—they spin uselessly in their screw holes—it means that the screws are stripped, and not engaging with the wood sill that should anchor the door below its metal frame. Replace the screws with longer ones, to better hold them down. Make sure the doors are aligned in the tracks before you tighten the new screws.
Dirty Tracks
Dirt, grease, leaves, gunk—all of these can make a sliding door bump and balk. Clean out the tracks and lubricate them; some people like to rub paraffin in the lower track to assist door movement.
Bent Track
If the slider track is only slightly bent, you can bend it back into shape by putting a wood block on either side of the bend (room side and track side) and hammering the block on the room side of the bend to iron out the bend.

Straighten bent sliding door track.
Now, for the second problem.
Securing a Sliding Door
The simple latch on a sliding door is easy for any burglar to foil. Because they usually open to back yards and other property areas not visible from the street, many burglars attempt entry through a slider.
Many people stop unwanted entries by wedging a broomstick or 1”×2” piece of lumber cut to length between the edge of the slider and the door frame. This would jam the door if someone were to try to pry it open.
You can also buy locking devices that are more secure. You will need an electric drill, a drill bit for drilling through metal, and mounting screws, to install either a “Charley bar”—a locking metal bar that serves the same purpose as the stick—or a foot-operated lock that prevents the slider from opening. Follow the manufacturer’s instructions for installing these.
The Least You Need to Know
• Don’t attempt a dramatic fix when simple will serve you. Sometimes doors that stick simply need the hinges or strike plate tightened to the jamb.
• You can fill a loose hinge or strike screw hole with glued up matchsticks for a tighter fit, or use a longer screw.
• The adjustment for a storm/screen door closer is usually the turn of a single screw.
• When creating a security peephole for an outer door, drill straight through the door; a spade bit works well for this large-sized hole.
..................Content has been hidden....................
You can't read the all page of ebook, please click here login for view all page.