Chapter
13
T’ai Chi Long Form Instruction
In This Chapter
• Learning the Kuang Ping Yang T’ai Chi long form
• Adjusting T’ai Chi to fit your body
• Breathing through life’s challenges
• Using T’ai Chi to help prevent repetitive stress injuries
• Relaxing into “complexity” and tapping into universal, limitless energy
• Web Video Support: Exhibition of the Entire T’ai Chi Long Form and detailed lesson excerpts
My 30 years of studying have shown me that even when studying other styles I haven’t trained extensively in, I discover much about my own familiar style. So even if you are currently practicing some other form of T’ai Chi, by emptying yourself of your knowledge, you can learn something useful here that will add to your current forms. As in all arts and sciences, there is no one master who knows everything about T’ai Chi. Each teacher brings his or her own unique genius to bear and I’ve learned much from all the masters and teachers I’ve played T’ai Chi with.
This book’s graphic, illustrated, and Web Video Support instruction will flesh out how and why each movement benefits you, and detail the internal mechanics of posture, weight shift, and Qi flow that is common to all T’ai Chi styles, not just this one.
Because T’ai Chi is constant movement, the Web Video Support that complements this new edition gives you visual support for this chapter’s already unequaled illustrated and text instructions. Use this chapter’s text and illustrated instructions in their proper order for T’ai Chi instruction, preceding T’ai Chi practice with the warm-ups in Chapter 11. The Web Video Support for this book provides visual enhancement meant to augment this chapter’s text and illustrated instructions—not to replace them.
| OUCH! |
The explanations and instructions you find in this book—now augmented by the new Web Video Support—provide an unparalleled instructional tool that is unequaled in T’ai Chi book instruction. Each movement is broken down into a series of sketches to help you see both external and internal aspects, as the video exhibitions of this T’ai Chi Long Form on the Web Video Support bring these illustrated instructions to life.
The video exhibitions supporting each of the 64 postures taught in this chapter are intended to support their corresponding instructional figures, to more effectively familiarize you with the “patterns” of this book’s illustrated and text instructional techniques. In this way, you’ll be clearer on all the text and graphic movement instructions, which will give you precise details on many levels.
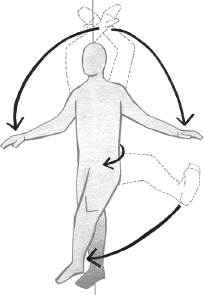
The movement sketches and their accompanying text in this chapter include the following:
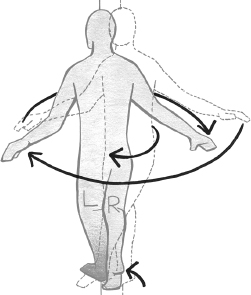
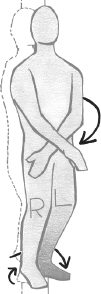
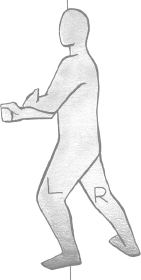
• Directional arrows. Arrows show how your limbs or body move from the previous “ghost image” position into the current position, taking all the guesswork out of how you get from one pose to another.
• Markers. “L” and “R” are marked on the figures so you can see at a glance whether the left or right side of the body is depicted.
• Shading. The leg the weight is on, or the filled leg, is shaded to a darkness level reflecting just how much weight is shifted onto it. When both legs are shaded, weight is evenly distributed.
• Posture line. This is a line indicating your Vertical Axis or postural alignment centered over the dan tien.
• Emphasis. Occasional italicized text explains what sensations and internal awareness, releases, and benefits you may be experiencing within as you go through the motions.
• “Ghost” images. Most of the sketches have a ghost image indicating what the previous posture was, helping you see transitions.
Using the very first Chapter 13 Web Video Support link, you’ll see how each movement’s detailed instructions work in action.
Begin by viewing the Exhibition of the Entire T’ai Chi Long Form and the first movement’s lesson video on the Web Video Support, while viewing the corresponding illustrated drawings in this chapter and reading the associated instructional text in this chapter. This will make all the illustrated instructional cues more tangible as you progress through the instruction for all the 64 movements that follow.
Some of the more complex instructional figures in this chapter have corresponding, intensely detailed Web Video Support, including figures for movements #1, #6 through 8, and #15 through 19, where you’ll see “Sage Sifu Says” notations by these figures, indicating they have super-detailed video support.
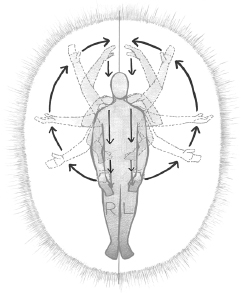
A few sketches also reflect how the Qi, or life energy, flows outward through the hand or the foot. This is shown only in a few figures because too many graphics would be distracting. As a general rule, when you are physically moving an empty foot to a new location on the floor, you take an in breath. When the weight (Vertical Axis) is shifting over/into/onto a leg and foot, the breath is being exhaled as you sink into the leg, allowing Qi to flow down through your relaxed “filling” leg and out the extending arms and hands (revisit Web Video Support’s T’ai Chi Walking, Filling and Emptying, and The Unbendable Arm). This illustrates why the practice of Sitting QiGong is such a critical element to a powerful and effective T’ai Chi form (no matter what style you do), as it enables you to practice “feeling the Qi,” or relaxation flowing through your arms and body.
The Kuang Ping Yang-style long form takes approximately 20 minutes to complete. Before beginning the movements, to understand why the Vertical Axis and filling illustrations are so important to your T’ai Chi practice, try this simple exercise:
1. Standing comfortably in the Horse Stance, close your eyes and breathe while relaxing the entire body and standing in your proper Vertical Axis with the head stacked up above the lower dan tien.
2. Lean your head forward, noticing how the muscles tighten to hold you up. As the head goes back into Vertical Axis alignment, notice how effortless the stance becomes. The same thing happens when you lean back slightly.
Moving in Vertical Axis posture makes everything more effortless. See the Web Video Support’s Enhanced Internal Tutor for Vertical Alignment. This will show you that ultimately your greatest T’ai Chi tutor will be you, as you learn how to sense the correctness of your own postural alignment by each movement’s level of effortlessness. Practicing T’ai Chi with this awareness of effortless versus effortful movement easily and naturally changes the way you move through life as well. T’ai Chi, and life, should be mostly effortless—and strangely, when it is, this is usually when we are getting the most accomplished.
As you go through this exercise, note that the movement names offer two tools: they evoke healthful and soothing mental/sensual images to calm the mind and heart, and they offer visual mental images to help you remember how to move. Part of the calming effect results from T’ai Chi’s left brain/right brain integration of feeling and thinking.
Before you dive into learning the movements using the following text and illustrated instructions, again, if you haven’t already, view the Web Video Support’s Exhibition of the Entire T’ai Chi Long Form while flipping through the pages of this chapter to get a general feel for the motion of T’ai Chi movement. Then, view T’ai Chi Long Form Lesson 1 Excerpt. Once you’ve done that, you can begin learning the movements one at a time, following the instructions, and referring to each individual movement’s video example when needed.
NOTE: On your computer or smart phone, bookmark the web pages www.idiotsguides.com/taichi, and www.idiotsguides.com/taichi13. These will help you quickly find links to each movement’s video as you break down each movement individually with this chapter’s following instructions, beginning with Movement #1, Strike Palm to Ask Blessings. The combination of this chapter and its video support provides an unequaled T’ai Chi book-learning experience.
| SAGE SIFU SAYS |
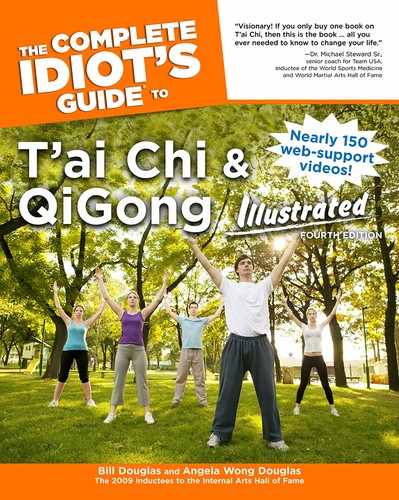
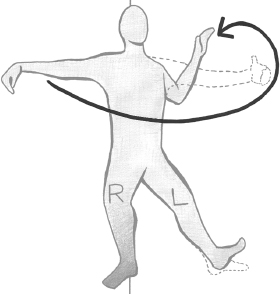
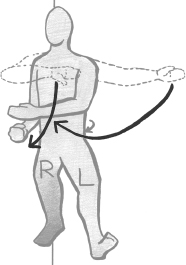
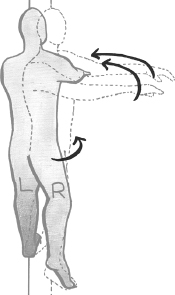
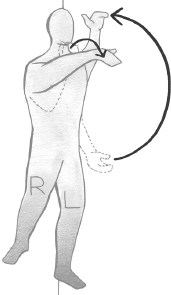
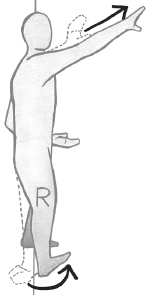
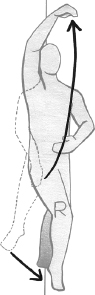
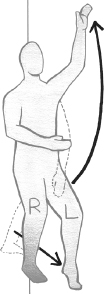
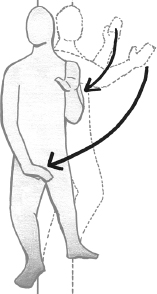
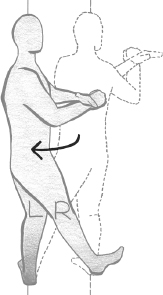
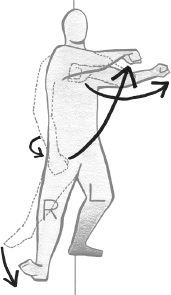
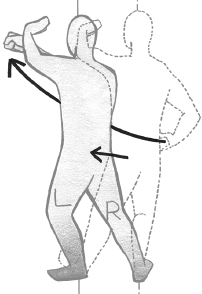
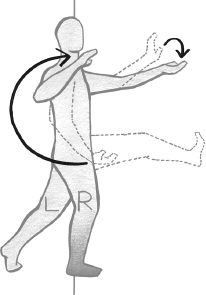
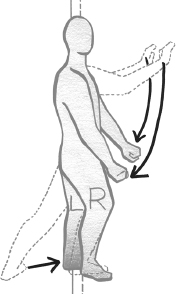
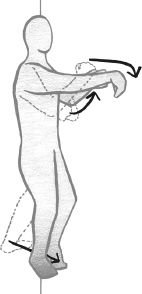
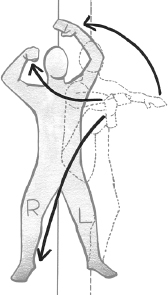
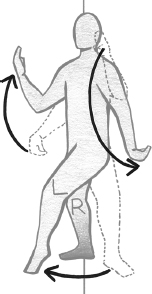
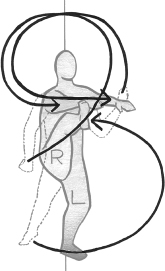
Strike Palm to Ask Blessings, #1
Breathe in deeply and lift your palms as if circling them up in front of you over a large 3-foot ball of energy, shifting your weight toward the left foot as your hands circle up over the ball.
As the palms pull back over, down the back of the sphere, ending up in front of your chest as though you were going to push something away, the weight is shifting back to the right foot, sinking the Qi, or filling the right foot/leg, as palms drop to the sides of the hips.
From palms-down position, palms pull out and behind a bit to gently rotate out the shoulders. As your empty left foot comes out in front, place your left heel lightly on the ground. Continue circling your arms around in front of the body as if hugging a large tree, and the left heel touches just as your palms almost meet. The left palm is lateral as in the sketch, while the right palm is vertical. Although the movement is called Strike Palm, the palms don’t actually strike; pretend there is a soft energy sphere the size of a honeydew melon between your relaxed, rounded hands.

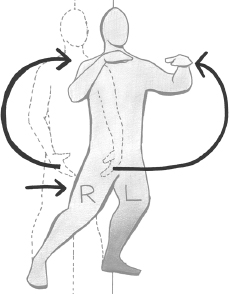
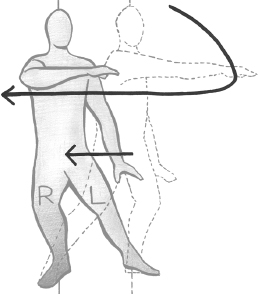
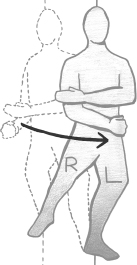
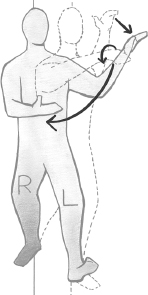
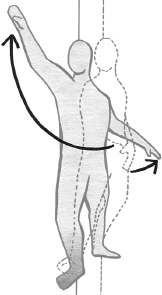
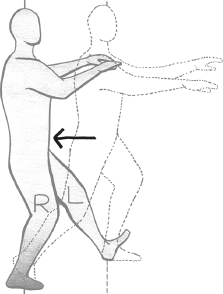
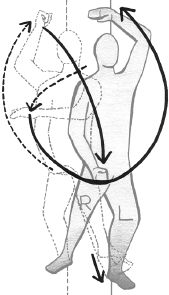
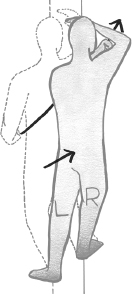
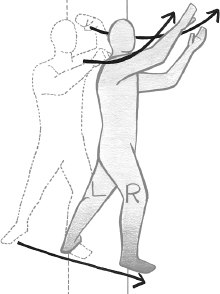
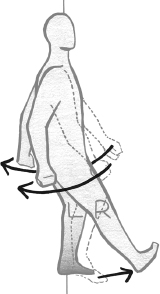
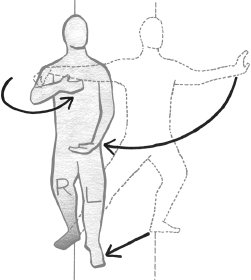
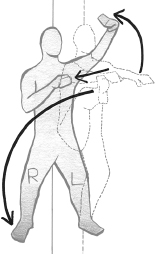
From completed Strike Palms, reach with your arms up and out to the right as your left toe reaches out to the left and back.

With your right hand palm down on top of your left hand palm up, stroke the bird’s tail as your arms pull down and back. Your weight shifts back to the left foot behind.
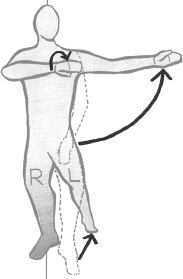
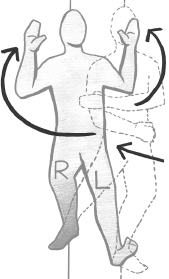
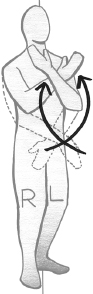
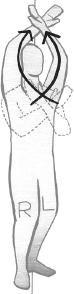
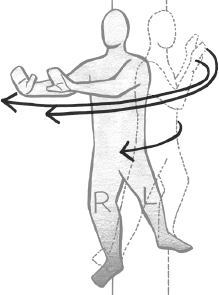
Your hands stroke down to the groin, releasing the bird’s tail. Turn your palms away from your body with your elbows at your sides while your hands continue to circle up in front of your face. Your right foot pulls back, touching your right toe near the left instep.

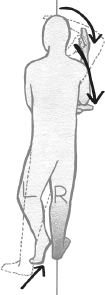
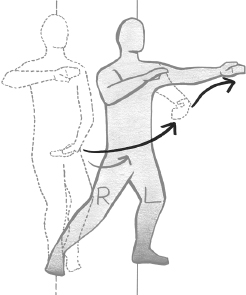
Now turn your dan tien and torso to the right at a 45° angle (front/right), while your arms follow around and in front of your chest, ready to push out diagonally to right.

| SAGE SIFU SAYS |
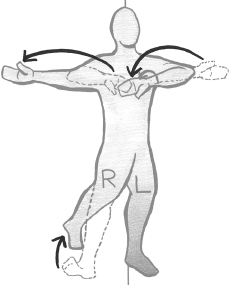
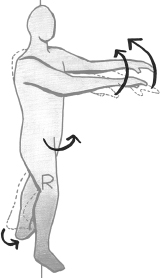
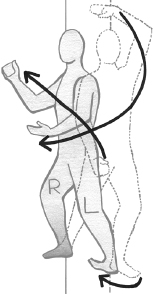
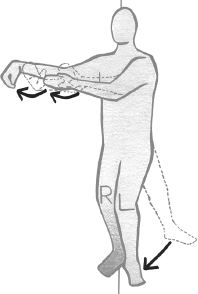
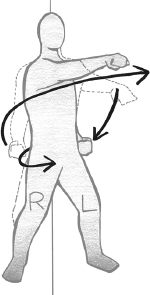
Step out with your right heel, pushing your hands forward as the weight shifts onto the right foot (rolling onto the heel first and then the rest of the foot goes flat). Notice how Qi flows through the relaxed body, out your pushing hands, and down through the filling right leg into the earth. At first you simply relax and exhale; then over time, a feeling of “empty flow” will settle through you, and in time you’ll perceive a soothing flow of energy.
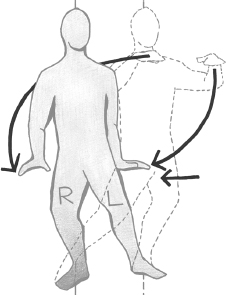
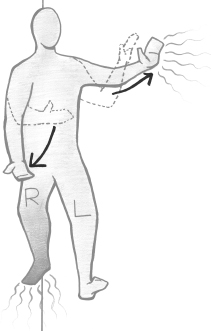
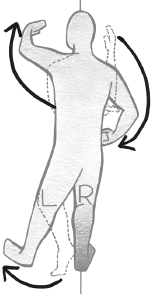
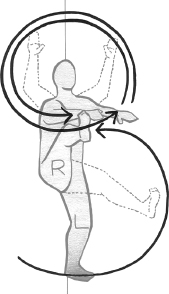
Your arms stretch out to your right side, as the fingers on the right hand bend down, touching your right thumb (forming a duck’s beak).

Your left fingers stroke the inside of the right arm. Your left palm pulls across your body in a great half-circle toward the left side as the body follows, turning at the dan tien.
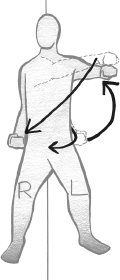
Your left palm continues over to the left side, as if circling a globe on its axis, until your palm is near your shoulder …
| T’AI SCI |
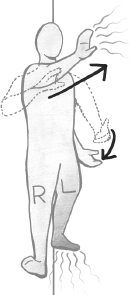
… and then your left hand pushes the imaginary globe away to the left, while the weight sinks onto the left heel and then the rest of the left foot, with about 60 percent of your weight now on the left foot. Again, note how the Qi or life energy flows through the relaxed body, out the body, arm, and hand, and down the left leg and deeply into the earth.

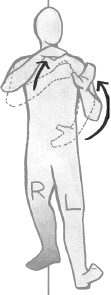
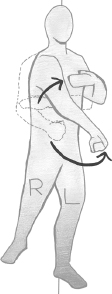
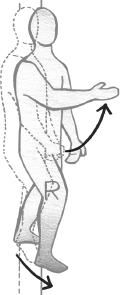
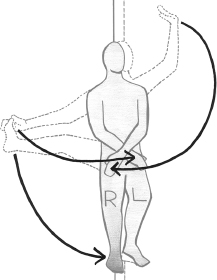
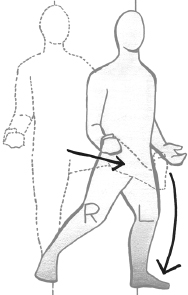
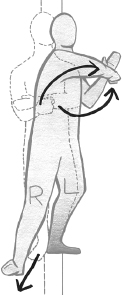
White Crane Cools Its Wings, #4
Your weight shifts to the left leg as the torso turns to the left. The left arm drops down to your side, the palm facing the ground, as the right arm circles from behind up above the head.

| T’AI SCI |
Note that the following two sketches show the same pose, so you can now see it from a front angle as well. The right arm comes straight down as the right foot sticks out a few inches in front.

Step out to the right side with your right toe, as the right elbow circles to the left side, to prepare by winding up for upcoming elbow strike. (Both your palms are face down in their respective positions.) See figure on next page.

Now shift the weight to the right foot as the right elbow pulls across in an elbow strike, allowing the sinking dan tien to pull the elbow strike across.
Lift the left foot and place it out in front, as the left hand moves slightly to the front, as shown in the following figure.

| SAGE SIFU SAYS |
The left hand extends out 45° to the left of front, as the left foot steps back behind slightly. The right forearm twists a bit so the “back” of the right hand is facing the chest, and the palm faces out.
Now the weight sinks back into the left foot as the left arm brushes to the center of the body, as if slapping an imaginary wall in front of you. Exhale and allow the body to relax as the weight, or dan tien, sinks back on each brush motion.

With the weight back on the left foot, the right empty foot steps slightly back as the right hand extends out 45° to the right, and the “back” or left hand is placed in front of your heart.
| OUCH! |
Just as you did on the left side, now shift your weight back to the right, brushing the right hand toward your center.
Repeat once more on both sides, as in the first four figures of Brush Knee Twist Step (Movement #5). As you finish the last brush, shift to your right foot and brush across your body with your right hand.

Move the left hand out 45° to the left, but do not move the left foot this time.

Brush the left hand across the body, and let the left arm circle out in front as the right hand forms a fist by the right hip.
Now shift your weight 60 percent onto the left foot, and throw the right-fisted punch out in front beneath the left arm, circling out in a defensive posture, or parry.
| SAGE SIFU SAYS |
From the Parry and Punch position, the palms turn down; then your hands open and come back to the temples as your weight shifts back onto the right leg and the left foot rolls back on its heel.
Push out as the weight rolls forward onto the left leg. Step through with the right foot and then shift your weight to the right leg as you push out to point with flat hands.

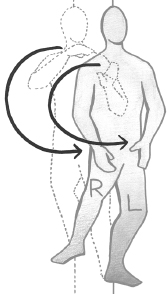
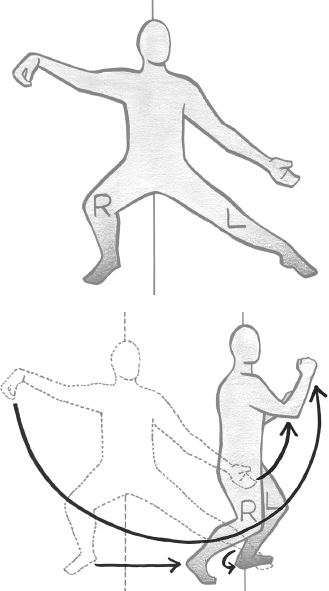
Push Turn and Carry Tiger to Mountain, #7
Carry Tiger to the Mountain, as with other movements, reminds us of our connection to nature as we mimic the grace of noble beasts.
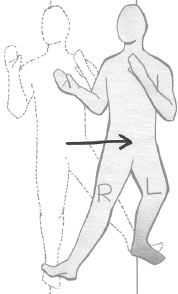
With your weight on the right foot and your hands pushed out flat, your weight comes off the left foot until only the toe is touching as your pushing hands circle flatly (as if on a table top) to the left as the left foot pivots on the toe.
At 3/4 of the hands circling to the left, your weight begins shifting to the left foot as the empty right foot pivots on the toe.
With the 180° turn complete, your weight settles back on the right foot. Only the left heel touches, as your left toes come up off the floor and your right fist rests over the thumb of your open left hand in front of your abdomen. Note the two figures in this sketch depict the same posture, only shown twice so you can now view it frontally.

Spiraling Hands to Focus Mind Toward the Temple to Parry and Punch, #8
This movement encompasses the spiritual image of Focusing Our Mind Toward Our Temple, which is the heart, while providing a protective shield for the vital/vulnerable areas of the body.
With your hands open, the palms should be parallel to one another and pointing straight as the left heel lifts (your weight is still on the right leg) and the left heel lightly retouches the ground.
Your weight slowly shifts up to the left foot as your hands begin a clockwise corkscrew downward. (Keep your hands relaxed at the wrists so they pivot facing straight.)
As your weight shifts completely to the left foot, your hands begin the upward part of a clockwise rotation, lifting the right foot up from behind, as if a string were attached from your hands to your feet, and reaching the top as the right heel touches the ground in front of you.

Repeat this stepping/shifting/spiraling hands with the right foot out this time, and repeat left foot out, and then right foot out (for a total of five times stepping forward on this Spiraling Hands Movement, alternating feet each time, of course).

Remember not to “bob up” as you shift up into the front leg. In T’ai Chi, you always stay “down” in a slightly bent-knee stance.
However, on the fifth step, which is with the left foot out, don’t shift your weight to the left foot. Leave it out and empty as the hands corkscrew one last time all the way around.
Then allow the right hand to fall to your side, forming a fist as the left circles in front to parry.

Now parry and punch, with your weight shifting about 65 percent onto the left foot.

With your weight still mostly on the left foot (in the Parry and Punch position), drop your right fist down under your left elbow.
As your right fist is pulled up with the palm facing your chin, the left parry hand drops to the palm up position to rest at the left hip.

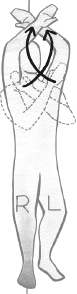
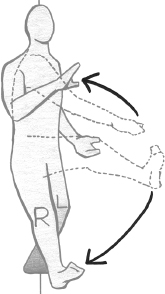
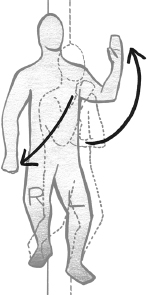
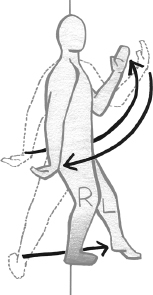
Repulse the Monkey can be a powerful martial arts tactic of blocking an incoming blow, yielding to the opponent’s force, and allowing that force to carry the opponent off to your side. However, it also fosters a very healing exchange of energy that Traditional Chinese Medicine (TCM) calls Long Qi when the open palms pass one another in front of the heart chakra, an energy center called the middle dan tien. According to TCM, this has a supercharging effect, opening the body to the healing force of Qi, and practitioners feel this sense of opening release through that area of the body each time they practice.
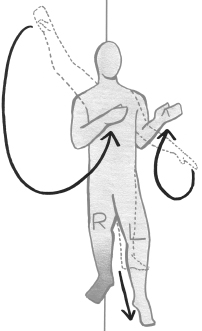
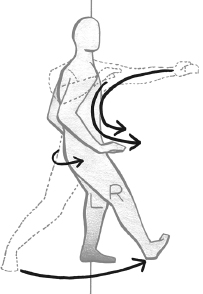
Without moving your legs, the left hand (palm up at your waist) begins an outside arc up to the left ear, as if stroking out and away over a large orb at the side of the body.
Now the right hand, palm up, pulls back to the right side of your waist, while the left hand, palm facing front, pushes outward from your chest; simultaneously, weight sinks back into your right leg, as shown in the following figure.
Now the weight shifts back to the right leg. Notice how your relaxed torso and body allow Qi to flow out of your relaxed left shoulder, arm, and hand as it also flows down and through your sinking back into the right leg.
Prepare for the next three moves by moving the opposite leg back as your palm at your waist circles up near the ear, poised to push when the other hand pulls back as you shift back.

Repeat with the right hand pushing, the left hand pulling as you sink back.

Shifting back to the left leg, Qi flows out of your relaxed torso, right shoulder, right arm, and right hand.
Repeat with the left hand pushing and the right hand pulling, shifting back to the right leg (see the third and fourth figures of the Repulse the Monkey movement).
Repeat with the right hand pushing and the left hand pulling, shifting back to the left leg (see the sixth and seventh figures of the Repulse the Monkey movement).
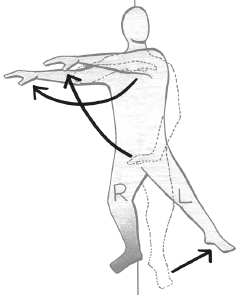
Stork Covers Its Wing/Sword in Sheath, #11
After completing the last Repulse the Monkey with the right hand pushed out and the weight back on the left, back foot, the right foot now pivots on the heel to follow the extended right arm out to point diagonally 45° to left/front, as shown in the following figure.
Upon completing the pivot, the weight shifts to the right foot while pivoting on the left ball and dropping the left heel in toward the right foot a bit.

Now, as the left palm up turns into a sheath (palm turns in to face body), the weight shifts back to the left leg, and the right extended hand pulls back into the left hand’s sheath between the left palm and the left hip. The right toe simultaneously pulls back to rest at the left instep, as shown in the following figure.

Slow Palm Slant Flying is one of the most beautiful and uplifting movements in the entire series.
The right heel goes out diagonally.
As your weight shifts to your right foot, the right palm extends slowly outward from your left hand’s sheath as your left hand extends back to the opposite corner, as shown in the following figure.
Extend your arms fully with your weight totally on your right leg; the right arm begins a great arcing circle around a bit behind your body, while the open left palm arcs up from behind until both open palms meet in front of the chest. Lift the left foot to place the left toe lightly a couple inches in front of the body below your parallel palms.
Raise Right Hand and Left: Turn and Repeat (Part I), #13
Although each movement has powerful martial applications, the goal of T’ai Chi is to “soong yi dien,” to loosen the mind, heart, and body. This movement loosens the abdominal area, back, and shoulders by performing Long Qi. The palms passing one another healthfully stimulate the dan tien energy centers within the body, also relaxing the solar plexus.
Your left heel extends forward as your left arm curls around (as if hugging a tree), and your weight continues rolling up onto the left foot, as the heel of the right wrist begins to descend. (A soothing Long Qi experience can be felt in the abdomen as the right palm passes the left palm as the right hand drops.) Now the right hand forms a Duck’s Beak and begins to lift upward.

The right hand’s Duck’s Beak rises, as if pulling a string attached to the right foot, and pulls the back right foot up in front to touch the toe. When the Duck’s Beak is above the head, the palm opens.
Now the right hand drops down as the right toe reaches back behind, until the right and left palms are once again parallel, facing one another in front, and the weight has shifted back to the right foot, with only the left heel touching.
Turn to the right, pivoting on the (empty) left heel, palms arcing across in front of the chest, still parallel and facing one another.

| OUCH! |
As the 180° turn/pivot completes, the weight sinks completely back into the left leg, and the hands fall again parallel in front of the chest.

(The following sketch merely gives you a frontal view for easier viewing.)
Now the left wrist begins its descent as the right arm parries as if hugging a tree and the weight begins shifting up onto the right leg.
| T’AI SCI |
Your left hand forms the Duck’s Beak, pulling the imaginary string up, bringing the left toe to touch in front as the left hand raises overhead and the weight completely shifts to the right leg.
Although this movement is very soothing to the upper body and therapeutic for the hand and arm, its martial application is powerful. As the right hand blocks a punch, the left hand lowers to block a kick. The left hand then rises to strike an opponent’s face or nose as the left knee rises to kick the groin. Ouch!
As the left hand opens and descends, the left toe reaches back, and the weight shifts back to the left foot as the palms face, parallel, in front of the chest (the right heel touching in front).

Wave Hand Over Light/ Fly Pulling Back, #14
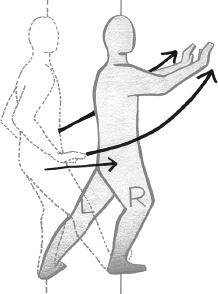
With the palms parallel and facing each other, they rotate as if over a ball so the right palm is over the left palm.

The right fingers extend straight out from chest level at your shadow opponent’s throat level, as the weight shifts forward onto the right leg. The right palm curves around downward as if it has gone over and is now curving back under a sphere of light, to rest in front of the dan tien, cradled in the left palm, as the right toe pulls back to rest by the left instep.

The right heel extends out front as the right palm circles, this time from “beneath the sphere of light” …
… and continuing up and over the back of the sphere of light until the back of the right hand rests in front of the chest. As the right hand is completing the circle, the left foot pulls up to rest with the toe at the right instep.
Fly Pulling Back extends your Qi forward and out in an expressive motion and then relaxes your Qi, sinking back into a retreat.

| SAGE SIFU SAYS |
With the back of the right hand facing the chest and the open left palm in front of the dan tien, the left palm arcs outward to the left at shoulder height, and your weight shifts 60 percent to the left.
Your left fanning arm relaxes away from the body as the weight shifts toward the left leg. The dan tien carries the arm outward as it sinks over the left leg. Your arm moves out and up like a clock hand moving from 6 to 3 o’clock as you relax and exhale.

Green Dragon Rising from the Water, #16
Your weight shifts back to the right foot as the left foot pivots on the heel to point the left toe catty-corner toward the right. Your left arm follows so the entire body is turned catty-corner to the left now.

With the right and left palms falling parallel in front of the chest, weight settles back onto the left leg, and the right foot comes to the heel as your right toe comes up.
| SAGE SIFU SAYS |
Lift your right heel slightly and replace it to extend out more catty-corner to right, then reaching open palms upward and outward while the weight shifts about 65 percent up toward the right foot.
This Green Dragon move teaches you to push and lift from your dan tien, keeping the back heel planted down, thereby reducing back pressure. This creates more power and less chance of injury while performing daily tasks.

As if the hands are pulling a sphere of light back down into your heart, the weight settles back onto the left leg and the right toe pulls back to touch at the left instep.

Then the right heel goes out and the hands push out from the torso.
The weight shifts on up to the right leg as you complete the push and then the hands turn to the right side, where the Duck’s Beak begins for Single Whip.

Single Whip (Part II), #17
The right hand is in a Duck’s Beak (the fingers touching the right thumb), and as the left fingers stroke the inside of the right arm, the left palm pulls across the body. (Refer to the second, third, and fourth figures of the first Single Whip [Movement #3], and to the Web Video Support for this movement.)

On the Duck’s Beak, all the fingers on the right hand extend down to touch the right thumb. Modern carpal-tunnel-prevention exercises include movements like these. So among its many benefits, T’ai Chi appears to be an ergonomic carpal-tunnel-prevention exercise as well.
Wave Hands Like Clouds (3), #18 (Part I, Linear Style)
T’ai Chi connects us with nature as we rise up from the water to Wave Hands Like Clouds (parentheses indicate number of repetitions).
As your hands draw in from Single Whip extension, turn both palms to face down. Shift the weight to the right leg, bringing the left toe out to touch in front, as the right hand comes parallel to ground at shoulder height to the center chest and the left hand comes down to arrive at the center dan tien level.

| OUCH! |
As the left toe goes straight out to the left, both hands reach straight out to the right at shoulder level.
As the weight shifts back to the left leg, the right hand drops to the dan tien center, while the left hand pulls parallel to the ground across the center chest.

Your weight shifts to the left leg as the right leg is drawn toward the left leg and the hands reach out to the left at shoulder level.

Your weight shifts to the right leg as the hands come to center (right at chest, left at dan tien).
Though obviously martial, there’s also a soothing quality of imagining the hands waving like clouds. The thought unlocks an effortlessness flow throughout the mind and body.

As the left toe goes straight out to the left, both hands reach straight out to the right at shoulder level.

Repeat the second through sixth figures of this movement two more times (for a total of three repetitions for Wave Hands Like Clouds). However, on the last repetition, leave off the action from the sixth figure of this movement, because you will be going right into a Single Whip from there. All Wave Hands Like Clouds (and there are four of them in this style) begin and end with a Single Whip.
| SAGE SIFU SAYS |
Single Whip (Part III), #19
Refer to Movement #3’s (the first Single Whip) second, third, and fourth figures, and to the Web Video Support for this movement, if needed, although if you are this far, you should know the Single Whip by heart by now. If not, go back and review. It’s not a test, only a game. Enjoy!

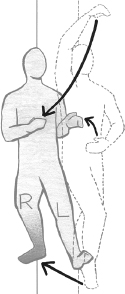
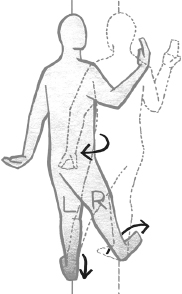
High Pat on Horse/Guarding the Temples, #20
From the Single Whip pose, the torso rotates to the right and the arms begin to curve into a horseshoe shape in front of the body. While the torso turns, you pivot on the ball of the right foot, as shown in the following figure.

The weight now sinks back on the right leg as the left toe comes up (left heel down) and the arms settle in front of the chest.
With the weight settled on the right leg, raise the left foot a bit and then touch the left toe in front, the palms patting downward a little as if patting a pony’s hindquarters, as shown in the following figure.

While shifting up onto the left leg, turn the palms outward, each palm arcing up to the side of the temples of the head as if protecting from a side blow, and then arcing down to form a low block by crossing the right wrist over the left in front of the dan tien. The right foot comes up to touch empty (without any weight on it) by the left instep (the left foot being filled with your weight on it).

(The following sketch shows the front position of the preceding figure.)

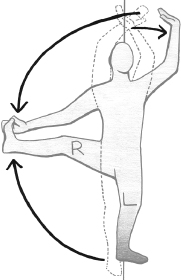
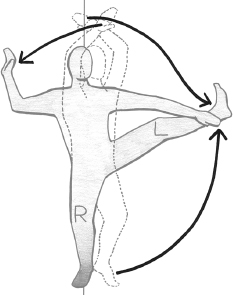
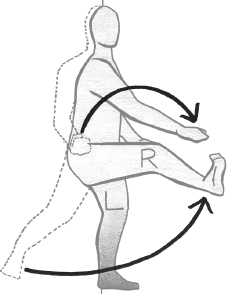
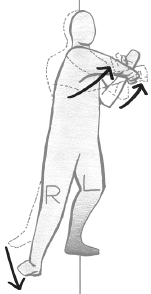
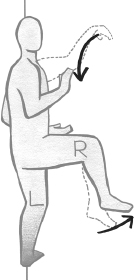
Lower Block/Upper Block, Separation of Right Foot; Lower Block/Upper Block, Separation of Left Foot, #21
With the wrists crossed at the dan tien in the preceding figure, now lift the wrists to cross them at mid-chest block (the palms still facing in toward the chest).
The arms continue rising as the palms turn out, causing the wrists to twist and forming an up block (with the palms facing out). It takes a 7-count to go from the low block to the up block and the kick that follows.
| OUCH! |
Kick the right foot up and out to the right side as the right hand chops down to meet the foot (at whatever height is comfortable—don’t force it; the kicks will get higher over time). Catch the foot on its descent, and slowly settle the descending right foot down by the left foot, as shown in the following figure.
Your hand may not touch the kicking foot at first. That’s okay; just kick as high as is comfortable.
| T’AI SCI |
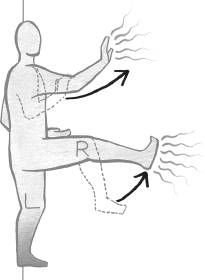
The weight shifts back into the right foot as the left wrist crosses over the right this time.
Begin the low/mid/upper block, the left leg preparing for the separation kick.

As the up block completes, the left hand begins to slip sideways to the left as the left foot prepares to kick out and up to the left.
Kick the left foot out and up to the left side as the left hand chops down to meet the foot (again, kicking only as high as is comfortable) and catches the left foot as it drops to slowly settle “behind” the right heel, as the hands lower to your sides.

The hands complete lowering to your sides, as the left foot settles behind the right heel, the body turns 1/4 turn to the left. The left leg fills and the right leg empties as you complete the 1/4 turn.

(The following sketch presents a frontal view of the pose in the preceding figure.)

The weight shifts into the right leg as the low block rises to mid block.

| A T’AI CHI PUNCH LINE |
The weight sinks fully into the right leg as the mid block rises to high block as the palms twist out.

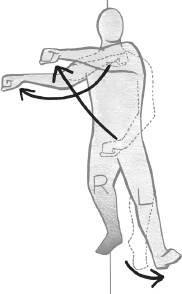
Kick the left leg up and out to the left as the left hand swings out in front and around to the side to slap the instep of the left foot (or the inside of the left leg), as the right hand chops out to the right slightly.
Wind Blowing Lotus Leaves (4), #23
This is an exquisite move. It is artistically beautiful and feels fantastic because it loosens the entire torso. It also helps the body learn to push the lawn mower or perform other tasks with much less pressure on the lower back. Correct T’ai Chi movement shifts strain from the lower back to the thighs, which are much stronger and less delicate than the back’s vertebrae.
After the left hand smacks the instep or the inside of the left leg, it pulls back to the head just off the right ear, and the right hand pulls behind that, as if holding a beach ball off to the right side of the head. Place the left heel down at a 45° angle to the left/front.

The weight shifts forward onto the left leg as the front/left arm drops down in a circular motion, blocking the groin area as the torso turns to shift over the left leg, the right hand still by the right shoulder to push as the body shifts forward. Exhale as you shift forward, relaxing.

Now imagine holding the beach ball off to the left side of the head (the right hand forward of the left this time) as the right heel goes out 45° to the front/right.
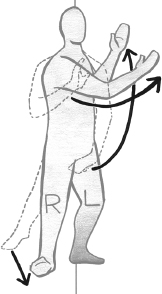
The weight shifts forward onto the right leg as the front/right arm drops down in a circular motion, blocking the groin area, with the torso turning slightly to shift over the right leg and the left hand still by the left shoulder. Exhale as you shift, relaxing.
Shift forward, as the breath seems to relax out of every cell. As your Qi sinks into the earth, its power also flows through you and out your hands. The dan tien pulls your relaxed body forward.
Now repeat the four figures of Wind Blowing Lotus Leaves for a total of four movements in this series, two from the right to left and two from the left to right.
Begin similar to the first two figures in the preceding Wind Blowing Lotus Leaves (Movement #23). However, this time, your right hand forms a fist and rises up and over to deliver a downward hammer-fist. Your left hand doesn’t stop down at a groin block, but it continues circling up in front to a high block protecting your forehead, with the left palm down in a down block. As the block arcs out and up in front of the body, the palm continues to face away from the upper body even as the block is completed. (See the following figure.)
Turn 180° to prepare for the Double Kick by shifting the weight back on the right leg and pivoting on the “empty” left heel as the body turns to the right.
Sink back into the left leg as the pivot completes, allowing the right toe to come up, pivoting on the right heel. The left open palm rests at the left hip, facing up, as the right fist swings out in front of the right shoulder.

(The next sketch shows a frontal view of this last figure.)
| SAGE SIFU SAYS |
From sunken down on the right leg, shift forward and kick the left leg up and out for a left front kick.

Remember that your kick does not have to be as high as illustrated. Then place the left leg out in front and shift up into the left leg …
… kicking the right leg up and out front while opening the right fist and smacking the right palm down on top of the kicking right foot (or leg).
As the right leg kicks up, the right palm turns over and smacks down to slap the top of the right foot, or calf, or knee, or wherever your hand comfortably slaps without leaning forward.
Place your right foot down in front after the kick, heel first.
| OUCH! |
Step forward with the left foot while preparing the right fist near the right hip and dropping the left parry.

Then parry and punch as the weight shifts onto the left front foot about 60 percent forward. Again, don’t lean forward as you punch. The body or Vertical Axis always stays stacked above the dan tien.
As the punch is thrown and Qi sinks into the forward left leg, breath is released in an easy sigh. This action is a wonderful stress release for both the hips and the upper body. Tension can be allowed to pour out the left foot into the earth, and upper-body tension can be released out the punching fist.

Step Back/Lower Block/Upper Block, Kick Front, #27
Shift the weight back to the right leg, rolling up off the left heel as the hands drop out to the sides.

Bring the hands back down to center (the left wrist crossing on top) as the left foot comes back to touch at the right instep.
The low block rises to mid block as the left knee rises up.

| T’AI SCI |
As the mid block becomes an upper block, your palms twist out and begin to strike up and out to the sides, as the left foot kicks out front.

This kick is great for balance. You don’t have to perform the kick as high as what’s illustrated here. You may begin much lower. Go as high as is comfortable, without leaning backward out of your Vertical Axis. As with all movements, it is done very slowly, placing the foot out in front as you breathe. Observe your balance as you do this.
The hands slowly lower to the sides as the left foot slowly lowers to rest flat on the right side of the right foot.
| SAGE SIFU SAYS |
Pivoting clockwise, shift the weight slowly to the left foot, pivoting on the right ball (you are working to achieve a 3/4-turn pivot).
Shift the weight to the right foot as the 3/4 turn continues to the right.
Pivot on the left ball as the 3/4 pivot is completed.

(The following figure is a frontal view of the previous figure, not more turning. See that the weight shifts back to the left foot as the right wrist crosses over the left.)
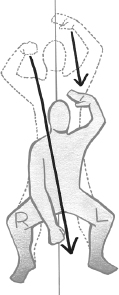
Lower Block/Upper Block Separation of Right Foot, #28
Perform a lower/mid/upper block with the right wrist crossed on top and the weight on the left foot so you can separate the right foot kick. (Refer to earlier lower/mid/upper block separation right foot kicks, and to the Web Video Support for this movement, if you need a refresher before proceeding on to this Parry and Punch.)
Don’t psyche yourself into thinking this isn’t for you. It’s perfect for you. If you are in a wheelchair, this movement will involve your hand arcing down. If you are paralyzed to the waist, you’ll give the right-side abdominal muscles instructions to extend upward toward the arcing right hand, and this intention of motion will exercise and coordinate mind and body, relieving tension.
When Separation Right Foot completes, place the right heel out to the right side and shift into it, proceeding in to a Parry and Punch. (Refer to earlier Parry and Punch instructions, and to the Web Video Support for this movement, if you need a refresher.)
| SAGE SIFU SAYS |
Chop Opponent with Fist (Pivot and Rotate Fist)(3), #30
When turning, you must empty a leg before pivoting on it so you don’t damage the knee. Once a foot is pivoted to the desired position, the weight can be returned to it. From Parry and Punch position, your weight shifts back to the right leg as the torso pivots 180° toward the right, and the “empty” left leg pivots on the heel to the right.

Sink back into the left leg, as the empty right leg pivots on the heel, the toes coming up, to result in a completed 180° turn.
(The following figure is simply a frontal view of the preceding figure.)

The dan tien sinks forward over the right leg, and the empty left leg comes up to place the empty left foot by the right instep.

The weight now shifts onto the left leg, placing the empty right foot out, the heel first at a 45° angle front/right, simultaneously drawing the right elbow back to the left to prepare for the upcoming strike.
Now, shifting forward into the right leg, throw out the right elbow strike, exhaling and allowing the body to relax into the strike.

| SAGE SIFU SAYS |
The weight continues shifting onto the right foot, with the left foot placed out at a 45° front/left angle.

The weight shifts into the left foot as the right fist strikes a punch out to the left/front.

The right foot comes up to touch near the left instep and continues on out at a 45° angle to the front/right.
Sink the weight forward to the right foot, and throw another right elbow strike, as shown in the following figure.

To recap, Chop Opponent involves an elbow strike stepping to the right, a punch stepping to the left, and an elbow strike stepping to the right. Over time, this movement, although martial in appearance, becomes soothing, healing, and almost dancelike in the way it lifts your mood to do it.
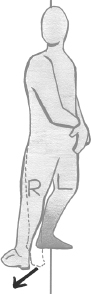
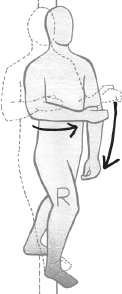
Sink to the Earth/Backward Elbow Strike, #31
Now drop the weight back to the left foot and throw the elbow strike out left/behind. (Don’t look back; it’s supposed to be a surprise.)

The depth of this strike is all in the bend of the left knee. If your knee feels comfortable with only a slight bend, then that is perfect for you. It will get deeper in time, and there’s no rush.
Before coming up out of back stance, turn to the right and aim the right forearm to the front/right 45° angle.

Now the right fist punches upward and the weight springs forward to settle over the right foot, the left wrist still crossed over the right fist, but then turning to follow the right hand to prepare for a Single Whip.

| SAGE SIFU SAYS |
Single Whip, 3/4 Single Whip (Part IV), #32
This begins like normal Single Whip.

However, the left foot doesn’t go all the way out to the left, but the heel touches out left/front at a 45° angle, and then the hand pushes out at that same left/front angle. (See the following figure.)

Partition of Wild Horse’s Mane (4) and Single Whip, #33
Keep the eyes looking straight ahead (ideally). The right arm/fist settles back from the Single Whip at chest level, the left hand drops down to groin level, and the left toe touches in front of the body. This is much like preparing for the Wave Hands Like Clouds position, except with fists.

Now, as the left heel extends out front/left 45°, the fists begin to roll back behind/right. The left elbow rises as the right fist lowers. Again, this is much like the hand motion you learned for Wave Hands Like Clouds, except with fists, and Wave Hands Like Clouds steps sideways, while Partition of Horse’s Mane steps out at 45° angles forward.
As the weight shifts up into the left leg, the left elbow strikes out.

| SAGE SIFU SAYS |
Now, with the left leg full, the right leg extends out to the front/right 45°, with the arms rolling back to the back/left this time.
The right elbow strikes out as the weight shifts up to fill the right leg.

Repeat the second through fifth figures of this movement (for a total of four Elbow Strikes, left, right, left, right strikes in Part Wild Horse’s Mane). End after the last right elbow strike by stepping up to form a Single Whip.
When striking forward, the “back” heel should stay down on the floor until the Vertical Axis is completely over the front filling foot. Also remember never to lean into a strike, but to maintain upright posture.

Fair Lady Works at Shuttles, #34
Fair Lady Works at Shuttles is actually a shadow-boxing routine involving blocks and punches used to spar with four opponents coming from four different directions.
From a completed Single Whip position, the right toe reaches back to behind the left heel. The left forearm points up to the sky, and the right arm comes across to rest the right open hand (palm down) just below the left elbow. (See the following figure.)

Now fill the right foot as the left pivots on the ball of the left foot. Both the body and the left foot are now pivoting toward the right for a 3/4 pivot.

As the pivot completes, sink the weight back on the left foot pivot as the right toes come up, pivoting from the right heel. The left hand drops beside the waist to form a fist as the right hand arcs up to form an up block (palm out).

Shifting the weight forward about 60 percent into the right leg, the left hand punches out at about nose height, punching out front just beneath and beyond the blocking right forearm.
To prepare for the right-hand punch, first empty the left leg and bring it up to touch the left toe by the right instep, as the open left hand (palm down) touches under the right elbow and the right forearm points up to the sky.
Now the left heel extends out front/left at 45°, the left arm rises in an arc to up block (palm out), and the right fist drops to the right hip, preparing for a punch.
| OUCH! |
The weight shifts 60 percent forward into the left leg as the torso turns to the left slightly, to deliver the right-fist punch beneath the blocking left arm.
Again, note that the back foot remains down flat until the punch is complete. The body is in a state of “song” or relaxation, allowing the force of the earth to flow up through your body.
(The following figure presents a frontal view of the preceding figure.)

Repeat the movements shown in all these figures up to this point of Fair Lady Works the Shuttles—except, of course, beginning from this punch position, not from a completed Single Whip (as in the very first illustration/instruction of this movement).
To proceed from the punch in the preceding figure to Grasp the Bird’s Tail, continue on through the punch, stepping forward out to left catty-corner with your right foot reaching hands up into Grasp the Bird’s Tail.
Grasp the Bird’s Tail (Part II), #35
Notice this figure is simply a frontal view of the preceding figure. Refer to the earlier Grasp the Bird’s Tail instructions, and to the Web Video Support for this movement, if you need a refresher.

This is the same as the first Grasp the Bird’s Tail, except that, to get in position, you step forward from the last punch of Fair Lady Works at Shuttles with your right foot out to Grasp the Bird’s Tail.

Caressing the Bird’s Tail, Waving Hands Like Clouds, and so on, all can return upward cosmic experiences to the solid roots of Earth—and it feels great!
Single Whip (Part V), #36
From Grasp the Bird’s Tail, push out to prepare for a Single Whip, with the left leg coming forward as the push completes.
| SAGE SIFU SAYS |
Refer to the first Single Whip instructions (Movement #3), and to the Web Video Support for this movement, if you need a refresher on Single Whip details.
Wave Hands Like Clouds (Part II, Linear Style), #37
Refer to Wave Hands Like Clouds, Part I, if you need a refresher, but end with Single Whip “Down,” as in the next figure.
Incorporate breath with each movement. This slows the movement and makes it a relaxing and centering exercise of and by itself. Be absorbed and loosened. Enjoy!
Single Whip Down, Return to the Earth (Part I), #38
Single Whip Down is performed just like regular Single Whip, except you step out left farther and on the ball of the left foot rather than the heel. Note that you do not have to go as low as what’s shown in the following figure. Go to your comfort level.
Golden Cock Stands on One Leg (×4), #39
From the Single Whip Down pose, shift the weight over to the right leg a bit more to the empty left leg completely so you can drop the left heel in slightly toward the body, as shown in the following figure.
Now shift the weight up into the left leg and bring the right leg/knee up while forming Duck’s Beak with the right hand and sliding it down the top of the right thigh. The left hand falls palm up to the side of the left hip.

Slide the right hand Duck’s Beak off the end of the right knee, up in a circular motion, and around back toward the body. The left palm up still rests next to the left hip.
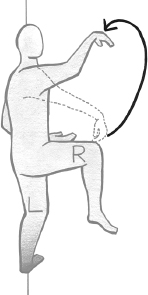
The hand completes a circle down to the chest, with the palm open and ready to push away from the body.
Then the right hand pushes out simultaneously as the right foot kicks straight out in front. Note that you don’t have to kick as high as what’s shown in the figure. Just go as high as is comfortable and balanced. You’ll get higher in time, so just relax and enjoy.
This movement may look tough if you are leafing through the book, but learning the previous movements changes your body and mind in ways that will make this movement feel easy. As always, each of us does it in our own way.
After the kick, place the right foot down slightly out in front of the body, and begin to shift the weight toward the right leg as the palm-up right hand begins dropping down to waist level and the left hand now forms a Duck’s Beak.

| T’AI SCI |
Now shift your weight completely into the right leg, and bring the left leg/knee up while forming a Duck’s Beak with the left hand, which now slides down the top of the left thigh.

Slide the left-hand Duck’s Beak off the end of the left knee, up in a circular motion, and around back toward the body.

| T’AI SCI |
The left hand completes the circle down to the chest, with the palm open and ready to push away from the body.

The left hand pushes out simultaneously as the left foot kicks straight out in front. Kick only as high as is comfortable and balanced; it’ll get higher in time. Relax and enjoy!

From here, repeat both right and left kicks again as in all the preceding figures for Golden Cock Stands on One Leg, but as you finish the last front kick with the left leg, put the left leg behind you and circle your right hand up from the right side to put you in position for Repulse the Monkey.
Repulse the Monkey (3) (Part II), #40
This Repulse the Monkey series begins with the right hand pushing out, so it’s only three repetitions, not four, as in the first one.
Again, enjoy the soothing Long Qi as the palms pass one another, allowing a loosening of the back and shoulders.
You just did #40, Repulse the Monkey, so the next four movements are repeats of movement series 11 through 14. You already know them! But go back for a refresher, or just look at the Web Video Support for these movements, if needed. The movements are as follows:
• Stork Covers Its Wing/Sword in Sheath (Part II), #41
• Slow Palm Slant Flying (Part II), #42
• Raise Right Hand and Left: Turn and Repeat (Part II), #43
• Wave Hand Over Light/Fly Pulling Back, #44
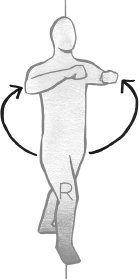
Fan Through the Arms (Backhand Slap), #45
This Fan Through the Arms doesn’t come up in a rising arc to the left (as the first Fan Through the Arms [Movement #15], did); instead, it swings out front and then to the left side like a back-handed slap. As always, dan tien turning left throws the slap/blow. Let the body loosen and relax the slap out from the dan tien up through the relaxed body and out through the hand.
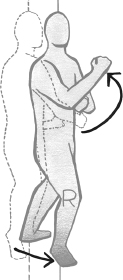
Step Push/Box Opponent’s Ears/Cannon Through Sky, #46
This series, a powerful advancing attack, involves three consecutive blows and three leg lunges forward, toward the opponent.
After the Back Hand Slap, the weight shifts totally to the left leg. This movement begins with the right foot stepping forward, as the hands begin to drop, preparing you to push away in front. (See the following figure.)
The dan tien now shifts over the front/right foot as you push out. The back heel stays down until the push is complete, before then touching the right instep as shown in the following figure.
The weight completely fills the left leg so the empty right leg can come up. Now the right heel touches out front as the hands drop down and back, forming fists.
| SAGE SIFU SAYS |
The weight shifts toward the right leg while the fists begin to fly out and forward.
The fists arc around to drive into the shadow opponent’s ears or temples, carried forward by the force of the dan tien shifting up completely into the right leg.

Just as Fanning Through the Arm allows deep tension releases through the hips, Box Opponent’s Ears can foster releases through the spine, shoulders, and head.
(The following figure is simply a frontal view of the pose in the preceding figure.)
| SAGE SIFU SAYS |
The left toe comes up to touch at the right instep as the fist drops down below the waist in front (slightly to the left of the body), and the weight shifts into the left leg.

With the right heel touching out, the front (right) fist now circles up and out to drive forward as the weight settles up into the right foot.
Be sure not to lean into the opponent as you box his ears, push, or strike. Remember, all punches come from shifting the dan tien forward rather than from a lunging upper body.
Single Whip (Part VI), #47
Finishing the right fist punch of Cannon Through Sky, step up with the back/left foot and turn the fist into a Duck’s Beak for Single Whip, which begins the next Wave Hands Like Clouds sequence.
Wave Hands Like Clouds (Round Style; Part I), #48
Round Style Wave Hands is nearly identical to the original Wave Hands, except the hands are held palm up (bottom hand) and palm in (upper), as in the following figure. You already know Wave Hands, but if you need a refresher, see the figures for movements #18 and #19, and refer to the Web Video Support for these movements.
Beware of “creeping-butt syndrome” as you do this exercise. Any lower-back pain is likely caused by the sacral vertebrae (or butt) creeping out behind you, causing an over-arch in the lower back. As your breath relaxes out of you, allow your lower-back muscles to relax and your tailbone to drop. Don’t force it—let it relax down.
As always, Wave Hands Like Clouds begins and ends here with a Single Whip.
High Pat on Horse (Part II), #50
From Single Whip, the left hand stays in place as the right arm circles around. Once the right arm is around, bend both arms and relax like a horseshoe before patting the horse’s behind in front. Shift your weight back to the right foot as the left toe touches out front. (If you need a detailed refresher, refer back to the first High Pat, and to the Web Video Support for this movement.)

Cross Wave of Water Lily Kick (Part I), #51
From High Pat on Horse, the left heel steps out; then the weight begins to sink into it.

Then the right leg kicks up and out to the left side of front as the hands begin a clockwise circle up and out to the left of the body. The right leg is then pulled back across the body in an arc toward the left, where the now-descending hands circle to touch the foot or leg as it passes underneath, hearing a “pat-pat” sound as they lightly connect in passing, as shown in the following figure. Note that your “pat-pat” sound may come from tapping your shin or thigh rather than your foot. That’s fine; don’t force it. You’ll gain flexibility over time.

After the “pat-pat” of the hands lightly striking the foot or leg, the palms continue on out to the left as the arcing leg continues on to the right, passing by one another.
Place the right foot down in a normal Horse Stance, as the palms rise upward above the head to form a right fist and a left up block, preparing for the next movement.
Parry Up; Downward Strike, #52
The right fist strikes down, and the left palm faces outward from the forehead. As you punch downward, try not to bend the back. Again, always maintain the Vertical Axis, aligning the three dan tien points vertically.
Now step forward with the right foot at a 45° left/frontal angle to Grasp the Bird’s Tail.
Movements #53, #54, #55, and #56 are a repetition of movements #35, #36, #37, and #38, with one exception: this time around, Movement #55, Wave Hands Like Clouds, is “circular/round” rather than linear (see Movement #48 for hand placement on Round Style Wave Hands if you need a refresher, and to the Web Video Support for these movements). Wave Hands is a deep loosening of torso muscles and tissue when done well, and each time you do it, your body opens more deeply to be permeated by the expanding Qi energy.
Step Up to Form Seven Stars, #57
Form Seven Stars and the remaining movement’s complexity is at first a bit mind-boggling. However, as that complexity is absorbed into our beings, we grow from it, and that growth feels great! We learn to breathe and relax through seeming chaos, which stretches the mind’s capacity to comprehend, absorb, and function. This ability carries over into all aspects of our lives.
| OUCH! |
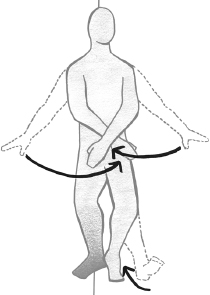
From Single Whip Down, shift up into the left foot, forming a fist from the Duck’s Beak, and swinging it down and up into a groin punch.
(The following figure is a frontal view of the preceding figure, to help you see the next move’s details better.)

Note that you can bend the knees more for a lower strike, or higher if your knees ask you to bend them less. Listen to your knees and body. That is the essence of T’ai Chi—working with your body rather than riding roughshod over it with harsh demands.
Retreat to Ride the Tiger, #58
The right foot steps back flat so the weight is about 50-50 on both feet, as the left hand swings to the left in an out block (palm out, away from body) and the right hand drops back and down to form a Duck’s Beak, as shown in the following figure.
Slanting Body/Turn the Moon, #59
The weight sinks fully into the left leg so the empty right foot can pivot on the toe as the body turns to the right for a 1/4 turn.

Complete the 1/4 turn as the weight settles back on the right leg.

Although these blocks have very direct martial applications, they are soothing to the upper body. Breathe easily and enjoy the circular movement of the right arm blocking up and out while the left hand arcs easily down to form the Duck’s Beak behind. As you memorize the movements, the silken flowing will be more and more soothing each time you perform them.
The arms exchange positions, with the right going up (palm in)/left going down (in Duck’s Beak) as the left toe touches out in front.
The left foot rises slightly, and as the body pivots, the left foot pivots on the empty left toe and the left heel drops in to the left (moving toward a 180° pivot).

The pivot completes as the weight sinks back into the left foot and the right toe comes up, pivoting on the right heel.
The weight shifts up into the right leg.

With the weight fully into the right leg, the arms again exchange places, with the left swinging up (out block, palm in facing body) and the right swinging down (side/down block) as the left foot touches the left toe out front.
The weight sinks back up into the left leg.

(The following figure is a frontal view of the preceding figure, to help you see the transition to the next movement.)
Cross Wave of Water Lily (Part II), #60
This movement is a repetition; see Movement #51 for details if you need a refresher, and to the Web Video Support for this movement.
From Cross Wave Kick, keep the hands going out left for Stretch Bow to Shoot Tiger.
Stretch Bow to Shoot Tiger, #61
Imagine you’re stretching a bowstring back with the right hand, while the left hand (palm out away from the body) aims the bow out to the left at a 45° angle.
The right hand settles at the right hip.

Now the right fist punches out and around to punch out directly in front of the chest.
Then the left hand punches out and around while the right hand returns to the hip.
Punch three more times, right, left, right. Both hands punch and return for five punches total, beginning with the right fist and ending with the right fist. Note how the “hip” arrows indicate the punches’ power ia in the turning dan tien.
As one hand punches, the other draws back to act as a pulley system. The hand pulling back adds power to the hand punching out. Stay loose; this is where your power is maximized.
Grasp the Bird’s Tail (Right Style), #62
From the last right-fisted punch, bring the fists down to the sides and the left foot over to touch by the right instep.

Then go into Grasp the Bird’s Tail by dropping the left foot back and reaching up to the right. Complete Grasp the Bird’s Tail, and if you need a refresher, go to figures for Movement #2 (the first Grasp the Bird’s Tail), and to the Web Video Support for this movement.

After drawing back the bird’s tail, shift back to the left leg, and then shift forward to the right leg, performing a movement just like Green Dragon Rises from the Water. If you need a refresher, review the second, third, and fourth figures for Movement #16 (Green Dragon Rises), and see the Web Video Support for this movement.

Complete the Green Dragon movement by drawing the arms back and bringing the left leg back, to now stand on both legs with fists at the sides.
Grasp the Bird’s Tail (Left Style), #63
This and the next figure mirror the Grasp the Bird’s Tail and Green Dragon–like movement you did in the preceding figures, except, as you’ll see, with opposite sides.
Reach up with the hands out to the left (with the left hand on top for this left-style movement and the right hand palm up underneath). The right foot goes out behind.

Draw the bird’s tail back then push up into the Green Dragon–type movement, this time to the left/front.

Complete the left-style motion before drawing back to the start point (as shown in the first figure for Movement #62), and now begin Grand Terminus, the very last movement.
Grand Terminus; Gather Heaven to Earth, #64
Congratulations! You deserve a great, deep bow. Upon completion of learning the entire 64 posture series of the Kuang Ping Yang style form, you are now about to do the most wonderful movement of all, Grand Terminus.
This final move cleanses and reinvigorates the body, leaving you feeling about as terrific as a kid could feel, or as Dave Letterman might say, “Feeling better than people should be allowed.”
| A T’AI CHI PUNCH LINE |
1. From Grasp the Bird’s Tail Left Style/Green Dragon movement, return to the feet-together/fist-at-sides pose to start Grand Terminus.
2. Reach the hands out and slightly back, extending the arms back and outward.
3. As you stretch up, straighten the knees for the first time throughout the entire 64 posture series.
4. Gathering the Qi from all around, the light pours over your relaxing body as the palms turn down.
5. Slowly descend the palms, invoking the cleansing light to wash through every area as the palms pass through.
6. As the hands descend back to your sides, just bask in the soothing healing of this ocean of silken effortless energy washing over and through. Experience effortlessness.
“Experience the light!”
This movement is meant to gather all the light, or Qi, we have generated through the 64 movements. As the hands turn downward at the top of their arcs, allow the light to spill, washing over and through your entire being to cleanse any heavy loads or toxins. Let the feet open to release any loads right down into the earth’s gentle pull. This will leave an expanding lightness within, throughout, and all around you in its wake. Continue to allow the light to expand through you throughout the day, touching into it anytime by breathing and being willing to let go.
• Practicing movements with full, easy abdominal breaths, relax each breath out of the entire body, allowing Qi to flow into and through your limbs as the weight shifts or sinks.
• Allow yourself to become T’ai Chi’s natural elegance, as you feel at one with the world while each movement is transforming you.
• Push from your dan tien, not your shoulders or back. T’ai Chi’s powerful self-defense moves can be soothing and can teach you to lift groceries or mow the grass correctly.
• T’ai Chi is effortless, showing that most battles are fought in our own minds and hearts, as we learn to let go of what’s inevitable and to positively affect what is changeable.
• Adjust movements to fit your mobility. No matter how expansive or limited your mobility, T’ai Chi extends it. Don’t force it.
• Pushing and punching with your back foot planted and your body relaxed guides the force of the earth through you, as you relax out of the way, as in Unbendable Arm.