9
Beyond Acr Basics

In the previous chapter we saw how we could take a camera file in raw format and, using the features of Adobe Camera Raw (ACR), process the image, enhancing color, tone and sharpness. Let’s now look at some more specialized Adobe Camera Raw techniques that the professionals are using daily to speed up their workflow whilst maintaining the ultimate image quality.
The Curves feature in ACR works in a similar way to the similarly named tool in Photoshop and provides custom control over the tones in your raw photos.
Curves provide advanced tonal control
Available in: ACR for Photoshop/Bridge and Lightroom Experienced digital photographers who want a little finer control over the tones in their pictures often turn to the Curves feature in Photoshop. The feature contains a graph-based workspace with a light gray histogram preview of the picture’s tones and a straight line that represents the relationship between input values and output tones. By manipulating the line in the Curves dialog, the user can finely tune the appearance of different tones in the photo without unduly affecting other areas of the image.
Sophisticated raw converters, such as Adobe Camera Raw (Photoshop and Bridge) and Lightroom, contain curves features as well. This means that such fine-tuning steps can be applied directly to raw files without having to transfer the images to Photoshop first. The feature is located in the Tone Curve panel in both programs, but the ACR implementation contains two different modes – Parametric and Point.
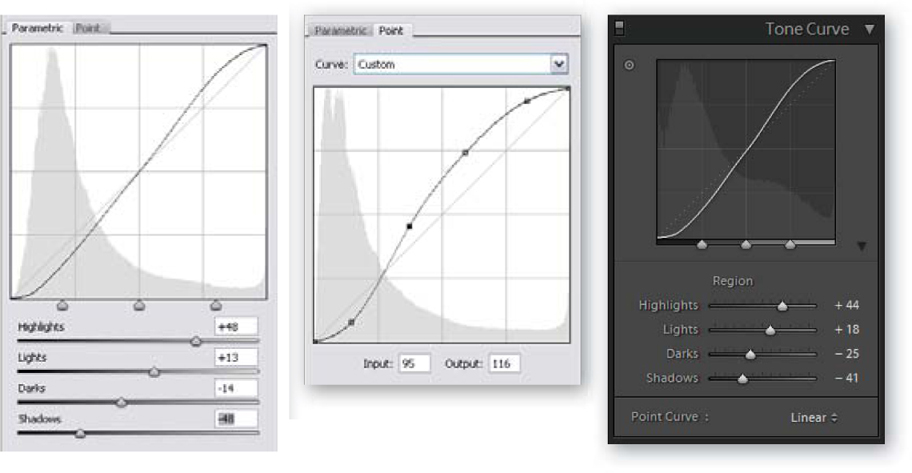
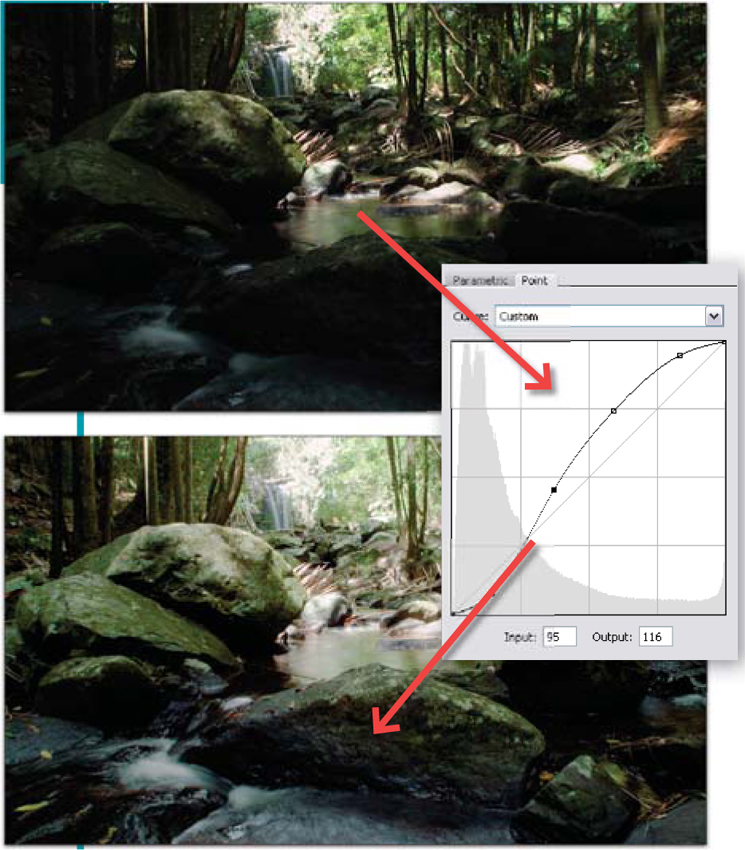
In the ACR’s Point version and Lightroom (via the Point Curve menu) the user can select from several different curve presets. Alternatively all modes provide the ability for the user to create their own ‘custom’ curve settings. Tonal range sliders are used in Lightroom and Parametric mode of ACR to adjust specific tones. In the Point mode of ACR users place control points on the curve and then click-drag the points to new positions to alter the tones in this part of the image.
Quick start Curves summary
Top left: Point curve adjustments in Adobe Camera Raw.
Above: Slider-based adjustments in Lightroom or the Parametric mode of Adobe Camera Raw.
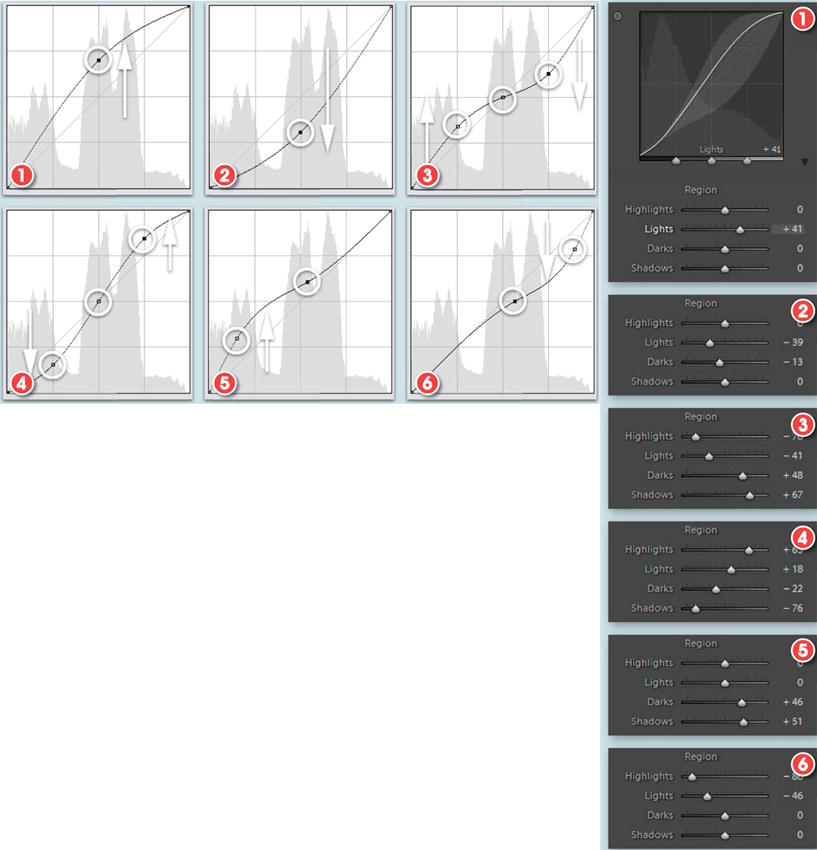
1. To lighten midtones but no change to highlight and shadow areas – Click and drag a middle control point upwards or move the Lights slider to the right.
2. To darken midtones but no change to highlight and shadow areas – Click and drag a middle control point downwards or move the Lights slider to the left.
3. To decrease contrast – Click to add a control point to the middle and then click and drag a shadow control point upwards and a highlight point downwards or drag Highlights/Lights sliders to the left and Darks/Shadows sliders to the right.
4. To increase contrast – Click to add a control point to the middle and then click and drag a shadow control point downwards and a highlight point upwards or move the Highlights/Lights sliders to the right and the Darks/Shadows to the left.
5. To lighten shadows only – Click to add a control point in the middle and then click and drag a shadow point upwards. Now adjust the middle point until the highlight area of the line is almost straight again or move the Darks/Shadows sliders to the right.
6. To darken highlights only – Click to add a control point in the middle and then click and drag a highlight point downwards. Now adjust the middle point until the shadow area of the line is almost straight again or drag the Highlights/Lights sliders to the left.
Color fine-tuning with the Calibrate feature
Available in: ACR for Photoshop/Bridge (can be used in Lightroom)
As well as the white balance presets and Temperature and Tint sliders, Adobe Camera Raw also contains a set of color-specific controls grouped under the Calibrate tab in the Settings section of the dialog. Though daunting to start with, the options found here do provide an amazing amount of control and are used by many professional photographers to ‘profile’ the way that the color from their cameras is interpreted by the raw converter. This is particularly useful for building a profile for neutralizing the casts that are present in images photographed under mixed artificial lighting conditions. Though this technique is only possible in ACR, the results can be used in Lightroom as well.
The process involves photographing a GretagMacbeth Color Checker reference board under the lighting conditions that are typical for the scene. The raw file is then opened into Adobe Camera Raw and the color and tones of the captured file are adjusted to match the ‘true’ values of the patches. The RGB values that each patch should be (in a variety of color spaces) can be obtained from Bruce Lindbloom’s great website (www.brucelindbloom.com). These synthetic values will act as a reference when making your adjustments.
Start by setting a basic white balance by clicking onto the light gray patch of the Color Checker with ACR’s White Balance tool. Next use the Exposure and Shadow sliders to adjust the contrast of the image. Use the Color Sampler tool to check the patch values in the raw preview against those synthetic values found on Lindbloom’s site.
The Calibrate control provides the ability for photographers to fine-tune their white balance in their pictures to match difficult non-standard lighting conditions. After making these settings you can then save the values to be used with other pictures photographed under the same lighting conditions.
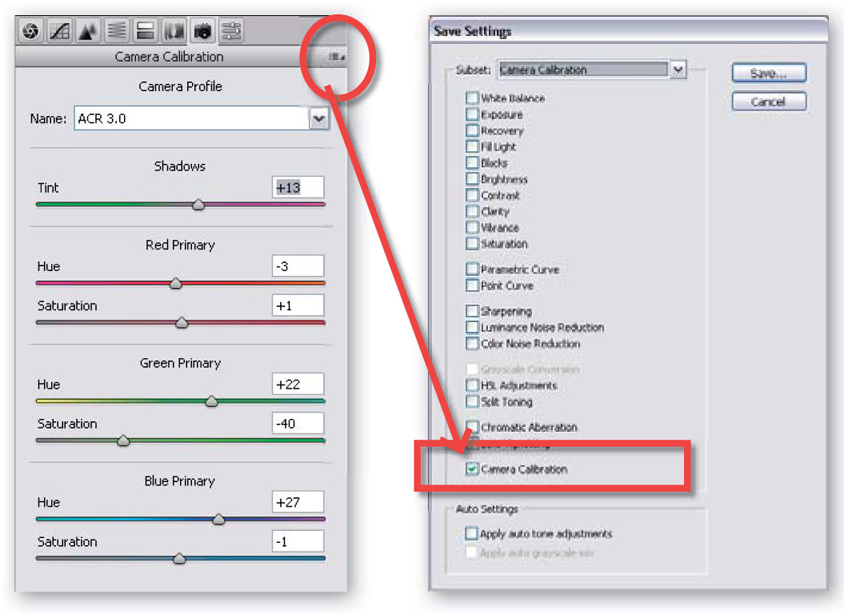
Next switch to the Calibrate tab and use the sliders to start to adjust the color of the test patches. Again your aim is to match as closely as possible the captured (sampled from the preview) values with the synthetic values of the Color Checker. This can be a pretty exacting task as moving one slider will not only affect its color but also the value of the other two. Matching the two values is a process of adjust, check and then adjust again, but once completed the final color settings can be saved as a new settings subset and applied to all photographs taken under the same lighting conditions.
Performing this process manually is tedious and takes a lot of time, a better approach is to employ the help of a specially written custom script that automates the process. The cross platform script is available from the Chromoholics website (http://www.fors.net/chromoholics/) and once installed automates the fine tuning procedure detailed here.
You can obtain a script that automates the fine-tuning process from the Chromoholics website (http://www.fors.net/chromoholics/).


The table is laid out in the same 6 × 4 array as the Color Checker chart, and within each cell, the color components are shown in red, green, blue order from top to bottom. When adjusting the sliders in the ACR Calibrate tab aim to replicate these RGB values.
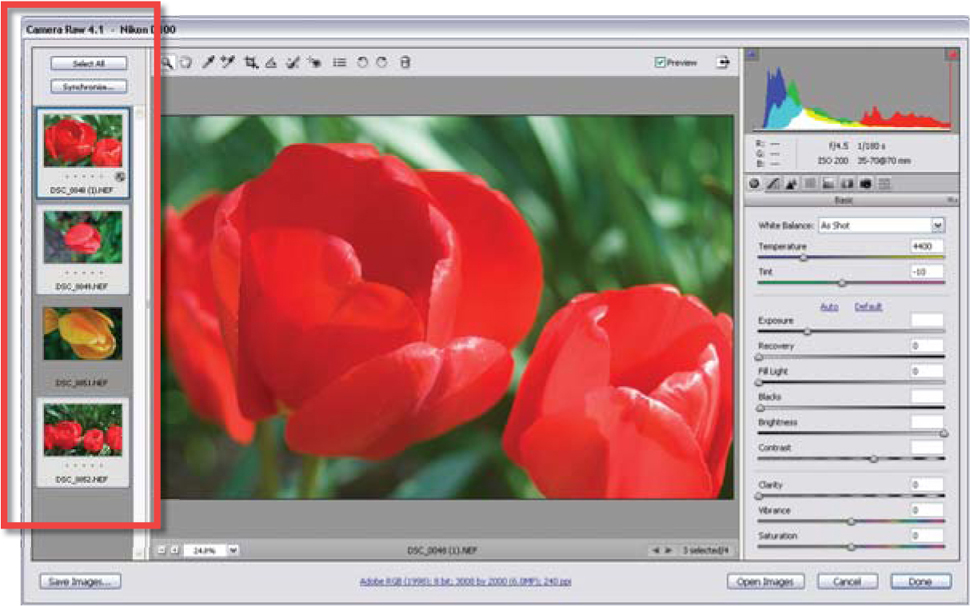
The version of ACR that ships with Photoshop and the latest version of Photoshop Elements can process multiple raw files at the same time. Multi-selected files are displayed as thumbnails to the left of the main preview area.
Applying raw conversion settings without opening files
Available in: ACR for Photoshop/Bridge and Photoshop Elements
The version of Adobe Camera Raw that ships with Photoshop and Photoshop Elements includes many features that make processing several files at a time an easier task than it has been. Earlier versions of the utility were only able to work on one file at a time.
To process several files at once, multi-select their thumbnails in the Bridge or Organizer workspaces and then select File > Open with Camera Raw (Alt/Option + R) or select the Full Edit option from the right-click menu for Elements users. The first selected file is previewed in the ACR workspace and highlighted in the slide table section (left) of the dialog. The rest of the pictures are also displayed here in thumbnail form.
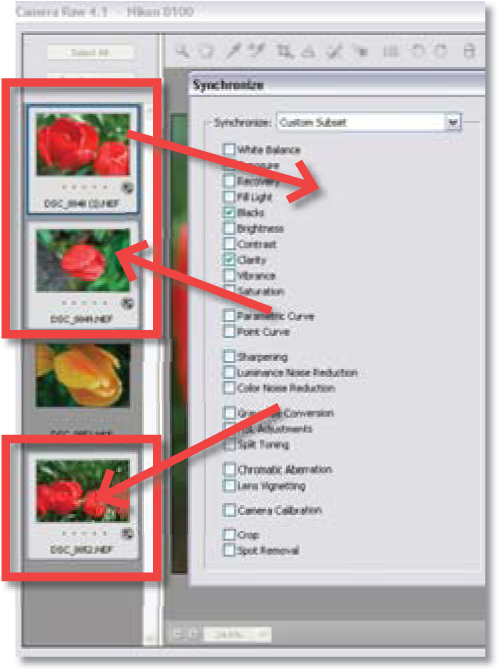
To process the files simply click on each thumbnail in turn, making your enhancements using the slider controls and then clicking Save or Done to apply the changes. For images shot at the same time under the same lighting conditions, the enhancement process is even quicker. Photoshop users start by adjusting the settings for the first photo in the series. Next choose the Select All button at the top left of the dialog (you can also multi-select specific thumbnails) and then click Synchronize. ACR then displays the Synchronize dialog, where you can select the specific enhancements that you want to apply to all selected images. Click OK to exit the dialog and apply the changes to the thumbnails. Press the Save or Done buttons to apply the changes to the photos.
Elements users click the Select All button first and then start to adjust the Develop controls. The changes made to the first image are flown through to the rest of the selected photos. And remember that the enhancements have not been applied permanently – you can always reopen the raw file and change the settings or even remove the enhancements altogether.
One step further…
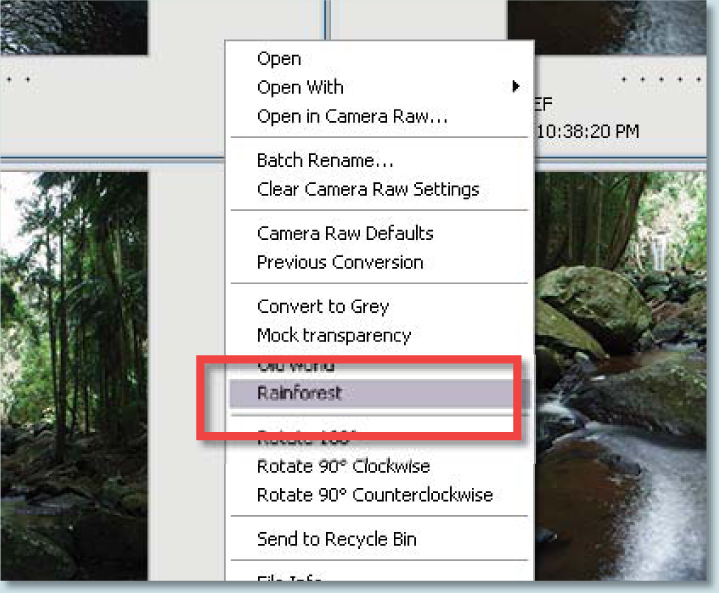
Photoshop users can take this multi-image processing idea a step further with the ability to apply saved Camera Raw settings directly to thumbnails from within Bridge. Development settings are listed in the pop-up menu that is displayed when you right-click a raw thumbnail in the Bridge workspace. The default options include Camera Raw Defaults and Previous Conversion. To apply these to an unopened raw file, simply right-click onto the thumbnail and select the entry from the pop-up menu. To set a new Camera Raw Default, open a file, make any adjustments and then click the sideways arrow button beside the Settings drop-down menu in the top right of the dialog and select the Save New Camera Raw Defaults option from the menu that is displayed. This records the current settings as the new defaults. To reset all the settings choose Reset Camera Raw Defaults from the same menu.
To store custom raw conversion values as new entries on the right-click pop-up menu, open an example file, make the changes necessary to achieve the look you want and then select the Save Settings entry from the pop-up menu. In the Save window that follows, you will get a chance to name the settings with a title that will become a new entry on the right-click menu. Now to apply these new custom raw conversion settings to a series of images, choose several thumbnails from within Bridge, right-click on one of the photos and select your custom settings entry from those listed. ACR will then apply the group of settings to all the selected photos and automatically update the thumbnails to reflect the changes.
Lightroom users don’t miss out on this efficient way to process multiple raw files. Simply make changes to a sample photo using the settings in the Develop module. Next, click the + button at the top right of the Presets dialog and save the settings as a new develop preset. To apply the saved settings to other images, multi-select the photos in the Grid View and then choose the preset from the Develop Settings menu on the right-click pop-up menu.
The Select All and Synchronize (Photoshop) options allow the user to apply the settings created for one file to a selection of other raw photos.
Lightroom users can apply Develop Setting Presets to multiple photos by selecting the pictures in the Grid View and then choosing the preset from the Develop Settings option on the right-click menu.

Managing saved settings in ACR and Lightroom

The Save Settings option in ACR is used to store a specific group of raw conversion values.
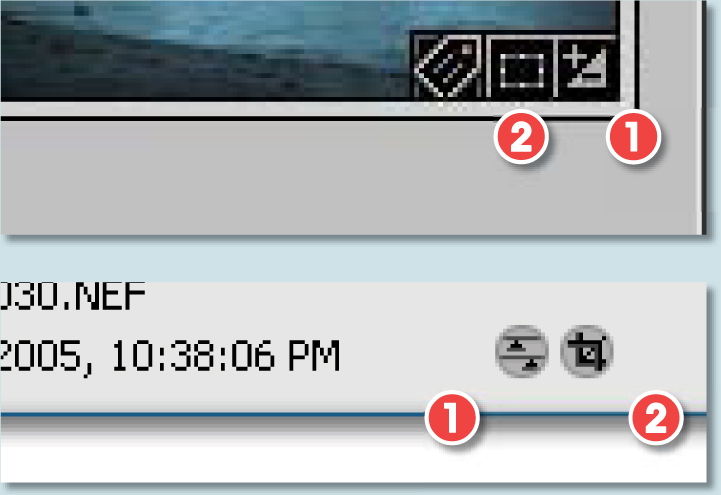
Raw settings (1) and cropping (2) icons are displayed on thumbnails in Bridge and the Lightroom Library when the picture has had conversion settings applied to the photo.

Save Lightroom develop settings to a new preset by clicking the + button in the top of the Presets panel and selecting the settings options to include.
In Bridge saved conversion settings can be applied to raw files by right-clicking the thumbnail and then selecting the setting entry from the menu list.
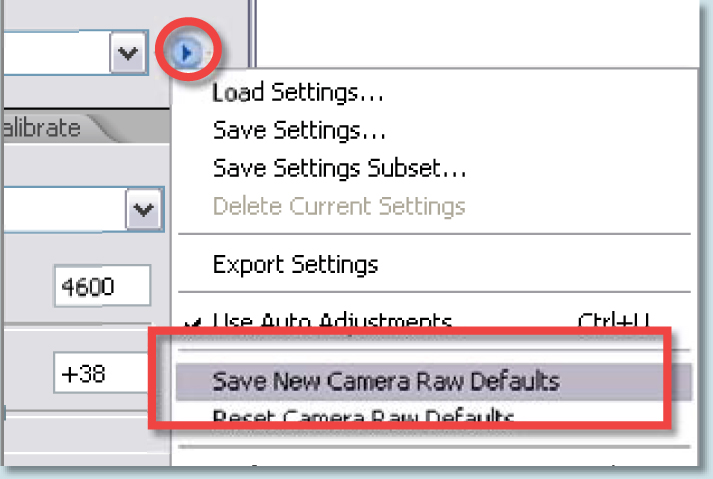
The Save New Camera Raw Defaults in ACR replaces the stored default settings with those applied to the currently selected photo.
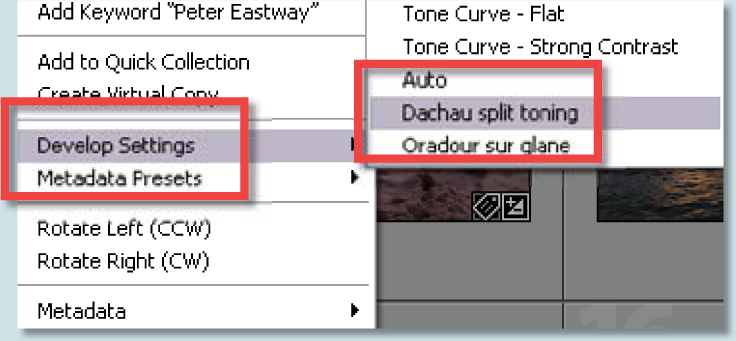
Apply Develop presets to selected images by either choosing the option from the Presets panel in the Develop module or by right-clicking a picture in the Grid View and then choosing the option from the Develop Settings menu.
Correcting color fringes and vignetting
Available in: ACR for Photoshop/Bridge and Photoshop Lightroom
The ultra-wide-angle lenses that are now available for many DSLR cameras can capture incredible angles of view, but in doing so some images from these lenses exhibit color fringing and vignetting problems.
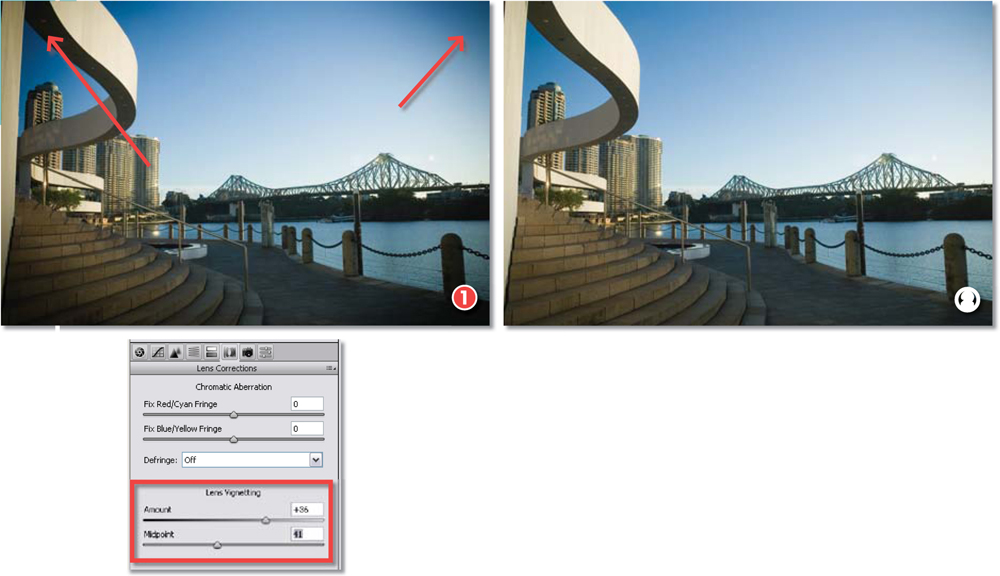
The fringing is the result of different wavelengths of light not being focused at the same position on the sensor. Known as chromatic aberration, the visual results of this lens defect is most noticeable on areas of contrast around the borders of the photo. Most users will see the problem as colored lines hugging the sides of edge detail. In the example image, there is distinct red/cyan fringing (1) visible along the main structural element in the photo. The Lens Correction section in both Adobe Camera Raw and Lightroom contains two sliders that are designed to reduce the appearance of chromatic aberration in your photos.
Use the Chromatic Aberration sliders in the Lens Corrections section of ACR or Lightroom to correct the color fringes that sometimes occur on photos taken with wide-angle lenses.
1. Before chromatic correction.
2. After chromatic correction.
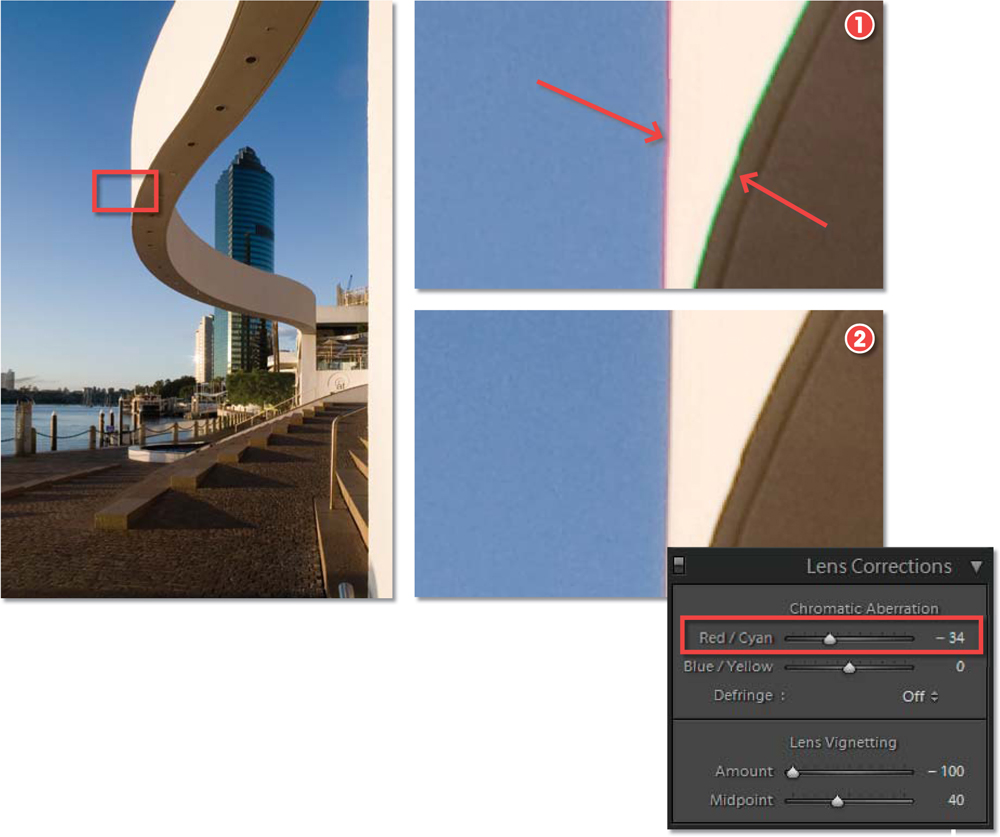
The feature contains two sliders, one that concentrates on Red/Cyan fringing and a second that works on Blue/Yellow fringes. To reduce the effects of this lens problem, zoom into the photo in the preview and navigate to a part of the picture where the colored lines are clear and easy to see. Now carefully move one of the sliders and watch the preview. Move the slider enough to reduce the effects of the fringing but be careful not to overcompensate and introduce fringing of the opposite color to your photo.
Vignetting is another visual effect that results from a lens problem. This time it is the lens’s inability to maintain even exposure across the whole sensor. This results in the darkening (sometimes lightening) of the corners of the frame. Now sometimes this effect can be artistic, and many photographers actually introduce a little vignetting into their photos as part of the enhancement process, but dark corners, when they are not wanted, are a problem.
Included alongside the Chromatic Aberration controls under the Lens Corrections section are two sliders that help counteract the vignetting effect. The Amount slider lightens the corners of a photo when moved to the right and darkens them when moved left. The Midpoint control adjusts the amount of the picture that the lightening or darkening is applied to. To reduce the vignetting in your photos drag the Amount slider until the brightness of the corners is similar to the rest of the picture then use the Midpoint slider to fine-tune the lightening effect so that the transition to the rest of the photo is even.
The darkening of photo edges or vignetting can be corrected with the aid of the Amount and Midpoint sliders in the Vignetting section of the Lens tab part of ACR. (1) Before vignette correction. (2) After vignette correction.