13
Organizing Raw Assets

With no film or processing costs to think about each time we take a picture, it seems that many of us are pressing the shutter more frequently than we did when film was king. The results of such collective shooting frenzies are hard drives all over the country full of photos. Which is great for photography but what happens when you want to track down that once in a lifetime shot that just happens to be one of thousands stored on your machine? Well, believe it or not, being able to locate your raw files quickly and easily is more a task in organization, naming and camera setup than browsing through loads of thumbnails.
This Canon camera, as do most raw-enabled cameras, provides options for selecting the way in which files are numbered. The continuous option ensures that a new number is used for each picture even if memory cards are changed in the middle of a shoot.

It starts in-camera
Getting those pesky picture files in order starts with your camera setup. Most models and makes have options for adjusting the numbering sequence used for the pictures you take. Generally you will have a choice between an ongoing sequence, where no two photos will have the same number, and one that resets each time you change memory cards or download all the pictures. In addition, many models provide an option for adding the current date to the file name, with some including customized comments (such as shoot location or photographer’s name) in the naming sequence or as part of the metadata stored with the file.
Search through the setup section of your camera’s menu system for headings such as File Numbering and Custom Comments to locate and change the options for your own camera.
Pro’s tip: Ensure that number sequencing and date inclusion options are switched on and where available append the metadata with the photographer’s name and copyright statement.
As we have already seen in Chapter 4 both the Adobe Photo Downloader, that comes bundled with Photoshop and Photoshop Elements, and the Import options in Photoshop Lightroom allow the user to automatically apply naming changes and to determine the location where transferred files will be saved.

And continues when downloading
As we have seen in earlier chapters most camera manufacturers, as well as producers of photo editing software, supply downloading utilities that are designed to detect when a camera or card reader is attached to the computer and then automatically transfer your pictures to your hard drive. As part of the download process, the user gets to select the location of the files, the way that the files are to be named and numbered, as well as what metadata will be included with the file.
It is at this part of the process that you need to be careful about the type of folder or directory structure you use. Most photographers group their images by date, subject, location or client. The approach that you employ is up to you but once you have selected a folder structure try to stick with it. Consistency is the byword of organization.
If your camera doesn’t provide enough automatic naming and metadata options to satisfy your needs, then use the downloading software to enhance your ability to distinguish the current images with those that already exist on your hard drive by including extra comments with the picture files.
Pro’s tip: Nominate and create a new directory for the downloaded photos. Add extra metadata captions, keywords, photographer and copyright details.
In addition to naming and location changes, metadata keywords can be added to groups of picture files as they are being downloaded using the latest version of Nikon’s transfer software (left). Keywords and pre-saved metadata templates can also be added in the Information to Apply section of the Lightroom Import dialog (below). These keywords and metadata entries can be used later to help locate pictures.

Organizing and searching software
Most image editing software contains file browsing features which not only provide thumbnail previews of your photos but increasingly contain options for attaching keywords, editing the image’s metadata as well as providing a variety of search mechanisms. Photoshop’s own file browser, Bridge, and Lightroom’s Library module both contain all of these functions and, when used in conjunction with the program’s label and rating options, provide a sophisticated method of organizing and locating files.
Even the latest version of Adobe’s entry-level image editing program, Photoshop Elements, employs such organizational concepts in its Organizer workspace. Here images are not just previewed as thumbnails, but can also be split in different Albums (previously called Collections), located as members of different groups or searched based on the keywords associated with each photo. Unlike a traditional browser system, which is folder based (i.e. it displays thumbnails of the images that are physically stored in the folder), Elements’ Organizer creates a catalog version of the pictures and uses these as the basis for searches and organization. With this approach it is possible for one picture to be a member of many different groups and to contain a variety of different keywords.
The Organizer workspace, or Photo Browser as it is sometimes called, in Photoshop Elements (Windows) provides an easy to use organizational tool complete with keyword tagging, album creation (previously called Collections) and cataloging, together with the proven editing abilities of the package.

Photoshop’s own super browser, Bridge, supplied with Photoshop from CS2, provides preview, search and customized view options, as well as the ability to add and edit the photo’s metadata and keywords, all from within the browsing window.

The Library module in Photoshop Lightroom contains a variety of ways to search for individual images or groups of photos. The Find panel provides a filtered search option based on metadata, EXIF or keyword text and date range.

Lightroom too provides substantial support for features that aid in the organizing of your photos. Centered around the Library module, users can add keywords and metadata entries in the Key wording and Metadata panels. As in Photoshop Elements, groups of photos can be divided virtually into Collections or sunsets of the main library. The same photo can be referenced in a variety of collections or image groups.
Individual files can be located in Lightroom via the collection, keyword tag, folder, metadata entry or with the sophisticated Find feature. Here the images displayed in the Grid View are progressively filtered according to the criteria (text and/or date range) entered in the dialog.
Both Extensis Portfolio and Fotoware Fotostation contain sophisticated cataloging, sorting, searching and displaying features and are firm favorites with professionals.

Moving beyond these included browsers are the dedicated organizational programs that take the cataloging, searching and attaching keywords idea to the next level. These stand-alone pieces of software range from those designed with the professional or dedicated amateur in mind and include products such as Extensis Portfolio and Fotoware Fotostation, to lower priced but still sophisticated offerings such as Apple’s iPhoto, Jasc Photo Album, Ulead Photo Explorer and the ever popular ACDSee. When considering any of these browsing products ensure that they are raw enabled and that the software supports the raw files that your camera creates.
Pro’s tip: Try using the organizational or browsing utilities that came bundled with your camera or those that are included in your photo editing software. When they prove not to be up to the challenge then move on to a dedicated organizational program.
Grouping and keyword strategies
The best way to group or catalog your pictures will depend a great deal on the way you work, the pictures you take and the type of content they include, but here are a few different proven methods you can use as a starting point.
• Subject: Photos are broken down into subject groups using headings such as family, friends, holidays, work, summer, night shots, trip to Paris, etc. This is the most popular and most applicable approach for most readers and should be the method to try first.
Readers who regularly submit their images to stock libraries or online stock services should contact the administration of these organizations and ask for a keyword subject list. Most libraries have a set list of descriptive words they use to organize their images. Using the same keywords will mean that your images will fit better into the management system of the library, be easier to find and will secure more revenue. Photojournalists are often required to categorize their photos according to the subject groupings published by the International Press Telecommunications Council or IPTC. Using the subject and topic headings recommended by the IPTC, called News Codes, allows for consistent keywording and makes your photos more easily found, and therefore more easily sold. Go to www.iptc.org/newscodes/ for the latest list of subject headings.
The International Press Telecommunications Council or IPTC manages a core set of subject keywords used by news organizations across the world to categorize their media content. You can download the latest list of these keywords, called News Codes, from the organization’s website, www.iptc.org.

• Time line: Images are sorted and stored based on their capture date (when the picture was photographed), the day they were downloaded or the date they were imported into the organizational package. This way of working links well with the auto file naming functions available with most digital cameras, but can be problematic if you can’t remember the approximate dates on which important events occurred. Try using the date approach as a subcategory for subject headings, e.g. Bill’s Birthday > 2007.
• File type: Image groups are divided into different file type groups. Although this approach may not seem that applicable at first glance it is a good way to work if you are in the habit of shooting raw files which are then processed into PSD files before use.
• Project: This organizational method works well for the photographer who likes to shoot to a theme over an extended period of time. All the project images, despite their age and file type, are collated in the one spot, making for ease of access.
• Client or job: Many working pros prefer to base their filing system around the way their business works, keeping separate groups for each client and each job undertaken for each client.
Most of the more sophisticated organizational software on the market allows you to allocate the same image to several different groups. Unlike in the old days, this doesn’t mean that the same file is duplicated and stored multiple times in different folders; instead the picture is only stored or saved once and a series of keywords (tags) or group associations are used to indicate its membership in different groups. When you want to display a group of images based on a specific subject, taken at a particular time or shot as part of a certain job, the program searches through its database of keywords or tags and only shows those images that meet your search criteria.
Pro’s tip: Find out how your organizational software categorizes pictures and then use these features to catalog, group or add keywords to your pictures. Where possible add multiple tags or keywords to the same picture to make it a member of several different groups.
The tags feature in the Organizer workspace of Photoshop Elements provides drag and drop subject organization for individual pictures. In this program one picture can have multiple tags and belong to several different albums or collections.

The Painter tool in Photoshop Lightroom can paste a range of settings onto images displayed in the Grid View. One option for the tool is the pasting of keywords.
Here the Keyword entry is selected from the dropdown Paint content menu before the photographer’s name is typed into the text box (on the right). Next, the Keyword is painted onto one or more images in the Grid View.

Now we can search
With the pictures named in-camera, downloaded to a structured set of folders, grouped, tagged, keywords attached and cataloged, we are all set for quick, easy and, more importantly, accurate searches of our picture archives. Depending on the software you may locate pictures based on adding a variable in a search dialog, selecting a keyword from a list, gradually filtering photos using a growing list of selection criteria, or clicking a group icon in a collections window. Whatever the approach, a little organization up front will work wonders when tracking down those elusive shots.
The Find dialog in Bridge has options for locating files based on the contents of the metadata. Here the pictures were located because the word ‘tivoli’ was used in their file names.

In action: Managing raw files within Bridge
By replacing the file browser found in previous versions of Photoshop with the full featured Bridge application, Adobe made a big change to the way that picture files were handled. Bridge is not just a tool for viewing your photos, it is a key technology in the managing, sorting and enhancing of those files. And this pivotal role is never more evident than when one is managing raw files. So with the general theory outlined in the previous section let’s look at the ‘nitty-gritty’ of the ways you can bring order to your raw files using Bridge.
Using keywords
As we have seen keywords are single-word descriptions of the content of image files. Most photo libraries use keywords as part of the way they locate images with specific content. The words are stored in the metadata associated with the picture. Users can allocate, edit and create new keywords (and keyword categories) using the Keywords panel in the Bridge browser and File Info palette in Photoshop.
Attaching keywords to your pictures means faster searching especially when your picture library grows into the thousands.

New keywords and keyword categories (set) can be added to the Keyword panel by clicking the New Keyword Set and New Keyword buttons at the bottom of the panel. Unwanted sets or keywords can be removed by selecting first and then clicking the Delete button. Unknown keywords imported with newly downloaded or edited pictures are stored in the panel under the Other Keywords set.
A quick method for adding a star rating is to click the space just below the thumbnail in Bridge.

Star ratings and colored labels can be applied to photos in Bridge using the options in the Label menu or the associated keystroke combination.

Rating and labelling files
One of the many ways you can organize the raw files displayed in the Bridge workspace is by attributing a label to the picture. In CS3/CS2 the labels option is supplied in two forms – a color tag, called a Label, or star rating, called a Rating. Either or both label types can be applied to any picture. The Label tag can then be used to sort or locate individual pictures from groups of photos.
Labels and/or ratings are attached by selecting the thumbnail(s) in the workspace and then choosing the desired label from the list under the Label menu. Keyboard shortcuts are also provided for each label option, making it possible to quickly apply a label to a thumbnail, or group of thumbnails, or you can quickly add star ratings by clicking beneath the thumbnail in the workspace. Labels can also be attached to pictures in Adobe Camera Raw and Slideshow features.
Raw thumbnails can be sorted and displayed in different ways in the Bridge workspace by selecting different entries from the View > Sort menu.

Sorting images
The thumbnails that are displayed in the Bridge workspace can be sorted and displayed in a variety of different ways.
By default the pictures are displayed in ascending order based on their file names but Bridge provides a variety of other options in the View > Sort menu. Most of the settings listed here are self-explanatory. Once a Sort entry is selected the workspace is automatically updated and the files reordered.
In addition, the following related features extend the control that you have over how your files are sorted for display:
• The Show options in the View menu,
• The Ratings and Labels features, together with the filtering options contained in the drop-down menu, at the top right of the Bridge workspace.
Finding files
One of the great benefits of organizing your raw pictures in the Bridge workspace is the huge range of search options that then become available to you. Selecting Find from the Edit menu displays the Find dialog. Here you will be able to nominate what you want to search for, the criteria for the search, which folder you want to search in, what type of metadata to search and finally what to do with the pictures that match the search criteria.
To locate pictures with specific keywords, input the text into the Find feature in Bridge, setting Keywords as the location for the search.
A huge variety of search criteria can be used for the search. For many tasks, those listed in the Criteria drop-down menus are all that is needed, but for complex find operations it is possible to add multiple search criteria in the same dialog.

The Find command also displays a subset of the total images in a library. Images are selected for display if they meet the search criteria input via the Find dialog.

To form a search based on a rating level, select the Edit > Find feature and choose Rating, equal to, greater than, less than and the star value as the criteria.
The Find dialog provides the ability to search based on Rating as an alternative to the options located in the Filter drop-down menu.

Metadata panel
The Metadata panel in Bridge displays a variety of information about your picture. Some of this detail is created at time of capture and other parts are added as the file is edited. The metadata includes File Properties, IPTC (copyright and caption details), EXIF (camera data), GPS (navigational data from a global positioning system), Camera Raw settings and Edit History. To display the contents of each metadata category click on the side-arrow to the left of the category heading.
The data displayed in this palette, such as the copyright, description, author and caption information, can be edited here or via the File > File Info dialog in Photoshop and the range of content types displayed in the palette is controlled by the selections in the Metadata Preferences in Bridge (Edit > Preferences > Metadata).
The Metadata panel displays the metadata info stored with the picture file. It is a rich source of image and EXIF details.

Users can enter custom metadata details via the File Info dialog (File > File Info) in Photoshop or the Metadata panel in Bridge.

As well as entering metadata details image by image, a set of details can be saved and added to groups of files via the options available in the sideways arrow menu (top right) of the File Info dialog.

Metadata Templates
The metadata options in CS3/CS2 also allow users to create and apply groups of metadata settings to individual or groups of files. The settings are created, saved and applied as a metadata template. This functionality really speeds up the management of the many files taken during shooting sessions, all of which need to have shoot, location, client and copyright details attached.
In Photoshop: To create a template, open an example image in Photoshop and then display the File Info dialog. Add your own details and information into the editable areas of the various data sections in the dialog. Next, select the Save Metadata Template option from the pop-up menu that appears after pressing the sideways arrow at the top right of the dialog.
Using Bridge: You can also create a Metadata Template in Bridge. Start by selecting the Create Metadata Template option from the pop-up settings menu (accessed by clicking the settings icon in the top right of the Metadata panel). Add specific entries in the Create Metadata Template dialog. Add a name for the template and then click the Save button.
Saved metadata templates can be accessed either via the File Info dialog in Photoshop or with the settings menu in the Metadata panel in Bridge.

The new template will be added to the template list, allowing you to easily append existing details in Photoshop by opening the picture’s File Info dialog and selecting the template from the pop-up menu. The same template can be applied to several pictures by multi-selecting the thumbnails first and then choosing the desired template from the list available in the pop-up menu in the Metadata panel in Bridge.
The template files that you create are stored in XML format and are saved to a Metadata Templates folder in Documents and SettingsUserApplication DataAdobeXMP for Windows machines.
Like a lot of settings used for image processing in Photoshop, Bridge and Lightroom, the metadata templates that you save are stored as individual files in the XML format.

Some basic filtering options can be found in previous versions of Bridge with the entries in the drop-down Filter menu. The choices here provide a mechanism for adjusting the subset of pictures being displayed based on their Labels or Ratings.

Live filtering
In yet another technique for locating individual images, or groups of files, the entries in the Filter panel of Bridge can be used to sort images displayed in the content area of the program.
The panel displays a range of information about the images currently being displayed. The panel entries change according to the characteristics of the folder currently selected. If all the photos in the folder are of the same file type, for instance, there will be no File Type heading displayed. If both JPEG and DNG files are present then the File Type heading will appear with two filter entries – JPEG and DNG.
Selecting a heading in the panel automatically filters the images being displayed so that only those with the selected characteristic are left. Picking another entry refines the display further to only those images containing both selected characteristics. This is a very fast method for sorting through your images.
At the top left of the Filter panel is the View Subfolders/View Current Folder only toggle button. Select this option to display images in the current folder and any subfolders. On the right side is a Sort by dropdown menu providing a range of options for the way that the results are displayed.
At the bottom left of the panel is the Keep Filtering while Browsing button, that maintains the current filter selections even when changing the folders being viewed. On the right is the Clear Filter button, which the user chooses to remove all current filter selections.
The Filter panel in Bridge 2.0 provides the ability to progressively filter the current displayed folder of images using file type as one of its criteria.

In action: Managing raw files in Lightroom
Unlike Photoshop, which uses a sister program, Bridge, for the bulk of its organization and management tasks, Lightroom keeps these activities in-house and centers them around the Library module. In fact, this ‘all included’ approach is one of the main reasons that many photographers are switching to a Lightroom-based workflow. Let’s look at how to perform some of the basic management tasks in the program.
Applying keywords
To add a keyword to a photo selected in the Grid View, or in the Filmstrip area of the dialog, either type the keyword directly into the Keyword Tags area of the Keywording panel (multiple keywords can be added with a comma separating each entry), or click the + button at the top of the Keyword Tags panel and input the keyword here.
The Create Keyword Tag dialog is displayed after clicking the + button at the top right of the Keyword Tags panel.

Add specific metadata details to several photos at once by selecting them first in the Grid View and then typing in the information in the Metadata panel.

Once a new keyword is added to the Keyword Tags panel you can apply the word by selecting the image (or images) in the Grid View and then choosing the Assign this Keyword to Selected Photo option. This option is available from the menu that is displayed when right-clicking the keyword entry in the Keyword Tags panel.
Also available on the same menu is the option to Use this as Keyword Shortcut. Selecting this option holds this specific keyword in memory, allowing the user to apply it by choosing images in the Grid View and pressing the K key.
Sets of keywords can be imported into Lightroom by selecting Metadata > Import Keywords and then browsing for the text file containing the words. Keywords used in a different Lightroom Catalog can also be imported in this way. After importing the keywords become Keyword Tags and appear in the Keyword Tags panel.
Adding metadata
The Metadata functions in Lightroom pivot around the Metadata panel. Both fixed (EXIF data from the camera) and custom metadata entries are listed in the panel. Entry types that allow users to input their own text are displayed with text boxes next to the entry. Adding details on a picture-by-picture basis is possible by selecting the photo and then typing in the metadata content directly into the panel. To add the same entry to several files, simply multi-select the images in Grid View and then input the metadata details.
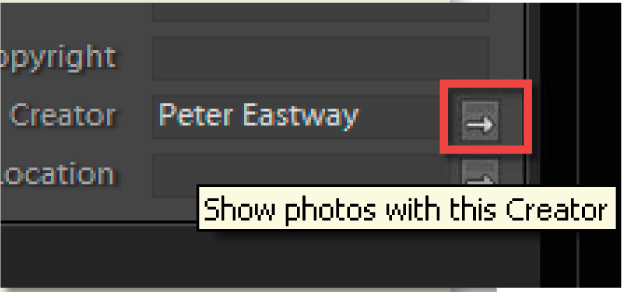
The latest version of Lightroom includes extra options in the Metadata panel for large captions, location, email and URLs. Also, extra functions have been added in the form of action buttons on the right of the metadata fields.
The new buttons on the right of the metadata fields in the Metadata panel automate a range of associated actions. Here clicking the button next to the Creator field will automatically display all photos, with this person listed as the creator.
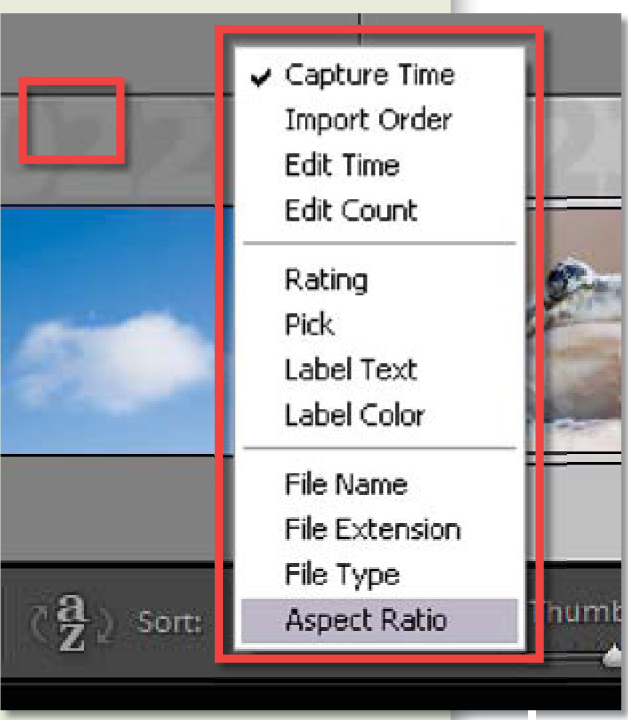
Sorting files
The order that photos are displayed in the Grid View of Lightroom is controlled by the Sort setting. To change the order simply select a different option from those listed in the Sort menu located in the Library toolbar. The direction, ascending/descending, the images are displayed in using the sort criteria from the menu can be switched via the Sort Direction button, which is also located in the toolbar.
Searching
The Find panel in Lightroom provides two distinct ways to search for photos. The first is by using text input by the user. Using the drop-down Text menu at the top of the panel you can nominate where to search (filename, title, keywords, ITPC, EXIF, anywhere, etc.) and what type of search rule (contains, contains all, doesn’t contain, etc.) is applied during the process. The actual text used for the search is input at the bottom of this part of the panel. Lightroom filters the displayed photos and presents the results of the search in Grid View. By selecting the Date search options as well, in the section below the text area, you can further refine the search process.
Images displayed in the Grid View are arranged based on criteria selected in the Sort menu on the Library module’s toolbar. The order or direction, ascending or descending, is changed by clicking the Sort Direction button to the left of the menu.
Filtering the display
Like the Filter panel in Bridge, Lightroom filters the images displayed in the Grid View of the Library module as you select different criteria. Filtering is like performing a search live. The subset of images that are presented at the end of the filtering process may be the result of setting several different criteria across a range of panels.
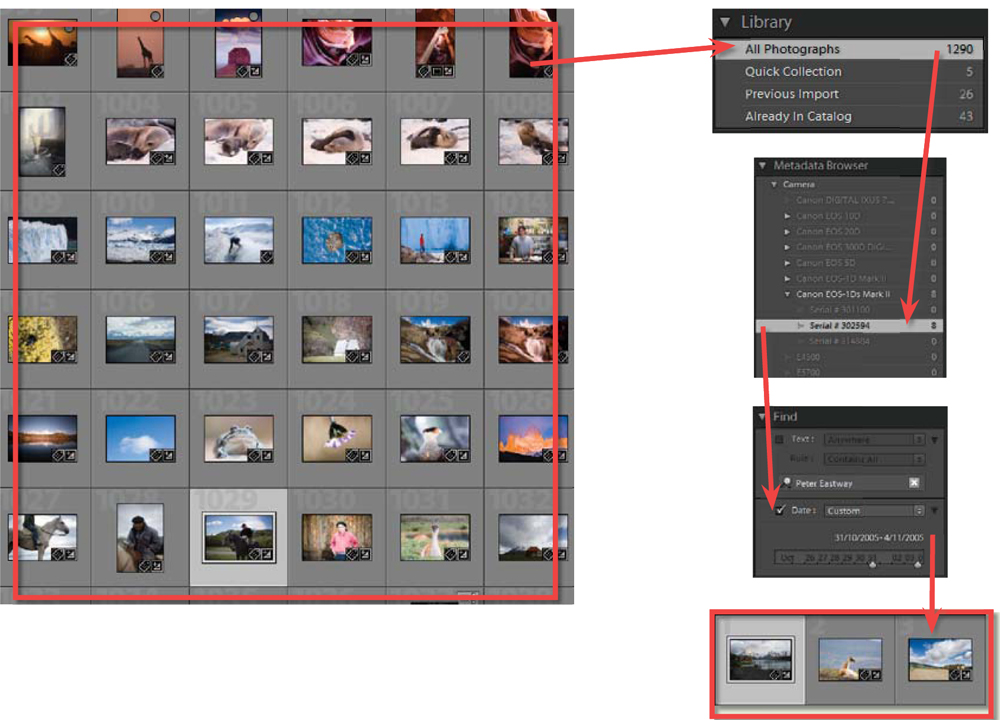
For instance, you may start the filtering process by making sure that your whole collection of photos available. To do this you would select the All Photographs option from the Library panel. Next you may want to narrow the display to only those images captured with a particular camera. Filter out the others by selecting a specific camera model under the camera heading of the Metadata Browser. Lastly, you want to narrow the search to only the images captured over a specific time period. For this filter, use the Date section in the Find panel. In this example, with just three filter criteria, and in a matter of seconds, it has been possible to reduce the number of images displayed from over a thousand to just three. This is the power of the Lightroom filtering approach in practice.
When selecting options in the Metadata Browser Library or Find panels, Lightroom automatically filters the images displayed in the Grid View. Here over a thousand photos have been reduced to three with just a few clicks.