
10
Lossless Image Enhancement Comes of Age

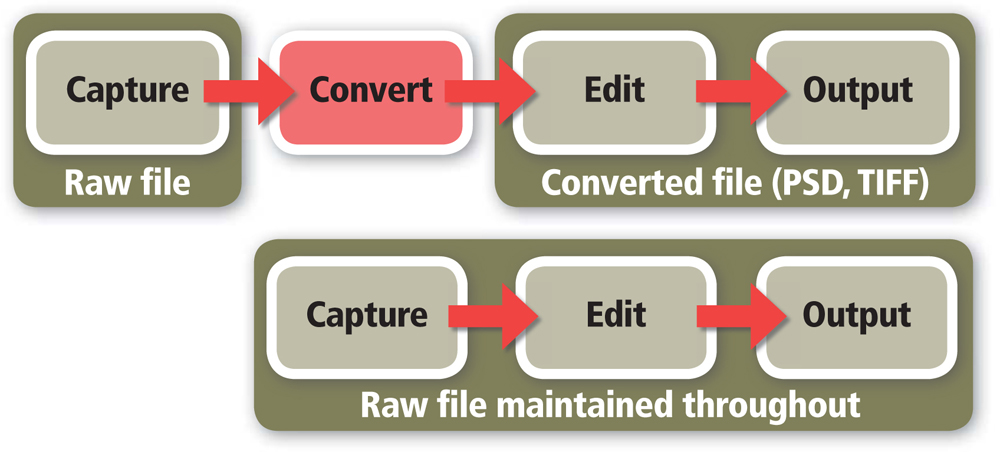
As we have already seen in Chapter 2 the current state of play for photographers who want to take their image processing a little further than what is available with most dedicated raw programs involves a ‘Convert and then Edit’ approach. The conversion step is handled by a dedicated raw utility such as Adobe Camera Raw, or Lightroom, and the editing operations fall to Photoshop. But this way of working doesn’t take full advantage of the possibilities that abound in the area of non-destructive or lossless editing.
For years photographers have advocated using a non-destructive editing workflow whenever possible. On a simple level, this meant applying changes to images in Photoshop via adjustment layers, rather than altering the original pixels themselves. Until recently, no matter how much a photographer wanted to adopt a non-destructive editing workflow the first step was to convert the raw file from its original state (image data taken from the sensor with little processing applied) to a picture format that enabled further processing. Sure, from this point forward, it was possible to make use of non-destructive editing techniques, but these changes were made to the converted file, not the original raw picture.
Well, thankfully, ‘times are a changin’’. Companies such as Adobe have taken up the challenge and have started to create non-destructive editing options for raw shooters that maintain the integrity of the original raw file throughout the editing process. With dedicated programs such as Adobe’s Lightroom, and new ‘Smart raw-aware’ workflows in Photoshop, the future for raw shooting photographers is looking decidedly rosy.
True lossless image editing comes about with a workflow that maintains the raw file throughout, rather than the ‘Convert then Edit’ approach.
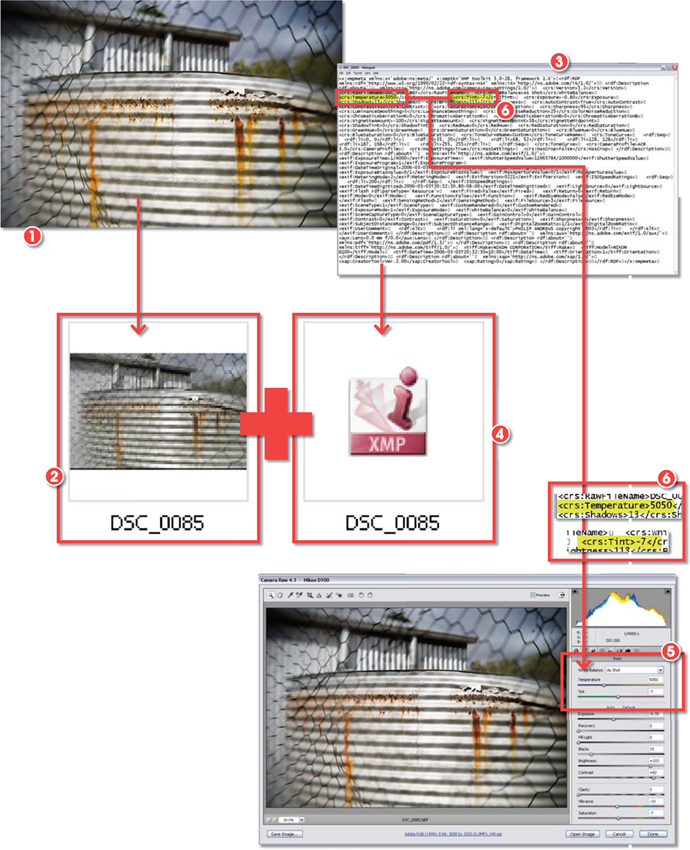
With Adobe’s approach to non-destructive editing of raw files the primary picture data or raw photo (1) is maintained in the original file (2) whilst the conversion settings (3) are stored in a separate XMP file (4) or in the Camera Raw Database (ACR) or Lightroom database.
The specific values (5) used for raw conversion are saved as text entries and in the case of Adobe Camera Raw these are stored in the XML sidecar file (6).
But how does it work?
Providing a workflow that is non-destructive is pretty tricky, but how do the software developers actually make the process work? Well, the underlying principle of the approach is to maintain the original raw files as a separate entity from the conversion and editing settings that are applied to the picture. With Adobe’s system these conversion, or ‘Develop’, settings are stored separately from the picture data, often in an XML (Extensible Markup Language) file that is named the same as the picture itself. More recently, it has also become possible to write the settings to the metadata section of the image file itself. This is necessary if the development settings are to be recognized in a different program to the one in which the photo was originally enhanced.
When making adjustments to the look of your files inside Adobe Camera Raw, or Photoshop Lightroom, the settings you select are not applied to your files directly. Instead, they are stored with the image file, either in a small associated sidecar file or in the metadata section of the image file, and are used to display a preview of the developed file on screen. It is necessary to select the ‘Automatically write changes in XMP’ in Lightroom’s Catalog Settings to ensure that Develop changes are recognized by other programs.

Check this out yourself. Have a look at the folders containing pictures that have been processed through Adobe Camera Raw (ACR); you will see a series of XML files associated with the raw files. The XML file is essentially the full set of conversion settings that were selected in ACR at the time of processing. When the raw file is reopened, ACR uses these values to automatically set up the dialog’s controls as well as adjust the preview of the raw photo so that it matches how the picture will look when processed. Making a change to conversion settings, such as white balance, exposure or saturation, merely adjusts the appropriate entry in the settings file, which in turn updates the preview in the ACR dialog and the thumbnail displayed in Bridge.
Working this way means that the original raw file data are never destructively changed. The settings can always be altered at a later date, or even removed, without any loss of quality – it is, if you like, the ultimate form of ‘Undo’.
Note: This method of providing a live preview of how the image looks with the conversion settings applied is one of the reasons why some full workflow programs require substantial system resources (processor and video power as well as high levels of available RAM) to function quickly.
Smart workflows
Starting with Photoshop CS2 and continuing with CS3 Adobe has been developing an editing system that is sufficiently ‘raw aware’ that it is now possible to continue non-destructive editing of the raw file beyond the conversion software. Instead of converting the image in order to undertake localized editing tasks, the use of powerful Smart Object technology enables the raw file to be embedded in a Photoshop document, where it can be edited and enhanced pretty much like any other photo.
The Smart Object technology in Photoshop CS3, including the new Smart Filter system, provides the ability to embed raw files into Photoshop documents.
Once in this form, the user can make further editing changes to the image that are not possible when working with the file in Adobe Camera Raw or Lightroom.
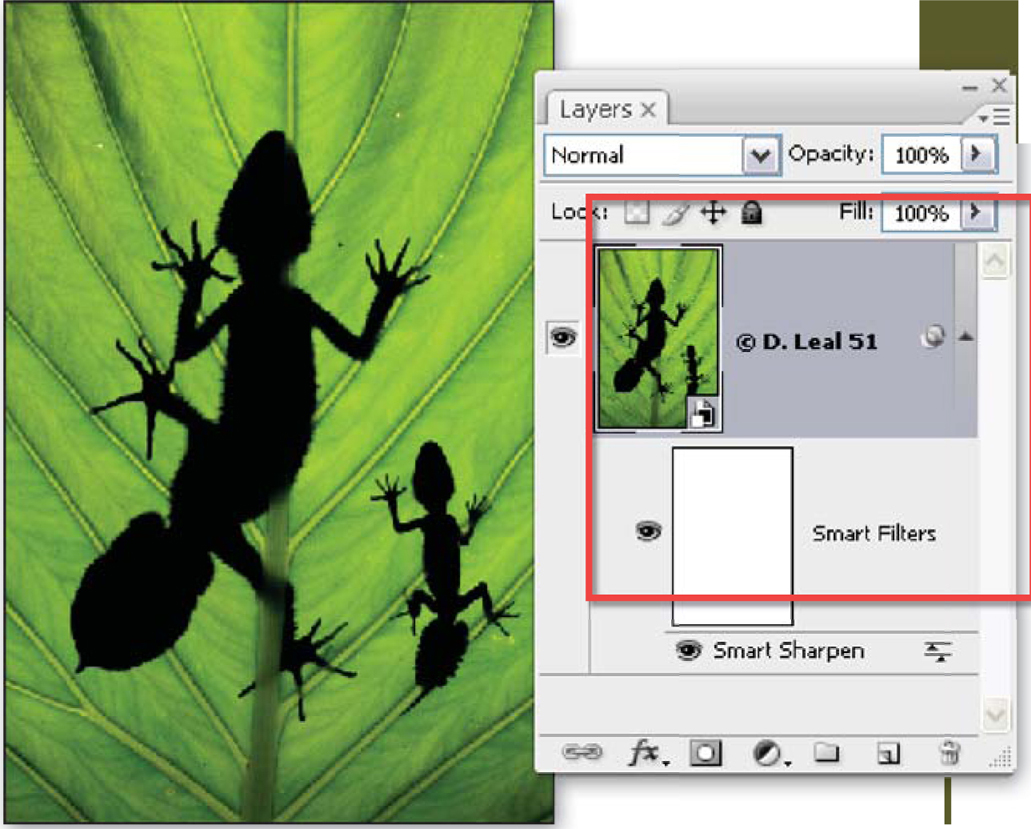
The embedding process ensures that you can re-open the raw file at a later date and can change the Develop settings that you initially applied. Sure, there are some tasks that still require conversion of the file to a standard photo format such as PSD, TIFF or JPEG, but in many other cases, simple Smart Object-based workflows will get the job done.
What happens when I want to print or create a slideshow?
Okay, that is editing, what about the output side of things? Unfortunately raw files cannot remain so forever. By their very nature the act of printing, or presenting photos on screen, requires a change in the picture’s state. This means at some stage the raw file will be converted to a standard format that is suitable for output.
With full raw workflow packages like Photoshop Lightroom, that contain print, slideshow and web gallery production options, the raw file is duplicated with development settings applied and then sent to the printer or screen or used to produce the thumbnail and gallery photos for online work. Because of the sophistication of the Lightroom workflow the user is blissfully unaware of the mechanics involved in the output sections of the program.
When creating a web gallery using Photoshop Lightroom’s Web module, the program seamlessly creates web-ready versions of the raw files with all Develop settings applied.

When working with Bridge and Photoshop it is also possible to retain the original embedded raw file during the enhancement process and then use the tools in Photoshop to make the necessary conversions when printing or creating a web gallery or presentation.
State of play
Over the next couple of chapters we will look at the current state of play for photographers who want to maintain their raw files but still be able to manage, manipulate and output these pictures as easily as if they were stored in more traditional formats (PSD, TIFF or JPEG). In particular we will look at the workflows and techniques associated with Bridge, Photoshop and Lightroom.