
14
Protecting Raw Files

Even in this era of alleged ‘increased masculine sensitivity’ it is a difficult thing to watch a grown man cry. But recently I had to witness such a spectacle when a professional photographer friend of mine related his story of the crashing of his hard drive and the loss of 5 rs’ worth of images. When I enquired whether he kept backups, the onse said it all, a blank expression followed by a growing awareness an opportunity missed. Ensuring that you keep up-to-date duplicates of all your important pictures, both the original raw files as well as any working documents derived from them, is one of the smartest work habits that the digital photographer can adopt.
Decide what to back up
Ask yourself ‘What images can’t I afford to lose – either emotionally or financially?’ The photos you include in your answer are those that are in the most need of backing up. If you are like most image makers then every picture you have ever taken (good and bad) has special meaning and therefore is worthy of inclusion. So let’s assume that you want to secure all the photos you have accumulated.
Organizing your files is the first step to guaranteeing that you have backed up all important pictures. To make the task simpler store all your photos in a single space. This may be a single drive dedicated to the purpose, or a ‘parent’ directory set aside for image data only. If currently your pictures are scattered across your machine then set about rearranging the files so that they are stored in a single location. Now from this time forward make sure that newly added files or older images that you are enhancing or editing are always saved back to this location.
Organizing your image files into one central location will make it much easier to back up or archive all your pictures in one go.

Pro’s tip: Ensure that all your picture assets are organized and stored in a single location.
Most CD or DVD writing software has multi-disk spanning features built in. This technology allows you to archive large numbers of files across several disks without the risk of losing data.

Making your first backup
Gone are the days when creating a back up of your work involved costly tape hardware and complex server software. Now there are a variety of simpler ways to ensure that your files are secure.
1. Create duplicate CD-ROM or DVD disks
The most basic approach employed by many photographers is to write extra copies of all imaging files to CD-ROM or DVD disk. It is easy to create multi-disk archives that can store gigabytes of information using software like Roxio Creator Classic or Toast. The program divides up the files into disk size sections and then calculates the number of blanks needed to store the archive. As each disk is written, the software prompts the user for more disks and sequentially labels each DVD in turn. In this way whole picture libraries can be stored on a set of disks.
2. Back up from your editing program
Photoshop Elements, Photoshop (in conjunction with Version Cue) and Photoshop Lightroom all have backup options built in.
The Backup Options built into the Organizer workspace of Photoshop Elements for Windows creates an archive of all the files you have in your catalog via an easy to use step-by-step wizard.
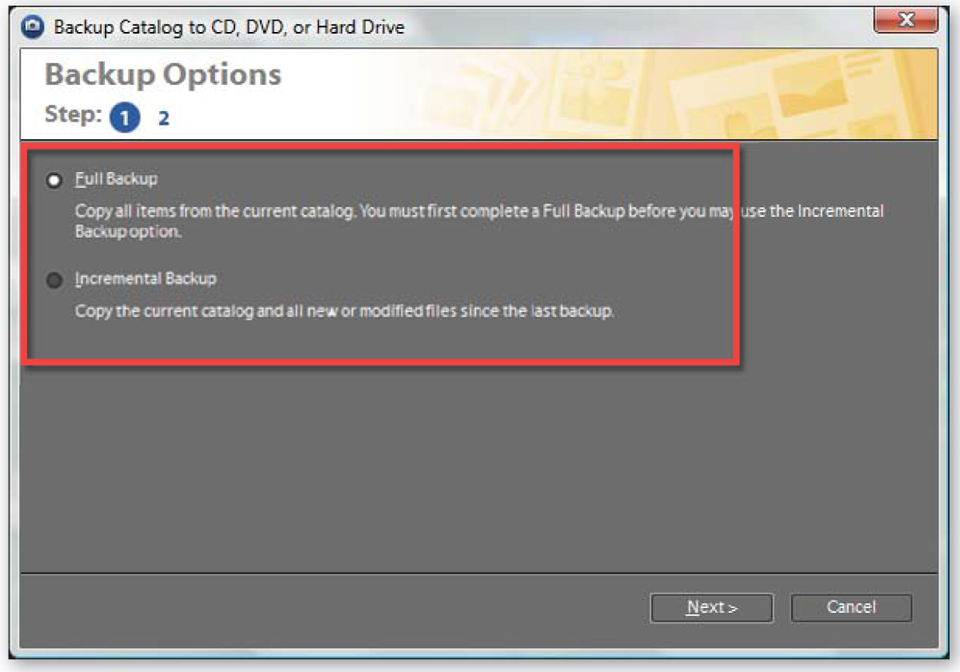
The Backup feature (Organizer: File > Backup) in Organizer in the Windows version of Elements is designed for copying your pictures (and catalog files) onto DVD, CD or an external hard drive for archiving purposes.
To secure your work simply follow the steps in the wizard. The feature includes the option to back up all the photos you currently have cataloged in the Organizer along with the ability to move selected files from your hard disk to CD or DVD to help free up valuable hard disk space.
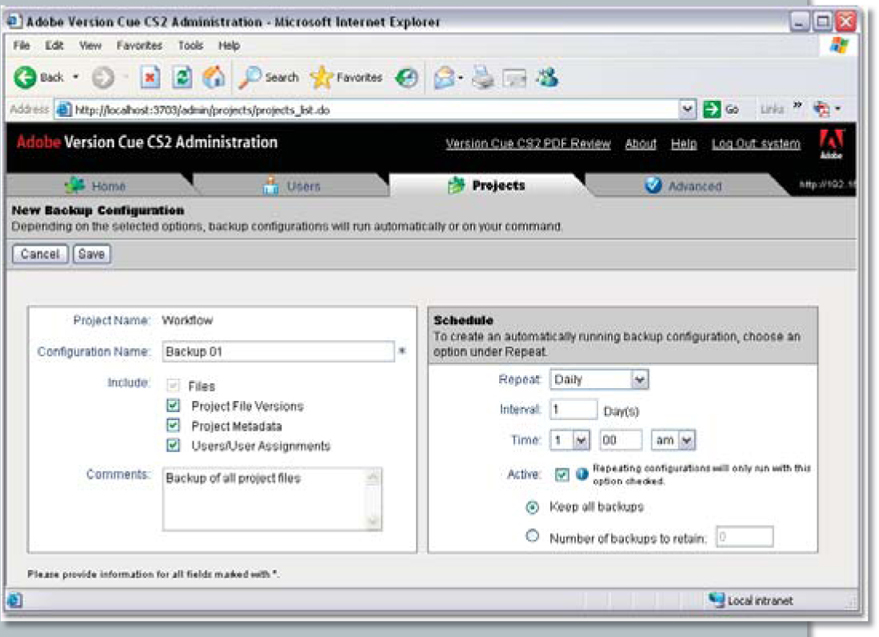
The Version Cue program, which ships as part of Adobe Creative Suite, can automate the backup of Photoshop projects via the settings in the Administration component of the program.
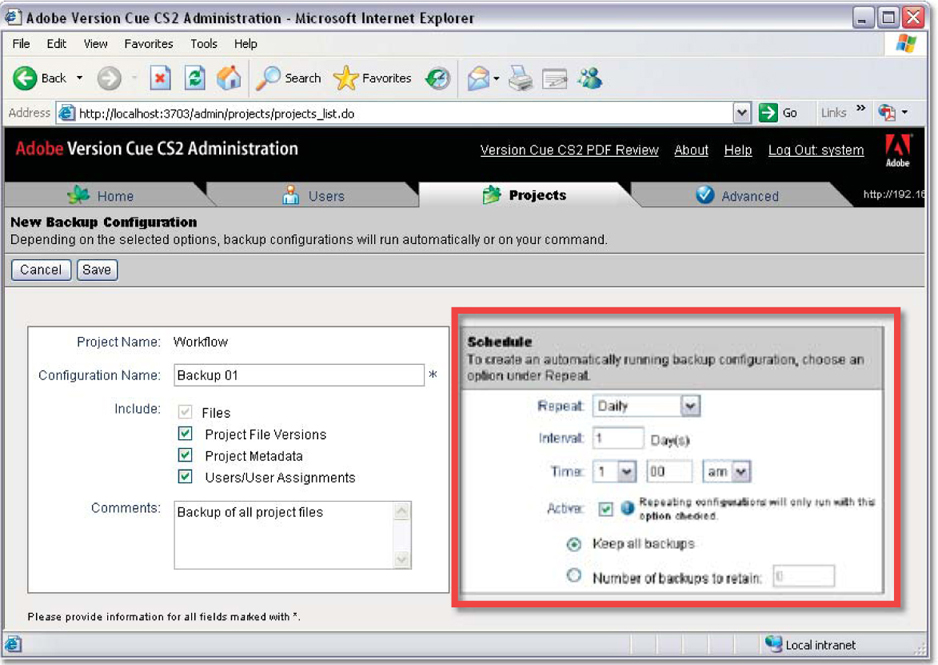
Adobe has also included sophisticated backup options in its Creative Suite release. By placing your Photoshop files in a Version Cue project you can take advantage of all the archive features that this workspace provides.
Backups are created via the Version Cue Administration screen. Here individual archive strategies can be created for each of your projects with the user selecting what to back up, where the duplicate files will be saved and when the automated system will copy these files.
Lightroom contains a sophisticated backup system that copies its catalog files to a specific Backup directory when Lightroom starts up. Users can nominate how often the automatic backups will be performed in the Catalog Settings dialog.

Lightroom also takes the task of keeping your catalog and image files safe very seriously. Ensuring that your files are safe is a two-step process. Let’s look at the catalog files first. The program contains an automated Catalog backup system that you can schedule to run either at regular intervals, or each time Lightroom starts.
When the backup option is selected the Back Up Catalog dialog is displayed when Lightroom first opens. The user has the option to perform the backup, skip the backup, or reschedule the backup for one week’s time. The dialog also contains an option to select the backup directory and a setting to instruct Lightroom to perform an integrity check on the catalog at the same time as backing up.
The scheduling options for the Backup system in Lightroom are located in the Catalog Settings dialog (File > Catalog Settings). Choose when the system functions from the list available here.

Use the Backup option in the Import dialog to make duplicates of the raw files that you download to Lightroom.

The second part of the Lightroom backup process is making sure that your raw photos are archived as well. Backing up the catalog doesn’t copy the image files to the backup directory, it just archives the database of Develop settings and saved metadata associated with these files.
Lightroom provides the opportunity to back up the originals raw photos when first importing the pictures into the program. By selecting the backup option in the Import dialog you can choose where Lightroom will make and store a duplicate version of the files as it imports the pictures into the program. You can even nominate a portable hard drive as the default backup medium for importing photos just as long as the drive is connected at the time of downloading.
When working with files stored on DVD disks, select the ‘Copy photos to a new location and import’ option from the File Handling section of the Import dialog.

If you are working with photos that have already been downloaded to you computer or network, the same Backup option is available in the Import Photos from Disk dialog. If your workflow includes writing the original photos to a DVD before importing then it is possible to select the ‘Copy photos to a new location and import’ option in the File Handling section of the dialog. This setting makes a copy of the DVD files and stores them on your system before import.
With both the catalog and the original image files backed up, your Lightroom library should be secure as you can always re-import the image and catalog files.
3. Use a dedicated backup utility
For the ultimate in customized backup options you may want to employ the abilities of a dedicated backup utility. Until recently many of these programs were designed for use with high-end networked environments and largely ignored the smaller home or SOHO users, but recent releases such as Roxio’s BackUp MyPC, Retrospect or SupewrDuper on the Mac, are both affordable and well suited to the digital photographer. The program provides both wizard and manual approaches to backing up your photos, includes the option to compress the archive file and gives you the choice of Full (all files duplicated) or Incremental (only backs up changed files since last backup) backup types.
Pro’s tip: Use a backup solution that fits your budget as well as the way you work.
Dedicated backup software such as BackUp MyPC generally provides more features than the archive options built into other programs.

Back up regularly
There is no point having duplicate versions of your data if they are out of date. Base the interval between backups on the amount of work you do. In heavy periods when you are downloading, editing and enhancing many images at a time, back up more often; in the quieter moments you won’t need to duplicate files as frequently. Most professionals back up on a daily basis or at the conclusion of a work session.
Pro’s tip: The quality of your protection is only as good as the currency of your archives.
Store the duplicates securely
In ensuring the security of your images you will need to protect your photos not only from the possibility of a hard drive crash, but also from such dramatic events as burglary and fire. Do this by storing one copy of your files securely at home and an extra copy of your archive disks or external backup drives somewhere other than your home or office. I know that this may sound a little extreme but swapping archive disks with a friend who is just as passionate about protecting their images will prove to be less painful than losing all your hard work.
Pro’s tip: Make sure you keep a second archive set off site as insurance against fire and theft.
The DNG or Digital Negative file format is an open source raw file format that Adobe designed to try to bring some stability and capability to the area.

Which format should I use for backups?
After reading the bulk of this book it should be plain to see that the raw format has many advantages for photographers, offering greater control over the tone and color in their files, but unfortunately there is no one standard available for the specification of how these raw files are saved. Each camera manufacturer has their own flavor of raw file format. This can make the long-term management of such files a little tricky. Backing up the original files is great, but what happens if, over time, the specific format used by your camera, and archived by you faithfully, falls out of favor and is no longer supported by the major editing packages? Will you be able to access your picture content in the future?
Adobe developed the DNG or Digital Negative file type to help promote a common raw format that can be used for archival as well as editing and enhancement purposes. The company hopes that the specification will be adopted by the major manufacturers and provide a degree of compatibility and stability to the raw format area. At the moment Hasselblad, Leica, Ricoh and Samsung have all produced cameras that capture in the DNG format, with more predicted to follow.
Adobe has included DNG output options in both Photoshop CS2 and Photoshop Elements 4.0, and other software producers, such as Apple (via Aperture), also provide DNG output options. In addition, Adobe also provides a DNG Converter that can change many proprietary Camera Raw formats directly to DNG. The converter is free and can be downloaded from www.adobe.com.
In addition to providing a common raw file format, the DNG specification also includes a lossless compression option which, when considering the size of some raw files, will help reduce the space taken up with the thousands of images that photographers accumulate.

Saving DNG – To save your raw files in the DNG format, select this option as the file type when saving from the Adobe Camera Raw utility or other software with DNG save options.
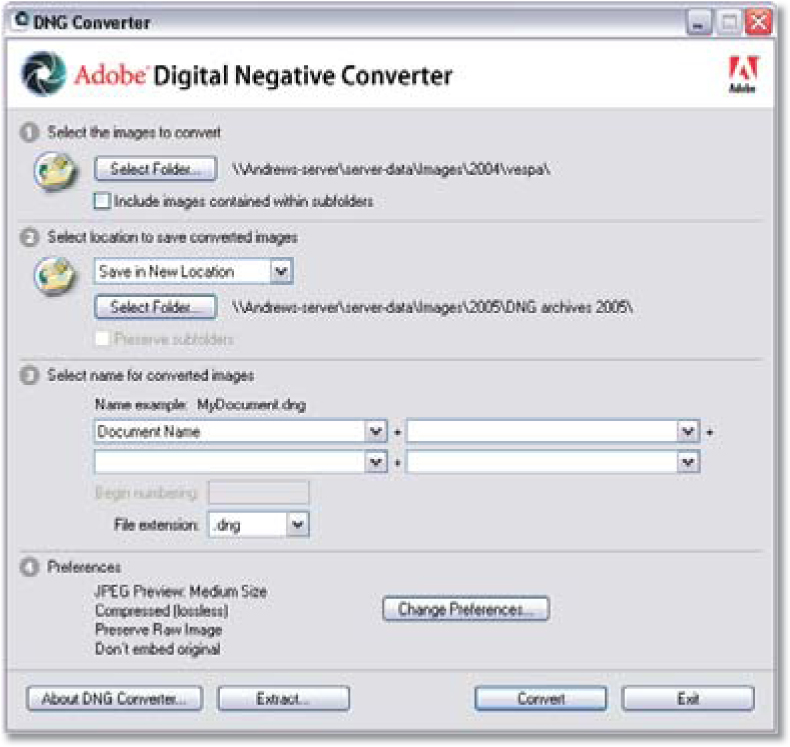
The DNG Converter – Alternatively, multiple files can be converted to the DNG format using the free DNG Converter which is available as a download from www.adobe.com. After launching the utility select the source and destination directories and determine the name and extension to be used with the converted files. The last setting in the dialog is the Change Preferences button. Click here to alter the default settings used for the conversion.

Embedding raw – The current version of the DNG Converter offers the option to embed the original raw file within the DNG conversion. This action will cause the resultant file to be larger, as it will contain two forms of the picture, but it does provide an added sense of security knowing that you can extract the original file at a later date.
Backup jargon buster
Multi-disk archive – A process, often called spanning, by which chunks of data that are larger than one disk can be split up and saved to multiple CD-ROMs or DVDs using spanning software. The files can be recompiled later using utility software supplied by the same company that wrote the disks.
Version Cue – Version Cue and the backup features it includes is included free when you purchase the Adobe Creative Suite 2 and is not supplied when you buy Photoshop CS2 as an individual product.
Full backup – Duplicates all files even if they haven’t changed since the last time an archive was produced.
Incremental – Backs up only those files that have changed since the last archive was produced. This makes for faster backups but means that it takes longer to restore files as the program must look for the latest version of files before restoring them.
Restore – Reinstates files from a backup archive to their original state on your hard drive.
Backup hardware options
CD-ROM or DVD writer – This option is very economical when coupled with writing software that is capable of writing large numbers of files over multiple disks. The sets of archive disks can easily be stored off site, insuring you against theft and fire problems, but the backup and restore process of this approach can be long and tedious. New optical formats such as Blu-Ray, and HD-DVD, although relatively new will gradually become the default standard fro mass archiving.

Internal hard drive – Adding an extra hard drive inside your computer that can be used for backing up provides a fast and efficient way to archive your files, but won’t secure them against theft, fire or even some electrical breakdowns such as power surges.

External hard drive – Connected via USB or Firewire, these external self-contained units are both fast and efficient and can also be stored off site, providing good all-round protection. Some, like the Maxtor One Touch models, are shipped with their own backup software. Keep in mind that these devices are still mechanical drives and that care should be taken when transporting them.

Online or web-based backup – Not a viable option for most image makers as the number of files and their accumulative size make transfer slow and the cost of web space exorbitant.
Versioning your edits – ‘on-the-fly’ backups
Backing up on a whole system level is pretty obvious but what about applying the same ideas on a file-by-file basis? In this section we look at a sure-fire method for protecting your files from accidentally being overwritten in the editing process.
Save me from myself
OK, here goes. I’m going to make an embarrassing confession but please keep it just between ourselves. Occasionally, yes that means not that often, I get so involved in a series of complex edits that I inadvertently save the edited version of my picture over the top of the original. For most tasks this is not a drama as the edits I make are generally nondestructive (applied with adjustment layers and the like) and so I can extract the original file from inside the enhanced document, but sometimes because of the changes I have made there is no way of going back. The end result of saving over the original untouched digital photo is equivalent to destroying the negative back in the days when film was king. Yep, photographic sacrilege!
So you can imagine my relief to find that in the latest editions of Adobe’s flagship editing software programs, Photoshop and Photoshop Elements, the company has technology that protects the original file and tracks the changes made to the picture in a series of successive saved photos. This technology is called versioning as the software allows you to store different versions of the picture as your editing progresses. What’s more the feature (in both Elements and Photoshop) provides options for viewing and using any of the versions that you have previously saved.
Let’s see how this file protection technology works in practice.
Versions and Photoshop Elements
Versioning in Photoshop Elements is an extension of the idea of image stacks and works by storing the edited version of pictures together with the original photo in a special group or Version Set.
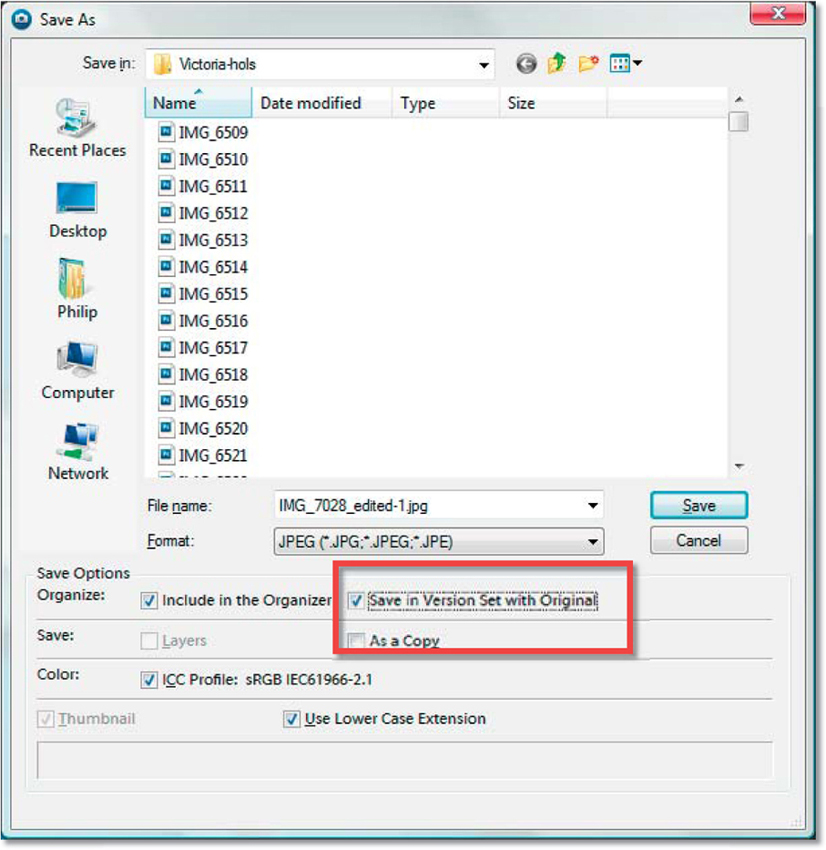
All photos enhanced in the Organizer workspace using tools like Auto Smart Fix are automatically included in a Version Set. Those images saved in the Quick and Full Edit spaces with the Save As command can also be added to a Version Set by making sure that the Save with Original option is ticked before pressing the Save button in the dialog.
When editing pictures that have been opened from the Organizer into the Editor workspace Photoshop Elements provides the user with the opportunity of saving the edited file as part of a Version Set. To use the feature, click the option in the Save As dialog when storing pictures.
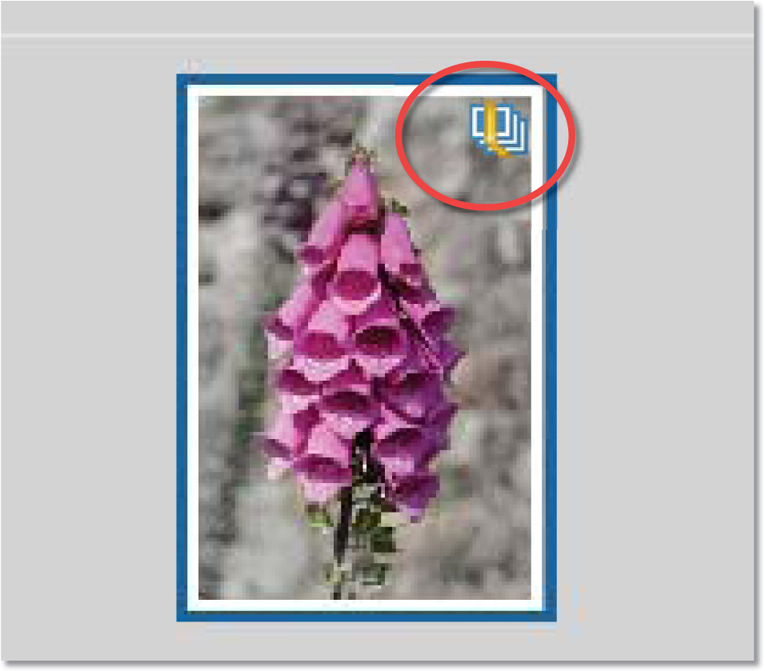
The small stacked pictures icon in the top right of the thumbnails in the Photoshop Elements Organizer workspace indicates that the picture displayed is part of a Version Set.
Selecting the Version Set > Reveal Photos in Version Set option from the pop-up menu that is displayed when a thumbnail is right-clicked in the Organizer workspace will display all the saved edited versions associated with the image in a separate display window.

Saving in this way means that edited files are not saved over the top of the original; instead a new version of the image is saved in a Version Set with the original. It is appended with a file name that has the suffix ‘_edited’ attached to the original name. This way you will always be able to identify the original and edited files. The two files are ‘stacked’ together in the Photo Browser with the most recent file displayed on top.
When a photo is part of a Version Set, there is a small icon displayed in the top right of the Photo Browser thumbnail. The icon shows a pile of photos.
To see the other images in the version stack simply right-click the thumbnail image and select Version Set > Reveal Photos in Version Set. Using the other options available in this pop-up menu the sets can be expanded or collapsed, the current version reverted back to its original form or all versions flattened into one picture. Version Set options are also available via the Photo Browser Edit menu.
What are image stacks?
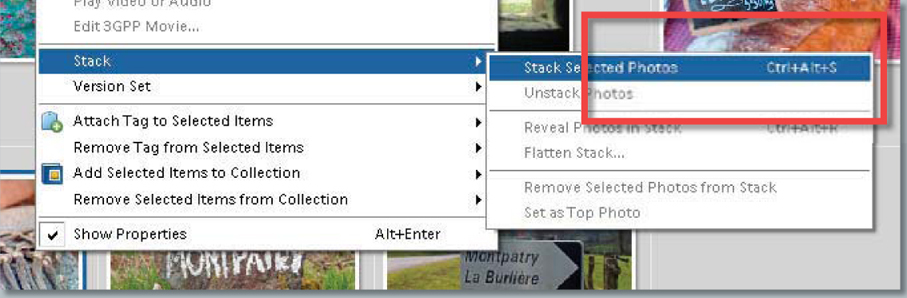
An image stack is slightly different from a Version Set as it is a set of pictures that have been grouped together into a single place in the Organizer workspace. Most often stacks are used to group pictures that have a common subject or theme and the feature is one way that Elements users can sort and manage their pictures. To create an image stack, multi-select a series of thumbnails in the workspace then right-click on one of the selected images to show the menu and from here select the Stack > Stack Select Photos option. You can identify stacked image groups by the small icon in the top right of the thumbnail.
The Stack feature in Photoshop Elements groups together several different images into a set. To create a Stack, multi-select the images in Organizer first and then choose the Stack > Stack Select Photos option from the right-click pop-up menu.
Elements indicates that a picture is the upper image in a stack of photos in Organizer by displaying a small ‘photo stack’ icon in the top right-hand corner of the thumbnail.

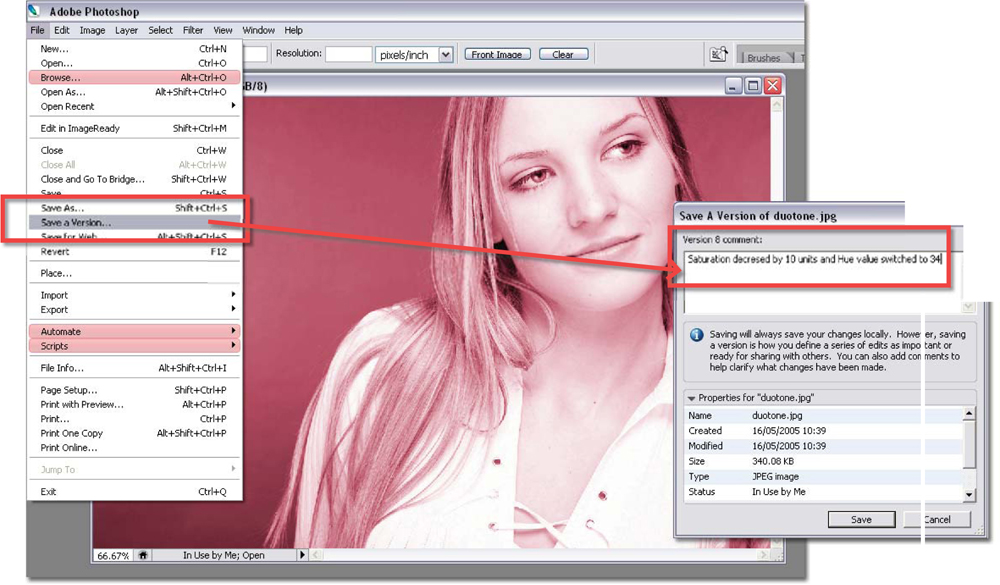
The Save a Version option is available when the files you are working on in Photoshop are part of a Version Cue project. The Save a Version dialog is displayed as part of the save process and allows the user to insert version-based comments before storing the new version of the file.
Photoshop CS3/CS2 and versioning
The Versions feature in Photoshop CS3/CS2 is a very useful tool for photographers who create multiple editions of the same image or design. When activated, the feature allows you to save a version from inside the Photoshop workspace. After using either the File > Save a Version (CS2) or File > Check In (CS3) option, a Version details dialog is displayed. The window contains all the details for the picture as well as a space for you to enter comments about the version you are saving.
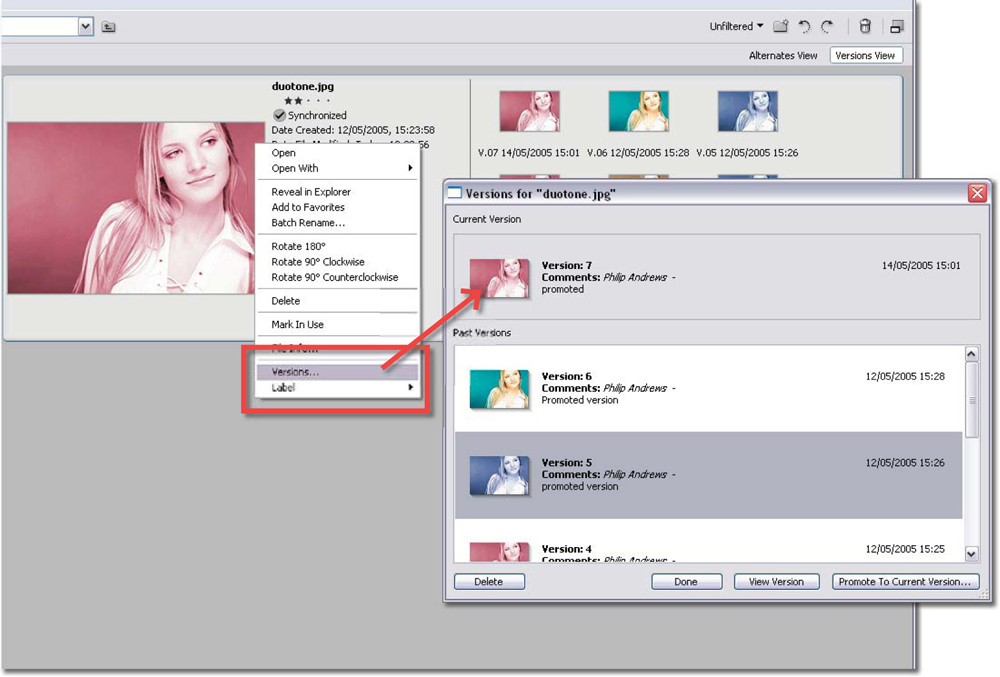
After clicking the Save button the latest version of the file is then saved and displayed in the standard thumbnail view in Bridge. To see the previous version saved with the file, switch the workspace to the Versions and Alternates View (Bridge: View > As Versions and Alternates). This will display all the previous iterations of the photo.
Alternatively, right-clicking on the Bridge thumbnail and selecting the Versions option from the pop-up menu displays just the versions available for the selected image.
All the versions associated with a specific file can be viewed in Bridge, Photoshop’s new file browser, by selecting the View > As Versions or Alternates.

The versions associated with a Photoshop file can also be displayed in a separate Versions window by selecting the Versions option from the pop-up menu that is displayed when right-clicking the picture thumbnail in Bridge.
To use the versioning features in Photoshop and other Adobe Creative Suite programs you need to ensure that Version Cue is installed and active, and that the Version Cue options are enabled in the preferences of the program you are using.

Setting up for saving Photoshop versions
In order to make it possible to use the Save a Version feature in Photoshop (or any other CS2 program) the folders or files that you are working with must be organized in a Version Cue project or workspace. In addition, the Enable Version Cue options in the preferences of each of the CS2 programs also need to be selected. In Photoshop this setting is located in the File Handling Preferences dialog.
Now when a Version Cue protected file is opened and enhanced or edited in any way, the Save a Version option appears as a usable option on the File menu.
What is Version Cue?
To use versioning in Photoshop CS3/CS2 the Version Cue program must be installed and the Version Cue features must be enabled in the File Handling Preferences in Photoshop. Version Cue is included free when you purchase the Adobe Creative Suite 3/2 and is not supplied when you buy Photoshop as an individual product.
Though not quite the same as versioning, Lightroom does provide the ability to create virtual copies of images and apply different development settings to each, leaving the original untouched. Alternatively, a virtual copy can be made of the original file at pivotal points in its processing history. This provides a versioning-like result where the different copies of the image act as separate versions.

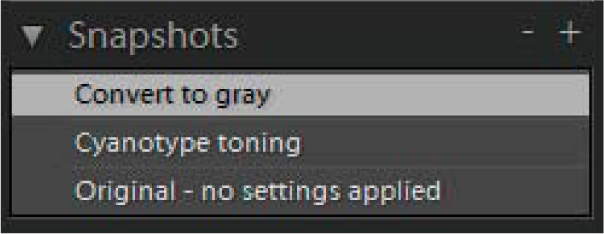
Or you can use the Snapshots feature to keep a copy of the settings at key points in the development process.
Lightroom and virtual copies
Even though lightroom doesnt contain a versioning feature there are still a couple of Lightroom technologies that may help when you have overwritten the original file.
Firstly keep in mind that Lightroom employs a completely nondestructive workflow. All enhancement changes you see on screen are the ‘on-the-fly’ application of a bunch of settings that are stored separately to the image component of the file. At any time during the life of a Lightroom image it is possible to right-click on the photo in Grid View and select Reset from the Develop Settings menu. This will remove all enhancement changes and return the picture to its captured state. This is the ultimate form of undo and safeguards your files as well.
What about the situation where you want to revert to an enhancement state midway through a series of changes? Well, the Snapshots feature works well in this scenario. When reaching pivotal points in the enhancement of a photo it is worth creating a snapshot of the development settings at that time. This way it is always possible to return to the version of the image later. To retain several versions of the image at different stages of processing, employ a strategy of creating a virtual copy of the file at each pivotal point in the processing. These virtual copies will act as different versions of the image in a similar way to how the technology works in Photoshop and Photoshop Elements. Virtual Copies are not file duplicates, just extra sets of metadata instructions, that are applied to the same base raw file providing different previews.
Last appeal
Now be honest, ‘Have you backed up your photos lately?’ ‘Do you have a file-by-file protection method in place?’ If you haven’t, then I hope that I have convinced you to do so and that you will start today; otherwise, like my photographer friend, you may just need to keep a stack of tissues handy for that day, heaven forbid, when your photos go missing.